The procedure for attaching roller blinds to windows. How are roller blinds attached to plastic windows? Types of roller blinds and methods of installing them Attaching roller blinds to a plastic window
Attaching roller blinds to a window or to a wall is not such a difficult job as it might seem from the outside. Any apartment owner can install such structures if desired, saving a significant amount on the services of professional installers.
To do this, you will need a simple set of home construction tools and basic skills in working with them. In this article we will try to take a closer look at how to fasten roller blinds: methods of fastening in one case or another, step by step process installation, features and nuances of work.
Types of design and arrangement options for roller blinds
Roller blinds come in any color and textureRoll systems are modern version window light-protection systems that combine style vertical blinds with practicality classic curtains. More and more people, wanting to update the interior of their home, are turning their attention to these convenient and easy-to-use designs.
The rich range of colors and texture of the material make it possible to use roller blinds with equal success in both residential and commercial settings. office premises. With their help you can give the interior required direction: in one case it can be distinguished by grace and a bright play of colors, and in another it can be emphasized by a businesslike and strict style.
Design features
 All roller blinds are structurally composed of a light-protective fabric and a shaft with control elements. The canvas can be raised, wound around a shaft, or lowered, blocking access to external lighting inside the room.
There are two main types of roll systems:
- Open type. In this case, the shaft with a strip of fabric wound on it is not covered with a protective box, but is installed on the end fasteners in an open manner.
- Closed type. For such a system, the shaft is installed in a special box. Firstly, it protects structural elements from external damage and dust, and secondly, it gives the curtains a more presentable appearance. By choosing the desired color of the box, you can organically fit it into the surrounding interior.
Installation work for roller blinds
 Method of attaching curtains to the window
In order to hang fabric roller shutters on windows, you will need the following tools:
- building level;
- pencil;
- tape measure or long ruler;
- drill or hammer drill;
- screwdriver or screwdriver.
Before you start self-installation design, you should carefully read the attached assembly instructions.
Also make sure that the product is complete and that all parts are included.
Mounting methods
 Roller blinds can be installed in several ways, differing in the location of their attachment and the set of fastening elements.
They can be attached to the ceiling, wall above the window, or directly to window hole or for each individual leaf.
The following mounting options can be used:
- self-tapping screws;
- spring brackets;
- double-sided mounting tape;
- design with side guides.
Installation using self-tapping screws
 In this way, you can attach roller blinds to plastic windows, wooden frames, on the wall or ceiling. First of all, you should assemble the entire structure:

It is best to attach roller blinds to wooden windows using self-tapping screws. If you suddenly decide to change the light-protective structures to others, the holes in the wood can be easily puttied and painted over.
It will be much more difficult to seal holes drilled with self-tapping screws in metal or plastic frames. For more information about installing roller blinds, watch this useful video:
Installation with double-sided tape
 Scotch tape will only withstand lightweight structures
 Most often with help double sided tape Roller blinds are attached to the frames of plastic windows. Thanks to the tape, the window frame remains intact, and after removing the curtain there are no holes left on it.
Since the adhesive tape has a certain tensile strength, light-protective structures of relatively light weight, most often intended for one window sash, can be attached to it.
Work on installing curtains to the window frame is carried out in the same order as using self-tapping screws. Initially, measurements are taken and the mounting location is marked using a pencil and level, and then the curtain is adjusted to the center of the window.
 Before attaching with tape, clean the frame from dust
 The adhesive tape on one side is attached to the frame or fastening devices of the roller blind. After this, the protective layer is removed from outside tape, and the structure is carefully glued to the surface of the frame in the right place.
Instead of tape for roller blinds, you can use construction glue or liquid nails. However, it should be taken into account that the structure will be attached to the frame very firmly, and when dismantling it, certain difficulties may arise.
Before attaching the tape to the frame, it should be cleaned of dust and other contaminants, and, if necessary, degreased with solvent, gasoline or white spirit.
Mounting on spring brackets
This method used for fastening roller blinds to opening window sashes. This method is good because it makes it possible to do without drilling window frames, and also allows, if necessary, to dismantle and reinstall the roller system on the window. For details on attaching roller blinds to windows, watch this video:
 Before installation, you should assemble the curtain structure, and, placing it on the sash, mark with a pencil the installation locations of the spring brackets. Using the marks, we install the brackets and the shaft attached to them.
We put the side covers on the brackets, lower and raise the curtain fabric to make sure that the structure is installed correctly and is functioning properly. We install a stopper on the control chain in the marked place, fixing the blade in the lower position.
Installing the Side Rails
 Clamps for string guides are secured using self-tapping screws
 If the curtain system requires side guides in the form of strings, then after installing the shaft on the window sash or wall, additional elements should be installed.
To do this, take a string, measure it and cut it to the required length. At the bottom of the frame, on both sides, you will need to install the appropriate clamps for the guide strings. They can be attached using self-tapping screws, double-sided tape or mounting adhesive. We attach the string to the edges of the shaft in specially designated places (see instructions). We measure the distance between them and put exactly the same size on the bottom of the frame, marking the attachment points of the lower clamps.
 After installing them, we pass the string through the holes of the bottom bar on the curtain fabric. We attach the lower edge of the string to the lower clamps, so that it is tightly stretched between them and the shaft, forming a guide for the fabric curtain fabric.
As you can see, installing a roller blind of any design is not so difficult. The main thing is to have the skills to master construction tools and desire. In this case, installing roller blinds on windows should not cause you serious difficulties.
Roller blinds for plastic windows V modern interior are replacing the curtains and tulle we are used to. Indeed, in addition to ease of use and care, they are creative solution window decoration. Great variety colors and textures allows them to fit harmoniously into the design of any room.
This type of curtain is especially suitable for small rooms, where curtains on ordinary cornices will definitely not be appropriate, for example, on or in the office.
Roller blinds are quite simple design. The fabric sheet is fixed and wound onto the holder shaft. Using the lifting mechanism included in the kit, you can raise and lower the curtains to the desired height.
Sometimes roller blinds are called fabric roller blinds or roller blinds. Derived from the famous Roman blinds, but made of composite materials with an improved mechanism, they have become a new trend in the design of plastic windows.
Roller blinds can act as a complete element of decor, or can also complement traditional curtains, protecting them from fading and destruction of the fabric structure from the bright sun.
These curtains are very compact, as they are attached to the window opening. Fixed very close to the glass, they reliably block the light flux and, even in the July heat, provide a favorable indoor environment.
They do not accumulate dust and are easy to clean with a damp sponge.
Types of roller blinds
Roller blinds differ in the type of fastening system; it can be open or closed. IN open system a shaft with a curtain fabric, attached to the window frame or directly to the frame. The regulating mechanism is strings. Closed system is an aluminum box that hides part of the assembled canvas. The curtains move along aluminum guides.
To prevent the fabric from being deformed, the bottom of the curtain is fixed to a decorative strip.
Roller blinds also differ in the operating principle of the lifting mechanism. It can be manual - this is a cord or chain, or automatic - the height of raising and lowering the curtains is regulated by a remote control.
Roller blinds integrate perfectly into the Smart Home system.
Roller blinds are classified into the following categories:
— “mini” system
 This is the simplest and most budget look traditional roller blinds. Thanks to compact design, these roller blinds will be excellent option for small windows. Raised and lowered by hand using a chain. They are easy to install and remove.
— cassette roller blinds
In these curtains, the shaft with the fabric attached to it is placed in a compact box, which can be matched to the color or textured pattern frames When folded, the curtain is practically invisible. Some cassette roller blinds have a spring device that regulates the length of the curtain. The mechanism can be controlled either manually or remotely using a remote control. Such a system is much more beautiful and practical than an open one, but its price will be higher.
— Lovolight system
Used on large windows, panoramic windows up to 7 meters wide and 6 meters high. Curtains are attached to the ceiling and unfold all the way to the floor. The shaft can be open or hidden in a box. They are most often controlled using a remote control.
- "day Night"
 This type of curtain is also sometimes called “zebra”. Day-night curtains harmoniously combine the advantages of roller blinds and blinds. Instead of a thick fabric, alternating stripes are used.
Half of the stripes are made of black-out fabric, the remaining stripes are transparent. The strips are thermally connected to each other using a special impregnation, which provides an antistatic and dust-repellent effect. Curtains can have either open or cassette roller systems.
NOTE:
When different strips are superimposed on each other, the light stops falling. The desired degree of illumination is achieved by adjustment using a chain.
How to install roller blinds
...on plastic windows without drilling
Even a person who does not have special skills can install roller blinds on plastic windows with their own hands. Below is step-by-step instruction, how to do it.
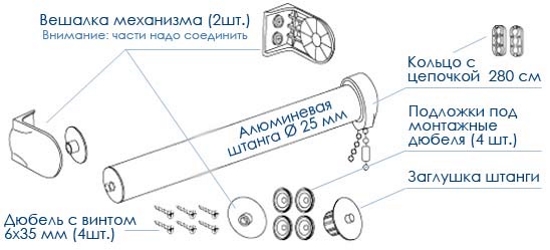
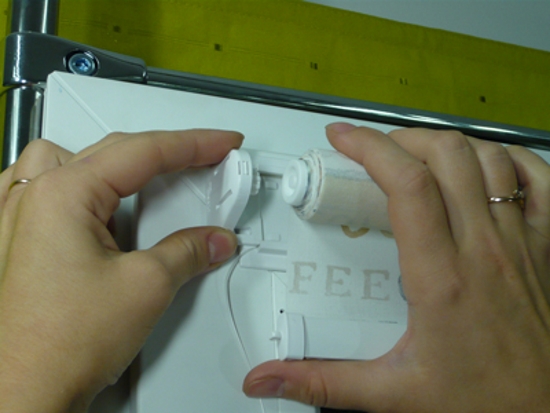
To begin, prepare all the components for. Lay them out on the surface and assemble them into a structure as indicated in the instructions. The brackets will hold the roller with the curtain on the window sash.
The kit should contain parts that have a semicircular shape on one side. One of them has round hole- a groove, and in the other protruding part - a tenon. On the roller you will find the same mating elements.
How to attach mini roller blinds to an opening window sash:

How to attach mini roller blinds to a fixed window sash
- To install roller blinds on non-opening window sashes, it is necessary to use special plates with grooves for fixing the side brackets on them;
- Degrease the plates and glue them on sticky tape;
- Attach the side brackets to the plates;
- Install the chain mechanism on the gear, insert the brackets into the shaft;
- Try on the assembled parts on the window, mark the places where the curtain will be attached;
- Degrease the attachment points of the plates with holders;
- Remove the protective tape from the tape and press the brackets to the previously marked places;
- Insert the chain mechanism from the gear side, and place the roller with the curtain into the fixed brackets;
- Check the operation of the mechanism.
How to attach cassette roller blinds
Manufacturers usually supply these curtains in finished form, so they are installed quickly and easily:
- Degrease the window surface and mark;
- Try the box on the window. Remove the protective tape from the tape located on the back of the box. Press the structure firmly against the window sash;
- Now you need to secure the guides. There are two installation options - on the internal or external surface of the bead. When mounted on the inside, the curtains are pressed against the glass on one side.
- Apply tape to the guides, having previously degreased the surface;
- Remove approximately 40mm of the protective strip from the adhesive tape. Install the guide into the box and to the glazing bead;
- Pressing the guide against the window frame with one hand, continue to remove the protective one with the other hand;
- Next, you need to firmly press the guide against the glazing bead. Using the steps above, attach the second guide to the other side;
- Place the curtain fabric into the guides. Place a retaining ring on the chain mechanism to prevent the chain from slipping along the gear;
- Check for proper installation by opening and closing the curtain.
How to care for roller blinds
IMPORTANT: Fabric sheets of roller blinds cannot be washed in washing machine!
- — For washing, use soft sponges and neutral detergents. It is better to dry the wetted fabric in a straightened form so that there are no folds left on the material;
- - to deal with the stain, try an ordinary eraser;
- - usually curtain fabric does not need ironing. If small wrinkles remain after drying, you can use the iron at minimum temperature and only through a damp cloth;
- - do not smoke near the curtains. The smell is quickly absorbed into the material, not to mention the holes from the ash;
- - To extend the life of the lifting mechanism, lubricate it with oil.
Roller blinds are very functional and convenient way decorating a window opening, allowing you to quickly adjust the amount of light entering the room through the window, on a hot summer day to shade the room from direct sun rays or close the window in the evening.

But the question often arises about how to attach a roller blind to a plastic window without damaging its structure.
Attaching roller blinds to the wall (ceiling)
If you are faced with the task of completely closing the window opening, hiding everything that is on the windowsill, the best option will use roller blinds mounted on the wall or ceiling.
Typically, roller blinds have a short length, covering only the window opening, with a small margin for the space above the window opening and 10-15 cm below the window sill level. This is quite enough for them to fully fulfill their utilitarian functions - to shade the room or protect it from views from the street.

There are two options for mounting roller blinds: on the wall and on the ceiling.
In the first case, when mounting on a wall, you will have the opportunity to use side guides, which are fixed on both sides of the window opening. The guides along which the lower weight bar of the roller blind slides do not allow the canvas to move away from the window opening during a draft or gusts of wind, presses the canvas more tightly to the wall in which the window is located and provides better shading, since there is practically no gap between the wall and the curtain .

Another significant advantage of this method of fastening is the ability to use a roller blind with a spring mechanism that ensures its automatic winding onto the drum.
When purchasing, take into account the size of the window opening. The roller blind should be 30-40 cm longer than the height of the window opening and 10 cm wider than it.
Since the weight of the structure is not great, it is enough to drill into the wall with a hammer drill or impact drill holes D 6 mm. Such small holes, if you decide to get rid of roller blinds, it will be easy to seal with acrylic sealant. They will be almost invisible.
When attaching a roller blind to the wall, it is necessary to take into account the fact that when lowered, it will fall approximately in the middle of the window sill of the plastic window. He must be free from indoor plants and other items. Otherwise, it will be difficult to use roller blinds at full length.

If you want to preserve the flowers located on the window and not move them, then it is better to fix the roller blind on the ceiling. The place where it will be necessary to drill holes for fastening is determined using a plumb line, which is brought to the level of the edge of the window sill.

The use of guides and a spring mechanism for winding curtains in this case is impossible.
Fastening roller blinds in a window opening
Attaching roller blinds directly to window opening- a more popular way of placing them. It allows you to use the entire area of the window sill.

Depending on the design of the curtains - open or closed (cassette), the distance from the top edge is determined window frame, in which the mount for roller blinds will be mounted. Modern roller blinds allow two mounting options - using self-tapping screws and using double-sided foam tape or glue for PVC structures.
Most people prefer tape. It avoids damage to the structure of the plastic window profile. Faster and more convenient, does not require absolutely any additional tools.

If you plan to decorate the entire window opening with a wide roller blind (for non-opening windows), its width should be 3-5 mm less than the width of the window frame so that when lowering the curtain, the weight bar does not touch the slopes. It should be noted that this method of placing roller blinds is not very convenient, since directly on PVC profile it will not be possible to place the winding mechanism - it will interfere window handle. Therefore, the winding drum will have to be 70-80 mm away from the plastic frame. You will have to use elongated L-shaped brackets that will provide the necessary gap between the window and the curtain.

Another option is to use “Mini” roller blinds - structures that are mounted directly on the window sash and allow you to fully use the windows - tear them off without lifting the roller blinds, tilt them to the “ventilation” position.
Features of fastening roller blinds of the “Mini” design
“Mini” roller blinds come in both an open design – with a winding device not covered by a casing, and “cassette” – in which the curtain fabric is covered with a casing made of aluminum or plastic. There is no significant difference in the mounting methods. The only difference is the price. Open structures are cheaper than cassette ones.

When choosing roller blinds, you need to pay attention to the design of the glazing bead that your plastic window is equipped with. It comes in two types - straight and beveled. The dimensions (width) of the roller blind will depend on this.

If the glazing bead is straight, the width of the roller blind must exactly match the width window glass. The length of the rolled torus is the height of the window glass. (UNI type 1). If the glazing bead is beveled, the width of the roller blind is determined by the outer edges of the glazing bead, as well as the length. (UNI type 2).
The methods of attaching roller blinds to opening and non-opening window sashes are somewhat different. L-shaped brackets are used for fastening to the opening sash, which hook onto the top edge of the window frame and snap onto it.

The non-opening curtain uses flat fastening strips that are held in place only with double-sided tape or glue.

Before starting installation, the side holders are removed from the roller blinds, freed from packaging; the curtain should be oriented so that the winding mechanism is located at the edge of the curtain facing the slope. Brackets or mounting strips are glued to the removed holders. After this, the holders are put on the winding drum.
The assembled roller blind is applied to the upper edge of the window frame and the place where the brackets come into contact with the frame is marked with a pencil. Before final installation brackets with holders plastic frame must be cleaned of dust and degreased with alcohol or gasoline for lighters.
(Under no circumstances use acetone or other solvents that can damage the PVC profile!).
The side holders are again removed from the ends of the winding drum.
After this simple manipulation, all that remains is to remove the protective paper from the surface of the double-sided foam tape and, in the case of an opening window sash, hook the L-shaped brackets to the upper edge of the window frame and press down until it clicks, at the same time pressing the tape tightly to the surface of the PVC profile.

A “cassette” or an open drum with a curtain is inserted into the glued holders (don’t forget to put a chain on the winder gear first) and the functionality of the mechanism is checked. Guides are glued along the glazing beads. A weight bar is inserted into them at the bottom of the curtain fabric. Installation complete!
Let's sum it up
Roller blinds are very convenient, inexpensive option decorating a plastic window, which has high functionality, while being much cheaper than horizontal ones metal blinds. Their installation takes very little time and can be done by anyone not knowledgeable in construction.
- pencil;
- roulette;
- scissors;
- a screwdriver and a drill with a Ø 2 mm drill (for installation on double-sided tape, you do not need a drill and a drill).
Open the package and take out the MINI roller blind. Do not use a knife or blade to cut the packaging to avoid damaging the product!
Option No. 1 – how to attach roller blinds WITHOUT drilling – using double-sided tape
Place the roller blind on the window and use a pencil to mark it for gluing. To avoid uneven winding of the fabric on the shaft, as a result, do not horizontal installation products - we recommend using building level. Degrease the adhesive areas with the means available to you - apply alcohol, lighter gasoline or nail polish remover (containing solvent) to a cotton swab and wipe well. Remove protective film from tape from the top cornice of the roller blind. Pressing tightly, glue the entire structure to the window leaf. Please note that installation with double-sided tape is suitable for products standard size, but not recommended for large sizes products (due to their heavy weight).
Option No. 2 – how to attach MINI roller blinds to self-tapping screws

Place the roller blind on the window and mark with a pencil at the attachment points. To avoid uneven winding of the fabric on the shaft due to non-horizontal installation of the product, we recommend using a building level. Screw the top brackets to the plastic window frame using self-tapping screws. Snap the top curtain rod of the roller blind into the brackets until you hear a characteristic click.
Option No. 3 – how to install MINI roller blinds on hanging brackets

Insert the plastic hanging brackets into the grooves in the top cornice. Remove the protective layer of tape from the hanging brackets. Degrease the gluing areas with any available means and remove the protective layer of tape from the hanging brackets. Put the entire structure on top part window sashes according to the markings and press tightly at the fastening points.
With the change of old wooden windows There is a fashion for new plastic ones and for new curtains - roller blinds. The simple design of roller blinds allows you to darken or decorate windows without wasting space. Most often, roller blinds are installed directly on the window sashes, then they darken the room as much as possible and do not add a new flavor to the design. By the way, roller blinds go perfectly with the heavy curtains, drapes and light tulles we are used to, just choose the right one color scheme. On the market you can find similar products of any modification and configuration, usually curtains different manufacturers may differ in key points. That is why the question may arise, how to install roller blinds. This is what we will talk about in this article.
Advantages and disadvantages of roller blinds
Roller blinds, or as they are also called “roller blinds” or “fabric roller blinds,” have come into fashion quite recently, but at the same time they are intensively capturing the market. Today, many people immediately order additional installation of curtains along with the installation of new windows. And this popularity is quite justified. Roller blinds have significant advantages over conventional blinds.
Advantages of roller blinds:
- A huge selection of colors and shades, textures, fabric textures that will suit any interior. Due to the fact that roller blinds are a single piece, it can easily have a complex pattern, and it will not look clumsy or ugly. The canvases can have different densities, be either almost transparent or dense enough to completely darken the room. The design on the canvas can be monochromatic, colored, with images of children's drawings, photo printing of complex drawings, paintings or branding.
- A variety of fabric structures - cotton, linen, silk, polyester and even PVC fabric. Curtains/blinds are impregnated with a special composition, thanks to which the canvases do not fade, get minimally dirty, dust does not accumulate on them, and the edges of the canvas do not unravel.
- You can even find roller blinds on the market with anti-glare properties or thermal insulation.

- Roller blinds combine perfectly with tulle, unlike regular blinds. To liven up your interior, you just need to choose the right color combinations.
- There are special roller blinds that completely darken the room; they consist of two layers - the inner one is fabric, and the outer one is a reflective screen. These blinds are perfect for rooms where there is home cinema, and bedrooms.
- Roller blinds are very compact, take up very little space, and are rolled up, leaving the window sill free. They can also not be lowered all the way, covering only part of the window, leaving the opportunity for sunlight to penetrate.
- Roller blinds, which are mounted on each window sash separately, allow you to close only one sash, depending on your needs. This is impossible to do with ordinary blinds.
- Very easy to clean - just wipe damp cloth, and wash off any accidental stains with soapy water.
Disadvantages of roller blinds:
- The components of roller blinds are not strong enough and durable enough. Almost all parts are made of plastic and can easily be broken if handled carelessly.
- The canvas can absorb odors, especially if the curtain is installed in the kitchen, and they cannot be washed, unlike regular curtains.
- If the roller blind is installed on the window frame, and not on the profile, or inside the window opening, then it will not be possible to open the window with the curtains closed. This is a rather significant drawback, since ordinary curtains can be completely combined with open vents and windows. If the curtain is installed on the sash profile, then this problem does not exist.
To minimize the shortcomings, it is better to choose roller blinds from trusted manufacturers made from high-quality materials.
Roller blinds - instructions for installing roller blinds on a window sash
The most popular option for roller blinds are those that are attached directly to the window sash. This is due to ease of installation and operation, as well as minimal loss of usable space and the ability to completely close the entire window without gaps. Roller blinds for casement windows are available in several different modifications, each of which is good in certain cases and is designed to satisfy the needs and wishes of the customer.
How to make roller blinds smaller without a Mini frame
Mini roller blinds are a fairly simple design - a canvas wound on a shaft and a mechanism for raising/lowering it. This type of curtain is also called a “roller blind without a box”, since the rolled fabric is not protected by anything. If you order a similar version of the curtain from the manufacturer, then there should be no problem with the size, but if you bought the product in a supermarket, its size will have to be adjusted. Please note that this is not possible with every model.
How to cut a roller blind:
- First, we take accurate measurements: length - between the outer edges of the horizontal beads, width - between the outer edges of the vertical beads. The width of the curtain fabric should be equal to the resulting width.
- We unfold the roller blind fabric and remove it from the shaft.
- We make a mark on the shaft at a distance of the width from the edge.

- Cut off the excess shaft with a hacksaw.
- We saw off the bottom rail of the curtain to the same length.
- We install a plug with a protrusion on the shaft.
- Next, spread the curtain fabric on a flat surface and measure the required width. We make the appropriate note.

- We cut off the excess fabric using a sharp construction knife or scissors.
- Then you need to secure the curtain fabric to the shaft. To do this, remove the protective film from the self-adhesive strip from the surface of the shaft.

- Then we bend the upper edge of the canvas upward so that the upper edge is about 5 cm.
- Place the shaft in the resulting niche with the self-adhesive strip facing up. We align the shaft evenly.
- Roll the shaft up onto a short strip. We do this carefully so as not to distort the canvas. Press the self-adhesive strip onto the canvas.
- We wrap the curtain fabric to ¾ of the length and insert the bottom rail into the bottom edge.
The roller blind is now ready for use. If there is a need to cut the canvas to length, then you will have to do it in the upper part, where there is no hole for the bottom rail.

Typically, roller blinds of the Mini system without a box are supplied completely disassembled. To assemble the structure, first cut the packaging and take out all the components. We have already described how to trim the blade and secure it to the shaft.

- We find the fastening corners and fishing line, thread the fishing line through the holes in the corners and tie the edge with a double knot. We carry out the same procedure with the second edge of the fishing line - we thread it into the holes of the second corner.
- Cut the line in half.
- We insert plastic capsules into the edge of the roller blind shaft.
- We snap the edges of the capsule into the mounting corners.
Further assembly must be combined with the installation described we'll talk below.
Fastening Mini roller blinds with screws

Fastening roller blinds of the Mini system with self-tapping screws is the most reliable of all. But if you plan to remove the curtains in the future, then it is better to pay attention to another method, after which there will be no holes left in the profile.
Measurements: length and width - the distance between the outer edges of the beads. There must be at least 23 mm in width on both sides for mounting the fastening mechanism.
Installation:
- We apply the roller blind in the form in which we assembled it in the previous paragraph to the window sash at the top, focusing on the outer edge of the glazing bead.
- We set it strictly according to the level, we control the even position in width.
- We make marks on the window profile where the mounting angles will be located.
- We remove the fastening corners from the curtain shaft and attach them to the profile separately. We align it according to the previously marked marks and make exact marks for the holes. Using a screwdriver, drill holes.
- We assemble the curtain mechanism: insert plastic capsules into the mounting corner, and press them on top with a side plate.
- We insert a control chain into the mechanism for opening and closing the curtains so that one edge hangs down by 10 - 15 cm. The wider part of the mechanism is its upper part.
- We insert assembled mechanism control the curtain inside the capsule. Please note that the spring of the mechanism must coincide with the groove inside the capsule.
- We put on the side cover with a hole for the control chain. Before putting the lid on, thread a chain through the hole.
- We screw the assembled corner with self-tapping screws into the prepared holes.
- On at this stage you can check the length of the chain and trim off the excess. We connect the edges of the chain using a special latch.
- Remove the tape from the roller blind that holds the roll of fabric. We insert the curtain into the fixed corner.
- Supporting the second edge of the curtain with your hand, untwist the fabric and see if it hangs evenly. If it’s level, then we’ll mark holes for attaching the second corner.
- Remove the curtain and drill holes for the second mounting angle. We secure the corner with self-tapping screws so that the fishing line is sandwiched between the profile and the corner.
- We insert the curtain into the mounting corners.
- We thread the free edges of the fishing line through special holes in the bottom strip of the roller blinds.
- We fix the capsule of the second corner with a side plate and close it with a lid.
- Now we fix the lower edge of the fishing line. There are special elements for this - clamps. We pull the free edge of the fishing line parallel to the glazing bead. We make sure that the line is strictly vertical. We outline the resulting strip with a pencil. We do the same on the other side.
- Strictly along the line of the fishing line at the very bottom - at the edge of the glazing bead - we secure the latch using two self-tapping screws.
- We pass the fishing line through a special hole in the latch and tighten it, tightening the latch mechanism with a screwdriver. Excess fishing line can be trimmed.
- On the control chain we install clamps for the minimum and maximum position of the curtain. Minimum position - the curtain with the bottom bar should not go under the control mechanism. Maximum position - the curtain should cover the fishing line clamps so that they are not visible.
- We hang a weight or plumb line on the chain. It should be included - most often a beautiful decorative detail.
Important! Attaching roller blinds of the Mini system without a frame to an opening sash is no different. Only the control chain must be fixed to the sash so that it does not dangle when the sash is in ventilation mode. To do this, the kit comes with a special clamp, which we install 10 cm above the bottom edge of the curtain. Also note that the control mechanism and shaft may prevent the window sash from fully opening wide.
Attaching Mini roller blinds using a spring bracket
In order not to injure the surface of the profile or frame, you can use the method of attaching the roller blind to a special spring bracket. This method is only suitable for an opening sash.

Spring brackets are made of plastic or aluminum; they are hung on the sash in open position and simply press down the seal. When the sash is in the closed position, nothing is injured or sticks out; it closes quite tightly.

We put side clamps or covers on the brackets. For this purpose, there are special fasteners on both the bracket and the side clamp. Then we put on the curtain with the shaft. We assemble the curtain according to exactly the same pattern as described above. We lower the curtain fabric, check the evenness of its position and install limiters on the control chain.

Important! IN different models For roller blinds of the Mini system, the mechanism for fixing the bottom bar in the position when the curtain is lowered is done differently. In the previous paragraph, we considered the option of fixing using fishing line and limiters. But you can do without fishing line. Magnets are installed on the bottom bar of the curtain, and exactly the same ones are attached to the window profile/frame. When the curtain is lowered, you can lightly press the bar against the magnets and it will lock into place. To raise the curtain, you will first have to remove the bar from the magnets and then pull the chain.
Attaching Mini roller blinds with adhesive tape
A non-traumatic option for attaching a roller blind to a window profile, which is suitable for both an opening sash and a blind sash, is fastening with adhesive tape. Sometimes it is also called the Easy Fix fastening system.

The kit includes special fasteners, the back wall of which is hidden with a protective tape, under which there is an adhesive layer. After accurately calibrating the dimensions of the curtains and marking where the mounting brackets should be located, it is necessary to degrease the surface of the profile. Remove the protective tape and apply the elements to the window profile. We press them to fix them.

When such elements are installed on both sides, we attach the side clamps to them, and then the curtain itself. The curtains are assembled according to the standard pattern.

Important! To fix the curtains in the lowered position, you can use textile Velcro with an adhesive back. Velcro with a thinner pile is glued to the window frame, and with a fluffier pile - to the bottom bar of the curtain.
The method of attaching roller blinds to adhesive tape allows you not to make a single hole in the profile of the window frame, but at the same time it is not strong enough. It’s one thing when only the lower fastener is attached to Velcro, and quite another when the curtain shaft with a control mechanism is attached. There is a high probability that the curtain will fall off.
How to attach Classic roller blinds

Roller blinds of the Classic system are different curtains Mini the fact that the roller with the curtain is hidden in the box, and also the fact that the unwound curtain fabric is fixed on the window with guides.
Measurements: height - from the outer edge of the upper bead to the inner edge of the lower bead. Width - the distance between the inner edges of the beads. It is necessary to take measurements very carefully, without rounding the results, since the measured width is the distance between the holes in the fasteners. The beads must be smooth and at least 12 mm wide. If less, then it is necessary to expand the width measurements by 2 - 4 mm. Such curtains cannot be installed on rounded or uneven glazing beads. If the width of the glazing beads is more than 20 mm, then, on the contrary, the dimensions need to be narrowed. The glass installation depth must be at least 7 mm, otherwise you will have to use a different system.
The Classic roller blind comes almost assembled, so no assembly of the elements is required. The kit also includes guides and other components.

Installation:
- We degrease the window beads using alcohol or alcohol wipes.
- We remove the protective tape from the back side of the guide and glue it to the glazing bead so that its edge coincides with the outer edge of the glazing bead. The opposite edge of the guide will hang freely in the air above the window. Start gluing from bottom to top, the bottom edge should coincide with the outer edge of the bottom bead.
- Carefully glue both guides, making pressing movements over their entire surface.
- Next, we install the curtain itself. First, remove the side covers so that the mounting holes are visible.
- Carefully place the roller blind fabric behind the guides, align the location of the roller blind so that its upper edge coincides with the outer edge of the glazing bead. We check the level.
- We secure the curtain with self-tapping screws.
- Return the side covers to their place.
- We lower the curtain fabric and put the clamps/stoppers on the control chain. The second stopper must be installed in a position where the curtain is unwinded quite a bit so that the bottom bar does not go under the box.
- We hang the weight/plumb line on a chain.
- We install a lock for the chain on the window frame so that it does not interfere with open sash window.
Important! The advantage of roller blinds of the Classic system is the absence of light gaps on the sides of the window. The guides overlap the canvas, resulting in almost complete shading. All installation is carried out only on glazing beads; the frame itself is not damaged.
How to attach Profil roller blinds

Roller blinds of the Profil system differ from the Classic system in that the guides in it are a U-shaped profile, into which the curtain fabric is wound. Such curtains are convenient to use when the glass installation depth is less than 7 mm. The second feature is the method of fastening to sticky adaptation corners without using self-tapping screws.
Measurements: length and width - the distance between the outer edges of the beads. If the glazing beads are rounded, then the measurements increase by 9 mm on each side. The distance from the outer edge of the top bead to the slope must be more than 35 mm.
Installation:
- We degrease the glazing beads before installing the guides, as well as the upper part of the window profile.
- Glue the guides with the hole inside the window. We focus on the lower edge of the lower bead.
- Remove the protective film from the adaptation corners on the curtain box.
- We insert the bottom bar into the guides, align the curtain box and glue it to the base.
- We install stoppers on the control chain and the weight/plumb of the chain.
Roller blinds - Mix system mount at the bottom of the window

As practice has shown, quite often curtains on windows are used only so that no one looks into them, and not for darkening. For such cases, you can use roller blinds of the Mix system, which can be installed with a box at the bottom and unrolled up to required height, leaving sunlight above.
Measurements: length and width - the distance between the outer edges of the beads.
Roller blinds - installation:
- Cut the fishing line that comes with the kit in half.
- We insert its edge into the upper limiter and tie it with a double knot. We do the same with our other half.
- We fix the limiters on the window bead.
- We thread the free edges of the fishing line through the holes in the curtain box.
- We fix the curtain bar at the top of the window, stretch the fishing line and thread it through the lower stops.
- We lower the curtain box down and fix it at the bottom.
- To lower the blade, you need to release the latches on the bar.

Installing roller blinds inside a window opening makes sense only if the distance from the slope to the beginning of the opening sash is large enough so that when the curtain is rolled up, the sash can be opened without hindrance.
Measurements: width - the distance between opposite slopes minus 4 cm, 2 on each side. Length - the distance from the upper slope to the window sill.

Installation Roller blinds inside the window opening are made on corner brackets using self-tapping screws or self-tapping screws. The brackets themselves can be placed on the side slopes or on the top slope. The curtain turns out to be free-hanging without bottom fixation; side light gaps are also inevitable.

A roller blind outside a window opening actually replaces a regular curtain.
Measurements: the width should be at least 5 cm wider than the window opening on each side, i.e. by 10 cm. Although you can make a curtain of any width. The height should be at least from the place where the curtain is attached (ceiling or place on the wall) to the window sill, if it protrudes beyond the window opening. If the window sill is made flush with the window opening, then the curtain can be made long.
Instructions for installing roller blinds must be included with the curtain. If you haven’t found it, you may have come across an unscrupulous supplier, and it’s better to go elsewhere. Installing roller blinds does not take much time and effort; you can do it yourself. Instructions for installing another type of roller blind system - Day-Night - can be seen in the video at the end of the article.