How to make sliding interior doors with your own hands. How to assemble and install a mechanism for sliding doors
Surely everyone at least once thought about installing something unusual in their apartment. In this article, we will find out how to make a door between rooms on rollers with our own hands.
T  Those who live in cramped apartments often come to the idea of installing sliding doors (or compartments) that can at least slightly free up space that can be useful for various purposes, for example, for free passage or furniture placement. AT spacious rooms such structures are also appropriate, as they can advantageously divide the territory. For example, dividing large kitchen dining room and cooking area. If you know how to hold a screwdriver and other tools in your hands, then installing a door for a room on rollers will not be difficult for you.
So, first you need to get the right materials for work:
- Doors. Suitable for both single and double doors.
- Roller construction.
- Metallic profile.
- Grooves made of plastic.
- Screwdriver (medium size) and drill.
- Self-tapping screws and brackets.
- Door furniture.
- Level and epoxy.
 Next, you need to mark the doorway. To do this, add 20 mm to the height of the canvas for gaps from below and above. After you need to put a point, which will serve as a place for attaching the profile. Further from it, two other points should be set aside parallel to the ceiling at the same distances. Then you need to do the following:
- install the grooves using self-tapping screws, and so that the caps are completely sealed;
- after that, using a chisel, you need to remove a part of the tree, in place of which there will be rollers;
- then, using self-tapping screws, the structure of the wheels must be attached to the door. If the version of the canvas is not an "accordion", then the wheels can simply be screwed to the door leaf;
- then you need to start working with the lock and handles, but here it’s better not to act on your own, as you can ruin the door. It is advisable to move this stage of work to the end, and then hire specialists;
- after installed design hang on the profile. It is worthwhile to make a supply of limiters in advance, which will prevent the canvas from falling out. Better pour them epoxy glue for secure fastening;
- after hinged doors are inserted directly into the slots.
 In the end installed door must be checked several times by opening and closing to ensure that it is fit for use. If all is well, you can start refining metal profile. For this you need wooden plank put on it and fix it using brackets. On this installation work are running out. On average, this procedure takes no more than 3 hours, and experienced craftsmen able to cope in 1.5-2 hours.
Interior doors that have guide rollers in their design must be installed correctly, otherwise it will be very inconvenient to use them. To do this, you must follow the rules and follow the instructions. Often, novice craftsmen make mistakes when they install an interior door on rollers with their own hands, which in the future affects its performance characteristics. Consider what you can not do when installing this design:

When installing doors on rollers, do not forget about safety rules. Also, you can not neglect the rules for using sliding structures. It is not allowed to open or close them sharply, clap and pull. Otherwise, they will fail. In addition, it is very important that the compartment doors can open freely all the way, therefore, if there is furniture nearby that interferes with this, it must be removed to the side.
Summing up, we can say that interior sliding doors are a very profitable and convenient option for partitioning rooms. They are able to visually enlarge the space, it is impossible to get hurt about them, they are durable and practical. If you install such structures correctly, they will serve for a long time and regularly, delighting with their stylish look.
A sliding door today will not surprise anyone. Sliding structures are easy to meet everywhere. They are used for any type of doors, including glass and metal, but are more often used as interior doors and wardrobe doors.
In most cases, cabinets are assembled and installed by hand. The assembly and installation scheme is not very complicated. It is important to choose a quality sliding mechanism and strictly follow the chosen scheme.
Advantages and disadvantages of sliding structures
The main advantages of using a sliding structure are the following:
- Space saving.
- Ease of installation, which allows you to install them yourself.
- No need to mount the box.
- Noiselessness, reliability and durability of work.
- Reducing the risk of injury.
- Ability to install tight any size and system automatic control.
The disadvantages include low tightness and the need to install a canister (in some cases).
Sliding door types
Sliding doors are different from sliding doors. The latter can be folding, in which the wings are folded into an "accordion" or "book".
Retractable structures differ in the ways of opening and the number of wings.
- Sliding doors. One or two sashes move along guides parallel to the wall in one or opposite directions. They are also used in Versailles compartment systems.
- Cassette. The difference from the first is that the doors are hidden in a pencil case when opened. It is made by hand from drywall, other materials, or purchased complete with a sliding structure.
- Radius. They differ in their original shape, determined by the curvature of the guides.

- Cascading. Each sash has its own guides. There are one stationary and several movable canvases.
- Intra-hole. The device assumes an option when at the moment of opening the two doors move towards each other, and only part of the opening remains for the passage
Rollback system design
Depending on the weight of the canvas, the sliding mechanism may have different design. In a simplified form, the sliding door mechanism consists of the following structural elements:
- Guide with roller carriages. The number of these elements may be different for different types doors. Made more often from thick-walled aluminum profile, are used to fasten the leaves of the canvas in them. Inside the rails, polymer rollers on bearings are installed, which provide the necessary smoothness of opening. Attach to wall, floor or ceiling.
- Limiters or locking mechanisms. Used to hold the sash in the guide.
Types of sliding systems
Depending on the implementation of the constructive idea, retractable systems can have several guides. More often one or two. The location of the support rollers can also be different:
- Up. This is a hanging system. The suspension of the web is carried out only to the upper guide. The load is distributed only on the upper rollers, and the door is opened without touching the floor.
- At the bottom. This is the support system. All load falls on the bottom rail. The top hanger is not used.
The mechanisms themselves for execution and purpose are divided into the following:
- Standard. This is the simplest and most common option, which does not cause difficulties when installing with your own hands. As a rule, thresholdless.
Designed for a maximum load of 40 to 120 kg, it has bearings in the design.

- Open type. It is called so because all structural elements are visible. The suspension is designed for a door with a leaf weighing up to 100 kg. Let's do-it-yourself installation of a pencil case.
- Hidden type. Structural elements are hidden behind the sash leaf. The bottom guide is not used. Not recommended for glass doors. Due to its simplicity, do-it-yourself installation is allowed.
- With a conductor. A special device ensures smooth movement of the valves. The closer is installed on any type of door and can work in both directions of movement of the wings.
- Synchronous. The mechanism provides synchronous opening of the shutters in different sides. Designed for doors weighing no more than 80 kg. Additionally, the kit includes tension rollers, cable, fasteners and hooks. Do-it-yourself installation is not recommended due to the complexity of the work.
- Telescopic. The mechanism provides opening of shutters in one party. There are two parallel rails on which doors are suspended, connected by a synchronous opening device. Suspension of up to three wings is allowed.
- Rotary. it new type mechanism for interior structures. It has the advantages characteristic of sliding, pendulum and swing doors.
What is needed for installation
Do-it-yourself sliding mechanisms are installed on the door using the following tools and components:
- Drill, screwdriver, screwdrivers.
- Fasteners - self-tapping screws, dowels and screws.
- Roulette.
- Pencil.
- Aluminum profile. For standard design"Versailles" is enough to purchase a two-meter bar. Choice of length individual sizes openings are performed using calculations that can be found on the network.

- Wooden bar. One or two according to the number of upper guides. The thickness is chosen according to the thickness of the canvas, taking into account the dimensions of the mechanism. Usually - 4-5 cm.
- Limiters. The number of restrictive brackets must correspond to the number of rails multiplied by two.
- Guides. The slats should be even, and the material durable and lightweight.
- Rollers with carriages. Retractable block - the most main part systems. The service life and functionality of the entire system depends on its reliability and quality. This must be taken into account when choosing.
- Decorative caps.
After preparing all this, proceed to installation on the sash. Installation can be carried out both on their own and with the involvement of specialists.
Mounting
The scheme and installation order are as follows:
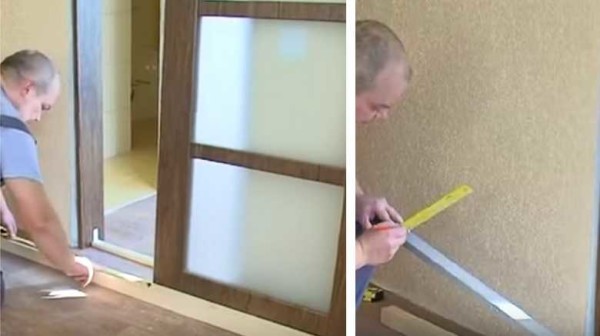
- The first step is to mark the position of the guides. The rails are installed 15-20 cm above the door, taking into account the height of the roller mechanism. Height is measured from the floor. Horizontal lines are drawn on the wall, which are checked by the level.
Irregularities can lead to spontaneous rollback of the wings, especially when installing the Versailles compartment system.
- Then a beam is attached under the guide rails. It is mounted above the drawn marking lines. Dowels are used.
- Guides are attached to the beam. Sometimes they are placed directly on the wall. Be sure to make a small gap between the wall / beam so that the sash does not touch it. The length of the rail must exceed the width of the widow opening.

- A block of roller carriages with fasteners is inserted into the rails.
- Brackets are installed to lock the roller mechanisms. They are placed 5 mm from the edge of the canvas.
On the video you can see the installation of the mechanism with your own hands:
- Next, the canvas is screwed to the brackets with screws. When installing the Versailles compartment system Special attention given to the absence of gaps. In the Versailles system, they often already appear due to the synchronous movement of the rollers.
- Plugs are put on the rails from the ends, and the sliding block is closed with platbands or decorative strips.
Installation of a sliding structure and an automatic control system is not so complicated. If there are skills, the scheme is observed, then any uninformed person can put the sliding block with their own hands.
The quality of components is important. Each element plays a role - a sliding block, a guide, a suspension, a stopper and even screw connections. Very popular Italian products that differ high quality. They provide exceptionally easy movement of the leaf and tight closing of the wings.
There is an opinion that do-it-yourself sliding doors at home is not realistic, but this is not so. A sliding door is not such a complicated thing, and then we will talk about what retractable doors are, go through the pros and cons of compartment doors, and most importantly, it will be given step-by-step instruction how to make a sliding door with your own hands, and in 2 versions.
Sliding structures in houses are not only beautiful, but also convenient.
The question of how to make sliding doors is just right to ask when you know what you want, so first let's figure out what they are like:

The harmonica looks original, but it is not very convenient to use.
The accordion sliding interior door consists of a certain number of sections connected by hinges, which are folded according to the accordion principle. It makes no sense to manually assemble this design, firstly, there are a lot of small and precise work, and secondly, the system is inconvenient in operation, plus, a completely shifted package takes part of the doorway.

Cascade sliding structures.
A cascading sliding structure is called several door panels that slide and hide behind each other. The whole point is that the canvases, no matter how many there are, move apart synchronously, and you can’t do such a sliding door mechanism with your own hands, and installation there is far from the easiest.

Retractable radius design.
Retractable radius design is aerobatics in this niche. Don't even try to do this sliding doors with your own hands, because almost all the details of the radius doors will have to be ordered individually. Agree, it would be a shame to pay money for the order, and then break the doors, trying to install them yourself.

Making interior compartment doors with your own hands is quite realistic.
Sliding compartment doors best option for home craftsman. Such a door can be single-leaf and double-leaf. The mechanism for sliding compartment doors is simple, but reliable, in short, guides are installed on the wall along which the doors move.
- Hidden doors that hide in the wall;
- A door that slides along the wall.
But this is not true in principle, because the drawings, diagrams and device of the structure itself are identical in both cases, the door slides in the same way, the roller mechanism is the same. The only difference is that a drywall box is mounted next to the door leaf, in which the canvas is hidden.

General scheme of hidden sliding doors.
Interior doors differ from similar structures in sliding wardrobes only in a more powerful mechanism, because the canvas is much heavier here. Therefore, it is not so important that you mount the sliding door with your own hands on a cabinet or on a doorway, the technology is almost the same.
We figured out the main differences and the choice of design, now let's talk specifically about how to make do-it-yourself compartment doors.
Two options for self-arrangement of sliding doors
Do-it-yourself sliding interior doors can be done in different ways, more precisely, for different rooms. Plus, the size of the budget plays a significant role, it is one thing to assemble doors for small dacha With seasonal residence and it is quite another to make sliding interior doors for a city apartment.
Option number 1. A solid door for an apartment
In this case, we will learn how to properly install sliding doors on rollers with our own hands.
O homemade mechanisms must be forgotten immediately we are talking just for installation ready systems. Of course, such designs are sold with a description, but there are nuances that are not in the description.
To install sliding interior doors with your own hands, you need a tool:
- Hammer drill or electric drill with impact function;
- Hydraulic level;
- bubble level;
- Screwdriver;
- Roulette;
- A set of open-end wrenches (from No. 5 and above);
- Manual frezer;
- Hacksaw for wood;
- Hacksaw for metal;
- Pencil;
- A hammer.

We proceed from the fact that the door is made from ready-made units, that is, we have a door leaf, guides, rollers, stops and other door fittings. The only thing you will need to buy additionally is a wooden block 50x50 or 50x70 mm.
Even before assembling a sliding door and even before going to the store for accessories, you need to make sure of fundamental things:
- Check how smooth your opening is, if there is a skew, take a wide canvas (with a margin);
- Make sure the wall can withstand the load. It is better for an amateur to work with brick or concrete wall, foam concrete and drywall false walls, leave to professionals;
- Absolutely all finishing must be finished. Door assembly is done at the very end.
How to make a do-it-yourself compartment door:
There are many models of rollers, we are interested in mechanisms on a carrier platform with the ability to adjust the gap between the blade and the guide profile.
Wide platforms are mounted on the edge of the canvas, but if the canvas is more than 80 cm, then you can step back from the corner by 1/6 of the door width.
Using a tape measure, we calculate the center and, by attaching a roller platform to the end of the canvas, we mark the entry points of the self-tapping screws.

It’s not worth driving the self-tapping screws on the markup right away, you don’t know what quality the plate is, when screwing the self-tapping screw “on the live” it can crack. Therefore, first drill holes, the drill diameter is about 2 mm. Next, attach the bar and screw in the screws.

Now insert the carrier plate itself into the grooves of the roller bar, equipped with a rod for the roller. In this case, the plate is fixed on the bar by screwing the stem a couple of turns (open-end wrenches come in handy here).

As you can see in the photo, the stem is equipped with a thread, we need to wind the rollers onto this thread. Of course, there is the possibility of adjustment, but the thread must enter the roller by at least 3 - 4 turns. It is better to count the revolutions, so that they are approximately equal on all rollers.

In order not to work later on, it is better to embed handles and locks immediately, especially when it comes to hidden handles, as in the photo. All such grooves in the canvas are cut with a manual milling cutter.

With the rollers and fittings finished, now we move on to installing the guide bar. The guide bar itself is metal, we will mount it on a wooden block. It is important here how to calculate the cross section and length of the bar.
Don't worry, we only need a tape measure and a pencil to calculate. If your doorway is simply plastered, without platbands, then you can take a bar of 50x50 mm. The platbands will take at least 10 - 15 mm, so under them you need to take a bar of 50x70 mm.
As for the length of the bar, it is calculated as 2 widths door leaf, plus another 50 mm for the stoppers.
Now we lay the guide on the bar and fasten it with self-tapping screws in increments of about 200 mm. The holes in the guide are drilled in the bottom, that is, so that the head of the self-tapping screw does not protrude from above, otherwise the roller will begin to cling to it when moving.

Next, we hang the structure. It is enough for a professional to make a measurement once, after which the craftsmen fix the timber separately, and then hook the doors onto it. Lover better try on assembled doors, for this we start the rollers in the guide.

To make the measurement more accurate, you need to insert a wedge between the door and the guide bar, preferably not even one.

Above the bar you need to put a mark on the wall and already from this mark step back up at least 7 mm, plus the thickness of the carpets, if any are planned
Holes in the bar must be drilled immediately. The step depends on what exactly you will hang the structure on. For anchor bolts with a section of 6 - 8 mm, a step of 50 - 70 cm is enough, and for long self-tapping screws with plastic dowels, holes are drilled at a distance of no more than 25 cm.
We make markings on the wall through the bar. The photo below shows how the craftsmen drill the wall without removing the doors, we do not advise you to do this. We have the markup, now you can remove the door, attach the bar to the wall, set it on a level and mark the future holes with a drill. Then remove the bar and drill.

To prevent the rollers from popping out, you need to install stoppers along the edges of the guide, but they are installed after hanging the doors. The stopper is inserted into the groove and the clamping screw is tightened. The mounting point is empirically determined by the position of the rollers.

Our doors hang on a rail, but so that they do not dangle, they need to be somehow fixed from below. To do this, a groove is cut from the lower end along the entire length with a milling cutter, if the door is factory, then the groove should already be there.
The canvas will be controlled by a pinch roller, which is attached to the floor directly next to the door jamb.

In order for the door to rub against the roller less, it must be set strictly on a plumb line. The technology for setting the flag is shown in the photo below.

Control flag technology.
Basically retractable door installed with my own hands, it will work, but you still need to bring beauty. To do this, buy a trim to match the door leaf and nail or screw it to the carrier wooden block. Such a bar will hide both the bar itself and the suspension mechanism.

Option number 2. Homemade to give
Sliding doors are a good thing and they have a lot of advantages, but all these advantages fade into the background when a person finds out the price of such fittings. Don't get upset when creativity you can solve this problem too. The design is not the most beautiful, but it is quite suitable for giving.
So, let's take a step-by-step look at how to make sliding doors for a summer residence yourself and not spend a lot of money.
The door leaf will cost the most. Although there are options here, for example, you can restore old door and hang it up.

Old doors can find new uses.
Next we go to the store furniture fittings and buy the simplest furniture wheels there. Rotary mechanisms do not take on a hinge, it will only get worse with them. Such wheels are attached to the doors with a pair of self-tapping screws. There are 2 anchor points for each canvas.

From the upper end of the canvas, we fasten steel rings over the wheels. The thickness of the metal in such rings should be at least 3 - 4 mm, otherwise they will quickly fray.

We will use as a guide steel pipe three quarters of an inch, although this is not important, you can take any pipe, as long as the rings fit into it normally. We calculate the length in the same way as in the case of a wooden bar.
We install, as shown in the photo below, the knee and the fixing “penny” can be found on any construction market, however, like the pipe itself.

Fixing the pipe to the wall.

Conclusion
As you can see, it’s not so difficult to install sliding doors with your own hands, but for those readers who thought this information was not enough, there is also a video on this topic.

Option homemade design on the top hanger.
Exist different systems opening doors, one of the most convenient is sliding. Such a system can save space in the room, as it does not require large area for opening, can fit well into any interior. Making sliding doors with your own hands is an interesting activity that can save money on buying a finished product.
Benefits of a sliding design
- Sliding doors have many advantages, the main one being the ability to save space.
- Installation of such a door does not cause difficulties even for a beginner, it does not require you to have a complex tool with you or have special knowledge.
- Installing such a door will take much less time than installing a conventional one; The box is much easier to put together.
- You can create sliding doors with your own hands by purchasing suitable fittings and any door panels that you like.
Where to start work?
Before buying Construction Materials, accessories, tools, you will need to arm yourself with an ordinary tape measure. Use it to measure the width and height of the doorway. If you already have a door, you can measure it. It is worth noting that it is quite possible to turn an ordinary hinged door into a sliding structure using an old canvas from it.
The dimensions of a standard door leaf are usually as follows: height - 2 meters, width - 80 cm, canvases of 60 or 70 cm are less common, sometimes you can find custom door 90 cm
The main element necessary to create such a door is a sliding mechanism. It is completely optional to invent it: to purchase finished structure you can in any store that sells door panels and accessories for them.

Should know: when picking sliding mechanism you need to know exactly the length of the door (for example, 80 cm). The length of the mechanism should exceed it twice. It's okay if you buy a longer mechanism - it can be easily shortened, but with a short product there may be problems. It will not be possible to lengthen it, and if the length is insufficient, the doors will not open to the end.
You can install any mechanisms for sliding doors with your own hands. If it is required that the door does not open simply from a push, you can install handles with a special lock on it. Such a device can come in handy if you want the door to be able to be locked or to prevent animals and children from opening it.
With the help of these mechanisms, any door leaf can turn into a sliding door. For a more aesthetic appearance of the structure, you can make a new door frame, specially equipped for a sliding structure.
What is required to create a box on the door?
Buying a box for the door leaf is not necessary at all. It is enough to purchase the following materials in order to assemble it yourself. You will need:
- 5 meters rail; thickness is selected in accordance with the thickness of the wall in the doorway.
- platbands
- A bar used to hide the opening mechanism from view.
- The door leaf itself. You can use both new and previously standing.
H The new canvas will not have traces of the installation of standard fasteners, so it will look more attractive.
Fittings for sliding doors with your own hands will cost much less than buying a ready-made door in assembled form. This applies to even the most expensive fittings: installation does not require hiring specialists, since an amateur can handle it.

Door assembly preparations
In order to prepare the door leaf, you will need the following tools:
- Manual frezer; if not, you can get by with the tools below.
- Chisel.
- Bulgarian.
- Drill.
Any tool is suitable for work, but if available manual router work is faster and more accurate. Fabric preparation includes the following items:
- It is required to start work from the bottom end of the door leaf. Clearly in the middle, you will need to cut an even groove, the depth of which should be 3 mm. This recess is necessary so that the lower guide can work. It will serve as a stop for the door, which will not allow the canvas to sway during operation. You can cut a groove using a manual milling cutter or grinder, on which a special circle for working with wood will be installed: it must have a fine tooth.
- The set of the sliding mechanism includes rollers, brackets. They need to be connected to each other. This is easy to do with nuts. Elements have special openings for connection.
- After fixing, the elements must be attached to the upper part of the door leaf from the end side. You don’t need to screw them right away: you need to trace the contours, then measure the thickness of the metal from which the elements are made, and make grooves equal to this thickness.
- After that, you can screw the rollers to the canvas.
- Making sliding doors can be made a little easier by not cutting the staples into the door itself. Rollers can be simply screwed to it. This will affect external characteristics future door, however, if you have little experience, and only a chisel and a hammer are in your hands, it is better not to make grooves for the rollers at all.
- After the mechanism is almost ready, you can proceed to the installation door lock. This design element is optional, it is placed solely at your own discretion.
- It will be convenient to use the design if you install handles. If you put the usual ones, the door will not open all the way, beat the handles on the doorway. In order to avoid this, you will need to embed a special set of handles. For them, grooves are made on both sides, then a through hole is drilled. The contour for the handles will need to be marked in advance. It is most convenient to cut places for them with a jigsaw.

Installation of the sliding mechanism
The scheme of sliding doors, as you can see, is not very complicated. After the canvas is ready for installation, you can proceed to further steps.
Before you can install the canvas in the doorway, you will need to mount the door opening mechanism. To do this, you need to properly fix the guide profile: it must be located strictly horizontally. When installing it, you must use the level; the guide is placed on the floor. If it is uneven, you will have to carry out work to level the surface. If the profile is crooked, the door will not be able to open easily, if the slope is large, the canvas may not be able to move along the guide at all.
Features of mounting the guide
Do-it-yourself guides for sliding doors must be installed in accordance with some rules, otherwise you cannot expect the design to work correctly.
- Make sure that the edge of the guide protrudes 50 mm from one side of the opening. On the side where the door will roll back, the profile should not protrude. Its length should clearly match the dimensions of the door leaf. If the mechanism is too long, it can always be shortened with a grinder.
- It is necessary to correctly calculate the height to which the door mechanism will be raised. You can calculate it, taking into account the following factors: the gap under the door, the resulting height of the canvas, taking into account the rollers already installed on it (the gap can be from 10 to 20 mm, it depends on how flat the floor is).

Before you make sliding doors with your own hands, you should check how smooth your walls are. If they are too crooked, this problem will have to be solved. On the flat wall It is easy to attach the guide, for this you just need to drill holes in the wall for it. If the walls are very curved, you can use wooden lath; you will have to slightly move the guide away from the wall.
In order to put the finished canvas with rollers on the guide, you will need to get the rollers on the side. After installing the canvas, a special stop is placed on the door, which does not allow it to move to the side. For this stop in the canvas from below, a special groove was sawn through.
To prevent the internal guides from flying out, they must be fixed with self-tapping screws. To do this, you need to open the door completely. Fix the rubber pillow first: it is used as a limiter, then you will need to insert an emphasis into the lower groove of the canvas. It is attached with dowels. After that, you can close the door, fix the bottom stop completely. If you watch the video, it will be clearer how to make sliding doors yourself .
In order for the installation to be completed, it is necessary to install door trims and a bar that will close the opening mechanism. It is attached to a rail fixed to the wall. Slots can be closed mounting foam or sealant.
Sliding structures are becoming increasingly popular due to their appearance and the ability to save space in the room. They are actively used for zoning space. When deciding to install such a door, you need to know its types and features.
Advantages and disadvantages
The sliding design has both its pros and cons. To positive moments uses include:
- Space saving. This is very true in small rooms.
- external attraction. They look unusual and interesting compared to conventional swing doors.
- Ease of use. This is especially important for people with disabilities.
The downsides include the following:
- Although sliding products save space, they create difficulties when arranging furniture next to them. It will have to be placed so that there is no interference when opening and closing the door.
- Low soundproofing. For a single leaf, this problem is solved with the help of an adjoining bar, to which it will fit snugly when closed.
Sliding design and its types
Products differ in their appearance. Their construction may be as follows:
- sliding;
- harmonic.
Each of them has its own characteristics, described below.
Accordion door
Its peculiarity is that when opened, it folds several times without going beyond the doorway. The canvas of such a door will consist of several identical parts interconnected by rods or slats. Individual parts can be made from the most different materials with glass or leather inserts. Rollers are attached to each of them to move along the guide.

These doors will be the most economical in terms of their space. But they narrow the doorway, so it may need to be widened. Such products are actively used for zoning the space of the room, they are replaced by partitions. But it is worth considering that these designs have relatively short term services.
External sliding door
You can make it from one or more canvases. standard size using guides. You can install the product different ways depending on the movement of the canvases, which can:
- walk along the wall;
- hide in the wall
- hide in a special niche.
A door that moves along the wall when opening and closing is the easiest to make. Its sliding is provided by guides.

In order to hide the canvas in the wall, the doorway must be twice as wide as the door itself. The pencil case can be made from drywall yourself or you can install a ready-made metal cassette.

The niche in which the door will hide can be attached to a wall of any material. It is easiest to do it from drywall. But such a niche will occupy usable area premises.
Installation Tools
You can install interior sliding doors with your own hands if you have necessary tools. These include:

- pencil, tape measure, level;
- screwdriver, hex;
- screwdriver;
- self-tapping screws.
What you need to know before installing
Before buying a door, you first need to determine the size of the opening. Its width and height are measured at several points. If the measured values differ from each other, then the smaller of them is taken as the basis. The opening is leveled.
The wall along which the structure will slide should be flat, without bulges. Otherwise, the canvas may cling to them.

The fastening of the guides must be perfectly even for the door to work correctly.
Installing a door with two rails
This installation method is used for structures with several canvases.

Do not forget to check the correct operation of the sliding system. The door movement must be silent, gaps between it and the feigned vertical bar are not allowed.
Hanging
Another way to install sliding structures- hanging. In this case, the door will not go in the opening itself, but along the wall. Unlike the method described above, here a flag roller is installed instead of the lower guide in order to prevent transverse vibrations of the web. At the bottom end, there should be a special groove for it, which you can make yourself using a chisel or an electric milling cutter.
Hanging the door has the following steps:

When installing a structure using hanging, you need to take into account its weight and the material from which the wall is made. Hanging on concrete or brick wall will not cause problems, but drywall may not withstand a large mass of the product.
Installation of an accordion door
The sliding structure in the form of an accordion is sold unassembled. As a rule, the product is accompanied by instructions with detailed description collection and installation process. Let's list the main steps.


A responsible approach to the selection and installation will guarantee that the sliding door will serve for many years.