Suspended ceilings made of pvc. PVC suspended ceiling: marking, frame, installation of panels
A ceiling made of plastic ceiling panels is one of the options for suspended ceilings. Such ceilings are usually installed in bathrooms, corridors and kitchens.
A room decorated with a plastic ceiling does not look very cozy. Installation of ceiling plastic panels not recommended in the bedroom. No matter how manufacturers claim that the material is absolutely harmless, finishing the ceilings with plastic in the rooms in which you are long time- not the best the best option. In addition, if the length of the room is more than 3 meters, you will have to join the panels, and this looks ugly.
How to choose the necessary materials
Selection of plastic panels for the ceiling
Light-colored panels are usually used to decorate ceilings.
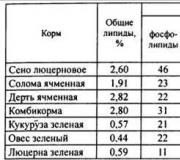
There are panels on sale with colors that imitate slatted ceiling. In terms of cost, plastic ceiling panels are much cheaper than aluminum slats for finishing the ceiling, and by appearance it is sometimes difficult to distinguish a plastic ceiling from an aluminum slatted one.

Such panels have standard sizes— width 240 mm, length 3000 mm.
The photo shows plastic panels imitating a slatted ceiling.
 The advantages of finishing the ceiling with plastic panels include speed of installation. The ceiling does not need to be leveled plaster mixtures. The ability to insert spotlights into the suspended ceiling allows you to create cozy lighting in the room. The price of plastic ceiling panels is affordable for economy class renovations.
Calculation of materials
You will need:
- panels
- aluminum profile
- dowels
- galvanized self-tapping screws with press washer
- ceiling plinth
- electrical cable
Standard panels are 24 cm wide and 2.7 m or 3 m long. Divide the width of the room by the width of the panel. When planning the finishing of ceilings in two rooms, calculate how best to mount the panels so that the scraps can be used in the toilet or on the balcony.
Buy panels designed specifically for ceilings. Wall panels stronger and heavier in weight. Strength is not required for ceiling panels, but excess weight will create excessive load on the ceiling frame.
To install the panels you will need an aluminum profile. It is allowed to mount plastic ceiling panels on a lathing made of wooden beam, but in wet rooms it is better to use a profile. Over time, the timber becomes deformed due to humidity and the panels may warp.
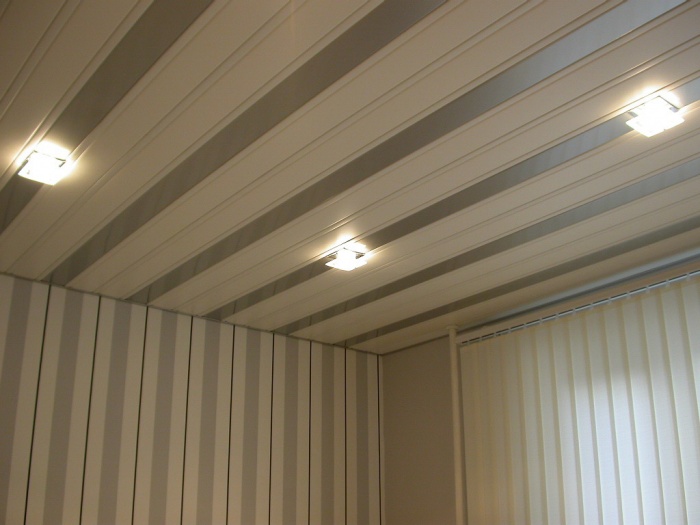
A U-shaped guide profile with a cross section of 27-28 mm is mounted around the perimeter of the room. It is marked PN, or marked PNP - ceiling guide profile.
To figure out which profile serves what purpose, look at the photo. The number of guide profiles is easy to calculate. The profile is produced in a length of 3 m. Divide the perimeter of the room by 3 and round to the nearest whole number.

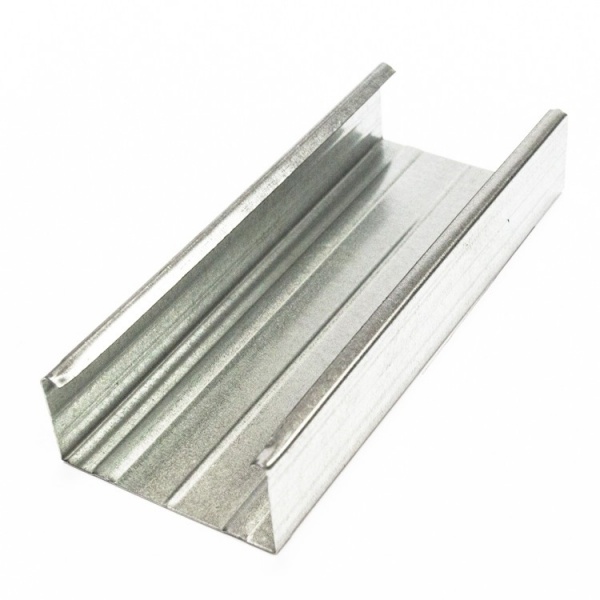
To form the frame you will need a ceiling profile - PP. This profile is installed perpendicular to the panels every 60 cm. Based on the width of the room, you can calculate how many ceiling profiles you will need.
To attach the ceiling profile, hangers are needed.
The hangers are attached at a distance from the wall - 30 cm, then - after 60 cm. Based on the length of the profile, calculate how many hangers are required for each profile.

Dowels are used to attach the guide profile to the wall and hangers to the ceiling. The profile is attached to dowels in the corners and then every 20-30 cm. For each suspension, at least two dowels are required. Don't try to count exact amount dowel-nails. Take it with a reserve - dowels and nails will always be useful for subsequent repairs, so it’s not a big deal if two or three dozen are left over.

To attach the panels to the frame and connect the guide and ceiling profiles, you will need galvanized self-tapping screws - a 4.2x16mm press washer. The price of self-tapping screws is small - buy 150-200 pieces.
Ceiling plinth for plastic panels is used in two types - PVC plinth or regular polyurethane. The PVC skirting board is installed before the installation of the panels begins. If the walls in the room are uneven, it is better to cover the joint between the wall and the suspended ceiling with a polyurethane plinth.
The PVC skirting board covers the gap between the wall and the ceiling, and at the same time serves for the installation of plastic panels.

The ceiling plinth is installed around the perimeter of the room. The amount of plinth can be easily calculated by dividing the perimeter of the room by the length of the plinth and rounding the resulting value.
Buy required amount lamps and electrical cable to connect them.

When installing panels on wooden sheathing you will need timber, slats and brackets to attach the panels.
How to properly install plastic ceiling panels
Tools
- level
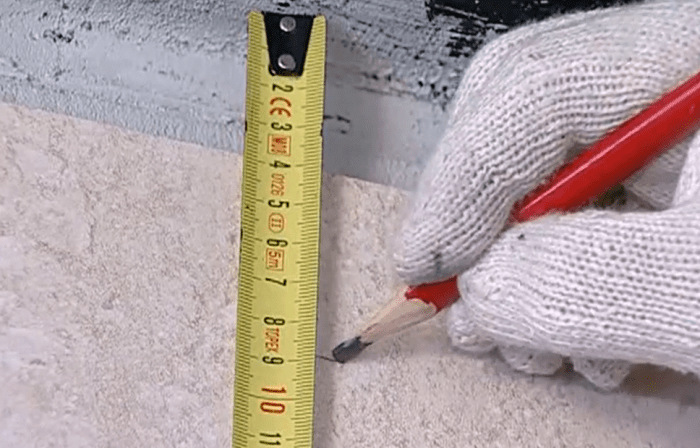
- pencil or marker
- roulette
- hammer drill
- metal scissors
- screwdriver
- hacksaw or jigsaw
- drill with crown
- construction or stationery knife
Operating procedure
Using a water level, mark a horizontal line around the perimeter of the room. You can use regular building level, but the hydraulic level gives fewer errors. Make sure that there are no air bubbles in the connecting hose. The easiest way to make marks is with a laser level, but laser level- an expensive instrument and not everyone has it home handyman it is in stock.
Secure the guide profile to the marks. The profile is attached to dowels at a distance of 30-50 cm. Cut the profile to length. The profile can be cut with a grinder, but it can be cut quite well with metal scissors. It might be faster with a grinder, but it’s easier with scissors.
Use a hammer drill with a concrete drill to make holes in the wall. Secure the profile with dowels.

Attach hangers for the ceiling profile. Suspensions are necessary for reliable fastening frame to the ceiling and to adjust the level at which the profile will be mounted.

Attach the PVC skirting board to the guide profile.
Install ceiling profile, to which you will attach the panels. The PP profile is attached to the hangers and to the PN profile with self-tapping screws and a press washer. The ceiling profile is attached perpendicular to the direction of the plastic panels.

When using PVC plinth, secure the plinth with self-tapping screws to the guide profile around the perimeter of the room. At the corners, the plinth is cut at an angle of 45°.
Route out the electrical cable for installing the lamps.
Cut the panels to length. The panel is cut with a hacksaw or an electric jigsaw.
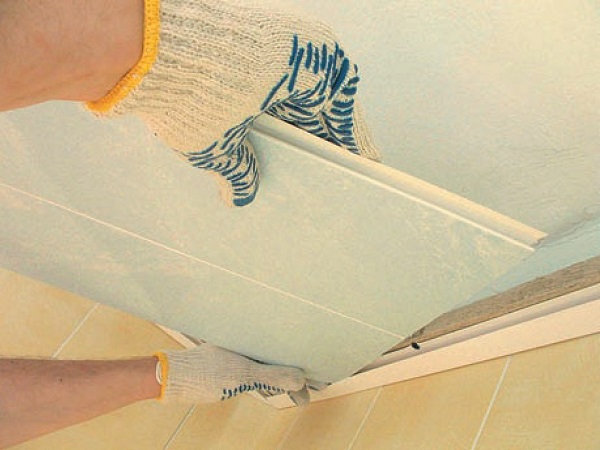
Place the edge of the panel into the groove of the baseboard. Secure the panel shelf with self-tapping screws to the ceiling profile. The next panel is inserted into the groove of the previous one and secured with self-tapping screws in the same way as the first. The photo shows the installation of panels without PVC plinth; a hole for a lamp is cut along the edge of the panel.

Holes for lamps are cut before installing the panel using a drill with a crown or a knife.

When installing the last panel, cut it to width.
Install and connect the lamps. The lamps are connected in parallel.

By using liquid nails glue polyurethane baseboard, if you did not use PVC plinth.
When installing panels on a wooden sheathing, the principle of operation is the same. The panel is attached to a block or slats using staples.

Answers to frequently asked questions
How to mark the flow level - correctly or beautifully?
When installing plastic ceiling panels, it is important to install the suspended ceiling evenly along the entire plane. It happens that the tiles that line the walls are placed incorrectly. It turns out that if the ceiling is mounted strictly according to the level, errors in laying the tiles will become noticeable. It is permissible to mount the ceiling parallel to the last seam of the tile. It won’t warp too much, but it won’t be visually noticeable that the tiles are not laid quite level.
How to secure the last panel?
The last panel is not fastened with self-tapping screws; it is inserted into the groove of the previous panel and into the groove of the PVC skirting board or guide profile. Due to its light weight, the panel is firmly held in its position.
How to install polyurethane ceiling plinth?
Polyurethane or foam ceiling plinth is glued with liquid nails. The corners are cut according to the miter box. If a gap forms between the wall and the baseboard, it is sealed with acrylic sealant.
Video installation instructions plastic ceiling.
Plastic panels today are increasingly used as finishing material for walls and ceilings. Their popularity is constantly trending upward, due to good performance characteristics, aesthetic appearance and easy operation installation work. Another significant advantage of panels of this type is the affordable price level.
How to choose plastic panels
Plastic panels can be used in rooms with high humidity without any particular concerns.
This material is resistant to impacts aggressive environment and temperature fluctuations - suitable for. Moreover, their use prevents the formation of mold and mildew, which is important for. When choosing PVC panels, you should take into account the length and width. The surface of the material can be varnished, glossy or matte.
Another significant advantage of PVC panels is the absence of the need for careful leveling of the surface, as well as the ability to hide individual communication elements under the frame.

Photo: finishing the bathroom with plastic panels
When choosing this variation of finishing material, you should focus on the fact that plastic panels for walls and ceilings have certain differences. The former have higher weight indicators. In addition, they have a more rigid structure.

Option for finishing a bathroom with plastic panels
Plastic panels intended for finishing the ceiling have less weight. This is due to the need to carry out installation work at height. Minimum weight indicators greatly facilitate this procedure.

Finishing the walls and ceiling in the kitchen with plastic panels
Along with this, plastic ceiling panels are more fragile. When performing installation work, you should be very careful, as you can easily damage the surface of the finishing material.

Wall decoration with decorative plastic panels
With a standard thickness of 5-10 mm, the width of the panels can vary from 25 to 50 cm. The length ranges from 2.7 to 3 m. When choosing a finishing material, you should pay attention to the quality of the color of the panel, the uniformity of the pattern and the correctness of the shape. You should also take into account the quality of the stiffeners. They shouldn't hang around outside. The surface of the material should not contain characteristic chips and cracks.
The level of resistance of the material to deformation will depend on the quality of the density and flexibility of the PVC panel. If such a panel is tightly compressed, there should be no traces of mechanical damage on it.
Required tools and materials
When performing work on installing plastic panels on the wall and ceiling, at the initial stage you should select necessary tools and materials. To resolve an installation issue, you may need:
- PVC panels;
- drill;
- dowels;
- cord and pencil;
- perforator;
- ladder.
Moldings and corners should also be added here. By using the latter, you can achieve the most even markings. Otherwise, when installing plastic panels on walls or ceilings, certain difficulties may arise.

Photo: plastic panels for bathroom tiles
Plastic panels are selected depending on the specific layout of the room. IN small room It is advisable to use narrow panels. Subject to finishing more spacious room It is most advisable to resort to the use of wider products.

Photo: ceiling decoration with built-in lamps and PVC panels
Self-tapping screws can be used instead of dowels. They are necessary if the frame will have a metal design. Dowels are only relevant if used wooden frame. It should be noted here that a wooden base cannot be installed in rooms with high humidity. This is due to the fact that such material is susceptible to rotting, as well as negative influence fungi and mold. For this reason, using a wooden frame in the kitchen and bathroom is not a practical solution.
Construction of lathing for walls and ceilings
The structure of the frame is the primary issue that should be resolved when installing plastic panels on a wall or ceiling. It was noted above that a wooden or metal variation of the frame can be used as a base. The optimal distance between the individual elements of such a base is equivalent to 50 cm. In this way, it is possible to compensate for the uneven surface of the ceiling or walls. The recommended sequence of actions will look like this:
- Carrying out markings.
- Installation of profiles along the entire perimeter of the surface.
- Installation of transverse profiles.
- Installation of the base for fastening PVC panels.
- Installation of panels.

When marking, you should first determine the minimum ceiling height. From this point on the walls you need to draw two lines. To do this, you can resort to using a cord painted with chalk. The correctness of the marking is checked using a building level.

After marking, profiles should be installed along the entire perimeter of the surface. These elements must be fixed without creating voids or gaps. Otherwise, it will be very difficult to achieve maximum reliability of the entire structure.

Profile frame for walls
After installing the transverse profiles, the task that needs to be resolved is to install the base for the panel fastenings. For fastening plastic profiles You can use self-tapping screws.

Profile frame on the ceiling
When installing a metal frame variation, you should be as careful as possible. The total weight of the structure will be quite large, so it is necessary to ensure high reliability of its fastening. Attaching hangers to concrete floor can be done through the use of special dowels with a cap on the sleeve. Conventional dowels will fail, since concrete is characterized by the presence of internal voids.

Attaching the first panel to the frame
Holes in the metal profile can be drilled simultaneously with the preparation of holes in the wall. Provided that the frame is installed on ceramic tiles It is advisable to resort to using a hammer drill only if glue mixture completely dry. Otherwise, cracks may appear on the surface of the tile.
Features of panel installation
Or is it best to start a wall with the definition optimal length material. It is recommended that this issue be resolved in advance. To cut plastic panels, you can use a regular hacksaw.
There is nothing complicated in the installation procedure of such panels. They are first placed in the profile and then secured using self-tapping screws. It is recommended to start installing plastic panels from the corner of the room. This applies to both the ceiling and the wall. It is also very important to monitor the quality and evenness of installation of the first element. It should be located strictly perpendicular to the wall or ceiling. Otherwise, the panel will not be able to snap into the groove and there will be a need for dismantling and new installation.
Special lathing for plastic panels with fasteners
The edges of the plastic panels must fit into the slats. The last part is adjusted to optimal distance to the wall. If necessary, you can cut the panel with a regular hacksaw.
Advice! Before carrying out work related to the installation of plastic panels on a ceiling or wall, it is recommended to take care of the installation first various elements communication systems. They are able to camouflage well water pipes, electrical wiring or heating pipes.
From time to time it becomes necessary to repair the ceilings in an apartment. Inexpensive and practical option- PVC panels for the ceiling. This type of design is ideal for rooms with high humidity (kitchen, bathroom, hallway). Installation is quite simple and can be easily carried out even by someone far from construction, if they have the right tools.
Installation costs suspended ceiling from PVC panels with your own hands, compared to other types of finishing ceiling surface, significantly lower. Ceiling finishing process PVC panels includes several stages, some of which can be divided into several more points. Let's take a closer look at each of them.

Preparatory stage
It can be roughly divided into three points:

Purchasing the necessary materials
The selection of panels is a rather serious process, since there are many types of these products and they all differ in size, design, and texture. When choosing, you should pay attention Special attention to the width of the product. For small rooms, panels with a width of no more than 250 mm are suitable; for large rooms, it is advisable to choose options with a width of more than 250 mm.

To obtain advice, it is better to contact the sellers of a specialized store; as a rule, they are well prepared and can provide high-quality advice on the choice of materials for installing a ceiling made of PVC panels.

The bars must have a cross-section of at least 30*30 mm.
As a ceiling plinth in the construction of a PVC ceiling, you can use plastic, specially made for this purpose, which has a groove for installing panels into it. It is worth taking skirting boards with a small margin of about 1 m more than the perimeter of the ceiling, because during the installation process it will have to be cut at an angle and a mistake may be made.

If you plan to make a metal frame, you will need to purchase:
Tool
In work with PVC ceilings required:
- Roulette
- Pencil or thin marker
- Construction level
- Construction corner
- Lace
- Metal scissors
- Miter box
- Electric jigsaw or wood saw
- Grinder with a disc no more than 2 mm.
- Impact drill or hammer drill with drilling function (for concrete ceiling)
- Screwdriver
- Extension

Tip: For ease of use, the extension cord should have several sockets, this will allow you not to switch the power tool during operation.
Preparing the surface for installation
For installation, it is necessary to free the ceiling from anything that could interfere with its implementation. Remove old lamps and chandeliers. It is worth determining in advance where they are taking place. electric wires and mark these places with a marker or pencil. Clean the surface from dirt and dust.
Frame making
The frame can be made of wooden blocks or metal profiles 60*27 mm. For wet areas It is advisable to use a metal structure, since it is less susceptible to corrosion under the influence of moisture. Also installation system metal frame Ideal for leveling the ceiling because it uses hangers that allow the frame to be lowered by 3 - 4 cm.

It is advisable to use wooden blocks in a dry room and with a fairly even rough ceiling. A combination of these two methods is also possible; for this, fastening with metal hangers is used in a system of wooden blocks. The method is impractical, because you have to use bars with a cross-section of at least 5*5 cm and perfectly flat.
Metal carcass
Frame made of metal profile must be installed at a distance of no more than 4 cm from the draft ceiling.
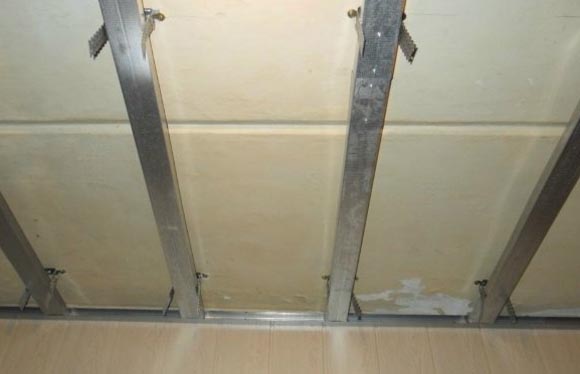
It is convenient to hide the wiring in the resulting gap.
First, a starting profile 27*28 is attached to the wall along the perimeter of the entire ceiling, at a distance of 3 - 4 cm, so that later the main profile 60*27 can be inserted into it. Depending on the material of the walls, fastening is carried out using self-tapping screws or dowels - nails. When installing on a dowel - nails, you will need to drill a hole in the profile and in the wall and, pressing tightly, drive the dowel into the nail.
Important: Dowel - nails used for installation starting profile, must have a cylindrical skirt. Only in this case is it possible to use through-mounting technology.
The starting profile is mounted strictly level, starting from any corner of the room and moving along the entire perimeter. If the profile is installed accurately, the starting and ending points should converge and thereby close the perimeter.
The next stage is the placement of metal hangers. To do this, you need to mark the places where the main profiles will pass. It is convenient to use a cord for marking. The main profile is attached at a distance of 40 - 60 cm from each other, strictly parallel. Suspensions should be installed at a distance of 80 cm from each other. The hangers are mounted using self-tapping screws or dowels - nails in the holes provided for this purpose, and are immediately bent to facilitate installation of the main profile in them.
The last stage is installing the main profile. To do this, the profile is cut to the required length with a gap of 5 mm on each side, inserted into the starting profile and secured with self-tapping screws with a press washer to the hangers. The level controls its horizontal position, as well as its strictly rectilinear position.
Advice: When attaching the starting profile, do not neglect its horizontal position, since in the future this will lead to incorrect positioning of the main profile and, as a result, you will have to start the installation again from the very beginning.
Frame made of wooden blocks
It is installed by analogy with metal, with the difference that the bars are fastened using the method of through installation without the use of hangers. To level the plane, it is permissible to place wood chips under the bars. First of all, the outer bars are installed, then the middle is filled at a distance of 40 - 60 cm from each other.

Panel installation
First of all, the ceiling plinths are measured and sawed at an angle of 45 degrees. Their fastening can be carried out using 13 mm PSh self-tapping screws or using liquid nails. Skirting boards are installed around the entire perimeter in such a way that subsequently installed panels fit exactly into their groove.

Installation of PVC panels on the ceiling begins with determining the length of the workpiece. To do this, measure the distance from one wall to another, then subtract 2 cm from this distance and draw a strictly perpendicular line on the panel using a pencil and a construction corner.

Then they cut it using a grinder. Next, install the first panel into the grooves of the ceiling plinth and push it all the way to the wall. As a result, it should turn out that the first panel fits into the grooves of the ceiling plinth on three sides. Only after this can the panel be attached to the bars or profile.
Tip: There are two ways to attach PVC panels to the ceiling when making a wooden frame. The first is with self-tapping screws and a press washer, the second is with a stapler and with staples. Both methods are equally effective, but fastening with a stapler is more convenient and faster.
Subsequent panels are cut to size and installed so that the ends are in the grooves of the baseboards and each subsequent panel fits into the lock of the previous one. The last panel must be cut to length and then, having measured the required distance, cut to width and then installed.
You can learn more about the installation process by watching a video description of the process.
- Familiar Stranger
- Preparing the base ceiling
- Sheathing device
- Installation of plastic panels
Until recently, there were not many ways to decorate the ceiling. Whitewash, paint with water-based emulsion. The brave souls still dared to wallpaper the ceiling - and that was it. And today there are suspended ceilings, suspended ceilings, mirrored ceilings, stained glass ceilings, etc.
Covering the ceiling with plastic panels is the simplest, most economical and quick way finishing.
Today, one of the most popular, especially among those who like to do everything around the house with their own hands, is a plastic ceiling. This popularity is due to the fact that making a plastic ceiling is quite simple, especially for those who have had to deal with the installation of suspended ceilings, and it will cost only a little more than a plasterboard ceiling.
Familiar Stranger
Strictly speaking, a plastic ceiling is a suspended ceiling.
It is attached to the main ceiling using special hangers on a frame made of metal profiles or wooden slats. Only the material for the panels, instead of drywall, is polyvinyl chloride, one of the safest and healthiest types of plastic. Suffice it to say that in addition to wall and ceiling panels, food containers are made from PVC.
You can easily make such a ceiling with your own hands, giving it an attractive appearance. It won't be visible panel seams, besides, it will serve you much longer than its plasterboard counterpart, and it requires very minimal personal care - remove dust from the plastic from time to time. This is easy to do with damp cloth, since plastic is absolutely not afraid of water.
When choosing panels, it is important not to confuse and not buy wall panels instead of ceiling ones. Although they are made from the same material, they differ significantly. Wall panels are much heavier compared to ceiling panels, which makes a huge difference.
Related article: Choosing a sofa for the living room: some recommendations
If you mount such panels on the ceiling, you will get a significant load on its frame. And this is fraught: one fine day the frame may simply not hold up, and the ceiling will collapse. And if you install ceiling panels on the wall, they will become deformed over time, as they mechanical strength much lower.
Return to contents
Preparing the base ceiling

Types of plastic panels.
Making such a plastic ceiling with your own hands is no more difficult than a regular suspended ceiling made of plasterboard. Installation of any suspended ceiling, incl. and plastic, you should start by preparing the base ceiling. Its surface must be thoroughly cleaned of exfoliated lime or plaster and treated with an antifungal solution.
Then you need to take care of the electrical wiring running along the ceiling. Indeed, in most cases, lamps and chandeliers will be mounted on the ceiling. Before installing the ceiling, you need to secure the wires and at least lead them to the switch. The wires must be reliably insulated. Joking with electricity is dangerous, so if you do not have sufficient experience in this matter, it is better to seek help from a specialist.
To install a plastic ceiling yourself, you will need the following tools:

PVC panel fastening diagram.
- hammer drill or electric drill with a pobedit drill bit;
- hacksaw for metal;
- construction knife;
- roulette;
- square;
- break paint cord;
- water level;
- screwdriver
Don't forget to purchase the following materials:
- antifungal solution;
- pendants;
- dowels (you must take the same diameter as the drill you will use to drill the holes);
- plastic panels;
- ceiling profiles;
- self-tapping screws
Return to contents
Sheathing device

Installation of plastic ceilings.
The frame for a plastic ceiling can be made from either wooden slats or a metal guide profile. The second option is still preferable, since the metal is less susceptible to changing its dimensions under the influence of temperature and humidity.
You need to decide in advance how far you will lower the panels. At the same time, you need to take into account the depth of your lamps - mainly from 5 to 10 cm. Having decided on the height, you need to install and fix the profile guides strictly horizontally. It’s better not to rush here and double-check everything several times. Otherwise, if you rush and install the profile incorrectly, you will be left with no other choice but to make the ceiling slanted, which will immediately catch your eye.
Related article: How to defrost plastic water pipe
From the base ceiling at the corners of one of the walls, the required distance is measured down. It is important that the marked marks are at the same level, so be sure to check their location using a water level. Then these two marks are connected into one horizontal line using a cord.
Taking the measured horizontal line as a guide, you need to draw the same lines along the entire perimeter of the room, checking them with a level. This will be the horizontal plane to make the ceiling even.
The next step in installation will be the installation of metal guide profiles along the marked border. The profiles are attached directly to the wall by drilling holes in it with a puncher or drill, using plastic dowels and galvanized screws for fastening.
In order not to disturb the horizontal position when attaching profiles, the end of the unattached profile is placed at the end of the attached one, then its other end is laid strictly according to the markings, and the profile along its entire length is attached to the wall.
Having finished installing the profile on the walls, you need to install the profile on the ceiling itself. To do this, straight hangers need to be fixed on the ceiling along the direction of installation of the ceiling profile in increments of 50-60 cm. The hangers need to be fixed strictly along a straight line, beating it off using a painting cord. Ceiling profiles are attached to these suspensions, and the ends of the guide profiles fixed to the walls are laid. With such a suspended ceiling design, there is no danger that one day it will fall on your head.
With the advent of inexpensive building plastic, it has become much easier to repair the ceiling, and the reduction of costs and easy installation has added to the presentable appearance of the structure. Indeed, practical glossy panels in the bathroom or kitchen look elegant and quite appropriate, and their design is not inferior to the design of plasterboard and tension systems. Thanks to wide range ready-made building materials You can make a suspended ceiling out of plastic with your own hands, and the result will be practically no different from the work of professional craftsmen.
Why is plastic better than other materials?
The first question that arises when mentioning plastic suspended ceilings concerns their safety for people or animals. Modern artificial panels made of polyvinyl chloride are absolutely harmless. Modifications of PVC are used not only for the production of building materials, but also for the production of tableware, food packaging, and souvenirs.
At the same time, plastic, unlike wood, is lightweight, and for the installation of a ceiling this is an important factor. In addition, PVC parts have a smooth, non-porous texture, whereas natural material– wood – changes shape and weight with changes in temperature or air humidity in a limited space.
Plastic is perfect for finishing ceilings in modern kitchens
One of the important advantages for utility rooms and bathrooms is practicality. The slats and panels do not need to be renewed with paint; it is enough to wipe them with a slightly dampened cloth several times a year. Heavier stains can be removed using traditional detergents – laundry soap or cleaning gel. It is not recommended to use abrasive powders, as they can scratch a smooth surface, and it is especially easy to ruin the appearance of mirror and glossy elements.
The ease of installation of a structure made of PVC panels is also one of the advantages of this material. Even without special training you can design and create a frame from metal profiles or wooden slats, and then attach plastic parts to it. Anyone who knows how to use a screwdriver or drill will be able to do this.
Let’s not forget that a plastic suspended ceiling perfectly masks communications: ventilation pipes and electrical wiring. PVC panels also hide perfectly thermal insulation mats. In case of flooding from above, even repairs will not be required, although, suppose, the drywall becomes unusable, and tension structure has to be restored. As you can see, plastic ceilings have enough advantages.

Sample of a ceiling made from fragments of textured plastic panels: thanks to segments of different lengths, an interesting pattern is formed
Selection of plastic panels
Consumable plastic can be divided into two categories - wide panels, most often glossy or matte, and narrow slats, reminiscent of wooden “lining” in size. The assembly principle for both types is the same: the parts are folded parallel end-to-end, one after another, over the entire ceiling area. It is not necessary to place elements along or across the walls; some fans lay them diagonally, although this method is a little more difficult to implement.
Considering the interior of the room, you can choose colored panels - most often they are painted in pastel, pale colors. There are options with a pattern, but they should be used extremely carefully, and the ornament on the plastic should be compatible in style with the wallpaper, tiles and furnishings.
Having chosen the color and size of the parts, you need to calculate their quantity. The dimensions of the panels are indicated on the labels, therefore, knowing total area rooms, it’s easy to calculate the number of pieces: divide the area of the room by the area of one part. 1-2 additional element will not interfere, since some of the panels have to be trimmed.

Samples of panels with natural-themed drawings
When purchasing, pay attention to the following nuances:
- the same color of the elements of the entire batch;
- integrity of cardboard or film packaging;
- no scratches or chips on the plastic.
Pay special attention to the thickness of the panels. As a rule, ceiling-mounted units are slightly thinner than wall-mounted ones, their average thickness is 8-10 mm, the most reliable is 12.5 mm.

In addition to panels of traditional white Colored plastic is widely used
What materials and tools will be required
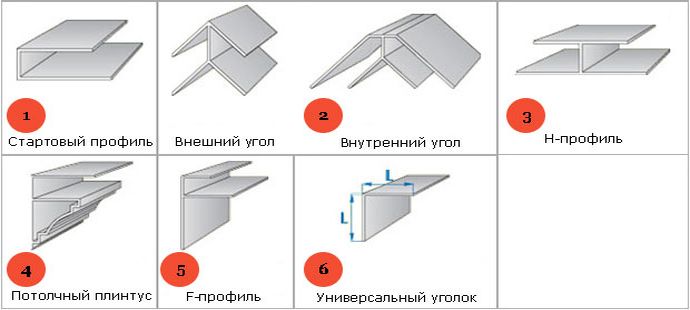
In addition to plastic panels for suspended ceilings, you will need a number of materials for the frame and a set of tools:
- starting (carrying) profile;
- connecting H-profile;
- corner (end) F-profile;
- ceiling plinth;
- corners (external and internal).
In the process of drawing up a project, it is necessary to draw a diagram of the layout of the panels and calculate approximately how many will be required consumables. Don’t forget about lamps, wires and fasteners - dowels and screws.
A standard set of tools will most likely be found on the farm; the rest will have to be purchased: a drill, a screwdriver, a hacksaw or a circular saw, carpenter's knife.

Mirror panels visually increase the height of the ceiling in the bathroom
Installation instructions for a plastic ceiling
The proposed step-by-step plan is the basis for the construction of a plastic suspended ceiling simplest design. It is suitable for decorating a kitchen, bathroom or hallway, rectangular or square shape. The instructions can be supplemented or slightly changed if required. design solution.
Surface preparation and marking
Preparatory work consist in removing all unnecessary from the surface of the ceiling - old paint, fragments of plaster. If there are large cracks, they must be filled with putty. Concrete slabs in rooms with high level humidity should be treated with a composition against mold and mildew.
Then, using a level and tape measure, you need to make markings for the guide profile. The distance from the ceiling surface to the starting level is at least 10 cm, and preferably 12-15. The height of the ceilings will noticeably decrease; it is for this reason that it is not recommended to install suspended structures in typical panel and brick housing with a ceiling height of 2 m 50 cm.

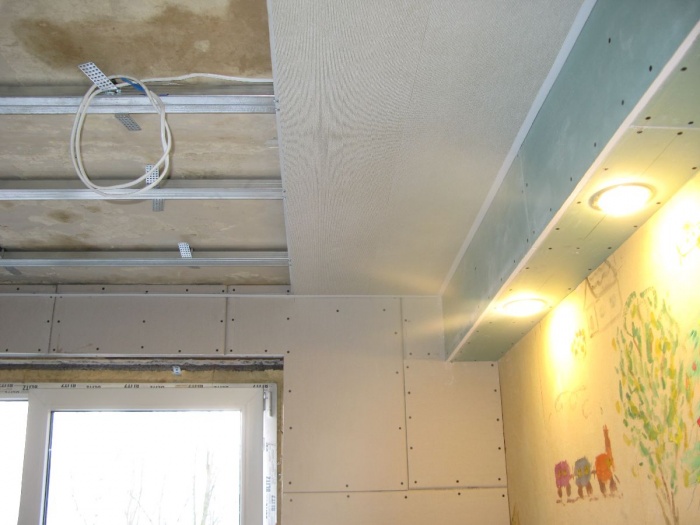
Finished frame from a guide and ceiling profile in the bathroom
Installation of a profile box
Properly installed profile frame– guarantee of long service life and reliability of the suspended structure. The procedure for installing a box made of a metal profile (the lathing made of wooden slats is attached according to the same principle):
- We drill holes for dowels in the walls and fix the guide profile.
- We connect the parts together with special fasteners - “bugs”.
- We attach the suspensions to the ceiling - in a straight line, at intervals of 50-55 cm.
- We mount a ceiling profile to the suspensions, onto which the plastic panels will be attached.
If necessary, if the room is more than 4 meters long, we extend the profile in sections using longitudinal connectors or simply fasten it with self-tapping screws.

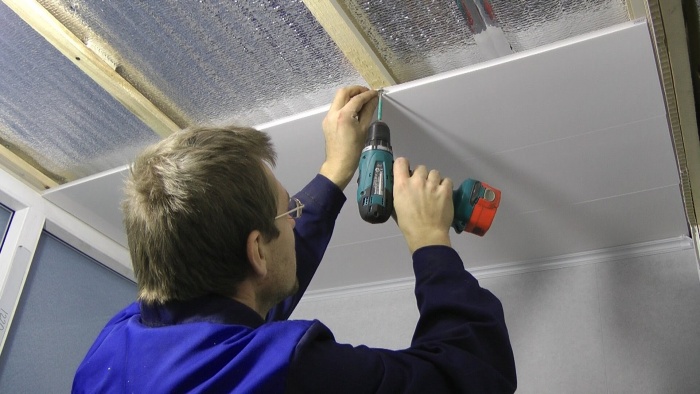
Fastening plastic panels with pre-installed spotlights
Installation of plastic panels
The final stage which should be done slowly and very carefully. We free each part from the film and, if necessary, cut off the excess part using a grinder. You can work with a hacksaw or jigsaw, but in this case the process will be delayed. The length of each panel should be 4-5 mm shorter than the length of the room. We sand the edges and fasten them to the profile with self-tapping screws.
From the following panels, folded end to end, we assemble a smooth canvas. For glossy parts, the seams will be barely noticeable; for elements with a pattern, they will appear more clearly. There will be small grooves between the thin slats. We cut off the last part according to the width of the remaining space.

Standard scheme laying plastic panels
We cut out the holes for the lamps with a knife; the wiring to them was laid during the installation of the frame. Spotlights have different size and design, so it will not be difficult to choose models that are suitable specifically for your type of ceiling. We cover the edges of the plastic sheet with a frieze or corner.
The result of your efforts will be a beautifully designed suspended structure, masking all the shortcomings of the old ceiling.
Video selection: installation of a ceiling made of plastic panels