How to make a folding or retractable ladder to the attic with your own hands
The space between the ceiling and the roof in private houses is occupied by the attic. It is used by the owners for storage, provides an opportunity to inspect and repair the inside of the roofing pie. A folding ladder installed to get to the attic can be made by hand. Portable structures such as ladders are not always convenient and reliable. The stationary version, which is easily extended if necessary, and most of the time is in the folded state, will be the best model for a small space.
- Place of installation:
- outdoor - mounted outside the building, the disadvantage is the need to leave the premises in any weather;
- internal - located in the house.
- By design:
- monolithic - screw or marching;
- portable - attached, ladders;
- folding - sliding, folding, scissor, folding.
Monolithic structures provide complete safety of lifting to the attic. But they take up valuable space in the room. Portable models are convenient as a temporary option, but they are not suitable for permanent use due to the increased risk of injury. The best choice is a folding ladder, which takes up a minimum of space. This design is often attached to the hatch, it has a compact size, and making it yourself will save money.
Features of folding structures
Transforming models have several options, from which you can choose the right one for your home. When designing a product, one should take into account not only the dimensions, but also the design features. The minimum number of sections of a folding ladder should be 3 pieces. A 2-piece model will require a significant increase in the size of the attic hatch. The folding ladder is lowered manually, using a weight for weighting, or automatically, using an electric drive.
Varieties of folding attic stairs
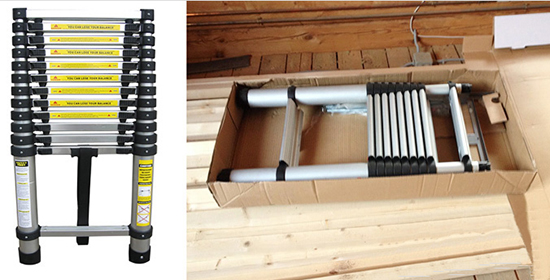
telescopic model consists of parts that slide into each other. The material for it is aluminum, which is lightweight, durable, and resistant to corrosion. It is compact, functional, will last a long time, but it is difficult to make such a product with your own hands. A variant of mounting on a hatch of a finished structure is possible.
scissor model made from metal parts. It develops according to the principle of an accordion. A solid construction with comfortable steps has one drawback - over time, a creak appears at the joints. Preventing the problem will allow timely lubrication of the attachment points.
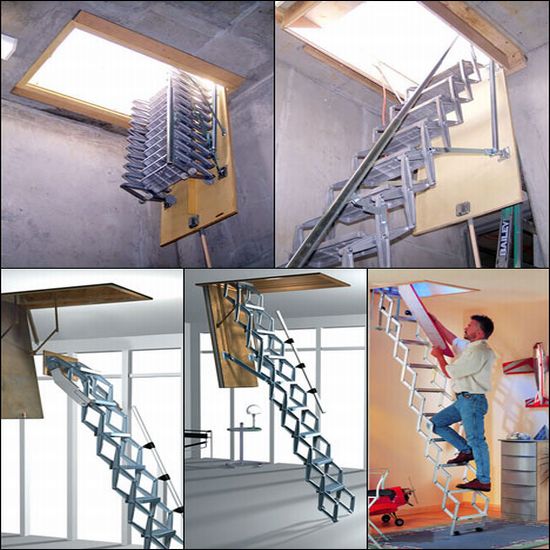
The scissor ladder is reliable and has a beautiful appearance
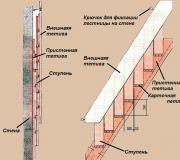
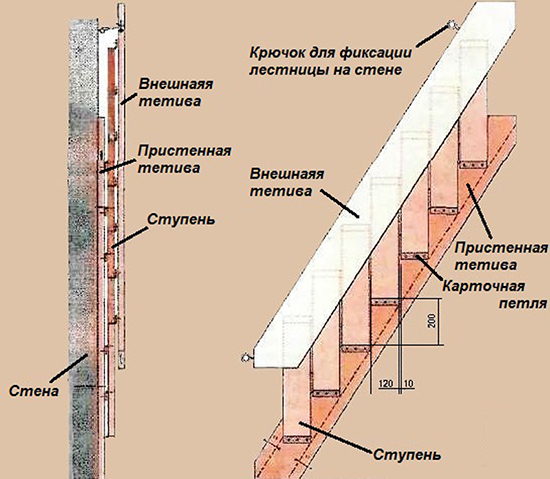
Folding ladder will not take up a single extra centimeter. It is difficult to design and install. Its steps are attached to the bowstring with card loops, and in the folded position, the folding model is fixed on the wall.
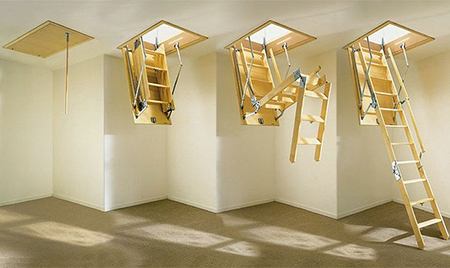
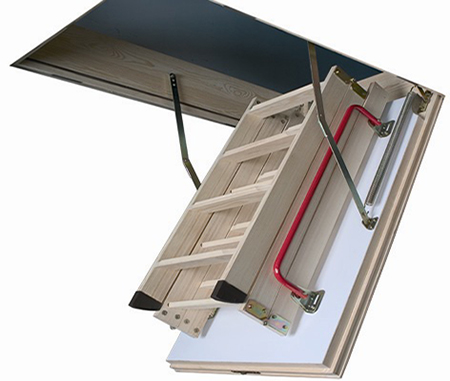
Retractable ladder to the attic consists of several sections, the upper part is firmly attached to the hatch, it is equal to the size of the cover. The remaining sections are connected by special fittings and hinges. When unfolded, they form an even flight of stairs. It is easy to bring the product into working position, thanks to its mobility. The difference between the telescopic and sliding models is in the way the sections slide. In the first case, they are placed one inside the other, and in the second, they move with the help of rollers from the outside along the guides.
The attic climb structure should be installed in a place where it will not interfere, usually a hall or corridor. Sliding and folding stairs are adjusted to standard dimensions, which are designed with safety in mind:
- the angle of inclination of the structure is 65-75 degrees, a larger value will make use unsafe, and a smaller one will require a lot of space for placement;
- the optimal width of the stairs is 65 cm;
- the recommended number of steps is 13-15 pieces;
- the length of the structure should be about 3.5 m, with an increase, it loses rigidity and strength, the processes of lowering and lifting become more complicated;
- convenient distance between the steps for movement - 19.3 cm;
- a ladder made by one's own hands is calculated for a load of up to 150 kg;
- the safe thickness of the steps is 1.8-2.2 cm;
- horizontal crossbars are mounted parallel to the floor, for safety they are supplemented with anti-slip pads.
The attic hatch also has standard dimensions, its parameters are 120x70cm, they provide unhindered passage and minimal heat loss.
Materials for manufacturing
The materials from which the stairs are made with their own hands are subject to requirements for strength and weight. The design for frequent use due to rapid wear is not made of wood. Metal is the best option for such a product, it will ensure safe and durable operation.
To reduce the total weight of the ladder attached to the hatch, the combination of materials will allow. Steps are made from lighter wood. Bars of hard wood with a thickness of about 2 cm are used. Metal or plastic fittings are installed to connect the products, the latter reduces the friction of the parts. In the folded position, the structure is attached to the hatch, which eliminates spontaneous loss.
Manufacturing technology of a simple folding design
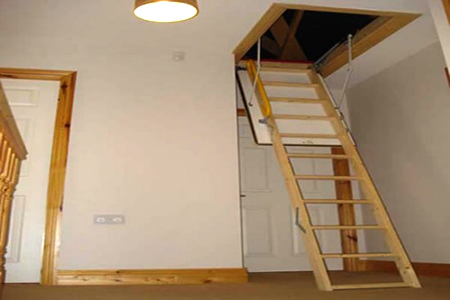
If the hatch is located near the edge of the ceiling, then for lifting you can install a folding ladder of two sections with your own hands, which will rest on the wall. The basis for the design can be a finished product, it will take about two hours to transform it.

A simple folding ladder that is easy to do with your own hands
Tools for work:
- screwdriver;
- roulette;
- hacksaw.
Materials:
- wooden blocks measuring 2x3 cm;
- card loops;
- self-tapping screws;
- hook and loop.
- Take two bars equal to the width of the stairs. One is hinged to the upper edge, and the second is firmly fixed at the bottom, ensuring the stability of the unfolded structure.
- The ladder used is divided into two parts - one of them is 2/3 of the length, and the second is 1/3. A neat cut of the bowstring is performed along the intended line.
- Metal hinges are screwed to connect the sections. Pay attention to how the fittings are located. It should ensure that the lower part of the ladder folds under the upper one.
- A bar is fixed on the wall under the attic opening, to which the folding structure is attached.
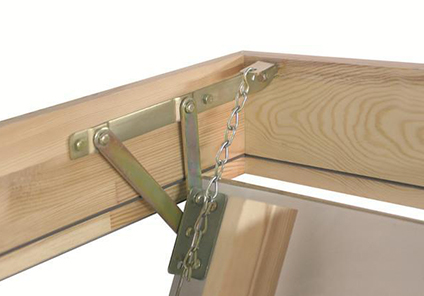
- For reliable fixation in the folded position, a loop is screwed in near the sawing point, and a hook is installed on the wall in the appropriate place.
The advantage of such a product is the ease of doing it yourself, and the disadvantage is an open location.
Manufacture of the hatch
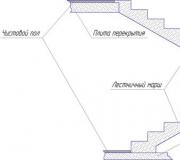
If a folding ladder is placed on the cover of the opening, it is not visible from the room and will not interfere with the interior. Simple drawings will help determine the dimensions of the hatch and the product. Having measured the sides of the passage to the attic, they begin to assemble the hatch with their own hands.
You need to prepare the following materials:
- bars with a section of 50x50m;
- plywood sheet 10 mm;
- PVA glue;
- fasteners;
- door latch with handle.
Two parts equal to the length of the opening and two similar to its width (120x70 cm) are cut off from the bar. Each edge of the bar is sawn to half the width. These sections are smeared with PVA glue and glued together into a rectangle. To hold the exact diagonal, right-angled plywood triangles, called kerchiefs, are attached to the frame. After the glue dries, the bars are additionally connected with self-tapping screws, and the scarves are removed. A prepared plywood sheet is screwed to the workpiece. The design will fit to the opening. To keep the hatch in the closed position, a door latch is cut into it. The fittings have a convenient handle with which the hatch will open.
Assembling the opening mechanism
Making a hatch opening mechanism with your own hands is a rather complicated process to make the task easier, it is enough to purchase a finished product in a store.
Those who decide to assemble the entire structure on their own must prepare a metal corner, two strips and a sheet of metal.
In order not to be mistaken with the size of the hinges, they are initially cut out of cardboard. After fitting, proceed to work with metal.
- Places for fastening according to the template are marked on the metal strip.
- Holes are drilled for a bolt with a diameter of 10.
- Details are assembled and baited with bolts. The selected angle of fixation of the stairs is measured with a small one, and then the parts are moved apart by the desired value.
- On the metal, a section is indicated, which, when lowered, is blocked by a corner. This area is cut off. Removing the excess, the details are processed to give an aesthetic appearance.
- The second mechanism should be identical to the one already made. For an exact match of the holes, the parts are connected with a clamp and drilled.
- Having inserted bolts into the second mechanism, it is equalized according to the model, cutting off excess metal.
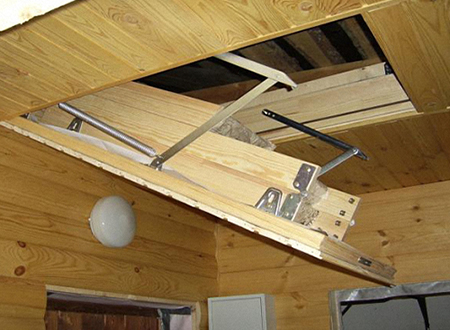
- Ready-made opening mechanisms are installed by hand on the hatch . They will create an emphasis, fixing the folding structure at the right angle.
To ensure uniform distribution of the load will allow the installation of a second hinge mechanism that supports the hatch in the middle. You will need: two metal strips 2 cm wide, a corner and a piece of metal. The corner serves as a support for the mechanism when opening. A piece of metal is welded to one part, against which the second part rests. When lowering the hatch, the hinge will move apart, taking part of the weight of the structure.
Wooden staircase, do it yourself
The easiest way is to make a wooden structure, the material will be a 2.5x10 cm board. The product consists of three sections, the first two are equal in length to the hatch, and the size of the last is the distance remaining to the floor.
The length of the sections is marked on two boards used to make the bowstring. The marks should mirror each other, therefore, before work, the workpieces are connected with adhesive tape. Holes for the hinges are drilled in the designated places, after which the boards are sawn. To give attractiveness, all wooden parts are sanded and covered with two layers of varnish. Do-it-yourself metal hinges are coated with a primer and paint before installation.
Holes 5 mm deep are cut out under the fasteners of the steps on the inside of the bowstring. PVA glue is applied to them, and then fixed with self-tapping screws. The next step is to connect the three sections into a common structure using hinges. After checking the possibility of bending the parts, the ladder is fixed to the hatch. The upper section of the product is fixed on it with anchors. Folding ladder to the attic is ready.
In contact with