How to make a garden swing with your own hands: useful tips, step-by-step instructions and the subtleties of work. How to make a garden swing out of wood? How to assemble a summer swing
on 06.05.2017 1,878 Views
A cushion chair for such a swing can be easily sewn from an old bedspread, however, it will not be as durable as, for example, wooden, and besides, it is better to protect it from moisture.
We go to the country to rest and work. We dream of lying in a hammock, drinking tea in the fresh air, but this is not enough for a child. Its energy requires intelligent use, and it is in our power to create the right conditions for this. A simple and practical way is to buy or build a swing with your own hands. So let's talk about what swings are, from what and how to build them.
- Material
- Building a wooden swing
- Building together
- two pillars
- rope (about 6 m)
- crossbar
- ring-shaped pendants (hooks are possible)
- fasteners
- We carefully clean the place under the swing from debris and level the site.
- We dig two holes for poles to a depth of 90-100 cm.
- Before installing the pillars in the pits, we will process the lower part, about 50 cm, with tar. This is how we keep them from rotting.
- We fasten the crossbar to the posts. It is desirable that the diameter of the crossbar coincide with the diameter of the pillars.
- We mount metal parts using special fasteners. They can be purchased at the store.
- We process sharp corners with a grinder.
- We fasten ropes or chains to the crossbar, checking their reliability with their own weight.
- We tie the ends of the ropes to the seat, having previously drilled holes in it.

A seat woven from a wicker with a back will provide children with a comfortable rest on a swing
Children's outdoor swing: types
When choosing a children's swing for outdoor summer cottages, parents are required to check them for absolute safety for the child. Consider what manufacturers offer us for our treasures.

For the safety of the swing seat, it is necessary to provide a horizontal bar in front of the chair, which will provide protection for your child
First of all, the swing is divided according to the material of manufacture. They can be wood, metal or plastic.
Children's wooden swing for giving environmentally friendly, durable, easy to assemble and beautiful appearance. Impregnation of wood with a special composition increases the service life of products.

An old skateboard is also suitable as a swing seat, because its board is very durable and hardy.

You will have to tinker with such a wooden swing-airplane, but the result is worth it, your child will feel like a real pilot
metal swings are among the most reliable and durable models. They can be forged, collapsible, welded. They weigh a lot, but this is justified by their strength and stability of the installation.

Hanging swing, the seat of which is made of metal rings, will become a real decoration of your yard

For a children's swing, it is possible to use any options as a seat, for example, part of a ski lift
Plastic designed for the little ones. Light and bright, they are great for babies under the age of 5, but they are afraid of winter frosts and fade in the sun.

For babies, a fabric seat with a perimeter enclosing structure will be comfortable and safe, where the child will feel confident
Swings are also distinguished by the type of construction: suspended and frame.

A frame-type swing in the form of a red wooden sofa is a bright accent for your site
Frame, of course, it is preferable for children, because they are highly stable, they can be freely moved to different parts of the site, they are durable and safe enough to use.

A swing that is simple in shape can be made special - a little imagination and boring seats have turned into bright little animals that will be much more interesting for your children to play with.
Suspended Models are simple, do not require special skills to assemble. To equip them, you need a carrier beam, a strong rope and a board for the seat. It is desirable that she had a back.

By choosing bright colors for the swing, you can even more cheer up the children.

Car tires can be great material for children's swings if you apply fun coloring to them.
Swing chairs Designed for kids up to 3 years old. They are usually low, with a soft back and a seat in the form of a deck chair.

Chaise lounge with soft seats - a safe swing option for a small child
All these models can be purchased in stores, but if you decide not to spend money and build a children's swing for a summer residence with your own hands, we will help you.
Material
Of the materials for structures with supports, there are two options: metal and wood. Unfortunately, a children's metal swing for a summer residence will require special skills from you. If you are not a blacksmith or a welder, building a metal frame will be problematic. Yes, and pipes for supports will also have to be looked for.

To make such a swing, you will need quite a bit: a wooden chair and chains - and a unique decor for your yard is ready.

Children's swings are not particularly demanding on design. The main thing for children is movement, and a rope suspended from a thick tree branch with a board for sitting can also provide it.
The best solution that any parent can do is to build a wooden swing.
Building a wooden swing
The simplest design is a children's hanging swing for giving without a frame. It's great if you have a large tree with a low thick bough on or near the site. They threw two ropes over it, built a seat from improvised means - and the swing is ready. As a seat, you can use tires traditionally loved by summer residents, a high chair, an abandoned skateboard, a piece of board, an old ice rink. In general, everything that, in your opinion, is suitable for a comfortable ride for a child.

The easiest way to organize a swing is to use a tree branch as a base

In such a round swing on a soft pillow, tied to the base, so as not to “fly away”, it will be pleasant to spend time not only for children, but also for adults
For the construction of a frame swing, we first determine the place. It should be close to the house, but away from the fence and trees. Then we need lumber and tools. We choose conifers, but others are also possible, the main thing is that the tree is dry, durable, without defects. We carry out preliminary processing of wooden parts: we clean, grind, process with a special compound to increase moisture resistance. For the swing we need:

The beautiful and durable design of the swing chair will not leave indifferent not only children, but also adults

For the stability of the frame, the side supports can be made in the shape of the letter "L"
Advice! Please note that nails are not suitable for attaching swing parts, it is better to take bolts.

With your own hands you can build such a hanging swing-bed, where your children will play
From the tool we take a shovel, hammer, drill, tape measure, planer, grinder, paint and brushes. Well, the springboard for work is ready. Let's move on to step-by-step design.

To create such a wonderful swing, you only need an old chair, a rope and bright paint.

U-shaped children's outdoor swings with green spaces at the uprights provide shade and aesthetics for this simple design.
We got the letter "P".
Advice!For kids, it is better to attach seatbnot two ropes, but four. To do this, take two lengths for each rope, fold in half, and thread the ends into the seat.
If this option bothers you, you can build a more stable structure by taking four pillars for the frame and placing them in the form of a block letter "L". The sequence of work is almost the same, only you will need to dig four holes, cut off the tops of the pillars at an angle, connect them with metal parts. Between the pillars, below, at a height of about 50 cm, stiffeners should be nailed on both sides of the swing. This design creates opportunities for creating a real children's summer cottage. By increasing the distance between the posts, you can nail a long bar and add a rope or climbing ladder to the swing.

Children's wooden swings for summer cottages are environmentally friendly, durable and easy to assemble

Swing-bed for rest and entertainment of a child, made of a wooden pallet
Building together
Now you know how to make a children's swing in a wooden cottage on your own.

Original children's bright swing, the seat of which is made of fabric with rubber bands

A funny swing in the form of a deer will bring joy to every child
If the first experience does not disappoint you, do not stop there. The child is growing, or maybe you are planning the birth of a second baby, and swings alone will not be enough. Build children's swings and slides in the country together with neighbors in the area or with friends. Maybe among them there will be metal craftsmen, and then you will get an eternal swing for children of any age.

Multi-colored swing baskets will not only bring joy to children, but also noticeably transform your yard


Holidays with children can be made even more enjoyable by providing interesting elements and facilities.
This is a barbecue area, and a playground or a whole complex.
In this article, we will consider the manufacture and assembly of wooden swings for summer cottages, drawings and photos of various construction options.
Blueprints
There are a lot of advantages in self-manufacturing of the structure:
- the choice of design convenient and functional according to your own taste and desire;
- a product made of natural wood is environmentally friendly and durable (with appropriate processing);
- cost savings (buying a finished product is always higher, moreover, there is not always a guarantee of quality);
- the tree will harmoniously fit into the environment, and the canopy over the structure will allow you to enjoy measured swaying and fresh air without the risk of getting burned under the scorching fire.
Did you know?In Ecuador, in the city of Baños, there is a swing on which brave tourists can soar over a precipice more than 2000 m deep and enjoy the view of the Tungurahua volcano.
We adjust the board to the desired dimensions, place them on a straight surface (on the floor) in the position in which they will be assembled, measure the width of the base and the angle at the top of the future rack.  In the upper part, two racks will be fastened together by a transverse beam. Therefore, the angle is measured, taking into account this detail, the easiest way to take measurements is to cut off excess wood by attaching a short bar of the same width to the parts of the supports folded together, draw a marking line with a pencil.
  Cut off excess parts with a jigsaw, assemble all the parts together. Fix with a clamp for complete immobility and make sure that the bottom of the rack is not skewed, a level will come in handy here, remove excess.
  Make the second rack in the same way.
A board of the desired size can be made rounded at the edges protruding from the fastener for aesthetics. 
 Next, we assemble the support: before screwing in bolts or screws, make sure that all corners of the structure correspond to the calculations.
  The rack is not ready yet: it will need additional side rails for reliability. We try on a beam of suitable length to the bottom of the rack, the distance from the floor corresponds to the level of the future hanging bench.
  Mark the cut lines with a pencil, making sure that there is no skew with a level. Install the prepared cross member in the right place, fix it with a clamp and fasten it with bolts.
  In the same way, fabricate and install the crossbars in the upper corner of the rack about 20 cm below the attachment point. We add fasteners in the upper part for final fixation - the base of the swing is ready.
Important! Remember, all fasteners must be galvanized: this will protect the wood from cracks and extend the life of the wooden product.
Bench
Let's go to the bench. In order not to miss anything when making a swing to the country house with your own hands, refer to the diagrams and drawings.  Make frame parts for the bench of the desired size, turn and sand them, mark and carve grooves in the right places. Don't forget about armrests, they can be made curly.
  Then the frame must be assembled and fixed with a clamp (one tool is indispensable here) in order to more accurately calculate the width and length of the back and seat parts. Start making details of a bench for a wooden swing, it is not difficult to make them with your own hands, the main thing is to take measurements accurately.
Two long parts with a groove turned along (for lamellas) and spikes at the ends. A thin planochka, narrowed on one side (under the width of the groove) and equal in width to two bases, will be needed during assembly to close the groove between the lamellae. Cut the plank into pieces equal to the width of the gap between the lamellas.  Further make lamellas, depending on the length of your bench, there will be from 10 to 12 pieces on the back, located perpendicular to the bases, do not forget to carve spikes at both ends for the grooves made in the bases.
  For the seat, make the slats longer by the length of the bench, they will be parallel to the longer bases of the seat. The number of slats also corresponds to the width of the seat.
  All parts are ready, start assembling the bench.
Assemble the backrest: install one of the bases with the groove up, mark the location of the lamellas with a pencil. Lubricate the groove and install all the slats in turn, and then the chops that close the gaps between them.  Also fix the upper base with glue and fix the assembled back with clamps.
  Next, assemble by smearing all the grooves with glue, and fasten the frame for the bench with bolts. Install the prepared back on the frame, coat the spikes included in the grooves of the two side frame guides with glue.
  Grind, sand, fix the seat slats with glue and press with a clamp.
  Do-it-yourself wooden swing is almost ready, it remains to install the suspension and canopy.
How much delight and happy squeal is caused by one kind of children's swing in kids. In an adult, memories of swings evoke nostalgia, tender feelings and a surge of peace. If there are still no children's swings in the suburban summer cottage, this must be urgently corrected. Of course, by buying a factory-made swing, you will get rid of unnecessary trouble, but it will not be difficult to make them yourself, and self-esteem and authority in the eyes of your daughter or son will increase significantly. Especially if you have the necessary tools, hardworking hands and a bit of imagination with ingenuity at your disposal.
A variety of models of children's swings
It goes without saying that at the dacha there is enough work in the garden, and in the construction of outbuildings, and with the garden. Also bother with swings, you might think. Be that as it may, with the construction of a swing, you can be sure that your five-year-old baby will sit quietly in one place for some time and you won’t have to look for him in green places. Children under five years of age should not be left on a swing without adult supervision. Although often this role can be performed by older children (yours or neighbors). Especially girls who love to play "daughters-mothers" and responsibly treat the "motherly" duties assigned to them.
Having decided on the construction of an attraction for your child, you need to decide on the swing model. It can be:
- suspended single or double swings with seats in the form of a bench, a chair, an airplane and everything that your violent fantasy tells you;
Seats for hanging swings can be designed as fantasy tells
- swing-balancer (if you have more than one child in the family or many neighborhood children who will keep your baby company);
Making a swing-balancer with your own hands is not difficult
- swing chairs for the smallest children, which serve as temporary cradles in the fresh country air;
In a sun lounger in the fresh air, the baby will always have a good night's sleep
- swing-boats, so quiveringly winding memories of a distant and carefree childhood;
A boat swing can be made using the welding method
- roundabouts with seats, without seats, with horses and other wooden animals.
Bright swing-carousels will become the central attraction of the suburban area
Advantages and disadvantages of a children's swing
Before you get started, you need to weigh the pros and cons. What are the advantages and disadvantages of one or another type of children's swing. Among the wide variety of types and models, we need to choose the option that is convenient and safe, and most importantly, easy to do with our own hands. Using the table, it is easy to choose a variant of a children's swing for a summer residence, which you can make yourself on a garden plot.
Table: advantages and disadvantages of a children's swing for a summer cottage
Preparatory stage: dimensions, drawings, calculations
If the issue with the choice of a swing model is resolved, it's time to start drawing, selecting tools and materials from which it is planned to build a miracle of landscape design for your child to the envy of neighbors. Each owner assumes what material is more appropriate to make a swing. Profile metal pipes or wooden beams (even trimmings of thick trunks of old trees) will come as a basis.
If the pendulum of your doubts has outweighed in favor of a wooden building, then you need to have wooden blanks on the farm for the base of a bar or trunk, as well as woodworking tools:
- circular, drill and jigsaw;
- wood screws, a screwdriver, bolts with nuts and washers of the right size;
- hammers, pliers, tape measure;
- chains, cable or strong rope for fixing the seat;
- special means for protecting wood from moisture and multi-colored paints to please the baby;
- shovel, sand and cement, if there is a need for concreting pits for supports.
And if you are a happy owner of a welding machine, and electric welding is a familiar thing for you, then if you have iron material, it is quite possible to weld the structure yourself. Such swings are the strongest, most durable and reliable. Both children and adults can swing on them.
Swing-balancer and the simplest hanging swing
Both types of swings can be easily built even by a novice carpenter. Drawings and step-by-step instructions will be mastered by every man who understands all the responsibility for the well-being and mood of his baby.
The balancer is more suitable for older children. Playing in pairs adapts the child to society, instills the skills of sociability and cooperation. The irresponsible actions of one child can lead to injury to another.
Of all types of swings, the balancer is the least expensive in terms of materials, time and labor invested. When constructing a swing, it is necessary to take into account the age of the children and their weight.
Correct calculations will help to avoid mistakes in the manufacture of swings
In hanging swings, the racks bear the main load, and the seat can vary from your fantasies, skills and additional finishing materials.
When making a swing, adhere to the recommended dimensions.
Calculation of the necessary materials for the production of hanging swings and balancers
The swing-balancer is constructed both with a wooden base and with an iron one. At the same time, the seats themselves can even be made of plastic. Their types and forms can vary from mice to horses. It would be original to make seats for the animal in which the baby was born: a tiger cub, a kitten, a monkey, a dog.
Since working with iron and a welding machine requires certain skills, it’s easier to make a swing out of wood. The most suitable wood is oak, birch or pine. Wooden structures do not require concreting and are relatively stable.
The same materials are used in the construction of hanging swings. The tree is cut based on the dimensions in the drawings using tools for woodworking (or for metal, if you decide to work with iron).
Do-it-yourself swing-balancer, step by step instructions
If such work is a novelty for you, then for the first time you need to take a tree as the basis of the balancer. It is easy to process, good friends with varnish and paints. True, they will have to be applied in at least two layers. So, we will need:
- two beams of hardwood with a size of 40 * 100 * 2500 mm;
- two racks 40*140*600 mm;
- two pairs of transverse and side supports (40 * 140 * 900 mm and 40 * 140 * 600 mm, respectively);
- two supports for handles 40*140*300;
- two wooden rods for handles 600 mm and 30 mm in diameter;
- two seats 20*200*400;
- axle bolt with nuts and washers:
- screws or screws.
Handles can still be made from scraps of a metal-plastic water pipe: stylish, beautiful and convenient for small children's fingers. The shape of the seats varies from rectangular to oval, and look like a camomile or a cloud. Alternatively, they can be sheathed with foam rubber with leatherette or other dense material and made removable. Such seats will be perfectly preserved in the garage or change house until the next summer season.
We begin the step-by-step construction of the swing:
- We attach the side ones to the transverse supports in the same way.
Fasten the cross and side supports together
- Between the longitudinal beams we install supports for the handles, fix with self-tapping screws. Drill a hole in the center for the pivot.
Using self-tapping screws, connect the main beams to the supports for the handles
- We drill holes in the handle supports, install and fix the handles.
- We fix the seats, assemble all the components into a single structure and install on a flat surface.
Assemble the structure and place on a flat surface
Using screws or self-tapping screws, we connect the transverse supports to the beams. The design should be stable and solid, so do not save on connections.
Connect racks and supports
Processing sharp corners, cleaning from splinters, applying stain, acrylic varnish or paint, and you can give the swing to the playful hands of the smallest summer residents.
A little fiction and children's laughter will make you happy
All parts of the structure must be carefully processed from knots and thorns, and self-tapping screws are recessed into the body of the tree, puttied and painted over.
Some features and issues of care
The place for installing the swing must be chosen with the condition that the surface is as flat as possible. They will look better at their summer cottage if they are decorated in bright colorful colors. You only need to regularly check the reliability of the fasteners and touch up the weathered areas. And your work will be rewarded with the joy and happiness of happy kids.
Never put a child on a defective swing. Safety in a particular case has weight. Even if it is a small weight of your baby.
Video: do-it-yourself swing-balancer
Hanging swing: easy and simple
To make a hanging swing in a summer cottage, you will need a high-quality inexpensive wooden beam (you can use the one that is on the farm or buy it at a building materials store). Birch, spruce, pine have excellent quality characteristics for this venture. You also need a standard set of tools for working with wood: a circular saw, electric jigsaw, grinder, drill, screwdriver and other necessary tools for marking and processing wooden surfaces.
Additional materials needed:
- wood screws;
- bolts for fastening the base of the swing;
- eye bolts for attaching the swing seat to chains or strong ropes;
- fastening carabiners;
- paint, stain, varnish to protect wooden surfaces from moisture and the sun.
Then we decide on the shape of the basis for the swing. It can be a U-shaped frame, A-shaped or L-shaped.
Choose the right swing base
If the choice is made in favor of a U-shaped base, the bases of the vertical racks for greater safety must not only be dug to a depth of up to 70-80 cm, but also concreted.
We prepare all the necessary materials and get to work:
- Using a drill or a shovel, we prepare pits for pillars, having previously treated the base with an antifungal coating.
Pits for the base are more convenient to do with a hand drill
- We strengthen the base with sand, screenings or crushed stone and concrete if necessary.
Strengthen the base of the swing with concrete
- We connect the crossbar to the support posts, to which chains, cables or ropes with a seat will be attached. For reliability, you can use special metal fasteners.
Use metal fasteners for L-shaped and A-shaped bases
- With the help of anchor or eyebolts, we fix the chains on the horizontal crossbar, to which the seat of the desired shape will subsequently be connected.
Fasten the chains to the horizontal beam using anchor bolts with nuts and washers of the appropriate diameter.
When attaching the seats with anchor bolts, be sure to use additional locknuts. This will increase the security of the fasteners and enhance the reliability of fixation.
Variety of seat options for hanging swings
Trips to the dacha provide not only fruitful work, but also a thorough rest. And what could be more beautiful than relaxing in the shade on a do-it-yourself swing, also with a glass of cool kvass. Often, hanging swings are made in such a way that not only one child, but also the rest of the family can swing at the same time. For this option, a swing with a bench seat is suitable.
On a swing with a seat-sofa, the baby will be able to comfortably sit with mom and dad
You can choose a great variety of seating options for this design: an old skateboard, a conveyor belt, car tires and a variety of chairs of various designs.
It will not be difficult for a novice master to make a board seat for a hanging swing
A simple board can be fixed on the ropes using ordinary knots.
An old board from a skateboard is suitable for a summer vacation
This option of fastening the board from the skateboard is designed for a child with a small weight. For greater safety, you can put old pillows under the swing.
In 4 places, fix the tire with eyebolts to ropes or chains
Swings made from old tires were held in high esteem by our parents and were very popular along with the bungee.
One kind of swing with an original seat will delight the baby
There are countless options for hanging swing seats, but the main thing to keep in mind is the safety of your kids. All fasteners must be reliable and of high quality.
To fasten the main beams of the swing, use not nails, but bolts with nuts and washers.
Video: garden swing in 1 day
Finishing, lubrication and other subtleties
Whichever version of the swing you choose, each of them needs care and attention. If you prefer a swing made of natural wood, make sure that the material is well treated with a special antifungal antiseptic and impregnated with water-repellent agents. The wooden parts of the swing must be varnished or painted for outdoor use: this will protect the wood and give it the desired shade. The paint can be matched to the color of the gazebo, porch or fences. And you can choose a color and paint with your child. If he is mature enough and independent, he will be happy to keep you company. The main thing is that you both then miss from your mother.
Swings using metal structures also need to be painted and treated with an anti-corrosion coating. In addition, all movable joints of the swing must be treated with a thick lubricant. Suitable litol, nigrol, cyatim or any other. It is enough to lubricate the swing once a year before the opening of the summer season.
If you plan to build a swing without a canopy, then in late autumn you need to protect them with an awning. This will protect against snow and rain and extend their lifespan.
If you decide to build a swing for your child with your own hands, we hope that the first experience will not disappoint you. Considering that over time the baby will grow up, it may be necessary to start building a swing with a strong iron frame. Try, learn, experiment with children, invent. And remember that a negative experience is also an experience. And children's cheerful and gambling laughter will incite you to new heights of country-swinging skills.
A favorite detail is a garden swing made of wood. They are equally liked by adults and children. It's nice to stretch out on soft pillows in the shade of trees, relax, dream under the measured swaying. And for children, this is the main entertainment.
The classic design of a wooden garden swing using a chain
Manufacturers present a large selection of finished models from different materials. They differ:

Conditionally share a swing for adults and children. Large sofa-type models designed for several people are the most popular type. They additionally complete with an awning, soft pillows.
Suspended structures with a spring attract attention. The seat is made in the form of a basket-cocoon from a vine, rattan. They are hung from the thick branches of trees.
 Design and construction of a wicker garden swing in the form of a cocoon
 Cabinet sofas, attached on ropes to tree supports, beams, will add romantic appeal to a corner of the garden.
For entertainment, outdoor activities, Russian swings for several people are suitable. Practical and convenient for relaxation, rest designs with mosquito nets, a tent.
Children are smaller in size, according to the growth of the child. Additionally, they install safety elements, side supports.
 Classic Russian swing assembled from logs using a chain
 Main types:
- balancers;
- suspended;
- pendulum;
- carousel.
You can choose a model according to your wishes, idea of relaxation, landscape style.
How to make a wooden swing with your own hands
Swings are most often made from wood. It has many advantages:

Such a swing is easy to make, even with minimal carpentry skills. Remember that a tree needs protection from moisture, temperature changes, snow, sun, pests. Therefore, all structural elements are opened with moisture-resistant varnish.
Material selection and tools
They begin work by auditing the existing material, selecting wooden blanks. Choose a model, draw its sketch.
The second option is easier. It is necessary to select a product, study the drawing and calculations. Based on them, purchase the necessary material for blanks.
Prepare the tool. For work you will need:
 A drawing with the optimal size of a swing for installation in a summer cottage
 - for measurements, marking - tape measure, construction pencil;
- jigsaw, they cut out individual parts;
- hacksaw, circular saw (cut the main elements);
- building corner, level;
- planer for woodworking;
- clamps tighten individual elements;
- screwdriver, hammer;
- tighten the mount with wrenches;
- electric drill, screwdriver.
 Ready-made drawing of a country penitent sofa under an awning
 Fasteners are also needed: self-tapping screws, screws, fasteners for rafters (connect complex nodes), eyebolts with washers. Clean, grind wooden surfaces with sandpaper, or with a nozzle on a drill. The swing is painted, opened with a protective varnish.
Scheme of a garden swing
 Scheme of the arrangement of structural elements of the swing prepared for assembly
 A popular model among summer residents, gardeners is a swing sofa. They are mounted on two types of racks, "A" and "P" shaped. The material for them is timber, logs.
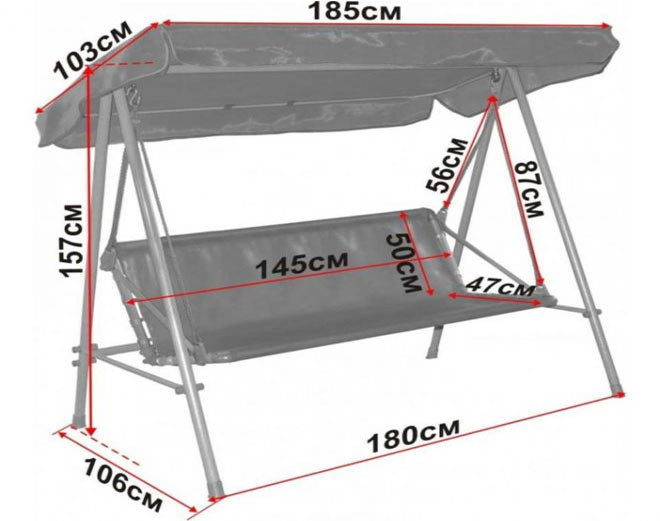
With a sofa seat length of 2 m (per 200 kg), the recommended section of the racks is at least 100 x 100 mm, for portable ones - better than 100 x 150; 200 mm.
You must first select a location. A straight platform will ensure the stability of the structure. The optimal location is in the shade behind the house. Then a design diagram is drawn.
 The location of the garden rocking chair in the shade of a tree will allow you to relax on a hot afternoon.
 It includes:
 The design option for a resting place in the form of a sofa is a great place to relax
 Fasteners: self-tapping screws, screws, eye nuts with bolts (to secure the chain), metal corners, carabiner for attaching the swing. The sofa is hung on a chain.
Step-by-step instruction
 A do-it-yourself swing made of timber is a simple and reliable country furniture
 To make a garden swing with your own hands from wood, you need to follow the sequence and carpentry rules. One of them is the ratio of the width of the seat of the bench and the step of the uprights, it should be 50 cm wider. This proportion will provide stability.
Step-by-step instruction:
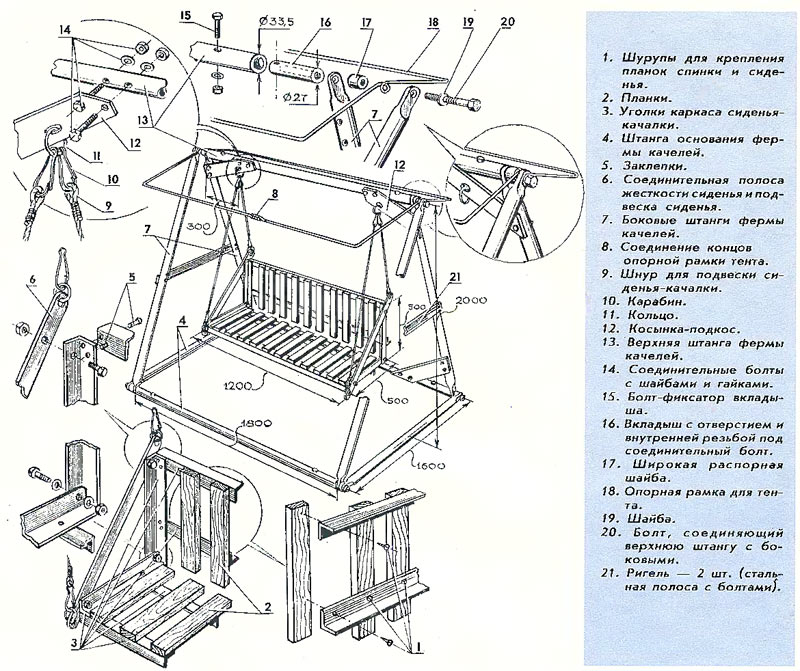
- Rack manufacturing. Cut blanks to desired dimensions. In the shape of the letter "A" connect the main standing supports. They must be rigidly connected, so it is better to use furniture bolts with washers.
 The process of sawing a log into bars for the manufacture of pillar supports
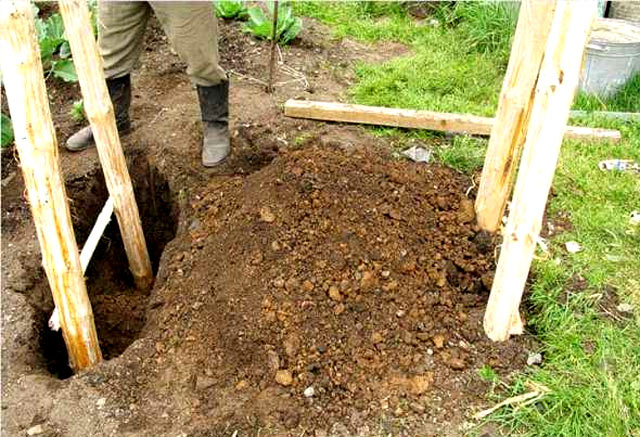
 - Mark, fasten the side rails. If it is a stationary swing, then they must be buried in the ground to a depth of 50 to 70 cm. This must be taken into account when marking the main racks.
 The process of deepening and installing frame pillars in dug holes
 The underground part of the support must be treated with bitumen, oil so that they do not rot. The design will be more reliable if the racks are cemented. The ground part is divided into three proportional parts and jumpers are mounted (on 2 sides of the main rack, on long self-tapping screws).
 The principle of processing wooden poles with bitumen or other materials
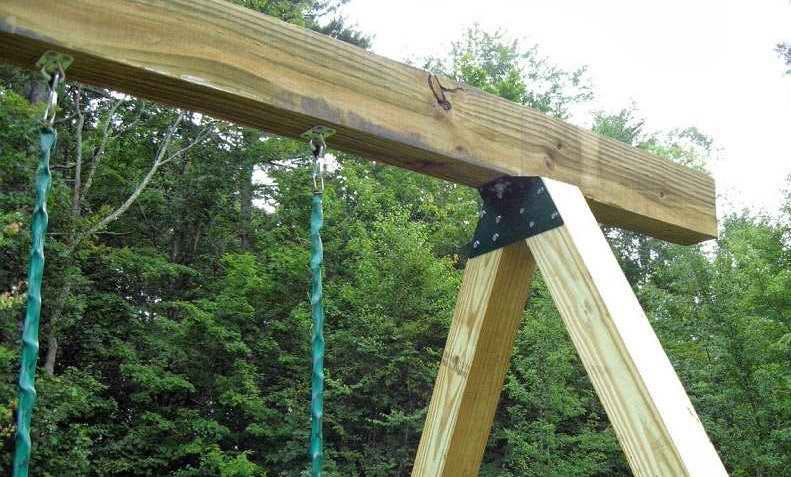
 - The next step is the installation of the main jumper. It is fastened with racks with metal corners.
 The device for attaching the main beam to wooden supports
 - From the upper side jumper to the main one, jibs are mounted (on metal corners) for stability and structural strength.
 The scheme of fastening the side struts to the main jumper
 - We make a seat. To do this, you need to make two frame structures with additional vertical jumpers. Sitting - 2 m long, 0.5 m wide; the back of the bench is 2 x 0.65 m. Planks are screwed to the frame at regular intervals, it is better to fix them with self-tapping screws. Connect both parts with metal corners. Then install the armrests of the bench.
 Scheme with the dimensions of various components of the design of the swing seat
 - Suspension installation. 2 pairs of eyebolts are attached to the edges of the backrest frame, the other to the seats. A through hole is drilled in the main crossbar, two bolts are passed into it. They put on a carabiner for attaching the swing. Then the chain links are inserted.
 An example of mounting a wooden chair on special bolts
 - The final stage is the installation, the deepening of the entire structure into the ground. The pit is dug 20–30 cm deeper than the underground part of the side post. Each installation step is checked using a level.
 An example of a rocking sofa installed in the garden with a canopy
The wooden structure will be preserved better if it is varnished and painted.
Making a children's swing
Suspended collapsible structures are the most popular type. They can be moved around the site by hanging on one of the branches of a tree. The child will always be in the field of view of the parents. Stationary hanging swings are installed on.
 Placing a swing with a slide and a ladder on the playground
 The sequence of installation of the structure does not differ from the usual scheme. The standard version is a "P" shaped support with a hanging seat. You need to take into account the age of the child. For small ones, safety jumpers are additionally installed. Children grow, so it is better to provide a mount that would allow you to adjust the height of the seat.
 Safe rocking seat with jumper for small children
 For this, swing carbines are suitable. The site should be flat, preferably with soft grass, sprinkled with sand. When falling, the child is less injured. Watch in the video the process of making a wooden garden swing.
Bird trills delight the soul, and a slight swaying soothes. Garden swings at their summer cottage are needed not only for children, but also for adults. Moreover, it is absolutely not necessary to buy the same type of model, covered with fabric. It is much more interesting to create an original designer thing on your own. How to make a garden swing with your own hands? What is better to choose for the frame, metal or wood? Tips from experienced craftsmen, drawings, a selection of photos and video instructions - in this review.
Homemade swing and their classification
As a child, it seems that the "winged swing" is able to reach the sun. Growing up, we remember this wonderful feeling of carelessness. And subconsciously we want to repeat it. This is quite possible, because the swing is not only for children:
- family. They look like a bench with a high back, suspended on strong supports by chains;
- mobile swing, if necessary, can be moved to another place;
- the hammock is the ultimate champion for relaxation;
- gazebo swing. Suitable for several people;
- balancer or pendulum. A floor structure in the form of a log, which is thrown to one side or the other, depending on the weight of the players;
- swings - sofas. Soft design with the ability to embody the most daring design decisions;
- swing - "boats".

According to the manufacturing method, the swing is divided into:
- frame;
- frameless.
By installation method:
- stationary;
- portable - easy to remove and put away.
The frame can be made from a number of materials and their combinations:
- plastic and fabric;
- tires and chains or ropes;
- wood and chains;
- rounded and non-rounded bars;
- metal.

Choosing the Right Option
Before proceeding with the construction, it is necessary to determine the purpose of use and the material of manufacture. If a baby needs a swing up to 3 years old, then a purchased or home-made stationary, stable option is suitable. For children from 5 years old - light plastic or wooden hanging swings. They can be attached to a canopy beam in front of the house or to a powerful tree branch. A noisy children's company will appreciate the entertainment in the form of a balancer (pendulum).
Attention! The most durable are products made of processed wood and metal. For "wintering" it is enough to cover them with polyethylene. Purchased swings with a plastic base covered with fabric - must be disassembled for the winter and stored in a dry, warm room.
If you want the garden swing to serve not only as a place of rest, but also as an accent detail of landscape design, then you can prefer noble forging or eco-friendly wood design.
For the older generation, durable benches with a high back and a canopy are ideal. For noisy youth - swinging sofas with a lot of colorful pillows or hammocks for relaxing with a book.
Original tire design
A swing that any beginner can make from improvised materials. For manufacturing, you will need a car tire, a strong rope and the ability to knit marine knots.

Installation steps:
- Drill four holes in the tire. 2 on each side.
- Insert the rope into the two holes next to it and tie it firmly below, under the tire.
- On the second side, repeat the same steps.
- Choose a suitable tree branch or any other crossbar. Hang an impromptu swing on the bar. The main thing is strong knots that ensure the safety of rocking.
Such installation will not take much time, but will bring a lot of joy to children.
Children's entertainment from a board and a rope
The easiest swing to make, which does not require special skills and materials, is a beam suspended on a rope.
Attention! A wooden swing without a back is unstable, so it is recommended to build them for children from 7 years old. If you want a swing with a back, you can cut off the legs of a wooden chair and attach it with a rope to the base and back.
For installation you will need:
- edged or unedged board with a thickness of 3-4 cm and a width of 15-20 cm;
- strong rope;
- antiseptic, varnish;
- hacksaw or saw.

Walkthrough:
- Saw off a piece of board to the desired length.
- Sand to smoothness.
- Cover with antiseptic and varnish.
- Cut 2 grooves along the long sides of the board closer to the corners.
- Make 2 more dranks on both sidewalls about 3 cm from the corners.
- Pass the rope from groove to groove with three "stitches".
- Attach the rope to any cross bar.
The fastening feature guarantees the strength of the structure. At the bottom, the rope will not untie and will not fray.
Making a family swing from wood and metal
Evening conversation on a bench swaying steadily promotes mutual understanding. And if you decorate the wooden frame with cute pillows, then a comfortable stay is guaranteed!
Advice. The thickness of the planks for the seat of the swing bench should be greater than for the back.
Before construction, you need to prepare everything you need:
- 15 pine or spruce boards 10x25x2500 mm;
- 1 board 150x50x2500 mm;
- a chain equal to the length of the swing;
- 40 self-tapping screws 80x4.5 in size;
- 200 self-tapping screws 51x3.5;
- 6 carbines;
- 2 screws with rings 12x100;
- 2 screws with rings 12x80;
- drill, jigsaw, circular saw, hammer, planer.

Action plan:
- Cut boards 1.5 m long.
- Cut out 6 curly parts for the base of the bench from the thickest board.
- Having arranged 6 parts in 1 row, attach wooden planks to them with self-tapping screws. The bar should be fixed first from the ends, then in the middle. The seat will take 17 boards, the back - 15.
- Make two armrests and the remaining wood.
- Attach a screw with a ring to the bottom of the armrest.
- Attach the finished swing to any crossbar. If it is not there, then you can dig 2 beams into the ground, concrete them and connect them with a transverse board.
- Attach 2 more rings to the top bar.
- Stretch the chain and hang the swing.
A properly built structure will be solid and reliable, and will last for several seasons.
Strong base for any kind of seat
You may want to hang a swing bench or a pair of children's plank rails on chains. The main thing is to mount a reliable base that can withstand both a small load and several adults.
For construction work, the following elements are required:
- bars 100x100 mm;
- boards for the construction of the base and canopy;
- concrete;
- self-tapping screws;
- hammer, hacksaw, drill, tape measure.
Advice. The part of the bars intended for digging into the ground should be treated with bituminous varnish or resin.

Step-by-step instruction:
- Determine the location for the swing. This step is important because design is not portable.
- Dig 4 holes 1 m deep each.
- Set the bars in the pits so that they cross at the top, resembling the letter "L".
- Fill the base with concrete.
- Fasten the bars with self-tapping screws at the intersections at the top.
- Knock down wooden flooring from half of the slats.
- From the second half - a canopy with a horizontal crossbar and jibs that strengthen the structure.
- Varnish the finished frame.
Any kind of swing can be attached to such a base using rings, a carabiner and a chain.
What to choose, chain or rope?
The safety of the swing directly depends on the type of suspension. Rope is a fairly strong option, especially if it is secured with a marine knot. But over time, it can stretch or fray. Therefore, such a suspension is recommended only for children's swings that are not subject to heavy loads.
Attention! The optimal rope is kapron with a cross lay from 24 mm.
The chain is a more durable option that can withstand heavy loads.
Advantages of using a metal chain:
- strong;
- the weakening of the ring is immediately visible;
- optimal for weak buildup.
- when mounted on bearings, it swings very strongly. This means that it is necessary to install a swing speed limiter;
- in large rings, babies can pinch their fingers.
Garden swings are not just a place of rest, but also an original "highlight" of any site. A rational choice of design, construction taking into account all the nuances and careful maintenance will provide the swing with a “long life”.
DIY garden swing - video
DIY garden swing - photo