How to make a real work of art out of a refrigerator. DIY refrigerator decor ideas Draw on the refrigerator with your own hands
Now we are surrounded by the same type of industrially manufactured products: standard furniture, household appliances, chandeliers, dishes. But sometimes we want to give individuality to everyday objects that we come into contact with every day. It’s good when you have the opportunity to order a product from a craftsman self made, which is guaranteed to be made only in a single copy. But this path requires financial investments, sometimes very large ones.
The easiest way is to decorate finished items to your liking. Decorating can also be an opportunity to renew old thing, which is still functionally usable, but has lost its presentable appearance.
And its structure is such that the traces of time do not in any way add to the noble patina and scuffs in the shabby chic style, except perhaps to emphasize the shabbyness of the thing.
The use of decorative techniques allows you to create a unique design product that will become the dominant feature of the entire interior. There are many design options that you can do yourself.
One such way is to decorate interior items using decoupage technique.
Where can I use it?

Any objects are suitable for decoration with cut-out designs. Most often, decoupage is used to decorate small decorative items: watches, boxes, candlesticks and lamps, decorative plates, cutting boards, etc. Applications can also be used for larger-scale works - for decorating furniture, household appliances, and even as a way to decorate walls.
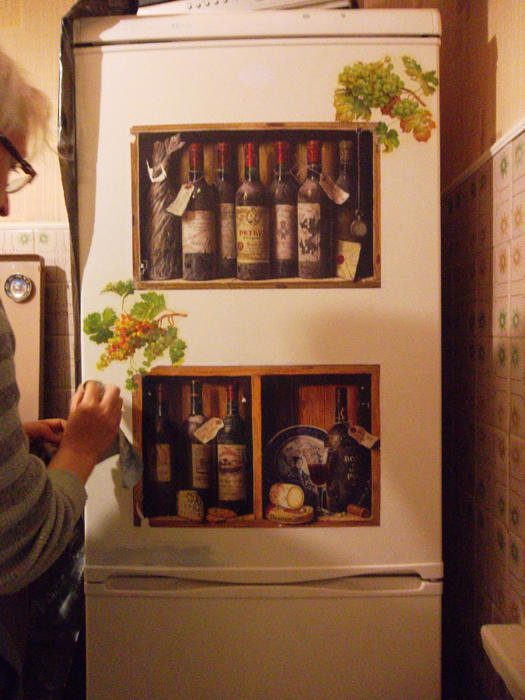
Refrigerator decoupage is often used because this household item is subjected to significant stress - it is “pawed” by hands several dozen times every day. From such a load, the paint on the surface wears off. In addition, the refrigerator is a convenient place to work: it is large and flat, and has a minimum of parts that could interfere with work.
In addition to household and interior items, this technique can be used to decorate clothes and shoes, and, if desired, even a car. The technique for making a pattern in all cases will be approximately the same, the only difference is in the materials.
For items experiencing increased load, special materials will have to be used.
In different styles
Of course, talking about different stylistic trends in decoupage, from the point of view of art criticism, would be too loud.
But, at the same time, it is still possible to trace a certain direction of styles:
- The charm of philistinism. In amateurish designs, most often objects are decorated in a bourgeois or burgher style. The most common motifs are pastoral scenes with shepherdesses, angels, and floral motifs. These items fit well into Provence or Biedermeier style interiors. Its varieties can be considered shabby chic, Victorian style;
- Ethnic style.
- To understand what the ethno-style is, you need to remember the history of the origin of technology. It was born as a counterfeit of items made in national traditions. To create an object using the decoupage technique, made in ethno-style, you can use stylization for any national tradition in decorative and applied arts;

Decopatch. This type of decoupage is similar to patchwork - a patchwork technique. The object is covered with pieces of paper without a plot composition, like a patchwork quilt. Sometimes deco patch is used as a background for a plot composition made using the conventional decoupage technique. In order to update old refrigerator using the decoupage method, any style and any technique will do. Probably, only the volumetric version will not be very suitable due to inconvenience during operation. The style you choose will depend on general style kitchen interior design and kitchen furniture. If the furniture gravitates towards country style, then
good choice there will be a decoupage of the refrigerator in the style of shabby chic, Provence, or Victorian. The cute provincialism of Provence or the shabby chic of shabby will turn a bulky white box into a stylish interior item. IN
modern kitchen
Refrigerator decoupage in sample or deco patch style will easily fit in.
From words to deeds

- Having dealt with the theory and choosing a style, it’s time to move on to practical exercises. If you decide that the refrigerator looks too familiar or shabby, then you should start decoupaging your refrigerator with your own hands:
- Image selection. Before starting work, it is necessary to carefully prepare the surface in order to decoupage the refrigerator efficiently. If the paint has not peeled off, then it is enough to wash the doors and other surfaces thoroughly. cleaning solutions, for degreasing. If the paint has peeled off in places, then you need to clean these places, removing what comes off easily, and sand the rest to smooth out the unevenness. If the damage is large, then after this stage the entire surface may need to be primed;
- Cut out the motifs. Having thought through the composition scheme, we cut out the motifs. For this purpose, it is convenient to use small scissors with curved tips, for example, manicure scissors. Cut out only large parts, all small elements better later finish painting using acrylic paints. When all the elements of the design are cut out, lay them out on the table, taking into account how they will be located in finished form. This way you can see a sketch of your idea, and if necessary, make changes and additions;
- Gluing the parts. We start work from the center. If you decide to use napkins, then separate the top layer with the pattern. This must be done carefully. We cover the area intended for gluing the pattern with glue, transfer the prepared pattern and carefully smooth it over the adhesive surface, squeezing out air bubbles and trying not to damage the pattern. This should be done using a flat artistic brush moistened with glue. We also glue the remaining parts of the composition;
- Additional decoration and varnishing. When everything is dry, we begin decorative processing. First you need to shade the contours of the cut out motifs to smooth out the transition from the pattern to the background. First we process it with fine sandpaper (No. 600), then we tint the background, depending on the idea.

The second stage will be to supplement the composition of the drawing with the missing small details. Having finished the drawing, cover the entire surface with two or three layers of varnish.
After 5-10 years of operation, the paint on the refrigerator turns yellow and its appearance becomes unsightly. Of course, in this case, you can buy a new one, but such a unit is quite expensive and not everyone can afford to change it because of such a trifle, and it’s not a fact that you will find equipment in the store suitable for the interior rooms according to style. However, you want your kitchen to have a neat and modern appearance. You can achieve this by decorating an old refrigerator using the decoupage technique.
Decoration using decoupage is a great way to fit a refrigerator or washing machine into the interior of the room. To decorate equipment in this way, use napkins, fabric or decoupage cards, which are available in abundance in art and stationery stores.
A refrigerator finished in this way will fit perfectly into the style of any classic design.
In order not to miss the mark with the design, you need to know which pictures are suitable for a particular interior.

What napkins to decorate refrigerators of different styles:
- Floral print, as well as images of angels and lambs will fit perfectly into provincial styles, for example Provence or Biedermeir.
- A refrigerator decorated with Russian or African folk motifs will complement the interior of an ethno-style kitchen. Ethnic style is a design direction that involves the presence of appropriate prints and details in the decor of the room.
- Ornate gold and silver patterns will decorate equipment in the Amp style.
- Decopatch is a direction of decoupage that consists of gluing torn pieces of napkin onto an object, without tracing any storyline drawing. This design of the refrigerator will look appropriate in modern interiors.
Decorating furniture and appliances with decoupage will turn yellowed and peeling objects into the main highlight of the room. When choosing a refrigerator design style, remember that the appearance of the equipment should fit into the main interior of the kitchen.
Refrigerator decoupage master class: objects and materials
Before you start changing the appearance of the refrigerator, you need to prepare everything necessary materials and tools. For some you will have to go to handicraft stores, and for others to the construction market.
Materials and tools that will be useful for decorating the refrigerator:
- Metal spatulas, which are useful for removing peeling paint;
- Sander or fine-grit sheet sandpaper;
- Metal paint suitable color;
- Napkins, decoupage cards or pieces of fabric with an interesting pattern;
- Special glue for decoupage;
- Scissors;
- Wide paint brush for painting a refrigerator, a flat hard brush for gluing pictures, a thin soft brush for drawing details;
- Acrylic paints;
- Acrylic lacquer;
- Detergent and sponge.
When all the decorative elements using napkin technology are ready, you can proceed directly to decorating the refrigerator with your own hands.
Master class: do-it-yourself refrigerator decoupage
Refrigerator decoupage will allow you to fit this old kitchen cooling furniture into new interior kitchens. Napkins can be used for decoration individual places technology bright elements, or to completely cover it with a pattern. If your refrigerator is practically new, and you just want to diversify its appearance using decoupage, then you do not need to remove the trim, but if the paint is yellowed, cracked and crumbling, it is better to replace it with a new one.
Master class on transforming a refrigerator:
- The first priority is to think over a new design for a decorative item. To do this, decide in what style it should be decorated to suit the interior of the kitchen.
- Now use a putty knife to scrape away the paint where it has cracked. If the paint has yellowed and cracked, it is better to remove it completely. Clean off any remaining paint with a grinder or sandpaper.
- Degrease the surface of the product with a solution detergent and water.
- Prime the surface of the refrigerator with two layers of paint of a suitable color. Wait for it to dry completely.
- Now you can cut necessary elements with decoupage cards. Mark the places where they will be located. Lubricate the refrigerator with glue where you plan to attach the pictures. Remove the top layer with the pattern from the napkin and place it on the file with the wrong side up. Attach the file to the refrigerator and press it against the picture. Smooth out the motif using a flat, stiff brush, removing any air bubbles underneath it.
- When the glue holding the drawings together with the refrigerator has dried, paint on the missing elements with acrylic paint and a thin brush.
- Cover the composition with varnish in three to four layers.

Repeated varnishing will not only help protect the patterns from being washed off, but will also give the refrigerator additional thermal insulation properties. If you want to decorate the entire refrigerator without using paint, you can do this with wallpaper or fabric.
Designing equipment is a very long and labor-intensive task, so before you start working with such difficult subject, we advise you to practice for more small items, for example, decorate refrigerator magnets.
Fridge magnets: decoupage
Magnets have a much smaller area than a refrigerator, and it is much easier to remake them in case of unsuccessful design. It is not necessary to buy a special blank; it is enough to find only an unnecessary magnet and a piece of thick cardboard, as well as all the standard components of decoupage.

Master class “Fridge magnet from A to Z”:
- Cut out two identical magnet bases from a thick piece of cardboard. You can take a box of some equipment or a pizza package for this purpose.
- Glue the two parts of the base together. And cover them with two layers of acrylic paint on both sides.
- Cut out the desired motif from a napkin or decoupage card and separate the top layer with the design from it.
- Glue the picture to the magnet using special glue or PVA. If you want to make a magnet three-dimensional, then you will need two identical images. After you have pasted the first image, place a mixture of pieces on the parts that should be voluminous. toilet paper, PVA and water, and pull a second similar picture on top of them.
- In addition to pictures, you can decorate the magnet with other elements, for example, rhinestones or paper flowers.
- Complete the missing elements with acrylic paint.
- Cover the magnet with three layers of acrylic varnish.
- You can put a braid or ribbon along the edge of the magnet.
- To the back of the base using glue gun glue the magnets.
Such a magnet can become a great gift to your loved ones and friends or decorate the refrigerator in your own kitchen.
At the moment, it cannot be said that there is a shortage of equipment in stores. But all of it is mostly monotonous and doesn’t look very interesting. Therefore, DIY refrigerator decor is more relevant than ever.
IN COUNTRY STYLE
To get a fun little unit in country style you will need acrylic enamel, gouache and acrylic varnish for fixation.
If you wish, you can even achieve that the refrigerator does not look like itself - rather, like a painted cabinet or sideboard!
AIR BRUSHING
If the kitchen is made in modern style, then the design on the refrigerator should not have small details, as this will make the interior less complete
 Similar original solution will be very appropriate in styles such as English and loft
How to decorate a refrigerator to make it look impressive? Use an airbrush! Using it you can create drawings of any complexity.
Everyone chooses their own topic. If you are not confident in your abilities, you should contact the designers!
USING STICKERS
The most inexpensive way to decorate an old refrigerator is to glue ready-made vinyl stickers or self-adhesive film. In the second case, the design of the device will change completely. The refrigerator can become “stone”, “leopard” and even “wooden”. Stickers will make the product more attractive.

 Today there are a huge number of options to choose from ready-made solutions, plus, you can order photo printing with your own design

Most popular images:
- Marine life;
- flowers;
- cats;
- birds;
- butterflies.
In addition to stickers, you can apply sparkles, rhinestones or ribbons to the refrigerator. You can outline the drawing with paints or a marker.
 It is also decorated traditionally with crystalline matting, a little black stained glass film for ornament and a special graphic design, and just a little rhinestones.
An old refrigerator can be painted. Such a refrigerator can become bright accent in a white kitchen, or fit well and look harmonious in a bright kitchen.

DECOUPAGE TECHNIQUE
Decoupage is a decorating technique that involves cutting out various images from paper. These images are pasted directly onto the refrigerator.
Decoupage makes it possible to create a unique image of equipment that will suit your interior!


Refrigerator decoupage is a great way to try yourself as an artist or designer. Techniques such as gilding or aging can also be used. Volumetric decoupage involves the use of model mass.
Where can I get pictures? The first option is to purchase beautiful multi-layer napkins. In this case, you will need to separate the first layer with the picture, cut it out and stick it on the refrigerator using PVA. After the glue has dried, varnish is applied to the image in several layers.
The second option is to print the image you like on a printer. Regular office paper will do. Then the following steps are performed:
- Apply varnish to the print several times.
- Wait until it dries.
- Place the leaf in a bowl of water.
- Lay a towel on the table and place a wet picture on it, the image should face down.
- Roll the layers with your hands paper base.
- There should be a thin film of acrylic with the image left - this is glued to the refrigerator.
Separating the paper base is a complex process. Therefore, it is recommended to prepare two printouts. You can practice on one of them.
MAGNETIC NOTE BOARD

 A magnetic board will make your kitchen look a little like Italian restaurants. Why not? A chalkboard is a great way to decorate your refrigerator. It costs only 400-800 rubles. Also, anyone can make such a board on their own. All you need is magnetic paint and MDF sheet. The board is cut directly from MDF sheet.
Then you have to process the edges and apply several layers of magnetic paint to the product. All you have to do is wait until the board dries and you can use it! You can also purchase ready product. A magnetic board can be a marker board or a slate board (for drawing with chalk).
The slate board is distinguished by a black canvas. Drawings made with chalk are erased with a damp sponge. The stand for sponges and crayons is also attached to the refrigerator with a magnet.
Marker board - more modern version. It comes with a special sponge and markers.
A new product that stores offer is a multi-colored marker board. It will make any refrigerator bright and attractive.
REFRIGERATOR PAINTING
 The painting of the refrigerator is perhaps the most the hard way, because not only imagination is required, but also basic skills in handling a brush and paints. You can decorate the refrigerator with painting. For this purpose they are used different kinds paints
Manufacturers of household appliances are increasingly delighting us with variety color range and decor, which allows you to choose not only a functional refrigerator, but also one that fits perfectly into the interior concept. True, such new items are depressingly expensive. But is it necessary to overpay for fashion design, if it is quite possible to create it yourself? We invite you to study in detail how to paint and decoupage a refrigerator with your own hands, photos of original works and master classes various techniques decor from hand-made masters.
If the operation of the equipment does not cause any complaints, but the whole point is only in unpresentable appearance or a boring white color, you can repaint the device in any shade that suits the interior scheme. To do this, you will need sandpaper, a medium-width brush/roller or spray bottle, masking tape and a properly selected paint.
Important! Refrigerator paint should be waterproof, elastic and have high thixotropy, which will help it adhere well to a vertical surface and not leave streaks when applied.
Best suited:
- Automotive nitro enamels are easy to apply and offer a good choice of colors. They are sold in special cans for easy spraying. But it is better to restore the device at outdoors– undried paint releases toxins, and it is difficult to handle a massive device indoors without accidentally staining other surfaces.
- Epoxy paints are wear-resistant, sold both in spray cans and in regular cans for brush/roller application. There are even special enamels marked “for restoration of household appliances.” The only negative is the small range of colors.
- Acrylic paints for metal are a universal option for home craftsmen. These funds are not allocated hazardous substances, have a huge selection color solutions and can be easily applied with a roller or spray can.
Advice! When working with paint, do not forget about safety precautions - use a respirator and protective gloves.
Instructions for repainting the device yourself
After choosing the paint, you need to prepare the refrigerator itself - remove all the shelves, wash the body with soap. old paint, chips or cracks can be removed using sandpaper to ensure better adhesion for the new coating, then remove debris with a rag, degrease and prime all surfaces. Now all that remains is to protect the handles, decorative inserts and door seals masking tape, and you can get to work.
If you do not cover the fittings, you will have to wash off paint splashes with a solvent, and this can cause glossy coatings to fade.
Advice! Before starting work, it is worth carrying out a test by making a few strokes on the back wall or other inconspicuous area of the refrigerator to evaluate the color and properties of the paint (whether it lays evenly or if there are any drips).
The process of painting the device depends on the tools used and the type of paint:
- Working with a brush/roller
Pour some of the dye into the tray, roll the roller so that it is evenly saturated, and remove the excess on the ribbed surface. The paint can be applied in vertical movements, or from left to right. It is better to treat corners and areas near the fittings with a narrow brush. The second, and if necessary, the third layer can be applied only after the previous one has dried (the time depends on the type of paint and should be indicated on the packaging).
Important! If drips or other blemishes cannot be avoided, you can remove the defect with a solvent.
- Use of aerosol products
The spray can is held at a distance of 25-30 cm from the surface, spraying paint evenly from left to right. The main thing is not to linger in one place and not to leave unpainted “islands”. But even if there is a “gap”, it can be easily eliminated by re-processing. Aerosol paints usually dry quickly - after half an hour you can already apply a second coat.

With the help of a spray, the paint goes on smoothly and without drips.
More ideas on how to update an old refrigerator with your own hands are in the photo. We will consider decoration techniques in detail below.

DIY refrigerator
Attachment_20224="" style="width: 600px"> 
Fridge. It would seem simple thing. We are used to seeing it white or gray, or at least black. And it’s completely strange to see a refrigerator in red, not to mention its decor. It turns out that this item is also subject to design transformation. In addition to ordinary magnets brought from vacation, you can use airbrushing, decoupage techniques, use all your creative abilities, and turn the refrigerator into a real work of art or expand its functions in the kitchen.
The refrigerator can be completely covered, it will look very beautiful

You can stick this poster on your refrigerator door:

This is a fun sticker you can put on your refrigerator.
Decorating a refrigerator is not an easy task. That's why it's honorable. What you decide to do depends on your creativity. Draw: glue, sculpt, paint - we will select ideas for every taste, depending on the level of mastery of tools.
Before we get started, let's remember some preparation. First you need to prepare the basis for decoration. To do this, you need to wash the surface and wipe dry. Most refrigerators are single-colored, so the preparation stage is complete. Next, we pick up the selected tools and begin to create.

Telephone booths are very popular in refrigerator decor.

This telephone booth refrigerator looks really cool.
Decor ideas
We present to your attention several decor ideas. The design possibilities depend on what materials we choose.
|
materials used |
possible design |
||
|
art painting, airbrushing, painting |
the opportunity to use your imagination and create your own style |
airbrushing is an expensive procedure, low-quality paint can put your health at risk |
|
|
organizer for storing small items |
ability to store small items “at hand” |
fabric is not a practical and easily soiled material for the kitchen, it gets dirty quickly |
|
|
covering the surface with vinyl film, using stickers |
surface protection refrigerator Easy to use |
may not stick well surfaces |
|
|
magnetic boards, decoration with magnets brought as souvenirs from other countries |
Practical use as a writing board |
Over time, the magnet may deteriorate and cannot withstand the weight |
|
|
photographs, notepad, crafts made hands (attached with a magnet) |
the opportunity to create a cozy atmosphere and a kaleidoscope of memories |
paper darkens over time and may curl due to temperature changes |

You can decorate the refrigerator yourself

A great idea would be to make a refrigerator in the shape of a telephone booth.

Refrigerator doors can be covered with this poster:
Airbrush
Let's start with the most difficult one. For this type use special tool airbrush; the artist also uses brushes to draw detailed details. If you have talent and experience, and also have in use necessary tools and special paint - you can create this design yourself. However, it is better to entrust the matter to a professional. The procedure is expensive, but you will get a real work of art that fits perfectly into the overall design of the room.
Before applying the design to the surface, it is modeled using computer graphics. Your help will be needed here. To avoid disagreements regarding small details, location and colors, it is better to create a layout of the future image together with the master.

Landscape stickers look very beautiful

You can put these fun stickers on your refrigerator:
Artistic painting
In this case, the artist uses a regular brush, and not the spray method, as in the previous one. Therefore, creating it yourself is much easier. If you have extraordinary artistic talent, you can realize the most daring ideas.
Use acrylic or spray paint as a base. Different types of paint are suitable for different techniques. Graffiti is best painted with an aerosol, while small parts It is better to draw with a brush, using acrylic paint. Upon completion of the work, the drawing must be covered with a layer of varnish. This procedure will help preserve the design longer and also add depth and volume.

Even the simplest things will perfectly complement the decor

The refrigerator with the galaxy looks very beautiful

If you know how to draw, you can paint the refrigerator yourself
Stickers
Let's move from complex to simple. Decorative stickers are suitable for any room. At the moment there are a huge variety of them, and you can choose any one to suit your taste. It is also possible to create custom stickers in accordance with the selected design.
This design can replace artistic painting so that it will be difficult to distinguish between techniques. There are a number of 3D stickers that can turn your refrigerator into a world of its own. So you can easily “place” a pet in the kitchen, “build” a fireplace, “create” a sea beach and simply a cozy or cheerful atmosphere.

The refrigerator can be covered with completely different stickers

Refrigerator doors can be painted
Film
Another alternative to painting, as well as stickers, is decorative film. It will be even easier with her. There is no need to create a combination of stickers and figure out how to place them. It is enough to purchase a film of the appropriate size and cover the refrigerator with it, placing it over the entire area.
There are also many options for vinyl wrap. You can choose an existing plot, purchase a plain film, or with some kind of pattern. You also have the opportunity to order large-format printing on film, applying your favorite pattern or your own photographs to it.
The option to completely cover the refrigerator with film is also practical side. This coating dense and will protect the surface from scratches. Periodically, you can change the film or remove it completely, and your refrigerator will have the new kind without scratches or chips.

You can put special stickers on the doors

You can decorate your refrigerator with magite

You can put special stickers on the refrigerator door
Magnets
Everyone's favorite magnets are still popular. You may have seen a lot of magnets stuck on the refrigerator in your friends' houses. But by bringing memories from the sea, sealed in this magnet, you can create a work of art from them, and not just “stick” them on the refrigerator.
An interesting idea would be to attach it in a new city or country with a magnet brought from there. This option is more interesting and symbolic than simply placed magnets.
It is also convenient to use magnetic boards. They are quite light and simply attach to an iron surface. There are different sizes, formats and designs. You can choose a magnetic board framed in Victorian or Baroque style. Or vice versa in a cheerful frame with funny faces. This solution will also be practical. Here you can post notes, a to-do or grocery list, and also leave messages to your loved one, children or parents.

You can decorate your refrigerator in any way you like.

Unusual refrigerator decoration
Making an organizer
Continuing the idea of practical transformation of the refrigerator, we offer another idea: creating an organizer on the surface of this device.
This could be a DIY organizer for storing various small items. To do this you will need:
-
magnetic hooks.
canvas made of strong fabric;
several pieces of the same or another fabric;

A very cool idea for decorating a refrigerator in the form of a telephone booth.

Hearts on the refrigerator look beautiful

You can put these stickers on your refrigerator door:
Making an organizer is easy. Sew several pockets onto an existing fabric of the selected size. Hem all corners and edges to prevent the threads from fraying. You can decorate it with various stickers and photographs. In these pockets, place the little things you need in the kitchen: note paper, pen, pencil, scissors, lighter and other items you need.
For fastening, make two loops on the back of the organizer and purchase hooks that attach to the refrigerator using magnets. If you get tired of the organizer, you can then hang kitchen towels on these hooks.

You can cover your refrigerator like this:

Large stickers can be placed on the refrigerator door
There is also an electronic organizer. It looks like a tablet. Attaches to the refrigerator using a magnetic cover. Is also convenient solution. You can create audio or written reminders, watch videos or listen to music while cooking, and read messages left by other family members.
IN modern design New technologies are bursting into refrigerators, making certain tasks easier.