How to restore an old plywood chest of drawers with your own hands. The best ways to restore a chest of drawers at home, useful tips
Restoration antique furniture an interesting and creative process, but who needs it and why. In this article we will deal with this issue and visually restore an antique chest of drawers.
In fact, there is no shortage of furniture in stores now; on the contrary, there can be a lot. Furniture market in modern world replete with a large assortment and variety, and the prices are very affordable. Allow yourself to buy new chest of drawers Almost any family can.
The main point of restoration is that on an old grandmother’s chest of drawers, for example, you can reflect your individuality, reveal your creative abilities and harmoniously complement the interior of the room with decorative elements or paintings. After all, the exact same painted product that you want to see and that will fit perfectly into the interior of your home cannot be found in the store. But it is quite possible to do it yourself, even without special skills or any creative talent; you can repair old furniture by following simple instructions.
There are two other benefits to restoring antique furniture. Previously, it was all wooden and of high quality, but now we mainly buy from chipboard panels. That's why sometimes it's old wooden furniture will last longer than a recently purchased new one. And the last advantage of repairing such products is still cost-effectiveness. Sometimes it’s enough to repaint it or reupholster it with new fabric and it’s like new without extra costs.
So, let's figure out how to restore an old wooden chest of drawers with the least amount of money and painting the table top. 
Materials and tools used in the work:
1. Knife, spatula medium and small;
2. Fine-grained and coarse-grained sandpaper;
3. Grinding machine;
4. Wood putty;
5. Solvent No. 646;
6. Brushes different sizes and a pencil;
7. Varnish on water based transparent and solvent varnish.
The first step is cleaning the chest of drawers
First, before work, you need to remove all the fittings from it, these could be handles on drawers and decorative elements. They can be damaged during the restoration process and they themselves will constantly interfere with your work.
Next, you should clean the chest of drawers from the old varnish. To do this, we need a grinding machine with coarse and fine-grained sandpaper. If the tabletop was covered with a thick layer of varnish, then sandpaper alone will not do. In our case, we cleaned the countertop using a knife and spatula. 
There are several ways to remove old varnish:
1. Scrape off with a knife or spatula.
2. Soak with solvent and remove with a cloth in several stages.
3. Use construction hair dryer with a special nozzle.
The third option is, of course, the most effective and fastest, but not everyone has such a device. Therefore, we successfully scraped off the varnish with a knife and spatula. And the second option is the longest and most painstaking, but wooden table top most likely it will remain intact and not scratched.
After removing the old varnish, you should sand the entire surface well. If the drawers had a thin layer of varnish and were almost undamaged, then you can simply sand them with coarse sanding paper. But still, ideally, for a uniform color after applying varnish, especially light ones, it is better to remove all the old varnish.
After we are convinced that the sanded surface is smooth, we can proceed to the next stage.
The second stage is preparation for painting and leveling the surface
Use a wide brush to brush off dust from the entire surface and wipe with a cloth soaked in solvent No. 646. On a degreased surface, varnish or putty will last longer and stronger.
It must be remembered that the newly applied varnish very noticeably reveals all surface imperfections, even the most insignificant ones; one speck of dust will be visible under the varnish as an unsightly pimple.
After degreasing the surface, take wood putty and a small spatula. The main thing when choosing putty is to match its color to the color of the sanded surface. And we begin to smoothly cover up the cracks, scratches, gouges and chips. We are waiting for the putty areas to dry completely.
In deep places, the putty may “fail” after drying, so you may have to putty again. After final drying, sand and degrease again. The surface should be perfectly flat and smooth. 
Now that we have achieved a uniform, even, smooth surface, we can begin decorating and painting the chest of drawers, moving on to the third stage.
The third stage - applying varnish and design
So, we coat the surface of the tabletop with varnish in one layer using a brush. 
After the first layer has dried, the pile will rise on the wood; it needs to be sanded so that the design can be easily applied. The design will not be displayed on a varnish surface that has not been sanded. Using a pencil, we draw the necessary design; for us it was a flower. 
If something happens, the pencil can be easily erased from the varnish surface with a regular eraser. After applying the drawing, you can start painting with paints. In the technique of drawing with shading, it is necessary to use water-based paint.
We buy a regular color for water-based paint Brown color. First we draw the outline of the petals, then the centers and shade them with a napkin. It’s not at all difficult to draw such a flower, even without drawing skills. 
Very important point
– coating of the design with varnish. The main thing is to choose the right varnish. It should be transparent and water-based. Solvent-based or acetone-based varnish cannot be used., such a varnish will immediately dissolve the entire drawing. It is better to cover with a roller, not a brush, in the direction of petal growth and only in one direction. That is, do not move it back and forth with a roller, otherwise the entire design will be smeared and lose its appearance.
It is advisable to cover the design with transparent varnish in two or, better yet, three layers. For the last time, you can safely apply the varnish as you wish, the design will no longer be blurred. 
All that remains is to varnish the boxes and side walls. If you do not plan to make a drawing on them, then you can apply the varnish with a roller or brush, but be sure to apply the second layer after the first has completely dried. And also do not forget that after the first layer, pile will rise on the wood, which needs to be sanded with fine-grained sandpaper.
The dresser handles can be painted with the same solvent-based varnish and screwed back to the drawers. That's all, all that remains is to remove the nasty smell and let the varnish dry completely. 
The chest of drawers has been given a new life; it will fit perfectly into the interior of any room and will last for many more years. You can use completely different drawing and decoration techniques; there are many interesting options, the only thing you need to do is adhere to the rules that you read earlier, otherwise you can simply ruin the drawing.
Have you inherited a set of furniture from the beginning of the last century, or are well-worn chairs and chests of drawers gathering dust in your house and are sad to part with? Congratulations! You have the opportunity, and most importantly, the right texture, to update old furniture and interiors at minimal cost, thereby transforming your home. You will only need a couple of hours and a small set of repair materials. With their help and if you have the desire to create, you can achieve great results quickly and easily!
Before you start work, you need to prepare necessary materials. In order to update old furniture, it is convenient to use paint in cans. In this case, you will only need a few aerosols of the desired shades. There is no need to purchase rollers of different sizes, numerous brushes and solvent. So, before we start painting, we carry out preparatory work. This stage cannot be neglected, because the quality of the painting and its durability largely depend on it.
- First of all, we clean the surface to be painted from dirt and dust, and then wipe it dry.
- We sand varnished furniture with sandpaper.
- Before painting, it is advisable to coat the surface with a special primer. This way we will achieve the best adhesion of the paint to the coating.
- We cover the area that we do not want to paint with old newspapers or plastic wrap, and also protect the surrounding area from excess paint when spraying it.
- We use masking tape to tape off parts of the furniture that are not to be painted, as well as to obtain a smooth edge to the area to be painted.
- We protect our hands with gloves.
- Before using the container, shake it vigorously for several minutes. We spray from a distance of 25–30 cm from the surface to be painted.
- Designers advise boldly using bright contrasting shades, decorating the surface with drawings, as well as decorative elements, colored film and various moldings. The main thing is not to be afraid to fantasize, be creative and realize your most unusual ideas!
Well, a selection of our photos will help you look at old furniture in a new way!

1. To turn an old dark chest of drawers into an original one dressing table, just update it with bright paint. You can purchase new handles for doors and drawers, or clean the finish of old ones using a special metal cleaner.

2. New interior design is not a reason to replace furniture. Using paint, you can change the shade of a table or chest of drawers, fitting them perfectly into the surroundings. By covering the area around the moldings with masking tape, you can easily paint them the desired color. In this case, golden strips and handles perfectly decorate the white chest of drawers.

3. A dull, unsightly chest of drawers that you wanted to push into the darkest corner of the dacha can become a real decoration for the living room. To do this, all its elements are painted with white paint. Gray moldings will perfectly highlight the drawers and contrast with the main color. The color composition will be complemented by original silver handles.

4. Wood is an excellent texture for creating decorative effects. This chest of drawers was painted White color, after which the boxes were covered with colored film and highlighted with moldings. New fittings gave the composition a complete look, allowing the old furniture to be updated and turned into an ideal addition to the interior, decorated in light colors.

5. Don't rush to get rid of your beat-up desk. The white shade will refresh and allow you to update old furniture. And with the help of masking tape, you can experiment and create a pattern on the drawers that will help fit the table into its surroundings. In this case, the color shades of the drawers are ideally combined with the decorative shelves on the tabletop.

6. In an hour and a half, you can repaint an old cabinet white and creatively decorate its door with black squares. We treat the interior space using an aerosol can with yellow paint. Unusual handles will perfectly complement the new look of your cabinet, which will become a decoration in the hallway.

7. An old Soviet-era lacquered cabinet gets an updated look with two contrasting shades. Their bold combination is perfectly complemented by thin moldings painted with golden paint. The handles on the doors are also processed in the same way.

8. To update your grandmother's old chest of drawers, you can paint its frame white and make the drawers gray. Then, using a stencil and white paint, we create a magnificent openwork effect on them. New fittings will complement the look. By the way, the boxes can be swapped, after which your family will definitely decide what you bought new furniture!

9. From old cabinet you can make it great serving table. Aerosol paint will help create smooth color transitions that look impressive thanks to the combination of contrasting shades. A minimum of work - and such a great result!

10. The updated chest of drawers organically combines light and dark shades. An original decorative element was created on the drawers using masking tape. The hardware looks like new after applying gold paint.

11. Using stencils, you can easily update old furniture, making it fashionable and stylish. This chest of drawers with an original ship design will now decorate the nursery. Contrasting color combinations look great here.

12. Old wooden chairs can be easily restored by painting the frame with bright paint and replacing the seat upholstery. In this case, the yellow paint harmonizes perfectly with the golden pattern of the fabric. Original, practical and inexpensive!

13. You are quite capable of making a bright designer chair! We paint the frame of the ancient exhibit with bright paint, change the seat upholstery and make striped covers to match the main shades. A small contrasting pad – and the harmonious look is complete!

14. So creative coffee table can be done using a stencil. First, we paint the entire structure with white paint, wait until it dries completely, and then put the stencil on the tabletop and spray it with a bright blue tint. The new table is ready and fits perfectly into the interior!

15. A shabby wooden chest of drawers is a great opportunity create something special with your own hands. Bright sunny shades, interesting color combinations and new fittings will help update old furniture and turn it into original decoration your bedroom.

16. An excellent solution: the green chest of drawers are visually highlighted with the help of thin moldings painted white. Using masking tape, you can easily and simply paint thin furniture parts in the color you want. New handles on the drawers complement the attractive look of the chest of drawers.

17. The old bedside table was changed beyond recognition with the help of bright green paint and decorative film that covered the tabletop. The old fittings were used - they were removed and painted black. Stunning decoration original interior!

18. Skillful hands turned an old bed into a small sofa, with its headboard becoming its back! The structure is painted white, the seat is upholstered in attractive fabric, and cute cushions complete the new look.

19. Grandma's old chest of drawers turned into an elegant dressing table for modern bedroom. Delicate pastel colors are complemented by the original design of the decorative film that covers the doors. You can update old furniture very easily, getting great results with minimal effort!

20. A section of an old Soviet slide was turned into an excellent storage unit. The base is painted white, the doors are papered decorative film pleasant colors and decorated with new fittings. Simple solutions– and global restoration!

21. If you can draw, you can decorate white dresser drawers with bright designs or intricate patterns. To create them, choose colors that match the shades of the interior.

22. This folding table gets a makeover with yellow paint and an original pattern on the tabletop. Using stencils you can create a variety of color compositions, which will perfectly fit your updated furniture into the surrounding environment.

23. The old shabby desk began to look stylish and modern. Unusually designed legs give it an elegant look, and bright hues refresh and renew.

24. Updating old furniture, or rather this bedside table, is easy and simple. It is enough to cover it with white paint, and draw the pattern on the doors with a regular marker with a thick pen, and then fix the result with colorless varnish. You can complete the work by installing new fittings. After all, manufacturers today offer huge variety handles and hinges of all shapes, colors and sizes.

25. If you no longer like the new coffee table, hurry up and get some paint! By using aerosol cans we change the color of the frame - and now the updated piece of furniture pleases the eye.

26. Painted with bright colors, this garden group looks fresh and festive. A combination of contrasting shades looks advantageous, as well as bold accents created with the help of multi-colored pillows. Such garden furniture can decorate any terrace.

27. We clean the surface of the old chest of drawers with sandpaper, removing the peeling varnish. After this, apply primer and paint. In our case, the old fittings only emphasize vintage style updated interior item. Fashionable, creative and tasteful!

28. Using paint, you can update old furniture and combine tables and chairs from different groups into a single composition. We paint the table white and cover the seats of the chairs with white fabric. Fresh furniture is pleasing to the eye!

29. Do you want something new? A kitchen cabinet can be changed beyond recognition by painting its frame and drawers one color, the countertop another, and installing new handles. Feel free to experiment with colors and accessories!

30. Don’t rush to send your old Soviet-era table-book to the landfill. Using stencils and paint, you can create a fancy design on furniture, after which you won’t even need a tablecloth for such a table.

31. Children's furniture should be bright and attractive! You can update old furniture and create unique interior together with the child, painting the table and chairs. Add more colors and contrasting combinations, interesting designs and patterns. Your baby will sit at such a table with great pleasure.

32. Old chairs will look like new after painting and reupholstering. Minimum effort – and great results!

33. This well-worn stool now looks bright and fresh. Pleasant contrasting shades allow you to update old furniture, creating a new look. A comfortable and practical stool will become a real decoration of the kitchen or dining room.

34. And this is how you can update a stool for a nursery. By using bright colors paint old and shabby furniture has become fashionable and creative. Agree, such a beautiful stool has a place in a new nursery!

35. White interior color is one of the newfangled modern trends. Light furniture looks light and elegant. At the same time, there is no need to spend significant funds - you can update the chest of drawers with your own hands using high-quality paint, making it an effective element of a fashionable interior.

36. An antique mirror frame will look like new after painting. A spectacular shade will help her regain her former chic, and you will refresh your interior!

37. Color accents are very important to create modern interior. You can decorate the room in two primary colors, and use a third to highlight the details. Spray paint can help give objects the desired shade, say golden.


38. 39, 40. Bright doors will become a real decoration of the interior, emphasizing the excellent taste of its owners. Using masking tape and high-quality spray paint, you can give the canvas and door frame any, even the boldest shade, and also create a spectacular combination of contrasting colors.

41. Feel free to experiment with contrasting shades! Such furniture will reflect your individuality and creativity.


42, 43, 44. Bright colors, interesting combinations of shades, new fittings - and a shabby chest of drawers is unrecognizable! Updating old furniture is easy and simple with spray paint. All you need to do is choose colors, add imagination and create the interior of your dreams!

45. Designers do not have the concept of “outdated furniture” - only vintage, which means it is certainly fashionable! Add fresh shades and create an original interior!

46. Painting tape will help you create creative geometric designs on your furniture. Add accessories to match the chosen shades - and enjoy the new look of your home!

47. Bright bold shades will transform old furniture, which, in turn, will refresh the room and fill it with inspiration. After all, after painting a shabby table, you will want to change everything around it!

48. You can paint the outside of the rack with one color, and inner space– to others. It will turn out bright, bold and original!

49. With the help of spray paint and your imagination, you can easily and simply update old garden furniture. The most unexpected decision is sometimes the most correct one. Choose a creative path to create original garden compositions!
![]()
50. Bright, fresh shades of updated furniture will fill you with positivity and bring back a great summer mood. With Motip aerosol paints the world around you becomes more beautiful!
When starting to update your furniture, don't be afraid of minor difficulties that you may have to face. After all, an excellent result will be a reward for your efforts and will inspire you to create a unique, original interior for your home!
Many hobbyists transform old items by breathing into them new life. By spending a little money and personal time, you can restore the chest of drawers yourself, making it more modern and suitable for the interior of the room.
Let's tell you how you can do it yourself.
Materials and tools
Before carrying out restoration work at home, you should prepare necessary tools. In this case, the process will go faster.
Materials and tools that will be needed for work.
- Sandpaper, it is better to use fine-grained sandpaper.
- Sander.
- Brushes or roller for painting.
- Paint and tray.
- Putty for woodworking.
- Appliques and stickers (in case of additional decoration).
- PVA glue.
Reference. The list may vary depending on personal preferences in furniture restoration.
Preparing a chest of drawers for restoration 
The final result directly depends on the preparatory process. The chest of drawers that we are restoring should be thoroughly prepared for transformation. This will speed up the restoration process and help extend the life of the product.
- First of all you should empty all drawers from other things and objects. Old handles and fasteners must be unscrewed. If desired, they can be left, treated with paint to obtain a new, more attractive color.
- We thoroughly wipe the surfaces of the chest of drawers from dust and dirt.. To do this, use a special detergent for cleaning wooden furniture.
- If the drawers are decorated with carved elements, dust may accumulate in the openings and cuts. For more thorough cleaning, you can use a toothbrush..
Advice. It is better to avoid modern alkaline cleaners. This may damage the finish of the dresser. A solution with laundry soap is suitable for cleaning.
- By using grinder we treat the surface of the chest of drawers, carefully removing the old coating. IN hard to reach places connect to work sandpaper.
- If the fasteners are loose, they can be unscrewed and treated with PVA glue for reliable fixation.. The slats for moving boxes can also be replaced with modern runners.
- The surface of the furniture is treated with the first layer of primer.. Leave for at least 12 hours until completely dry. After that apply a second layer, leave for another 12 hours. In this case, work should be carried out outdoors or in a well-ventilated area.
Important! The drying time for the primer can be up to 24 hours. It depends on the chosen composition. Necessary information indicated on the packaging.
Preparatory work is a rather lengthy and labor-intensive task. For quality and effective result All steps should be performed one by one. Otherwise, the process will not have the desired result and will be in vain.
Options for restoration work
In order to return furniture to an attractive and bright appearance, there are several methods.
Coloring 
The most popular type of restoration is staining. Painting work is the simplest method for changing the image of furniture. New paint will help refresh the chest of drawers and fit it harmoniously into the interior of the bedroom or living room.
The chest of drawers can be painted a different color, use several combinations, and apply bright designs of a different shade on top of the main paint.
Important! All work is carried out exclusively on fresh air.
Operating procedure

Before painting, it is necessary to clean the surface of the chest of drawers from the old coating. Here you can use acetone or a special cleaner. Using a brush, apply the cleaner to the surface. Experienced craftsmen apply cling film, which is applied to the surface for 5–10 minutes. In conditions of interruption of air supply cleaner or acetone works much faster.
Important! When working, do not forget about a respirator and gloves to avoid injuries.
After the required time has passed, remove the film. After such “preservation” the paint easily comes off the wood. In hard-to-reach places, you can use a spatula or brush soaked in acetone.
At the second stage, you need to prepare the chest of drawers for painting. For this we use  grinding machine. With its help, it is easy to remove the remnants of the old coating and level all surfaces. In hard-to-reach places we use fine-grained sandpaper. After sanding, we treat the chest of drawers with putty.
After preparation, you can proceed directly to coloring.. Pour the paint into the tray; a small roller or brushes (optional) will do the job. We treat the surfaces with paint and let them dry. It is recommended to apply two layers of paint to obtain a more saturated shade.. We fix the result by treating it with varnish. Inner surface drawers can be finished in white or beige.
 Aging
Aging
Nowadays, furniture made using the “aging” technique is very popular. If desired, a painted chest of drawers can be decorated using the antique imitation technique.
After processing, the paint is erased in some places using sandpaper. When the desired result is achieved, the surfaces are covered with wax. You can use a regular candle. The chest of drawers is ready. It will become the main decoration of the room and will attract the attention of every guest.
Additional decoration
The decoupage technique is also not inferior in position. With its help you can achieve a complete renovation of furniture.

In this case used for decoration additional elements . These can be applications, stickers, logos of various brands or popular music artists. Drawings and applications are chosen at your own request.

Also as decoration you can also use collages from colored paper, newspaper and magazine clippings or photos.

Many craftsmen also use unnecessary rolls of wallpaper, lace or scraps of fabric. When decorating with additional fittings, you can fully reveal and show your imagination.
After the preparatory process and painting, you can begin to design the fittings.
- Cut out decoration elements, we roughly place their position on the surface of the chest of drawers.
- The wrong side of the pictures treated with PVA glue, we perform a similar action with the chest of drawers.
- Place the drawings on the surface and let dry.
- In order for the fittings to look more natural, it is necessary to remove as much of the gluing edges as possible. To do this, you can lightly rub the surface with sandpaper.
- Large elements look harmonious on drawers, on the sides or on the top shelf. You can decorate the corners with small details.
Repair work 
Antique pieces of furniture need more than just updating their appearance. To update, you will need to perform various repairs.
Restoration of fixtures and fittings will positively affect the appearance and significantly extend the service life.
Another option is alteration. The chest of drawers can be transformed with the help of several auxiliary slats and the drawers can be redesigned. With this approach, the product undergoes a thorough transformation and radically changes its appearance.
Antique handles, if they are tightly installed and not damaged, could be slightly updated. All you need for this is bright paint. Gold or silver look especially impressive. After painting, carefully paint the handles using a thin brush.
For more comfortable use, you should replace old guides with new runners. We remove the old runners and mark the location of the new ones. Using screws and a screwdriver, we secure the runners to the surface of the boxes.
Useful tips 
- For repairs and restoration you must first change the fasteners, and then start decorating the appearance.
- Removal of the old coating during the preparatory process is necessary. If you ignore this point, the restoration process may be in vain.
- Don't forget about protective measures . Working outdoors, wearing gloves and a respirator will help protect against serious harm to health.
- Apply primer, paint or varnish only after the previous layer has dried. Otherwise, streaks or cracks may appear. Then the work will have to start again.
A small but roomy chest of drawers has become an integral part of the design of any room. However, many products are not attractive in appearance or price. In this case, you can use a little skill and restore old chest of drawers. Such a piece of furniture will stand out for its uniqueness and originality.
Despite the fact that Soviet-era furniture is quite reliable and strong, it is not considered beautiful, much less competing with modern furniture. In addition, by this time it was pretty worn out and required repairs. Even in such conditions, the owners feel sorry to part with her. To buy a new, modern one, you need a lot of money, since furniture has always been not cheap, and it is not cheap now. In this case, there is one alternative option to leave the old furniture and not buy new - this is to try to update the furniture with your own hands, giving it an attractive and modern appearance. Cabinet furniture can be remade quite easily, especially since all the materials necessary for this are available. In any case, purchasing materials to remake furniture will be much cheaper than buying new furniture. One of the easy and accessible techniques is changing the color and replacing the fittings. There won’t be any special problems with the fittings, but changing the appearance is much more complicated. There are several options, but the two most common are painting and gluing special film or wallpaper.

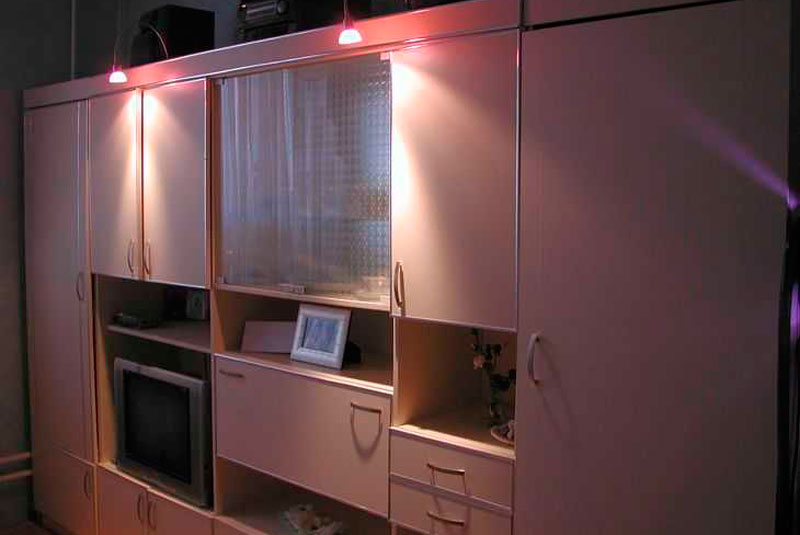
The most affordable and simplest option is to cover old furniture with self-adhesive film. On sale you can find film for every taste, both colored and monotonous, in various colors, shades and textures. Many people prefer wood-effect film, but there are other options that meet the spirit of modernity. This approach can really turn an old wall into furniture that will have an attractive and modern appearance. It’s not difficult at all; it’s enough to do your work slowly and carefully, which will allow you to get an interesting result that deserves attention. To verify this, just look at 2 photos. The first photo shows an outdated Soviet wall made of chipboard, and the second photo shows the same wall, but after updating.
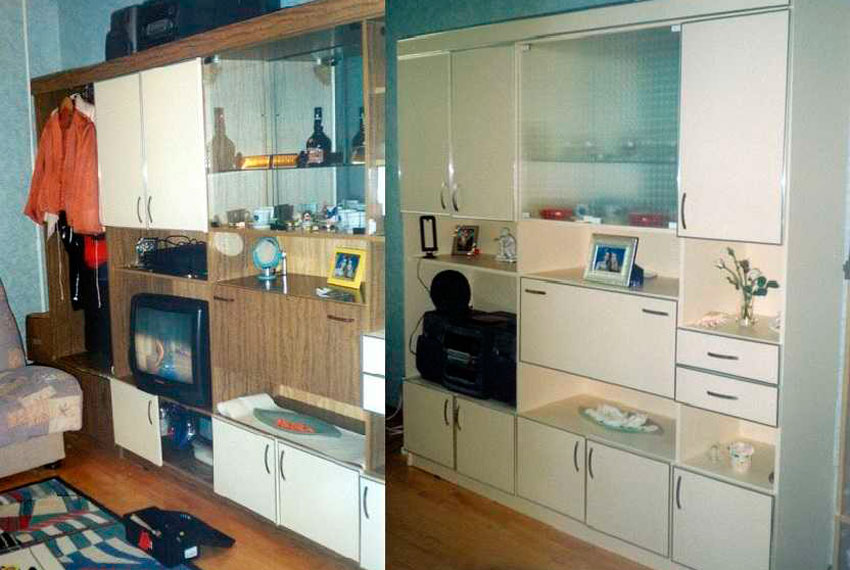
The wall received a new appearance thanks to the use of compacted furniture self-adhesive film, cream color with a matte surface. Where there was an open part of the wall, there were glass doors covered with a translucent matte film. For the edging, a furniture layout was used, chrome-colored, and also self-adhesive.
The work consists of the following stages:
- The old wall is disassembled, everything that is not needed is removed, including the fittings.
- All surfaces are cleaned of dirt and degreased. To do this, use a soft rag and detergent. After this, the product is washed off with warm water and vinegar and finally the surfaces are wiped with a dry, clean cloth.
- Fragments of the required size are cut out of the film, with a margin of up to 1 cm. After pasting, the excess film is cut off with a stationery knife.
- Before pasting, the surface is irrigated with water from a spray bottle. A wet surface will allow you to accurately position the film, since it can be moved, or even peeled off if it was not possible to glue it properly the first time.
- Before pasting, it is removed from the film protective film, after which it is laid on the surface. Having correctly positioned the film fragment, begin to smooth it with a soft cloth in the direction from the middle to the edges. The main thing is that there are no air bubbles left under the film. In this regard, all work is performed slowly and very carefully.
- When bubbles form, they are pierced with a thin needle and the air is expelled from them. This operation is also carried out using a rag, moving from the edges to the puncture point. After this, this place is thoroughly rubbed with a rag.
- After the film is glued, a thin cotton fabric is taken and placed on top of the film, after which an iron with medium heating temperature is used. The fabric is ironed together with the film.
- Finally, the trim (edging) is glued and the fittings (handles) are installed.
- This technology is applied to every part being glued. Glass is glued in the same way, only from the inside. After complete assembly, you will get a completely new furniture wall. In this way, you can breathe a second life into items such as bedside tables, chests of drawers, cabinets and kitchen furniture.
After the wall was successfully pasted over, it was also updated old wardrobe and installed on the right. The result is that the entire wall is filled with updated furniture. Using the same technology you can update the old one kitchen furniture- glue self-adhesive film and replace the handles.
There is a second option for upgrading furniture, which is less expensive and, what’s most interesting, does not require disassembling anything. In this option, only furniture doors are covered, not with film, but with non-woven wallpaper. For gluing, PVA glue is used. To prevent the edges of the wallpaper from lifting, they are cut into blanks, the size of which is 5 mm smaller size door Judging by the photo below, the result is not bad at all.

The advantage of such a finish is that the finish can be replaced with new wallpaper at any time.
As a rule, a surface covered with wallpaper lasts for five years. A similar technology was used to decorate the kitchen set. To make the surface washable, the wallpaper is covered with two layers of PVA glue. The most important thing here is to do everything carefully so that no smudges form, since you will have to work with a brush.
Alternatively, the wallpaper can be opened with varnish, but before that it is better to experiment on unnecessary wallpaper. It is important to determine what the reaction of the wallpaper to the varnish will be. When choosing a varnish, you need to know that acrylic and cellulose provide a transparent surface, while polyurethane will turn yellow after a certain time. Polyurethane varnish is practically resistant to solvents and, if it needs to be removed, you will have to resort to mechanical action. Typically, coarse sandpaper is used for this or an electric drill with an attachment is used.
How to update a chest of drawers
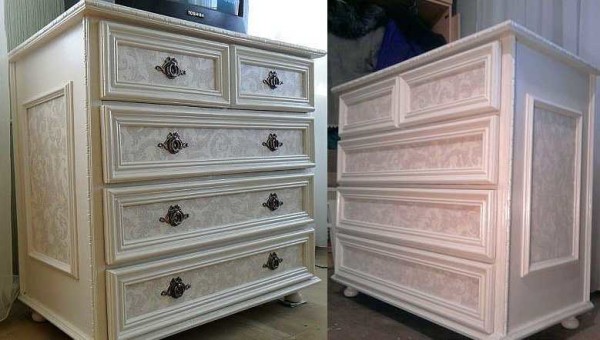
An old chest of drawers can sit in the attic for several years and lose only its appearance. As a rule, the old varnish coating cracks, but otherwise it can be envied modern furniture. It does not dry out and remains as reliable and strong as it was before. In this case, the chest of drawers undergoes a more complex renovation, using painting and decoration, using polyurethane molding and wallpaper.

Stage No. 1. All fittings are removed from the chest of drawers, after which the old covering is removed. As a rule, the old varnish coating is removed mechanically, using sandpaper (coarse) for this. All sinks, cracks and chips are sealed with putty and wait until it dries. After complete drying, the surface is sanded with fine sandpaper. The result is what is shown in the photo below.

Stage No. 2. Installation of polyurethane moldings. The main task is to choose the right moldings so that they are neither small nor large. Basically, products are selected up to 5 cm wide and very narrow if you look at them in profile.
The purchased moldings are very carefully and accurately cut into pieces of the required length, and the corners are cut at an angle of 45 degrees. At the same time, you need to make sure that the drawing matches. The molding is attached using PVA glue. Alternatively, you can use self-tapping screws for reliability. At the same time, before screwing them in, recesses are made for them. All recesses are filled with putty very carefully, otherwise there may be problems when the putty dries.

Stage No. 3. All surfaces for gluing are treated with a primer. As a primer, it is possible to use PVA glue diluted with water in a ratio of 1:2. After the primer has completely dried, begin painting. As a rule, 2 layers are applied acrylic paint water based. The color is coffee with milk, although the color in the photo does not match the one indicated due to poor color rendering.

Stage No. 4. Decoration is carried out on the basis of wallpaper made using silk-screen printing technology. Sections of wallpaper are cut precisely according to the dimensions of the inner part, bordered by the molding. The wallpaper is glued using PVA glue. After complete drying, the entire chest of drawers is coated with water-based varnish in 2 layers.

Stage No. 5. Finally, modern legs in the form of furniture wheels are screwed onto the chest of drawers and handles are installed.
If you carefully study the technology, everything is much simpler than it might seem. Although, all stages require a certain accuracy, otherwise there will be problems with the appearance. You can update your wardrobe in the same style. The result is not a bad set for a room or bedroom. It may not be entirely modern, but it is original and stylish, and most importantly, very cheap.
If old furniture has a varnish coating, it is very difficult to get rid of it. If there are no obvious flaws, it is better to use a primer for complex surfaces and only then start painting. This approach will minimize the effort to update old furniture.
Updating an old bedside table
The photo below shows the process of updating an old polished bedside table. First of all, the polish was removed, after which the surfaces were filled and sanded. After that, it was painted with acrylic paint in two layers. Finally, the paper from the gift bag was pasted onto the door, thanks to which we managed to get original drawing. After this, the entire bedside table is covered with two layers of semi-gloss acrylic varnish.

All stages are not particularly difficult if you have the slightest skills. All processes correspond to the sequence of actions described during the restoration of the chest of drawers. The result exceeds all expectations.
 This old bedside table subject to update.
  This bag will serve as an excellent decor for doors.
  The result of updating an old bedside table.
 Remaking furniture with your own hands is simple and accessible to everyone, if desired. Unfortunately, without desire nothing will happen. Below in the photo, you can see a bedside table that was redone using a very simple method: the bedside table was simply covered with embossed wallpaper and varnished twice.
How to remake a table
By adopting this technology, you can simply transform an ordinary coffee table into a piece of modern interior design. They simply take it and cover it with wrapping paper. This is thick paper that sticks without problems and does not become limp under the influence of varnish.
First you need to work on the legs and edges of the table top. They need to be painted a light color so that they blend better with the new style. After this, you can begin further work.
Before pasting, you should cut out a piece of paper several times. large sizes than the size of the tabletop. PVA glue is used for gluing. The surface is well rolled with a roller so that there are no air bubbles. The result should be a perfectly smooth surface.

After this, remove excess material by running a fine-grit sandpaper along the edge of the tabletop, pressing the paper against the tabletop. This method allows you to remove excess material very smoothly, which is more like a professional action.
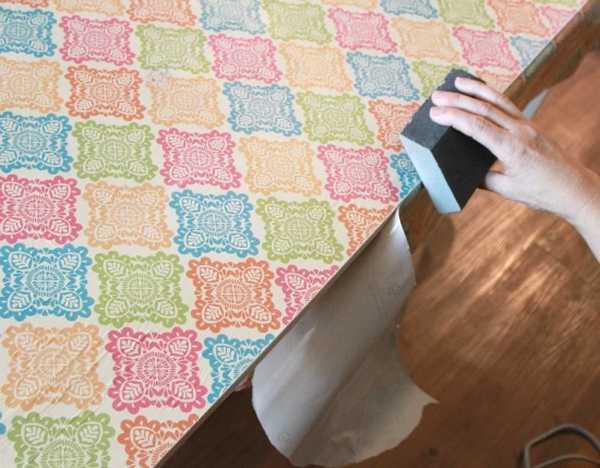
Finally, the surface is covered with two layers of varnish. At the same time, the layers should be thin. Each layer is applied perpendicular to the previous one.

Furniture remodeling: photo ideas
Making a designer chest of drawers with your own hands means turning a simple, ordinary chest of drawers into an expensive designer item. Few people can afford to buy designer items - they are not cheap. It is within our power to surround ourselves with beautiful things that make us feel good and cozy – we just have to really want to. Creating a special mood in the house, giving uniqueness to the atmosphere - it’s all in our hands. If you are a novice decorator, you can start by decorating your bedside table with your own hands. We offer 2 master classes: on chest of drawers decor, and on volumetric decor wooden parts putty.

Dresser decor in English style (master class)
Decorating an old chest of drawers from an Ikea store is our task for one or two evenings. We will do the decoration using acrylic paint, red and blue pigment, with which we achieve the desired color by mixing these components. In addition, we will need putty in order to make the surface textured. Then you will need oil paint and toplazure. Toplazur is decorative coating with natural wax, which will preserve the unique color of the wood.

To work you will need:
- White acrylic paint, water-based.
- Ready finishing putty.
- Red and blue pigments.
- Walnut topla glaze.
- Brown oil paint.
- Decorative furniture nails.
- Putty knife.
- Masking tape.
- Roller and brush.
- Sandpaper.
- Your own wooden chest of drawers.
Let's get started
Before decorating, you need to remove all the handles from the chest of drawers and wipe it from dust with a damp cloth.

Next, we take a spatula and spread a thin layer of white putty on the fronts of all our drawers, that is, on the visible part of the chest of drawers. There is no need to adhere to uniform puttying of the surface; the board should be textured, not simple. Spread the putty stains on the board. We wait for the putty to dry and go over the top of the drawers with a roller of white acrylic paint and a semi-dry brush. Masking tape We glue and separate the places that we will paint in blue and red.

We take 2 glass jars and make the colors we need. Add blue and red pigments to white acrylic paint. The more pigment, the darker the paint will be.

When painting, we see some spotting - this is how it should be. We need an unevenly painted surface.

Let's paint it again, otherwise the color will be too pale. This is how it should turn out.

Then we take sandpaper and sand the top of the chest, side edges, and corners.

Then we take a sponge and begin to rub walnut-colored toplazure over the entire surface of the chest of drawers, with the exception of the drawers. We especially intensively process the side parts, the corners of the facade, and the top of the chest of drawers. Next, we begin to hammer furniture nails along the front of our chest of drawers. Make sure that the distance between the nails is the same.

Then we screw on the handles that we removed at the beginning of the work, or others that suit the style. We use a brush and oil paint around the nails and handles to create a dark shade. Let's finish the job.

People often throw away old furniture not because it is broken, but because they are tired of old bedside tables, sideboards, or chests of drawers and no longer look beautiful. You often see discarded furniture from good wood, and not from modern chipboard and fiberboard. Old furniture undoubtedly deserves to be given a second chance, because this is a value that, in skillful hands, turns into a stylish designer item. Yes, of course, you will have to put in your own hands and effort, but such decor does not require large material costs, and the work will definitely please you.

With the help of such voluminous decor, you can decorate the cabinet with your own hands. With a voluminous decoration you can decorate not only a chest of drawers or a bedside table, but also decorate a buffet with your own hands. Next you will see stencils that may be useful to you in your work.

To work you will need:
- Wooden detail of a bedside table or chest of drawers.
- Putty knife.
- The stencil is plastic or thick cardboard.
- Acrylic putty or volumetric paste.
- White and brown acrylic paint.
- Brush or sponge.
- Painting tape.

Let's get started
We fix the stencil on the surface of the wood, securing it with tape. Apply putty to the stencil and level the surface with a spatula. Then remove the stencil with both hands and leave the work to dry.

This is the kind of voluminous decor we got.


Or another option: after drying decorative element paint the surface with brown acrylic paint, then rub the pattern itself and the surface next to it with a candle.


Not everyone has the talent of an artist, and not everyone knows how to draw. It is in such cases that stencils can come in handy. We transfer it to cardboard, cut it out, and use stencils for work.


I won’t reveal a secret if I say that slate (chalk) paint is now very often used to decorate furniture. It applies well, uniformly to the surface, and does not require special effort for coloring. But the price for it is quite high. Therefore, we want to offer a recipe that will help you make your own chalk paint for decor.
Paint composition:
- 250 grams of latex or acrylic water-based paint.
- 2 tablespoons of regular plaster (can be taken from a children's kit). Plaster can be replaced with chalk.
- 1 tbsp. spoon hot water.
Preparation:
- Let's take it glass jar, pour 1 spoon of hot water into it, then pour gypsum into it and mix well.
- Immediately pour paint into this mixture (do not wait for the plaster to harden).
- Mix the resulting mass thoroughly. Chalk paint is ready. This paint can be used to paint a chest of drawers, a nightstand, etc.


Dresser decor options
There are many decoration options: using fabric, acrylic or oil paints, remnants of wallpaper, paper, volumetric decor. Even if you just change something as small as fittings - buy interesting metal or wooden handles, metal locks with keys, and replace these small parts– this can completely change the look of your furniture.