Wooden shower frame. How to build a summer shower for your dacha with your own hands: drawings with dimensions, step-by-step instructions, photos and videos
During the summer work at the dacha there is a desire to freshen up under the pressure of warm water. Not everyone has country house convenience, so a summer structure in the form of a shower can be made in the yard.
Summer showers for dachas are the most different forms and layouts of varying complexity. Today, many manufacturers offer simple, easy-to-install shower stalls with a frame made of aluminum profile and a cover made of polycarbonate plates. A 100 liter plastic container is installed at the top. Such a shower can be put away in the utility room for the winter. Buy Summer shower For a dacha of this type, you can either buy it in supermarkets or order it from online stores, of which there are many online. You just need to choose the appropriate configuration, height and internal volume of the structure itself.
There are also more complex stationary buildings that are used not only in summer, but also in winter. They are usually created from a capital foundation and building material(foam block, gas block, brick, concrete block). An intermediate and one of the most commonly used materials for a classic summer shower is wood. In any case, building a summer shower for your dacha with your own hands (see photo) will not be much of a hassle, as long as you plan and prepare everything carefully. In modern conditions there are many opportunities and means (materials, equipment, tools) for quick solution any dacha task. How to build a summer shower at the dacha with your own hands and which option to choose? 
Types of summer showers and principles of their structure
Depending on the complexity of the future structure, several types of these useful structures are distinguished.
Simple summer shower.
At the dacha, it can be installed in a hidden part of the garden plot. Making such a structure will not be particularly difficult. To do this, it will be enough to prepare four supports made of wood, metal or durable plastic. They go 80 cm into the ground. To do this, holes are dug to fit the diameter of the material. Then the supports are installed in the holes and filled with concrete. 
For side walls, you can use a simple opaque fabric, a sheet, a tablecloth, blue or plastic film white. A watering can with a special device in the form of a pedal is installed on one of the supports, which can be bought at a plumbing store.
The shower tank can be made from a 15 liter bucket. (for one person this is quite enough), but you can install plastic container special purpose. One end of the hose is connected to the water supply, and the other is inserted into the tank. There is a hole at the bottom where the watering can is connected. The pedal and the faucet of the watering can are connected with a rope. The simplest shower for the cottage is ready.
Ready shower for the cottage.
You can buy an inexpensive summer shower in disassembled form. He's at the dacha  assembled at a pre-selected location, according to the included instructions. Its price depends on the internal volume of the cabin, the quality of polycarbonate panels, plumbing fixtures(mixer, watering can, shower stand, shelf with hooks), water tank capacity, as well as the presence of an additional heating system. However, you can experiment with the configuration according to your taste and financial capabilities.
The main thing you need to pay attention to when buying such a shower is the presence of a hygiene passport, instructions for assembly and operation, as well as a certificate for the construction.
An undeniable advantage such a summer shower in the country (see photo) is its transportability and the ability to be stored disassembled in the winter in a utility room country house. This is one of the most budget and low-cost projects for installing a shower stall in the country in the summer.
Wooden summer shower.
How to make a shower with your own hands from wood? A question of this nature can often be heard from summer residents who are just starting to settle in their dacha. 
Wood is a universal material. You can easily create any shower stall design from it. Working with wood is very easy and interesting. What will you need to create a wooden shower stall? A drawing is drawn up in advance and the quantity is determined required material. Metal corners (for the frame), screws, and nails are used as fastening accessories.
Having a screwdriver makes the task much easier. When everything is ready to begin work, you can safely begin to assemble the frame. It must be made of durable timber with a diameter of at least 80 cm to support the weight of the planned container. Then it is covered with boards. You can choose a wide variety of cladding, because it not only performs a decorative and covering function, but also strengthens the entire frame. You can also cover the roof with any material. You can use porous polycarbonate, profiled metal sheet, slate.
It should be noted that the cost of such a structure, if available, own material will be much cheaper than a ready-made booth purchased.
Capital structures of a summer shower. You can build a summer shower at your dacha with your own hands from bricks, concrete blocks, stone, and gas blocks. This method requires from the owner not only design thinking, but also special skills. Anyone can build walls, but here the question of the reliability of the structure often arises. What needs to be taken into account when constructing a capital building?
- Foundation. One of the most important, basic elements of any capital structure. The foundation walls must be at least 30 cm wide. They are made from concrete and stones. For country houses Pile pit foundation is best suited. If it is not possible to install piles, use concrete, columnar foundation with the arrangement of pillows. Asbestos or metal pipes are used as piles. They are installed in pre-drilled openings using a drill. Then they are concreted. The depth of the openings should not be less than 1 m.
- Septic tank. It can be designed so that a septic tank is installed under the foundation for waste water. It is required if you plan to install a sanitary unit with a toilet. As a septic tank, you can take a container (barrel, cube, concrete walls with cover). For a shower stall it will be quite well equipped drainage system in the form of routing plastic pipes.
- When the foundation is ready, you can proceed to the construction of walls. The only rule for installing walls is level. The guideline for this is a stretched thread and plumb lines at the corners.
- After installing the walls of a country shower, you can also make a roof with your own hands. To do this, you will need help or advice from a specialist. There are many roof installation options available online. The best one will be gable roof. A container of water fits well under it. For convenience, hoses are inserted into it for supplying and draining water (if the shower will not be used in winter).
- The next step is the installation of doors and windows (if provided).
 Interior finishing and installation plumbing equipment carried out according to the individual wishes of the owner.
Water supply and installation of a tank for a summer shower for a summer cottage
Immediately before lifting the container onto the roof of the house, it is necessary to install a faucet with a spray nozzle. Ready-made tanks for summer showers have a built-in valve system to prevent the tank from overflowing. If it is not possible to purchase a tank, you will need to monitor the level each time you fill the water. To do this, a hole is drilled under the top of the tank and a tap with a hose is installed. When it overflows, water will flow out of the hose. Such a signal will indicate that the water supply needs to be turned off.
After installing all necessary components, the container is planted on the roof or next to it. If it is made of polycarbonate, it can be used under the roof. In principle, many summer residents place the container immediately under the cover. In this case, the water will take longer to heat up. The tank is attached to the base using metal ties. 
Building a summer shower in your dacha will not be difficult. If the cottage is used only in the summer, it will be enough to make a simple shower. If it will be visited in winter, it is necessary to construct a permanent structure and install additional equipment for heating water and the premises.
Ideas for a summer shower in the country, video
A dacha is the dream of almost every metropolis resident. Many city dwellers enjoy spending part of their vacations and weekends at their dacha. They enjoy working in the garden, gardening, and arranging the dacha itself: this way they are distracted from the noisy bustle of the city. It’s good if the site is located near rivers and reservoirs. The rest have to build their own country shower cabin on the site, equipping it with heating and a changing room. We will discuss how to do this with your own hands in this material.
Choosing materials for a country shower
A country shower with heating and a changing room is not so difficult to build. But how great it is to take a swim after a hard day in comfortable conditions. It's worth spending a little time and effort, and for your own convenience. In this case, it is absolutely not necessary to spend a large number of funds for construction and equipment of the structure.
For a summer shower, you can choose practical and not the most expensive materials. Firstly, you will definitely need cement mortar. It is better to install more massive structures on a poured foundation; for lightweight models, you can choose a pile option.
When choosing materials, you should be guided by the characteristics of the work. For a small pit for pouring the foundation, a shovel, available in every house, is sufficient. Pile structures will require narrow but deep holes, which are dug using special electric or pneumatic tools.
Choosing suitable material, take into account not only its cost, but also the characteristics and requirements regarding preparation and care (impregnation protective equipment, the need for timely ventilation, etc.).
What material to use to build a summer shower
- brickwork is not the most cheap option, however, the most durable of all. If you have brick left over from building a house, then choose this option. Such a shower with a dressing room and heating will last a long time;
Brick building
- You can often find wooden shower buildings in the country. Natural wood is environmentally friendly, looks impressive against the backdrop of nature and has quite acceptable strength. But here it is important to remember: to ensure the durability of the building, it is necessary to provide high-quality ventilation for the shower stall. For this purpose, during construction, wide gaps are specially left in the floor and walls. The disadvantage of this option is that in windy weather or when it gets cold, it will blow from these cracks. In addition, it is necessary to treat the wood with a fire retardant (fire retardant) to protect against fire, because the building is equipped heating devices(electric or fuel);
- a modern option is a garden shower with a changing room and heating made of polycarbonate. This material has a lot of advantages: while the sheets are light in weight, their cellular structure provides high strength. In addition, polycarbonate does not change its properties under the influence of natural factors. The ease of cutting and installation are also convincing arguments in favor of this material. Thanks to a lot of advantages, it is quite convenient to work with polycarbonate even for those who have picked up this material for the first time;
- outdoor showers are often built from plywood. This material inferior in strength to boards, but also costs much less. Plywood also requires treatment to protect it from fire, moisture and rot;
- Slate with a straight surface can also be used to build a country shower. It is more difficult to work with when cutting material, but it is strong and durable, and is not afraid of moisture, so it is quite suitable for building a shower cabin;
- sheet plastic is a moisture-resistant material that allows you to build a summer country shower with heating and a changing room yourself in the most short time. Varieties with different characteristics. When choosing, you should pay attention to strength, possible temperature range, lack of toxicity, including emissions harmful substances when heated;

Plastic shower
- It is also possible to use corrugated board or siding.
All sheet materials used as frame cladding. The frame itself can be made from wooden beams, metal pipes or profiles. Special attention deserves an upper deck on which the water tank will be placed. It must rest securely on the vertical parts of the frame and be strong enough to support the weight to the brim of the filled tank.
Heated tank options
The tank, that is, a container for water, is selected based on how many people will use the shower. If few people come to the dacha, then there is no need for a large tank. The compact container is easy to install, weighs little, so it heats the water faster. This is quite enough for washing 1-2 people.
There are several types of tanks for summer cottages, depending on the material they are made of:
- carbon metal. This material quickly becomes covered with rust, so its surface must be enameled. Its disadvantage is that with the slightest damage, corrosion develops over time and leaks form. Such a tank is not the best choice at all;

Carbon steel tank
- stainless steel. This material is not afraid of moisture and temperature changes, but it has another disadvantage - it is heavy, which is why it is necessary to build a more durable frame.
- Cink Steel. The coating lasts longer black steel, but also short-lived.
- plastic. Nowadays, country showers are increasingly made of plastic. Its basis is food grade polyethylene. Light weight, different colors, quick heating - all these are the advantages of plastic tanks for country showers.
Heating methods
There are two ways to equip your shower with heating:
- use solar energy;
- use a heating element - heating element.
For a dacha that is visited mainly in hot weather, a naturally heated option is suitable. To increase the sun's effectiveness on the water tank, choose a black container.
Artificial heating is carried out by a device such as a heating element. This device is sold separately, so you can equip your shower with it yourself. At the same time, you can purchase a ready-made container with an already installed heating element. Its advantage is the high-quality installation, as well as the ability to purchase a tank with a thermostat.
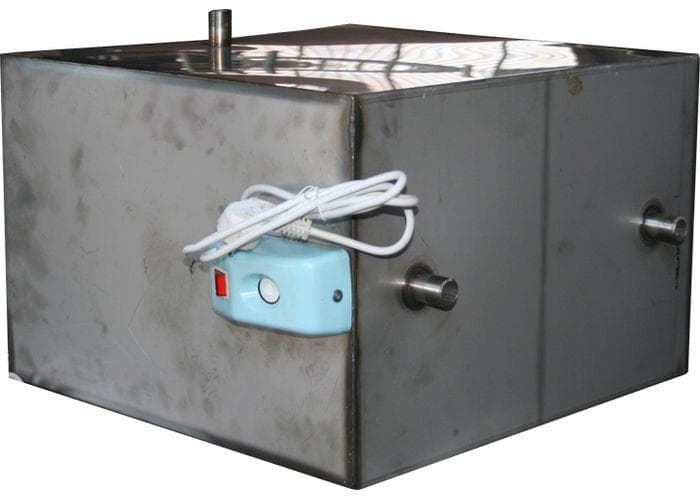
Tank with heating element
You set the temperature to which the water will warm up. Attach two containers to the roof, one of which will be with a heating element, and the second without a heating device. Thus, by mixing water, you can use your wooden or polycarbonate shower at any time of the year.
Draft drawing with a locker room
First you need to choose the place where the shower will be installed. It is best to place it on the edge of the site in a well-lit place on a small hill. The optimal height is 2–3 meters.

Street building drawing
The space that the cabin itself will occupy must be at least 100x100 cm. Together with the changing room it standard sizes can be 160x100 cm or a little more.
Having decided on the location, you can begin developing the project. Despite the simplicity of the design, it is better to first transfer your idea to paper. This makes it easier to identify bottlenecks and calculate the amount of materials needed.
DIY construction
The process of building an outdoor summer shower begins with preparing the frame parts. It is better to build it from pine boards. You will need:
- 4 horizontal frame parts (20x90x664 mm);
- Vertical jumper (20x90-664 mm);
- 2 lattice boards (15x90x700 mm);
- 7 planks (15x90x700mm);
- 4 vertical parts (20x40x1820 mm);
- 4 connections (transverse) (20x40x1820 mm);
- hose support (20x40x160 mm);
- 8 fixing strips (20x40x660 mm).
It is also necessary to prepare the following parts for the construction of the shower:
- shower head (with external thread) with a plate for fastening;
- connecting element with internal thread;
- couplings for connecting the shower to the watering hose (4 pcs.);
- coupling shut-off valve;
- clamps (6 pcs.);
- hinges 25x180 mm (4 pcs.);
- wood glue;
- long bolts, nuts, screws.
Construction must begin with the installation of support pillars. Then the frame is assembled separately and attached to supports. It is recommended to use long bolts for frame fastenings, since the structure must withstand the load from a filled water tank.
How to make a floor
The floor can be made of boards, fitting them together not very tightly so that water leaves the cabin through the cracks. But the disadvantage of this option is that cold air will come from under the floor. It is better to use a ready-made shower tray. A hose is connected to the drainage hole (water supply), through which the water will be discharged to the place intended for drainage.

Laying the foundation
Space delimitation
An outdoor shower can be separated: one part can be separated for a dressing room and covered with a plastic curtain, and the second can be made directly into a shower room. The second option is to install a partition made of moisture-resistant plywood or polycarbonate between these rooms.
Wall cladding and door installation
It is not necessary to install a door from the locker room to the shower - it is enough to hang a curtain made of waterproof material. However, if you have laid a wooden floor, then it is better to build a high threshold between the shower and the locker room.
The outer door must close tightly. However, a well-fitted door can swell from moisture and then jam. To prevent this from happening, you need to provide a gap between the door frame and the door, which will be covered by a seal attached along the contour door leaf or frames.
The frame can be covered with polycarbonate. The shower stall will be quite bright. You can also cover the walls with siding or cover them with clapboard, but then you will have to install artificial lighting.
Electricity supply
To connect heating elements to the electrical network, it is better to call an electrician who will select the required wire cross-section and do everything necessary to ensure safe operation device. It is better for an inexperienced person not to undertake this part of the work.

Electricity supply
As you can see, building a summer shower with a changing room and heating is not that difficult task, if you have the desire and opportunity to make such a shower with your own hands. To do this you need:
- Decide on a shower model;
- Choose a water heating method and materials;
- Find a suitable place for installation on the site;
- Build a shower taking into account all the rules listed above in the article.
Video
For an example of creating a warm shower for a summer house, see the video
Conclusion
Using this shower is easy and convenient. It can be used in the off-season, and, if desired, in the winter, you just need to insulate it. All in your hands.
It is unlikely that anyone would agree to deny themselves the pleasure of taking a shower outdoors allowing you to refresh yourself at the end of a hard day's work. In this article we will tell you how to make a summer shower with your own hands from various materials(made of polycarbonate, metal profiles, brick, wood), we will show the exact dimensions, and also provide photo and video instructions.
This approach to the manufacture of a shower structure will save on expensive materials, and what is equally important - to produce a structure that best suits your individual preferences.
Selecting a location and options

The place for the shower is usually chosen on open place, located at some elevation above the general level of the suburban area. Since structures of this type use solar energy to heat water, the place for them should not be located in the shade of trees or other high-rise objects.
It is known that on our summer cottages summer shower cabins of the most varied architecture are traditionally built (including quite original designs). Moreover, all of them can be reduced to the following execution options:
- lightweight buildings without strong side walls;
- lightweight structures equipped with improvised side walls;
- capital shower houses with walls made of polycarbonate or similar material.
Let's look at each of the above options in more detail.
Shower cubicle dimensions

The inside of the shower stall should be comfortable enough to easily bend, turn around and stand freely. Therefore, you can start from these sizes:
- Height 2–3 m.
- Length 1.9 m.
- Width 1.4 m.
These sizes are quite convenient. Taking into account the thickness of the walls, the room will be slightly smaller. In this case, the shower stall itself will have an average size of 1 × 1, as well as a dressing room of 0.6 × 0.4 m.
From scrap materials

The simplest shower design made from scrap materials contains a tank with a built-in tap, a standard shower head and a regular watering hose. Such a simple structure is installed near the house, and the tank is mounted on the wall or roof of the building at a height slightly higher than human height.
The location of the tank should be chosen in such a way that the sun's rays linger on it as long as possible during the day.
After fixing the collection container, a valve tap is built into it, onto which a hose of suitable length is put on with a shower head installed at its end.
The convenience of this option for a summer shower is that in this case you can do without installing a separate shower stall. The main thing you should pay attention to is to properly protect the wall and roof of the house from the destructive effects of moisture accumulating near the tank. For this purpose, the area of the building in the area where the latter is located should be insulated using special water-repellent impregnations or simply covered with several layers of ordinary oilcloth.
Note that this embodiment has natural disadvantages, which are as follows:
- In this case, the shower area is completely unprotected from the wind;
- a significant part of the daytime it will be in the shade of the house;
- there is a threat of gradual destruction of the walls of the house from moisture accumulating in this place.
Taking into account all the listed disadvantages, the use of such structures is, as a rule, limited.

The process of building a summer shower made of wood consists of several successive steps. First of all, you need to prepare the place. It should be well ventilated, since under the influence of constant exposure to moisture the structure can quickly become unusable. Next, you need to dig a hole 1x1 m and a depth of 0.4 m. Fill it with crushed stone. This must be done so that the soapy water does not spread over the summer cottage, but has time to be absorbed into the soil.
If you have organized the drainage of sewage waste into a drainage pit, then skip this stage of preparation.
- Covering the frame with clapboard.
- Painting.
- Tank installation.
Frame construction
Take boards with a cross section of 30 mm × 15 cm and make a 1x1 base. Attach 4 side beams to it, the cross-section of which is 100x70 mm. They will serve as the basis for installing the tank. They must be installed in the grooves.
Frame covering
To cover the frame, you can use false timber, blockhouse or lining. When installing them, leave a gap of up to 3 mm between each strip. This also applies to the first one at the base. In this case, under the influence of moisture, the product will be able to expand freely. If this is not taken into account, then the summer shower will turn into an “accordion”.
Painting
Once the sheathing is complete, you can begin painting. To do this, the entire surface should be coated with antifungal impregnation. The next layer will be façade acrylic water-borne varnish. It is applied in 3 layers.
You should not skimp on varnish, so it is better to apply it in sufficient quantities. It is important to ensure that water slides easily over the surface of the walls and does not linger in the shower. This painting is carried out both outside and inside.
Tank installation
To store water, you can install a 100 liter tank. The tank can be made from different materials, stainless steel, plastic, etc. You can buy a ready-made tank just for this purpose. Some home owners often find one or another container to install on an outdoor shower.
Finally, all that remains is to hang the curtain on the hooks. On average, such a shower can be built in 1–2 days.
Photo instructions for making a summer shower made of wood


Another option for building a shower is to use polycarbonate. To build it you will need to purchase the following building material:
- Polycarbonate. The sheet size is 2.1×1.2 m. For arranging a shower, a thickness of 8–15 mm will be sufficient. As for the choice of color, choose one that is less transparent milky or bronze.
- For fastening you will need special hardware, tapes and corners.
- Frame material, e.g. wood, metal corner or pipe, brick, aluminum profile and so on.
- Shower tank.
- Shower sprayer.
- If necessary plastic pipe for drainage.
We have already discussed the general principle of constructing a frame for a summer shower made of wood above. Therefore, it is worth paying attention to some specific features when working with polycarbonate.
Any material, whether stone, wood or metal, can withstand the weight of polycarbonate. But there is one caveat. This material is distinguished by its windage, so the frame should be equipped with a sufficient number of cross-shaped, vertical and horizontal jumpers.
The thickness of the frame material for polycarbonate may be less than for wood.
Tank installation
The tank is installed on an installed frame. Due to this, the water is heated in it sun rays. Usually a flat tank is installed, but there are no strict rules.
It is better to install a polycarbonate shower tank under the roof. Thus, there will be a greenhouse effect and the water will heat up much faster and cool down accordingly.
Installation of polycarbonate
If you want to make a locker room, you will need two sheets of polycarbonate. Use an opaque one for the walls and a transparent one for the roof, so the water will heat up faster. First of all, make blanks by cutting the sheets to the required sizes.
A polycarbonate sheet can be cut with a regular knife both along the voids and across.
Be sure to treat the cut area sandpaper. Check to see if any sawdust has gotten inside the honeycomb. If yes, then they can be removed with a vacuum cleaner. To avoid chipping when drilling holes, step back 3–4 cm from the edge. Drill between the stiffeners. Be sure to cover the edges of the sheet with perforated tape. This is done to prevent debris, dust, water, etc. from getting inside the honeycombs. As for the end part, use an end profile, H-shaped or corner.
To prevent condensation from forming inside the honeycomb, drill thin holes in several places. 3 holes per 1 m of profile are enough.
Photo


Video
In this video you will see how to make a wooden shower:
This video will tell you about the possibility of quickly building a shower:
Scheme


Photo instructions for a summer shower on a plank base


You can easily make and arrange a summer shower in your dacha with your own hands. Photos and dimensions, as well as recommendations for choosing a site for construction, can be found in this article. After all, there is nothing better in the summer heat than to refresh yourself with cool water, especially after active work on the personal plot. With the onset of hot days, having a shower at the dacha becomes relevant and necessary requirement. This factor is especially important if your house is under renovation and the water supply has not yet been installed.
In any case, the interior space of the shower should be spacious so that the bathing person can comfortably accommodate himself and, along with him, all the things necessary for this procedure. The most common parameters for country shower buildings are 2.5 meters in height and 190/140-160/100 cm in width. You need to plan the construction of a summer shower in the spring, at the very beginning, so that by the time summer arrives it will be ready.
There are no particularly strict criteria regarding the arrangement of such a shower. If you have imagination and ability to hold Building tools in your hands, you can turn your ideas into reality and build something so necessary for your dacha. Depending on the complexity of the plan, it is possible to equip a simple summer shower in one day. A more detailed project will take more time, but will also last you more than one year.
Shower for a summer residence, what place to choose for it
To prevent the water in the tank from being cold, it is more logical to place the shower building in a place illuminated by the sun's rays. If you prefer to shower in the afternoon or late evening, then you should choose a part of the area where the concentration solar activity observed in the afternoon. It is important that this place is protected from wind.
Second important factor is the presence of a drain for used water. An outdoor shower for a dacha should be installed on a hill so that the water drains quickly and does not stagnate, attracting insects. Operating any shower involves using large quantities water, and if many people (a large family) will wash in it, then this nuance needs to be calculated and properly equipped.

If the capacity of your shower tank is approximately 1-2 m³, then drain hole will definitely be needed. When arranging a place for water drainage, its correct placement is important - in no case should it be located under the building itself. A waste pit or septic tank with drainage should be located at some distance from the cabin, and the slope should go in their direction.

The presence of a waterproof layer for drainage is highly desirable: hydroglass insulation, PVC film, roofing felt or concrete screed suitable for this purpose. Drainage pit should be at least 3 meters away from the cabin, its depth should be 2.5-3 meters, the bottom should be covered with crushed stone or a thick layer of sand. The top of the pit must be covered and fenced.
How to make a shower in the country - an example of a simple design
Options for this useful country house building there may be a great variety - it depends on your creative approach. As an example, we will look at the features of the “standard” version of a country summer shower.
The shower should be comfortable, so the most minimum dimensions internal space must be at least 100×100 cm. Movements should not be constrained - a person should freely raise his arms and bend over during the process of ablution. There should also be a small space allocated for clothes and towels (locker room), 50-60 cm is enough for it. Thus, in the total footage, the dimensions of the shower will be 160 × 100 cm and 2-3 m in height.
- Install strong and reliable racks - this is your safety, since a tank for a summer shower filled with water has enormous weight. A 100×100 wooden beam is ideal for this purpose.
- It is better to dig the racks into the ground, having previously treated them with tar or a fat-containing product. Filling them with concrete mortar, by the way, would be best.
- For the container at the top there should be a horizontal platform.
- The cabin can be made of any materials, the main thing is that it should hide the swimmer from prying eyes and protect from drafts.
- Containers for summer showers can be metal or plastic. It is worth considering that a metal tank will heat up faster, but it will also rust. To make the water heat up faster, it is recommended to paint the tank with black paint.
- If you make a frame over the tank and cover it with plastic film, then the process of heating the water will occur much faster.
- The valve for the tank can be anything, but a ball valve is most suitable.
The whole process begins with marking the perimeter of the future shower; the racks are installed in the corners and connected at the top with a bandage made of similar timber. After this comes the turn of the lower dressing, keep in mind that it should be located 10-15 cm from the ground level.

To fasten all fragments of the frame, use long bolts - this will have a positive effect on the overall strength of the structure.


However, you can do it simpler and install a metal or acrylic tray, and the water will drain using a hose.
To ensure that the shower door closes tightly, use seals. The shower compartment and the locker room can be separated by a special curtain, but it will be better if the threshold between these two compartments is slightly higher (to prevent water from flowing into the dry room).
A summer shower, as already mentioned, the outside can be decorated with absolutely any material. Lining, plastic, polycarbonate, moisture-resistant plywood, fiberboard, slate, metal sheets, siding - the main thing is that the building is harmoniously combined with the rest of the buildings on the site.

It wouldn’t hurt to pre-open wooden materials with protective compounds.

If the frame is welded from metal, then it must also be coated with anti-corrosion agents or painted.

To make the water in the tank heat up many times faster, you can lay rafters on top of the top trim, and place a sheet of roofing iron on top of them. The metal will reflect the rays of the sun, making the water heating process more active.
Tank for a summer shower, which one to choose

Separately, it is worth paying attention to water containers or shower tanks - their choice is determined by the individual requirements and preferences of the developer. They come in small and large volumes, flat and round, iron and plastic. The size of the tank depends on how many people will wash in this shower; often a volume of 100-200 liters is enough for an average family. As mentioned above, it is better to choose a tank dark color or even black - this way the water will heat up faster.

Such a container must have a lid to prevent various debris and insects from getting inside. At the very bottom of the tank, an outlet for the tap is mounted, to which a watering can-diffuser is screwed.

Present here important point– the tap should be located at the very bottom of the tank so that all the water drains from the tank and does not stagnate.
When setting up a summer shower with your own hands, you can purchase a ready-made tank in a specialized department of the construction market. There are also containers for sale specifically for such showers, with all the necessary parts included.
If you have a suitable metal or plastic barrel, then after certain manipulations it can turn out to be a completely acceptable shower tank. For these purposes, a hatch is cut out on top of the barrel laid on its side to fill the water, and the barrel itself is treated with acrylic enamel (or a bath repair product) from the inside - this applies to metal containers.
Or you don’t have to lay the barrel on its side. You can do anything if “your hands grow from where they need to be.”

Tanks that have fallen into disrepair also play a good role in this role. washing machines. Despite the fact that their volume is enough for 2 washes, they very quickly adapt to the shower tank, thanks to the presence of inlet and outlet pipes, as well as the necessary technical holes. Such tanks are not afraid of corrosion.
When arranging a summer shower at the dacha with your own hands, it is better to prepare photos and dimensions, as well as approximate drawings in advance. This way you will see all the working stages clearly and will be able to accurately calculate the final result. Having such a work plan before your eyes, you will know how much material you will need for external and interior decoration cabins and drainage pit.

While paying attention to the functional part, do not forget about aesthetics appearance your summer shower - everything should not only be comfortable, but also pleasing to the eye.

In the summer, it’s a fairy tale at the dacha: clean air, berries from your own garden, salads made from only picked vegetables. ruin it happy time, maybe only lack of water. Everyone wants to take a shower at the dacha after finishing work in the garden. While some people prefer a bath, others require a shower and that’s all. Therefore, the decision to build a summer country shower with your own hands is logical and expedient. After small house without windows, building a shower is first on everyone’s list. For it, they use materials found on the site and purchased, advice from neighbors on the site and their own imagination.
One of the options for creating a shower body in the country is to build additional design to the finished shed, it can be painted with cheerful colors. You can also divide an existing building and use a partition to create a space for a shower.
If there is no such shed that will be convenient and durable, you can give preference to a frame made of wooden beams. A reliable support will be a beam 10 cm in cross section. To protect the wood from moisture and insects, we paint it or treat it with a wood preservative. We choose the installation location, it should be the sunniest and preferably on a hill, otherwise you will have to make an embankment so that there is drainage.
DIY shower plan
- Choose a sunny place
- Pour the foundation
- Make a drain
- Install the pallet
- Build a frame
- Install tank
Creating a foundation
We mark a rectangle 1x1.4 meters, drive in pegs, stretch a rope between them, measure the distance of the sides and diagonals with a tape measure.
If we are planning a stationary and durable shower in the country, then we need to do. Using a garden drill, we make holes one meter deep in place of the pegs. Placed there metal pipe 1.2 meters long and 90 mm in diameter. We use three parts sand, one part cement and five parts crushed stone for pouring. We measure the distance between pipes rising 20 cm.

The structure will be protected from moisture by formwork; it must be filled with the same mixture as the foundation. Due to this, the country shower will rise above the site. On the posts that have not yet hardened, you need to insert 3 reinforcement sticks with a small cross-section of up to 1 cm and 20 cm in length. We are waiting for the foundation to harden.
Making a drain
To arrange the drain, we dig a two-meter hole. We strengthen the walls so that the edges do not crumble, economical way- lay down 6 - 8 unnecessary tires. We make a hole for the drain pipe connected to the pan in the penultimate one. You can do without a pallet, but water will corrode the soil; you can buy a ready-made pallet.

Building a frame

We assemble the wooden beams of the frame onto the dried foundation. Bandaging is done from below and above. The upper and lower frames are assembled separately on the ground. The structure is bolted together and installed on the foundation. To install, you need to drill holes for the reinforcement on which the beams are mounted. Additional stability is provided by securing the spacers diagonally. It can be sheathed with planed wood, but it must be varnished or painted. It is advisable to seal the door to avoid drafts.
Tank installation

There are two options: simply place the tank on the roof of the building or create a frame of beams over the tank and cover it with polyethylene, which will give the effect of a greenhouse. If the first option speeds up the work, the second will save the time it takes to heat the water and will retain heat.
Considering the instability of weather conditions, it is worth choosing the second option so that the presence of a shower in the country does not depend on the sunshine of the days. To create a structure above the tank, we knock together two pieces of beams into the letter V. We select the length of the beams according to the diameter of the barrel. We connect the workpieces using wooden slats. We place the structure along the edges of the roof and secure it using self-tapping screws. Then we simply cover it with polyethylene.
Tank material alternatives range between lightweight plastic and fast-heating metal. A metal tank can be painted with dark paint, and it will heat up faster; lightweight plastic is convenient to install. We will give preference to dark plastic, 200l barrel. in volume. It needs to be laid on the roof, secured with straps, and secured on both sides with nails.

You need to cut two holes in the barrel, the first will be for the watering can, it should be sealed with silicone, through the second the tank will be filled with water. Using a hose, connect the top hole of the tank and the water tap. You can use a pump to pump water from a well.
Your country shower is ready for use!

Summer country shower in the greenhouse
You can plant moisture-loving plants around the shower. Attach hooks for clothes outside the building. Creating a summer shower in the country is an easy and enjoyable task, the result of which will delight you many summer days.

Those who have a summer cottage good greenhouse for vegetables, sometimes they place a barrel of water in it for showering.
Even in case of windy and cloudy weather, you can close all the windows and doors in the greenhouse in order to comfortably take a shower in the country.
It is very convenient that water in a barrel, exposed to the sun all day, warms up much faster.