Icicles from ceiling tiles. Master Class
For cups for candles:
Two glass jars of different sizes
various lace ribbons 70 cm long
organza ribbon 70 cm long
satin ribbon 70 cm long
cotton cord 70 cm long
window film with “Deer” and “Squirrel” motifs
2 wooden snowflakes with a diameter of 3−4 cm
2 white wax beads with a diameter of 8 mm
white acrylic matte paint
Besides:
scissors scraper or flexible plastic spatula kebab sticks clear tapeFor snowflakes and icicles:

Ice-simulating structural gel paste in a tube
transparencies
Czech beads and cut glass beads with a diameter of 2−6 mm
artificial decorative sparkling ice crystals
thin silver thread or silver cord with a diameter of 1 mm
white organza ribbons 10 and 3 mm wide, 30 cm long
white satin ribbon 3 mm wide and 30 cm long
self-adhesive transparent faceted glass beads with a diameter of 8−10 mm
silver wire with a diameter of 0.25 mm
Besides:
scissors paint spatula drill 1 mm drill bit hot glue gun darning needlefor free download
Step 1
Enlarge the motifs for snowflakes and icicles and secure them with tape on the back of the film.
For icicles, use a spatula to apply structural gel paste to the film, and apply it in an uneven layer, in places forming “piles” reminiscent of snowdrifts.

Scatter small beads and sparkling sparkles over the still soft gel paste. artificial crystals ice.
Step 2
When applied, the gel paste has a milky color and, depending on the thickness of the layer, dries within 2-4 days. Once the gel paste has dried, the film can be removed.
After this, grease the icicles on the reverse side with gel paste and, as the first time, sprinkle with beads and sparkling ice crystals.
Step 3
When the icicle is completely dry, drill a hole with a diameter of 1 mm for hanging. Insert a thin wire into the hole and bend it into a small loop. Hang the icicle on a thin silver cord. Place a satin ribbon and two organza ribbons in the shape of a bow, tie with silver wire and hot glue to a loop for hanging.Step 4
Glass jars degrease. Measure the circumference of the cans and cut out a film with motifs 2 cm longer. Place the film around the can and stick it without folds. At the same time, press it with a squeegee or a flexible plastic spatula.
Tie the jars with various ribbons and lace, as shown in the photo, and additionally decorate them with wooden snowflakes. Place a candle in a jar or fill it with Christmas balls.
Step 5
The motif for the snowflake, as well as for the icicle, is fixed under the film.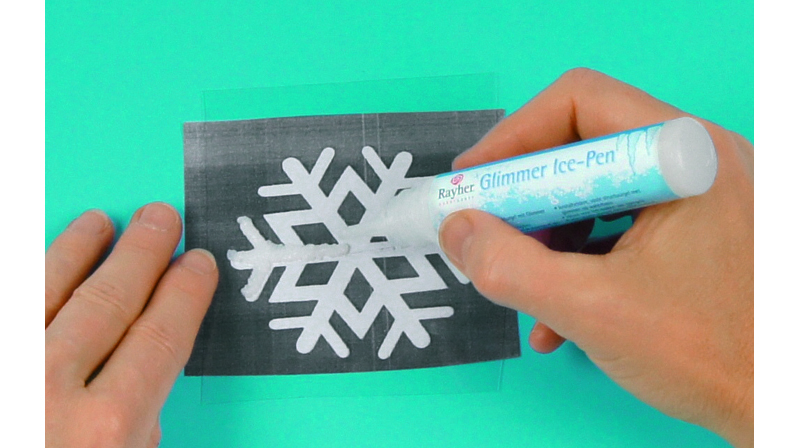
Squeeze the structural gel paste onto the film directly from the tube. In this case, hold the tip of the tube vertically, squeeze out the gel paste slowly and follow the contours of the motif with the lines of the gel paste. Thus, using lines of gel paste, alternately repeat each ray of the snowflake. In the middle, press a large cut glass bead into the gel paste.

After this, sprinkle the gel paste with a thin layer of sparkling ice, leave to dry for 1-2 days and finally carefully and slowly remove the film. Use a thick darning needle to make a hole and hang the snowflake on a thin silver thread.
How to make artificial icicles with your own hands!I am sure that many needlewomen and mothers with children are now actively creating their own, handmade and warm Christmas tree toys. At this wonderful moment, we all return to childhood, to the wonderful atmosphere of a fairy tale and the expectation of a miracle. In such an atmosphere of happiness and serenity, this spontaneous, unexpected and very simple, which anyone can do, was born.
So, for work we need:
Thermal gun and three rods for it;
Glue "Titan" or similar;
Clear nail polish;
A clean plastic surface (a container lid will do);
Transparent glitter;
And artificial snow.

Transparent glitter is sold in almost any stationery and craft store on the eve of the New Year; For this occasion, you can buy a hot-melt gun and glue from Fix-Price, which are now available literally at every turn; nail polish - the first colorless sticky substance that catches your eye - can be replaced with any glue. A separate matter is artificial snow.

I've been hunting for it for a long time, because I have no time (or laziness...) to do it myself! In fact, it can be made from ordinary isolon, grated on a fine grater. The effect is exactly the same! Okay, enough of the long harnessing - it's time to go fast!

Let's get started. For authenticity, you can open an image of an icicle on the Internet and look at the structural features. We warm up the gun and begin to form icicles at our discretion.

We make the most different shapes: long and thin, double, triple, short - the more varied, the better! When you have completed the icicle, make a loop on top for attaching to the tree.
Here they are, our future beauties:

After the glue has cooled, remove it from the surface by simply picking it up under the edge. The reverse side turns out flat. If desired, you can also fill it with hot glue to create volume on both sides.
Now comes the fun part - decor! We cover the entire icicle, except the upper part where it is fastened, with varnish and sprinkle it thickly with glitter.

While the varnish is drying, turn on the hamster and collect the spilled glitter back into the jar - there’s no point in wasting any goodness! When everything is dry, take Titan glue (it can be replaced with any, I believe, thick PVA, and other types of thick, bulky glues), apply it to top part icicles where we will glue the snow:

We put it on plastic surface and sprinkle the snow thickly, pressing slightly.
Elena Masalova
On the eve of the New Year, creative teachers always face the question of decorating groups, halls and other premises for the holiday. New Year It’s a magical holiday, which means the decorations must match the fairytale magic. Every time I want to bring something new, unusual, to capture the imagination. But at the same time, decorations should be simple, accessible and not expensive.
This year we have focused on using ceiling tiles . She may be different color and relief, does not require special skills, anyone can master the technology of cutting from tiles.
For the manufacture of icicles we will need ceiling tiles, pencil, template paper, tape, scissors or a sharp construction knife.

Cut out a template from paper icicles and snowflakes.

Translating the template to tiles.

Cutting out parts from ceiling tiles.

Using a strip of tape we form a garland of icicles.

We attach the finished garland to a prepared place - a closet, window, window sill, porch, etc.


Snowflakes and icicles can be used independently as separate elements.


I thank all the guests who visited my post and left their votes. I will be glad if my idea is useful to someone. I wish everyone a Happy New Year.
Publications on the topic:
Master class on making a sun from foam ceiling tiles. I present to you a master class on making a sun from foam plastic.
I present to your attention my idea of making “icicles” for girls to dance at New Year's holiday. We will need bells, a strip.
In anticipation of the New Year, we continue to come up with decorations for the home. For work, prepare: ceiling tiles, a stationery knife, a simple one.
Leaf fall, leaf fall, Yellow leaves are flying. Yellow maple, yellow beech, Yellow circle of the sun in the sky. Yellow yard, yellow house. The whole earth is yellow all around.
Dear colleagues! In connection with the implementation of the Federal State Educational Standard, the teacher’s task is to organize work with parents, one of the forms of which is.
Recently, I have become very interested in making crafts from ceiling tiles. This is a thin, light material, very suitable for creativity.
Restoring a birch tree in a natural corner Once upon a time we decorated our group with figures made from ceiling tiles. Time has passed, it’s a pity to delete them.
Inspired by winter art installations and the super popular movie Frozen, this winter themed holiday decor is sure to please everyone, young and old. It takes 2-3 hours to implement, besides, the project will require almost no costs (which is extremely important in the context of the next crisis), or any skills, and the result, as always, is very impressive.
.jpg)
.jpg)
Collect materials
:
- White paper (ordinary A4 is also suitable - it can always be glued into several sheets - and when crumpled, the seams will never be visible, but the most best option- a roll of kraft paper),
- Ruler,
- Pencil,
- Glue stick,
- Scissors,
- Duct tape.
.jpg)
1. Fold the A4 sheet in half, connecting the long edges to each other, and draw a diagonal line on top of the folded sheet. Not from corner to corner, but by eye: but depending on the length of your right triangle in any case it should be quite narrow. Perhaps the most difficult thing in this sense is to draw a blank for very long icicles, which on top in thickness should not differ too much from small icicles, and at the same time on the bottom should not be too narrow over a long segment.
.jpg)
.jpg)
2. Cut the fold along the drawn line and immediately use a good eraser to erase any pencil marks if there are any left on the triangle.


Open your double piece and glue the smeared edge inside - just behind the fold of the second edge.

5. Run glue along the remaining folded edge and press the edge to the paper in front of it. Immediately wipe off any released adhesive.


8. Trim the open bottom of the pyramid so that the bottom line becomes even with the top of the flat triangle, and the triangle turns out to be isosceles from a rectangular one.
.jpg)
9. Directly along the lines of all folds, make 4 slits from the open bottom to a depth of 1.2-1.9 cm (depending on the ceiling material and how difficult it will potentially be to glue the icicles - the more difficult it is, the deeper you cut).
10. Bend 4 rectangles from the base of the icicle to the side, getting “ears” for which you need to glue your decorative elements to the ceiling.

11. Now just take it and boldly crumple/crumple the icicle, only trying not to crumple the very top. And then open it again: the easiest way to return the icicle to its previous shape is to forcefully blow it from the base. It's amazing how much creasing can transform our holiday decor and make it look much more natural.


We make the rest of the icicles by complete analogy, always trying to vary the size and not get two of the same length.
12. Now we attach the entire composition to the ceiling: we turn each icicle with a vertical seam to the wall and glue it on top by the ears with adhesive tape (not shiny, so that it does not stand out on the ceiling). If you glue your installation in a relatively dark corner, even the top ears will not be visible, and it will seem as if the icicles are real.

First, secure the large icicles (in life, the longest one always hangs usually in the center or near the wall, if the top was inclined - towards the wall) and only then add small analogues where they are missing. In this case, the largest icicle has the length of 4 glued A4 sheets - i.e. about 1.25 meters.
Among New Year's decor, which can be easily made from ordinary office paper, it is necessary to mention the voluminous icicles.
Paper icicles are made quickly and look very impressive, especially if you add a small tassel of yarn and a few bright beads to them.
For the craft you will need:
- 2 squares of office colored paper 9*9 cm;
- lace or threads for knitting;
- 3 beads for decoration;
- scissors;
- gypsy needle.
How to make an icicle out of paper:

- On a square sheet, use folds to mark both middle and two diagonal lines.
- We connect the halves of the horizontal line, the figure turns into a triangle of several layers along the edges.
- In origami, such a basic figure is called a “water bomb”.
- Raise the first layer of the triangle on the right side.

- We combine the line that was the side with the vertical line emanating from the vertex of the triangle. Smooth out the folds.
- Bend the left side of the resulting quadrilateral to the right. Raise the top layer of the triangle on the left side.
- We repeat point 5.
- Turn the figure over to the other side and lift it up right side triangle.

- We repeat point 5.
- Repeat step 5 for the last (left) side of the triangle.
- We make the second half of the icicle in the same way.
- Now we make the suspension. Insert a piece of cord or knitting thread folded in half into a gypsy needle.

- We pierce the upper part of the icicle in the middle, bringing the needle out from the inside. We remove the needle - a loop remains. We tie a thick knot at the ends from the inside out - such that it does not slip through the hole.
- For the tassel, we wrap 7 circles of thread around three folded fingers.
- We cut the resulting skein in two places and tie it with another thread in the middle.
- We put all the threads of the brush together and under the knot we wind several turns of another thread, which we secure with a knot and hide the ends under the turns. We trim the brush with scissors.

- We thread both ends of the thread on which the brush is held into a needle, and string 3 beads on them.
- Now we puncture the second half of the paper icicle in the center with outside, bringing the needle inward.
- Closer to the paper, tighten a thick knot and trim off the excess thread.
- We insert both halves of the icicle into each other. This requires accuracy and slowness. Each long, sharp part of the icicle should lie under the short triangle-pocket of the other part. Refill the parts sequentially.
For strength, I put a couple of drops of glue under the pockets. Otherwise, the weight of the beads could separate the paper structure.

Enjoy your preparations for the holidays!
Shared master class
Kononenko Anastasia