Folding tables made of wood. DIY folding table - the best models and projects for manufacturing (70 photos)
Do-it-yourself round sliding solves the problem of lack of space in the kitchen or living room.
Of course, such furniture can be purchased in ready-made choosing from a wide range. However, this is expensive, and does not always fit perfectly into a cramped room.
make a table different size you can on your own. Moreover, depending on the existing carpentry skills, you can choose a drawing of varying degrees of design complexity.
 For small spaces where a dining table is installed (kitchen, living room or separate dining room), round design looks practical and attractive. She takes less space and allows you to comfortably fit around.
The problems start when dining table a significant number of family members and guests gather. Oversized furniture simply does not fit in a cramped room.
Sliding design eliminates the problem. Its essence is as follows. In its normal state, it looks like a small round table for 3-4 people. It is easy to move and install in a new place.
If necessary, a transformation is made - it moves apart, acquiring the shape of an oval. Inserts help to form a significantly larger surface area.
Reference: 8-10 people can already be accommodated at such a table.
 Most simple system has a tabletop divided in half, the halves of which can move along the guide elements in opposite directions.
The gap at the divergence of the halves is filled with special inserts that allow you to maintain the integrity of the countertop. In the assembled state, the inserts are located inside and are invisible to others.
Important: The final capacity of an extended table depends on the distance that the elements can be moved without disturbing its stability.
In order for the design under consideration to work reliably, the following must be fulfilled: requirements:
- sufficient strength of the table top at maximum extension;
- providing the necessary capacity and ease of use;
- assembly and disassembly without undue effort by one person;
- the possibility of practical use of the entire surface of the extended tabletop;
- mobility;
- ease of manufacture with your own hands;
- low cost;
- outward attraction.
Wood or plastic?
The choice of materials for homemade table due to their availability and appearance. Particular attention is paid to the countertop. It can be made from the following materials:

The table, in addition to the countertop, must stand securely on. For their manufacture, a wooden beam is most often used.
Advice: for these you can also use metallic profile, in particular, an aluminum flat pipe, a corner or a U-shaped profile looks modern.
Drawings and assembly diagram
Work on the manufacture of the table begins with the development or selection of the project. Required Assembly drawing and detailing.
 circuit diagram extendable table
  General drawing extendable table
 Unlike regular table, in sliding design the base of the tabletop is firmly fixed to the legs, and the main tabletop is mounted movably on it and consists of two halves. The base is made in the form of a frame connecting the legs to each other with collets.
To ensure the movement of the tabletop, guides are permanently installed on it. It is recommended to use typical guide rails for the full drawout of drawers as their recommended. Additional elements are attached to the main tabletop from below, sliding along the guides. Depending on the length of the maximum rollout amount additional elements is 1-3 pieces.
Important: the length of the slats must be at least 35 cm.
After fixing the halves of the tabletop in the extreme position, the resulting gap is filled with rectangular inserts. In the simplest design, they are simply removed from storage and installed by hand. Furniture pins are used to eliminate displacement. In more complex structures established lifting mechanisms, which automatically raise the inserts to the level of the tabletop surface.
Tools
When making a wooden table with your own hands, you should prepare the following tool:

When using plywood, you will need electric jigsaw . For surface treatment, grinding and emery skins are used. Measurements and quality control are provided with a tape measure, a metal ruler, a caliper, a plumb line and a building level.
How to make and collect?
Dimensions finished table the number of people planned to be accommodated is determined. Standard height is 72-75cm.
 Assembly diagram
 The size of the tabletop is selected based on the condition - 60-65 cm per "eater". Manufacturing and assembly is carried out in the following order:

The final assembly consists in inserting the table top guides into the grooves of the base guides. Further, extension limiters are installed, if necessary.
Finishing
 The table should have an attractive appearance, which is provided by the finish. First of all, the end face is processed. To avoid scratching on a sharp edge, it is recommended to remove a small chamfer.
The butt itself is polished to eliminate the risk of splinters. The entire surface of the countertop is also processed. It should be perfectly even, horizontal and smooth.
Important: the most common ways finishing- painting and varnishing.
After sanding the surface, the wood can be impregnated with tinting compounds that will create a certain shade and emphasize the wood structure. A layer of varnish will secure the finish. By using alkyd paints it is possible to provide almost any color of furniture for combination with other elements of the interior.
Another common option is self-adhesive film. It is often used to finish chipboard worktops. It can be used to simulate various natural materials- wood, a natural stone, marble, metal, etc. Inlay or veneering gives a special sophistication to the table.
A photo
Depending on the materials used and imagination, you can get completely different results:


Useful video
The main stages of production with detailed description sliding mechanism can be seen in the following video:
Conclusion
Round extendable table is well suited for small kitchens. When assembled, it does not take up much space, and when extended, it allows you to accommodate all family members and guests. With a little carpentry skills, you can make such furniture with your own hands. This will avoid significant costs and optimally fit the table into a cramped room.
In contact with
A folding table is a convenient and practical thing that is popular among owners. small apartments, summer residents, lovers active rest Outdoors.
Functionality of folding furniture
Exists big variety folding tables - the photo shows typical options. Often ready product purchased in specialized stores, it is not difficult to make a table yourself.

AT small spaces often use furniture that allows you to rationalize free space - it unfolds if a large work surface is required, and is removed in other cases: student desks, tables in the kitchen, in the hall, garage, workshop, etc.

It is convenient to use portable models of tables: they are light, compact, moderately durable. They are made from different materials, each with its own strengths and weaknesses.
Wood must be protected from water, mold, but it is affordable and well processed, steel is heavy but strong, aluminum is easily damaged, but light.

It must be borne in mind that for outdoor use, protection from moisture is required. Metal structures should not rust, the materials used must be moisture resistant - an aluminum frame and a plastic worktop are often found as the best combination. Plywood, wood, fiberboard suitable for indoor use.

You need to choose a suitable table according to weight, dimensions. If the transportation of things involves the use of a car, then total weight and the shape of the tabletop is not of great importance, the main thing is that everything fits in the trunk of the car.

If you want to fit a folding table into a tourist backpack, the requirements are higher: minimum weight with maximum functionality.

During operation, it is important not to overload the tables - they are usually not designed for the weight of an adult, therefore it is unacceptable to use them as a stand for large items.

Which table to take for going out into nature
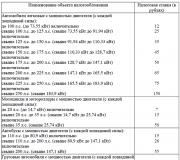
Inexpensive folding picnic tables are a sought-after product in stores. They are presented in a wide range. Sold separately or in combination with chairs. Rectangular table top with adjustable height- the most popular option. Manufacturers specify the maximum load on the table, the average range is 20 - 40 kg, for metal structures 2-4 times more.

Home craftsmen, with minimal carpentry skills and appropriate tools, in as soon as possible able to make an analogue that is not inferior to the purchased table.
Homemade portable table No. 1
Materials:
- For the countertop: boards, chipboard or thick plywood, size 55cm x 30cm - 2 pcs.
- For legs: wooden beam 69 cm x 4.5 cm x 2 cm - 4 pcs., additional supports 50 cm x 4.5 cm x 2 cm - 4 pcs., Crossbar 45 cm x 4 cm x 2 cm - 2 pcs.

The model of this folding table is convenient for transportation when folded, it is not difficult to do it yourself. A special feature is the folding mechanism, in which the tabletop splits into two parts.

The bar for the legs is rounded on one side and is connected to the foot supports not fixedly, but movably. To do this, a hole for fastening is drilled in the upper part of each future leg, bolted to the support. The tabletop is attached to the support with self-tapping screws.

The crossbars are fixed so that at the finished table in the unfolded state they are located at a distance of 15-20 cm from the ground, parallel to it. To increase overall stability, the lower part of the leg is sawn off at 45 degrees.

Before doing the work, it is necessary to prepare a drawing of the details.


Homemade portable table number 2
A one-piece table top is less compact, but it is easier and faster to make such a table than the previous version.
The fastening mechanism is simplified - two supports are connected to the tabletop and one pair of legs. The second pair moves freely, when unfolding, it rests against the limiter at the bottom of the working surface.

Most folding table models have cruciform legs - this is how the maximum strength and stability of the product is achieved.

For this, you have to endure some discomfort - sitting behind such a design is not very convenient.

You can also try another option, when four supports are arranged in parallel. The margin of safety then decreases.

Roll table
A compact product is obtained if a lining is used for the countertop, parquet boards or analogues. The size and shape is selected independently in accordance with personal preferences, it is even possible to make a round table.


The workpieces do not need to be rigidly connected to each other at the same distance. For this, a strong nylon tape is used. Fixation is carried out using a construction stapler or small nails.

It is permissible to temporarily insert small boards into the gaps during work, which will help ensure correct distance between table tops.

In order for the final structure to keep its shape and be durable, a pair of removable bars are placed along the edges, to which the legs are attached.
It is good to use parts of an old collapsible Soviet stool as a support, or prepare a similar one yourself. Ideally suited pads with a round cross section.


In order to be able to use this table, it remains only to make a through hole in the table top, removable bars and fix everything with bolts.

Outwardly, such a table is similar to a stationary one, but is not designed for heavy loads. When disassembled, it is easily rolled up, the legs and planks for fixing do not take up much space - it is convenient to transport and store.

It is easy to find a portable aluminum table on sale, which also folds into a roll and is placed in a protective case during storage.

With a dead weight of 5-7 kg, such models are designed for an average load of 80 kg. They are quite durable, easy to use and have reliable mechanism fixation. For big company going on vacation in nature, this is a good option.

Compact tables for apartments and cottages
Collapsible furniture is often used in stationary conditions with a shortage of space. If guests are expected to arrive, then the usual seats at the dining table are not enough, the presence of a folding one is great solution Problems.
Change in the number of permanent residents in the family with unchanged square meters also makes you think about the embodiment of interesting design solutions in your personal space.

A full-fledged office is a luxury available to everyone in a standard apartment, but to arrange a compact working area is quite real. Multifunctional furniture, such as transforming tables, is often used by schoolchildren and students.

Manufacturers modern furniture offer different models folding tables, the most picky buyer is able to choose the best option for himself.

Before buying, you need to think in advance what exactly the table is intended for, whether it will have a minimally useful constantly used area, or be stored in a secluded corner when folded.

The most sought-after square tables, which extend to a rectangular shape for a great deal. For many years, book tables have shown reliability and practicality. Sliding system on the principle of a slider also finds its application.
Significantly save space in the room comfortable models with wings". A bistro-type kitchen folding table is rational to use for a tiny room. They are laid out like an ironing board, hiding when not in use, freeing up usable space.

Many of the above ideas can really be implemented independently if there is a desire and suitable materials. For family budget the benefit is obvious - a manufactured product will cost less than a new purchase.

You can implement the most daring ideas, optimally combined with the interior and the size of the room. Wooden table – classic version, but you can choose any source material, depending on personal preferences and the amount of planned costs.

Home craftsmen often like to remake suitable parts old furniture rather than buying new building materials.

Rationally select folding tables and do not experience domestic inconveniences at home and in field conditions.

Photo of a folding table


With it, you can change the location of the feast, as well as take the design to nature. Such a product will not take up much space in the interior, because when you do not use it, the table can be folded and placed outside the door.
Instrument preparation
A folding table with your own hands can be made by any home craftsman who has dealt with wood at least once in his life. However, to carry out these works, you will need a certain set of tools and materials. You should prepare a screwdriver with a keyless chuck and a set of bits, a manual grinder, a tape measure, a pencil, building level and right angle.
If not grinder, then there is no need to purchase it for one time, it is best to use sandpaper, while you can finish making the table, making its surface smooth. Some modern stores offer consumers to use such equipment for rent.
Preparation of materials
You can complete a folding table with your own hands in one evening, if everything is at hand. necessary materials. You will need two types of rails, one of them should have a cross section of 30 mm, while the other should have a cross section of 20 x 40 millimeters. In the first case, you need to prepare four elements, the length of each of which will be 1200 millimeters. The total molding of the latter should be equal to 5 meters.
For the manufacture of countertops, you can use a glued array, which is made of pine. A reliable and durable option will be a countertop, the thickness of which varies from 30 to 40 millimeters. A part is cut out of the workpiece with the following dimensions: 1300 x 650 millimeters. Every component is well processed sandpaper, and then varnished, which should be done even before the assembly of the structure. The slats that will form the basis of the legs must be rounded in the upper part, and then sanded well.

Additional preparation of elements
A folding table with your own hands is made in sizes that will suit the future owner. But the technology remains the same as described in the article. Thus, in the legs, which have not yet been sawn to length, it is necessary to drill through holes, they will be needed for the frame strips and axle bolts. The diameter for the fasteners should be 8 millimeters, and for the strips, the two holes should have a diameter of 5 millimeters.
In the central part of the bar, a hole should be drilled for the axle bolts, stepping back 430 millimeters from above. Frame strips are marked by eye, but symmetry should be observed.

The nuances of the work
A do-it-yourself folding table is made according to a certain technology, it provides for the creation of goats and countertops, these components should not be fastened together. In the countertop, it is necessary to make grooves where they will be installed, and then the legs will be wedged. Special sockets must be made in such a way that they are fastened to the table top with 4 x 50 mm self-tapping screws.
On the next step you can proceed to the assembly of the structure. If you decide to make a folding table with your own hands, then the goats should look like a clamshell, such a system will save space in the house or in the trunk of your car.

Initially, the legs should not be sawn from the bottom, but they should be approximately the same. The axle bolts are also not tightened to the end, so that it is possible to expand the legs. To secure the tolerance, locknuts should be used. The master can purchase absolutely any bolts, however, their length and diameter must be suitable. For legs, for example, 8 x 70 mm bolts should be used. In the grooves of the tabletop, restrictive bolts should be used, the parameters of which are 8 x 120 millimeters.
When built with your own hands, the next step is to install the upper ends of the legs in the unfolded state into the grooves of the table top. The unfinished structure should be placed on any level surface to determine how much the legs need to be cut to eliminate length errors. In this case, be sure to use the building level. When adjusting the length, you should not be particularly zealous; to carry out these manipulations, you will need a jigsaw. If the table will be used only in nature, then the generally accepted height of 750 millimeters should be reduced, since you will literally have to sit at such a design on the ground.

Making a coffee folding table
Folding coffee table you can also make it with your own hands, his photos are presented in the article. The frame is assembled for confirmations, and you need to use a special drill. Marking on the surface of the chipboard can be done with the help of stickers, since the pencil will not be visible, its lines glare. A transformation mechanism should be installed in the frame, which has the shape of a rectangle, but before that, springs are mounted to help unfold the structure. The mechanism is fixed in a through way, because the weight of the table will be impressive.
Folding legs should hide all technical fasteners and openings. Marking for fasteners can be done in the same way. Through holes for the bolts should be prepared in the next step, then the place for installing the bolt head is indicated with a drill. This fastener will allow you to fix the mechanism, but do not be afraid that the number of fasteners is large enough. The legs look like a rectangle and should be as strong as possible, since the weight of the entire structure is approximately 45 kilograms. Between themselves, these components should be fixed with ties.

A folding table with your own hands, the drawings of which are presented in the article, can be completed by you in one evening. The next step is to screw the legs to the structure itself, for this, the fasteners are initially marked. You can drill in place if you have enough experience. Installation is recommended to be carried out on metal bushings. For this fastener, holes are drilled in the legs. Legs are installed on the four sides, which will hide the technical holes in the frame.
Table top assembly
The table top must be assembled with particular precision, as the hinged unfolding is strong enough to ensure that the elements slide smoothly. It will be quite difficult to keep the hinge in the sockets, and the screws cannot cope with this task. Therefore, other hinges can be purchased. The tabletop of this design is divided into two parts, first a small one is installed, then a large one. On this we can assume that the table is ready for use.

A folding picnic table with your own hands, the drawings of which are presented in the article, can be made according to individual sizes. You can make the design according to the principle of a book-table, which has an attractive appearance. To do this, you need to prepare two legs, a drawer, an underframe, 4 horizontal and two vertical beams, movable leg and All cuts must be edged first. After the central part is fastened. The next step is to assemble the tabletop and fix the cover to the ends of the legs. The movable element with a frame is installed on the piano hinges, only after that the table can be assembled completely, and, if necessary, varnished.
Conclusion
When a do-it-yourself folding camping table or any other type of design for eating is being made, the preparation of the details is of particular difficulty. It is better to entrust their sawing to professionals if you do not have special skills and tools. But each master will be able to do the assembly on their own.
Hiking trips involve recreation, requiring availability a large number specialized items and devices. One of these structures, which you can’t do without in nature, is a camping table. If you have certain skills, it is quite possible to make it with your own hands.
Features and types of structures
Varieties of camping tables differ from each other in the list various characteristics. Their list includes the following:
- cover material;
- design and material of the supporting part;
- functionality;
- the size.


The range of the modern tourist market offers wide selection camping table modifications. Among the list constituting the main the lineup, you can find folding tables, detachable, one-piece, combined and others. A folding camping table consists of the main parts: table top, supporting elements, fasteners.
The parameters of these components may vary in shape, size and other design characteristics.


The principle of operation of the folding mechanism of the camp table is similar for all models. The main rules for its implementation are simplicity of functionality and saving free space. Modifications of detachable tables allow you to separate their supporting parts from the tabletop. Depending on the design, the parts can be stored together or separately. Models of one-piece camping tables suggest a partial separation of the supporting part from the tabletop. In this case, the parts that make up the structure are stored together.


Tourist picnic table, can be used in different ways. Depending on the need, it can serve for the processing of various kinds of food. For example, on a camping table, you can butcher meat, prepare food for further cooking procedures (frying, boiling, drying, and so on). Among other things, you can use this table as a storage surface for various camping supplies, such as crockery or other kitchen tools.
If the design and size allow, the table can be installed in a tent, which makes it possible to use it for its intended purpose in adverse weather conditions. In order to meet the individual needs of a particular tourist group, you can assemble a homemade camping table.
To attain best result when assembling, it is necessary to take into account the full range of needs that may arise on a hike or on a picnic.

Materials used
From the factors that determine the intended use camping table, depends on what materials it will be made of. Before choosing a particular material, the degree of expected load that will be exerted on the product during its operation is calculated.
Boards
It is allowed to use boards as the main material that makes up the surface of the countertop. For example, you can use boards taken from a loading pallet. However, they are not the best option. This is explained technical specifications plank material, determining the methods of its attachment to the supporting elements.
To attach table top boards to the top support legs table, you must use two fastening points on both edges of each individual board. If bolts are used for attachment, then a minimum of 4 bolts will need to be used per board, which will lead to an increase in the number Supplies used in assembly, and increasing the weight of the entire structure.

Chipboard
Chipboard as a countertop has characteristics that meet the criteria for greater efficiency. However, its main disadvantage is the susceptibility to structural destruction. Under the influence of moisture or destructive loads exerted on various fastening currents, it quickly collapses, which leads to the appearance of factors of defectiveness of the entire structure, a decrease in the period of uninterrupted operation and a decrease in reliability.


Plastic
Plastics are materials that meet the practicality criteria to a greater extent than other materials. It is not affected by moisture and, depending on the brand, is resistant to most loads. However, finding a suitable plastic blank is extremely difficult.


Plywood
The most advantageous material for the manufacture of countertops is plywood sheet. Its structure suggests the presence of several wood layers interconnected by gluing. At the same time, the direction of the wood fiber of each layer is perpendicular to the others, which has a positive effect on the parameters of rigidity and resistance to deformation loads.

Structural characteristics plywood makes it possible to equip reliable fasteners that serve uninterruptedly for a long time. If there is enough this material it is also possible to design a "suitcase" type camping table, which is stored and transported in a closed case. For the manufacture of legs, it is recommended to use a metal square tube with a side size of at least 2.5 cm.
Its profile provides a sufficient level of structural rigidity and makes it resistant to deformation loads.


Required Tools
To make a camping table with your own hands, you need to prepare a set of basic tools with which the assembly will be carried out. In the list of the set, the following names of tools can be noted:
- wood saw or electric jigsaw;
- welding inverter (if possible);
- electric drill or screwdriver;
- angle grinder;
- circular nozzle on the angle grinder for grinding;
- a hammer;
- square;
- brushes or a small roller;
- marking devices (pencil, marker or chalk);
- measuring instruments (tape measure or ruler);
- other related tools.


In the manufacture of metal support legs, it is desirable to use a metal welding machine. This is due to the fact that welded joints separate parts structures in this case are the most durable. With absence welding inverter you can use bolted connections. To do this, you need to prepare a certain number of bolts and nuts. The presence or absence of certain items of tools will be determined by the type of design of the future table and the method of its assembly.

Expendable materials:
- sandpaper;
- drill;
- self-tapping screws;
- bolts;
- electrodes;
- cutting wheels on the grinder.


Depending on the characteristics specific model table may require additional consumables.
How to make?
Before starting the manufacture of a homemade camping table, it is necessary to prepare drawings of its design. The drawings should indicate the dimensional parameters of individual parts of the product: table tops, height and width of the supporting elements, data on the dimensions of the workpieces used. Fastener locations should also be marked on the drawing.

Support legs
For the manufacture of support legs, it is necessary to cut off from a square metal pipe segments that will be legs and jumpers connecting them. Optimal Height one pair of legs, taking into account their diagonal arrangement - 70 cm. The height of the other pair should be 3-5 cm more, which will compensate for the displacement that occurs when 2 support pairs are cross-connected.

The width of the upper jumpers connecting the legs is equal to the width of the table top, reduced by 20 cm. Reducing the width of the jumper is necessary to free the end edge of the table top from the proximity of metal parts and ensure ease of use. The resulting blanks are welded in the form of the letter "P". U-shaped pairs should be made in such a way that one of them fits into the inner perimeter of the other with a minimum gap.

Through holes are drilled in the side faces of the legs, penetrating both pairs in the same place. Bolts are inserted into these holes, the length of which should allow them to pass through the thickness of two legs and go out on the other side by at least 1.5 cm. The protruding distance is needed to screw the nuts onto it. Washers are laid under the bolt head between the walls of the legs that are in contact with each other and under the nut, which reduces the friction of the workpieces against each other.

It is recommended to use a lock nut whose profile does not allow it to be completely screwed onto the bolt. This will help maintain a sufficient gap between the workpieces, causing their free movement relative to each other. At the same time, a Grover is placed under the nut, preventing its arbitrary unscrewing.
If there is no counter-profile nut, you can rivet the edge of the bolt opposite its head. Violation of the integrity of the extreme threads prevents the screw connection from unraveling. Finished sliding legs are prepared for further installation.
The desire to break out into the vastness of nature is increasingly overpowering residents of cities and towns. One-day trips to the nearest reservoir or multi-day fishing trips to other regions of vast Russia require careful preparation and organization. One of the essential elements of camping life is a table. Wherein the best option will serve as a folding table that takes up as little space as possible in the trunk of a car and is convenient to transport. A wonderful option for a camping table can be easily made with your own hands.

The design is so simple that it can be made by any home craftsman with experience in owning various tools. The following tools will be required for work:
- a carpentry hacksaw with a fine tooth for sawing parts;
- sandpaper (sandpaper) of various grain sizes for finishing the edges of parts and the entire product;
- tape measure for measuring the lengths of parts;
- joiner's square to control the squareness of the edges of flat parts;
- construction stapler with a supply of staples;
- drill with a drill of suitable diameter;
- flat screwdriver.
In addition to tools, you need to prepare the following materials:
- a round rod with a diameter of about thirty millimeters and a length of one hundred and sixty centimeters;
- a hardwood lath with a section of fifteen by forty-five millimeters - six meters;
- two slats of the same section, fifty-four centimeters long each;
- two pieces of a nylon belt twenty-five to thirty millimeters fifty-four centimeters wide;
- threaded inserts made of brass internal thread ten millimeters;
- four bolts М10×70.
Let's start the description of the manufacturing technology with the legs of the camping table. best material for them, two birch cuttings for rakes can become, which are easy to purchase at any hardware store. Choose straight-line products to make the table look neat. Saw off four pieces of forty centimeters with a carpenter's saw, clean the ends with sandpaper, slightly round the lower edges. It will not be superfluous to grind the surface of the parts.

The next stage in the manufacture of the table is sawing birch slats into ten pieces of sixty centimeters. According to the preliminary marking, use a tape measure and a square with a hacksaw to cut the blanks. To give smoothness, planes and ends, sand with an emery cloth. Next, you need to process with sandpaper two pre-prepared parts fifty-four centimeters long each.

This is followed by work on the manufacture of a flexible tabletop, which is a slatted rolled mat. Its basis is those ten rails of sixty centimeters. To connect the rails, we use nylon straps and a construction stapler. Lay the countertop elements on a flat, smooth surface, with the reverse side facing you, trimming their ends.

To maintain straightness, lay a planed even bar along the ends. It is better to calibrate the distance between these parts with small elements with a cross section of one centimeter. Lay the belts on the back side of the rails, stepping back an equal distance from the ends. Pre-melt the edges of the belts in the flame of a lighter.

Using a stapler, attach the belt to the rails as shown in the attached photos. Watch the distance between the rails.

If the stapler does not finish the staple slightly, then use a hammer for a tighter fit in the material. Thus, attach all the slats of the tabletop to the belts. Next, we proceed to the installation of threaded bushings in the legs of the camping table.

To do this, drill blind holes about 40 mm deep with a drill of the required diameter from one of the ends, then carefully screw the bushings in with a screwdriver, trying to keep them aligned with the hole.
Now, having laid out the tabletop front side down, lay the prepared slats at an equal distance from the ends of the countertop elements and drill one hole in each slat (as shown below).

The diameter of the holes must be such that the bolts pass freely through them.