Beautiful fencing for a flower bed. DIY fencing for flower beds
- even the most beautiful flowers will appear untidy without proper design. A best design for them – decorative fences. Fortunately, you can make them with your own hands from almost anything. Next we will look at the most interesting options fencing for flower beds in the country: made of wood, brick, stone and waste materials. For your attention simple instructions and photos of original fences that will definitely inspire you to experiment.
Wood fencing
Wooden fences fit harmoniously into any summer cottage, which is why they are most often used to decorate flower beds. Such fencing can be presented in a variety of variations, but we offer you three of the simplest.
- A fence made of driftwood. Most easy way decorate a flowerbed - make a fence from twisted trees: take deformed trunks and lay them along the edge of the future flowerbed. The first row will serve as the edging. Tie subsequent rows with willow branches.
Advice. Build a fence before planting flowers - it will be very difficult to do this afterwards, since the shape of the snags cannot be adjusted to fit the plants.
- Fencing made of chocks. A more original, but no less simple option. First, cut the logs, remove the bark and treat the tree with an antiseptic. All products should be more or less the same in both diameter and height. Wrap the bottom of the logs with roofing felt to prevent the wood from rotting when exposed to moisture. Dig a groove 20 cm deep along the perimeter of the bed and fix the logs in it at the same level. Then fill the groove with soil and compact it well.
- Fence made of boards. Classic version- a fence made of boards, which can be obtained either from wood scraps, or from the usual wooden pallet. In the first case, cut the boards to the same length, sharpen the upper edge into a triangle, and secure the products in the ground with the lower edge. And in the second case, you first need to disassemble the pallet, and then perform all the same steps. The resulting fence can be primed and painted.
Brick fences
From brick you can build not only a beautiful, but also a very strong fence. Use for this different variants masonry
Single-level masonry. Prepare the bricks and lay them on edges along the edge of the flowerbed in one row. The material must be tightly fitted to each other so that there are no gaps. For better fixation, bricks can be laid on sand.
Masonry at an angle. A more complex, but original fence, which is performed as follows:
- dig a shallow trench around the perimeter of the flowerbed and fill it 1/3 with coarse sand;
- install bricks in the trench at an angle of 45 degrees: they should protrude half above the ground;
- fill the trench with soil and compact it.
You should now have a jagged fence. The advantage of this fence is that it simplifies the drainage of water after precipitation. But in order for the structure to be not only functional, but also aesthetic, watch the corners of the bricks - they should not be knocked down. Additionally, you can tint or whitewash the fence.
Horizontal masonry. If you want to get a high fence, use classic horizontal multi-level masonry:
- dig a ditch and fill it 1/3 with concrete;
- lay the first row of bricks, fastening their sides with ordinary cement composition;
- Continue the laying so that the joints of the bricks of the top row are located in the middle of the bricks of the bottom row.
The optimal height for such a fence is four to five rows.
Stone borders
Every summer resident can make a stone fence for a flower bed, since it is not difficult to find working materials: there are plenty of them in the forest, in the fields and even in the garden. Rubble, cobblestones, boulders, flagstone, slate, tuff - all this can be used to build a fence. Features of the installation of the structure will directly depend on the dimensions and shape of the stones.
Large cobblestones can be used for a simple edging of a flower bed: dig a shallow trench, fill it with concrete and plant all the stones in it, pressing them tightly together.
Flat stones are great for building high fences. Lay the first row in the trench, and all subsequent rows on top of each other, firmly connecting them with concrete mortar with the addition of construction adhesive.
Rubble stones can be used to create a multi-level fence: prepare the rubble different shapes and lay them out in two or three rows, fixing them together with cement mortar.
You can make a kind of rockery from fine tuff and slate: lay the pebbles in one level not only along the edge of the flowerbed, but in the middle of it - between the plants. However, keep in mind that this option is only suitable for tall and lush flowers - small plants will get lost against the background of a large number of pebbles.
If the original appearance of natural stones does not suit you, decorate them. Luminescent paint is perfect for this. Carefully cover the finished fence with it and get an unusual flower bed, beautifully illuminated in the evening and at night.
Fencing made from scrap materials
To make a fence for a flower bed, it is not necessary to use only traditional materials– you can also use available waste products. For example, glass or plastic bottles, or even music CDs. How?
- Glass bottles. Prepare required amount identical bottles. Fill the containers with either sand or fine gravel. To enhance the visual effect, you can paint the filler in any color. Then dig a trench and place the bottles halfway into the ground, necks down.
Advice. If you want to bury bottles with their necks up, firstly, close them with identical corks, secondly, tie them with bright ropes and, thirdly, place the containers at a slight slope - this will give your fence greater aesthetics.
- Plastic bottles. Take bottles of the same size and preferably the same color. Cut off their bottoms and make “petals” from the walls of the container. Fold these “petals” down. Dig the bottles into the ground, necks down, and cover with soil. You can also place the containers horizontally, that is, on top of each other, and make several rows of them, but in this case you need to connect the bottles tightly construction glue. The resulting fence can be painted or left in its original form.
- Music discs. Tie several chains from the disks - six pieces in each. Secure each “link” into a pre-prepared shallow groove. The simplest option is a fence of two or three rows. There may be more of them, but the main thing is that the chains of disks do not sag and do not fall on each other from gravity.
As you can see, even with your own hands you can build a strong decorative fence chick for a flower bed that will effectively decorate the landscape summer cottage. Don’t be afraid to experiment - your courage will yield wonderful fruits in the form of a bright flower garden.
DIY fencing for flower beds: video
Fences for flower beds: photos


Today, a person who decides to build a house on his own must be prepared for significant costs. Most of the money is often spent on the foundation and laying the walls, but in most cases you have to spend a lot on things that at first glance do not seem obvious. It's about about the fence.
A smart owner of a future home sets the goal of saving on such details. Moreover, this is a completely justified and feasible solution.
A key way to reduce the cost of a fence is to do it yourself. Do not underestimate the importance of this process, since a fence is not only a decorative structure that hides the territory from prying eyes, but also safety fence, designed to prevent suspicious persons from entering the site.

In other words, the design must be reliable, durable and aesthetically pleasing. Only under such conditions will it satisfy all the requirements placed on it. In our case, ease of installation should also be added to the list of conditions.
Materials for building a fence

There are several basic materials that allow you to build an inexpensive and functional structure:
- tree;
- Rabitz;
- corrugated sheeting;
- plastic.
The main limiter in construction technology and combination of materials is financial costs. First, you should select the material that will become the basis for the fence, then find a suitable economical construction technology, and then make basic calculations.
Wooden fence: pros and cons


Modern hardware stores offer a large number of wood options suitable for construction reliable design. This material has some advantages over others, which makes it almost the most popular product.
Advantages of wooden structures:

Flaws:

Materials for installing a wooden fence
To build a standard wooden fence, you will need the following materials: picket fence, cross boards, support posts, pegs, ropes, cement, sand, shovel, saw, fasteners, and a special anti-rotting agent for wood.

It is best if the entire set of tools is collected in one place within reach to facilitate access to components.

Construction of a wooden fence
Stage 1. We mark the site for the structure and determine the location of the gate. We use pegs and rope. The distance between the pillars is 2 meters. This is how the structure’s resistance to external influences is ensured.
Stage 2. Take a shovel and dig holes for the support pillars.
Stage 3. We immerse the pillars in the ground by about one-fourth of their length.
Stage 4. We install spacers to secure the pillars and fill the hole with cement mixed with sand.
Stage 5. We drive in the cross boards.
Stage 6. We fix it vertically on cross boards fence.

Stage 7. Paint the finished fence in the chosen color.

At this point, the work on the construction of a wooden fence is considered completed. This is a relatively simple fence option that is usually installed as a temporary option.

A fence made of mesh is considered the most economical option, available today. Among the advantages of such fences it should be noted:

Clarifying the last point, it should be noted that installation will require tools that are easy to find in every home. In addition, modern stores offer a wide range of meshes of the most different colors and sizes, which allows you to move away from the banal appearance of the fence.
Materials for building a fence:

For those who adhere more original solutions, exist vinyl coverings, however, they tend to lose color over time.
Construction of a chain-link fence

Step 1. Carry out the markings.
Step 2. We dig holes for the support pillars.
Step 3. Place the pipes in the holes.

Mesh fence
Step 4. Fill the holes with pre-prepared concrete mortar. In some cases, builders simply drive pipes into the ground using a sledgehammer. This is possible provided the soil is sufficiently soft.
Step 5. We begin to secure the mesh. We fasten the beginning of the roll at the first pipe, which acts as the beginning of the future fence.
Step 6. We stretch the mesh around the remaining supports, gradually securing it. It is important to ensure that the mesh does not sag, otherwise all work will be useless.


Stages of work during sectional construction of a fence
Step 1. Lay the foundation.
Step 2. We construct a tension frame from metal corners.
Step 3. Fasten the corners between the supports.
Step 4. Attach the mesh inside the corners using welding.
Chain-link fences are very easy to erect without the help of specialists, which allows you to save a lot and try your hand at it.
Corrugated fencing

This type of fence can rightfully be called the most common. Most often it is used for fencing summer cottages and private houses. To build such a fence you will need welding machine and a little patience. In general, the installation technology is very simple, which can be attributed to the advantages of the design.
Modern construction markets offer corrugated sheeting in various colors and sizes, so buyers should not limit themselves to their imagination.
As additional components, you should purchase anti-corrosion paint, support structures, logs, shovels, screws, and also make a cement mortar.
Installation of a corrugated fence

Step 1. We mark for the future fence. It is important that the distance between adjacent supports does not exceed two and a half meters. Pegs and twine are used as auxiliary elements.
Step 2. We make indentations in the established places. In the future, supporting elements will be inserted into these holes. This task can be accomplished using a special drill or simply digging a hole with a shovel. The standard depth of the pit is one hundred and thirty centimeters.
Step 3. We install support pillars at the corners of the territory, and then along the entire perimeter.
Step 4. Strengthen the bases of the pillars with cement.
Step 5. Install the logs that are necessary for further attaching the corrugated sheeting.
Step 6. Attach the sheets to the joists using self-tapping screws.
Step 7. Paint the metal elements with enamel. In some cases, a primer is used.
Ultimately, the fence turns out to be quite pleasant in terms of aesthetic characteristics, as well as durable and reliable. It looks much more solid than a fence made of wood or chain-link mesh, and therefore can be regarded as a full-fledged fence.
Plastic fence

Plastic deservedly bears the title of one of the most available materials for building a fence. This is a real salvation for summer residents who do not want to build expensive structures on their plots.
The positive aspects of such fences are as follows:
- strength;
- durability;
- ease of installation;
- low cost;
- nice appearance.
Installation of a plastic fence


Stage 1. We mark the area where we plan to install the fence.
Stage 2. Mark the places where the wicket and gate will be.
Stage 3. In established places, we drive support pillars into the ground.
Stage 4. We fix piles made of durable metal in the corners.
Stage 5. We stretch the piles along the perimeter of the site.
Stage 6. Secure the pillars with spacers.
Stage 7. Attach the sections between the supports.

Thus, as a result of simple machinations, a beautiful and functional fence is obtained, which in its external qualities, although it cannot compete with structures made of decorative stone or forged elements, but completely satisfies the owners of the territory.
This article discussed the most simple ways construction of fences, the choice of which is determined only by your preferences. Now you can build cheap fence with your own hands.
Video – Construction of a wooden fence
Video - Construction of a mesh fence
Video - Installation of a fence made of corrugated sheets
Video - Installing a plastic fence
Concrete
In fact, there is nothing complicated about casting a concrete fence and installing it yourself. It is only at first glance that it seems that only a professional can handle this. But in fact, all you need is some tools and skillful hands.
Due to the development of modern technologies, concrete fences no longer look like a gloomy decoration of the perimeter of some government building. It is because of this that they for a long time not recognized as a decorative element. However, today there are many ways to liven up a boring grey colour material, give it a certain texture. To do this, you can use special molds for casting or decorative panels. In general, it is not necessary to decorate both sides of the fence with voluminous details. If you are completely satisfied with one, the outer side, use the molds and paint the inside.
Concrete fence
The presence of a foundation depends on the height of the fence. As a rule, one section has parameters of 2 meters in length and 50 cm in width. Three-panel fences do not need additional reinforcement, but four-panel fences need to be installed solid foundation. The top one can be decorated with forged elements or some other pattern, for example, made in the form of a series of small columns.
To take a leak concrete panel, you will need forms, metal carcass, a vibrating table (for compacting the material), a small concrete mixer and a surface on which the blocks will dry. All this can be purchased in stores garden tools or in specialized warehouses. Concrete is poured into a mold, which is placed on a vibrating table. This way the mixture is better distributed throughout it and possible voids are filled. Then the resulting slab must be removed from the mold and laid out to dry. They are fastened between two columns located at an appropriate distance and having special grooves where the blocks are placed. The columns are buried in the ground, the depth depends on their height and the height of the future fence.
Cladding panels are good option decor of concrete fencing. They will be an excellent alternative to a mold for casting, and in this case there are more options and they are more varied.
From blocks
In addition to concrete, you can make a fence from blocks. They can be an imitation of stone or consist of raw clay. This fence is moisture resistant and very durable. But it’s practically impossible to do without a foundation.
 block fence
 The construction of a fence from blocks is rarely done without the involvement of builders and the use of special equipment. In any case, this includes casting the foundation, installing blocks on top of each other and fastening them together using special solutions. Sometimes used to secure the structure metal fittings. It is most widely used when constructing a fence from blocks with voids. This gives it extra strength and stability.
Between the blocks, as in the construction of a concrete fence, columns are placed, also fixing the sections in place. And the tools are basically the same: a vibrating table (or just a leveler), a surface for drying and a concrete mixer for mixing building material. And the casting process itself is not very different from the concrete version.
Metal
With installation metal fence You can do it without special construction education. Typically, installation requires metal supports, cross bars, sheets for the main part and material for securing the supports. Tools should include a screwdriver and, ideally, a welding machine.
 metal fence
 Supports can be secured in several ways. But the first thing you need is to dig holes for them about 50 centimeters deep and 20-30 centimeters in diameter. The supports are installed in these holes and subsequently filled with concrete. If the latter is missing, they can simply be driven into the ground to approximately the same depth.
Once the supports are secured, begin attaching crossbars or joists to them. As a rule, two pieces are enough: one on top, the other on bottom. But if the fence is higher than usual, you can add as many logs as necessary.
Sheets of corrugated sheets are screwed to these joists using a drill and screwdriver. Place the fastening elements at an equal distance, this will distribute the load evenly. That's the whole simple system. You can paint such a fence in any color, and even paint entire pictures on it.
Wood
Manufacturing wooden fence- This is the least labor- and financially-intensive way to fence your territory. To install it, you will not need any additional tools other than a hammer, screwdriver and nails (bolts). You can also use it as a base concrete pouring, or you can drive demarcation stakes into the ground to a depth of about 50 centimeters.
 wooden fence
 After the markings around the perimeter of the site have been made and the foundations have been driven in, the attachment of the crossbars begins. Their number also depends on the height of the fence, as with the construction of a metal fence. And after that it’s time to adjust the picket fence itself. And here a lot depends on your preferences. Do you want nothing to be seen through the fence? Nail the boards close to each other. If you are absolutely open to your neighbors, you can leave gaps between the pickets of the width you need. The shapes at the ends of the picket fence can be completely different: cone-shaped, with curls and monograms - it all depends on your imagination.
Before installing the fence, pay special attention to the material. It is advisable to give preference to those types of wood that are moisture resistant and generally not affected by weather changes. Larch, for example, is perfect. In addition, decide for yourself whether you can process the wood yourself or whether you would prefer finished material. This will significantly affect the price: untreated wood will be much cheaper.
For flower beds
When installing a decorative fence for flower beds, there is no need to adhere to any building codes. Usually these are low fences, the main requirement for which is to stand firmly on the ground. That is, of course, you will still have to work hard, digging holes to install foundations or fencing right away, but this is the greatest effort that may be required of you.
 fence for flower beds


After all, this is the main element of landscape decoration.
But even the most beautiful flowers need a decent frame.
And here you can’t do without decorative fences or fences.
Fences for flower beds - functional and beautiful
Decorative fences for flower beds play not only a decorative, but also a practical role:
- protect plants from domestic animals;
- help divide the site into zones;
- thanks to them, the territory looks neater and more well-groomed;
- do not allow plant roots to grow beyond the flower bed;
- create a unified style of the site.
A good choice for country flower beds would be - best perennials and annuals are discussed in the article on our website.
Original hand-made borders will help give your flowerbed a beautiful, finished look. What options for borders are available on your site?
Types of fencing
Currently available in stores huge variety plastic, metal and wooden borders, fences and fences of different colors and shapes:
- Fences from separate plastic sections They are small in height and can be of different colors and shapes. They have molded legs that help keep the fence in the ground.
- Border for flower bed in the form of a continuous flexible plastic tape in a roll they are almost completely buried in the ground. With its help, you can create a flowerbed of any shape.
- Forged metal fences look great in any composition; they are ideal for open front gardens and flower beds.
- Concrete fencing are able to withstand sudden changes in temperature, are resistant to unfavorable environments, and tolerate excessive humidity well. They come in the form of decorative borders different sizes and shapes. Frames and individual sections are also made from concrete, allowing you to create multi-level compositions.
- The classic option for fencing flower beds is wooden fences. They fit seamlessly into rustic, modern or classic landscapes.

Despite the variety of ready-made fencing, they all have one significant drawback - a rather high price.
Therefore, if you lack finances and have skillful hands, you can create original fences for flower beds and flower beds from any available materials with your own hands.
The video shows ready-made decorative fencing for flower beds, made by yourself.
Choosing a fence for a flower garden
When choosing how to fence a flowerbed, you need to determine the purpose of the structure. The fence, which will simply separate flower beds from lawns or paths, may be low.
If the fence is expected to protect plants from pets, it is better to make it taller (about 40 cm) and use wood or metal. Plastic is not suitable for these purposes.
In flower beds raised above the ground, fencing should help strengthen the soil and prevent it from crumbling. Won't fit here either plastic structures. For such flower beds it is better to use concrete, stone or metal.
Fences for flower beds can help solve another problem - to prevent the “spreading” of roots perennial plants, for example, fern.
In this case, a rolled plastic border is ideal, which should be buried in the ground to 2/3 of its height.
It is also necessary to take into account the style in which the site is decorated. So, the fence is made of plastic bottles it will look ridiculous in classic style. And graceful forged fences are in country style.
Fence made of plastic bottles
Plastic bottles are a material available to any summer resident. You can use them to make a fence around your flowerbed with your own hands. It is enough just to select bottles of the same shape, size and color, fill them with small pebbles or sand and close the lids.
Then you need to dig the plastic blanks along the edge of the flower bed with their necks down.
If the required number of bottles of the same color is not found, the finished fence can be painted. The same border can be made from glass bottles.
How to make a fence for a flower bed from plastic bottles with your own hands:
Wooden structures
A wooden fence for a flower bed can be made in several ways:
- Fence made of driftwood looks very unusual. Making it is quite simple - you need to find several dry thick branches or thin trunks, remove the bark from them, treat them with some means that prevent rotting, and lay them out around the perimeter of the future flower bed. After this, add soil and plant your favorite flowers.
- has an attractive appearance and will please the eye for a long time. To make it, you need to prepare the required number of logs of approximately the same height and thickness. Along the perimeter of the flower bed, remove a strip of turf and dig a small groove. Insert wooden blanks into it, tightly next to each other, fill their lower part with soil and compact them well. In the same way, a palisade is made from low pegs.
- Wicker fence Suitable for a country style plot. In order to make it, you will need fresh willow twigs and wooden pegs.

Decorative fence made of logs
Sequence of actions in the latter case:
- first you need to dig pegs around the flowerbed;
- then take a twig and start braiding from the wrong side;
- the pegs should be braided in a checkerboard pattern;
- so that the branches fit more tightly to each other, they need to be tapped with a hammer;
- the ends of the rods must be secured to pegs using nails.
If there are bricks left after building a house, they can make a cute and, at the same time, easy-to-make flower border. The easiest way is to lay the bricks flat around the flower bed.
You can do it another way - remove the top layer of earth, pour sand into the resulting groove and compact it tightly. Then build a wall of bricks placed on the short side, cover it with earth and compact it well again.
Instead of sand, you can use cement mortar.
The photo shows a simple decorative brick fence
Natural stone - unusual and functional
In addition to bricks, you can also use natural stones. After all, they are found almost everywhere - in the field, in the garden or at the edge of the forest.
It’s enough just to make a border from large boulders - remove the turf around the flowerbed and lay them close to each other. The bottom of the stones should be covered with earth.
If you need a higher fence, it is better to choose flat stones. The first row is laid out on a concrete pad, and all the rest are laid using concrete mortar, to which (for strength) you can add special glue for exterior use.

Stone fencing
IN last years Fences made of luminous stones are very popular.
To make such a decorative fence with your own hands, you need to cover the pebbles with luminescent paint, which will accumulate energy during the day, and in the evening all the flower beds will be surrounded by a mysterious light.
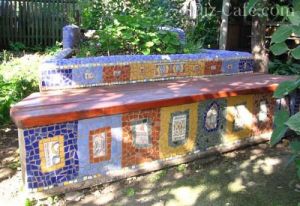
Mosaic fences
Very beautiful fence around the flowerbed you can create from multi-colored pebbles:

Pieces are also used instead of pebbles ceramic tiles, dishes, glass shards or shells.
Rope fence
Using a rope or string you can make a unique fence. It is made without the use of special tools.
It is necessary to place wooden posts with holes drilled in them around the perimeter of the flower bed and stretch the rope, lowering it slightly.
Unusual uses for ordinary things
Almost every home has unwanted or damaged CDs. But few people know that they can make an excellent fence for a flower bed.
You need to tie the disks one to the other in a chain (no more than 6 pieces in each) and attach them to pegs dug along the edge of the flowerbed. You can make a fence either in one or in 2-3 rows. Such a fence will sparkle beautifully in the sun, attracting the attention of passers-by.
Often used to make fences for flower gardens.
They are painted in a variety of bright colors, then dug in vertically or laid flat. Several tires laid one on top of the other make an excellent multi-tiered flower bed.
How to make fences for flower beds from tires?
Old furniture and plumbing - unusual and interesting
Effective fencing is made from old furniture and plumbing fixtures, such as those from beds, dresser drawers, bathtubs and vanities. They are dug into the ground, covered with nutritious soil and flowers are planted. Old boats or carts are also used.

Fence for a flower bed from the bathroom
An original border can be made from unnecessary plates, placing them on an edge along the perimeter of the flowerbed. The main thing is to choose dishes according to color and size.
Each type of fencing has both pros and cons. However even the most modest and easy-to-make fence can make a flower bed attractive. And making decorative fences for flower beds with your own hands is not so difficult. The main thing is imagination and patience.
Made with your own hands from scrap materials or installed using ready-made elements is important detail in the overall landscape design of the site. It not only performs decorative functions, giving the flower beds a finished, well-groomed look, but also creates a harmonious, unified landscape composition. In addition, it helps in zoning the site, dividing it into thematic zones, as well as performing protective function, protecting delicate plants from “excessive interest” of children and animals.
Types of fencing for flower beds
Depending on the purpose for which the garden fence will be used, a certain type of fence is selected:
- to simply separate the lawn and flower garden, marking the border of the flower bed, a low, modest fence 5-7 cm high will do
- if the fence for the flower bed also serves as a border for garden path, a more stable and powerful fence with a height of at least 10 cm will be required
- a fence made of brick and stone is usually used for flower beds raised above the ground. In this case, to hold the soil and keep it unchanged and stable shape flower beds, fencing must be stable and durable
- to prevent the flowerbed from growing and block long roots Some types of plants will require a fence recessed to a sufficient depth in the ground. For these purposes they usually use plastic tape or stone (brick) masonry, but wood will quickly collapse in such conditions
- To protect flower beds from children and pets, you will need a fairly high fence, at least 40 cm. But in order to maintain the visual appeal of the flower bed, “transparent” fences are used - picket fences made of wood, metal or plastic.
The choice of fencing type is directly influenced by the plants in the flowerbed. A fence of medium (40-50 cm) height will look harmonious around a front garden or rose garden. A low fence will simply be visually lost against the background of tall slender roses, spreading peonies or lush dahlias. But a mixborder or color border practically does not need a fencing as such; here it is quite possible to limit yourself to a line laid out from paving slabs, mosaics or flat stones.
Wooden fences
Wood – very cozy and warm natural material, which will look quite natural on the site. It does not get hot in the sun and does not reflect Sun rays, so it will not cause burns to delicate vegetation. Working with such material is simple, interesting and enjoyable; it does not require any special skills. A significant drawback is the fragility of wood, which is partially compensated by treatment with special impregnations and periodic tinting. In this case, it would be appropriate to use any type of wood - from cut branches to lining, picket fence and even slab.
Wooden fencing can be very diverse:
- palisade or border made of pegs (blocks) buried in the ground
- inlaid picket fence - both simple and carved planks, including different widths
- mosaic laid out from flat transverse cuts
- log fence
- branch fence
- wickerwork
A fairly simple decorative fencing for flower beds with your own hands is edging a flower bed with wooden chocks. For this, logs of approximately the same diameter can be used, while required height fences should be added 20 cm - to this depth they are buried in the ground. Before installation, the logs are cleared of bark and treated with an antiseptic to prevent rot.
In addition, the bottom of the logs can be wrapped in roofing material - this will reliably protect the wood from ground moisture. A ditch is dug along the perimeter of the planned flower bed, 20 cm deep, logs are placed tightly and evenly in it and, compacted well, they are covered with soil. If the tree is well protected from moisture, such a fence will last for at least ten years.
How to make a wooden border with your own hands - details in the video:
Stone fencing
Stone (meaning brick, paving slabs, natural and fake diamond) the fence can be erected either using dry masonry (the fencing elements are held in place by friction and gravity), or using lime, clay and cement mortar. In addition, stone can be combined with other materials (wood, stone). This is a very durable and reliable fence, but it is also very expensive.
The variety of shapes, configurations, sizes and colors of paving slabs allows you to use them for fencing even the smallest flower beds. And thanks to his neat appearance, paving slabs will harmoniously fit into a fragile flower arrangement.
Plastic fencing
Plastic attracts with its excellent performance qualities: immunity to moisture and temperature changes, it is not hygroscopic and durable, and retains its shape perfectly. A plastic fence is easy to install and equally easy to dismantle, replace or rearrange. A huge plus - big choice sizes, shapes, sizes and colors, it’s easy to choose a plastic fence to suit your style landscape design. There are borders that quite accurately imitate stone, wood or brick.
The main options for plastic fencing:
- sectional fences are of different colors and configurations, small in height, they already have strong cast pegs at the edges. To get a fence, you just need to drive the pegs into the ground
- plastic border - flexible tape in a roll. With its help, you can get a flowerbed of any, the most bizarre shape, or fence off a path that bends along the flower bed. The border tape can be either smooth or have a textured surface: corrugated, imitating stone or brick.
Installing plastic fencing for flower beds with your own hands will take a minimum of time.
Advice! Before installation, unroll the plastic border and place it in the sun - it will become softer and more flexible, making it easier to install.
To begin with, dig a ditch around the perimeter of the planned flower bed (the depth depends on the purpose of the border; to protect it from roots, the border is buried deeper). Measure the tape to the required length, and so that the ends do not diverge, fasten them with a stapler. Place the curb tape in the recess and fill its lower part, compacting it well.
Advice! Along the outer edge, the border can be decorated with small pebbles, crushed stone, cut bark and other bulk materials.

Light, low, openwork wrought-iron fences will decorate almost any garden. For flower beds with tall flowers, you can choose the appropriate height of such a fence, and it will provide good review colors