How to make a hand drill for posts for making holes. How to make a homemade earth drill (pit drill, earth drill) Working with a hand drill for pillars
Sometimes when earthworks it is necessary to dig holes that are needed to install piles, pillars and various types support Often this needs to be done in hard soils, and in this case working with a shovel is too long and difficult, especially if the wells are required to be deep and in large numbers.
In this situation, you can use a drill to earthworks Moreover, you can completely do without calling specialists and do everything yourself. If you wish, you can make a garden drill with your own hands. Drawings of this tool are available, some of them are very easy to use in practice. But first you need to understand the design and types of this device in order to have an idea of what kind of mechanism it is and what type of drill is more suitable for individual work.
An earth drill is construction tool, whose main task is to dig holes to the depth of the required foundation. The principle of operation is similar to a bottle opener - first the tool is screwed into the ground to the required depth, and then pulled back to the surface along with the ground , carried along by the drill blades. As a result of this operation, a hole with regular round edges is formed, suitable for installing pillars and supports. The most popular and frequently used types of drill include:

There is also a classification by engine type: gasoline and electric. The advantage of drills with engines is that that they have a high drilling speed, require less physical activity, and it is possible to change attachments. Motorized tools are available in two options:
- Manual. This type is more compact, but less powerful and has more weight.
- Wheeled. Larger in size compared to a manual one, but this tool is more powerful.
The gasoline drill should be warmed up before idling. This is not required for an electric motor. The disadvantage of any motorized tool is that they require a source of electricity or fuel to operate them.
Types of drills not used in gardening
 The impact drill is used exclusively in the construction and drilling of deep wells. Presented in the form of a pipe secured by rafters. By using impact mechanism the pipe is set in motion, pierces the ground deep and loosens the soil.
Crown mechanism, which is a pipe with a gear crown attached to the base. Requires auxiliary equipment, therefore not used in amateur earthworks.
DIY making
If necessary, this tool can be made independently if you have some required tools. . For work you will need a grinder, welding machine, plumbing kit, electric drill and grinding wheel. The most important thing in making a homemade drill is to make a fairly comfortable handle and good blades, which can be based on discs from circular saw.
Homemade disc drill
This design the easiest to self-production and requires a minimum amount of materials.
For work you will need:
- Metal reinforcement for a rod with a length of 1.5 meters.
- A piece of pipe for the handle.
- Circular disk for blade.
- A thick drill that will act as a tip.
 Having selected the desired diameter of the disk, it should be cut in half, and it is advisable to grind off the existing teeth to avoid cuts during work. The handle is welded to the top of the rod, as a result of which the structure takes on a T-shaped appearance. A drill is welded to the opposite part of the rod in the center, and blades are welded at some distance from it. It is important to maintain an angle of inclination between the blades of 25 degrees.
You can make a disk drill with replaceable blades, for which, instead of the blades themselves, you need to weld metal landing pads at the same angle and come up with a way to fix the discs. Bolt-on mounting is ideal, for which a hole is drilled in the platform to the size of the required bolt and the required thread is cut.
This modification allows you to select the required diameter of the working disks as work progresses.
Auger tool
 The design of the auger is more complicated to manufacture and use, but with its help it is easier to dig holes of narrow diameter. To make it you will need the same materials as for a disk drill, but instead of a cutting wheel, for a circular saw it is better to take several ordinary round metal disks of equal thickness and diameter.
First, the rod, handle and drill are welded together as was described above in the manufacture of a disk drill. Then you should make an auger from the existing disks.
To do this, drill a hole in the center of each of the available disks with a diameter equal to the diameter of the rod. After this, a small sector is cut out of part of each disk, and the disks are welded in such a way as to form a spiral-shaped structure.
The rod is installed inside the resulting spiral, which is then stretched along the rod. Once the required shape and height of the auger is obtained, it is welded to the rod, starting with the upper and lower disks.
Rotary drill from a shovel
To work with soft, loose soils, you can make a garden auger from a shovel. To do this, cut lines are marked on the blade of the shovel according to the existing drawing, then the canvas is cut according to the markings with a grinder, and the resulting edges are folded into different sides. Moreover, the ends of the canvas bend slightly upward.
The resulting structure is light in weight and small in size, resembles a whirlpool, and is ideal for planting plants on a plot of land.
Rules of care during operation
Regardless of whether the drill is mechanical or manual, whether it is purchased or homemade, this tool requires mandatory maintenance. This allows you to extend its service life and prevent possible breakdowns during operation:

 A hand drill is an indispensable tool when carrying out construction on a land plot. With its help, you can drill holes for the foundation of gazebos and support posts for a fence. In addition, the drill will also make it easier to replant shrubs and trees, which will make the gardener’s work easier.
This tool does not require special skills to use, and its use does not cause difficulties. The design is not very complicated, which allows you to make a drill with your own hands if you have a welding machine, grinder and drill. Self-created The tool will save money and ultimately provide exactly the mechanism that is required for individual work.
A hand drill is necessary for construction when repair work. In addition, it is often used when working in the garden or vegetable garden. Using this item, it is very convenient and quick to dig deep and narrow holes that are needed for planting trees or for installing supports during the process of pouring the foundation. In addition, the drill cannot be replaced with any other tool when drilling wells. Few people know that hand drill for poles you can do it yourself, saving a significant amount of money. All you need to make this indispensable tool is detailed instructions, describing how to make a drill, the availability of the necessary materials, tools and, of course, patience.
Using a hand auger, it is convenient to dig narrow holes for posts or planting trees.
It should be noted that the use of a hand drill is not intended for soil with stone impurities. The soil should have a clay or loamy base. In this case, the drill is usually made from high quality materials. In this case, its service life may be unlimited.
Materials and tools
Before you begin, you need to make sure that you have all the materials and tools available. It will be much more convenient to work if everything you need is at hand.
In order to do this, you need to have:
- welding machine;
- welding clamps;
- grinders with a cutting disc for iron;
- electric drills;
- pairs of gas keys;
- dies, the diameter of which must match the diameter of the rod;
- die holder;
- vice.

Materials for making a drill: grinder disc, drill, pipes.
As practice shows, in this case the use of simple cutting plates with a sufficiently large diameter is unable to give the desired effect. A hand drill made from such material will take away your energy and time in the process of drilling earth holes. In order to avoid such a result, professionals recommend supplementing such a tool with two shortened pre-rippers. In this case, a hand-made drill, made with your own hands, will be much more effective, and working with it will take noticeably less time.
Return to contents
Device
A hand drill consists of the following elements:
- Pen.
- Insert.
- Cutting attachment.
- Clutch.
- Bolt with nut.
- Cutting blades.
- Guide rod.
- Blade.
Return to contents
Manufacturing of pre-rippers
As for the worm version of the tool, making it yourself is quite difficult. Taking this into account, it is possible to replace the stepped auger with two welded pre-rippers having an increasing diameter of the cutting material. In this case, the soil resistance is evenly distributed over the steps, and the amount of force applied for one revolution of the drilling device around its axis is noticeably reduced.

The purpose of the first pre-ripper is to crumble dense soil, then cut a wider radius of the hole and supply the already loosened soil to the surface of the disk ripper.
The disk ripper performs the function of forming the walls of the hole, as well as pushing part of the soil upward. During one such process, the depth of the dug well can reach 40-50 cm. In the case of a large load, working with a hand drill will be quite difficult.
A good material for making pre-rippers can be car spring, the thickness of which is at least 5 mm.
To sharpen the cutting edge of such a ripper, it is necessary to maintain a certain angle. To the main rod this element should be butt welded, after which you can begin welding the next section of the rod. The next step it is necessary to attach the second pre-ripper element to it (end-to-end). Finally, all that remains is to weld the sharp part of the rod. In this case, it is necessary to take into account the ratio of all segments, since otherwise backlash may occur.
As for the disk, whose function is to form the walls of the hole, for its manufacture it is recommended to use a treated circular saw designed for woodworking. Its thickness must be at least 3 mm. The disk is cut into two equal parts, after which its cut edges need to be sharpened. The next step is to weld the resulting pair of elements onto the main rod, while maintaining the same angle. In this way, you will be able to avoid displacement of forces, as a result of which the dug wells may turn out crooked.
Return to contents
Threading

At the opposite end of the rod it is necessary to cut a thread onto which the coupling will subsequently be screwed. For this purpose you will need a vice and a special die. Clamp the barbell (end up) in a strong vise, maintaining a right angle. In this case, it is recommended to monitor the protrusion of the rod, which should not exceed 10 cm. Otherwise, completely undesirable depreciation may occur at the moment when the die is subjected to pressure. Using a file, grind the end to form a cone. This will guarantee that the die will sit correctly and evenly on the bar. After this, you can begin cutting work.
There is nothing complicated in the thread cutting process. The die holder rotates slowly clockwise. If a die gets stuck during work, twist it and sharpen the interfering burr. After this, screw the die back onto the finished part of the thread and continue cutting to the planned mark. The most optimal thread is considered to be 10 cm long.
The next step is to screw a coupling onto the thread, which is welded onto the main rod in the area of the connecting seam. At this point, you can safely assume that you have completed the main part of making a hand drill with your own hands.
Return to contents
Making a pen

The handle or rotating part of the hand drill is welded strictly at right angles in a T-shape. The main bar itself can have a length of 40 to 50 cm. The recommended width of the handle should be no more than shoulder width. The fact is that the rod's resistance to rotational force is limited. If it is exceeded, the rod may twist, as a result of which the hand-held pole drill will become unsuitable for work. In order to avoid such troubles, limit the effort and gradually drill the ground in moderate parts.
Before you start welding, secure the handle to the rod using a welding clamp, making sure the corners are straight. This way you will not only save correct angle, but you will also be sure that the handle will not move to the side. The weld should be along the end side of the main rod. On at this stage you should work as carefully as possible. It is worth considering that the reliability and service life of the future drill depend on the quality of this joint. Since the seam takes on all the stress, don’t skimp on the electrodes.
The uneven joints are ground down using a grinder; this will not only give the tool a more aesthetic appearance, but will also eliminate cuts on your hands that you can get while using a hand drill. Having welded the handle, a connecting thread is cut at the other end of the main rod in the same way as the previous one.
We decided to dig a well at personal plot, but the budget does not allow you to buy a drill and hire workers? The question arises: how to make a drill for pillars yourself at home using auxiliary materials? In the article we will talk about methods for its manufacture and use when drilling a well.
Features of manual drilling
A home well means savings, water quality, and ease of maintenance. The services of drilling specialists are expensive, so many drill wells on their own. Sometimes this is the only way out of the situation if you plan to loosen the soil in a place where special equipment cannot enter. Is it difficult to drill the soil to the water yourself? It all depends on the depth of water in the chosen location and on compliance with drilling rules. Following all the rules, you can easily drill a well using a ready-made mechanism.
Spiral drill for hand drilling
You can make your own spiral or spoon-shaped drill from the most simple materials. A twist drill is similar to a drill large diameter, its main element is a cutting edge in the form of a spiral, which is a twisted and sharpened steel strip.
Most common with hand tools are a shovel and a hand drill
The width of the cutting edge that loosens the soil depends on the size of the required well. During drilling, the earth is pushed up and remains on the edges of the drill, so the process will need to be stopped and the rod cleaned. This design is universal, because a spiral drill can loosen any soil.
Spoon drill for hand drilling
This type of drill has a cylindrical working surface and metal rod. A slot of a spiral or longitudinal shape is made in the lower part of the tool. The edge of the slot is one centimeter from the base and acts like a spoon, which helps make the hole wider than the diameter of the cylinder. A spoon-shaped drill is used when loosening loamy soils, which allows you to drill a well in stages with the installation of pipes.
Making a drill yourself
How to make a drill with your own hands? To make a spiral drill, you will need the following tools:
- steel rod;
- Bulgarian;
- welding machine;
- roulette;
- disk made of hard, infusible material.
 The basis of the design is the cutting part, or simply the drill
 Divide the latter into two equal parts and sharpen along the line of the circle and cut. The better the sharpening, the more effective it will be further work with a drill. The rod is sharpened from one end and at a distance of 20 cm from the sharp tip, a notch is applied to the rod, and the cutting edges are welded along it at an angle of 20 degrees to the central axis and 40 degrees to each other.
Similar homemade drill made from steel strip. It is heated and turned into a spiral at a pouring angle of 45 degrees. The finished product is welded to the rod.
How to make a spoon-shaped drill?
A spoon-shaped drill will help you dig a well more accurately. To make it, you will need a grinder, a metal drill, a welding machine, a metal rod and a hollow cylinder. First, you should cut the cylindrical base from the side and make a special grip in the form of a spoon from below. If the soil is loose, then make a larger cut. Earth gets inside the cylinder and cleaning needs to be done. The dimensions of the drill depend on the required dimensions of the well.
You can make a drill for poles with your own hands from old pipe, balloon. Use a grinder to cut a hole in the bottom of the element and weld the workpiece according longitudinal seam. Weld a metal drill or a pointed piece to the end of the rod metal plate. Offset from the central axis – 1 cm. Use exclusively hard materials, capable of withstanding heavy loads.
 The main advantages of this device are that the hole in the ground is very neat and accurate
 How to make a handle for a drill?
The handle is welded on top of the split pipe. Rolled metal is an excellent choice when making a handle. It is she who bears the heaviest load during construction work. The handle must be well secured and should not wobble during rotation. To avoid injury, make it smooth and easy to use.
Split drill pipe
The drilling base is made in the form of a detachable pipe 150 cm long in order to loosen the earth to the required depth. It lengthens as the well deepens by adding sections, no more than 1 m in size.
Fastening split pipe sections
Fastening can be done using several methods:
- welded coupling;
- threaded coupling;
- fastening with nuts or bolts.
The coupling should be welded to the base or additional sections of the drill. The coupling is attached with a nut to the lower section. The drill must sometimes be lifted from the ground and cleaned by disassembling and reassembling.
The second option is to attach it to a thread. To prevent the elements from being separated, install a cotter pin.
Bolts and nuts are best used in drilling narrow wells; they are attached specifically to sections of the pipe. The method is not entirely reliable, so do not use it when working with dry soil.
 To assemble it yourself, you will need either a welding machine, or bolts with nuts and a drill to drill holes for them
 Percussion-rope drilling
Another way to dig a well on a private plot with your own hands. You will need tools: a tripod, a winch, a cable and the drill itself. The average height of the tripod should be 2.5 meters; a block with a cable is attached to its upper part. The winch is located near the supports. The working tool is a part of a pipe with thick walls and a welded seam.
A metal strip is welded horizontally to the upper part, on which a cable loop is made, where the base is suspended. The soil is removed thanks to a slot 75 percent of the length of the base. Sharpen the lower edge of the pipe and make a special petal or ball-type grip inside. The soil will remain in the grip, so its height from the bottom edge of the pipe should be about 6 cm.
During construction and arrangement land plot, very often you need to do round holes in earthen soil. Such pits are needed for light utility structures, these include: arched structures, fences, pillars and other buildings. Even the pits that are made when performing pile foundation, only smaller diameters are also performed with a hand drill.
Types of equipment
In what cases can it be used this type equipment:
- When utility networks are laid.
- For the construction of a well.
- For installing a load-bearing base on piles for light outbuildings or other structures.
- When installing a fence.

Types of structures and their technical characteristics
In the past, vertical shovels were used for such purposes. They have been replaced by new, improved, simple models that will greatly facilitate all types of work.
A few simple kits:
The simplest mechanical device

It is a conventional double-sided equipment with a tubular rod, a handle and a cutter with 2 blades on the other side.
Used for digging shallow holes and shallow wells.
Model with removable cutters

It can be used for all types of work
Auger drilling device

The main differences of the improved manual model are that behind the cutting blades there is a screw auger. Thanks to several cutters and a split design, work is carried out quickly, and due to extension, penetration occurs to the required depth.
Fundamental manual equipment "TISE": characteristics and production
Today, in private suburban construction increasingly you can find drilling operations with load-bearing base. In frequent cases, individual construction opts for TISE, optimal solution in terms of cost of work and quality of work.
Modern device for wide use

The operating principle of the drill will ensure comfortable work:
- The presence of sliding sections of the rod allows you to adjust the desired depth, since the length of each part is 1.10 m.
- The equipment is equipped with a soil receiver with a diameter of 20.5 cm, which exactly corresponds to the size of the holes.
- In order for the well to be vertically ideal, a cylindrical accumulator is used.
- If during drilling operations obstacles form in the ground, a guide pin will come to the rescue, which will be responsible for the given direction in the event of interference.
- Auger plates and special loosening cutters, which are located in the lower part of the receiver, are responsible for collecting soil.
- The device is equipped with a folding paddle, which is raised by a cord and lowered by its own weight.

There are only two versions of the TISE drill, which differ only in the storage device.
TISE drill: manual assembly in several versions
A drill made independently can be represented as 2 different equipment: one model with extension, the other is designed for drilling, simpler design.
Manual assembly for drilling work, without expansion:
- You will need 2 pieces of regular water pipe(diameter 210mm and length 150mm).
- A bottom is welded on one end of the pipe, and a removable chamfer on the other.
- A thick drill and auger are mounted in the center.

For a telescopic rod you will need 2 pipes (250x250 mm and 200x200). This design can cope with drilling difficult soil up to 100 mm, and the wall of the cup will be perfectly smooth.
After watching the video review, you will be able to understand in more detail the assembly of the equipment and the principle of its operation:
To prevent soil from sticking to the walls of the well, you can use machine oil.

Assembling the device for expansion:
- This device has a more complex structure. A pipe with a diameter of 210 mm and a length of 800 mm is used for the glass.
- The second glass is made 50 mm smaller in diameter.
- Next, there is also a chamfer and a bottom, which acts as a storage tank for soil, holes are made there.
- A rod made of a pipe 200x200 mm in diameter and 100 cm long is attached in the center, into which a device made of bearings is mounted.
- Then you will need a steel angle, 250 mm long, connect it to the sleeve. Using a bolt up to 2 cm, we weld it to the dead rod (the design resembles a door hinge).
- No. 21 Device with extension
- A 250x250 mm pipe is mounted on the rod, and a sleeve with a bolt is welded to the bottom, onto which the 2nd angle is attached and connected to the first.
- Thus, we get a mobile device.
- Finally, we screw on the blade of the shovel, which visually resembles a simple plow for cleaning the bottom.
Schematic drawing of manual assembly

Mechanical hand pole equipment, application, work quality
Among the many models, I would like to highlight one of the universal drilling devices, the earth drill. The equipment is designed for a wide range of tasks. Used as in professional field, and for individual construction.
Using the equipment you can perform the following types of work:
- Construction of fences.
- Preparatory work for foundation supports.
- For the construction of drainage wells.
- Planting trees and plants.
The device can also be used for laying communications, i.e., for horizontal drilling.
This equipment is dismountable, lightweight, durable and easy to transport. To work with a digger, you do not need special physical training; you can handle all types of work independently, without outside help.
Types of structures for pillars
There are several types of equipment that differ in functional features and parameters.

We distinguish three groups:
- “Pit drills” are household without a motor; the work is carried out with the help of an operator.
- Equipment that runs on gasoline or motors.
- Hanging structures work only with the help of special equipment.
Manual hole drills without motor
The compactness of the model is convenient to use and transport. Thanks to the equipment, it is very easy to install a lightweight wooden fence or simply dig a hole for a well.
The design looks like this:
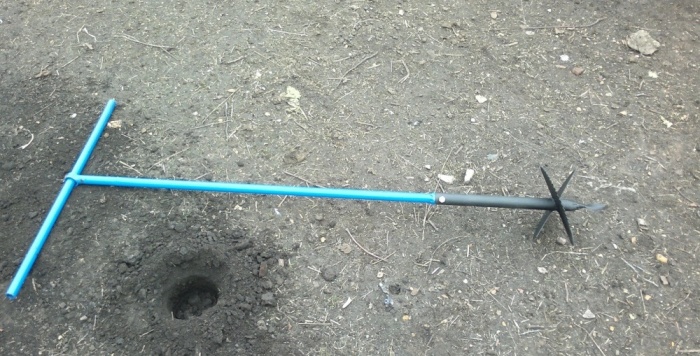
- Simple "T" handle.
- Rod with built-in knife.
Handmade models are made different sizes, there are also collapsible ones, which is very important during transportation. Holes are made with a diameter of up to 300 mm and a depth of up to 2 m.
Mechanized models
This is a simple piece of equipment with an electric drive and a motor. There are also gasoline models. The tool allows you to make fairly deep holes up to 3 m.

Drilling or mounted rigs
This model is designed for drilling large diameter wells. Just right for installing electric poles and serious fences, for example, airports or industrial enterprises.
How to make a hand drill yourself
Very few people know that making a hand drill can be done at home. You will need detailed instructions and availability necessary tools and materials.
The model provided is not suitable for complex work with stony clay.

We prepare the necessary materials for production
To manufacture the equipment you will need:
- Vise.
- Gas keys.
- Grinder with a nozzle for metal.
- Welding.
- Electric drill.
- Die holder.
Step-by-step assembly instructions
Pipe processing

We take a piece of pipe with a diameter of 5 cm and make an oval edge.
Drill handle

We prepare a place for the drill handle. We weld a piece of metal for the drill handle to the oval side.
Mounting the nut

A nut is welded to a part with a diameter of 5 cm.

We screw both ends of the pipe. We weld a tip on one side of the pipe, and a bolt on the other and screw it to each other. We cut the discs in half.
Mounting disks

The 2 halves of the disk are welded at an angle of 40 degrees to each other on the edge of the pipe. Second half larger diameter welded similarly above the first at a distance of 10 mm.

We twist both parts together. We get a hand drill.

After all the work has been carried out, it is necessary to carry out a test drilling and only after that it can be prepared for applying paint. It will take no more than 2.5 hours to make this model.
Choosing the right tool for yourself, it is better to use some recommendations that will help you do right choice, saving time:
- When choosing, pay attention to the spiral; the speed of work depends on this detail.
- If drilling is planned small sizes, then you can use a flat spiral.
- When purchasing, pay attention to the speed mode of the equipment. During drilling operations, you should strictly follow the instructions so that the tool does not fail quickly.
- If you are faced with choosing a hand drill for more serious work, then it is better to look at a model with an auger.
- Working with a manual device will be too tiring for you. It is necessary that the drill removes the earth from the drilling site, which will greatly facilitate your efforts.
For more detailed information, as an example of the operation of one of the types of devices, we recommend that you familiarize yourself with the video material on how to drill a well yourself using the percussion-rope method.
The video review will explain to everyone how competently you can drill a hole by hand. Practical advice will help you choose best option and take seriously the choice of the equipment you need.
25.06.2017
Surely, at least once in their lives, owners of land plots have had to deal with the need to dig holes, which are required to install pillars, supports, arches and other parts involved in the arrangement of the exterior. Narrow holes and wells sometimes have to be made in inconvenient places or difficult soils. An ordinary shovel cannot cope with digging deep holes, so the owner has to rent a drill or hire a specialist to handle the tool.
Garden auger – useful tool for a summer resident. It is light and compact, easy to transport and easy to use. Made of hard metals, it splits small stones and plant roots hidden in the depths of the earth. To dig holes, use it by placing it in the desired place and making several rotational movements, similar to a kitchen corkscrew.
Description of design
The main purpose of the drill is to dig wells to depth columnar foundation. The holes are made by the cutting part, the shape of which can be different:
- In the form of a screw;
- Two-blade;
- Helical;
- In the form of half-discs;
- Multi-tiered;
- Removable or fully welded.
Some models start with small blades and gradually increase to the largest ones at the top. But factory-made drills do not always turn out to be functional in practice, because the tool may not penetrate into the ground to the required depth or its attachments may not coincide with the expected diameter of the hole. And although the price finished product is small, it makes sense to learn how to make it yourself. The technology for creating a drill at home is simple and inexpensive; it is only important to decide on the configuration of the model.

Let's look at a few differences different designs responsible for the functionality of the tool:
- Baking powder. The item looks like a pair inclined planes or auger. In the second case, a spiral-shaped knife is located on a rod.
- Ground receiver. Soil accumulates in the so-called storage facility. The part facilitates work when drilling holes with a diameter of 35 cm.
- Plow-former of the lower expanded zone. The use of the structure helps to strengthen the columnar foundation, which is important when constructing massive structures.
The bolted connection of the drill secures the auger part to the handle. The length of the assembled product slightly exceeds 1 m, thanks to which the tool makes holes up to 700 mm. If you need to dig holes of greater depth, the structure can be supplemented with a connecting pipe (500 mm). The element looks like a part with a bolt and nut, the location of which is the end sections of the pipe.
Manufacturing and selection of components
When making a hand drill for digging wells under pillars with your own hands, there are usually no difficulties. But during the production process, the craftsman will need parts and materials from which the finished product is made.
Parts List
- M20 bolt and nut
- 2 discs with a diameter of 100 and 150 mm
- Tip and drill 20mm diameter
- Three pieces of pipe: two - 500 mm each and one piece of 400 mm. Additional parameters: wall thickness – 3.5 mm, outer diameter – 40 mm.
Necessary materials
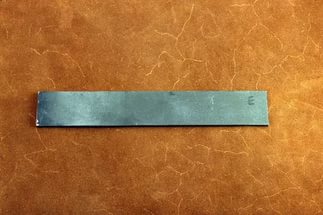
Required wall thickness iron pipes(3.5 mm) is explained by the strengthening of the product and the ability to work in hard soil. Discs for work can be removed from the circular saw or made independently. They will need metal sheets With minimum thickness 3 mm. 
Tools that will be useful:
- Hammer and grinder
- Welding technology
- Locksmith kit
- Electric drill with metal drills
- Sharpening wheel for cutting elements.
If there is no tip with a drill, they are replaced with a drill with a tapered shank. The diameter must match the screw part. To avoid injury in home production, use soft bicycle handles.
Step-by-step description of tool manufacturing

- A circle is drawn on a piece of sheet metal and its center is marked - this is
there will be a blade. Cut the workpiece with a grinder. Then a cut line is applied to it (it should go along the diameter line) and a cutout that coincides with the size of the collar circumference. The resulting disk is divided in two and holes for the collars are cut with a grinder. - At the end of the blank pipe intended for making a knob, using a grinder, make 4 longitudinal cuts about 3 - 4 cm long. Then a point is formed from them, armed with a hammer and collecting the cuts at the center of the pipe. Next, the tip is processed by welding so that the pipe-collar is not subsequently filled with earth.
- Weld the halves of the disk with the knob, maintaining a distance between them of 5 cm and an angle to the plane of rotation of 20°.
- The extension pipe is equipped with a handle. The part is welded perpendicularly, achieving the resemblance of the letter “T”, and reinforced with a metal “kerchief”. The workpiece is inserted into the collar pipe and a through hole is made through which the parts will be connected with a pin and wings. Several holes are drilled in the extension - they will help adjust the length of the knob.
- The work is completed by sharpening the blades. The cutting edge on the cutters is processed so that the tip “looks” down when rotating.
Application of protective coating
To prevent corrosion processes, all parts of a hand drill made for installing poles with your own hands must be cleaned with sandpaper, treated with a phosphating solution and primer. After this, the product can be painted.
Already during operation, after each work the drill must be disassembled for cleaning bolted connections from dust and coat with waterproof lubricant. Don’t be lazy - careful care of the tool prevents jamming of bolted joints and guarantees long work the entire structure.
Methods to improve tool performance
In the process of work, builders have to deal with an abundance of roots of various vegetation lying in the ground. The sharply sharpened edges of the knives make the drill easier to operate. Also, for ease of work, you can cut teeth on the sloping part of each blade or round off the cutting area.
Ways to improve the design

The first “highlight” will be the manufacture of a drill with replaceable cutters. Thanks to this tool, the master will be able to dig holes of any diameter. In addition to making spare elements, it is important to provide a method for attaching them to the collar. The easiest way to connect products is with two welded iron plates. In relation to the plane of rotation, welding is performed at an angle of 20°.
Holes are drilled in the blades and mounting plates for bolts - 2 pieces each. on every detail. The cutters are screwed with M6 bolts with washers and nuts. To prevent the bolts from interfering with drilling, they are inserted with the threads facing up.
The second way to improve the drill is to enhance the functionality of the lower end of the driver. From sheet iron cut out a narrow plate 10 x 2 cm and grind it into a cone with a grinder, giving it the appearance of a point. No cuts are made at the end of the knob - a turned plate is inserted into this part of the product, welded and flattened. The result should be something like a peak.
This is how the pike is made differently. The plate is cut longer (about 17 cm), heated and rolled into a screw (like a corkscrew). Work on creating the peaks continues, as in the first version.
Under the auger, you can use a drill of a suitable diameter that can handle wood or metal. An unusual tool can easily be inserted into the ground and drill it to the desired depth without problems.
The third tip will be useful for builders working on compacted deep soil layers. If a small flat cutter is welded between the peak and the cutter, the device can be used to perform preliminary loosening of the soil and additional centering during drilling. To make this part you will need 2 plates measuring 8 x 3 cm. It speeds up the work process.
Fourth: you can get friezes from grinder discs intended for stone processing. The circles are cut along the radius line and the central hole is expanded, adjusting the hole to the diameter of the knob. Its extension with the ends moving apart in different directions gives the appearance of a screw. All that remains is to weld it, as described above.
Making a cutter can be easily done from a circular saw blade. The sharp teeth of the modernized model will easily cut through the unruly roots of even the strongest vegetation. What you choose for yourself, decide for yourself. In general, making a drill is not difficult and requires minimal costs. The whole process takes about 2 hours.

DIY hand drill
The operation of a universal hand drill will be more productive if the auger blades are removable and not tightly coupled to the stand. And if you supplement the product with round blades of various sizes and configurations, the drill will become a truly multifunctional device that will be useful to a person in many household matters.
Experienced craftsmen say that blades with a diameter of 9 and 12 cm do an excellent job of drilling holes for water wells and seedlings, arranging holes for the construction of greenhouses and for installing tunnels for laying underground communications. Large knives with a diameter of 17 and 25 cm will serve rational decision for those who fill the supports of fences and small buildings, it suits compost pits and plants plants with powerful rhizomes, builds wells and surrounds the area with a fence.
Step by step photo guide:


To maintain a given angle of inclination of the lever, which will serve as a handle, when connecting the part to the stand, it is recommended to use a welding clamp. The handle must be attached to the stand itself at a right angle.
And one last tip: on the eve of drilling, loosen the top layer of soil with a shovel. Then the tool will go into the ground easier. We hope our recommendations will help you, without any extra effort, make a functional drill that will last for many years and bring many benefits to your household.