How to make a bathhouse from a trailer. Bathhouse from a trailer on a summer cottage
The change house is perfect for temporary living during the construction of a full-fledged house. But even after the completion of the main construction work, the change house will not remain out of use. It can be equipped for a budget country house, a place to store various equipment, work clothes, bicycles and other household supplies.
Ready-made cabins are relatively inexpensive. But why spend money if such a structure can be built on our own, having bought only necessary materials and tools? We present to your attention instructions for arranging a cabin made of wood, a finished trailer and a metal profile. Choose the option you like and get to work.


The change house is a secondary utility room, but you should not take the process of its construction and arrangement too lightly.
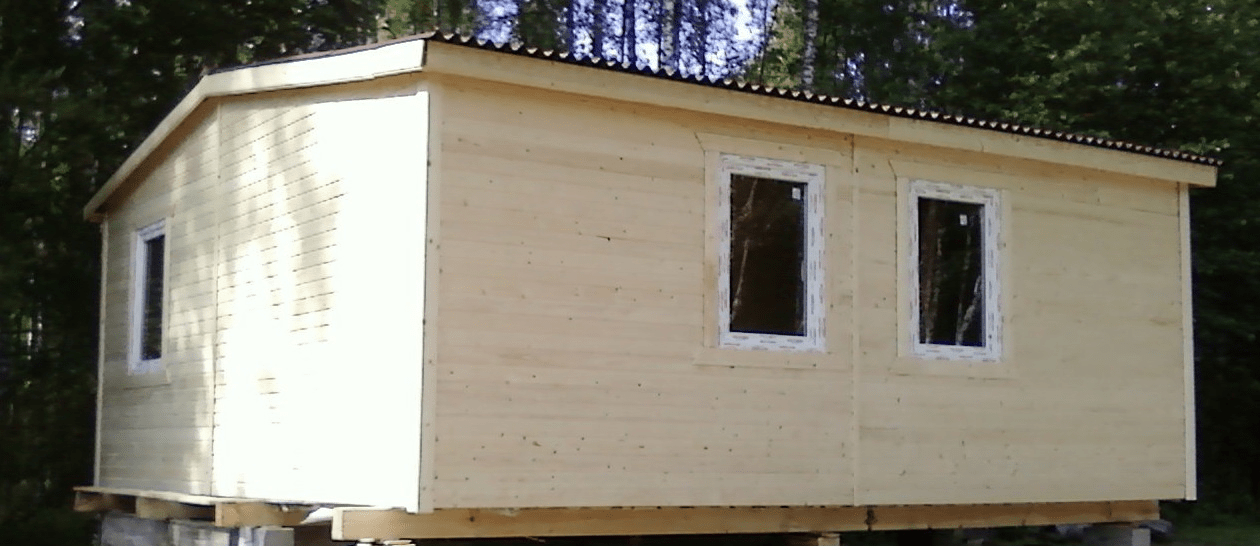
Select the dimensions of the structure and its layout at your discretion. Typically, designs industrial production, intended for living, have a length of about 5-6 m, a height of about 2.5 m and a similar width. Otherwise, regarding the dimensions of the house and its layout, be guided by your needs and preferences.
Choosing a place to build a shed

When choosing a location for our house, we take into account a couple of important points.
Firstly, we think about whether we will transport the structure somewhere in the future. For example, you are going to build a lightweight house for a couple of seasons, and then move it to another place. If moving is part of your plans, it is best to place the change house as close as possible to the exit from the site.


Secondly, we decide on the purpose of the room. If the shed will only be used as a storage shed various instruments and other household supplies, it is best to install it approximately in the center of the long side of the main house so that it can be easily reached from any side of the site.

Helpful advice! If you do not exclude that in the future the change house will be converted into, build it in a remote secluded corner of the site, remembering the rules against fire safety.
Making the base
We will have the same for all three cabins. The only exception would be a ready-made trailer on wheels - there is no need to build a foundation for it.


We make the basis as follows:
- we get rid of the top fertile layer of soil;
- compact the bottom and walls of the resulting pit;
- cover the hole with geotextiles;
- pour a layer of sand on top of the geotextile and compact it thoroughly;
- We place the cinder blocks symmetrically on the resulting pillow;
- We wrap each support with a layer of roofing material.
Important! If you plan to attach a small porch to the shed, consider installing supports for it at the same stage.
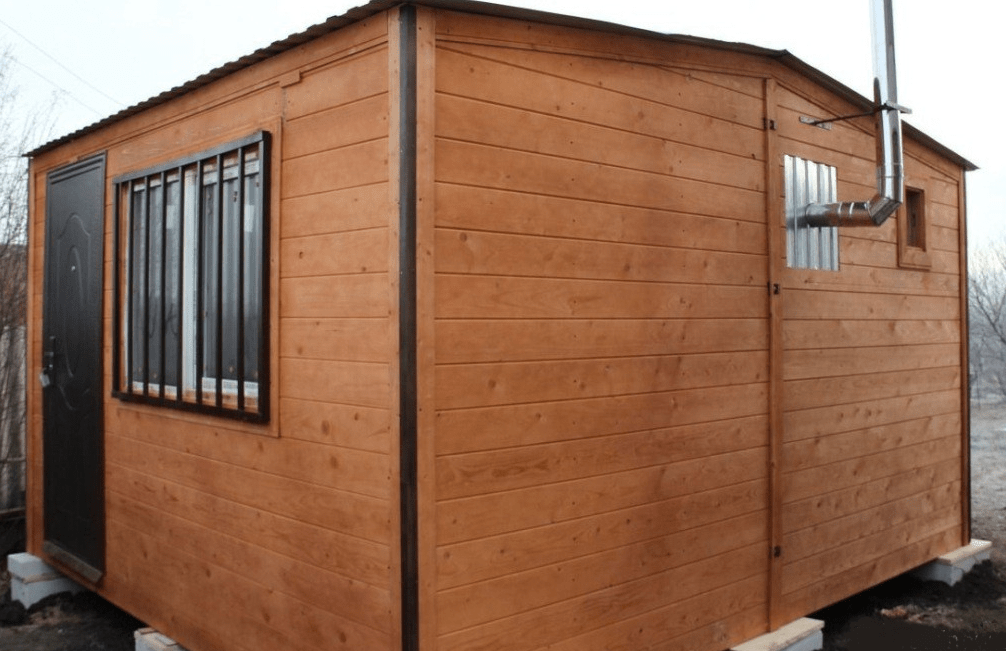
We are building a wooden shed


Let's start building the frame of our cabin. First we lay wooden beam along the perimeter of the future structure, as well as in its center for additional strengthening of the structure.


We connect the opposite sides of the beam. To do this, we fasten the logs to the timber bottom trim. Any connection can be made in a suitable way. Connections using the tongue-and-groove method, using metal corners and anchors, have proven themselves well. We made preliminary selections to connect the elements and additionally strengthened the fastening points with nails.
We install vertical corner and intermediate posts. We install intermediate supports in meter increments. To do this, we use timber with a cross section of 15x15 mm. Don't forget to leave an opening for the door. To reliably connect frame elements, we use metal corners and self-tapping screws. At the same stage, we install support pillars for the future porch, if its presence is provided for by the design of the cabin.


Important! The height of the vertical supports on the rear and front sides of the cabin should differ by approximately 50 cm. Such a difference will ensure an optimal slope of the roof and precipitation will not linger on it.
We mount the top trim. The support posts of our cabins have different heights, so we work as follows: first we lay the timber on the tops of the higher supports, then we connect the low posts and install the side crossbars perpendicular to them. We make connections using the already familiar method with samples and nails.


Laying floor beams
As a result, our frame will be divided into a number of rectangular sections. To strengthen the structure, we connect the opposite bottom and top corner each such section with jibs made of boards.
Fastening rafter beams to the top roof sheathing. We use the boards that are as even as possible to make lathing easier in the future. We install the rafters in increments of about 500-600 mm. We pay Special attention strength of connections on roof beams.


We construct it so that it protrudes slightly beyond the boundaries of the frame. This will allow us to arrange a base for drainage on the back side of the cabin, and mount a canopy on the front part.


Material for finishing coating We choose roofs at our discretion. For example, it will work well. We lay it with an overlap, starting from the bottom of the slope. Before laying ondulin, you should lay out a continuous sheathing of boards and attach a waterproofing film on top of them. Instead of ondulin, you can use slate or other material of your choice.
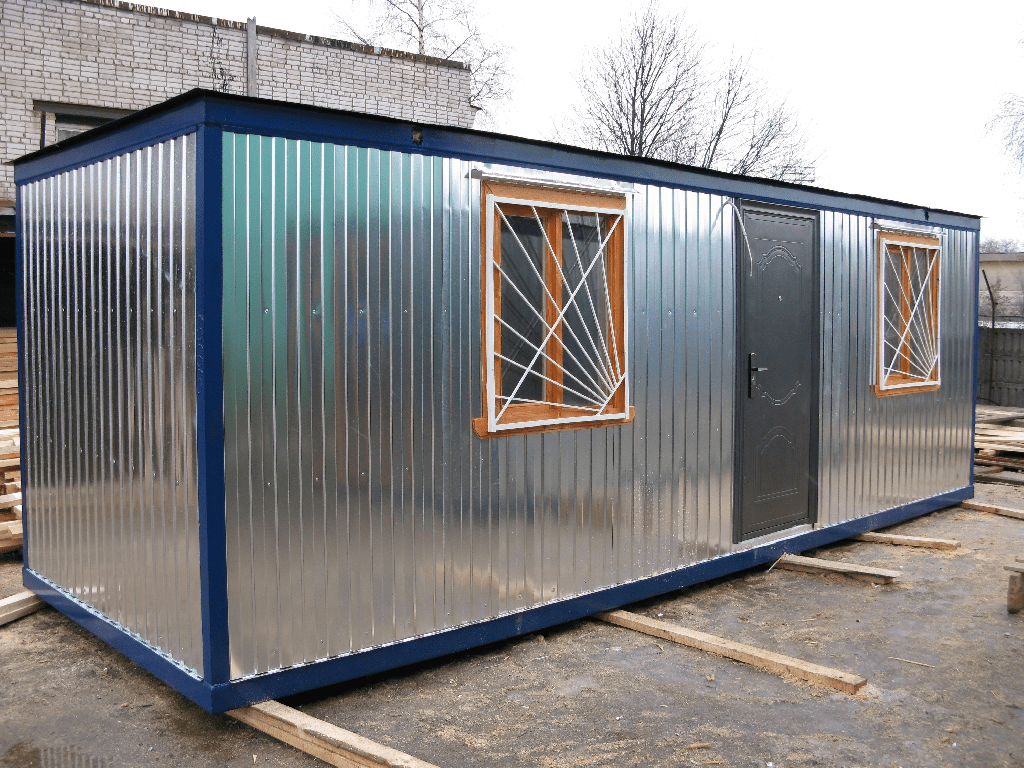
Change house from a construction trailer


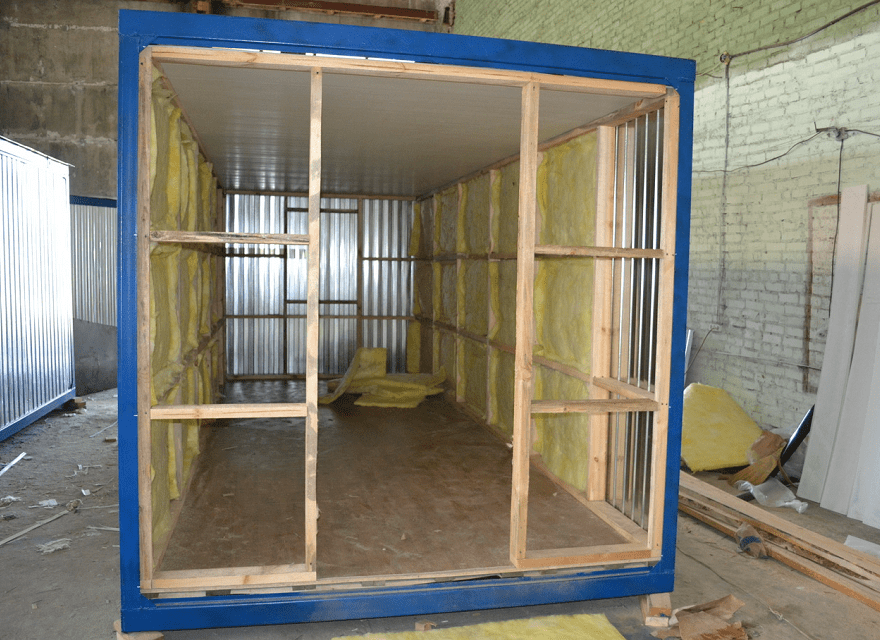
Don’t want to bother with assembling the frame and other related activities? You can buy a ready-made trailer and equip it for a cabin. Such trailers do not even need their own foundation - you just need to carefully level the site and install the container (trailer).
If you equip a used trailer as a cabin, carefully examine its condition. Clean off traces of rust, replace heavily damaged cladding elements with similar ones, weld patches onto the through holes, coat the metal with a special primer and paint.
The installed structure must be insulated. The rest of the arrangement is at the discretion of the owner. These points will be discussed separately below.
You can also buy a trailer on wheels. The option is mobile and very easy to use. After all the arrangements for arranging such a trailer have been completed, it is installed on the frame of the trailer.
We build a shed from metal profiles


The construction of a frame made of metal profiles will require more effort compared to the construction of a wooden analogue. But the iron change house will last much longer.
Kit necessary tools includes:
- hammer;
- welding machine;
- drill;
- screwdrivers;
- corner;
- grinder;
- tassels;
- construction stapler;
- roulette;
- hacksaw
We also buy the following materials:
- profiled pipe measuring 2x2 cm, 4x2 cm, 4x4 cm and 4x6 cm;
- mounting rail 2x4 cm;
- galvanized sheet steel;
- corrugated sheeting;
- primer for metal;
- self-tapping screws for fastening corrugated sheets;
- screws for metal;
- staples for a construction stapler;
- rivets;
- OSB boards;
- polyurethane foam.
Making the base
We will assemble the base of the frame from a pipe measuring 4x6 cm. We cut the pipes in accordance with the dimensions of the structure being built.
We weld the pipes according to their external dimensions and get a rectangular edging. In total we need to make 2 identical rectangles. From one we will make a floor, from the other top part cabins.
To make the floor reliable, we create a grid inside the rectangle from the same profiled pipes. We are making a change house with a width of 250 cm. With such dimensions, it is enough to weld 2-3 longitudinal pipes along the entire length inside the edging. We weld cross pipes every 50 cm.

Next, we take a galvanized sheet and fix it with self-tapping screws to the base of our change house. We turn the base over and lay it with the galvanized sheet down on cinder block supports or simply a leveled area. The structure does not need to be attached to the cinder block - the cabin will be sufficiently supported by its own weight.
We mount the racks

Installation of racks

Installation of racks


We make vertical supports from a 4x4 cm pipe. We cut it into pieces in accordance with the planned height of the change house. Usually it is 250 cm.
We place the first supports in the corners of the foundation constructed at the previous stage. We check that the angle at the junction of the posts with the base is strictly straight.
We fix the leveled rack by welding. Similarly, we set up the racks in the remaining corners.
Additionally, we will need to install intermediate racks. To do this without disturbing the geometry of the structure, we take the second rectangular pipe base made in the previous step and lay it on top of the corner posts.
We scald the resulting “cube” with intermediate posts and spacers. First, we take pieces of corrugated pipe 4x4 cm along the height of the structure and weld them vertically between the lower and upper bases. The recommended installation step is 100 cm. At the same stage, we provide an opening for the door.
We weld the horizontal cross member around the support structure. The pipe must be welded to vertical posts on high, equal to half height of the cabin.
We make spacers from a 2x4 cm profiled pipe. We cut it into 30-centimeter pieces. We cut each edge of the workpiece at a 45-degree angle. We scald all the corners of the structure with the resulting spacers. Additionally, we can scald the floor with them.
We make the roof

We made the bottom part of the frame and the wall. Next we are engaged in the manufacture of the “skeleton” of the roof.
We make trusses in the form of isosceles triangles. We use a 2x4 cm pipe. The recommended installation step for the trusses is 1 m. We weld them along the length of the frame. We cover the roof with corrugated sheets. If you wish, you can use another material of your choice.
We cover all metal elements of the frame with a special primer, and after it dries, we apply paint of the desired color.
Arrangement of a change house
We install windows and doors (it is better to purchase them from finished form). It is desirable that the windows have swing structure and there were at least two of them - you won’t have to waste time installing additional ventilation. We are starting to further arrange our cabin.

Making the floor
First, we construct a subfloor from treated boards. We lay them out as closely as possible to each other and attach them to the frame with self-tapping screws.


We spread it on top of the boards. We attach it to the joists using a construction stapler with staples.
We nail additional logs to the base for laying thermal insulation and attaching the second layer of boards. We fasten the logs in increments equal to the width of the selected thermal insulation material. Mineral wool, a relatively inexpensive and time-tested thermal insulation material, is well suited for floor insulation.
We lay insulation in the space between the joists. Fix the layer on top vapor barrier material. A stapler with staples will help us with this again.
We lay the finished floor boards. We attach them to the joists using self-tapping screws. Finally, we varnish or paint the floor.
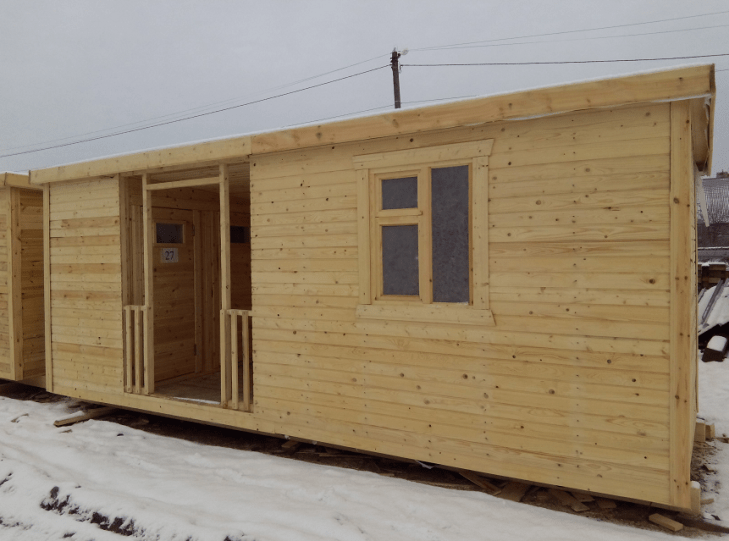
We carry out external cladding


A trailer cabin can be left without cladding, but a structure made of wood or metal will require mandatory external finishing. We won’t just leave the “bare” frame, will we?
We tighten the frame waterproofing film. Carefully seal the joints of the waterproofing strips with tape. For external cladding Many different materials are suitable for walls:
- wooden boards;
- composite panels;
- siding, etc.
Choose at your own discretion. The cabins covered with a block house also look very nice.


Sheathing metal shed professional sheet
Important! The area of the frame allocated for the porch is not sheathed.
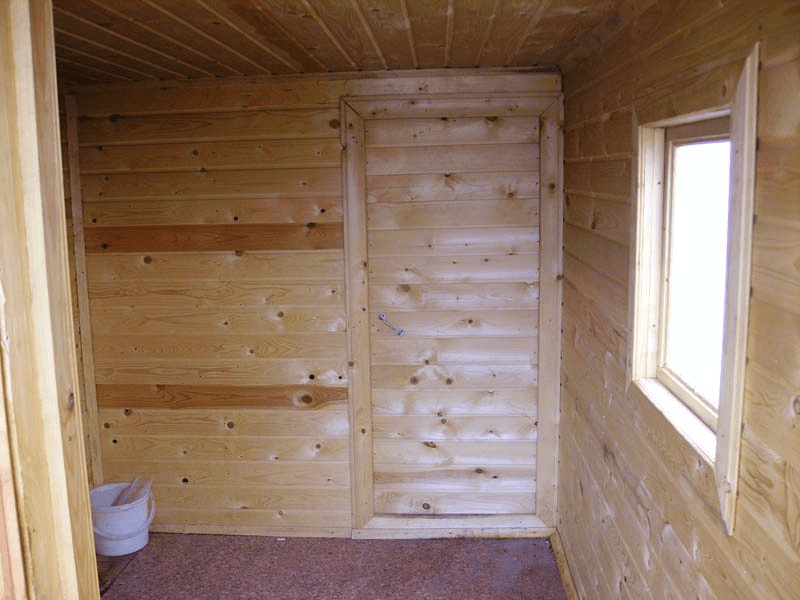
Interior decoration


We place it in the space between the frame posts. We cover it with a layer of vapor barrier material. We attach the vapor barrier to the frame using a suitable method.
We stuff transverse slats on top of the frame to secure the insulation. We attach the selected material to the same slats internal lining. Most often for interior decoration clapboard is used. For the rest, focus on your preferences and available budget.
Electricity


We will not install full-fledged wiring into the change house. Such buildings are not permanent and do not require such equipment. But how, in this case, can at least organize lighting and heating? A good extension cord with a cord of suitable length will help us with this. We include it in the nearest available source electricity and pull it into the change house.
In a change house, we can include a tee in such an extension cord for greater convenience and the ability to use several electrical appliances at once.
Lighting
We arrange it at our discretion. In general, a few will be enough for a change house. simple lamps installed in the main functional areas.

Water supply
For maximum convenience During the operation of the cabin, we introduce water into it. We will not build a major expensive water supply system. It is enough to connect a flexible hose to a water supply source, insert it into the household through a pre-prepared hole in the wall and equip it with a tap to shut off the water.
We can install a compact one near the hose attachment point. Special bulk models are available on the market. It is enough to remove the top cover from such a tank, fill the container with water from a hose, plug the heating unit into an outlet, and after shortest time use warm water at your discretion. If desired, a hose with a shower head can be easily connected to such a water heater.
A compact sink will not be superfluous in the change room. We attach it to the wall in convenient place. We connect a corrugated pipe to the sink drain to drain water. We remove the corrugation through a pre-arranged hole in the floor and connect it to the sewer pipe. Water will flow through the sewer pipe into drain hole or another place designated for this purpose.

Heating
We use electric heating. A budget option- pair . More expensive and efficient - oil heater or convector. We select the power of the heating unit in accordance with the area of our shed.


At the end, all we have to do is furnish the room. At this point, we focus entirely on our preferences and needs.
| Parameter | Metal shed | |
|---|---|---|
| Price | Cheaper. For additional cost reduction natural wood can be replaced with wood boards. | Expensive. Metal has a higher cost. |
| Durability | Lasts less than metal ones. Wood does not tolerate moisture well. | Lasts for decades. |
| Mobility | Easier to transport, but there is no guarantee that wooden structure will withstand transportation normally. | Transporting is more difficult, but safer. |
| Possibility of installing communications and additional elements | Can. More difficult. | Can. Easier. |
| Environmental friendliness | Eco-friendly | Less environmentally friendly when compared with wooden cabins. |
Good luck!
Video – DIY change house
After construction work is completed, traces of this activity usually remain. But not in all cases such “residues” are subject to mandatory removal from the territory. Certainly, construction garbage It’s worth taking it out, but if a shed was installed on the site, then it can be used. For example, you can make a bathhouse from a change house with your own hands, since it is relatively simple from the point of view of work and very practical. It goes without saying that to successfully complete the task you will need some experience in carrying out such work and the availability of tools, but these are truly impossible for common man no action is required.
Note! The key to the success of any event is its careful planning and consideration of all upcoming actions. In the case of making a bathhouse from a change house, it is necessary to understand that, in principle, converting one room into another is possible, but due to the specifics of their purpose, some effort will have to be made to complete the task.
To make it easier to understand what a person who has started such work will have to face, it is better to divide all actions into several stages.
Foundation
First of all, you need to make a solid foundation. The change house can also stand on several foam blocks, as in fact most often it is, but for the bathhouse it is necessary to make a strong and at the same time ventilated foundation. An example of such a basis is pile option manufacturing. If the question arises of how to make such a foundation, then work in general outline are as follows:
- Based on the dimensions of the cabin, an area allocated for the future bathhouse is marked out.
- Along the perimeter of the building, as well as under the dividing walls, at a distance of about 1.5 meters from each other, it is necessary to drill a number of recesses necessary for installing the piles. Asbestos pipes or their metal analogue can be used as these, and when drilling you need to start from their diameter.
- The pipes must be dug in so that their upper parts are in the same plane. To install them firmly, the pipes must be covered with medium-dispersed crushed stone and gravel.
- A beam with a cross-section of 20×20 cm is laid and secured on top of the pipes. As a result, a foundation is formed for the installation of the structure.
Preparing the frame of the cabin

The next stage of work will be preparing the frame of the cabin for installation on the base. The point is that the operating conditions of the bathhouse are quite extreme and, in connection with this, they must be selected and Decoration Materials. To put it simply, the way the cabin is finished is not suitable for a bathhouse. In this regard, all finishing, both external and internal, must be dismantled. In fact, only one frame of the building should remain. This is important not only because a number of works remain, but also due to the fact that the change house also needs to be installed on a prepared base, and the less weight, the easier it will be to complete the task.
Installation

In order to install the frame of the future bathhouse on the base, you will have to hire a crane. This, of course, will require some material investments, but it will simply not be possible without a crane. During installation, it is necessary to ensure that the frame is installed accurately on the base. Among other things, the requirements of safety regulations must not be neglected. After the technician finishes the work, the frame must be secured to the base. For this you can, for example, use pins of a suitable diameter.
Finishing

Once the frame is installed, you can proceed to finishing works. They can be divided into several stages:
- Isolation of the room. This includes the laying of heat-insulating materials and the installation of water vapor barrier. It is worth recalling that the best insulation option is polystyrene foam. The material is impervious to moisture and has excellent insulating properties.
- Finishing work. We are talking about internal and exterior decoration premises, now baths (if this was not done in advance). It should be noted that if any suitable material, but for interior work Traditionally, wood is chosen, and it is better to take deciduous species. One of the most affordable and high-quality options is wooden lining, for example, linden.
- Installation of equipment. The final stage of work on building a bathhouse from a cabin can be considered the installation of equipment. This refers to the installation of heating equipment, installation of electrical wiring and water supply and sewerage systems. It is worth noting here that a bathhouse rebuilt from a change house is not very suitable for the construction of a classic sauna stove, so it is better to use, for example, electrical equipment.
On this general description The work on rebuilding the cabin into a bathhouse can be considered completed. As an additional source of information you can use themed photos. Despite the fact that the work may seem somewhat complicated, in fact, with due diligence, it is quite doable.
Video
This video shows a mobile frame bath, made from a change house:
Photo

It is believed that you can equip a steam room from anything; a vivid example of a folk principle is a change house - a bathhouse. Simple and at the same time easy to assemble steam and washing compartments are usually made from construction trailers and mobile temporary sheds. The comfort level is, of course, lower; the sauna car is the result of a remodel, not a purposeful design, but you can steam in it with no less pleasure.
What is the difference between a change house and a stationary bathhouse?
The idea of building a steam room based on a ready-made metal box has existed for quite some time. They are made from cabins, railway and sea containers, old car booths, and decommissioned refrigerator trailers. Making a bathhouse from a trailer with your own hands is no more difficult than from other types of mobile structures.
A change house or trailer, which is what anyone calls a small structure on a wheeled trailer or construction carriage, is an industrially manufactured room with the following characteristics:
- The change house box is manufactured at metal frame made of aluminum or galvanized steel sheet;
- The walls of the trailer are a sandwich panel with insulation based on foam plastic or mineral wool. The floor of the cabin is reinforced with a steel profile, treated with mastic waterproofing and additionally insulated with a second layer of polystyrene foam;
- The dimensions of the future trailer bathhouse at the base of the structure are 2.3x6 m, 2.45x5.8 m, 2.8x6 m or 3x6 m. Ceiling height 220 - 230 cm, depending on the thickness flooring from boards.

For your information! The floor in the cabin, depending on the model of the trailer, can be made of pine timber; such structures are not placed on wheels, but are used for moving by trucks and cranes.
Most often, trailer cabins have an entrance from the wide side of the box. The doors can be located in the center of the trailer, dividing it into two rooms. In the automotive version, the entrance is made with folding ladder. This is the so-called sleeping trailer.
For insulated versions of cabins entrance doors can be shifted or performed from the end of the box.
A bathhouse made from a metal trailer turns out no worse than one built from foam concrete or timber, but the room itself, after installing additional insulation and lining the walls inside the cabin, turns out to be slightly cramped, especially in the steam room.
According to the owners, there is plenty of space for one or two people; a group of three people will have to take turns to take a steam bath. For a larger group, it is better to immediately build a bathhouse from two cabins. There is no particular difference, the basic circuit is the same as that of the single version. First, one of the side walls of each trailer is cut off, the two boxes are joined, after which the cladding of the outer walls is made from the timber of the entire bathhouse - the cabin.
What to pay attention to
At first glance, building a bathhouse from construction trailer You can do it yourself in a couple of days. The rigid frame of the cabin does not require additional measures to strengthen the walls and floor. The trailer room is already insulated during the manufacture of the box.
In theory, you will need to make only small additional equipment for a bathhouse with your own hands:
- Lay electrical wiring to connect lighting and ventilation systems, heating, if an electric heater will be used in the steam room of the bathhouse instead of a wood-burning stove;
- Supply water, make a drain for the shower and steam room, connect communications to the septic tank or sewer;
- Finish and install the stove.
Important! In practice, everything turns out to be more complicated. Before making a bathhouse from an iron trailer, you will need to solve the problem of arranging steam and thermal insulation.
The problem is that the steel or aluminum walls of the trailer, as well as modern sandwich panels based on bakelite plywood, do not allow water vapor to pass through at all. The task is not even how to make a bathhouse from a change house; it is important to ensure maximum comfort and durability of the building.
In such a situation, you have to choose - either build a bathhouse from a construction trailer with metal walls, durable and reliable, capable of standing for 20 years in the middle of a swamp, but at the same time rack your brains and look for best option insulation. Or look for a ready-made change house assembled from timber. In this case, the construction and insulation of the bathhouse is no different from the arrangement of a conventional frame steam room.
How to convert a change house into a bathhouse
First of all, a few words about the price. High-quality wooden cabins, which the market is currently flooded with construction equipment, cost about 1100-1200 dollars, without foundation and delivery. The best option for construction wooden bath from a change house with your own hands, photo, it will be difficult to find.
The design of the trailer, the presence of a durable frame made of 150 mm timber, allows you to transport a two-ton “blank” for a bathhouse to any accessible place without any problems. truck place.
Characteristics of a cabin for arranging a bathhouse
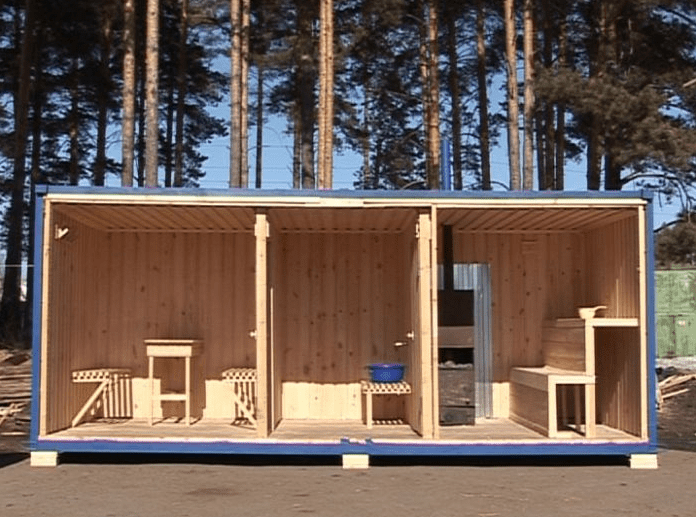
Structurally, the trailer differs little from the bathhouse frame type, the building has everything necessary to organize the washing process:
- Room for steam room and dressing room, total area the steam room and washing compartment is at least 12 m2;
- Built-in shower with electric boiler, a dirty water collection system was built, a 120 liter boiler was installed;
- The body of the future bathhouse is insulated with mineral fiber panels, and a double-sided vapor barrier is installed. The walls of the cabin are lined with 12 mm thick aspen lining.
The dimensions of the box are 2.3 x 5.8 m. Construction of a small bathhouse from timber of the same size and device, “from scratch”, with your own hands, will cost about 2.5 times more than refurbishment from a ready-made box.
From two trailers it is already possible to build a real bathhouse complex, while part of the premises can be allocated for a full-fledged rest room, and the second toilet can be converted for storing firewood.
Foundation for installing a domestic bathhouse
Particular attention must be paid to the arrangement of the foundation system for the installation of a wooden cabin. The frame's own structural strength is enough to lift the box with a crane and transport the building without any additional reinforcement struts. Therefore, the bathhouse can be placed on almost any ground. First, a 50 mm sewer pipe is buried in the ground. The entrance to the pipe is left above the surface; after connecting the drain corrugation from the bathhouse, the unit will need to be closed and insulated with polystyrene foam.

The best option is installation on concrete slab or columnar foundation. All you need to do is make a storm drain, level and compact the soil within the dimensions of the future bathhouse.

For columnar foundation, you may need to backfill the site with a mixture of sand and fine gravel.
What needs to be re-equipped in the cabin
The only drawback of this design is the inconvenient location of the toilet. For an ordinary room, the division into residential and sanitary zones is welcome. In the case of a bathhouse, it is recommended to cover the open mini-terrace at the entrance to the room with clapboard and install double-glazed entrance doors.

In addition, you will need to additionally install a partition separating the steam room from the common room of the change house. For interior walls baths usually use “Thermoplate” with a thickness of 100 mm; rolls of 50 mm thick are additionally laid on the ceiling and floor under the vapor barrier.
The stove in the bathhouse is installed according to general rules, adopted for wooden steam rooms. The chimney pipe is led out through the side wall at a height of at least two meters from the floor and 35 cm from the roof overhang.

How to make a sauna from a trailer
Usually the idea of a bathhouse from a work shift comes to the owners after the completion of construction work on suburban area. A decommissioned metal box with insulated walls is very cheap, and it makes a very decent bathhouse.
You can make a bathhouse from a trailer with your own hands in two versions. In the first case, the metal box remains unchanged, it is only insulated and equipped with a shower cabin and a heater stove.

In the second case, all the side walls of the metal trailer are cut out, and the surface is covered with siding or block house. Thus, the bathhouse solves the problem of combating water vapor and condensation falling on the steel walls of the room.

Foundation for a trailer
Unlike a wooden cabin, bathhouses from a trailer can be built directly on the ground. Of course, in practice such options are not used due to excessive hypothermia of the floor. It is considered optimal to install a bathhouse on a strip shallow foundation. For loamy soils, the steel box is often placed on columnar supports.
The design of the trailer is designed in such a way that the main load falls on two beams laid in the base of the floor along the entire length of the body. Therefore, for reliable fixation, it will be enough to install the body on two rows of concrete blocks.
This solution will allow you to insulate the space under the trailer by backfilling or sealing the base with red brick. At the same time it improves appearance baths and reduces the risk of metal corrosion.
Laying insulation in a metal box of a trailer
The insulation scheme is selected based on the design of the side walls. If the box is made of profiled sheets, then to install the insulation it will be enough to open internal lining and lay successively an additional layer of “Teploizol” on top of the mineral fiber slabs. After which the surface of the slabs is covered with glassine and lined with clapboard along the sheathing. Alder or linden are used for interior decoration of trailer baths.
On the walls of the trailer within the location of the steam room on mineral insulation Additional slats are stuffed onto the existing sheathing, foil polyethylene foam is laid, and only then the finishing is stuffed.
Sheets of expanded polystyrene, penoplex or polystyrene are usually laid on the floor, the insulation is filled with mastic waterproofing, a reinforcing mesh is laid and cement screed. The usual one is laid on top ceramic tile, which turns out to be much more practical in a bathhouse than wood.
The second option for insulating the trailer
For the manufacture of old-style metal boxes, non-profiled, smooth sheets of aluminum, galvanized or plastic were usually used. In this case, the insulation of the bathhouse must be done with a ventilation gap. A galvanized profile is sewn onto the walls inside the bathhouse.
Next, a lattice is filled with wooden planks, larch or aspen, thus it turns out air gap, through which water vapor will be removed from the steam room and bathhouse. The rest of the insulation is installed similarly to the previous option. It is necessary to take it to the roof ventilation duct from the gap between the walls.
Conclusion
It will take at least two weeks of time to build a change house - a bathhouse, and 6-30 thousand rubles worth of materials. Depending on the chosen model of the shift house, the material used for finishing and the heating method, the bathhouse can last up to 15 years without major repair.
The question of how to make a bathhouse out of a change house is relevant among many compatriots. And this is not surprising, since cabins are relatively inexpensive and available to most people, especially if used buildings are purchased.
So, what is the technology for converting a cabin into a bathhouse?
Initially, it is necessary to insulate the roof, floor and walls in order to reduce their thermal conductivity to a minimum.
The interior space is lined wooden clapboard. Next, the lining is treated with antiseptic agents in order to subsequently eliminate the possibility of mold formation and, as a consequence, destruction of the wood.
The total area of the room is divided into 3 equal parts: a steam room, a dressing room and a washing area.
After this it is installed sewage pipe, which is diverted to the drainage pit or to the septic tank. This pipe will drain water from washing department out.
Electrical wiring is well insulated to prevent the possibility of short circuit due to high humidity.
A wood-burning or electric stove is installed.
Water and electricity are supplied.
It is important to take into account the small dimensions of the bathhouse based on the change house and therefore make the doorway of all doors as tight as possible in order to prevent the penetration of excess moisture from the washing compartment and steam room into the dressing room. In addition, the bathhouse is a potentially fire-hazardous structure, and therefore all doors must open towards the exit, that is, outward.
How safe is a sauna from a cabin?
It is advisable to insulate a cabin using mineral wool, but not polystyrene foam. Mineral wool, as well as insulation based on it, is an environmentally friendly, fireproof material, which cannot be said about polystyrene foam. In order to comply with fire safety rules in the steam room, it is necessary to dismantle all plastic parts without exception.
For safe operation of the bathhouse, electrical wiring must be laid under a layer of insulation. Pay attention to high temperatures In the bathhouse, it is advisable to use wires that are resistant to overheating. If an electric oven is used as the main heating element, it should be connected through a circuit breaker with differential protection.
However, there is a simpler and effective method make a bathhouse out of a change house. Order such a design from our company. Your new bathhouse will be of high quality, safe and assembled in a short time.