How to beautifully paint a sandbox in kindergarten. Do-it-yourself children's sandbox for a summer cottage: drawings, options, materials, choice of sand
The sandbox brings so much joy to children! But it’s very easy to build it yourself; you only need a little material, skill, imagination and skillful hands.
Theory
Sandbox placement
First you need to decide where to organize cozy corner for the baby. When choosing a location, follow these rules:
- The sandbox should be located in plain sight so that adults can control baby's activities. There is no place for a children's play area behind a barn or tall bush.
- Think about shadows. The play corner must be arranged so that one half of it remains in the sun, and the other allows you to hide from the scorching rays. It’s good if a tree with a lush crown grows nearby.
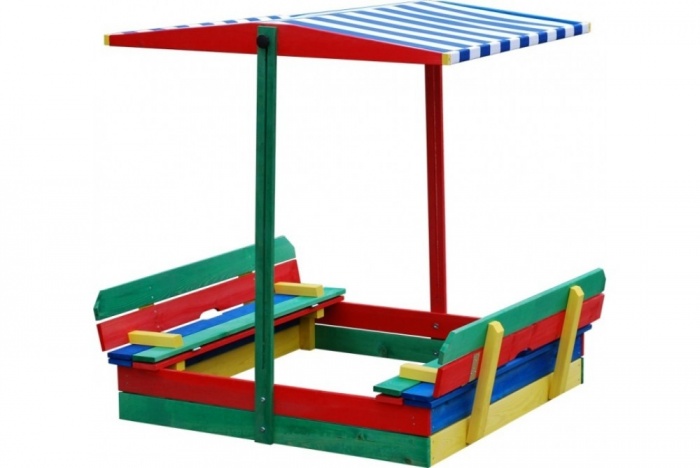
- Or create a shadow yourself. Not on site tall trees or are you not ready to constantly sweep fallen leaves out of the sandbox? No problem: make a cute umbrella-shaped canopy.

Size and preparation of the sandbox base, protection from moisture
Anyone can make a children's sandbox with their own hands! If there are a lot of kids, then, of course, it should be more spacious. However, the most common are square structures measuring 1.7 x 1.7 m - both two-year-old toddlers and already grown-up tomboys will be comfortable here. It is not difficult to build such a structure. But first you need to mark the area and do basis. To do this, you need a cord, marking tape and pegs.

Preparation of the base is carried out in several stages:
- Fence the desired area around the perimeter.
- Remove the top layer of soil - about 30 cm is enough.
- In the center, dig a hole with a diameter of 40-50 cm and a depth of 60-70 cm, fill it with small bulk material, for example, crushed stone, and compact it. This is necessary to ensure that excess moisture does not accumulate in the sandbox.
- From the sides to the center, make a slope along which rainwater will flow.
- When everything is ready, you can begin building the base of the sandbox.
Sandbox base
Anyone can play this role dense material: polyethylene, plywood (just don’t forget to make holes in it, otherwise water will constantly accumulate in the sandbox), paving slabs. The main thing is to add a small layer of sand before laying the material.

DIY sandbox photo step by step
The base performs several important functions. Thus, it protects the play area from mice and insects that are not averse to settling in the sand. And film or plywood will help keep the sandbox clean, preventing earth and stones from getting into it.
Sandbox sides
It's time for the sides for the sandbox. They help mark the territory of the playground, prevent sand from crumbling, and are actively used by children as an “exhibition area” for Easter cakes or just for relaxation.
For the sides you will need:
- bars 45x5x5 cm;
- boards 150x30x2.5 cm (you can replace them with narrow blanks 10 cm wide);
- wide boards for horizontal benches.

DIY sandbox photo step by step
Since do-it-yourself wooden sandboxes are usually square, 4 pieces are required.
The material must be carefully processed, otherwise the wood will quickly deteriorate and children will get a few splinters. Take a grinder or electric drill, put on a sanding attachment and go over the boards for horizontal edges. It is not necessary to sand the remaining boards and bars, but it is necessary to cover them in several layers with drying oil or any antiseptic. Bitumen works great.
To obtain the base, the bars are dug into the corners of the future sandbox to a depth of approximately 15-20 cm. Boards are nailed to them. Finally, horizontal overlays are fixed around the perimeter.
Sandbox cover
An important design element is lid. In principle, you can do without it, but in this case, garbage, branches and leaves will constantly get into the sand, and animals will probably choose it as a toilet. Therefore, it is better to make a lid for the sandbox. This role may include:


Sandbox decoration
The children's sandbox with their own hands is ready, but will the child be interested if you leave it without decorations? You can simply paint the structure in any color or draw an ornament on it, various pictures, letters, funny faces - whatever you want!


The final “touch” is filling the sandbox. Usually, high-quality river or quartz bulk material is used for this, in which insects will be uncomfortable, and children, on the contrary, will be safe and happy!
DIY sandbox photo
Let's move on to practice
Sandbox materials and sizes

DIY sandbox photo step by step
So, you've decided that your child needs a sandbox. You don’t have to make it yourself: now any children’s goods store already sells ready-made designs, which just needs to be installed in the chosen location. But this product is expensive, and it’s more pleasant to make a playground with your own hands. Moreover, it is easy to find hundreds of photographs on the Internet that will inspire and help you easily decide on the materials and sizes of the sandbox.

Before you start work, find the boards of the required sizes and polish them so that children do not get splinters. The width of the workpieces should not be less than 30 mm.


Now draw up a drawing, choosing the location of the playground and deciding on the size. Typically, sandboxes are made in the form of a square with a side of 1.5-2 m. Sufficient depth is 20-30 cm.

DIY sandbox. Drawing
How to make a children's sandbox?

When the materials are ready, it’s time to start creating a wooden sandbox with your own hands. It's not difficult at all if you follow the instructions:

Define place for the playground. As mentioned above, the sandbox should be installed so that children do not suffer from hot sun rays and are visible. An open area is not suitable - choose a corner under a spreading tree that provides enough shade. And don’t forget: the site must be clearly visible.

If the shade is not enough, docanopy. It will perfectly protect both from the scorching rays of the sun and from rain if it suddenly catches the kids while playing, and, in addition, will increase the service life of the sandbox.
Treat the woodantiseptic composition, which will not allow the material to rot and suffer from insect attacks. The sandbox is located outside, so the protection must be of high quality, otherwise precipitation will quickly render the boards unusable.

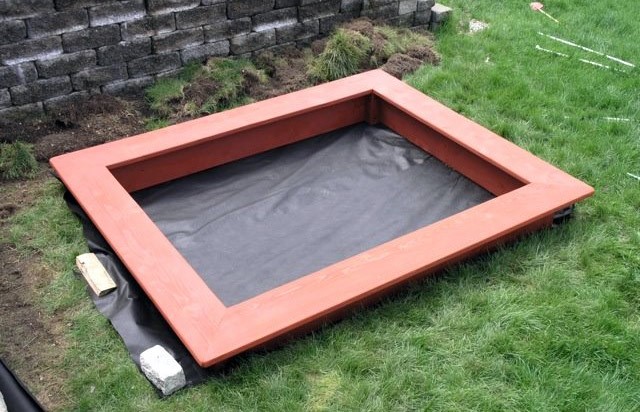
Prepare the surface and do base for the sandbox. It should be such as to prevent the penetration of insects and rodents, as well as the mixing of sand with soil. Agrofibre, which is attached to the boards using a regular furniture stapler, is good for this purpose.


DIY sandbox photo step by step
Install sides sandbox, connecting the boards with self-tapping screws. This is the most convenient and affordable option fastenings, which will give the structure required strength. Even the constant pressure of a mass of sand will not be able to deform it.


Secure wide horizontal boards around the perimeter of the playground so that children can rest while playing. You can also sit on comfortable benches with backs, which can be easily installed on both sides of the structure.


To understand how to make a sandbox with your own hands and find answers to all questions that may arise during the process, it is better to watch a video explaining all stages of installation. You might find some ideas for various sandboxes made by yourself useful.
A simple do-it-yourself sandbox made from large logs
The design is slightly reminiscent traditional log house. Whole logs were used as walls, wide boards covered with light paint and used as benches were fixed on both sides. Flooring became an excellent base that prevented soil from getting into the sand.

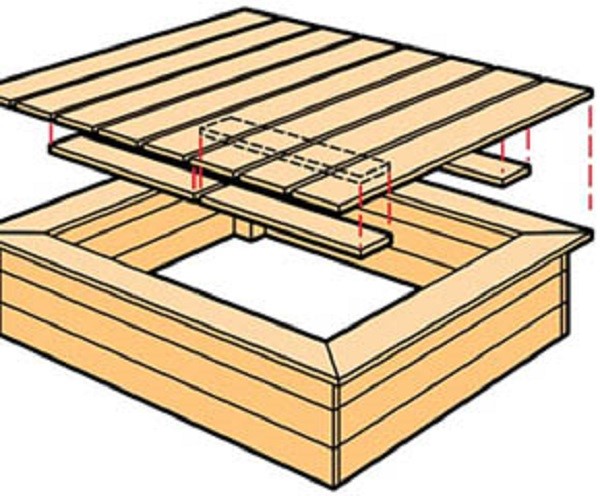
Transformable sandbox with folding lid
Perhaps the most practical and interesting option. It is done like this:
- As with a regular sandbox, a box is assembled from prepared boards.
- Materials for the lid are being prepared: 12 narrow boards (6 on each side) and hinges - standard door hinges and with one long shelf (4 pieces each).
- Two boards are nailed to the finished box on both sides.

Short shelves of hinges are attached to the resulting parts of the future lid, and the next pair of boards is screwed to the long ones. Keep in mind: the size of the blanks should be such that the long loop covers no less than half the width. This is necessary for structural strength.

The next board is attached using a regular loop, so that the shelves remain on the other side. To install the second workpiece, you will need a small block, which is stuffed on both sides, spaced approximately 15 cm from the edge.

On the first pair of boards, a suitable piece of wood is stuffed, which will not allow the lid to sag and put pressure on the hinges when folded down.

It turns out to be an interesting do-it-yourself sandbox with a lid, which all that remains is to paint. Even at the preparation stage, you can use a special impregnation that not only protects the wood, but also gives it a particular shade. The paint can be anything, the main thing is that it is intended for outdoor use and does not deteriorate under the influence of the sun and precipitation. Use your imagination and turn the sandbox into a little miracle for your child!

To make the play area even more practical, we recommend using the space under the seats to store toys, partitioning off the space like a compartment. Anyway, children mostly play in the center of the structure, and they can save on sand.

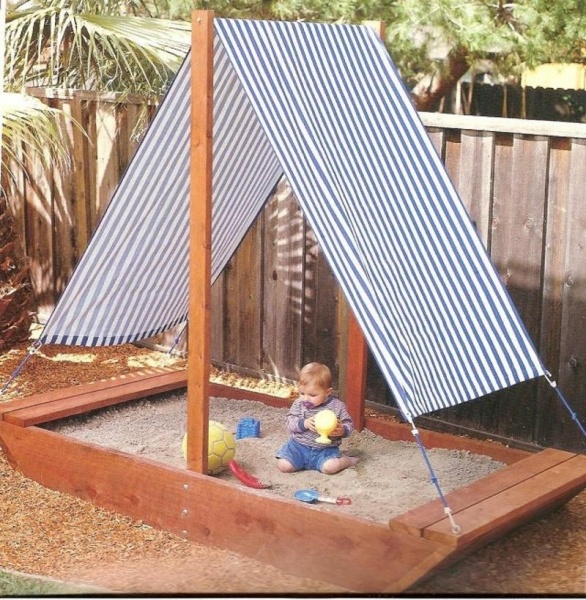
Do-it-yourself sandbox-boat
A wonderful option for little tomboys is a sandbox-boat. Probably every boy dreams of going sailing at least once in his life, so why not give him such an opportunity? How to build a sandbox with your own hands:
A regular square base with low sides is constructed.
Two blanks are driven into the ground near one of the sides of the hull, to which boards for the “nose” of the future ship are attached. It is made in the form of a triangle with sides whose height should be noticeably higher than the main part. The corners of the boards must be fastened by driving nails diagonally.

We make a ladder of 2-3 steps so that the child can easily move from the sandbox itself to the “nose” and back.

The top of the triangle is sewn up with boards.
Decor and additional equipment are built: equipment, masts, etc. The resulting boat is painted.

If desired, the design can be supplemented extension, which is installed on the other side of the sandbox. It is made from beams that are driven into the ground as posts, and sheets of plywood. In such a house it is convenient to store toys and play a variety of games.

DIY sandbox truck. Step by step photos
Playground - favorite place games for kids. For adults, it won’t be difficult to make it bright and cozy. For example, it’s not at all difficult to make it yourself interesting element- a sandbox in the shape of a truck, which will bring a lot of joy to the children.

What you will need
Any important undertaking begins with planning. To create a sandbox, you need to prepare materials and design a structure.
For this you will need:
- sheet of plywood 1.5x1.5 m thick 1.8 cm (several sheets);
- fastening elements (self-tapping screws, screws, metal corners);
- jigsaw;
- slate pencil, drawing instruments, whatman paper;
- primer;
- exterior paint;
- unnecessary car parts (steering wheel, wheels, toggle switches, headlights, etc.)
Manufacturing process
The sandbox in the form of a truck consists of two large parts - the cabin and the body. They can be made from 13 parts:
- Body side (2 pcs.)
- Hood
- Front
- Body seat
- Body seat bottom
- Side with doorway (2 pcs.)
- Steering wheel panel
- Roof
- Cabin seat
- Bottom of cabin seat
- Back wall


DIY sandbox drawings. Photo
In order not to make mistakes with the calculations, it would be advisable to first draw sketches of the parts on paper and find optimal location them on plywood. Then transfer the image to wood and cut along the lines with a jigsaw.


Using fasteners, we assemble the structure, process the edges and protruding parts to avoid injury to children.

Since the sandbox in the form of a truck will be used in street conditions and be exposed to weather phenomena, it should be processed. To do this, the entire surface is first coated with a primer, followed by a second layer of exterior paint.


DIY sandbox truck. Step-by-step instruction with photo
All that remains is to add realism to the truck by installing a steering wheel, switches, and you can also attach real wheels and headlights.
Thus, it will only take a few hours to make a sandbox with your own hands. And how many happy minutes will happy children spend in it?
Sandboxes with canopy. Photo
A sandbox with a canopy is very practical and decorative. There are many options for execution:
Simple wooden structure with benches around the perimeter and a fabric canopy. To construct it, holes are made in wide horizontal boards on both sides of the sandbox, through which long thin slats pass, serving as the base. The roof is attached to them.

Sandbox with canopy. Photo
The sandbox is shaped not like a square, but like a boat. To do this, two boards connected by a triangle are attached to one side at once. The steering wheel is placed in the “bow”. The fabric canopy is installed on four supports.

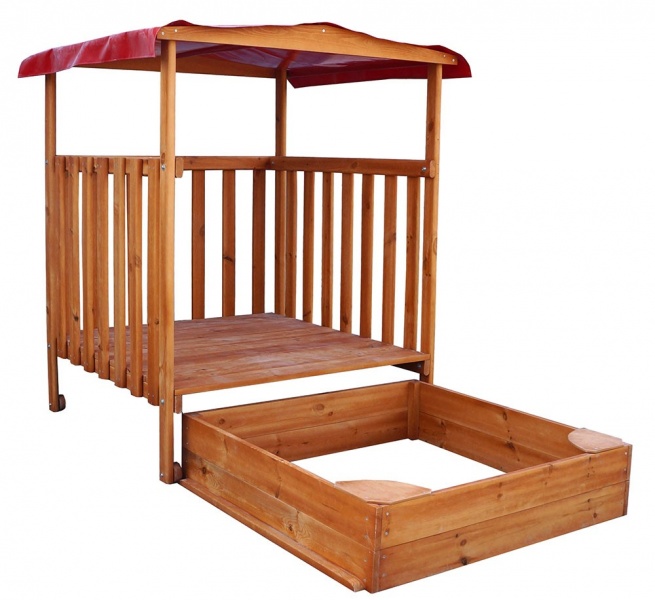
Sandbox in the form of a house: wooden poles are placed in the corners of the base, and a gable roof with a carved ridge and other decorations. An interesting effect is created by the sides of the structure, which are made not from boards, but from many bars placed in a picket fence.

Sandbox with a roof. Photo
Another boat. As in the option above, a base of the appropriate shape is made, a fabric triangular canopy is installed (two supports are driven in on the sides near the “nose”, and another one in the center of the board on the opposite side). A “captain's bridge” with a steering wheel is being built.

A laconic do-it-yourself sandbox with four supports, on which a waterproof fabric is stretched on top so that the edges are formed into sides. You can make a lid from the same material: you just need to stretch the fabric, tying it to the pillars in the corners. 
A playground with supports driven into the corners, on which a wooden gable roof is installed. At a small height, wide boards are attached between two pillars opposite each other, serving as benches. 
Little children love to play in the sand. To provide them with this opportunity, caring adults install sandboxes at home and in the country. Of course, there are ready-made ones for sale, but their price is not at all childish. The best way out is a sandbox made by yourself. When making it, you will certainly try to take into account all the characteristics and preferences of your child.
What can you make a sandbox out of?
The most popular material for building a children's sandbox is wood. These can be edged boards, small diameter logs, timber, block house. This is basically what they make from. To make the work go faster, you can buy polished materials. They are more expensive, but have a smooth surface. If you need to save money, take ordinary materials, then manually or using a grinder you will bring everything to perfect condition.
You can use plywood (moisture resistant) or OSB (OSB). Not everyone likes them, due to the presence of glue and harmful fumes (formaldehyde). But in air these emissions are not dangerous, and you can also use material with emission class E0 or E1. It guarantees safety - children's furniture is made from this material. It is convenient to work with plywood and OSB: cut out the parts of the required shape, twist them together, process the ends and you can paint them.
At the dacha, you can use improvised material. For example, plastic bottles. Just so that they stick, they are attached to the board: the lids are nailed at a certain pitch, bottles are screwed into them. Having received one “sidewall”, take a piece of thick wire equal to twice the length of the sidewall + 20 cm, pierce the bottles with the wire, retreating about 5-7 cm from the bottom, turn the wire upward and pierce it in the opposite direction from above. The ends are twisted, trying to hide the “tails”.

This is how it will be necessary to “sew” the bottles with wire
This twist is obtained only on one side - on the other there is simply a bent wire. When you install the sides, place them so that the “tails” are covered by the bottle. The finished sides of the sandbox made from bottles are installed in a shallow ditch, the board and the tapering bottom of the bottles are sprinkled with soil, and compacted well. You can throw a sheet of plywood at the bottom, and pour sand on top.
The second most popular “waste” material for country houses. They also make sandboxes. It is necessary to cut off the side panel on one side old tire. You will get quite high sides. Then there are two ways:

In any case, you will have to secure the cuts. Some tires have plastic cord (reinforcing fiber), some have metal. The plastic one can be sanded, but the metal one will have to be covered somehow.
To make a sandbox, you can use fallen tree trunks cut into pieces. They make a very interesting and quite reliable fence. Before digging in, the wood needs to be treated so that it lasts longer. There are modern impregnations with a simultaneous tinting effect. Comfortable. The treated stumps need to be dried, and while they are drying, dig a ditch around the perimeter of the future sandbox. Its depth is at least 20-25 cm. There is no need to do less - the children will walk and jump on the stumps, so they must hold up well. Insert the logs into the ditch, level them, fill the gaps with soil and compact them well.

You can also make a fence for a traditional sandbox from logs. Place a base on the ground: a piece of linoleum, for example, with several holes in it to drain water after rain. Place logs on the base, making a rectangle/square out of them. You can fasten them long nails, but more reliable with studs - steel rods with threads at both ends. Under them, you will need to drill a hole diagonally at the junction of the logs. Diameter - slightly larger diameter hairpins. Drill out the edges of the hole so that you can recess the nuts and washers. Insert a rod into the hole, put washers on both ends, and tighten everything with nuts.
You can make benches on top - one or two boards and benches for kids are ready. Of course, they rarely sit on them. More often they build their sand castles on them.

How to make a sandbox: step-by-step instructions
First, let's look at general principles manufacturing sandboxes of any design. With some modifications they are repeated every time.
Step one. Selecting a location . The location must be chosen so that part of the sandbox is in the shade, part in the sun. If this is not possible, we put it in a sunny place and make a canopy over it. Please make sure that there are no large trees or bushes nearby. They, of course, provide good shade, but leaves fall off them, and the sand will have to be sifted often.

Do not place the sandbox in strong sun, nor should it be in a corner where there is no air movement at all. But it also has no place in a draft. Another important point: if you plan to let your baby out to play in the yard on his own, the place for playing should be clearly visible from the window of the room where you spend most of the time.
Step two. Marking . If the sandbox is rectangular, use pegs and threads stretched between them. We drove the pegs, measuring the required dimensions ( standard size children's sandbox for children from 2 to 5 years old - 1.7 m * 1.7 m). Twine, rope, and cord were pulled between them. We checked the diagonals; for the angles to be right, they must be equal.

If the sandbox has rounded corners or sides, you can draw an arc using sand poured into a bag. A small hole is cut in the corner of the bag and in this way the required shape is “drawn”.

Step 3. We are digging a pit. We remove the sod and take it to the side, remove some soil, cleaning out the roots as we go, removing stones. The depth of the pit is 20-30 cm.

Let's get started earthworks- digging a pit
In the middle of the sandbox, make a small square of greater depth: with a side of about 60 cm and a depth of another 30-40 cm (the total depth of this hole will be 60-70 cm). Pour crushed stone into the hole. This will be the “water drainage system”. If you form a small slope from the edges to it, the sand will dry quickly after rains.
Step 4. Laying the base.
Add a little sand (5-6 cm) to the bottom of the resulting pit, leveling it well. Now you need to lay the foundation. The best option is . This non-woven material, very tear resistant. It will not allow grass to sprout and will not allow sand to mix with the soil. If you bring it to the edges of the pit, it will also “hold” the earth, preventing it from flowing inside when it rains.

If geotextiles are not found, you can lay a piece of plywood or linoleum. You just need to cut a few holes in them (1.5-2 cm in diameter) for water to drain.
DIY sandbox: step-by-step photo reports
No matter how simple the design may seem, when it comes to implementation, questions arise. To make there fewer of them, we publish several models homemade sandboxes With step by step photos, capturing the main nodes.
Simple design
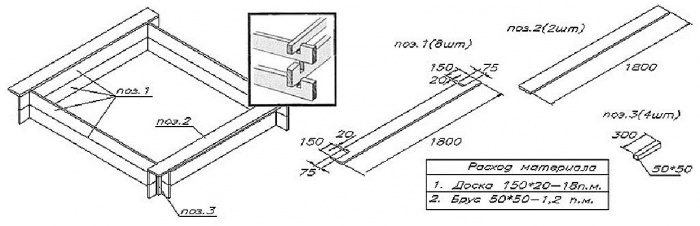
The simplest thing you can do is knock down a rectangle or square from the boards. For a sandbox, the normal side of a square is 1.7 m. So you will need 4 or 8, 12 boards of this length. Make the sizes larger or smaller - the choice is yours. The number of rows of boards depends on their width and how tall you want it to be.

If, as described earlier, you dug a pit 25 cm deep, then poured in 5 cm of sand, you get a 20 cm deepening. If you want the sides to protrude 10 cm from the ground (for 2-year-old children this is convenient, for older ones it can be from 20 cm and above), the total height is 30 cm. If the board is 10 cm wide, you will need 3 tiers (boards, respectively 3 rows * 4 pcs = 12 pcs).
You will also need a block with a cross section of 40*40 mm. It will need to be cut into pieces equal to the height of the sides of the sandbox. In our case it is 30 cm. You will need 4 pieces. The total length of the required timber is 1.2 m. All lumber is sanded well, then impregnated with protective impregnations, otherwise the wood will quickly lose its appearance.
We take two boards and fold them at an angle of 90°. We place a block at the joint, nail both boards or screw in self-tapping screws - two for each fastening. We attach the next board to one of the ends, place the block and repeat the operation. This is how we assemble the first row. It will look like in the photo on the left.

The second and third rows are assembled in a similar way. For each connection we place two hardware (nails or self-tapping screws). Just make sure that the heads do not protrude and the points do not stick out.

After the required height has been collected, we can consider that the sandbox is made with our own hands. But, as always, now I want to add something to make it more comfortable for the children. They usually like to make Easter cakes, and they need a platform for them. You can nail small triangles made of plywood or also assembled from cut boards in the corners. Another option is to nail two longitudinal boards. They fit perfectly on the bars in the corners. We hammer nails into them.

Adding comfort
Continuing the theme of “improving” sandboxes. Carrying toys home that are stained with sand every time is not very pleasant. The problem can be solved simply: fence off the part for toys. Convenient for both you and the child. An additional wall is installed, which is also attached to the existing ones using bars.

Separate the compartment for toys - put an additional wall
And so that there is no temptation to pour sand there, you can come up with a lid. You can sit on it, or you can build Easter cakes.
A couple of boards, a little imagination and an ordinary box turns into a car. The boys will definitely like this one.

Transformable sandbox with folding lid
Construction begins in exactly the same way as described earlier: a box of boards is assembled. The trick is in the design of the lid. You will also need boards for the lid and hinges - four regular door ones and four with one long shelf.
In our example, there were 6 boards on each side of the lid. They were attached in pairs. First, two boards were nailed to the finished box on one side and the other.

A short shelf of a loop, similar to a barn one, was screwed to them. Two boards were also attached to the long shelf. It is important that the second one is attached at least half the width, otherwise it can be twisted.

Screw onto regular ones door hinges next board. The shelves are on the other side. Then it turns out that the second part of the lid tilts in the other direction. The second board is attached to the fixed one using an auxiliary block. It is stuffed on both sides at a distance of about 15 cm from the edge.

To prevent the folded lid from pressing on the hinges, an additional piece of board is stuffed onto the first two boards. It serves as a support; when loaded, the board does not bend.

Based on operating experience, we can say that children almost never play under the seats: it’s uncomfortable. To use this area more efficiently, it can be fenced off as a compartment for toys. Another advantage of this solution is that less sand will be required.

IN in this example The docks are painted with an impregnation, which at the same time gives color to the wood. If desired, you can use regular opaque paint. Only take it for wood, for outdoor use. Otherwise, after a couple of rains, it will bubble or crack. Using paint, you can paint the sandbox in more “girlish” colors, although impregnations can also be different color, but they just give a tint.

Sandbox-boat
For boys you can make a sandbox-boat or ship. The main “body” is built as usual, all other superstructures are attached to it.
In this version, it was decided to make the sandbox low. A triangle was attached to the downed hull - the bow of the future ship. It is significantly higher than the main part. To ensure that the boards hold tightly, two boards are driven into the ground 60 cm deep on each side. The boards were nailed to them. In the corners they are also fastened, but only to each other - with nails (they were hit diagonally).

Since the height difference turned out to be significant, a staircase was made from the “deck” to the bow. The top is covered with boards and the masts are reinforced.

There are only Finishing work and equipment. After some time, it was decided to build an extension at the stern - a place to hide from the sun, and put a toy box there. They installed poles made of timber and covered them with plywood cut to size. IN final version the ship looked like this.

Another boat was built using approximately the same technology.

Awnings
It is not always possible to place a sandbox in partial shade. More often they place it in the sun, and then provide shading - some kind of canopy or umbrella. There are many interesting designs of such canopies that are quick and easy to make.

Perhaps the easiest to implement is this canopy: two posts are attached in the middle, with a crossbar between them. A thick tan is thrown over the crossbar and attached to the driven loops.

This canopy isn't much more complicated. Four racks are required. They are connected at the top by strips - they make the top trim. The awning is sewn to size and stretched. You can fasten it either with buttons or with decorative nails. The main thing is to have the opportunity to remove it in the fall.

Making such a roof is a little more difficult. Triangles are attached to the upper trim of the racks - rafter system. They are connected at the top by a longitudinal beam, which is correctly called a “ridge,” and supports are placed in the middle. Under soft tiles, which is used in this case, plywood or OSB is nailed, and roofing material is already laid on top.
Pay attention also to the decor of the sandbox itself: birch logs are driven/dug in around the perimeter, which are covered from the inside with boards: so that the peeling bark does not fall into the sand. Quite an interesting solution.

Another simple sun shade for the sandbox. The two triangles are connected by thin strips. They are attached to the racks, but it is advisable to make the racks more solid. For small children, this section is enough, but for older children - from 4 years old - something more solid is required - at least 60 * 60 cm. To save money, you can sew two boards - nail them on both sides. Pulling the awning will not be difficult.
How to make a sandbox with a “fungus” with a small wooden canopy - watch the video
Lids
The second attribute necessary for sandboxes is lids. Not only do leaves fall into the sand and all sorts of garbage gets into the sand, but animals also love to be there...being there. You can prevent attacks on the purity of the sand by using a lid. In the very simple version This is a shield knocked out of boards or cut out of plywood, to which handles are attached.

Cover made of boards
To avoid having to remove and install the panels every time, you can attach hinges, and to prevent the doors from hanging, weld handles on which they can rest. When the lid is folded back, you get two small play areas. Children can sit on them or build their own sand castles. Therefore, it is more convenient to make such covers from plywood: there are no cracks and they are lighter in weight.

There are even more interesting design— away. This type of cover is definitely made from plywood. Nail the top bar so that there is a gap left. A sheet of plywood is inserted into it. And so that the opposite end does not dangle, legs are nailed - small pieces of timber.

The same principle is implemented differently in the version in the photo below. It is already for those who are good at carpentry.

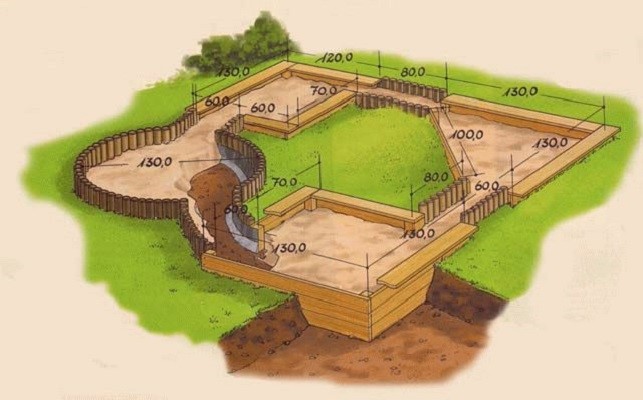
Blueprints
To build a sandbox with your own hands quickly and easily, all that remains is to provide you with a few drawings. You can build on them and take them as a basis. Adjustments can and should be made.


Sandbox with roof - photo and drawing


For active rest and the physical development of children, the presence of a children's sandbox is a very important point. This type of construction is found in almost all playgrounds, parks, and private areas. The stores offer a huge range of different models of children's sandboxes, made in different ideas. In addition, you don’t have to buy a sandbox; you can make it yourself. What is needed for this? Read the recommendations listed below.
Varieties of children's sandboxes with your own hands
A good sandbox will not go unnoticed by little playful people, especially if it is colorful and multifunctional. Plastic, wood or metal can be used as a material for the manufacture of this type of structure; based on the choice, types of children's sandboxes are also distinguished.
This is not the only principle for dividing children's sandboxes into types. The criteria for dividing this equipment include:
- mobility;
- shape;
- design;
- integrity;
- presence of bottom, etc.
1 - According to the first criterion, stationary and portable sandboxes are distinguished. The second type is most often used by private owners. The structures are removed for storage in the winter.
2 - In shape, places for playing with sand can be round, rectangular, square, with the use of individual additions (benches, tables, etc.).
3 - The design of the sandbox can be open or closed (presence of a canopy). The second option is more popular and more practical, as it protects children from direct sunlight, and sand from the effects of precipitation of various types.
4 - Monolithic and collapsible children's sandboxes are known. In terms of practicality, the second option is still better. Typically, collapsible structures consist of several constituent elements, which are quite simply connected to each other.
5 - According to this criterion, children's sandboxes are either equipped with a bottom or not. Designs with a bottom differ in their comparative small in size, they can be carried. The advantage of the second type is the possibility of increasing in volume, however, such sandboxes cannot be transported.
How to make a sandbox drawing with your own hands
Pediatricians and psychologists write a lot about how playing with sand has a beneficial effect not only on physical development and motor skills of children, but also well calm and balance mental health. Therefore, having a children's sandbox in the yard is mandatory and useful. Having decided on the shape and design of the future gaming installation on initial stage It's best to make a drawing of the sandbox. Some craftsmen note that in addition to drawings, they also create models of future buildings. It is worth remembering that a correctly drawn up drawing can neutralize the appearance of many inconsistencies. Also at this point in the work, it is worth paying attention to the ease of use, safety and hygiene of the sandbox. Experts give practical advice to inexperienced craftsmen: start with the simplest, standard design, for which you will need an earthen area of 2 * 2 meters.
When creating a drawing of a future workpiece, it is worth considering the presence of a canopy or fungus in the sandbox, as well as the location of its installation.
Basic materials for sandboxes
We have already mentioned the main materials that are used to make children's sandboxes above, but there are still some points that require attention. Of course, each owner chooses the material for a children’s installation based on its availability, financial capabilities, and the actual idea of the project. In addition to wooden, plastic and metal sandboxes, there are structures made from car tires, sheathed plastic bottles and so on. Any design one way or another has its advantages and disadvantages. For example, having chosen wood as the main material, you need to take maximum care of its polishing and processing, so children can easily drive away a splinter.
Other wood materials require treatment with antifungal agents during operation, as well as the use various types glue, etc., which, when exposed to the sun, can release bad smell, as well as other harmful fumes. Wooden sandboxes are considered the safest for children.
Plastic and metal buildings, which are characterized by ease of use and low cost of purchased materials, have become no less practical. However, the choice remains up to the personal preferences of the owners.
The advantage of using plastic is that it does not require regular painting and other improvement processes. Having purchased ready installation there is no need to call specialists for installation, since plastic sandboxes are simple and practical to use. The disadvantages of plastic include the fact that in the open air, due to the influence of the sun and precipitation, this material quickly changes color and is considered short-lived.
Concerning metal structures for playing with sand, they are considered less safe, since the metal heats up very quickly and quite strongly in the sun, and can lead to burns on the body of children. When exposed to moisture, metal is prone to rust and requires regular painting. The advantage of metal is its ability to last for a long time.
In this article we will focus on wooden installations for sand games. Unlike metal installations, wooden ones do not heat up in the sun and are considered absolutely safe for the health of children. In addition, when proper care wooden sandboxes can last for quite a long period of time.
As a working tool you will need:
- wooden boards;
- saw;
- roulette;
- agrofibre;
- hammer and stapler;
- drill;
- varnish for wood processing, etc.
How to make a roof for a sandbox with your own hands
Sandboxes containing so-called fungus are considered practical and safe, especially on hot summer days. How to properly think through and build it with my own hands Let's look at it in more detail later. So, you can make a canopy over the sandbox various shapes, the main thing is that it matches the dimensions of the planned frame and the selected sandbox model.
Option 1.
Most often there are mounted mushrooms, which are made step by step.
Step 1. To install the leg, i.e. the supports of our canopy will need to dig a hole at least one meter deep. This will allow the structure to be buried securely and motionlessly, creating safety for children. We use timber as material for the legs, which is best treated with an antiseptic solution during the work process.
Step 2. The prepared boards are connected to each other in the shape of a triangle, which are additionally sheathed with either plywood or plastic. At this stage you will need nails, screws, a drill, and a hammer.
Step 3. The finished leg and cap of the sandbox are connected to each other and secured in the hole. Experts recommend using the method of wedging the legs using additional stones. Some craftsmen resort to using concrete mortar, while the leg itself is initially installed on a base of crushed stone or gravel.
Option 2.
The roof for the sandbox can also be hipped. This type of canopy will require more time and materials to produce.
To install such a structure, it is necessary to dig not one, but four holes, so we will have 4 end elements. For the manufacture of the hinged part it is better to use edged board, which is poured onto cranial bars, with a cross section of 50*50 mm.
Considering the overall dimensions of the sandbox, it is better to mount the hinged part 20-25 centimeters larger. This will prevent moisture from penetrating into the structure.

How to make a frame for a sandbox correctly
Of course, the frame for the sandbox can be made in various shapes and sizes, but we will consider the simplest and most uncomplicated option, which will allow us to consider the main stages of this process and on the basis of which more complex models can be made. So, the construction of any sandbox begins with preparing the site, and then manufacturing and installing the frame. It is very important that the place chosen for the playground with sand is:
- safe;
- clearly visible;
- easily accessible;
- with no drafts;
- away from the roadway, etc.
When the above nuances are taken into account, you can proceed to preparing the earthen area, which must be cleared, sized to fit the dimensions of the sand installation, leveled, compacted and arranged for strength with agrofibre or geotextile.
To assemble a square or rectangular frame, you can use both wide and narrow boards. To avoid the proliferation of bacteria and harmful fungi, the tree must be treated with a special product.
All wooden elements structures must first be cleaned grinder or sandpaper, because for the benefit of children, the tree should be as smooth and safe as possible.
For the future reliable installation additionally, peculiar legs are made to the finished wooden frame, which are driven into the ground with the help of a large hammer, thus fixing the base.
For a more aesthetic appearance, as well as to protect the material, it is customary to open the frame with wood varnish, or you can paint it with multi-colored paints, embodying various children's ideas.
According to the advice of experts in making sandboxes with their own hands, the dimensions of the structure should be designed for at least three children.
To create the most hygienic conditions, it is better to install sandboxes away from trees. This aspect also implies the presence of a removable cover, which is installed when not in use. It is recommended to use the idea of a country cover with a sponsor, which easily turns into benches and allows children to sit comfortably in a play area.
Creating even the most simple design, try to combine shapes, materials, colors and ideas, then your children will simply be delighted with the sandbox made for them with their own hands.
Sandbox installation and permanent installation
The above processes for making a sandbox with your own hands can be supplemented with a few more installation and installation points. Definitely require attention: the presence of beekeepers in the sandbox and the manufacture of the bottom of the installation.
To protect against moisture in sandboxes, a sand cushion is used, on top of which, as a bottom, it is recommended to lay either plywood or polyethylene; even paving slabs are used.
As for the sides on the sandbox, they block the filler from pouring out of the structure, thus performing an economical function. To make beads for a classic sandbox, you need to prepare wooden boards and bars. At correct layout, children will also find it comfortable to sit on them.
Having installed sandboxes, you should not forget about regular maintenance:
- repaint annually;
- monitor the condition of toys;
- close the lid in a timely manner;
- control the penetration of animals and insects into the sandbox.
For more detailed information on this material, watch the video:
It's time happy childhood consists of many faces. Loving parents strive not only to provide their child with healthy food and beautiful clothes, but are also worried about its development. This direction includes a physical and psychological component. Equipped playgrounds contribute to a child’s pleasant pastime, while at the same time developing in him many vital inclinations. A banal children's sandbox is no exception: patience, spatial thinking and the ability to communicate with peers are not the entire list of character traits developed during the game. Often children's holiday V summer period takes place outside the city limits, away from prepared sites. Therefore, you will have to make a convenient sandbox yourself. We will tell you in detail which version of the children's design scheme to choose and how to properly organize the whole process.
Determining the place
In addition to studying possible schemes and preparing your own drawing, you should wisely choose a place to install a children's sandbox. There are many factors to consider when considering this issue. The priority direction for placing a children's sandbox is the sector between the northern and southeastern parts of the site. The logical explanation is due to the influence of ultraviolet rays. The first half of the day is characterized by clear air and soft UV radiation, after lunch the picture changes, the ultraviolet becomes harsher, so the formation of a shadow over the children's sandbox is mandatory. The diagram below clearly demonstrates the idea presented.
In addition to the reference point to the sun, there are several other factors that determine the location of the children's sandbox:
- Good visibility from the window of the house and the most visited points of the site. Children's unpredictability is a common phenomenon, so the sandbox should always be in the field of view of the older generation.
- Setting up a children's sandbox in the shade of trees is not recommended. At best, it will become contaminated with bird droppings and other debris; at worst, a caterpillar will fall on the child.
- It is also not recommended to draw up a drawing of a children's sandbox, focusing on the nearest location of sources of moisture; this could be an artificial pond or a regularly irrigated bed. Spiders may favor such places, and meeting them in a children's sandbox will not seem pleasant to a child.
- The northern side of housing construction will also have to be excluded - constant exposure to the shade prevents high-quality heating of the sand.
Note! In addition to installing the structure itself, the design should provide for the arrangement of the area around it. To avoid mass transfer of sand into the house or onto the garden path, there should be a lawn within a radius of one and a half meters. In its absence, it is recommended to make a blind area around the sandbox.
Having decided on the location, they proceed directly to drawing up a diagram of the children's sandbox.
Design stages
The work of drawing up a diagram includes several stages: designing the box, starting from its shape, the drawing is supplemented with a design for the lid and canopy. What the base of a children's sandbox will be depends on many factors:
- Is it planned to purchase new material or will remnants from previous construction be used?
- Your professional skills when working with wooden structures.
- How much time can you devote to creating a children's sandbox?
The most common version of the scheme is a standard square shape, with a side size from 1.2 to 3.0 m. The height of a children's sandbox varies between 25-30 cm, it can be equipped with a bottom. To fill a structure measuring 2x2 m you will need about 1 m 3 of sand. Having completed the drawing of the base, we move on to designing the lid.

Cap options
It is foolish to doubt the need to install a protective element for a children's sandbox. The reasons why the diagram should include a cover design are as follows:
- It is attractive for dogs and cats to set up a latrine there. To ensure that children's holiday does not end in treatment, hygiene standards should be observed at all times, and the sandbox is no exception. Purchasing expensive mixtures containing fragrances to repel animals does not always solve the problem for a long period. Firstly, the substance quickly evaporates, and secondly, the harmlessness of its effect on the child’s body is questionable.
- During periods of heavy rain, the cover will protect against excessive absorption of moisture by the sand, and as soon as the weather improves, the child will be able to begin his favorite games in the children's sandbox.
- You can save money and not include the installation of a cover in the scheme, but protection in the form of polyethylene pressed down with pipes or bricks is not aesthetically pleasing. In addition, a child cannot independently remove such protection from a children's sandbox.
Let's leave the drawing options with complex structures in the form of a fan-opening lid or equipped lifting mechanism aside. The simplest option for a children's sandbox is an ordinary removable board made of boards, shown in the drawing below:
But this is not a very good solution to the problem, due to possible child injuries if you want to remove it yourself. Very popular Lately They use models of children's sandboxes equipped with a folding lid that can easily be converted into a bench. A design option is shown in the following diagram:
For ease of opening, it is equipped with handles, as in the photo below:

For a children's sandbox, you can use a design with a sliding lid, which later plays the role of a shelf or bench without a back. Convenient lower stands provide ease of opening and contribute to the stability of the structure.

Canopy equipment
The canopy design also has many variations. Depending on the planned life of the children's sandbox, thick fabric, plywood or thin boards can be used as material. The mount is selected based on the overall dimensions of the structure:
- For small children's structures, two poles with a crossbar and a stretched awning are sufficient.
- You can stick to an option familiar from childhood and create a drawing with a fungus. But it is better to leave such sun protection as a last resort, because a pillar in the middle of a children's sandbox often brings complete inconvenience, and the shadow moves to the side.
- For volumetric structures, it is recommended to install four support pillars. The canopy can be flat or in the form of a gable roof.
The drawings and photos presented below will help you decide on the canopy shape required for your children's sandbox design.
Preparing the site
It is extremely rare to use designs that are removed for the winter or equipped with rollers for movement around the site. In most cases, a children's sandbox is installed on a permanent basis, so care should be taken to prepare the site first. The process consists of the following steps:
- The area for the future children's sandbox is deepened by 20 cm.
- After leveling the soil, it is covered with sand to a depth of 5 cm and treated with a rake.
- It is optimal to use geotextiles or agrofibre as a drainage base for a children's sandbox. Suitable for a modest budget dense polyethylene or propylene matting, which is spread with a margin of 30 cm along the border. This will prevent the germination of weeds and the penetration of pests, while at the same time speeding up the drying process of the sand.
- After installing the box, the unoccupied recess around the children's sandbox is filled with soil and compacted, and the excess edges of the film are trimmed.
See the photo below for an approximate work plan:
Nuances of the construction process
Having carefully double-checked the drawing of the children's design, according to the chosen scheme, they proceed to the purchase, cutting and preliminary preparation of the material.
Material
Wood is the most commonly used material for the manufacture of children's structures. At correct processing and timely preventive care wooden sandbox will last more than 10 years. Parts cut according to prepared drawings are coated twice with a water-polymer emulsion.
Note! Elements of the children's sandbox that will be in the soil are treated with bitumen mastic.
If you do not plan to use the children's sandbox for a long time, you can use aspen or alder to make it. Coniferous trees will help increase the service life. For construction it is convenient to use quarter or tongue and groove boards. How to assemble a box from them is clearly shown in the following diagram:
Box assembly
Based on the drawing, the children's sandbox box is assembled together. The boards are attached to 50x50 pieces of timber using self-tapping screws. If the side of the structure exceeds 1.8 m, the design must provide for additional fastening of the beam in the middle of the wall. The height of the beam for a permanent children's structure, according to the drawing, should be 30-40 cm. The corners of the children's sandbox need additional reinforcement. How to do this correctly, see the diagram below:

Advice ! All wooden parts should be sanded carefully to avoid injury to the child. Pay special attention to the corners, which should be slightly rounded.
We looked at the simplest version of the sandbox box. Having experience and free time allows you to improve the design. After the base, they move on to equipping the cover and canopy according to the prepared drawing. The diagram below will allow you to set up a miniature sandbox house that your child will love:


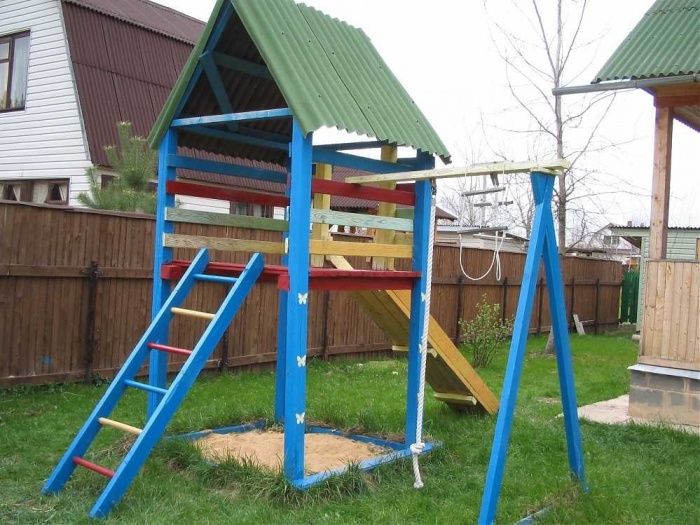
Looks interesting too children's building, where the sandbox is connected together with a slide:
And finally, a few more interesting ideas, which will be useful when creating your own drawing:


Good luck in your work and creative inspiration!
What could be more beautiful than a garden filled with flowers? Only a garden where children play! Kids are big fans of fun adventures on fresh air, and it is very important to take them away from the bustle of the city at least on weekends. At the same time, the child needs to be occupied with something interesting and useful. Today we will tell you how to make a sandbox at the dacha with your own hands to provide for the kids good place for children's games.
How to place the building correctly
Surely not only your children, but also their friends will relax at your dacha. This means that the sandbox must be spacious. There are several principles for placing a sandbox on a site that should be followed during its construction.
- Visibility from any point on the site. Children should always be in sight so that in certain cases adults can come to the rescue. The sandbox should always be visible and accessible.
- Hygiene. It is better not to build a sandbox under trees. Fallen leaves will clog the sand, and bird droppings will create additional problems.
- Protection from the sun and drafts. Direct sunlight is more harmful than beneficial for the child, especially if he is exposed to the sun for a long time. open area. Drafts can lead to illness.
- Ease of use. When you calculate the size of your sandbox, be sure to consider the number of children who will be playing in it.
Position the sandbox as conveniently as possible
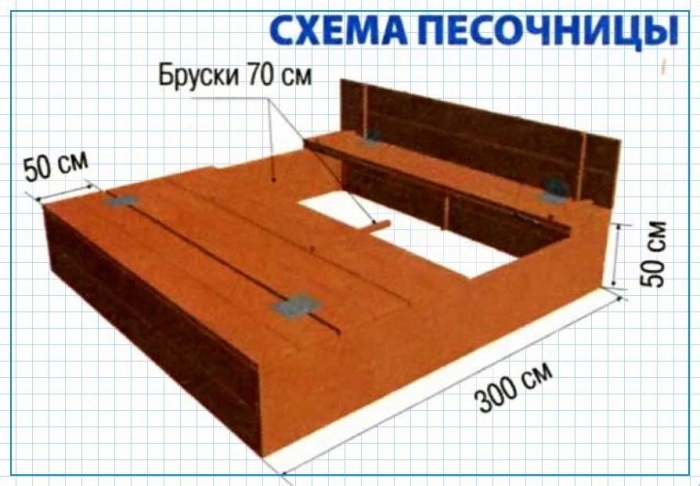
When building structures for children, it is imperative to adhere to existing standard standards. As a rule, such structures are usually made of wood, as the most environmentally friendly material. The sandbox usually has a square shape with sides measuring from 2.5 to 3 meters. For that. to fill the structure, you will need about 2 cubic meters of sand.
The most the best material for the body of a standard sandbox there will be a pine board 25-30 mm thick.
Simple Sandbox Installation Process
Before we get started, we first need to determine what our sandbox will look like. If this is your first time doing this kind of construction, then it is better to stick to a simple, standard design. Highlight in your garden small area, 2 x 2 m in size, over which tree branches will not hang, and begin to improve the place for games.
The dimensions of our structure will be 1.7 X 1.7 m. This sandbox is suitable for several children to play and takes up little space in the garden.
Simple sandbox enclosure
Prepare the site for the future structure. To do this, take a cord and pegs. Mark the perimeter of the future sandbox and dig a hole inside the fence, the depth of which will be 25 cm. The removed layer fertile soil can be useful in beds, flower beds and other areas.
Now you need to strengthen the base of the sandbox. It is advisable not to limit yourself to digging a hole: sand, when mixed with the ground, will become dirty, lose its appearance and will need to be changed often. The garden sandbox must be clean, which means you need to take care of the solid foundation.
A cushion of sand will help level the soil surface. Pour sand into a 5 cm layer at the bottom of the hole, compact it well and cover it with special material.
Paving slabs can be used as such a material, but this option is quite expensive. If you use plastic sheeting, after the first rain you will have to disassemble the sandbox to remove accumulated water. Therefore, drainage holes will need to be made in the film. The same goes for plywood if you decide to seal the base with it.
The best option is to use agrofibre or geotextile. These materials allow moisture to pass through perfectly and will not release moles or earthen insects.
Construction
Prepare bars measuring 450 x 50 x 50 mm. They will need to be placed in the corners of the structure. Be sure to treat the bars with an antiseptic, because they will be buried 15 cm into the ground. You can use bitumen for these purposes.
For each side of the box, assemble a shield 2.5 cm thick and 30 cm wide from pine boards. It can be made either from one wide board, or from several narrow ones.
The most important thing is that you need to carefully treat the surface of the boards, removing all knots, jags and splinters, so that children do not get injured later when playing.
To make it comfortable for children to be in the sandbox, make sides. Lay 4 boards around the perimeter of the structure, having previously planed them. The sides can be used as seats, stands for toys, buckets, and display cases for Easter cakes.
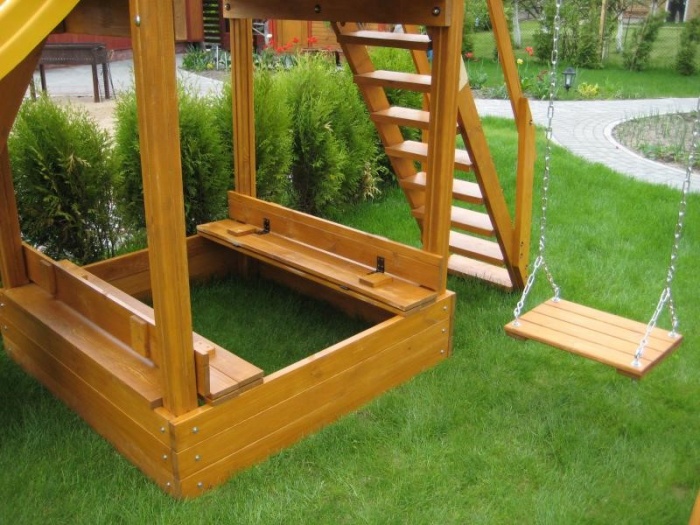
Sandbox with a lid that transforms into seats
Now let's talk about some simple ones. But useful additions. Can be upgraded regular option and prudently add a cover to it, which will be useful for protection:
- sand from moisture and rain;
- wind, which can carry debris and leaves into the sandbox;
- pets who will probably want to make a toilet for themselves.
A shield made of boards attached to the bars will serve as a cover. It will need to be picked up and put away before play. The baby himself will not be able to do this. To make his task easier, make a door cover in two parts: put together two panels of the required size, fasten them on hinges and attach handles.
Please note: if it is not possible to make a cover from boards, replace it with film or an awning. By stretching the material and securing it with an elastic band or stones, you will provide protection to the sandbox.
Final preparations: put up a canopy and fill up with sand
A canopy, especially in the form of a fungus, can be very the necessary element sandboxes. Under such a fungus you can hide from the rain, and children will be reliably protected from direct sunlight. You can also attach a table to it for added convenience.
It is better to make a canopy from wood. The leg will be a beam 100 X 100 mm and 3 meters long. To make the leg stable, dig it into the ground to about a meter depth. Be sure to treat the wood with an antiseptic.
For the mushroom cap, prepare triangular panels from boards. Nail them from the inside to the leg, and cover the outside with thin plywood. For a hat, a width of 2.5 meters will be sufficient.
You can make a canopy in the form of a roof. To do this you will need two beams and two rectangular boards. They should be nailed at an angle to create a gable roof and secured with strips of appropriate length.
river sand best suited for children's games
Now let's talk about choosing sand. River sand is preferable for children's games: it is fine, clean, without foreign impurities. Can be purchased at a hardware store quartz sand. But in any case, it must be carefully sifted.
Now there are special types of sand with a high clay content, specifically designed for sculpting figurines. They even contain special fragrances that will keep dogs and cats away from the sandbox.
Now all you have to do is color the sandbox. To do this, choose bright colors. Don’t limit yourself to one color, use all your imagination: let there be funny pictures, numbers, letters, geometric figures on the sides.
Sandbox options for children
Video about building a sandbox at the dacha
A DIY children's sandbox will serve as a decoration for your summer cottage and will become your kids’ favorite place to play. You can improve the design, add to it additional elements. Tell us in the comments about your experience installing sandboxes with your own hands. Easy work!


