Woodshed made of metal drawings. Woodshed at the dacha - what type to choose and how to build
Most owners of private houses in our country heat their homes using wood stove. Many people use them in their summer cottages and bathhouses. The stove should be heated only with dry wood, but often when purchasing it the owner receives it raw. To dry wood fuel Before the onset of the autumn-winter season, many people put them in a woodpile. However, this is far from The best decision for storing firewood. It is best to arrange a woodshed.
The firewood in it will dry out faster and will be reliably protected from atmospheric precipitation. If you don’t want to face a situation where the firewood gets wet, then you should think about creating a woodshed on your site. The design of this structure is quite simple, so you won’t have any big difficulties constructing this object with your own hands.
Choosing the type of firewood
Before choosing this structure, the owner of the site must decide what dimensions the future structure will have. They depend on how much firewood the owner plans to store in the woodshed throughout the year.
 You also need to decide how much money you are willing to spend on building a firewood shed on your site. Another important point: you need to decide whether the firewood shed will be built from scrap materials or whether you will use new ones. Today there are the most different types these buildings. Photos on the Internet allow you to see all their diversity. How the woodcutter turns out largely depends on your financial capabilities, as well as your imagination and ability to work with the tool. The most common types of firewood at the moment are:
- canopy;
- woodshed-gazebo;
- woodshed-shed.
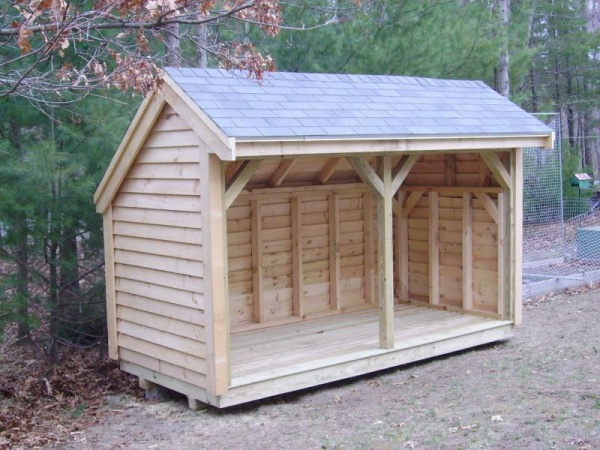
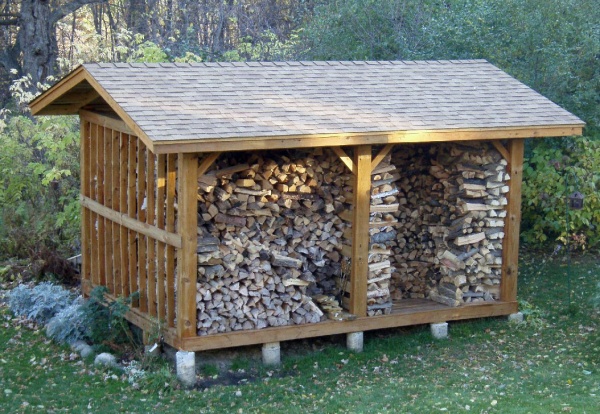
Canopy. This is the simplest storage option for wood fuel. A shed for firewood as the main elements of its design has three walls, a floor, and a roof, which is a canopy. In order for the firewood to be well preserved and not get wet not only from rain, but also from moisture coming from the ground, it is necessary to install a raised floor. A shed for firewood can be built as a separate structure or an extension to a barn or house.


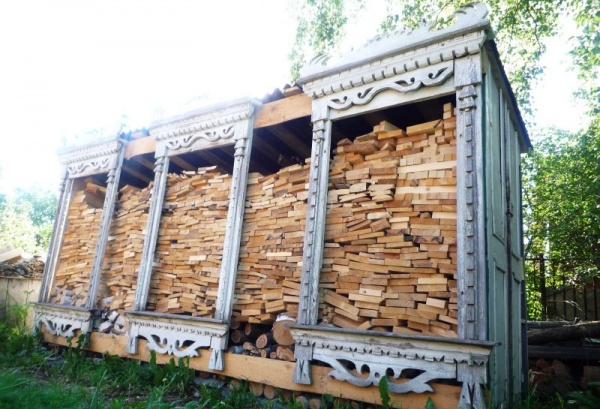
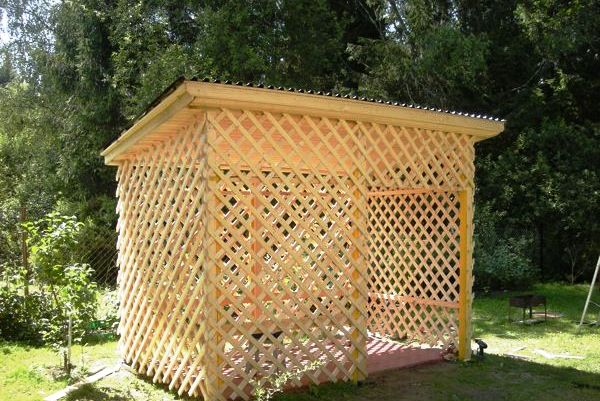
Alcove. The woodshed, which is built in the form of a gazebo, has an elegant appearance. Using it on his site, the owner has the opportunity to convenient storage firewood They will always be dry and the owner can easily access them at any time. In addition to its functionality, this structure is also distinguished by beautiful view. The construction of such a building on the site is a good opportunity to decorate the courtyard, which will look more attractive.
 Barn. A woodshed on your site can also be built in the form of a barn. This building differs from a traditional outbuilding only in its smaller size. The structure contains entrance doors. To ensure high reliability of the structure, it is best to build a woodshed-shed on a small foundation. In addition to firewood, tools can also be stored in this building. To do this, you need to install shelves. The construction of such a woodshed occurs quite quickly. A variety of materials can be used to create it:
- boards;
- plywood;
- slate
- profiled sheet.
 When arranging such an object, you should not forget about waterproofing. It is extremely important that moisture does not come into contact with firewood stored inside the structure. This can be achieved by installing a waterproofing gasket in the roof of the firewood shed.
 Most people in private homes use wood stoves. However, some home heating is carried out using a fireplace. They also need convenient storage for firewood. Therefore, such homeowners are beginning to be interested in how to build a firewood shed with their own hands. A firewood rack in a country house or country house should be considered as a kind of stand that allows you to conveniently store fuel for the fireplace. Thanks to such storage, the owner is always provided easy access to the firewood.
A variety of materials are used to make firewood. This design can be indoor or outdoor. A do-it-yourself firewood rack, placed in a home, provides the owner with the opportunity to store firewood without disturbing the interior. In addition to this, the owner who places a firewood rack in his home acquires a decorative element that adds originality to the interior of his home. If you need a firewood holder for your fireplace yourself, you should definitely look at projects online. They will help you decide on the design and design of the firewood storage.
Choosing a place for the woodshed on the site
In order to be able to conveniently use the woodshedder at the dacha, it is necessary choose the right place to place it. There are some nuances here that you should know about in advance. First of all, a shed for firewood or another type of structure that you plan to build on your site must be located a short distance from the house. In this case, you will not have to carry firewood into the house from afar. It is also not worth placing a woodshed very close to a country house.
The location must be chosen in such a way that the car with firewood can get as close to the structure as possible. Otherwise, you will have to spend a lot of time and effort in order to drag damp firewood in storage. If your home does not have a fireplace and a wood-burning stove, then it makes sense to place the woodburner closer to the bathhouse or to the place where you have a barbecue.
 When constructing a woodshed can't do without a drawing, if you want to create a functional structure and use it not only to store fuel for your wood stove, but also to place your tools there. Using the drawing before starting construction, you can easily determine the area of the building, since each owner needs a different supply of firewood on the site. Experts provide calculations according to which heating a house with an area of 100 square meters in autumn and winter requires approximately 2.1 cubic meters of dry pine or 1.7 cubic meters of birch firewood.
Materials and tools
In order to build a woodshed with your own hands at the dacha, you should look at photos on the Internet before starting work. They will allow you to quickly decide on the design of the object. Materials and tools should be prepared in advance. To carry out the work you will need:
- hacksaw;
- hammer;
- pliers;
- plumb line;
- twine;
- ladder.
If we talk about materials for building a firewood shed, then boards are usually used. If you want to save on the construction of this object, you can use the material that you had left on the site after building the house. Or you can dismantle unnecessary structures that are present on the site. In this case, you will receive free material for building a firewood shed.
Do-it-yourself woodcutter: progress of work
 Stationary woodshed is the most common option for firewood storage. It is usually constructed using a columnar foundation as a base. The foundation will be considered reliable and durable if the holes for the posts are dug below the freezing depth. In the process of creating such a foundation, the columns are filled with concrete. In the dug holes, it is necessary to create a cushion consisting of sand and crushed stone. Each layer must be thoroughly compacted.
The installation of pillars for the firewood foundation cannot be done directly on the ground. In this case, the entire structure will “walk” in the spring, when the soil thaws and swells.
On the created foundation, you should install columns of bricks or blocks, which are fastened with mortar. Four columns will be quite enough for a small woodshed.
The strapping is done using a timber frame. To create it, material with a cross section of 150x200 mm is used. A metal corner is used to stitch the frame together, and self-tapping screws are used as fasteners. You don’t have to use corners and just make do with fasteners, but then you need to use long self-tapping screws. Before creating the strapping, the timber must be treated with special compounds that will protect it from fire and insects. Also, do not forget about waterproofing. To do this, just put a few pieces of roofing felt.
Using corners, we install the vertical frame of the woodshed. First you need to mount the rear pillars, and then install the middle and front ones.
Next step we perform the upper harness, and also nail the rafters to the woodshed for the roof. In order to simplify the assembly of the vertical beam frame as much as possible, it is necessary to secure the beam with braces during installation work.
At the place where the woodcutter will have doorway , two should be installed additional timber. The door will subsequently be hung on them. If the choice is made in favor of a lockable shed with a woodshed, then there is no need for a door.
Next, you need to cover the horizontal frame using a floorboard. Precise adjustment of the boards is not required. Gaps should be left while working. In this case, good ventilation of the stored firewood will be ensured. To avoid injury when a foot gets caught in a gap, they should be made small.
Best for roofing choose a single-pitch design. The most suitable roofing material is corrugated sheeting. If you have the desire and financial capabilities, you can easily install a gable roof. For its installation, you can use any roofing material. Here everything largely depends on the budget allocated for the construction of the firewood shed.
When setting up a woodshed, it is necessary to build a canopy. In this case, raindrops and snow will not fall on the firewood. To make a canopy, you can use an end board, which is secured to the front roof board with dies. The end part of the dies should be cut at an angle, and then an end board should be nailed to them, which can be fixed in the wall with the help of supports. The simplest is this visor design. Without any serious effort, anyone who knows how to work with a tool can do it.
Then we cover the walls of the firewood shed using boards or bars.Having chosen the bars, they can be filled in increments of 25-30 mm. The boards are nailed with a small gap. In this case, natural ventilation of the structure is ensured.
Next you need to use antiseptic composition and fireproof impregnation, treat everything wooden parts. When the applied compounds have dried, they can be coated with paint or polyurethane varnish. After completing this work, the owner receives a beautiful structure that will serve for a long time.
Conclusion
Many people use a wood stove to heat their home. To ensure that the fuel is always dry, you need a wood burner. If you have a need for such a structure on your site, then instructions from experienced craftsmen, which can be easily found on the Internet. For many owners of suburban areas who need a woodshed for their summer cottage with their own hands, photos on the Internet will help them get an idea of what different types of these structures look like. Thanks to the photo, the summer resident will be able to quickly make a choice in favor of a suitable wood burner.
Making a woodshed on your own property is not big problem. The first thing you need to do is get acquainted with firewood storage projects. By selecting suitable option, you need to draw a drawing, and then do construction. In order to do everything correctly during construction, you must follow the recommendations in the instructions for the construction of this object. In this case, upon completion of the work, you will receive a reliable firewood rack in which your firewood will always be dry.
Almost everyone who has Vacation home, they store firewood on the site to light the stove in the house, bathhouse, or just make a barbecue. Used for storing firewood various options Drovnikov Even if a dacha for someone is only a place for summer vacation and does not involve traveling there during the cold season, firewood is needed to heat a bathhouse or make barbecue. Of course, you can use coals in a bag or buy popular ones in summer season bundles of firewood, but this is very inconvenient if the dacha is located far from shops. That is why, as a rule, there is a small supply of firewood at any summer cottage.

If the dacha needs heating, then a wood-burning stove will be a real “salvation” for a country house. Agree, not all homes have sufficient electricity capacity. In addition, this is the simplest and cheapest type of heating. Finally, the stove is an indispensable attribute country holiday: It’s beautiful, creates comfort and atmosphere. Many people stock up on firewood for the entire season and store it in specially equipped firewood sheds. This allows you to protect the firewood from precipitation and dry the still damp wood. In this article we will talk about ways to make a firewood rack for your dacha with your own hands.

Device
A woodshed is a structure made of wood or metal, which is used as a warehouse for firewood. Woodsheds for a summer residence can be completely different, the main thing is that they meet the basic requirements.
- The device should be spacious and allow access to firewood without difficulty.
- The woodshed should be open enough so that the firewood does not become damp and is ventilated. If there are fresh logs in the woodshed, they should have the opportunity to dry out.
- The structure must have a roof that will protect the logs from rain and snow.
- The woodshed should be positioned so that it is not exposed to direct Sun rays. Ultraviolet radiation has a bad effect on wood and reduces its suitability for its intended use.
- Of course, it is desirable that the woodshed be neat so as not to spoil the entire landscape of the site.

There are various design options for woodsheds depending on their location and type.
A woodshed that is leaning against a building (house, barn, bathhouse)
This is the most simple design, in which the wall of the building is the back wall of the woodshed. But this design has a number of serious disadvantages:
- Fire hazard. A large amount of dry wood near the house.
- Lives in wood a large number of insects This problem can be solved by treating the firewood shed with a special compound or separating the firewood from the building using a sheet of metal.

It is recommended to locate the woodshed near the building in the north or where the place is most open to the winds. Of course, a canopy against a wall is a very simple design, so it may not be very beautiful. It is better to hide such a canopy from the least visible part. The most simple circuit– these are 4 supports, a raised floor and 4 walls with a canopy.

Woodshed standing separately from buildings
It's more beautiful and reliable construction. Such a device involves a design and construction plan. Such a canopy can be built in suitable place and even decorate the landscape. The firewood maker will require time from you, but it will serve for a long time, and the firewood will be constantly blown from all directions.

Portable
Separately, it is worth mentioning about a portable firewood rack, which is necessary for storing a small amount of firewood. Such options are needed to keep firewood closer to the place of use. These are structures made of wood or metal that are easy to move along with firewood. Typically this is beautiful designs that complement the interior. A portable firewood must:
- be light;
- to be beautiful;
- easy to carry.

Such firewood sheds are located indoors. You can see such structures next to fireplaces in the house.

How to choose material?
Sometimes the woodshed is hidden in the farthest or most inconspicuous corner of the site, and then it is built without thinking about its appearance. Any available materials, remnants of various boards and logs can be used. You can make a woodshed without walls and supports. Then the evenly stacked firewood is covered with any material that will protect it from precipitation.

The most common material for woodshedders is wood. Wooden firewood sheds are made from boards and beams. Metal elements are also used. For example, pipes covered with boards. The roof is made from any light but rigid material. For example, galvanized iron, corrugated sheets, slate (it is quite heavy), ondulin, roofing felt.

When choosing materials for a woodshed, it is important to pay attention to its design. If the style suits a simple wooden woodshed, then the structure will be made of boards and beams. If you plan to use metal not only for support, but also for the walls of the woodshed, then you can think about a forged woodshed. Often portable firewood burners are made of metal.

Here are the materials you will need to create a regular wooden firewood shed.
- Floor board. This is necessary so that the logs do not lie on the ground. You should choose a thick board, no thinner than 2.5 cm, so that it can withstand firewood.

- Concrete blocks instead of a foundation.

- Beams, logs. For the base of the floor.

- Boards for the frame.

- Beam for the frame.

- Roof boards.

- Roofing material. Polycarbonate, slate or corrugated sheet.

- Nails and screws.

Required tools:
- electric drill;
- shovel;
- screwdriver;
- plumb line;
- axe;
- roulette;
- hacksaw;
- screwdriver;
- square

photos
For the construction and construction of original firewood sheds, barrels, former rabbit pens and even pallets and rings for wells are also used. Such options do not require the creation of a drawing and are distinguished not only by their external originality, but also by the ease of creating the design.

How to do it yourself?
Below are instructions for creating firewood loggers. Let's start with the option of a free-standing woodshed. To build such a structure, it is necessary to make manufacturing drawings so that the firewood shed turns out to be of a given size and fits into the landscape. The base will be 6 logs. These are the supports that create the frame. Let's look at how to build a firewood shed step by step.

- Determine and mark the construction area on the site. Dig 6 holes for supports - 3 each in the front and back. The dimensions of the depressions are no less than 30 cm by 30 cm, and the depth is up to 50 cm. Fill the holes with crushed stone to a depth of 15 cm and compact them. Make log holes.

- The logs must be deepened at least 25 cm. Treat the log with an antiseptic. Wrap with roofing felt. Secure the supports with concrete or stone. Treat the ends of the logs too.

- The length of the logs in the front and back should be different to create a roof slope. The back logs should be lower than the front ones by at least 3 cm.

- Place cross beams and a base for the floor. Secure them by connecting them to the supports. Cross joists should be raised above the ground by 10 cm to ensure ventilation.

- Install the floor boards onto the joists. Leave the distance between the boards small, up to 2 cm, for ventilation from the floor. Use wood screws and a screwdriver for fastening. You can use nails.

- Form the walls on three sides from boards. The step between the boards is about 15 cm. You can use a mesh. This is a cheaper option, but less beautiful.

- Place 3 rafters on the firewood frame to create a roof. Place 5 more logs across. Attach the roof to the frame. Use slate and roofing felt nails. Self-tapping screws are used for fastening corrugated sheets and ondulin.

- It is possible to use shingles instead of 5 logs for the roof frame and cover it with roofing felt or other roofing material.

- Coat the wood with varnish. You can paint the woodshed with paint and decorate it with decorative structures.

Please pay attention to the following details.
- Be sure to take into account the slope of the roof so that the snow falls down unhindered.
- The roof must be larger than the woodshed. The protrusion should be about 25 cm.
- It is necessary to have a floor that is raised 10 cm above the soil.
- There should be gaps in the walls and floors for free ventilation. These elements are made of wood.
- All wooden materials Before fastening, treat with an antiseptic.
- You can decorate the woodshed with carvings, plants, and sculptures.
- To protect firewood from moisture, create drainage.

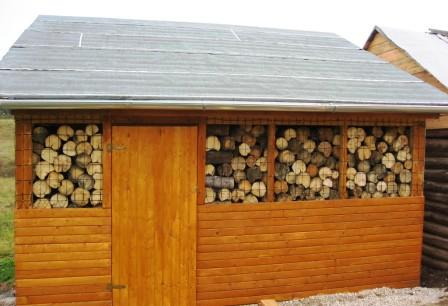
To build a woodshed that is adjacent to a building, you don’t need any special instructions. It is created in the same way as a separate woodshed. Such a woodshed should also be well ventilated, because one wall is solid, unlike the previous variation. The materials for the roof and frame are the same.

There are a number of distinctive features for such a building.
- It is necessary to pay attention to the fact that the woodshed is located close to the house. It is necessary to ensure that water from the roof of the building does not fall on the firewood.
- The woodshed located in the north will insulate the northern wall of the house. The house will shield the firewood from unwanted light.
- In this case, a floor is also needed. Firewood should not be stored directly on the ground.
- To add aesthetics, you can make doors that will close the firewood. If you place the firewood shed on a covered terrace, then leaving the house for logs will be more pleasant and easier.

For storing firewood. This is how Russian language dictionaries determine the meaning of this word. The structure is useful, in many cases simply necessary. For a stove in a house or a bathhouse, for a fireplace, barbecue, barbecue, firewood must be stored somewhere. And store it correctly. You can limit their storage to simple canopy or allocate a place for firewood in the outbuilding (it is important that there is natural ventilation in the outbuilding), or you can put your hands to it, build a firewood shed in your dacha with your own hands and decorate your site with an original and attractive structure.
Choosing a place for the woodshed on the site
In this question we need to find rational decision. The woodshed should not be conspicuous; it should be located not very far from the house, so that there is no need to carry firewood into the house from afar. And a car with firewood should drive as close to the woodshed as possible, otherwise carrying raw firewood from the place where it will be dumped will not be the easiest thing.
If the house does not have a fireplace and stove heating, it makes sense to place a woodshed near a bathhouse or barbecue area.
Draw a site plan and try to choose a suitable location, taking into account all these points. The woodshed can be built near the wall of a house or outbuilding (shed), or you can build a separate structure.
Choosing the type of wood burner
We have chosen the location, we need to decide what type of firewood shed we will build. As always, we first decide on a budget. This will allow you to immediately exclude some options and moderate the flight of fancy of some family members. The most accessible and cheapest material is wood. The woodshed can be sheathed along the frame with boards or timber.
Important ! We remember that the new building should fit organically into your summer cottage. Good decision- attach a firewood shed to an already erected structure. The amount of work will be less and you won’t have to rack your brains over the design of the building. In any case, the woodshed should be located in a dry place, preferably in the shade. In order for the firewood to dry properly and well, it must be ventilated, and direct sunlight is contraindicated for it. If the woodshed is being built against the wall of a house or outbuilding, place it on the north side.
You can also use corrugated sheets, slate, or polycarbonate for wall cladding. When using such materials for wall cladding, gaps must be left so that there is natural ventilation in the woodshed.
Carefully completed work on the construction of a woodshed with subsequent painting or color coating polyurethane varnish wooden details will make it elegant. Plant near side walls climbing plants- this will give the building a beautiful and unusual look.
A woodshed with walls made of tree cuts and grass growing on the roof will make your neighbors believe that you have relatives among the hobbits.

Let's remember that not only the type of dacha can tell a lot about the owner.

We make a drawing, prepare materials and tools
You will need a drawing if you plan to store tools and some not very necessary things in the woodshed. It will most likely be a barn combined with a wood shed.

The drawing will also help you determine the required area, because the supply of firewood required in each household is different. According to calculations, for heating a house with an area of 100 m² in autumn-winter period approximately 2.1 m³ of dry pine firewood or 1.7 m³ of birch firewood is required. Dry firewood is firewood with a moisture content of no more than 20%, which is achieved after a year of storage in the woodshed. You will need significantly more freshly cut firewood; their calorific value is approximately two times lower. And you need to have a reserve for at least 2 seasons. Of course, each furnace has its own efficiency, modern fireplace stoves can have fantastic high efficiency over 80%. In such ovens, one bookmark “works” for 8-10 hours. However, these calculations are made for conventional ovens. To this amount you need to add firewood for the stove in the bathhouse and for the barbecue.
From the tools we will need a drill (if we choose the “rustic” version of the woodshed with four pillars dug into the ground), a hacksaw, a hammer, pliers, a plumb line, twine, and a stepladder.
We buy material for construction after choosing the type of firewood - which one is more suitable for your site. The simplest woodshed can be built from the remnants of materials left over from others construction work or dismantling old structures.
Let's get started
Consider construction various types woodburners: stationary, wall-mounted and portable.
Stationary woodshed
Let's call this type stationary, because it can be built on a columnar foundation. This is a non-permanent building. A woodshed will be reliable and durable if holes are dug under the foundation columns to the depth of soil freezing and filled with concrete. You can get by by filling the holes with sand and crushed stone and compacting each layer.
You cannot install the posts directly on the ground; the entire structure will “walk,” especially in the spring, when the soil swells.

We install columns of bricks or blocks on the foundation and fasten them with mortar. For a small woodshed, four posts are enough; for a larger one or for a utility block combined with a woodshed, more will be needed.

We tie it with a frame made of 150x200 mm timber. We sew the frame using metal corners and self-tapping screws or we make do with only long self-tapping screws. The timber (like all other wooden parts of the structure) is pre-treated with fire-bioprotective impregnation and do not forget about waterproofing. Pieces of roofing felt folded in half will be enough.

Using the corners, we install the vertical frame of the woodshed. First we mount the rear pillars, then the middle and front ones.
We make the top trim and nail the rafters for the roof. To simplify the assembly of the vertical frame, we secure the timber with temporary braces during installation.


At the site of the future woodshed doorway, we place two additional beams. A door will then be hung on them if the option of a lockable shed with a woodshed is chosen. The woodcutter himself does not need a door. True, there is one point here. It depends on the situation in the holiday village or village. After all, there is a chance to repeat the fate of the heroes from the old joke: “Bosses, don’t you need firewood?”
We cover the horizontal frame with a floorboard. We do not need precise adjustment of the boards; let there be small gaps. But such that you don’t accidentally get injured by getting your foot into the gap. Water will escape into small cracks, you can also sweep away debris from firewood there, plus you get additional ventilation from below.

We make the roof of the woodshed from corrugated sheets, single-pitched. If desired, you can arrange a gable one. As roofing material use any one that your budget allows.
Important ! Make a canopy over the entrance to the woodshed. This way, water will not get on the logs during slanting rain or snow during a blizzard. The canopy can be made from an end board, which is attached to the front roof board with dies. The end part of the dies is cut at an angle, an end board is nailed to the dies, which is additionally fixed to the wall with two supports. This is the simplest design; you can choose any suitable option.
We cover the walls of the woodshed with boards or bars. The bars can be filled in increments of about 25-30 mm, and the boards can be nailed with a small gap. This way there will be good natural ventilation in the woodshed.
We treat all wooden parts with antiseptic and fire-resistant impregnation, then cover them with paint or colored polyurethane varnish. Besides the beautiful appearance, in this way we extend the life of the woodshed.
Several photos of do-it-yourself woodburners from available materials. Distinctive feature- accuracy and creativity in the design of such simple structure like a woodcutter.


Here is a version of a brutal woodcutter. Unprepossessing, in a purely rustic style, without any design, but it does its job.

To build such a woodshed (and any where the timber is dug into the ground or concreted in the ground) you will need a drill. With a drill, digging holes for posts will take very little time.
This type of woodshed design is the most budget option. All you need are pillars made of unsanded logs with a diameter of about 200 mm, crossbars made of logs of smaller diameter, several boards, slate or corrugated sheeting for the roof.
The support pillars are dug into the ground approximately 200-300 mm (the pillars are dug to different depths in order to make the roof of the woodshed sloping), having previously treated the lower end of the pillar with an antiseptic. For this design, you can use used machine oil as an antiseptic - the most cheap option. Then the pillars are concreted or the holes are filled with crushed stone and rubble stone.
Crossbars with a diameter of about 100 mm are used to sew together the support pillars. We nail three crossbars on each side, excluding the front one.
The photograph clearly shows that boards are nailed to the top of the support posts, and transverse beams are attached to the boards. We complete the work by nailing slate sheets to the cross beams.
Wall option
We choose the northern wall of the house or utility block for the construction of a wall firewood shed. Firewood does not like to “sunbathe” in the sun, for proper drying good natural ventilation is needed.
When building such a firewood shed, it is necessary to take into account that water from the walls of a house or outbuilding can flow onto the firewood. This must be avoided by slightly moving the woodshed away from the wall, or by installing a roof of the desired design on it.
Otherwise, the construction of the wall-mounted version repeats all the operations for the construction of a free-standing firewood shed. The peculiarity is that in the wall-mounted version the woodshed is “hidden” behind the house or outbuilding. Although here you can show creativity and make this building really interesting. Just look at the photo:


Below is a photo of a woodshed built near the fence. However, the principle of its construction repeats the wall version:

Portable option
Of course, there are many varieties of portable wood burners that you can buy at the store. Or order a beautiful forged model from the workshop. Yes, it is very difficult to make a forged wood burner yourself at home. But anyone can use their imagination and make it from available materials.
An old barrel can serve as a material for making an original firewood burner. We apply markings on the body. We need a hoop in the central part of the future woodshed, so we move it with a hammer and fix it. To do this, you can take self-tapping screws or select beautiful bolts. We take a jigsaw and cut out the shape of the firewood log according to the markings. We thoroughly sand the cut areas.
Using a jigsaw, cut out shaped legs from the board. IN drilled holes insert the old sanded cutting and fix it. We coat metal parts with metal paint, wooden parts with stain or colored polyurethane varnish. It would not be a shame to place such a woodcutter near the fireplace.

Here are some ideas for making a portable metal firewood burner. If you have experience working with metal and the necessary tool at the dacha the task is quite feasible:


A firewood shed is a structure designed to store neatly stacked firewood, which you cannot do without outside the city. It allows you to store fuel so as not to take up much space and allow it to dry. It’s more convenient to create it yourself in order to guess the size and shape as much as possible, and also get a product that meets the individual needs of the owners.
Features of a homemade firewood rack
A homemade woodpile for firewood is formed in accordance with several mandatory conditions. Firewood must be protected from rain and snow, but still have the opportunity for ventilation. In addition, it is important that the chosen place is in the shade, away from open fire. Materials should not be stored directly on the ground; the floor should be made of either bricks or planks.
However, it is very bad if the floor connects directly to the ground, so it is important to maintain a gap.


The next condition is an attractive design, which should be combined with the rest of the buildings on the site and the general landscape design. It is important that the building is convenient for use: the owner has the opportunity to approach it from the required side and easily obtain the required amount of firewood. In this case, the fuel material must adhere tightly and not fall apart.
Suitable location
It is important to say that some people at their dacha do not make a special woodpile, but simply store firewood under open air, covering with material that protects from water. But also for this purpose you can use an ordinary shed already existing on the site. Special street design located close to home will be much more convenient. By the way, if firewood is most often used for cooking on fresh air, then it is more logical to place the firewood closet to the stove or barbecue. The optimal location is the wall metal garage or a special area near the house. The main thing is that the firewood can be supported on three sides.


There are beautiful structures made of metal or wood that are installed indoors at home. For example, this could be a vertical firewood rack for a room with a fireplace. In this case, a decorative function is added to the wood storage function. A portable mini firewood rack is often made by hand.
Usually it stores a supply of firewood for lighting the stove, which you have to replenish when you go outside.


Which material to choose?
From the right choice The material will largely depend on how long and how successfully the firewood box will serve. For the street, metal is often used, which makes it possible to produce a visually attractive structure that will serve for a long time and will not deteriorate from precipitation and other weather conditions. For example, it could be a woodpile from aluminum profiles, self-production which takes a couple of hours at most. By the way, it is very convenient to use for carrying, because its low weight greatly simplifies this procedure.
Reliable and durable products are made from iron or steel parts, for example, rods or pipes.


The most popular are woodpiles made from wood. If the aesthetic appeal of the issue is not too important, you can use existing materials left over from previous construction work and not purchase new ones. As an option, wooden structure can be made of pallets, pallets, beams, bars or boards. The only thing important condition– pre-treat the material with a product that protects against moisture and insects. A wooden firewood box is quickly assembled, can be used for quite a long time, weighs little and is budget-friendly.
Covering a woodpile located outdoors is a must, and slate, sheets of metal, polycarbonate or even polyethylene are suitable for this purpose. By the way, the structure can even be woven from vines, if the latter grows in large quantities on the site. Separately, it is worth mentioning the woodpile built into the fireplace or stove, that is, it is a niche next to the firebox, made, as you might guess, of brick.


Decorative woodpiles, which are small in size and located in residential areas, can be forged, a regular bag made of thick cord or rope, a basket made of durable material, or even a regular one. wooden box with wheels.
How to do it yourself?
There are a large number of designs and drawings of various woodpiles on the Internet. They can vary in shape and appearance, have a frame or canopy, look like an ordinary barn with lattice walls, or be a real work of art. For a large amount of firewood used, a shed is more suitable, which can be regular or lattice. In the latter case, it will be possible to ensure better ventilation, which means the firewood will remain dry. In any case, you will first need to prepare the foundation - dig a pit for soft soil, the depth of which will vary from 20 to 25 centimeters.

The resulting hole is filled with layers of gravel and sand. Next, you can build a support of six blocks: a couple should be in the middle, and the rest should be in the corners. The parameters of the standard block are 200 by 200 and 600 millimeters. On next stage a double layer of roofing material is laid.
To assemble the frame, you will need to use bars with parameters of 100 by 100 millimeters, pre-treated with special machine oil.


Formation bottom trim The use of screws, nails or self-tapping screws will help, thanks to which blocks and bars will be connected. The harness is strengthened special corners, after which you can begin installing the racks - respectively, in the corners and in the middle part. In addition, you can add a couple of racks in front and one rack behind. They will be responsible for the entrance area and, accordingly, additional support. It is important to make the front pillars slightly longer and the rear pillars shorter to ensure a rainwater drainage system.


Boards are nailed to the side, after which the rafters and roof frame are formed. Roofing felt and corrugated sheets are placed on top. A roof overhang distance of 35 centimeters should be maintained. The floor can be laid so that gaps of 2 to 3 centimeters remain. It will be most convenient to assemble it from boards measuring 100 by 40 millimeters. The walls, by the way, are installed at intervals of 100 millimeters.
It is necessary to cover the shed with a special solution that will protect against beetles.


A small woodpile is most often located next to the home fireplace and is made of either wood or metal. In the first case, it is recommended to take as a basis old barrel and disassemble into separate planks. Since each part is usually bolted to metal hoop , it will have to be cut first. The bed can be easily made from chipboard or ordinary wide board

, and the legs are made of wooden blocks. It is important to varnish the resulting firewood for a better appearance, as well as long-term use. A steel woodpile is also often made independently. It is assembled from a 2-mm steel sheet and a steel rod with a cross-section of 8 mm. The sheet is bent or cut out in a semicircle, which can be done with a grinder or gas cylinder
. Next, legs and handles are attached to the resulting container. For beauty, the firewood box should be painted with black or silver paint.


First of all, a rectangle is assembled from slats to form a frame. Then several holes are made on opposite elongated sides. A copper wire is inserted into the middle holes, transforming into handles, and a vine is inserted into the rest. Having intertwined all the twigs, you can fix the finished firewood using stain or varnish.
If you don’t have time to create a full-fledged structure, you can make a firewood stand with a support made of stakes. First of all, the surface is treated - covered with pebbles or covered with a special waterproofing material. The material should be taken rectangular so that the woodpile has four distinct corners. High supports are dug into these points, to create which ordinary logs are taken. Their thickness will depend on the amount of firewood that will be stored.
A firewood shed is needed for storing pre-harvested logs and drying them. The drier the wood, the more heat it produces. Firewood is placed in it in neat rows so that they can be easily taken out without collapsing the entire stack. You can build a firewood shed for your dacha with your own hands from bricks, wood, metal or remnants of old building materials. A room for drying and storing firewood can be either ordinary and nondescript, or serve as a decoration for the site.
Types of woodsheds for a summer residence
There are several types of buildings for firewood in the country. A separate shed with a door is called a woodshed, a small stand or basket for the consumable part of the fuel supply is called a woodshed, and a shed for drying and storing firewood is called a woodshed.
The following requirements are imposed on the woodcutter:
- large capacity;
- maximum protection from precipitation;
- unhindered air circulation for quick drying of fuel.
Outbuildings are usually located in the depths of the site, away from prying eyes. But a firewood rack built with your own hands can look like an exquisite decoration for a summer house. Sometimes firewood sheds act as an element of home design; they are used to decorate one of the walls or a seating area.

Woodsheds are divided into:
- free-standing with a pitched roof;

- free-standing with gable roof;

- extension to the wall of a building;

- woodshed built into the wall.

One of the mistakes when building a firewood shed for a summer residence with your own hands is choosing the wrong location. You should not build it in the center of the site so that the structure does not obscure the plantings. You can’t install a woodshed in a low area so that the logs don’t start to rot. It is optimal to choose a small hill with infertile soil. You should make sure that there is a paved path leading to it.
Attaching a woodshed to a wooden wall of a dacha is very dangerous. First of all, it's against the rules. fire safety, secondly, the risk of infestation of the building with bugs that may be in the logs increases. If it is not possible to build a free-standing structure with your own hands, wooden wall dachas should be covered metal sheet slightly larger than the dimensions of the canopy. And be sure to treat the walls of the house and woodshed with a special insect repellent solution.
Freestanding firewood sheds look like a shed with lattice walls. If necessary, cover open woodsheds in winter plywood sheets for protection from snow. They can only be installed at the bottom of the canopy. With the arrival of spring, the protective sheets are removed so that the firewood dries faster.
Important! Firewood must not be placed on the floor or ground. This will allow them to become saturated with moisture and impede air circulation.
What are wood burners made of?
You can build woodsheds with your own hands from almost anything:
- beam;
- brick;
- leftover lumber;
- materials obtained from dismantling old buildings, etc.
As a last resort, you can build a woodshed “from what you had.” Review the supplies of lumber available at the dacha, and, based on this, build a shed with your own hands. Fast, cheap, but unreliable - there is no guarantee that the entire fuel supply will fit. Another economical option– woodshed made from wooden pallets.

An approximate list of materials and tools that will be required to build a woodshed at your dacha with your own hands:
- cinder block, pipes, pillars, concrete for the foundation;
- logs, beams for the frame;
- boards for wall cladding and roof construction;
- roofing material (galvanized sheets, corrugated sheets);
- nails, metal fastener, corner;
- power tools, tape measure, hammer, axe, screwdriver, level, plumb line, hacksaw, saw.
Important! Roofing requires lightweight but durable materials. Slate and tiles are too heavy; ondulin or roofing felt can sag on the sheathing with large cells.
If the dacha is built of brick and there is an overhang of the foundation that allows you to place a woodshed on it, you can use the roof of the building as a canopy, and build the walls and floor with your own hands from a metal grid and sheet. This is the safest and most economical option: the foundation, back wall and roof already exist, materials are only needed for the side walls and floor.

More difficult option a wooden firewood shed attached to the wall can also be placed on the foundation of the building, and the roof can be slightly expanded with galvanized sheets.
Woodcutter's drawings
Before starting work, you should determine how much fuel is supposed to be stored in the woodshed. If you come to the dacha from time to time, and you only need fuel to light the barbecue, then you won’t need a large woodshed. If you plan to live at the dacha during the cold season, and firewood is needed not only for cooking barbecue, but also for heating the house, then you will have to build a spacious firewood pit in which the logs can dry well. You need to build such a structure not far from your home, so that in cold and bad weather you don’t have to go far for fuel.
Important! For heating in winter season dachas with an area of 100 sq. m. you need approximately 1.7 cubic meters of birch firewood or 2 cubic meters of pine. It is necessary to create a supply of fuel for at least two seasons so that the wood has time to dry well.
Drawing of an open woodshed, which is easy to make with your own hands:
Approximate diagram columnar foundation, a method for installing and securing poles with your own hands:
If the logs in the woodshed are stacked several rows deep, it is more appropriate to divide the volume into parts. Then damp, recently delivered firewood will not mix with already dried firewood.
Drawing of a woodshed with a pitched roof:
Important! For ease of use, the roof of the firewood shed is raised to a level of 2 m or higher.
How to make a woodshed for storing firewood
The woodshed requires a reliable foundation. As a last resort, you can get by with columns dug into the ground to a depth exceeding the freezing level. It is optimal to use ready-made concrete tables with dimensions of 200x200x400 mm. If strong winds often blow in the region, they embed into the foundation pillars anchor bolts for securing the firewood frame. It is not enough to just dig the posts; they need to be concreted or strengthened with sand and crushed stone, covered in layers and compacted well.
Sometimes the floor in the woodshed is made of lattice or large gaps are intentionally left in it. This is not the smartest solution. Wood debris and dust that spills into the cracks will quickly rot, creating favorable conditions for reproduction harmful insects. Not only firewood can be damaged, but the dacha itself and the entire garden plot. Another danger of a cracked floor is that in warm weather, rotting debris may ferment. Not only are alcohol vapors explosive, they are also harmful to health.
Important! Monolithic foundation for a woodshed is difficult to manufacture, but will save you from many problems: there is no need to lay the floor and take care of the debris underneath it. In addition, concrete accumulates heat and then releases it for a long time, meaning the firewood will dry out much faster.

Experts have not come to a consensus regarding the location of the slats, the angle of inclination, and the distance between them. The horizontal lathing strengthens the frame, but splashes bounce off it when it rains, which is not good for fuel. The horizontal lattice does not have this disadvantage, but it does not support the frame. The best option- a diagonal lattice, but it will require high-quality material.

They claim that using planks mounted in a certain way can speed up the process of drying firewood in the country, but there is no evidence of this. The best option is to completely sew up the top and cover the bottom third with a lattice. In this case top part will reliably protect from precipitation, and the lower one will provide access to air.
Important! Wood felled in winter time or in early spring, will dry out by the beginning of the heating season, and firewood collected in the summer will only be ready next year.

Free-standing woodshed
The simplest option is a canopy on four poles with the floor raised above the ground. It is easy to make it yourself from leftover materials, but a large amount of fuel may not fit. A spacious separate firewood shed will require the development of a plan and the construction of a foundation on at least six columns.

Important! The distance between a residential building and a separate firewood shed cannot be less than 4 m.
Most often, wood sheds in the country are built from wooden beam and boards. The optimal option for a floor in a woodshed: tongue-and-groove boards (from 40 mm), laid on logs (150x75 mm) in increments of up to 450 mm. The floor must withstand loads of approximately 1000 kgf/sq.m. m. The gap between the base and the ground level is under no circumstances covered with a plinth, so that there is access for removing fire hazardous debris and air can circulate freely.
Drovnik open type built with lattice walls. If the region has snowy winters, then the slats are filled at a slight angle to prevent precipitation from getting inside. If the dacha does not have the required number of identical planks or boards (from 30 mm), you can use any relatively thin lumber, arranging them in any order: vertically, horizontally, at an angle. The main thing is to leave as many gaps as possible. The sizes of the cracks vary from 5 cm and more. Lumber is nailed (preferably with corrugated nails) or secured with self-tapping screws.

Important! Gaps in the sheathing that are too wide will give thieves access to the firewood supply.
The lower crown is made of timber (approximately 150x150 mm), for the side posts and the top trim the size is 100x200 mm. The recommended roof angle is 15-20°. Often, when constructing a roof, rafter beams are not used. Instead, a sheathing is installed in two tiers with increments of up to 45 cm. Longitudinal (along the long side) and transverse beams can be laid in two ways:
- longitudinal from above (good ventilation, suitable for regions with big amount precipitation);
- transverse from above (for places with high rainfall, snowy winters and strong winds).
For regions with harsh climatic conditions It is recommended to install a shed with a gable roof at the dacha. It will better protect the fuel from precipitation. But there is a nuance: the pediment needs to be made lattice like the walls, or it will have to be left small holes for ventilation.

Important! The sheathing of the walls of a gable woodshed should be straight (horizontal or vertical), cross or diagonal. Sheathing of the “blinds” type is not suitable for this design.
Woodshed adjacent to the wall
It is much easier to build a canopy adjacent to the wall of a summer house with your own hands than a free-standing structure. It is ideal for regions with warm winters with little snow, where there is no need to store large amounts of fuel. The disadvantages of an attached firewood shed include:
- high level of fire danger;
- the risk of infection of the dacha with bark beetles, mites, and fungus.
Problems may also arise with the foundation of the building. It’s good if the dacha was built taking into account the future extension and the foundation for it has already been laid. It is almost impossible to connect an existing foundation and the base of a woodshed with your own hands without damaging the structure.

The slope of the roof of an attached firewood shed should be directed away from the house. Then the heat from the residential building will speed up the drying of the logs. At the same time, the front wall cannot be made closed, since moist air collects under the overhang of the roof, which will prevent the firewood from drying. The roof deck should be as light as possible so as not to overload the structure. Galvanized or corrugated sheets are suitable.

Important! To reliably protect fuel from precipitation, the roof overhang should be at least 35 cm.
Covering the side walls with inclined slats (“blinds”) will protect the firewood from moisture, but will make it difficult for air to penetrate, that is, it will slow down drying. If such protection from frequent precipitation is necessary, the “blinds” slats should be spaced at large intervals or mounted in a woodshed forced ventilation. A budget option sheathing – poles or slabs with the “back” facing outwards. This is a cheap, but very fragile material, which is also quite difficult to secure.

Important! Treatment against bugs and fungus will not hurt a stone or brick cottage. Insects manage to “seep” into the smallest cracks, and fungal spores are able to penetrate even through the seams of brickwork.
Photos of woodsheds for a summer residence with your own hands
A country-style cottage will only benefit from a unique design solution- a whole wall of logs.