Wooden fence ladder. Wooden fence herringbone
IN Lately Owners of country real estate are increasingly giving preference to wooden fences for private homes installed by themselves, which are not only very beautiful, but also distinguished by their environmental friendliness and natural texture, easy to install and reliable in operation.
TO positive qualities Modern wooden fences can also be attributed to high levels of maintainability.
Building a wooden fence with your own hands is the topic of this article.

Before starting the construction of a wooden structure, it is advisable to carefully study all available for self-construction types, as well as choosing the right option.
As a rule, the design of any wooden fence consists of three main elements, represented by support posts, veins and the front part.
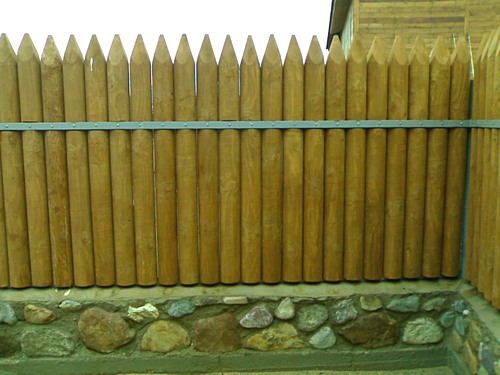
Fence "Palisade"
The structure is made of smooth, processed logs of medium diameter with a sharp point at the top. The elements are fixed to the crossbars in a vertical position. Elements can be driven directly into the ground, but most often a concrete foundation and wooden, brick or metal pillars are used as support.

Wooden fence Palisade
The appearance of such a fence resembles an ancient fortress, and the main disadvantage is the need to use a large amount of building material.
Fence "Herringbone"
The most aesthetic option for horizontal fencing, differing in installation finishing boards close to each other, with the obligatory overlap of the upper element onto the lower part.
Such a fence is vandal-resistant, and the presence of a protective canopy at the top of the structure allows not only to protect the most vulnerable part of the structure, but also significantly extends its service life.

The lower part of such a fence can be protected by a plinth.
Fence “Herringbone”
Fence "Chess" The option is distinguished by its attractive appearance and practicality, and design feature
is the presence of supporting pillars made of stone or brick, between which slats with special grooves located at a certain angle are mounted. The fence boards are laid in an overlapping manner, followed by fixation in the completed cuts. An original effect can be achieved by organizing small gaps.

Checkerboard version of the fence
Fence "Picket fence"
The most popular fencing option, characterized by the construction of vertical plank spans fixed on special guide beams installed in the vertical direction.
Varieties are represented by a blind picket fence, providing complete isolation from the outside space, and a fence with gaps, used to mark boundaries.

Picket fence
The position of the pickets in a wooden fence allows you to create an original and stylish design, which fits perfectly into any option landscape design, and will also serve not only as a barrier for uninvited guests, but will also become an original element of country decor.
Advantages and disadvantages of wooden fences
Modern wooden fences have proven themselves to be excellent fencing for suburban real estate, and also have a significant number of undeniable advantages:
- Natural wood is not capable of becoming very hot when exposed to sun rays and perfectly retains comfortable warmth in winter frosts.
- Wooden fencing is not required special care, therefore, it will only be necessary to treat the surface annually with paints and varnishes.
- Wood construction is distinguished by its maintainability, and it is quite possible to independently eliminate identified defects even in the absence of special skills.
- The surface of a wooden fence is perfect for decoration in almost any style, standard painting in order to preserve the natural texture, or applying an original modern ornament.
- Wooden fences go well with other types of building and finishing materials, such as brick, natural stone, metal and concrete.
The most significant disadvantages of wooden fences can be considered a sharp decline performance characteristics, visual appeal and durability in the absence of proper care.
Antiseptic and paint and varnish compositions should be used every year, and elements of the wooden structure that come into contact with the soil or are directly exposed must be treated especially carefully. negative impact atmospheric precipitation.
Making a wooden fence with your own hands step by step
Let's look at how to make a beautiful wooden fence with your own hands. The durability and attractiveness of the created wooden fence directly depends on the correct choice of materials, as well as adherence to technology at all stages of construction.
Preparation and materials
The choice and purchase of lumber will depend on the type of structure being built.
Materials presented for construction can be used:
- edged boards of equal width;
- croakers;
- figured wooden elements carved on a machine;
- logs of small diameter.
The height of all pickets does not have to be the same. Elements of varying lengths can create a very aesthetic wave effect at the top of the structure.
To make a palisade, it is recommended to use trunks with a diameter of up to 15 cm. The surface of such trunks should be thoroughly cleared of bark, and the lower part in contact with the ground should be treated with bitumen. The construction of a double-sided wooden fence “Chess” with your own hands is carried out from wide boards of the same width.
The best option is to use pine, spruce, aspen, alder and larch wood.
 Characteristic difference coniferous species trees are highly resinous, successfully resisting high humidity.
Oak and ash tolerate negative external factors well, but such wood cannot be classified as publicly available materials.
High-quality antiseptic treatment of wood with special solutions such as “Biosept” and “Novotex” requires special attention.
Wood for building a fence must be well dried, since drying under natural conditions often becomes the main cause of deformation, warping and cracking of elements.
Fencing installation
Regardless of the type of fence being built, the basic installation rules are the same and require phased implementation following events:
- Marking the area for installation using a cord and stakes. The standard distance between support posts is 200-250 cm. When installing ready-made sections, the entire length of the fence is divided into equal intervals.
- Installation of wooden, metal, concrete or brick pillars with depth in accordance with the level of soil freezing. You can use the installation of pillars by driving into the ground, digging or drilling holes, backfilling or full concreting.
- Assembling the frame part with the installation of horizontal joists between the pillars, which will serve as a connecting element and the basis for installing the cladding of the spans. For fixation wooden parts galvanized screws or nails are used for sampling. On iron supports the method can be used bolted connection. Steel jumpers on metal pipes are most often fixed by welding.
- The method of installing spans depends on the chosen fencing design. A standard picket fence is mounted on jumpers with outside. Assembling a double-sided fence involves fixing the front boards, and only then the rear elements are attached. The palisade is fixed on the reverse side, and the horizontal boards are fixed directly on the support posts.
The most critical stage is the installation of spans. To obtain a highly decorative, reliable and durable fencing design, it is necessary to verify each installed element using a building level.
Coating and painting
For reliable protection When erecting a fence against negative external influences, a canopy placed on top is used, and painting activities are also carried out. The visor can be made of thin sheet steel, coated with polymers or other resistant to precipitation materials.
Multicomponent dyes are used for coloring, acrylic paints, impregnations based on natural oils, as well as alkyd, yacht or polyurethane construction varnishes.
Painting can be done with a brush, roller or spray.
Before painting, knots and nicks are removed with sandpaper, and all released resin is cleaned with a spatula.
At making the right choice building material, compliance with installation technology and careful painting, the erected fence will retain its aesthetic and operational characteristics for a long time.
Video on the topic
Do-it-yourself wooden fence: Wood has been and remains a popular material in construction. Owners of private houses use wood to build gazebos, canopies, summer kitchens and other buildings. The environmental friendliness of this material, excellent processing flexibility and sufficient service life make it easy to build a wooden fence with your own hands. The forms of modern wooden fences have a decent appearance and perfectly complement the exterior of the home.
DIY wooden fences. Photos of current options
Wooden fences framing the territories of personal plots may have various shapes. For their construction, timber, edged and unedged boards, logs, planks, as well as twigs and tree branches are used. Fences can be made solid or with gaps, with elements arranged vertically, horizontally, at an angle, in one or two rows, with smooth and wavy edges, as well as with inserts of various patterns.
Stylish wooden fence decorated with climbing plants
The most popular are the following do-it-yourself wooden fence options, photos of which clearly illustrate their design:
- “Ladder” or “Herringbone” - this type of fencing is characterized by the arrangement of horizontal boards between the supports at a certain angle and overlapping. Externally, this design resembles blinds: the space behind the fence is not visible, and slanting gaps allow air and light to pass through;
- “Checkerboard” is a fence in which vertical elements are laid in two rows, shifting them in a checkerboard pattern. In this fence, both sides are front. The fence reliably covers the yard from prying eyes and at the same time has gaps that are noticeable only from a certain angle;

Solid fencing made of edged boards
- "Picket fence" - traditional look fence, where vertical slats are attached to guides with a certain pitch. You can give the fence an attractive look by designing the top edge of the fence in the form of a wave or a zigzag. The popularity is explained by ease of installation and cost-effectiveness;
- “Lattice” is an original type of fencing, consisting of wooden frames, inside of which there is a lattice of slats. Such a fence can be made in one or two rows with different patterns of crossing slats. It has a light and openwork appearance, used as a decorative type of fencing;

Various options for wooden fences
- "Braid" - original design fence, obtained by horizontal or vertical weaving of boards. Building a wicker fence with your own hands is not difficult, the costs are low, and the appearance is quite decent. Wicker fences made of branches or twigs have come into fashion, mainly used for decorative framing of small summer cottages.
This is not a complete list of wooden fences. Many people make fences by combining picket fences and lattice in one design, or combining wood with metal, stone, brick and other materials. You can get an original and inexpensive design by erecting a fence from unedged boards with your own hands. Photos of such structures illustrate the individuality and ingenuity of their manufacturers. 
Traditional fencing painted in bright colors
In order for the design of a self-installed wooden picket fence or other type of fencing to be strong and durable, you should follow some recommendations:
- support posts must be mounted using special shoes to expand the supporting area, which will ensure structural rigidity;
- vertical posts should be placed in increments of 2.5-3 m;

Examples of wooden fence designs, their installation dimensions
- the vertical and horizontal of the mounted fencing elements must be checked with a building level;
- wood processing antiseptic compounds must be done before installing the fence. When the structure is assembled, some places will become inaccessible for treatment, and therefore vulnerable to pests;
- The wooden fence should be protected from exposure to precipitation and sunlight. Remember that you need to paint a wooden surface after thoroughly drying the material;

Original fence around the territory of a country house
- It is not recommended to use oil-based paints and varnishes for painting wooden fences: under the influence of natural factors, such coatings peel off and crumble;
- to fix elements, it is advisable to use galvanized fasteners that are less susceptible to corrosion;
- Make sure that when using screws and nails, they do not damage the structure of the wood.
By following these recommendations, you can avoid common mistakes when installing a wooden fence at your dacha with your own hands. Photo self-construction wooden fencing, large quantities found on the Internet, demonstrate various stages of work.

Decorative wooden fence decorating the garden
DIY wicker fence. Photos of rustic fencing
Recently they have become popular decorative fences made of wood with your own hands. Photos of such fences show that their main purpose is not protection, but symbolic stylized framing and decoration personal plot or a small zone of it. Wicker fences are quite easy to build. Having studied step by step instructions, you can find out how to make a wicker fence with your own hands.

A wicker fence looks unusual and original
Types of wicker fences
Depending on the height, method of weaving and purpose, wicker fences can be divided into several groups:
- up to 1 m high - low fences with horizontal weaving. They are installed to frame flower beds, large tree trunks, wells, and also to mark paths;
- from 1 m to 1.5 m high - horizontal or vertical weaving is used in such a fence. They serve to delimit the territory into separate zones, for example, they can be used to separate a recreation area from vegetable beds or allocate garden space;

A hedge with horizontal weaving frames a flower bed
- up to 2 m high - can serve as protective fence and are installed along the outer perimeter of the plot. Both horizontal and vertical weaving can also be used here.
Helpful advice! To ensure that the wattle fence lasts as long as possible, choose hazel or vine for its manufacture. Such a fence will last more than 10 years.
Careful treatment of the raw materials with an antiseptic solution will help extend the service life of a wicker fence made by yourself from branches.

Types of trees for weaving a vine fence
Preparation of materials and tools
To build a wicker fence with your own hands you will need:
- metal or wooden stakes;
- willow vine stems;
- sledgehammer;
- pruning shears, knife, wire.
The twigs are collected in spring or autumn, choosing the straightest branches possible. After collection, the shoots must be dried and collected in bunches for storage. Before constructing the fence (15 minutes before weaving), to make the rods flexible, they are thoroughly soaked or steamed. After laying, the woven branches dry and acquire a strong structure.

Strawberry bushes are planted in a flowerbed with a fence made of twigs
Wooden or metal stakes are prepared for the frame. To prevent the supports installed in the ground from rotting, prepare a trench around the perimeter of the future fence and fill its bottom with sand. Thanks to this, moisture will drain and quickly pass through the sandy base into the ground.
Helpful advice! To give the structure of a wicker fence strength, it is recommended to deepen the support stakes by at least 0.5 m.

For the frame of a wicker fence, you need to prepare wooden or metal stakes
Frame construction and fence weaving
The fence frame is made of stakes located at a distance of 50 cm from each other. It is this distance that will facilitate comfortable weaving of the vine. At the end of the fence line, the installation of wooden fence posts is carried out in smaller increments. This allows you to properly fix the ends of the braided rods. If future design will have a height of more than 1 m, instead of wooden stakes use metal rods. They are pre-painted in a color that imitates wood. Such a frame will be more rigid and also more resistant to the effects of a moist environment in the soil.

Fencing with vertical arrangement twigs
If horizontal weaving is chosen, it starts from the bottom row and ends at the top. The support pillars are wrapped with vines in a figure eight shape. To ensure that the fence does not skew, it is necessary to have the upper ends wooden supports nail to a flat strip, which is removed before weaving the last row. To give the fence an aesthetic appearance, you need to make sure that the ends of the branches are located on the back side of the fence.

Various methods of weaving a vine fence
In order for a fence made of twigs to be strong, it is necessary to tie the ends of the twigs together with wire. The protruding ends are cut off with a knife or pruning shears, and the remaining parts of the rods of the last row are tucked along the support posts. For a more natural look, the fence uses rods of different lengths, thereby masking the joints.

Fencing in rustic style made from twigs
Making a fence from boards with your own hands: photos, construction stages
You can build a wooden fence with your own hands using a board with a section size of 15x2.5 cm. The length of the board is selected depending on the height of the planned fence. Traditionally, fences are installed with a height of 1.5 to 2.5 m.
Preparatory work
The first step is to mark the fence line. To do this, small (50-60 cm) stakes are driven around the entire perimeter of the plot in increments of about 2 m. A construction cord is stretched between the pegs. When tying stakes, you must ensure that the cord is sufficiently tensioned and does not sag. Then you will need to prepare boards of the required length.

Modern look of plank fencing
You can cut the boards yourself or order them ready material required length. All boards are sanded on a machine or using a sanding attachment on a drill. The ends of the boards can be left straight or cut in the shape of a semicircle or triangle. By processing an unedged board with your own hands, you can significantly save the cost of building a fence. For the supports, a wooden beam with a section size of 75x75 mm, 50x50 mm is prepared. The number of beams is calculated based on the total perimeter of the site. For guides, boards with a section of 10x2.5 cm are used.

Solid type of fencing with horizontal boards
How to Install Fence Posts
Before installing the support pillars, you need to drill holes to a depth of 0.5-1 m in the places where the stakes are dug. Pits are made using a drill (manual or electric). For vertical posts, timber with a cross section of 75x75 mm is used. Before installing the supports, it is necessary to thoroughly treat the part of the timber that will be in the ground. The treatment is carried out by soaking the lower parts of wooden supports in antiseptic impregnation for 48 hours. After this, the pillars must be thoroughly dried.

Scheme of a wooden fence
Additionally, you can protect a wooden stand from rotting by concreting. The bottom of the pit is covered with a small (1/3 of the depth) layer of sand and crushed stone, watered with water, a beam is installed and filled with concrete mortar. While the concrete has not set, the support is raised slightly to allow the solution to penetrate under the base of the post. Next, using a plumb line or level, the beam is installed vertically. In order to make sure that the height of all vertical supports is the same, it is necessary to hammer a nail into the upper end of each beam and pull the cord tightly between them. The resulting line will show how correctly the height of all supports is selected. Allow at least three days for each support to dry completely.

Unusual wooden fence in the courtyard of a private house
Installation of plank fencing
When all the vertical supports are installed and aligned, begin installing the horizontal guides. They are usually placed 25-30 cm above ground level and distributed at an equidistant distance from each other. For fixation, use nails, the length of which will allow you to pierce the timber and board right through and at the same time 1.5-2 cm will protrude from the back side. These protruding ends are carefully bent along the wooden plane.

DIY installation of edged board fencing
Next, they start covering with boards. Nails or screws are used for fastening. If you wish, you can fasten the boards close to each other or leave some gap. As soon as the fence is finally assembled, the wood is covered with drying oil, allowed to dry thoroughly and painted with a composition that is resistant to impact environment.
Wooden fence “Herringbone”
The “Herringbone” wooden fence is very popular and aesthetically pleasing. To assemble such a structure yourself, you will also need to mark the perimeter line and install vertical supports as described above.

Combined fence made of wood and stone. The boards are arranged in a herringbone pattern
The main feature of the horizontal fencing “Herringbone” is the arrangement of the boards at an angle and overlapping. To achieve such an arrangement, it is necessary to attach wooden linings to the vertical posts (in the form of steps) or use a channel into which you can easily insert a board at a slight angle. In addition, the boards can be placed not only horizontally, but also vertically at an angle. Filling the frame horizontal fence starts from the bottom row. The board is attached to vertical posts and guide beams. Next, the next row of boards is overlapped.
Helpful advice! To obtain a fence with small gaps, as well as to ensure ventilation, cushioning material is laid between the boards.

An example of a “Herringbone” fencing of horizontal type
The end edges of the boards must be carefully aligned. So, row by row is installed and after each run the edges are aligned. Before fastening, it is necessary to treat the boards protective compounds and apply a double coat of paint.
Features of the “Chess” fence
Wooden fencing “Chess” due to the fact that the boards are attached from the front and inside, has a more attractive appearance. Such a fence can also be laid in a horizontal or vertical direction. The position of the guide beams also depends on this. The distance between the boards is chosen independently and the fence can have small gaps or be continuous.

In the “Checkerboard” fence, small gaps are allowed between the boards, or the fence can be continuous
After installing all vertical supports, fix the guide beams. For ease of installation, grooves for crossbars are provided in the support pillars. If used metal supports, corners are welded to them, on which the beams are placed. To obtain an accurate checkerboard arrangement of the boards, you must first mark the attachment points for each board. Such markings will allow you to obtain flawless filling of the fencing section, eliminating the possibility of the formation of various gaps between the boards.

This type of fencing can be made in a horizontal or vertical direction
A chessboard fence made from horizontally or vertically laid unedged boards looks quite original. By following simple recommendations and expert advice, you can assemble a beautiful and strong fence made of wood, which will serve as a fence for over 10-15 years.
Since ancient times, fences have been built in Rus'. They were mostly wooden. With the advent of new technologies, materials such as metal, reinforced concrete, polycarbonate, corrugated sheeting, brick are increasingly crowding out the aesthetic, but not so durable wooden fence from our lives. Those who prefer environmentally friendly materials, create a rustic design on their site or already have wooden house, chooses a wooden fence. In addition, if you study the issue in detail, you will see how diverse wooden fences are. They can be one of the most impressive elements in your garden design.
Types of wooden fences

By wooden fence we often mean an ordinary picket fence, to which we have long been accustomed and which was quite common in Soviet times. Over time, the situation has changed radically and now wooden fences are herringbone, cross-country, chess, and lattice. And an ordinary wooden picket fence looks great equipped with brick pillars.

Classic wooden fence

Pipes are installed along the perimeter of the site and concreted into the ground. Between the pillars, veins or purlins are attached, made of timber measuring 50X100 mm or so. Fence boards are nailed perpendicular to the veins either joint to joint or at a short distance from each other.
Wooden fence with ladder or herringbone pattern

Similar to a classic fence, pillars are concreted into the ground. On their internal and outside decorative wooden overlays are attached. They will become guides for the remaining boards. Boards measuring 25x100mm are laid in the grooves between the overlays - horizontally overlapping. If you use calibrated pads, you can create a ventilated fence. And additional thin vertical metal stakes allow you to create another type of such fence.
The fence columns are covered with wooden decorative covers.
Fence "Cross"

It is possible to combine a wooden fence with reinforced concrete by constructing a “Cross” fence. The same 60X80 mm columns are installed in concrete-filled holes in the ground. The pillars are equipped with grooves into which decorative elements are first installed. reinforced concrete slabs(their approximate size is 300x300x550), and then wooden blocks. Both the columns and the fence sheet are covered with decorative covers to prevent moisture from entering the structure.
Checkerboard fence with clearance

Veins are laid between the pillars. Boards are attached to them in a checkerboard pattern - first on one side, then on the other. If you look from the side, the fence turns out to be not “solid”, but with gaps.
Fence "Lattice"

The base and supporting elements for this type of fence are similar - pillars. Between them, ready-made lattice sections made from slats are installed. The slats can be positioned either parallel or perpendicular to the posts, or diagonally. Such a fence is illuminated, allows the sun to pass through, and does not enclose the space. Its function is more decorative.
Fence "Rancho"

This is a barrier when on heavy wooden poles mounted horizontally with small gaps 2-4 wide boards. If you take well-processed thin boards and a little more of them, you can build a beautiful fence for a wooden house.
Fence "Palisade"
Treated, smooth, not too large in diameter logs are installed vertically to each other.
If you install the pillars and the entire structure on the foundation, this will protect the lower part from interaction with the ground and moisture, and, therefore, will significantly extend the life of the fence. Can be used as fence supports metal pipes, concreted into the ground, pillars made of stone or brick, ready-made reinforced concrete pillars or wooden logs.
Materials for building a fence
The cost of a wooden fence depends on its type and what material will be chosen: boards, pickets, beams, logs (for a picket fence). You will also need the following materials: crossbars (wooden or metal), support pillars, reinforcement for formwork, cement, sand, brick and stones for erecting pillars, nails and screws, fire retardant and antiseptic impregnation for wooden surfaces, bitumen or creazote for treating wooden poles installed in a support or strip foundation.
Tools
To build a fence, stock up on the following tools:
- drill or shovel
- roulette
- stakes
- level
- screwdriver
- hammer
- jigsaw
- brush
- sandpaper
How to make a wooden fence?
Before you make a wooden fence with your own hands, you need to decide on its design and how much of a major construction is planned. For a fence with a foundation, the sequence of actions will be as follows:
- marking;
- foundation construction;
- installation of poles;
- fastening wooden elements;
- processing of wooden surfaces.
Marking
Marking for the future fence is carried out using a tape measure and rope. We determine the location for the placement of the wicket and gate. We install them in poles in the corners of the site. We tighten the lacing between them so as not to deviate from the given line when determining the locations for the pillars.
Foundation

The most labor-intensive part of building a wooden fence with your own hands is pouring strip foundation. Under a light wooden fence, the foundation is not particularly deepened. To do this, dig a trench (depth up to 1 meter, width - 30-80 cm), deep into which a sand cushion is poured. Next, reinforcement is knitted, formwork is created, pillars are leveled and the foundation is poured. He might be like zero level, and higher - 30-50 cm above ground level. After it hardens (after 2-3 days), further work begins.

Installation of pillars

The more often the posts are placed, the stronger the fence will be. The pillars are installed during the process of pouring concrete into the foundation. The distance between them is about 2 m. The fewer pillars, the more crossbars there should be. If a foundation is not planned, then in the places designated for placing the pillars, dig holes 1-1.5 m deep, pour sand (20 cm) into them and water it abundantly with water. Next, using a level, install the pillars in them and fill the recesses with concrete.


Regular foundation for a fence

Foundation using stones
If the post is made of wood, then its lower edge is treated with bitumen or creosote to protect the wood from moisture and rotting.
If brick racks are planned instead of pillars, then space must be provided for them. After all, they will occupy square areas with a side of 1.5 bricks. To decorate the counter at the very bottom and at the top, the masonry is expanded by a quarter of a brick. During the laying process, cross members are installed in the racks. It is important to use a level to check whether the stand is laid evenly.

Fence installation
Next comes the installation of a wooden fence. Slats and boards are attached either to the crossbars or installed in grooves - depending on the selected type of fence. A simpler option is to install sections. If the pillars are wooden, then grooves are made in them to lay the crossbars; if the pillars are metal, then fasteners (corner) are welded to them, to which the legs will then be attached.
How to extend the life of a fence?
In order for a wooden fence to last a long time, wooden elements you need to cover it with antiseptic solutions and fire retardants, and only then with paint (use oil-based and water-soluble), stain, and varnish. Impregnations are applied even before the fence is installed. Fire-retardant impregnations will prevent fire, and antiseptics will protect the wood from the colonization of microorganisms and subsequent rotting. They extend the life of the fence to 30 years, protect the wood from the sun and dampness, and preserve the natural texture and beautiful appearance.
Galvanized fasteners are suitable. Before driving a nail, it is immersed in drying oil.
In the future, periodically, at least once every 2-3 years, the wooden fence must be treated with protective impregnations.
Original do-it-yourself wooden fences - photo:


A metal picket fence is an original, reliable and durable fence. The metal picket fence differs more spectacular design. Euro picket fences are an excellent choice at an affordable price.
Recently, the fashion for wooden fences has returned. Aesthetic and pleasing to the eye, they also have significant drawbacks, the main of which are poor strength and durability. However, the number of installed wooden structures growing from year to year. One of the most attractive and unusual types is the herringbone wooden fence.
Fence "Herringbone" or in other words - ladder
Peculiarities
The Christmas tree refers to horizontal type fences, that is, the boards are laid parallel to the surface of the ground. It got its name for an obvious reason: in profile it resembles a Christmas tree from a child’s drawing. It also resembles siding in appearance.
Thanks to this arrangement of the boards, a continuous coating is formed. This leads to some striking features:
- It is almost impossible to climb up such a fence (unless, of course, you put up a ladder), so any unwanted persons will not get onto your site.
- Provides protection from flying dust, noise and exhaust gases. This is especially useful for those whose Vacation home is located near the road.
- You don’t have to be afraid that someone’s prying eye will decide to spy on you through the fence.
As already mentioned, wooden fences cannot boast of durability. However, the “herringbone” usually has a special visor at the top, which protects all the most vulnerable elements of the structure, allowing you to significantly extend its service life. The plinth located at the bottom also adds strength and stability.
Fence sections, compared to other types of fencing, have a rather unusual shape, which resembles steps from the front. This effect is achieved due to the special method of fastening the boards at an angle.
 Cross-section of herringbone fence + gaps need to be made
 Advantages and disadvantages
It would be logical to start with the advantages, since there are quite a few of them along the ladder fence:
- The structure is almost completely protected from rotting and dampness (especially if it is covered with special paint). This is explained simply: horizontally and overlapping boards prevent snow, water and other precipitation from accumulating on the fence.
- As noted, a wood fence is very similar to siding. Thanks to this similarity, he becomes an excellent replacement real siding. In addition, the “Christmas tree” is also much more environmentally friendly.
- Good protection from noise and dust flying from the road.
If we talk about the disadvantages, we can highlight only two: fragility and complex installation. Although with the latter everything is relative. You can purchase ready-made sections for the fence at the manufacturer's factory. Installation in this case will not take much time. Making such a wooden fence with your own hands is a task for experienced people.
A little about installation
Before you start purchasing or making a wooden fence, you need to determine the type of board that will be used in the fence. It is customary to distinguish 4 types:
- Planed. A classic universal option that looks equally good on any suburban area.
- Aged. Gives your garden the atmosphere of an old manor's park. Great option for lovers of bright and original ideas.
- Uncircumcised. Outwardly it is similar to a croaker (a part of a log, one surface of which is singed, the other is not), the difference lies only in the processed edges.
- Decorative. The treated sides give the wood a neat and impressive appearance.
Having chosen the appropriate type of board for yourself, you can start purchasing necessary materials. Standard set as follows:
- Steel pipes (profile 60×60 mm, for lintels - 60×20 mm).
- Boards (the optimal size is 25x120 mm).
- Various tools needed for construction (level, tape measure, etc.).
- Paints and solutions for wood processing.
Processing a wooden fence
Snow, rain, dampness, fungus, temperature fluctuations - factors have a detrimental effect on the quality of wooden structures, destroying them and rendering them unusable. And although the wooden herringbone fence is partly protected from precipitation thanks to the canopy, even it needs to be treated.
Maintenance should begin immediately after installation. Such forethought will help reduce costs and effort in the future. All work is recommended to be carried out in non-sunny, but relatively warm weather. Most often, wood is first coated with a primer and then painted. Standard work plan:
- Treat the wood to make it as smooth and even as possible. Use sandpaper and a sponge, which will help remove dirt and (if you're dealing with an old fence) paint residue.
- If there are cracks on the boards, they can only be eliminated using a special primer. After hardening, immediately putty the surface. Then, if desired, you can sand it a second time, so the wood texture will be more saturated.
- After a day, treat the entire surface of the fence with a primer, paying attention Special attention ends. When choosing a primer, give preference to those that contain linseed oil, as it provides deep penetration.
- Now you can start painting. When choosing a coloring agent, you need to check its compatibility with the type of primer. Here you will have to seek help from a specialist.
However, even after carrying out the above work, insects and pests pose a serious danger to the Christmas tree fence. For protection, special compounds are used - antiseptics. They are available in paste, oil, organic and aqueous solutions. But people often use another, simplest method - treatment with a salt solution. True, the salt is washed off quite quickly, so the protection turns out to be ineffective.
A Christmas tree is not a New Year's fence
Lately, a huge number of new building materials, but classic - wooden picket fences– always remain relevant. They fit into almost any style of site, and they are easy to repair and install. Externally attractive, such fences differ in the choice of finishes, patterns and variety of designs. Wooden structures, if you look at photographs and pictures, can be made in the most unusual options: picket fence, trellis, wicker fence, checkerboard, etc. In combined designs, wood will enhance any fence, adding natural beauty to it.
Features of the “Herringbone” fence
It is not always possible to install ventilated and decorative fencing. For example, if your house is located near a road, you will refuse fences with gaps in favor of a blind fence, so it will be for you important protection your building from road dust, automobile gases and noise. A wooden herringbone fence has such functions, which can be used as a fence for a small country house, and also as a fence in modern cottage, finished with siding panels. Externally, herringbone resembles siding and is an option for double-sided face fencing.
You can see a typical herringbone fence in the photo:

The herringbone fence sections have a non-standard design: fastening the boards with lintels in a horizontal position, overlapping and at an angle, makes the pattern of the wooden panel look like steps.
Sections for the herringbone picket fence can be purchased at the manufacturer's factory (photo).

If you want to install a herringbone fence with your own hands, then the sections can also be made independently by connecting such “blinds” in your own way.
Fencing installation
A set of one section of the “Herringbone” fence may include 13 wood panels size 140x20 millimeters, 2 special jumpers made of wooden beam cross section 40x60 mm.
The columns are selected to match the main structure and can be made of various materials: wood, metal, brick. Most often, the support system is made using steel profile pipe section 60x60mm.
There is no particular preference in the height of the fence and the width of the board. But such a fence is good because it looks great on both sides. To manufacture such structures, horizontal picket fence boards with a width of 140 mm and a thickness of 20 mm are taken. The boards are installed one above the other with a slight slope. The canvas for the flights in the form of a ladder is continuous. If you need to make a ladder fence more attractive, then the metal posts are also sheathed with wooden materials.
The process of assembling the fence is shown in the video:
Sometimes wooden panels are laid horizontally, and special gaskets are installed between them. This addition makes the structure ventilated. To complete the structure and to protect it from precipitation, a wooden cornice strip is often installed over the edge of the spans. This makes the hedge even more interesting.

This is what an unedged board looks like
A herringbone fence can be made from several types of boards for construction:
- Unedged - resembles a slab, but its side edges are not sawn off or are partially sawn off. This option is shown in the photo on the right.
- Planed fence - suitable for all fences.
- Decorative fence - looks impressive with processed edges and ends.
- Aged - has original decor.
A beautiful wooden structure is often exposed to weather changes and environmental influences. Precipitation in the form of rain, insects, mold, and rot can ruin the life of your fencing structure.
When installing a ladder fence with your own hands, you should think about protecting your fence, for example, using various wood antiseptics. A picket fence covered with paints and varnishes turns out to be interesting.