Sharpening knives: theory and rules, making sharpeners with your own hands for various purposes. Let's not be stupid! Devices for sharpening knives that will free you from men's work Device for manual sharpening of knives
A DIY knife sharpener will be very useful in the household.
With the help of fairly simple ones, you can carefully and safely sharpen cutting tools, which is simply necessary in the kitchen, fishermen and hunters, and in the workshop.
Of course, sharpeners in wide range are offered in stores, but homemade devices will save you from unnecessary costs.
A dull knife is a torment for a housewife when she slices bread, cooks food, or cuts meat. Cutting with them is not only difficult, but also dangerous, because... exactly blunt instruments are more likely to cause injuries. There is no point in proving the need for a sharp blade for a fisherman, hunter, shoemaker, etc. It is absolutely clear to everyone that a knife requires periodic sharpening. Another thing is how to provide it.
Many people use tools such as abrasive stones, emery wheels and sandpaper, files. Most often, abrasive or grinding stones are purchased for these purposes, and the procedure itself is carried out “by eye.” After such sharpening, the knife becomes sharp, but also dulls quite quickly.
Why is this happening? The knife blade is made of various steels, has different thicknesses and sharpening parameters. The process of high-quality sharpening should completely restore the shape of the blade, and only in this case will its sharpness meet the planned standards.
Ensuring uniform sharpening without fixing the position and guide elements is very difficult even for professionals. The task is much easier when using special devices that allow you to stabilize the processing mode (loads, directions, speed).
To mechanize rather labor-intensive work, it is better to use appropriate sharpening machines. Both devices and machines can be made with your own hands.

Basic principles of sharpening
When properly sharpening a knife, the basic condition must be met: forming a sharp edge of the blade while maintaining its shape, which is ensured by removing metal at a certain angle.
Turning is carried out with an abrasive material that has different grain sizes. Its choice is determined by the strength characteristics of the steel. Proper sharpening implies a certain order of work.
Sharpening angle
The effectiveness and quality of the event under consideration is limited by a fundamental parameter - the sharpening angle. Depending on their purpose, knives have the following meanings:
- have the smallest angle straight razors– (7-11)°;
- fillet knives – (11-14)°;
- kitchen knives for most products, incl. bread, vegetables, meat, etc. – (16-21)°;
- hunting tools and knives for general technical purposes – (21-26)°;
- universal hunting knives – (21-40)°;
- a special tool that is used for cutting and chopping (for example, a machete) – (29-50)°.
The sharpening angle largely determines the thickness of the blade. At the smallest angles it should resemble a razor, and at large angles the possibility of manufacturing extra-strong, massive knives is created.
Important. Holding the abrasive element and the knife itself in your hands, it is very difficult to ensure a given angle along the entire length of the blade, which leads to uneven manual sharpening.
The main task of the device is rigid fixation one of the elements and a clear direction of movement of the second element.
Types and choice of abrasive
To sharpen knives you need abrasive stone, which will ensure the necessary cutting of metal. The abrasive ability is provided by a certain surface grain size, i.e. the number of abrasive grains per unit area. According to this parameter, the following stones are distinguished:
- very coarse abrasives ( international classification– extra coarse) – have a grain size of less than 260;
- coarse abrasives – 310-360;
- medium abrasives – 390-510;
- fine abrasives – 590-720. This is the main category of sharpening stones used for cutting knives;
- very fine (ultra, extra fine) or grinding abrasives. They are used for sharpening razors and fine surface finishing of knife blades.
According to the nature of their origin, abrasive stones are divided into natural or natural(corundum, slates) and artificial (ceramics, artificial diamond). In addition, rubber elements are sometimes used for fine processing. When using abrasives, their surface moistened with water or soap-water solution(water instrument) and oil(oil stones).
The shape of abrasives can be round (discs) or rectangular (bars). The bars are most often used, and they are selected so that length significantly exceeded the length of the knife blade.
To fully sharpen the tool, it is recommended to have 2 bars of medium and fine grain. It is better to complement the set with a very small stone. The best option It is considered the use of double-sided bars, in which one side has a medium grain, and the opposite has a fine grain.

Manual sharpening procedure
Any devices are designed to facilitate work and improve its quality, and general order manual sharpening remains the same:
- The process begins with a coarse or medium-grained bar, which is laid on a plane. It is advisable to ensure its fixation.
- The knife blade is brought to the abrasive surface at an angle, equal to half sharpening angle. The main task is to ensure a constant angle throughout the event.
- With a smooth movement with light pressure, the blade moves from the beginning to the end of the block in the direction “away from you.” The edge of the bar must always be perpendicular to the direction of movement of the blade. Do not allow the blade to break off at the end of the stone.
- After reaching the edge of the bar, movement is carried out in the opposite direction, while the sharp edge must always be on the surface of the abrasive. Changing direction is achieved by turning the handle.
- The process is repeated until a burr along the entire length appears on the back of the blade tip. It should move to the opposite side when changing direction.
- Next, take a medium-grained block, but with smaller grains. Sharpening continues, but the movements are carried out initially only “from oneself” until the metal shines on one side, and then the second side is also processed.
- A fine-grained block is taken and the blade is processed until a mirror surface appears.
- If a small burr remains, sharpening is completed by using a very fine grit sanding block. Some experienced people prefer to use instead of such a block leather belt. It polishes the knife blade perfectly.
Homemade devices
Home craftsmen make sharpening devices various designs, but they all include 2 main elements - abrasive stone and knife fastening mechanism. A ready-made abrasive block is best suited for the device, but you can also make it yourself.
To do this, sandpaper of different grain sizes is glued to glass with a thickness of at least 4 mm. The connection can be ensured with double-sided tape.
Fixed fixture
One of the most simple devices done from 2 wooden blocks of triangular shape. They are fastened together with thumbscrews. An abrasive block is clamped between the wooden elements at the desired angle. This angle is set strictly according to the protractor.
When sharpening a knife on such a device, the blade must be constantly held strictly vertical. Naturally, ensuring such a direction is much easier than constantly guiding the knife at an angle.
Movable structure
To improve the quality of sharpening, it is necessary to fix not only the abrasive, but also the knife. You can also make such a device yourself. It is assembled on a flat, horizontal, massive surface. The device consists of 2 parts - rigidly fixed abrasive stone at the desired angle(similar to a fixed structure) and trolleys on wheels(on rollers) with a knife fixed horizontally.
The trolley moves manually along a guide rail. Provided by hand light pressure on the blade to the abrasive surface. This ensures the desired sharpening angle and eliminates the need to provide the desired direction manually.
Direction changes can be made different ways. The simplest one is to make a cart with wheels at the top and bottom. When the bar ends, the cart simply turns over.
Dot machine
Sharpening machines have more complex design, which allows you to change the sharpening angle. There are several options for a constructive solution:
- A knife is fixed on the platform with the possibility of adjustment. It is adjusted to the required angle and fixed permanently. The abrasive bar is installed on a movable rod mounted on a vertical support. It moves strictly horizontally. Sharpening is achieved by moving the abrasive relative to the knife blade.
- It is fixed on a fixed frame, but the block can be moved along the guide to set the desired sharpening angle. The knife is installed in a movable table, and is secured with a magnetic holder, which makes it possible to turn it over.

DIY example
An example is the technology self-made sharpening accessory - analogue Lansky sharpeners. It has a standard design.
The knife is fixed on a horizontal base, and its fastening is ensured by magnet. The sanding element is located on a rod along which it can move perpendicular to the knife. The guide rod is installed in the holes of the vertical post.
These holes are drilled at an angle to the surface of the post and thus set a certain angle for the rod. Several holes are drilled vertically in the rack and by moving the guide you can also change the sharpening angle.
Manufacturing adaptations are carried out in the following order:
- On the base plate (, board, a metal sheet) on the edge slats are installed, limiting the displacement of the knife in the transverse direction. One of them is mounted in slots with thumbscrews for fixing knives with different blade widths. In the center of the knife location area is fixed magnet.
- The emery block is secured on two pieces of corner, which are fastened with pins. Holes are drilled on both sides of this part for installation on the rod.
- Steel rod with a diameter of 10-15 mm is passed through the indicated holes, and is installed at the end limiter to prevent the block from falling. The other end is cut thread.
- On an aluminum U-shaped profile 30-50 mm wide, 5-6 holes are drilled with a diameter 1-2 mm larger than the diameter of the rod. The holes are drilled at an angle corresponding to the sharpening angles, taking into account the height of the location on the rack.
- The rod is installed in the correct hole and fixed bolts.
This device works in the following way:
- the knife is fixed on the base and attracted by a magnet;
- a block of the required grain size is installed on the sharpening element;
- the rod is fixed in the desired hole on the stand;
- by hand, the block moves along the rod, processing the blade, and the movement is carried out “from oneself” and “towards oneself”;
- with the other hand, the knife gradually moves in the longitudinal direction.
See detailed drawings, descriptions and illustrations of a knife sharpener with and without a magnetic holder in the video below:
Scissor sharpener
With the help of knife tools you can also sharpen scissors, but such an undertaking has its own specifics. The sharpening angle is within (60-74)°. Tailor's scissors usually have an angle of (72-74)°. The cutting part at the point of contact of both parts is flat, and the bevel is made on one side. Main sharpening carried out from the outer, beveled side. Inner surface Only sanded with a fine stone.
The process is carried out in this order:
- Disassembling scissors. To do this, you need to unscrew the screw holding the halves together and carefully separate them. A negative screwdriver is used.
- Using coarse abrasive, it is carried out sharpening at the right angle. Movements are made only in one direction - “towards yourself”. Half of the scissors is held by the ring, and turning begins from the tip of the blade.
- Using small block, is carried out fine-tuning.
Some scissors cannot be disassembled. They can also be sharpened, for which they open up as much as possible. The halves are sharpened one by one.
How to check the sharpness?
There are several popular methods for checking the quality of knife sharpening:
- Paper. Take a sheet of paper (for example, for a printer) and cut off a strip at the edge. If the knife is well soaked, the strip is easily cut and has smooth edges. A dull knife crushes the edge and cuts unevenly, with tatters.
- Tomato. A sharp knife cuts a tomato in half evenly, while a dull knife crushes it.
- Hairs on the arm. A sharp blade works like a razor and cuts hairs, while a dull tool only crushes them.
- Sharpness can be checked finger, remaining cautious. The presence of burrs indicates poor quality processing. Absolutely straight edges indicate high-quality work.

Knives tend to become dull, making them difficult to use. Sharpening devices and machines will help solve the problem by ensuring the correct sharpening of the blade, restoring the specified angle. There are many designs of simple knife blades, and the owner must decide which one to choose.
The service life of any knife directly depends on the methods of its operation and the procedure for sharpening the blade. Devices for sharpening knives are so diverse that they allow to modern man do not resort to the work of specialists, but do all the work yourself at home. You can use a special tool to sharpen knives. industrial production, as well as any device manufactured with my own hands. It is important to know that simple elements for sharpening knives (for example, a whetstone), which are at hand, can do a bad job and the sharpness of the product will not only not return, but gradually the product will completely become unusable. Moreover, any homemade device for sharpening knives can be based on the use of these simple sharpening devices. Details on how to make your own sharpener can be found below.
A homemade manual machine for sharpening knives, provided that all the requirements for its creation are met, will simplify the sharpening of knives and its performance will be no worse than that of a professional. Correct sharpening includes the following rule: each type of cutting product has a certain edge sharpening angle, which must be constant along the entire length of the blade (see table No. 1). A sharpening device that will initially be based on this principle will give the craftsman a sharp knife edge for a long time.
Table No. 1. Sharpening angle in parallel with the type of cutting device
When sharpening the edges should be processed evenly. To fulfill this condition, the following rules must be observed:
- the blade must be fixed in the vice of the device reliably and efficiently, without exposing the metal of the blade to damage;
- the movement of the whetstone along the axis of the knife edge must be uniform and strictly at a certain angle;
- the point of contact of the blade must be strictly perpendicular to the longitudinal axis of the sharpening device;
- the pressure on the knife blade should change smoothly depending on the change in the area of contact between the blade and the sharpener.
A simple device for sharpening knives
The simplest device for sharpening knives is based on the use of an angular frame and a whetstone. The price of such a primitive factory-made device is quite high, as is the price of replaceable whetstones, but making such a device for sharpening knives at home will not be difficult for a craftsman. You will need the following equipment:
- Wooden blocks of the same size - 4 pcs.
- Drill (or any other drilling tool).
- Bolts and nuts (about 4 pieces each).
- Touchstone.
- Protractor.
First you need to make a pair wooden corners, placing the bars to each other strictly at an angle of 90º (Fig. 1). Close the resulting wooden corners together parallel to each other as a single whole and drill holes through the diameter of the bolts. Insert bolts into the holes and tighten the corners slightly with nuts.
The point of this invention is that it is possible to sharpen simply by holding the knife vertically in relation to the sharpening surface located at a given angle.
The most important thing is to properly secure the whetstone between the wooden corners of the device. To do this, using a protractor, you need to set the desired angle of inclination of the touchstone and tighten the bolts tightly to clearly fix the position of the touchstone.
With some modification of the device, you can also fix the position of the knife relative to the sharpening stone. A significant disadvantage of such a machine for manual sharpening is the inability to smoothly adjust the angle of inclination of the sharpening stone.
Device for sharpening from mounting angles
The diagram and drawings of a homemade knife sharpener made from mounting angles, based on a Lansky device, are clearly shown below.
To assemble this device you will need:
- Metal corners 90*90 mm with a wall thickness of 6 mm.
- Stud with M6 thread and length 160 mm.
- Thin rod (electrode, knitting needle, etc.).
- Touchstone.
- 2 rectangular pieces of metal (sponges for clamping the whetstone).
- Pliers.
- Hacksaw for metal.
- File (or any other tool for processing sharp corners).
- Set of hardware (nuts and bolts).
In both metal jaws, intended for fixing the keystone, you need to drill for a connecting bolt. Fix the touchstone. A thin smooth knitting needle, previously bent at an angle of 90º, must be inserted and secured in the hole of one of the jaws. In the future, using this knitting needle-shaped clamp, a certain angle of inclination of the touchstone will be set. Such a device for sharpening knives is characterized by a wide range of sharpening angles, which will undoubtedly be of interest to most craftsmen.
Locking blade machines
Knife sharpening machines with locking blades will attract the attention of those people who want to sharpen a knife not only efficiently, but also quickly. The design, which rigidly fixes the knife blade relative to the sharpening stone moving at a set angle, allows you to accurately set the angle of inclination.
To create something like this homemade machine with your own hands you will need:
- The base is a rectangular wooden plate with dimensions 440*92 mm and a thickness of 18 mm.
- Wooden die 92*45*45 mm (for fixing the vertical threaded rod).
- A wooden block 245*92 mm and 18 mm thick (the plate to which the knife will be attached).
- Iron plate 200*65 mm and metal thickness 4 mm.
- Piano hinge, 92 mm long.
- M8 hairpin 325 mm long.
- Nuts and bolts with M8 thread.
- Drill 6.5 mm.
- M8 tap.
- Self-tapping screws 50 mm, 4 pcs.
The die intended for fixing the vertical threaded rod must be drilled through with a 6.5 mm drill. The hole should be located at a distance of 15 mm from the edge of the die, approximately in the center.
Next, in the resulting hole you need to cut a thread for an M8 stud. The wooden block prepared in this way must be screwed to the base at a distance of 265 mm from the edge using ordinary self-tapping screws 50 mm long, screwed into the back of the base.
After securing the wooden part of the holding device, you can begin to attach the iron plate. In the center of the 200*65 mm plate, you need to drill an oblong groove, 90 mm long and about 1 cm wide. The groove should be located from the edge of the clamping plate at a distance of 60 mm. Additionally, you need to drill a hole at a distance of 20 mm from the opposite edge and cut a thread in it for an M8 bolt. Then you need to attach the clamping plate to the previously prepared wooden base using this bolt. Using another bolt and a suitable washer, you need to fix the clamping plate in the center of the cut groove. The fixation should be clear, but at the same time neat, so as not to damage the surface of the blade.
The most the hard part Assembling this device consists of preparing a control device that will set the sharpening angle of the knife. For this you will need:
- metal square profile 40×40 mm;
- furniture bracket, 40 mm wide;
- a pair of rivets;
- a piece of plywood 42×25 and 18 mm thick;
- bolt and nut M5;
- a pair of M8 wing nuts;
- whetstone;
- steel bar with a diameter of 0.8 cm and a length of 40 cm.
It is necessary to drill a couple of holes on a piece of plywood: a through hole with a diameter of 8 mm along a cross-section of 42×18 mm (the distance from the edge on the 42 mm side should be set at 15 mm) and a through hole with a diameter of 5 mm along the side with a cross-section of 42×25 mm (the distance from edges 10 mm). The square pipe should be cut in half so that you get a “U”-shaped bracket with a width of 40 * 15 mm and ears of 20 mm. You need to drill 8 mm holes in the ears, into which an M8 pin will later be inserted. Connect the resulting bracket with furniture hinge using rivets. Using the second part of the furniture bracket, attach a block of plywood to the resulting structure with an M5 bolt.
Connect the touchstone to a guide rod, which is a steel rod with a cross-section of 8 mm. When connecting the keystone and the guide rod, you should strictly ensure that their center lines coincide. If desired, for ease of use of the sharpener, a handle-holder can be attached to the whetstone on the reverse side. All that remains is to secure the whetstone in the guide mechanism, secure it with a thumb and the homemade device for sharpening knives is ready.
Machines with fixed sharpening surfaces
Machines with fixed sharpened surfaces are a simple modification of the device for processing household knives. IN similar device There is no possibility of adjusting the sharpening angle, but you can pre-set several different angles for sharpening different types of knives. The work of sharpening blades using such machines is not difficult; you just need to move the blade along the abrasive surfaces in the recess.
The device consists of a pair of planes inclined to each other at a certain angle, one of which is a grindstone.
Electric knife sharpeners
The procedure for creating an electric sharpening machine is simple: it is enough to equip almost any device for sharpening knives and scissors with an electric drive. Such a sharpening machine allows you to quickly and efficiently sharpen the product and at the same time provides a better concave shelf at the edge of the blade.
The mechanism of an electric sharpener for sharpening knives contains a guide, which is located along the axis of rotation of the sharpening stone, and with the help of which the blade is adjusted at a given angle. The sharpening angle is set and set by the guide, and the clamping force is determined by the master.
Particular attention must be paid to the speed of sharpening, because... The electric drive allows you to sharpen the product at high speed, as a result of which the surface of the knife heats up. Such surface heating leads to tempering of the hardened steel, as a result of which the knife can quickly lose its hardness and its service life will be noticeably reduced. To prevent tempering of the steel, sharpening should be done on a high-speed electric sharpener in short periods of time and with sufficient breaks to allow the knife to cool.
Making sharpening stones
It will not be difficult for a modern craftsman to make sharpening stones with his own hands. For this you will need:
- a wooden die to the size of the future sharpener;
- epoxy resin;
- cardboard boxes according to the size of the block;
- abrasive;
- protective rubber gloves.
You can use ready-made powder as an abrasive, or you can prepare your own abrasive, for example, from an old block Green colour still of Soviet production. Such a block can be ground into powder and used in the future as an abrasive.
The wooden die needs to be treated on one side with sandpaper and frequent cuts must be made with a saw. Mix epoxy resin with abrasive chips. Having previously placed the block in a cardboard box glued to the size of the block, cover the prepared surface of the wooden block with a mixture of epoxy resin and abrasive. Once the resin has completely cured, the block is ready for use.
Another option for making your own sharpening stones is to create a sharpening stone from small rectangular glass plates about 5 mm thick. Using double-sided adhesive tape, sandpaper is glued to the surface of the glass plate. The sharpening stone is ready for use.
Device for sharpening from wooden blocks
A simple device for sharpening knives is a tool consisting of a pair of wooden slats and a pair of abrasive bars with the same geometric dimensions.
Wooden slats should be thoroughly sanded with abrasive sandpaper. Then, after applying auxiliary markings, depending on the sharpening angle of the knife, make cuts to a depth of 15 mm. Insert sanding blocks into the resulting holes so that each groove matches, then secure them with bolts. To give the sharpening device greater stability, the lower part of the surface can be padded with a piece of rubber.
The types of devices for sharpening cutting tools are different and each master will be able to choose the manual machine that will fully satisfy his needs.
The blades in a cutting tool are the basis of everything. A kitchen knife, grinder wheels, chains for a brush cutter or chainsaw with a well-sharpened blade simplify and speed up the work process.
You can sharpen a tool in a professional workshop or at home if you make a knife sharpening machine with your own hands from simple materials.
For knives used at home, you do not need a special tool for sharpening; it is enough to have a sharpener in the form of a bar on hand. But if you have a chainsaw at home, the chains of which also need regular sharpening, or an angle grinder, the disks of which constantly become dull, then it is better to make the installation yourself. The essence of the device is this: a block is attached to the desktop in two variations - with or without adjustment. For those who do not understand the essence of making a sharpener with your own hands from the text, you can watch photo or video master classes.
Device manufacturing diagram
In order for the device to turn out to be of high quality and safe, you need to calculate in advance the dimensions of the machine for sharpening knives with your own hands and select necessary materials. The first thing to do is calculate the angle between working part cutting blade and whetstone.

Next comes the selection of base materials (support) and stone. You can make a machine from glass covered with sandpaper or stone attached to a support. The first option is less expensive, and the sandpaper can be changed at any time, but more reliable installation- made of stone.
Process nuances
In order for the machine for sharpening knives according to the drawings with your own hands to turn out perfect and last for more than one year, you need to take the advice of experts. The first thing to take into account is what type of blade will be sharpened.

After all, an individual angle is selected for each knife:
- Blades for cutting hard objects (for example, cardboard, wood, metal), chainsaws - 30-45 degrees.
- Hunting and tourist knives - at an angle of 25-30 degrees.
- Kitchen cutting tools for slicing various products need to be sharpened at 20-25 degrees.
- Simple knives for slicing bread, vegetables and fruits require 15-20 degrees of sharpening. Regular household scissors, as well as razor knives, should be sharpened at the same angle.
Necessary materials
If you need to make a sharpening machine, you will need the following materials:
- several wooden beams;
- sandpaper;
- sawing tools;
- drill with several drills.

Simple machine. Step-by-step instruction
- Step 1. Take three slats and place them so that together they form the letter H. The width of the middle rail should be equal to the width of the saw block. Repeat the procedure.
- Step 2. Place the slats perpendicular to each other, connecting their bases - the main structure for holding the saw bar is ready.
- Step 3. This is one of the most important stages! It is necessary to correctly calculate the angle of attachment of the bar relative to the slats. Calculate it using measuring tools and mark the places where the timber is attached along the vertical and horizontal slats.

If you want a universal device, then you need to make several retractable bolts at once at a distance apart so that you can change the tilt of the beam if necessary. This can be done using simple measuring tools and drills. After this, you can cut the slats to a convenient length.

The inconvenience of such a machine is that you will have to independently control the position of the knife relative to the beam. If you don’t want to think about anything at all while sharpening knives, scissors or chains, then you should make a more complex machine.
Universal machine. Step-by-step instruction

Read each step carefully and, where possible, draw a drawing for each step indicating all dimensions - this will be an excellent help in your work:
- Cut two rectangular trapezoids from plywood, the bases of which will be equal to 60 and 170 mm, and the side will be equal to right angle– 230 mm.
- Cut a rectangular board with dimensions 230 by 150 mm.
- Fix the rectangle between the bases so that it protrudes 40 mm upward.
- Cut a block measuring 60 by 60 mm and secure it to the base of the wedge.
- Using a drill, make a vertical hole in the block at a distance of 50 mm from the center. Insert the fittings at the top and bottom of the hole, and into them - a pin of the appropriate diameter, 25 cm long.
- Process the rectangular base. At the level of the 40 mm protrusion, make a cut of approximately 2 mm so that a sheet of sandpaper can be attached to this place
- Make a fix:
- Take an L-shaped plank with dimensions of 15 by 18 cm along the long edges and an approximate width of each shelf of up to 5 cm.
- Take a rectangular plank 5 by 5 cm.
- Make a groove in the board at the level of the stud and attach the strips to it with minimal movement.
8. Make a regulator:
- Secure the stud with a nut so that it does not rotate.
- Cut a block from hard wood with dimensions of 20x40x80 mm and secure it to the stud with nuts.
- On the wide side, make a hole of 9 mm with a distance of 15 mm from the edge.
- Cut two blocks of 50x80x20 mm from hard wood and make one hole in them at a distance of 20 mm from the edge in the center.
- Take the weld of the stud and the smooth rod and fasten the blocks to it as follows: first the locking nut, then the first block. Then aluminum profile, then a second block and another retainer.
- Glue the sandpaper to the aluminum profile.

The universal sharpening tool is ready. Cut out several templates with different angles so that you can use them as a guide when working. Remember that pre-created drawings will help you at every stage of creating a tool - do not neglect this step, otherwise it will be very difficult to avoid mistakes.
No matter what you need to sharpen - simple kitchen knife, garden or nail scissors or chainsaw chains - such a tool will cope with any job if you set the angle correctly and remember to use it when the need arises.
The myth about supposedly self-sharpening knives was quickly shattered... About everyday life. This is not surprising, the laws of physics are laws of physics, and even marketers, so to speak, are powerless against them. If there are no sharpened knives in the house, if you remember the famous bard, there is nothing good. Today the editors of the site will help solve the problem of dull blades and tell you how and with what you can properly sharpen a knife at home. We will introduce our readers to different types devices for sharpening knives, we will tell you about their effectiveness, and also teach you how to make a simple sharpening machine at home.
Read in the article
Types of devices for sharpening knives
A whetstone for sharpening knives is probably the very first device of this type. A simple, and, most importantly, affordable tool has been successfully coping with its task for many millennia.
To this day, the classification of machine tools depends on this once uncontested sharpener. Depending on the type of abrasive material, they can be:
- bars;
- sharpening stones.
By drive type:
- manual;
- electrically driven.
By place of use:
- domestic;
- professional.
However, in modern world A whetstone can only sharpen a simple hunting knife. In other cases, the quality will leave much to be desired. In addition, stones are used to sharpen only soft metals, if the cutting part of the blade has a hardness above 55 HRC, you cannot sharpen it with improvised means.
Important! Each type of blade has a different edge angle. And during sharpening it must be held along the entire length of the processed surface of the product.
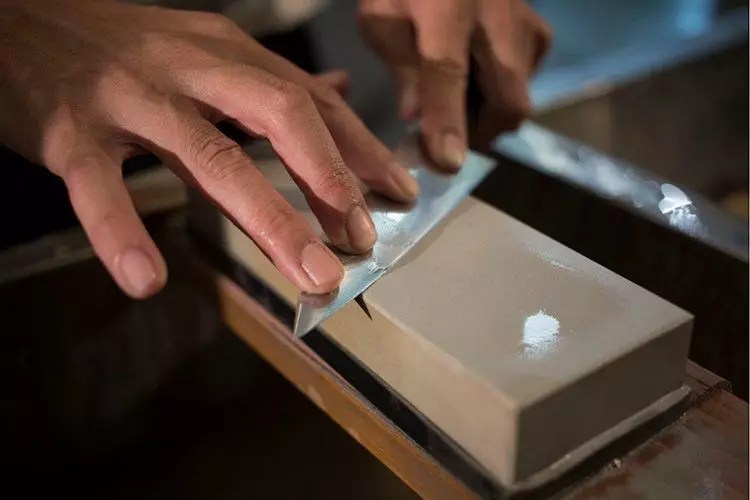
Some types of modern whetstones are still used today. An example of this natural stones– Japanese water stone (we showed it in the photo above) or American “Arkansas”. Master sharpeners even conduct special master classes on sharpening knives using natural stone. Interestingly, before the processing process it is soaked in water, sometimes with a soap solution, and after work it is dried. The whole process resembles a sacrament for initiates. So it should come as no surprise that these grades are too expensive and most sharpening devices use artificial abrasive surfaces.
Knife sharpening stones
These are artificially turned bars with an abrasive coating, which are suitable for manual sharpening of both carpentry and plumbing tools, as well as kitchen knives.

The bars, depending on the material from which they are made, can have varying degrees of wear resistance and grain size. Let's consider the main types of materials that are used in the manufacture of sharpening stones:
- Natural stones, such as novaculite or Japanese water stone. Working with such a tool is not very easy. They require certain skills and craftsmanship.
- Diamond(with diamond coating) – can be of different shapes and grain sizes. Wear-resistant. Reasonable price.
- Ceramic. Refer to more modern look whetstones for sharpening. They combine the strength of diamond coating with the hardness of natural stone.
- Artificial: electrocorundum or carbide. Quickly grinding abrasive is of low quality and the same price.
Artificial abrasives are created by mixing diamond powders of different fractions, as well as electrocorundum and carbide.
Important! Great value at the same time, it has the material used for gluing the rock, as well as the percentage of all elements. The stronger and better composition(this also applies to the particles themselves), the more durable the sharpening abrasive will be.

Moreover, there are two types of bonding of elements - galvanic bonding and soft bonding. In the first case, the crystals are glued strictly to the surface of their base, made of a nickel alloy. In fact, the crystals are located in a very thin layer on the bar. A soft binder is a chaotic arrangement of binding and abrasive elements. The second type is less wear-resistant.
Sharpening stones for knives
If we talk in more detail about sharpening stones, we need to talk about the main types used in such tools, this will help you understand the process in detail and understand how to sharpen a knife correctly. But before talking about them, it is impossible not to mention the sharpening stages, which in this context will play a decisive role in the description of different materials and machines.
| Stage | Description | Illustration |
| Sharpening | Restoring a blunt edge without adjusting the sharpening angle. |  |
| Finishing | Grinding the edge with fine grain abrasives. |  |
| Edit | Polishing bevels and cutting edges with a ceramic pencil, GOI paste or on a leather belt. |  |
| Resharpening (deep sharpening) | Complete restoration of the desired sharpening angle, blade profile geometry and elimination of chips on the edge. Most often, such work is carried out on special machines. |  |
Let's move on to a description of the main options for sharpening stones.
Japanese water stones Waterstone
They are used equally effectively at all stages of sharpening. There are artificial analogues (ceramic based), but professionals use original, natural materials. Stones require special care, because most important rule masters - a perfectly smooth surface of the grindstone.

A comment
Ask a Question“To check the level of the stone, use a simple method. Wet the timber and place it on a sheet of paper on a flat surface. The imprint will allow you to assess the level of evenness of the stone.”
Novaculites, or “Arkansas”, “Turkish”, “Belgian” stones, are natural schists and chalcedony interspersed with tiny particles of garnet and quartz. Today, both natural stones and their artificial substitutes are used.
Important! Stones only work in combination with a special oil lubricant. The extraordinary and unique structure of the stones allows them to be used at different stages of processing.
Musat for sharpening knives
Musat is a kind of file, most often installed vertically. The peculiarity of this tool is that its surface is magnetized, which means that metal flour will not fall on you.
 Musats come in different shapes: round, faceted, flat with beveled edges
 Each variation has its own merits. For example, round musat weighs little, but oval sharpens better, since its edges provide more complete contact with the surface being processed. Tetrahedral ones are more universal; here you can better refine the required sharpening angle.
Household manual knife sharpening machines
We can talk for hours about the options and varieties of hand-held machines used in everyday life. These include the usual home mini-sharpeners, known to almost everyone, and more specific devices with a polishing wheel.

The easiest way to work is with mini-sharpeners that control the stroke of the tool. In this case, the degree of sharpening depends on the effort the person makes.

Household electric knife sharpening machines
Electrical grinding machines more comfortable. Working with them saves time. Most often, such drive machines have different operating modes, which are regulated by switches.

Typically, such machines are compact, safe, simple and reliable, since all grinding wheels hidden inside the case. In this case, the sharpening angle is adjusted by a special spring, which completely eliminates errors in sharpening.
Professional manual sharpeners for sharpening knives
Professional hand tool A bit like a carpenter's vice. The object to be sharpened, the knife itself, is clamped with special clamps.

The sharpening machine itself is mounted on a stop. It is very important here to properly secure the machine and avoid the device slipping during sharpening.
A comment
Tool selection specialist at VseInstrumenty.ru
Ask a Question“If you do not have the skills to work with this tool, it is better to use automatic sharpeners. In addition, such a machine cannot be assembled without certain knowledge.”

Professional electric knife sharpening machines
Professional machines are distinguished by their versatility. Usually this is a device with a massive abrasive disk. Such tools allow you to sharpen not only knives, but also metalworking tools, for example, planes and chisels.

The combination of low speeds and constant cooling provides high-quality processing of products already at the stage of forming the cutting edge. And at the final stages of work they provide the blade with razor sharpness. IN professional instrument A large number of attachments and replaceable discs are provided. Moreover, the clamp where the blade is secured can move freely along the support in the horizontal direction. Moreover, you can adjust the sharpening angle.
How to sharpen a knife correctly
For high-quality sharpening of the machine, you need experience and certain knowledge. Let's start with the basics.
Optimal sharpening angles and degree of sharpness for kitchen knives
It's no secret that there are a lot of knives for different materials. A good housewife has her own knife for vegetables and meat. Let's look at the correct sharpening angles for different tools.
| Tool type | Sharpening angle |
| Razor and medical scalpel | 10-50° |
| Professional for chefs | 20-25° |
| Universal | 25-30° |
| For complex work | 25-30° |
| Kitchen cutlery | 55-60° |
| For fillet | 15-20° |
| Home universal | 30-35° |
| Deboning and cutting | 25-30° |
| Professional for fish | 25° |
| Professional for vegetables | 35° |
| Hunting and “Swiss” (spicy) | 30-35° |
| Hunting and “Swiss”, resistant to blunting | 40-45° |
For your information! The sharpest knives are considered to be blades with a sharpening angle of 50°; such versions, with a certain grade of steel, can cut nails. When sharpening knives, you can vary the angle at your discretion within the mentioned range.
In general, the sharpness of a blade depends on the shape of the blade. And it, in turn, must correlate with certain clear correspondences of the relationships between the blade and the blade.

How to sharpen a knife at home with a whetstone
The process is simple, but quite painstaking. Try it without sharpening experience this process pointless. Typically, craftsmen use two sharpening stones with different abrasive densities - with a large grain and a fine one.
A comment
Tool selection specialist at VseInstrumenty.ru
Ask a Question“The knife blade must be wet. You can use special oils or sharpening lubricants.”
The next step is choosing the sharpening angle. Here we focus on the table above and take the range from and to. Don't forget, the smaller the sharpening angle, the faster the knife will become dull. For a beginner, it will be difficult to maintain the same angle. In order to successfully complete this stage, it is important to hold the knife with both hands.

We start working on a coarse-grained stone, and then, when the edge grinding stage begins, with a fine abrasive
How to sharpen a knife with musat at home
Sharpening takes place by weight. The blade is passed along the entire length of the instrument; usually several such “passes” are enough.

To prevent the blade from slipping, the musat is equipped with a special stopper or guard, which prevents the blade from injuring the hand.
How to properly sharpen a knife on an electric sharpener
The sharpening process is practically no different from sharpening manually. The only difference is that in this case it is not the blade that is wetted, but the sharpening disk itself. Usually this happens automatically, like in the machines we talked about above.
Typical mistakes when sharpening knives with your own hands
Everyone knows that it is better to prevent mistakes than to correct them later. That is why the editors of the site have prepared a list of the most common mistakes beginners make when sharpening knives:
- Incorrect level of sharpening angle.
- Blade sharpening. It occurs when excessive pressure is applied to the sharpener by the blade, which can cause it to become damaged or even crack.
- Sharpening an unprepared tool or a worn sharpening disc.
- Use of musat at all stages of work. As we remember, musat is used to polish the cutting edge.
- Use fine-grained abrasive.
It is important to take into account all these subtleties already at the stage of organizing work. To learn how to properly sharpen a knife with a whetstone, watch this video.
Making your own knife sharpening machine
Purchasing a ready-made knife sharpening machine is not always necessary. For household needs, you can make it yourself. It doesn’t matter whether you create a mechanical or electrical machine, be guided, as mentioned earlier, by already existing diagrams and drawings.

What tools are needed to make a knife with your own hands?
To make a simple machine we will need:
- A piece of chipboard 10-12 mm thick. Can be used from old cabinet furniture.
- Wooden block.
- Metal rod M8 or M6.
- Sheet steel 1 mm thick.
- Fastening screws or nuts with washer corresponding to the diameter of the stud used.
- Abrasive material.
- Metal hacksaw or jigsaw
- Screwdriver.
Step-by-step instructions for making a do-it-yourself sharpening machine
Let's consider assembling a simple knife with your own hands from scrap materials.
| Illustration | Description of action |
 | As we can see, the base here is quite simple - several chipboards. Size - 37x12 cm. Pressure board - 30x8 cm. When lifted - something about 7 cm. |
| A nut with a diameter of 6 mm for fixing the blade clamping mechanism is attached to the wing. The clamp itself is made of a piece of plexiglass; you can use a metal plate. | |
 | A magnet is used, attached to 2 self-tapping screws in a special recess. |
 | A groove is drilled into the plexiglass with a drill for free movement. |
| You can use ready-made special stones as a bar or make it yourself. | |
 | The sharpening process does not cause problems, the main thing is to follow the recommendations outlined above |
We tried to introduce you to the main points related to the right technology sharpening knives with your own hands, as well as with the features of this whole process; in addition, you now know how to make the simplest ones with your own hands hand sharpeners for knives. And if you have questions for the author of the article, ask them in the comments and tell us about your own experience, which will certainly be useful to our readers.
There are two main reasons why buying a factory sharpener is not an option. Firstly, the purchase of an inexpensive device made in China, in further operation, will not provide the product with the required quality.
Branded copies can be a solution to this problem, but a significant drawback is the cost. If you don’t have the opportunity or just the desire to pay a tidy sum for a device, you can make a machine for sharpening knives with your own hands. There is no need to develop new designs; create your own creation based on already existing models. Do-it-yourself knife sharpening machine, different types with detailed instructions.
We imitate a sharpener model from Lansky
This knife sharpening machine is presented in the form of two metal corners, connected to each other. The sharpening angle is determined by the hole in which the knitting needle with the nozzle at the end will be inserted.
Of the options being considered, this one is the least convenient to use, but not easy to manufacture. We will improve the device and try to make a device for sharpening knives with a wider range of pressing angle degrees.


We take ordinary metal plates,
whose dimensions are 4x11 cm. Or more, all the same, during operation, the parts will be filed and adjusted to the required parameters.
Using a grinder, sharp corners are removed at the ends of the parts (the sides that act as clamps). Using a file, we grind down the edges of the clamps; you should get a smooth bevel from the middle of the base to the edges of the plates.
According to the drawing, we make markings for future holes. We drill them and cut the threads. We round off all sharp edges and corners on the plates with a file (not only for the sake of a noble appearance, but also for the sake of comfortable use, so that nothing cuts into your hands).

We purchase a standard aluminum corner and make holes in it in accordance with the drawing above. We cut threads in the holes intended for the entry of the pin. And the hole that is intended to support the knitting needles must be widened using a needle file.
Next you will need two pieces of metal rod
approximately 15 cm long. We insert them into the outer holes and fix the insertion depth with two nuts of the corresponding diameter. In our case, these elements are equal to size M6. We screw a bolt (about 14 cm long) size M8 into a hole of a larger diameter, onto which a wing nut is already screwed, and on top of it a pair of ordinary, but larger diameter than the bolt itself. It will be used as a support post for the structure. The remaining holes are for bolts that will be used to adjust the clamping force of the blade.
Nuts are threaded onto the ends of the rods, then corners are put on, which are again pressed with the help of nuts. By lowering them up or down, we can adjust the required sharpening angle.

The element that will hold the blade for sharpening is assembled from a thin metal rod (shaped like the letter “L”), two holders (the outer one with a through hole for a knitting needle), a wing nut and a rod with an M6 thread.
We imitate a sharpener model from Spyderco

This knife sharpening machine is presented in the form of a plastic horizontal holder with several holes. And each nest has its own angle of inclination.
Of all the options that will be considered, this one has the lowest level of sharpening quality. The problem is that the blade will be pressed manually, unlike the first option, without additional fixation on the support. But despite this, this device for sharpening knives, it is quite suitable for use for domestic purposes, and plus - it is very simple in terms of production.

In the process of work, we will need two wooden blocks with dimensions 6x4x30 cm, two bolts and wing nuts of sizes M6 or M8, two thin knitting needles (curved in the shape of the letter “L”).
The tools you need are a hacksaw blade, a chisel and a hammer, a file with sandpaper, a school protractor and a drill.


Using a regular protractor
We apply markings with the required angle of inclination. We take the canvas and file the first mark on one of the parts. There is no need to go deeper than the width of the canvas itself.
Turn the hacksaw over and insert its blunt side into the cut slot. We place the second part on top and make sure that both the edges of the elements themselves and the markings on them match. Next, we saw through all the remaining lines in the same way.


Apply the chisel to the excess wood that needs to be removed. Lightly tap the top of the chisel with a hammer and knock out small chips. When the bulk of the wood has been removed, we bring the area to the required level using a file.

We drill holes for the bolts and spokes to fit in as shown in the figure. Using fine-grit sandpaper, we smooth the edges of the holes, the corners of the parts and their entire surface.

We thread the bolts through the larger holes, then thread regular nuts and tighten them tighter. The smaller ones contain knitting needles (necessary to prevent the blades from sliding down during operation). We insert the canvases themselves into the grooves and press them against the second half of the product. At the end we fix everything with a pair of wing nuts.
We imitate a sharpener model from Apex
This machine for sharpening knives is presented in the form of a fairly massive device with a stand and a platform placed on it at an angle; a rod is mounted on the side, on which the end of the nozzle rests. This type of sharpening device, despite its dimensions, in comparison with the previous ones, is the most successful.
It is easy to use and its sharpening quality is high. In addition, making such a knife sharpener with your own hands is very simple.

To work we will need the following:
- (not a whole one, even a quarter is enough);
- magnet (with slots for bolts, if it is not possible to drill them yourself);
- metal rod M6 or M8;
- Not large sizes wooden block;
- a small piece of plexiglass;
- two bolts and three wing nuts;
- 10 screws;
- 4 rubber feet;
- saw;
- drill;
- ceramic clamps (or wood blanks).
First you need to cut three small blanks from a sheet of chipboard. Dimensions of the first: 37x12 cm. Dimensions of the second: 30x8 cm, measuring 6 cm from the edge on the longer side, drill a hole. Dimensions of the third: 7x8 cm. We saw off an 8 cm long element from the block (section 4x2 cm).
We drill two through holes perpendicular to each other in the segment. The first is at a distance of 3 cm from one edge, the second is at the same distance from the other. Starting from the edge of the block and right up to the hole, we cut out a pile of wood 1 cm thick. The plexiglass cut has the following parameters: 6x12 cm. A slot is drilled along the middle of the blade.
We take the first largest workpiece
from chipboard and drill holes in the corners for future legs of the product. At a distance of 4 cm from its edge, we place the smallest workpiece perpendicularly and connect them together using 2 self-tapping screws.
We place the edge of a medium-sized part on the top of the small workpiece and again connect them using 2 self-tapping screws. The hole in the middle piece should be closer to the top of the smaller one. The free edge of a medium-sized workpiece is rigidly attached to the platform of a large part, again using 2 self-tapping screws.
Using a drill, drill a shallow cavity into medium-sized parts. It should be almost at the very edge of it highest point, and the dimensions correspond to the parameters of the magnet.
We mount a magnet inside (so that it does not rise above the level of the surface of the board) and fix it with small self-tapping screws.
We place a piece of plexiglass on a medium-sized board so that its hole and slot coincide with each other. We pass a bolt with a washer on it through them and screw the nut from below.

A hole with a diameter corresponding to the diameter of the iron rod is drilled on the free edge of the largest chipboard part. The rod itself is fixed using two nuts: a regular one and a wing nut. To prevent them from cutting into the surface of the board, we separate them using washers.
A blank from a block is screwed onto a fixed rod.
A bolt is inserted into the hole to which the cut was made, screwed on the outside with a nut. By tightening the knob, we fix the part at a certain height of the rod; when we release it, we move it up and down freely. The sharpening angle is adjusted using this bar (raise or lower along the rod).
The element for clamping the sharpening blade is assembled from the cut metal rod two ceramic or wooden blanks and 4 nuts with washers. They are strung in the same order as in the photo. At the very end, rubber feet are screwed on for greater stability of the product.
We looked at three various options sharpening devices. And each of them has its pros and cons. You should choose a specific option based on your needs, as well as your skills in a similar work plan.
Information to note : , .