Do-it-yourself corner wardrobe: device. Do-it-yourself corner wardrobe: project preparation, choice of material and cabinet assembly Do-it-yourself corner wardrobe for clothes
A sliding wardrobe is a very popular type of wardrobe, because it is not only spacious, but also takes up quite a bit of space. This piece of furniture is quite functional.
In this article we will tell you how to make a wardrobe with your own hands.

What is a coupe?
The concept of a coupe first appeared in France during the age of horse-drawn carriages. At that time, the city streets where the common people lived were so narrow that it was not always possible to open the cart door. This led to the appearance of carriages with sliding doors in the 17th century.
It is believed that the first carriage-coupe was invented by the French carriage master Jeanto. Whether this is actually true is unknown.

The crew of the coupe was considered to be flirtatious and frivolous, because this type of transport was usually used for secret meetings with ladies. Some linguistic experts believe that coupe comes from the word “couple,” which in French means extramarital affair.

Over time, compartment doors began to be used for train cars. As for the furniture industry, a wardrobe is any wardrobe with sliding doors.

Types of wardrobes
- Sliding wardrobes can be:
- Radial;
- Built-in;
- Hull;
- Straight;
- Corner.

Do-it-yourself built-in wardrobe technology
Instructions on how to make a wardrobe with your own hands:
- Selecting the material;
- We determine the degree, nature and technology of how the filling of the cabinet will be placed;
- We design the doors, choose the suspension option;
- Choosing a technology for fastening shelves;
- Preparing a niche;
- We make the necessary measurements and drawings;
- We purchase necessary materials and accessories;
- We cut out the required blanks;
- We assemble the wardrobe and install interior lights if necessary.
What is a wardrobe made of?
Before you start designing a cabinet, you need to decide on the material, because it directly determines the technology by which this piece of furniture will be manufactured.
Made of wood and lining
Wood is classic material for making furniture. Today it is very prestigious to have headsets from natural wood. But for a wardrobe - this is not the best choice, since due to higher humidity the wood may begin to deform.

If you still want to make a wooden cabinet, then choose straight-grained wood that does not have strands, knots or cracks. It must be treated with special compounds.

The lining can be made of plastic or MDF. There is no need to prepare it in advance. But the frame of the cabinet doors will still have to be made of wood.

From plasterboard
It is possible to make a cabinet from gypsum plasterboard, but it is quite difficult. In fact it will be building construction, not a piece of furniture.
Made from laminate, MDF, fiberboard
This optimal materials for the manufacture of this type of furniture. You can make a wardrobe out of these at home easily and simply. They have all the advantages of wood and none of its disadvantages.

There is just one caveat: it is advisable to choose fibreboard with a density higher than average.
What is the filling made of?
The filling determines how the cabinet space will be distributed, where the shelves and drawers will be located. Experts advise following the following recommendations:
- Wet place on the side;
- The necessary small things are at eye level;
- Dry – at the top;
- The most expensive thing is to distribute it into boxes.
The purpose of planning the filling is to achieve the smallest width of the shelves, which will be required when calculating the doors. To distribution internal space The closet must be approached responsibly.

The contents of the closet significantly influences how comfortable, convenient it will be and how many years it will last.

Wardrobe doors
Doors are the most complex part of the cabinet and require the most responsible approach. It is necessary to decide how many sashes will be needed and what width, the design of the suspension and stoppers.
Note!


The fewer doors there are in a closet, the more convenient it is to use. But this increases the risk of warping and stalling. The maximum width allowed for sashes is 60-70 cm.

In addition, the doors should not be wider than narrow shelf, otherwise, it will be impossible to get close to her. It is also desirable that the sashes overlap by at least 5-7 cm.
like this necessary thing, like a wardrobe, you don’t have to buy it, you can make it yourself. On the Internet it is easy to find drawings of the most different models sliding wardrobes. A hand-made cabinet will be a source of pride for you.

Photo of a do-it-yourself wardrobe


Note!


Note!


The sliding wardrobe, invented in the USA, has become widely used as the main type of storage for household items and clothing. In our country, this type of furniture appeared only in the middle of the last century. This is surprising because many of us have lived in small apartments, in which its advantages are obvious.
Domestic craftsmen were in no hurry to make a wardrobe with their own hands. The reason is that the cabinet version, except for sliding doors instead of casement ones, has no other advantages over the usual wardrobe.
It is much easier to make a built-in wardrobe with your own hands. Its manufacture will require significant less material, and even an inexperienced carpenter can make such a compartment on his own. With a smaller footprint, this storage option will have a larger volume than a cabinet storage option.
Sliding wardrobe design: distinctive features

The sliding doors of the first wardrobes produced by our industry did not have rollers for movement. At the bottom there was a longitudinal tenon along which the door moved, which had a groove along the lower end.
Such simplest design was quite reliable. Its disadvantage was that moving the doors required great effort, because the cabinet itself and the doors were made of heavy material, which was chipboard at that time.
You can make a sliding wardrobe with your own hands, built-in or in a regular mobile version. You can also make a corner cabinet yourself, either built-in or cabinet-mounted.
A corner wardrobe with your own hands must be made in relation to a specific place.
In plan, it can have the shape of a triangle, trapezoid, L or U-shape. Among other types, five-walled can be distinguished. This design has the shape of a pentagon with 3 right and 2 obtuse angles.
This diversity is the versatility of a corner wardrobe. If everything is clear with other forms, then the five-wall requires clarity. This version of the sliding wardrobe, occupying a slightly larger area, is much more spacious than, for example, a triangular analogue.
Stages of preparation for making a five-wall
When making a wardrobe with your own hands, do not try to saw it at home sheet material, from which they will be made side walls and doors. It is almost impossible to manually achieve the required dimensional accuracy, especially for a corner wardrobe. Having decided on the dimensions of its sides and doors, it is advisable to use the services of a workshop where it is possible to ensure the required cutting accuracy. It is also advisable to process the ends that will be visible from the outside. The elements located inside the cabinet can be made independently.

Before making a corner compartment with your own hands, check the installation location. This is especially important for the built-in option. Any unevenness in the floor or ceiling where the doors will move must be corrected. Otherwise, there will be problems with installing guides for moving doors.
Make sure not electrical outlets and other elements that may affect the installation of a wardrobe with your own hands. Consider the size of the baseboards and, if any, moldings on the walls under the ceiling.
It is not advisable to save on a sliding door system. More expensive Italian or German designs will pay off due to reliability and long-term operation.
There is no point in showing the specific design of the carriages. There are quite a lot of them, and each of them has its own installation characteristics. First you need to figure out how to install: the dimensions of the cabinet elements will depend on this. A more reliable option is for doors with an upper running carriage. At the bottom of the door there will be a roller moving along a guide.
Before you start making a sliding wardrobe with your own hands, you should have the appropriate tool. When making a built-in version, a hammer drill is required. You will need a power tool to screw in the screws. It is advisable to have a manual circular saw with a guide ruler. A hand saw will also work.
You will need an angle clamp, a tape measure, a stapler, a soft and hard hammer, a drill with a set of drills, and a hex key for screwing in confirmations. To drill confirmation holes to a given depth, you will need confirmation drills. For simple drills, a stopper can be used.
It is necessary to purchase dowels, supports for shelves and screws.
Drilling holes in chipboard is the main operation when assembling furniture

To fasten panels made for furniture from chipboard, confirmats are used. Typically, confirmats with dimensions D×L = 6.4×50 mm are used for furniture. This mount has d=4.4 mm. The hole diameter for it should be in the range of 4.5-5 mm. At larger diameter the fastening will not be reliable; if it is less, the confirmat can destroy the fiberboard material.
To drill holes, special drills are used, which drill to a depth L and provide the appropriate dimensions in the upper part of the confirmat (H and h). Then the surface of the slab is countersunk to fit the cap. Screw in the confirmation without putting much effort, using a special hex key.
3 drilling options:
- drilling through the entire thickness;
- drilling in the end;
- drilling in 2 parts at the same time.
Another one, the most difficult option– drilling for dowels. General condition For all types of drilling, the position of the drill is perpendicular to the surface.
Let's consider the option of drilling in 2 parts. The parts are placed next to each other and secured using an angle clamp or other device. After this, marking and drilling are performed. This option is the fastest and most accurate. To determine the mark based on the thickness of the chipboard, it is advisable to make a template from wood or aluminum corner. If the chipboard thickness is 16 mm, then the center of the hole in the template should be exactly in the middle.

If the parts are connected in such a way that the holes are drilled separately, then the strength of the fastening depends on the accuracy of the markings. This is how you have to drill when connecting parts to dowels. For example, to install a cabinet lid on dowels, holes are first made in it using a drill with a diameter of 8 mm with a limiter that does not allow drilling through it. Holes from the edge of the cover are drilled taking into account the indentation of the sidewalls, if provided. Using the same drill, holes are made in the sidewalls to a depth of 20 mm. The accuracy of the marking determines whether the dowels will fit into the holes. The ends of the dowels are placed on glue. When assembling, craftsmen do not recommend pouring glue into the holes on the lid; you may have to disassemble the cabinet.
It is especially easy to assemble a built-in wardrobe, which will have only 2 sides, fixed perpendicular to the wall. These parts are securely attached to the ceiling, floor and wall using corners. The corner is secured to the base using plastic dowels and self-tapping screws. The sidewall is secured to the corners with self-tapping screws. It is between these elements that the door movement system must be secured.
With proper preparation, there should be no problems with assembling the cabinet.
have recently become one of the most common pieces of furniture. This design provides convenient. Most often they are purchased not in finished form, but they are made to order. But if there is a possibility necessary materials You can make a furniture set yourself. Before you begin, you need to decide on the number/location of shelves and drawers. It is also important to plan the design taking into account the dimensions of the room. In any case, all these points need to be studied before making a wardrobe with your own hands. In this case, the drawings are a kind of starting point, and our review today will help you cope with this rather difficult task with a minimum of errors.
The peculiarity of furniture designs of this type are that they allow you to save usable area in room. Wherein sliding doors for a wardrobe they can be glass, mirror, rattan, plastic or bamboo.

So, let's look at the main advantages of furniture sets:
- variety of designs: built-in, rectilinear, cabinet and;
- furniture sets allow you to effectively use even small space. This is an ideal solution for small spaces. Wherein mirror surfaces allow you to visually increase the space;
- brevity of designs;
- filling wardrobes. Such furniture sets allow you to hide everything unnecessary. They are used not only for clothing, but also for various household items and small appliances;
- models can be built-in, cabinet and with mezzanines;
- the wall of the room, as well as the floor or ceiling can be used as the walls of the cabinet;
- wardrobes are made to order;
- possibility of independent design.

It is worth noting some disadvantages:
- rapid wear of the sliding system;
- quality is required internal filling cabinet;
- the aluminum profile may be deformed;
- Careful maintenance is required: cleaning all surfaces and guides.
For your information! To prevent the door from coming off the rail, Schlegel for sliding wardrobes is used at the joints and ends. It needs to be glued, which will create shock absorption when the doors are opened suddenly.
Types of wardrobes
Let's look at the main types of wardrobes:
- built-in models that do not have a floor, back wall and ceiling. Such headsets cannot be moved or rearranged. They consist of side walls, shelves and internal partitions. Built-in models are made to order, but you can also purchase separate elements for self-assembly;
- free-standing sliding wardrobes are equipped with doors that move on a rail. This design has a floor, a back wall and a ceiling;
- corner headsets are suitable for small spaces. He's different compact size, but inside it is very spacious. Corner design is suitable for a small rectangular room or square hallway;
- diagonal corner completely occupy the entire corner. Such designs are more spacious and look stylish. Inside you can hide not only a wardrobe, but also bed linen and blankets.


Wardrobe materials
Before you start making a corner cabinet or any other with your own hands, decide on the material.
Tree
For durable sets, you should choose solid wood. This is a prestigious material for furniture. It is worth considering that wood is not the most the best option for a built-in wardrobe. The humidity level is higher in the niche. For a wooden cabinet, you must carefully select wood that is free from cracks and knots. The frames of the doors are also made of wood. In this case, it is necessary to glue them together.
Wooden sets have the following advantages:
- environmental friendliness of the material. The tree does not contain toxic components;
- increased level of wear resistance;
- aesthetics of products. Wood furniture is distinguished by natural colors and unique patterns;
- naturalness of the material;
- possibility of carrying out restoration work;
- ergonomic use of space;
- variety of styles.
Drywall

One of the popular materials is, which is made from pressed wood chips. To create a dense composition, a thermoactive synthetic resin is used. This material is easy to process.

When working with plywood, it is necessary to take into account the softness of the material. Products may become deformed when twisted. It is recommended to use washers for such connections.
Laminated plywood is also popular. At the same time, plastic reduces the influence of formaldehyde in resins.

Furniture panels
The best material for homemade designs are furniture panels. This material is known for its durability, environmental friendliness and reliability.
It is worth noting the following advantages of using this material:
- does not require significant funds;
- you can bring unusual design ideas to life;
- the product may have various shapes and design;
- For a furniture set, you can choose functional fittings.

Location of the wardrobe in the room
Before you start creating a wardrobe with your own hands in the hallway or in another room, it is worth considering its location.
If you place the set along a solid wall, then the furniture itself will be perceived as a wall. It would be better if the closet reached the ceiling. Doors can be mirrored, which allows you to visually enlarge the room.

If you place two identical cabinets along the wall and leave a distance between them, you will get an alcove. You can put or in the resulting niche. In the living room, an alcove can be used to create an area with a false fireplace.

A practical solution there will also be installation of fittings along the edges of door and window openings. A mezzanine can be installed above the opening. The cabinet can be recessed into specially created niches. If the size of the room allows, then small sizes can be used.
Depending on the a certain style When decorating a room, it is not necessary to make built-in wardrobes or disguise them. For retro or glam vintage style, bulky furniture will only complement the colorful design.

It is also necessary to choose the right drawer mechanism for the wardrobe. It shouldn't be noisy.
Hallway


Children's
There are many things that need to be placed in a child's room. These are seasonal clothes and shoes, children's toys, Board games And Sports Equipment. In addition, you need to find a place for books, notebooks and bedding.
The sliding wardrobe is a spacious set in which you can place all your things and objects. The doors of this piece of furniture move apart to the sides, which does not take up much space.
Keep in mind that cabinet furniture is selected for children, so the shelves should be on required height. It is important that there is no sharp corners at the ends of shelves and racks. Each thing must have a specific place, so the child will quickly learn order.
Note! When ordering externally, as a rule, it is not possible to control the consumption of material.
It is important to choose high-quality fittings; the correct adjustment of wardrobe doors depends on this. Doors should not jam or slide. Sliding systems consist of a profile and a sliding support. Roller mechanisms can be axial or bearing-based.

Choosing cabinet filling
The internal content helps decide what the layout will be. Not worth the section for outerwear place it in the center, as moisture from it can spread to the sides. It is better to place this compartment on the side. Boxes for bed linen It is not recommended to place it directly above the floor.

How to correctly arrange the elements and how to assemble a wardrobe with your own hands can be seen in the video below:
Number and sizes of doors, guides, rollers for wardrobes
When choosing guides for a wardrobe, Special attention pay attention to the material used to make them. Has the lowest cost plastic profile, but it is characterized by low reliability and short service life. The best solution There will be the use of combined rail guides, in which the supporting surface for the rollers is made of metal.
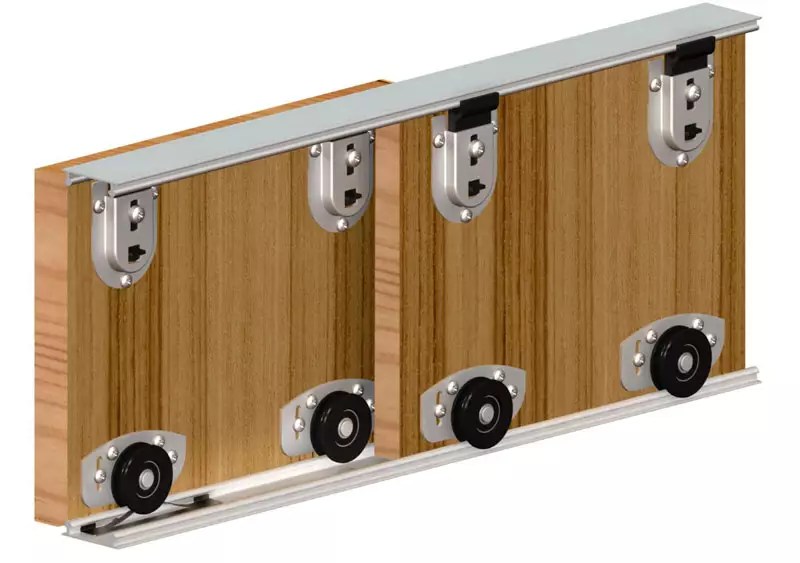
The steel profile for sliding doors has increased reliability. Rail supports for furniture of famous brands are made from aluminum.

The rollers are made of metal, since plastic is not durable. The roller contains a ball-bearing internal mechanism that allows the door to move freely in the horizontal direction.
Do-it-yourself wardrobe and compartment door assembly
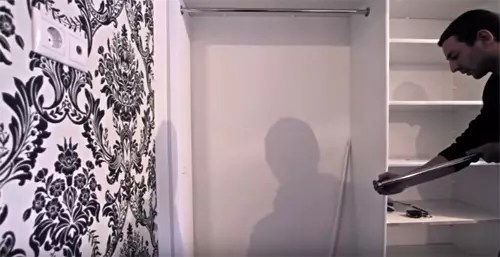
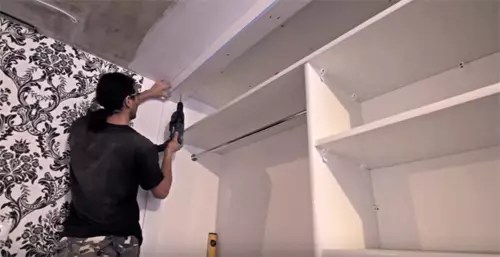
We invite you to familiarize yourself with the process of assembling a sliding wardrobe with your own hands in the table below:
| Photo | Description of work |
 | To assemble the wardrobe, you need to apply markings. It is necessary to note the dimensions of the cabinet in width and location vertical stand. The heights at which the shelves will be fixed are marked. |
 | Drill holes for dowels. |
 | The profile is put on before installation. |
 | Install the vertical stand. |
 | We mark the mezzanine shelf and install it. |
 | The side wall is installed. |
 | The shelves are marked and installed. |
 | The clothes rail is marked by size and installed. |
 | False panels are installed. |
 | One panel is fixed at the bottom. |
 | The supporting upper part is attached. |
 | The bottom guide is secured with a screw. |
 | The top guide is attached in the same way. |
 | Doors are being installed. |
The process is presented more clearly in this video:
Interesting solutions for sliding wardrobes: photo examples
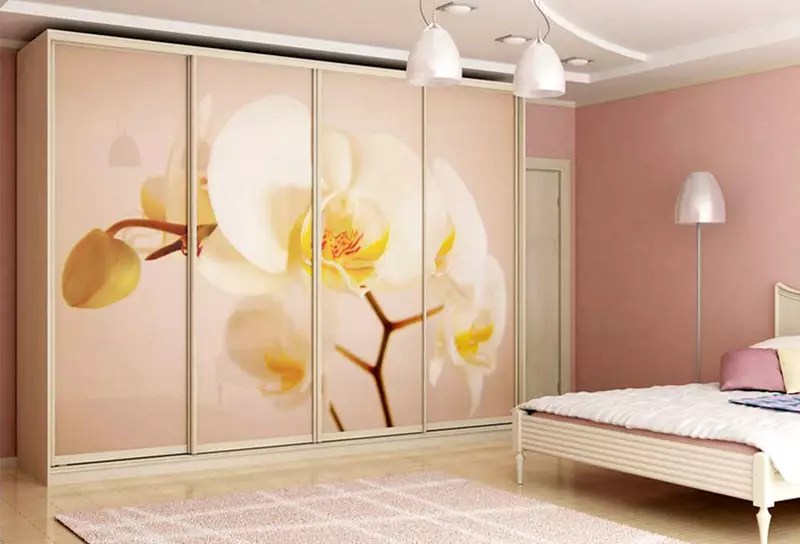
Don’t forget about the decor of the furniture set. Pilasters can be used as decoration. These elements are made from solid wood or MDF. You can install a furniture cornice on the roof. Interior baguette is used for decoration. You can choose a baguette of different shades. Furniture with photo printing also looks stylish.
Article
Photo
Many home craftsmen try to bring a piece of their soul into the house by making furniture with their own hands. In order to make a corner cabinet with your own hands, you will need a lot of effort, although financially this event will not cost that much.
Externally, such a cabinet has the shape of a square with a truncated corner.
Corner cabinet diagram.
Preparatory work
At the very beginning, you need to decide on the material from which the entire structure will be made. Only 2 options are optimal.
Laminated chipboard is much easier to work with, but you won’t be able to make a complex design or form a pattern based on partial cutting yourself, because This requires additional technology. The color range is huge, but the material is always visible (it is not possible to create a wood pattern even with a special desire). The ability to choose the density and thickness also has its advantages, although the frames are more rigid than those of a furniture panel. Exactly from of this material It would be more convenient to make a corner cabinet with your own hands.

Tools for making a corner cabinet.
It is advisable to purchase all internal fittings not only High Quality, but also from the same material and from the same manufacturer. Such a move will allow you to create a corner cabinet that is indistinguishable in quality from a factory one, and upon examination it will be almost impossible to indicate that it was made at home.
Jigsaw files can tear either heavily on one side or a little on both sides. In this case, it is better to use those that tear on both sides, because... the top can still be closed with piping.
Necessary tools and materials for work:
- jigsaw;
- screwdriver;
- laminated chipboard;
- furniture screws;
- aluminum screws;
- rubber pads (5 pcs.);
- edging for laminated chipboard;
- iron;
- accessories.
Main work activity
After the preparation of the drawing is completely completed, you can begin its production.
It is most convenient to make a corner cabinet with an equal spread, because there is not a single chance to do anything wrong. To begin with, a cut is made:
- 2 segments 900*2610 mm;
- 2 segments 500*2610 mm;
- 1 segment 540*2610 mm;
- 5 segments 380*450 mm;
- 1 segment 450*2200 mm;
- 3 segments with 5 corners so that they fit exactly inside the walls.

Corner cabinet assembly diagram.
When cutting, you cannot make errors of even 2 mm, because... this may compromise stability or produce an uneven joint. And after all the cuts are formed, you need to start connecting the segments to each other.
To begin with, 2 corner walls are joined together. For this purpose, furniture screws are used, for which holes are initially made with a drill in increments of 40 cm, after which they are fixed. Or you can use internal aluminum corners, which are tacked with a similar step. In the latter case, you need to carefully monitor the length of the screws so that it does not exceed 3/4 of the thickness of the chipboard. The method is selected initially, after which it will not change.
In a similar way, segments of 500 * 2610 mm are docked to them. On at this stage The outlines of the future corner cabinet are already visible, but right now you should be as careful as possible, because... The frame at this stage is at maximum risk.
Now you need to mount the bottom part from below, and at a height of 2-4 mm above the base, in order to achieve maximum stability. The top cover is mounted in a similar way, only it is already as close as possible to the top edge (1-2 mm can be left). Now the box already has good strength reserves, but it is still not worth subjecting it to additional loads.
An indent of 380 mm is made from any of the front plates and a vertical strip of 450 * 2200 mm is fixed. It is fixed not only to the back, but also to the bottom. There remains a gap at the top, which it is advisable to immediately close with the remaining 5-gonal plate, after which everything is mutually fixed. It is at this stage that the rigidity is brought almost to maximum, because the main protective elements are already installed.
The simplest thing remains - installing shelves and pipes. The pipe is installed in the larger compartment in the most careful manner. There is no need to spare screws here, because... At times the load will be truly enormous. But the shelves can be made in any way of interest, and most often only 2 guides are installed for them, and the plates themselves are not fixed in anything, which is very convenient when you need to quickly lighten the cabinet or completely carefully dismantle it.
Only in reality last stage hinges are installed and doors are attached to them.
Additional aspects
After the work on making the cabinet is completed, you need to complete the look with piping. The edging is fixed to all open edges of the chipboard using an ordinary household iron (the polymers at its base melt, after which it adheres to the wood).
After the corner cabinet is completely assembled, you can add open side shelves to it, hang a mirror on the door, and also modify the design as your heart desires.
The design is quite durable, so it can withstand even very heavy loads.


Any furniture should combine the beauty of design and ease of use. In small apartments, where every square centimeter is worth its weight in gold, the compactness of furniture plays a huge role. In this case, ideal solution There will be a corner cabinet installed, which, despite its large capacity, will not take up much space. Having ordered the furniture he likes, the buyer is faced with the issue of installation. There are two options for getting out of the situation - entrust the assembly to strangers and overpay an impressive amount of money for it, or solve this problem yourself.
The advantage of corner cabinets is that they take up little space, but they can accommodate a lot of things.

Try to accurately align all the holes, do not force them together by inserting a tie when the holes do not yet line up completely.

Specialists know exactly how to assemble the product correctly and quickly.
DIY assembly
Assembling a corner cabinet with your own hands has a number of advantages.
- Firstly, it saves money.
- Secondly, by assembling furniture yourself, you will be able to do everything efficiently, because you cannot always rely on the conscientiousness of hired workers.
Also, despite the fact that this activity is labor-intensive and painstaking, it is also interesting and useful, because after completing this work, you gain new experience. It is important to understand that this process does not have significant difficulties and does not require special professional skills; the buyer receives a kind of large construction set with assembly instructions. Even if the parts kit does not contain instructions, you can always turn to the Internet for help.

This perfect option for people living in small apartments, where every centimeter is precious.


At least two workers go to assemble furniture and can competently help each other.
Depending on the taste and imagination of the client, as well as on the required functionality of the furniture, the following variations can be distinguished. First of all, such cabinets are divided into built-in and free-standing (cabinet). Cases can be made either as a one-piece structure or as a combination of two direct components. According to their form, they are divided into the following groups:
- triangular;
- trapezoidal;
- L-shaped;
- five-walled;
- rounded execution.

However, each product comes with detailed instructions for assembling a corner cabinet.

When installing the door, the latch must be in open position. Then it must be closed.

When a corner wardrobe is installed in combination with a compartment model, it is possible that the door of the former will hit the compartment.
The choice of shape depends on the wishes of the customer, as well as on the characteristics of the room. According to the type of opening of the doors, they are divided into swing, sliding (compartment) and combined.

The assembly diagram for the corner wardrobe is also included with the product.

The design of the selected product should be combined with the style of the rest of the room. This applies to both execution style and color scheme.

When looking for professionals, focus not on their price, but on their skill.

Corner cabinets look small, but in fact they are quite spacious due to their depth.
Selection of materials and tools
The material from which your cabinet will be made is an important aspect on which the beauty and durability of the furniture will depend. The market pricing policy is divided into two groups.
- The first, more expensive, includes products made from natural wood. They are distinguished by their high price, heavy weight and high maintenance requirements.
- Cheaper and easier to install and operate are products made from chipboard (chipboard) and MDF (fine fraction). However, one of the disadvantages is their lower durability.

A corner cabinet allows you to effectively use non-working areas adjacent to cabinet furniture, as well as space in the corners of rooms.

Assembly is quite simple and can be done on your own.
Self-assembly of a corner cabinet will require a certain set of tools. Mainly:
- hammer drill for drilling holes in the wall;
- screwdriver;
- set of hex keys;
- hammer;
- screwdriver;
- hacksaw.


Schematic diagrams of the location of parts and the order of their assembly into the finished product are indicated in the drawings in the installation instructions.
If a store-bought assembly does not include additional assembly fittings (screws, plugs, hinges, confirmation, etc.), you must take care of purchasing them yourself. This process does not require any special carpentry tools.

Schematic diagrams of the location of parts and the order of their assembly into the finished product are indicated in the drawings in the installation instructions.

Before installing the strike plate under the hinges, you need to clearly know which way the door will open.
Assembly of a corner cabinet and its features
- If an ordinary cabinet can simply be placed securely on a flat surface, then the main feature of such sets is their installation with fasteners directly to the wall. Therefore, at the first stage of work it is necessary to prepare holes for fasteners. Then the installation of monolithic load-bearing walls, to which the remaining parts will be completed.
- It is necessary to immediately compare the number of parts available with what the instructions for assembling a corner cabinet suggest. In case of shortage, it is better to contact the store immediately. It is important to familiarize yourself in detail with the type of parts, as well as their connections.
- After marking is applied, holes are drilled and the cabinet is assembled from large parts to smaller ones.
- 4. At the end of the work, hinges are attached to the walls, and doors are hung on them. This point must be taken into account at the calculation stage, clearly understanding in which direction the sash will open.
- All work on the doors is carried out only with the latch in the open position, which is closed after installation. If the design includes a combination with a sliding wardrobe, you need to make sure that the sliding door does not interfere with other elements of the furniture.
- After completing the work, you can take care of appearance finished product. All connections are closed with plugs matching the color of the surface; if there is no end decorative strip, you can stick it on yourself, then use a utility knife to remove the excess.

After drilling each hole, immediately insert the intersection ties and secure them.

When a corner wardrobe is installed in combination with a compartment model, it is possible that the door of the former will hit the compartment.
Separately, it is worth noting the installation of retractable cabinets, since this is the most crucial moment in the assembly of such headsets. Pull-out shelves and cabinets move inside the structure on wheels along special guides. There are options with wooden and metal guides, but if we're talking about about really high-quality assembly, then wooden version should be dismissed outright. Fastening the guides to the inner walls must be done strictly opposite each other, being sure to adhere to the level. Even the slightest misalignment will lead to difficulties in operating moving furniture parts. If a lot of things will be stored in a cabinet or drawer, or they will be heavy, you can attach two guides on each side. This solution gives the design increased reliability.

In the case where the corner cabinet project was developed by the customer independently, it is recommended to invite company specialists for assembly.

Assembling such a product is a feasible task, especially with the help of instructions.

All modules are attached to each other using an intersection tie.

At the end, go over the ties again.
VIDEO: Corner wardrobe in the hallway!