Drainage system in a private house. Drainage of rainwater from the house: types of drainage systems and their features Well for drainage of rainwater
Since we are talking about arranging drainage, it means that our house is already standing (designed) and we are moving on to landscaping or landscape design. I am sincerely happy for you, Lord! I’m just as glad that you are interested in the question: “How to optimally implement water drainage from the site and from the house?" Having sorted this out, you will save a lot of time and money.
Let me start with the fact that water drainage is a complex task and should include complementary systems:
- Roof drainage system.
- Surface drainage system.
- If the groundwater level (GWL) on the site is high and the house has, for example, a basement or underground garage, there is a need to install a deep drainage system to drain groundwater.
The first two systems provide for the drainage of rainwater (to eliminate negative impact atmospheric precipitation), drainage of melt water (melting snow) and, accordingly, prevent the appearance of the so-called. "high water". Verkhodka, along with groundwater, is a type of soil water, has a seasonal nature and appears as a result of precipitation, melting snow, excessive watering, etc. As a rule, by mid-summer it disappears altogether and can appear briefly only after heavy rainfalls.
Verkhovodka is unpleasant problem for houses with a foundation (basement), and is also the reason for the rapid filling of a leaky septic tank (cesspool) in spring period and during heavy rainfall.
Roofing task drainage system– collect all rainwater from the roofs of buildings and bring it to the required drainage points. If you save on roof drainage, the rains will gradually break up your paths, blind areas, steps and will splash an even layer of dirt on the foundation of the building to a height of up to 50 cm.
Well, if your basement is flooded, its walls are saturated with moisture, and the septic tank needs to be pumped out every 7-10 days - you cannot do without deep drainage.
- What is the soil structure and groundwater level (hereinafter referred to as GWL) on your site? The answer to this question will clarify the need for underground (deep) drainage and waterproofing of the basement, if any. The bearers of this mysterious knowledge are usually the same people who drilled your water well or specialized geodetic organizations.
- Where will it be performed? drainage of surface and groundwater? This answer will help you figure out the water discharge point (it can be the same for both surface and groundwater) and will simplify the preparation of a technical solution. I am familiar with the following options:
- Storm drainage. Typically this is a concrete pipe large diameter. Ideally, it is buried below the freezing depth of the soil and equipped with collectors, i.e. places for connecting separate storm drainage systems, for example, from your site. Stormwater is drained into natural reservoirs.
- Mixed sewerage. Removes superficial and, in fact, sewage. Also equipped with collectors. Provides for the arrangement of wastewater treatment systems before their discharge, for example, into reservoirs.
- Drainage field (infiltration system). Equipped if the options listed above are not available. A system that ensures uniform and natural “absorption” of stormwater into the ground directly at the collection site.
- Neighbor's plot :). The simplest and quick way, which also allows you to “get closer” to your neighbors in the shortest possible time.
- Will the water be drained by gravity or is a drainage well and pump needed? To do this, you need to answer the previous questions, as well as determine the slopes of the site. A discharge point should be provided at the lowest part of the site.
- What is the area of the drainage area? The throughput and, accordingly, the cost of water collection systems depends on this. Knowing the area of your site, you can independently calculate the estimated flow of rainwater, which should be removed by drainage systems. Use the program for this.
- What load (surface pressure) must they withstand? engineering structures For water drainage? Let me rephrase. Who will walk (drive) on them? The so-called load class and still the same cost. The load class is important for both deep and surface drainage.
If your site is located on a slope and you want to make a diversion surface waters flowing from the upper site, then to intercept the water you should provide a system of drainage trays perpendicular to the slope in the upper part of the site (then the site looks landscaped and has a flat surface) or dig a drainage ditch along the upper border of the site and connect it with side ditches (the site becomes similar to a medieval outpost).
After you have answered the preparatory theoretical issues, you should take up implementation. I strongly recommend developing a project or just a technical solution. To do this, you should either contact design organization(department of water disposal and sewerage), or draw a sketch yourself.... and find an unperturbed builder who will take on the task of bringing it to life.
Ask and get into the details! Builders in most cases install a drainage system to drain water from the roof, but do not consider it necessary to divert this water far from the foundation. I know of cases where a contractor installed storm water inlets, but the collected water was “diverted” through the bottom of these same storm water inlets into the ground near the foundation. In this case, there is no fundamental difference between water simply draining from the roof and wetting the foundation, or flowing through the drainage system (collecting in a storm water inlet) and... wetting the foundation. The soil adjacent to the foundation, after construction work usually more loose than natural soil, so rainwater accumulates in the sinuses and penetrates into the concrete. In winter, water freezes and destroys concrete structures.
Therefore, in addition to constructing a blind area around the house 80-100 cm wide, the water collected by the drainage system must be drained into the storm drain. This can be done by a system of drainage trays (Fig. 1) or by installing point storm water inlets (Fig. 2).
In the first case we have less earthworks, the system will always be available for inspection and repair. In the second case, we can lay the pipe from the storm water inlets in the same trench with the drainage pipe.
In this case, in no case should you connect the surface drainage system with the drainage of the foundation of the house. Otherwise, rainwater will enter the drainage and vice versa - wet the foundation!!!
From above, sand traps and drainage channels are covered with removable protective and decorative grilles, which prevent debris and leaves from entering the system, and do not interfere with the movement of pedestrians and vehicles. The linear drainage system is connected to the storm sewer through a system of vertical and horizontal drains.
Important!!! When installing surface drainage, slopes should be provided (minimum 0.005, i.e. 5 mm per meter of length) for the movement of water by gravity! This can be done in two ways:
- By using the slope of the surface.
- Through the use of channels that inner surface with a slope (this function is provided in concrete channels of some manufacturers: Standartpark, Hauraton, ACO), as well as due to a stepped slope organized using channels of different heights.
It is most advisable to combine the arrangement of an underground drainage system with foundation work - it will not cost much. If, during the operation of the house, it turns out that the groundwater level is very high, and the drainage of water from the house is not organized, this will cost you a pretty penny.
Underground drainage is a system of drainage pipes (drains, i.e. pipes with holes, filled with crushed stone and wrapped in geotextiles) and drainage wells. Geotextiles protect drains from silting.
Drainage wells are designed for Maintenance drainage system, for example, cleaning with a jet of water. A drainage well is provided at every second bend of the pipe, so that both the inlet and outlet sections of the pipes can be serviced through it.
The wells are assembled from concrete rings with a diameter of 400 mm and 700 mm. Recently, ready-made plastic wells with a diameter of 315 mm are increasingly being used.
The water collected by drainage pipes enters a collector well (water collected by surface drainage can also be brought here), equipped with check valve, which prevents water from the well from flowing back into the drainage system. From a common well, water is removed (for example, pumped out) into a communal storm sewer, an open drain, or it is absorbed into the soil through a specially poured layer of crushed stone (drainage field).
Well, in general, that’s enough for the first time (especially if you don’t have special education). Conclusion: Arranging surface and, if necessary, deep drainage is a feasible task, but... if in doubt, trust it to professionals. If you are going to secure basements, foundations, etc., and are faced with perched water (groundwater), then due to the complexity and complexity of the task, I advise you to choose one contractor who will be responsible for the development and installation of the entire system as a whole. This is important because individual works performed by different contractors, as a rule, do not solve the problem as a whole, and the contractor always has the opportunity to declare: “It’s not me!” Try to negotiate a warranty on your drainage systems for at least a year. Only a full season will prove their viability!
Since you are paying money, do not entrust such a difficult task, for example, to the tilers who pave your paths! They can be performers - but they must be led by a professional.
Vladimir Polevoy.
Send a request
Leave your phone number and the manager will contact you
High-quality removal (drainage) of rain and groundwater from the house is a prerequisite for long and reliable operation of sidewalks and areas that are covered with any type of paving slabs.
From the article you will learn why water drainage is so important, what happens when water is not completely removed, and what schemes are used for this.

To understand why water drainage is so important, you need to know how pavements with any type of tile work. Before laying the underlying layers, part of the soil is removed and the surface of the ditch is compacted.
In most regions of Russia, clayey and sandy soils tens of meters deep, the top (soft) layer of which consists of a mixture of clay, sand and humus. In mountainous regions (the foothills of the Urals, the North Caucasus and others), often the depth of soft soil does not exceed 30 centimeters, after which rocky soil (stone, rock) begins. The blind area laid in these places is less sensitive to water.
When water penetrates the underlying layers and reaches the soil, the clay and black soil soften. If the amount of water is large and given enough time, the clay turns into liquid mud into which the base of the paving sinks. As a result, in a separate area, first a layer of crushed stone subsides, then a layer of sand and, finally, paving slabs or paving stones.
In Russia, washed sand and crushed stone are rarely used for the construction of foundations (underlying layers). Especially if they are not doing it for themselves.
If you hired a team of coven workers, at the same time entrusted them with the purchase of everything you need and want to save money, with a 95 percent chance they will save on the quality of materials. For the underlying layers, such workers use material that is not only not washed, but not even cleaned using a screen.

When water passes through unwashed and uncleaned sand and gravel, it washes away small particles. As a result, voids are formed that subside over time. This is especially evident when the soil is heaving (freezing of the water with which it is filled, as a result of which the ground level rises).
Poor drainage of water from areas leads to the destruction of paving elements. Water that has penetrated (absorbed) inside the tile freezes at temperatures below zero degrees, expands and destroys its structure.
It is cheaper to build normal drainage of storm and melt water once than to carry out major repairs of the blind area every 3-5 years.
Groundwater and meltwater drainage schemes
The following schemes are used for water drainage:
- surface using sidewalk gutters;
- surface using drainage ditches;
- underground with connection to the city storm sewer;
- underground with connection to a septic tank or water purification devices and subsequent discharge into a reservoir.
The water drainage scheme using sidewalk gutters is described in the article Elements of drainage.
A surface drainage scheme using drainage ditches is used if the terrain and structure of the area allows. A slope of at least 1 cm per 1 meter, the ability to discharge water into a river or lake, the ability to dig ditches or raise the road (sidewalk) and the opposite wall of the ditch are required.
The base is prepared in such a way that the slope of the paved area towards the ditch is at least 1 cm per 10 meters. The border is installed at the level of the paving elements, not allowing it to be exceeded even by one millimeter. This arrangement is rarely used for paved areas because it is necessary to reinforce the near side of the ditch with concrete, asphalt or other materials to protect the base.

The general structure of underground drainage schemes is the same. Water is drained through a closed concrete (socket pipes or trays with a lid) or plastic (PVC or polyethylene) pipe. The central pipe (collector) is laid either 0.1-0.5 meters deeper than the lower underlying layer, or on the side at a depth of 0.3-0.7 meters below the surface.
The location of the collector on the side is preferable, because in the event of a serious blockage, it is necessary to dig up the pipe, remove the blockage (often with the destruction of a section of the pipe and subsequent replacement) and cover it again with soil. Therefore, the use of concrete trays and covers to drain rainwater avoids the destruction of pipes. It is enough to remove the cover, clear the blockage, put the cover back in place, fill it with soil and restore the coating.

To decide which underground drainage scheme is preferable, contact the architecture department and find out where the nearest storm sewer is located and who owns it. After this, contact the owner to find out the connection conditions.
Consult the city/village administration about the possibility of discharging storm and melt water “on topography,” that is, into “natural ditches” - ravines, hollows and depressions that lead to a reservoir or river.
Most likely, you will be assigned several expensive examinations and will be required to purchase treatment facilities. Although there are cases where it was possible to save money on examinations without any bribes, this depends on the ecologist who makes the decision.
Organized discharge of storm and melt water without obtaining permission is illegal. If you are caught doing this, you will be forced to pay a large fine and be forced to dismantle the entire rainwater drainage system. Or they will be required to obtain permission from maximum number examinations, installation treatment facilities from “their” companies and at the maximum price.
Why you can’t discharge water into a domestic sewer or septic tank
Domestic (fecal sewer) is designed for a small amount of domestic waste, so the diameter of the pipes is smaller than for storm sewer. The amount of water during a rainstorm or melting snow is tens and hundreds of times greater throughput sewer or septic tank. As a result, their contents are washed to the surface.
Storm and melt water contains a large amount of sand, small and large debris, so supplying such water will lead to the formation of blockages in the collector. According to Russian law, discharging stormwater and wastewater into domestic sewers is illegal and is punishable by a large fine.
How to organize a drain in the yard with your own hands
If you paved your yard, use the old drainage system. If water flowed through holes in the fence foundation and went through the gutter, create a foundation for the blind area so that the slope was directed in a straight line from the fence foundation to the house, as well as towards the gutter. The slope is 1-1.5 cm per 10 meters.
Mark a line perpendicular to the foundation of the fence. If the diameter of the hole in the fence foundation is less than 20 cm, drill or punch several additional holes with a diameter of 6-15 cm.
If a storm sewer was connected to the yard, then no additional approvals are required. But just in case, consult the city/rural department of architecture or the water utility. Perhaps they will require a project for the reconstruction of storm drainage in your yard. But in 9 out of 10 cases no additional approvals are needed.
If you haven't had any storm water drainage, visit your neighbors and see how they do it. If most of your neighbors dump stormwater into a drain, feel free to dump the water into it using the technology described above. If your neighbors are connected to the storm sewer, contact the sewer owner about connecting to it.
Properly organized drainage of storm and melt water affects the strength and reliability of the blind area much more than the strength and quality of the tiles. From the article you learned about the schemes used to drain these waters, in which cases permits and approvals are necessary, and when you can do without them.
Land owners often face the problem of excess water after snow melts, rains, or due to high groundwater. Excess moisture is harmful not only to plant roots, but also leads to flooding of basements and even premature destruction of building foundations. Installing a drainage system will help cope with this problem. This is an engineering structure, thanks to which storm and groundwater are discharged outside the site.
The system includes point drainage systems and linear channels. The drainage system is a gravity flow system. Pipes (drains) are laid with a uniform slope (1–3 cm per meter of length). This is especially important for silty soils. The decline should go away from the house. At pipe bends they arrange inspection wells. They make the system easier to maintain. Straight sections are equipped with wells every 30–50 meters.

Layout of drains on the site according to the herringbone pattern
The drains on the site are laid out in a herringbone pattern. The diameter of the auxiliary pipes is 75 millimeters, the main pipe is 100 millimeters. The central pipe carries water outside the site.
Pipes should not be laid close to the house or fence. The distance from the foundation to the pipe is at least 1 meter.
Types of drainage
Drainage can be performed open or closed. The choice of drainage system depends on the climate and type of soil. The groundwater level is also important.
- Open drainage is the simplest method of drainage. Water flows through ditches to a given place. Drainage trays with decorative grilles are also used. The most important thing here is the slope. It should be 2-3 centimeters per meter of length.
- The closed version is more common. These are branched drainage systems located in the ground. Pipes or crushed stone are placed at the bottom of the trench. Brushwood or large stones are also suitable for this. The main thing is that the material conducts water. To make the water decrease faster, the slope is 2–5 centimeters per meter of length.
Open system
A ditch is dug along the perimeter of the site and the house. The width should be 40–50 centimeters, the depth 50–60 centimeters. The slope is made towards the common water intake trench. For better water drainage, the walls of the ditch are beveled at an angle of 30 degrees.
This system has its own characteristics:
- low cost;
- completing the work does not take much time;
- has an unaesthetic appearance;
- at large quantities water, the depth of the ditch needs to be increased, which increases the likelihood of falls and injuries;
- Over time, the wall of such a ditch collapses.

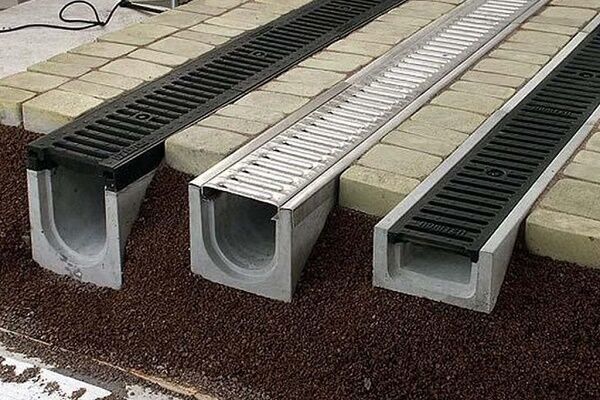
Decorative trays extend the life of the drainage system and give a more aesthetic appearance
To increase service life, trays are used. They can be plastic or concrete. Decorative grilles increase safety. Improves and appearance plot.
Modern drainage according to a linear scheme involves the use of special parts: channels, gutters and trays, which are installed in pre-prepared ditches dug to the water collection site with a slope. Grates are laid on top of such ditches.
Closed system
Pipe drainage carries water to the catchment well. Drainage drains are laid in trenches. Perforated pipes are filled with crushed stone and covered with geotextiles. Connecting to the collector, the water is discharged to the collection well.

Using a network of drainage pipes, excess soil moisture is drained into separately located drainage wells
The closed type is a drainage pit. A hole dug to a depth of 2 meters is filled with gravel. going to it excess moisture. Subsequently, the water gradually disappears into the soil.
Backfill drainage is similar to closed drainage, but the difference between them is that instead of pipes, in this case the trench is half filled with large crushed stone or broken bricks. The upper part of the trench is covered with a smaller fraction - small stone or gravel. The top layer is made of soil. Backfill drainage is now rarely used. On clay soils the system quickly breaks down. The filter media becomes silted and does not allow water to pass through.
Modern drainage systems
Modern industry offers new types of drainage systems. Synthetic materials are durable and lightweight. The versatility of the parts ensures ease of assembly.
Pipe and pipeless structures have been developed. Plastic devices are environmentally friendly. Pipes are sold with or without geotextile wrapping. The drainage kit includes two-layer drains and synthetic filters.
Systems without crushed stone
Instead of crushed stone they are used synthetic aggregates. The bottom of the trench is compacted and covered with sand. Pipes are laid taking into account the slope. The tecton is covered with layer-by-layer water-permeable material.
The thickness of the coating depends on the water permeability of the soil. Usually it is 100–300 millimeters. Geotextiles are laid on top and soil is filled. Soft drainage is more expensive, but more effective than crushed stone.

Geotextiles are used in drainage systems as a separating layer
Systems without pipes
With new technologies, pipes can be replaced with a different design. Synthetic drainage mats are now being produced. This is a three-dimensional plastic mesh wrapped in geotextile. Lightweight products made of composite material are easy to install. Their advantage is protection against silting.

Even if the upper or lower layers of geotextile silt, the drainage grid itself will continue to work perfectly and drain groundwater
When the soil is highly moistened, there are enlarged systems. These are drainage tunnels and fields. Plastic elements assembled into monumental structures. They can be used on large areas.
Softrock systems
The cassette consists of a perforated pipe and polystyrene foam filler. The structure is covered with durable woven mesh. The top layer is made of double geotextile. Special channels improve water flow. Drainage cassette more efficient than the system with crushed stone by 35–60%.
The flexible pipe in the case is 3 meters long. It is completely ready for installation. The softrock drainage system is located at a depth of 45 centimeters. After installation, they are covered with soil.

The softrock system uses polystyrene foam instead of crushed stone
According to consumer reviews, the system is reliable and durable. Many have mounted it on our own. The time of year does not affect the production of work. The flexibility of the sections is especially noted, which makes it possible to bend around trees and buildings.
After the autumn rains, water stood in the basement; it was necessary to provide high-quality drainage. I remembered about the crushed stone and figured out in my mind how many resources needed to be poured into this project: time, labor, transport to transport this crushed stone and then spread it out... I was looking for instructions on the Internet, came across Softrock, decided to take a risk and did not regret it. Easy, inexpensive, modern and smart: foam balls tucked into the belt. Indeed, everything is ingenious - simple
Valentinehttp://softrock.ru/o-nas/otzyvy/
The pipe there is the same as the 110 or 160 pipe, it is the same, the filtration element is only polystyrene foam, in bad soils sand and crushed stone can kill a lot and the area will turn into a swamp, but this pipe can be laid in a landscaped area, it will work out neatly. The main thing that year was to make 2 sections from the standard system: geotextiles, sand, crushed stone + pipe + crushed stone, geotextile soil, the second only softrock - in the first section the soil has not yet receded and the water is standing, but the softrock works faster. It has a surrounding layer of foam plastic, it is like insulation for drainage, and the diameter is stable 27 cm. Of course, everything depends on its purpose, the soft rock will simply go along the site, and if it does not carry the load on the road.
Drenazh2013https://www.forumhouse.ru/threads/195034/page-3
Modern and high-quality drainage, if you, like me, did not know how technology has advanced in this area, then look at soft rock, there is something to be surprised at. Very easy to install and requires no maintenance. No rubble or problems. External material It only lets water through, no need to clean it. No, it's really very convenient.
Cinderellahttps://www.otovarah.ru/forum/topic/4373-drenazh-softrok-softrock/
Drainage for storm water drainage
The façade, foundations, and area around the house suffer from precipitation. The drainage system for drainage of storm water includes:
- roof gutters;
- point storm water inlets;
- storm drainage;
- drainage system.
Gutters and pipes remove water from the roof. Stormwater inlets are installed under the drainpipe. They direct water through pipes into storm drains. Typically, two-layer polymer drains are used. They are laid in trenches at a slope of 2 centimeters by 1 meter.
Drainage system and storm sewerage
Rainwater must be removed from the building. To do this, drainage wells or storage tanks are installed in the drainage system. Rainwater is collected in a sealed reservoir. It can be used for irrigation or technical purposes.
The walls of the well are reinforced with concrete rings. The depth should be at the level of the filter layer of soil. Then the water will gradually go into the soil. If such layers lie deep, wells are drilled. It is necessary to take into account the groundwater level. At high levels, wells are ineffective.

Storm drainage for country house should be installed simultaneously with the drainage system for a more correct calculation of water drainage
Installation of a drainage system: step-by-step technology
Before starting installation, it is necessary to draw up a diagram of the site, note natural slopes, and determine the groundwater level. Mark the trenches on the ground according to the diagram. To do this, use pegs and cord.
Calculation and drainage diagram
The calculation consists of determining the upper and lower points of the system. The lowest point corresponds to the place of water discharge. The top one is selected 30 centimeters below the foundation. The slope angle is taken to be at least 1%.
You need to calculate the length of the entire trench. To do this, add up the distance from the well and the length of the trench around the house. One percent of this amount is equal to the difference between the upper and lower points. If the water intake point is higher, a drainage pump is needed.

The correct diagram of the drainage system will help you make it yourself
The drainage system diagram indicates:
- location of buildings on the site;
- water storage area;
- main conductor;
- drainage drains.
SNiP drainage system
When designing drainage systems to prevent or eliminate flooding of territories, the requirements of SNiP drainage 2.06.15–85, as well as SNiP 2.06.14–85 and SNiP II-52–74 must be met.
- When designing, preference should be given to systems with gravity drainage. Drainage systems with forced pumping of water require additional justification.
- Depending on hydrogeological conditions, horizontal, vertical and combined drainages should be used.
- The use of a drainage system should be justified by studying the water, and for the arid zone, the salt balance of groundwater.
- Performing horizontal drainage using open trench and trenchless methods is determined by economic feasibility. In the case of installing open horizontal drainages at a depth of up to 4 m from the ground surface, the depth of soil freezing, as well as the possibility of their overgrowing, should be taken into account.
- Open channels and trenches should be constructed in cases where drainage of large areas with one- and two-story low-density buildings is required. Their use is also possible to protect ground transport communications from flooding.
- For fastening open slopes drainage ditches and trenches, concrete or reinforced concrete slabs or rock fill must be used. Drainage holes must be provided in reinforced slopes.
- In closed drainages, sand and gravel mixture, expanded clay, slag, polymer and other materials should be used as a filter and filter bedding.
- Water should be drained through trenches or channels by gravity. Installation of water collection tanks with pumping stations pumping is advisable in cases where the topography of the protected territory has lower elevations than the water level in the nearest water body where it should be diverted surface runoff from the protected territory.
- Discharge of water into storm sewers is permitted if the capacity of the storm sewer is determined taking into account the additional costs of water coming from the drainage system. In this case, back-up of the drainage system is not allowed.
- Inspection wells should be installed at least every 50 m in straight sections of drainage, as well as in places of turns, intersections and changes in slope of drainage pipes. Inspection wells may be used in prefabricated reinforced concrete rings with a settling tank (at least 0.5 m deep) and concrete bottoms in accordance with GOST 8020–80. Inspection wells on reclamation drainages should be adopted in accordance with SNiP II-52–74.
- The following pipes should be used: ceramic, asbestos-cement, concrete, reinforced concrete or polyvinyl chloride pipes, as well as pipe filters made of porous concrete or porous polymer concrete.
- Concrete, reinforced concrete, asbestos cement pipes, as well as pipe filters made of porous concrete should be used only in soils and water that are not aggressive towards concrete.
Pipes for drainage system
Modern industry produces three types of pipes:
- asbestos-cement;
- ceramic;
- polymer.
The first two types are now rarely used. They are expensive, heavy and short-lived. Diversity plastic pipes fills the market. Single and double-layer, flexible and rigid polymer pipes have many advantages.

Polymer pipes are most often used for drainage
Do-it-yourself drainage installation
You can install drainage on the site yourself. Any company can help you select pipes and fittings for them. To make a drainage system you will need the following tools and materials:
- pipes made of asbestos cement or plastic, fittings;
- wrenches, pipe cutting scissors;
- filter non-woven material;
- ready-made or manufactured manholes;
- storm water inlets (catchment inlet), trays, gutters, gratings, sand traps;
- gravel, sand;
- level;
- bayonet and shovel;
- electric or pneumatic hammer drill;
- wheelbarrow, buckets;
- iron or wooden rammer;
- individual protection means.
The construction of a deep drainage system occurs as follows:
- Construction begins with the installation of a collector well, that is, a place where water will be collected from the entire system. It would be simple and rational to use a ready-made container made of durable polymer, although it is also possible to independently manufacture a well from reinforced concrete rings.

A prefabricated drainage well is needed so that excess water accumulates in it, which fills the drainage system to capacity
- Next, trenches are prepared for laying drainage pipes. The trench is dug 20–30 cm deeper than the expected depth of the pipes to be laid, and it is necessary to maintain a slope of 0.5–0.7%.

The depth of the trench depends on climatic conditions the area where the drainage system is installed
- If it is impossible to maintain the given slope, then this scheme will have to include an additional pump for the drainage structure of the site.
- Sand cushions 10 cm thick are placed in the dug trenches, which are compacted very carefully.
- Then the trench is lined with geotextile fabric so that its edges extend beyond the trench.
- Gravel 10–20 cm thick is poured onto the fabric, on which the pipes will be laid.

We lay out the geotextile fabric so that it completely covers the entire area of the trench and continues to spread along the surface of the earth for another 20–30 centimeters
- Inspection wells are installed at the turning points of the drainage structure pipeline. Wells are also installed on straight sections every 50 meters.

Inspection drainage plastic well needed in order to easily check the drainage system, and, if necessary, repair or clean it
- After the pipes are laid, washed gravel is poured on top of them in a layer of 10 to 20 cm and all this is wrapped in excess geotextile overlapping. You can secure the fabric with polyethylene twine.

A layer of washed gravel is poured onto the pipes and wrapped in excess geotextile
- Geotextiles will act as a filter that does not allow soil particles to pass through and will prevent the gravel layer from silting.
- Filling the trench: sand, then soil or crushed stone, and turf is laid on top. A sand cushion is needed to prevent pipe deformation during the off-season.

You can lay grass turf on top of the drainage trench or decorate it with stones
Video: laying drainage using perforated pipeline
Drainage system maintenance, cleaning
Maintenance consists of inspecting and cleaning the system. Regular inspection will help identify minor problems.
Basic methods of servicing drying and drainage systems:
- Cleaning the drain ( mechanical method). It can be carried out different methods. The choice of any of them depends on where exactly the pipes are located and design features. If the drain is on the surface, it is best to choose a manual cleaning method. It can be carried out independently, without the involvement of qualified specialists. If we are talking about deep drainage, more efficient methods will be required, which may involve excavation work. In this case, you will need a pneumatic installation with a cleaning tool and a shaft. The second option involves the use of a special nozzle, which will remove deposits on the pipe walls and crush large inclusions. The system should be cleaned at least once every 3–4 years.
- Flushing drainage (hydrodynamic method). Typically, the system is cleaned in sections using a hose and pump. Global cleaning of the system should be done once every 10–15 years. To do this, you need to provide access to each drain from both ends. On one side the pipe goes into a drainage well, and the other end is brought to the surface. To do this, even at the stage of laying the system, outlets are made and with the help of fittings the pipe is extended and taken to a certain place. During the washing process pump equipment They connect it to one or the other end of the pipe, and a stream of water is passed under pressure. This uses a compressor that will supply compressed air into the pipe. The system is cleaned by a flow of a mixture of air and water. The hydrodynamic method is different high efficiency - under this influence, sediments and debris are crushed, after which they are washed out of the drains with clean water.
Video: cleaning a drainage well with a drainage pump
Manholes require regular cleaning. They must always be closed. Pipes are cleaned of debris using a hydraulic method using high pressure. Mechanical cleaning scrapers or brushes are not allowed.

In order for the water drainage system from the site to work as efficiently and as long as possible, it is necessary to pay attention to its maintenance and repair.
The type of drainage system is determined by the characteristics of a particular site. Each owner chooses the most suitable option for him. Drainage installation can be done independently, with the necessary calculations, compliance with sanitary standards and rules and recommendations of specialists. If properly maintained, the system can operate for more than 50 years.
The foundation is the foundation, the support of the building; the life of the house depends on its quality, strength and integrity. The integrity of the foundation is compromised, first of all, under the influence of water coming into contact with it during rains, runoff of melted snow, rising groundwater levels (or the constant presence of groundwater at high level) etc. As a result, the foundation walls become wet, damp, overgrown with mold, and moisture gradually collects around and creeps up to the upper floors.
All of the above problems demonstrate the importance of timely drainage from the foundation of a building. Moreover, foundation drainage must be carried out during the process of creating a residential structure in order to carefully consider the design of the drainage system, calculate the angle of inclination, and select suitable materials for drainage and calculate the depth at which structural elements should be located.
Drainage materials
If you follow all design standards and use only quality materials, then effective foundation drainage can be done even with your own hands.
It is extremely important at the design stage of the drainage system to calculate the degree of load to which the trays and drains will be subjected.
If the load is high, then you need to choose very strong materials; plastic will not work in this case, but durable concrete will do an excellent job. Wells, gutters and channels made of concrete can withstand loads of up to 90 tons.
Gutters, which act as water drainage, can have their service life extended if protective gratings made of cast iron are used. If they are carefully attached, they will cover all external elements of the system.
In addition, rainwater inlets can also be placed around the territory of a private house, which will collect water pointwise. In order to choose the material for their execution, you need to know the degree of operational load.
Wall drainage is a device that provides drainage and consists of fittings and special drainage plastic pipes with perforation.
The pipes are laid in grooves prepared in advance around the perimeter of the house, filled with a drainage layer.
For the drainage system, pipes with both corrugated and smooth surfaces can be used. Smoothness gives good throughput, which intensifies drainage, and the corrugation in the pipe increases its rigidity, and, consequently, strength.
Foundation drainage: types and features
- Drainage happens:
- open - creating ditches;
- closed - laying drainage pipes;
It is easiest to do open drainage with your own hands; in this case, the sequence of actions is as follows:

- digging ditches half a meter wide and a meter deep along the entire perimeter;
- preparation of ditches: mowing the walls at an angle of 30 degrees.
Water will accumulate in the grooves, which will subsequently be discharged into the main drainage ditch. Naturally, if the site is located at an angle, it will be easier for the open drainage system to drain water away from the house, so its efficiency will be much higher.
Closed drainage looks like a deep (one and a half meters) trench, about 30 cm wide.
The following rules for laying such drainage with your own hands can be distinguished:
- The pipe responsible for drainage of water must be inclined towards the slope of the natural flow, or towards drainage well.
- The bottom of the trench is densely covered with crushed stone or sand.
- The pipes must be wrapped in filtered material, and after direct installation in the trench, they must be covered with material that will later serve as a water-carrying layer.
- Having completed the installation, all ditches must be filled with soil and turf laid.
- After wrapping the pipes with a special material, they are laid on the bottom and sprinkled with material that will subsequently play the role of a water-carrying layer.

Now the ditch is covered with soil and the removed turf is laid in place.
How to drain melt and storm water from the foundation
To protect the foundation of the house from rain and melt water, you can use a blind area. Water can be drained by installing surface drainage trays along the blind area. It is worth remembering that in the spring the trays will become clogged very quickly, because melt water will run freely across the frozen ground without being absorbed into it.
 Foundation blind area
In addition, at night the temperature will drop, the water will freeze, its drainage will be impossible, and the trays will become useless. It is more advisable to use a device made from trays in the summer: storm water will freely flow from the lawns directly into the drainage device.
In addition, you can drain water with your own hands almost free of charge and more efficiently. This method is called watershed creation and landscape modeling.
To create a watershed, all you need is a shovel, a rake and a wheelbarrow to transport the earth. First of all, the parameters of the watershed are calculated: shape, length and width. A direct watershed line is drawn in large areas: near a private house, cottage, parking lot.
Small objects are limited by an arc-shaped watershed, at a distance of about four meters from the beginning of the foundation. In this case, drainage is carried out into a ditch or a special drainage well.
In order for water to drain naturally, it is necessary to make the depth of the watershed above the bottom of the ditch and below the level of the blind area by 20 cm.
After marking the watersheds, you can begin to create them.
How to make watersheds?
There are a couple of ways to create watersheds:

- The first method involves digging a canal along the bottom of the watershed, inclined towards the ditch. The degree of inclination is calculated using a level. After this, it is necessary to dig several beacon channels coming from the blind area and converging together in the first channel. After this, the soil between the beacons is removed.
- The second method: to ensure drainage at the bottom of the watershed, sloping in the direction from the blind area, the soil is removed. Next, the same soil is compacted behind the watershed, creating a slope away from the building. The house will eventually stand on a slight elevation, providing good drainage from the foundation down into the ditch.
Lawns planted near the house will also help improve drainage.
If a natural meadow does not prevent rainwater from penetrating into the soil, then a grown, strong lawn is able to drain water along the slope, so that impregnation occurs only to 3-4 cm of the soil.
This protective property of the lawn is explained by the content of a dense fibrous grass mixture, which (if the lawn is laid correctly) blocks the penetration of water deep into it.
How to drain groundwater from the foundation of a private house with your own hands?
The foundation of any house, and especially a private one, is subject to the negative influence of ground water. They contain components that can destroy concrete base. Even if the house is carefully waterproofed and equipped with supports, this does not guarantee protection from the influence of groundwater and further destruction. Only foundation drainage can provide such protection and ensure drainage.

The main stages of creating a closed drainage with your own hands:
- Digging a trench half a meter wide and half to one and a half meters deep. You should dig with an inclination towards the ditch into which the water will drain.
- Filling the trench bottom with sand and further compacting it, taking into account the angle of inclination of the bottom.
- Laying drainage pipes on the sand (if there are no special perforated ones, you can make them yourself: by drilling holes in ordinary plumbing pipes in a 180-degree sector).
- Sprinkling the pipes first with large and then small crushed stone and compacting a layer of earth on top of the crushed stone.
- An inspection well must be installed in the bend of the drainage system, to which pipes with holes for drainage are attached. The pipes must lead to the very boundaries of the site.
Now we need to organize water drainage outside private property:
- we dig a trench again;
- we make a slope and cover it with sand;
- we install pipes without holes (here there is no need to collect water from the lawn);
- we fill up the pipes and put the soil and turf in place.
Thus, foundation drainage is an operation, before which it is not recommended to engage in the actual construction of the house. Drainage provides protection around the foundation, removal of excess moisture from it and, therefore, long-term operation of the building.
Drainage of ground and storm water from the foundation will significantly increase the service life of both the permanent building and the country house. An easy-to-use drainage system will protect underground concrete structures from gradual erosion and basements from watering. But it is extremely important to prevent the destruction of the very foundation of the structure, right?
A well-designed drainage diagram around the house will help to build an efficient collection and disposal system natural water. We invite you to familiarize yourself with carefully selected and verified information based on regulations and real experience of builders of low-rise buildings.
We will tell you in detail about the types of drainage systems, the features of their design, and the specifics of operation. We will give reasons in favor of choosing a certain type of drainage. Offered to your attention useful information supplemented with photos, diagrams and video instructions.
When designing a drainage system, the goals that are planned to be achieved are first determined. They may consist of draining the entire area, protecting the foundation and basement of the house from excess moisture.
From existing systems There are two main types of drainage - open and deep (closed). The first can be used for agricultural needs, for drainage from cultivated areas. Closed drainage is used to drain water in dacha and cottage areas, to protect buildings from the negative effects of high groundwater levels.
The organization of a drainage system is necessary when the groundwater level is high, which is especially evident during the flood period. Drainage to protect from underground water aggression concrete foundation and reduce the hydraulic load
Combined drainage systems are also used. They are often supplemented with storm sewer lines designed for recycling atmospheric water. Provided they are properly designed, they can significantly save on the construction of each system separately.
Image gallery
The first and main sign that site owners need to arrange drainage is stagnation of water during the snowmelt period. This means that the underlying soils have low filtration capacity, i.e. do not allow water to pass through well or not at all
Drainage is necessary in areas with pronounced signs of soil erosion: cracks that appear during the dry period. This is a manifestation of soil erosion by groundwater, ultimately leading to destruction
Collection and drainage of water is required if, during the period of snowmelt and heavy rainfall, groundwater rises to the level of utility lines.
Drainage systems are constructed in areas with a characteristic slope. But in this case they are needed for a balanced distribution of water and retention of it on elevated areas
Flooding of the area during snowmelt
Erosion and erosion of soil under the foundation
Water at the level of utility lines
Suburban plot with slope
#1: Open drainage device
Open drainage is the simplest and most economical method of draining water, which can be used subject to the following conditions:
- the underlying soil layer is clayey, poorly permeable to water, which is why the fertile layer, located 20–30 cm from the surface of the earth, is waterlogged;
- the site is located in a lowland into which rainwater naturally flows during periods of heavy rainfall;
- there is no natural slope in the terrain of the site to ensure the movement of excess water towards the street.
Open drainage is arranged in areas with high groundwater level, the elevation of which is most often determined by the location of the land plot in a lowland or the clayey composition of the soil, which does not allow or very weakly allows water to pass into the underlying layers.

A drainage system designed to drain excess groundwater works perfectly in tandem with a storm drain, whose job is to collect and drain precipitation (+)
Planning a drainage scheme is best done at the design stage of a house. This will allow you to tie up the work and place the rainwater inlet under the gutters before installing the blind area.
Open drainage is considered the simplest and does not require drawing up a diagram. It consists of trenches 0.5 m wide and 0.6-0.7 m deep. The sides of the trench are positioned at an angle of 30°. They encircle the perimeter of the territory and direct wastewater into a ditch or pit, into a storm drain.
Areas sloping towards the street are easier to drain. To do this, a drainage ditch is dug in front of the house, across the slope, which will retain water from the garden. Then they dig a ditch, it will direct the wastewater towards the street, into the ditch.
If the site has a slope in the opposite direction from the road, then a transverse drainage ditch is dug in front of the fence facade and another longitudinal one is made to the end of the site.
The disadvantage of such drainage is its low aesthetics and the need to regularly clean the gutters from silt and dirt that periodically accumulate in them. This type of drainage is not recommended to be installed under the road surface, as it leads to subsidence of the soil and deformation of the road surface.
The length of lines for water drainage, the number of wells and sand collectors depends on the area of the site, its topography, and the intensity of precipitation in a particular area.
Drainage ditches can be strengthened from erosion using reinforced concrete slabs, stone paving, turf with crushed stone bottom
If the site is considered to be more or less flat, and its level of swampiness is not too high, then you can get by with installing the simplest drainage system.
Along the foundation of the fence, in the lowest place of the site, they dig a ditch 0.5 m wide, 2-3 m long and 1 m deep. Although such a drainage system will protect against high groundwater levels, it will also cope well with precipitation.
To prevent the edges of the ditch from collapsing, it is filled with rubble, broken glass and brick. Having filled it, they dig the next one, it is also filled and compacted tightly. The excavated soil is used to fill low-lying areas on the territory
Over time, this simple drainage system may become ineffective due to gradual silting. To prevent this from happening, it can be protected with geotextile. It is laid on the ground, and after filling the ditch, the drainage layer is overlapped with it. From above, to hide the ditch, it is sprinkled with a layer of fertile soil.
#2: Construction of an effective storm drain
Storm drainage is necessary for the accumulation and removal from the site of water falling in the form of precipitation. It is equipped with point and linear drainage devices.
Image gallery
Stormwater sewer systems arranged to collect atmospheric water and prevent its penetration into the soil and then into the underlying soils
Based on the type of water intake devices, storm sewer systems are divided into point and linear. The former are built in areas with organized drainage, the latter - with unorganized
Linear water intakes have a much larger collection area than point ones. They are installed next to houses with unorganized drainage and on areas paved with a waterproof coating
In linear storm drains, water is both collected and transported through a network of channels covered with metal or plastic grating. In point systems, water is drained through a system of pipes laid in the ground
Storm sewer with point water intake
Point storm drainage channels
Linear water intakes
Structure of trays with gratings
The first type of water collectors is installed under the risers of an organized drainage system. The second type of water collectors is located under the slopes of roofs with unorganized drainage.
Water entering the catch basin moves through an open or closed pipeline. It is diverted either to a common catchment well or to a collector well, from which it is transferred to a centralized sewer network or drainage ditch.
A storm inlet is a container for collecting water, equipped with outlets for connecting pipes of a linear drainage system. The devices are made of durable plastic or cast iron (+)
Elements of a storm system with point drainage basins also include drains, ladders, and dampers. Some manufacturers provide the possibility of connecting storm water inlets to roof gutters, as well as to underground drainage systems.
In addition, ready production models provide sand traps and garbage containers to simplify system maintenance.
The device with installed decorative grille should be located 3-5 mm lower than the level of the path or ground
This is a system of drainage gutters made of plastic or concrete, which are installed on the site in those places where water accumulation is most likely, but extremely undesirable.
For a drainage well, choose the most distant place from the house, well, or cellar. If there is a natural or artificial reservoir nearby, then water can be drained into it
When designing with linear water intakes, the first step is to plan the placement of a catchment or collector well. Next, determine the location of the rotary and inspection wells. Their placement will depend on the placement of stormwater inlets, gutters and closed sewer branches.
To prevent water from the street from entering the yard, gutters are installed along the line of the gate leading into the yard, garage doors, as well as in the wicket area. When choosing system elements that will be installed on the roadway, the future load on them is taken into account.
To prevent moisture from getting inside the building, the slope of the coating in the garage is made towards the water intake grille. So water, when washing a car or thawing snow on vehicle, will flow into the gutter.
Drainage trays must be installed on the porch, around the pool. They are also installed along the blind area, garden paths, laid out from facing material sites
To give the storm drain a neat appearance, special trays made of polymer concrete and plastic are used, which are covered with metal or plastic gratings. When entering the house, use a special tray to clean shoes.
The grate for the gutter installed near the pool is chosen to be plastic, white, to avoid burns on a hot summer day.
For intensive use, drainage trays are mounted on a concrete base. The higher the load class on the roadway, the thicker the concrete base should be (+)
The gutters and water intake points are connected to the drainage tank. Inspection wells are provided at the junctions of gutters and pipes. They are designed to facilitate access to the system and clean it from possible clogging.
Inspection wells are made mainly of plastic. In order to obtain the required depth, their design provides for the possibility of extension using special extension elements.
The placement, slope and length of storm sewer pipes - all these characteristics are very individual and depend on many conditions on the site
A wide range of system elements allows you to design the most rationally, which will be optimal from a technical and financial point of view.
The main elements of linear drainage are gutters made of concrete, polymer concrete, plastic, point receivers, sand traps, gratings (+)
#3: Construction of closed drainage options
Underground, closed drainage used if an open system device will take up too much space on plot of land or it absolutely does not fit into the landscape picture of the territory. The conditions for constructing a closed drainage system are similar to those for organizing a network of open drainage ditches and ditches.
Closed drainage schemes are used to protect the foundation, basements from the impact of groundwater and increasing their service life. By analogy with open ones, they are used to drain suburban areas from excess groundwater.
It is imperative to organize underground drainage on the site if:
- it is located in a lowland, wetland area;
- there is a natural pond near the buildings;
Underground drainage can be divided into two types:
- wall drainage;
- trench (stratal) drainage.
Both types of underground drainage are carried out at the construction stage of the building. If it was decided to begin the problem of drainage after the construction of the house, then a trench ring system is used. There are also limitations to the use of trench drainage. It can be used if the house does not have a basement.
The fact is that, after filling the pit with sand or soil, it creates a looser environment between the bedrock and the foundation. As a result, high water penetrates into this environment and then even the presence of a clay castle does not protect the building from moisture.
Therefore, if the house has a basement floor, for effective drainage it is best to install wall drainage. It is used for drainage to drain groundwater directly from the foundation of a building, to protect basements, cellars, and ground floors from flooding.
Trees and shrubs should not be planted near the drain. The distance to the planted tree can be at least two meters and to the bush at least one meter
The wall one limits the rise in water level, preventing it from rising above the line where the drainage pipes are located - drains. It is believed that a drainage pipe 1 m long is capable of draining an area of about 10-20 m2.
When installing wall drainage, the pipe is laid around the perimeter of the building. The depth of the drains cannot be lower than the base of the foundation slab or the base of the foundation. If the foundation is very deep, then laying the pipe slightly above its base is allowed (+)
The distance from the drainage pipe to the foundation depends on the location. They are laid in each corner (or through one corner) of the building, as well as in places where pipes turn and connect.
Inspection wells are also located in places where there is a large difference in the level of the site and when the pipes are long - the distance between the wells should be no more than 40 meters.
In an inspection well, the pipe cannot be solid; it breaks. This is done so that if the pipeline becomes clogged, it remains possible to flush it using a high-pressure hose
The entire system closes to the last well. It should be located in the lowest place. The water then flows into a regular sewer or open reservoir. If it is not possible to drain water from the house by gravity, then pumping equipment is installed and it is forcibly pumped out.
To ensure gravity drainage of water, the pipes are laid to the side of the collecting manifold. The slope should be two centimeters per meter of drainage pipeline. The depth of the pipe must be greater than the freezing depth of the soil.
The pipe is covered with drainage material - gravel, small crushed stone or sand. The minimum layer that will ensure the flow of water into the drain is 0.2 m
To save on geocomposite materials and prevent them from mixing with the soil, geotextiles are used. It freely passes water to the drains and at the same time retains particles that lead to silting. The pipe itself must also be wrapped in protective material before backfilling. Some drain models are produced with ready-made geotextile filters.
You can increase the efficiency of wall drainage using a profiled polymer membrane, which can be two- or three-layer. One of its layers is a polyethylene film with formed protrusions, the second layer of the membrane is geotextile fabric.
The three-layer membrane is equipped with an additional layer of smooth polyethylene film. The membrane helps filter water from the soil and at the same time serves waterproofing layer for the foundation of the building.
Closed trench-type drainage protects the structure from flooding and moisture. It is a filter layer that is poured into a trench at a distance of 1.5-3 m from the wall of the house.
It is better that the depth of the drain be 0.5 m deeper than the base of the foundation - this way the water will not exert pressure on it from below. There remains a layer between the trench with drainage and the foundation of the house clay soil, which serves as a so-called clay castle.
As with the installation of a wall drainage system, drains are laid on a layer of gravel or small crushed stone. Both the pipes and the gravel layer are protected from clogging by geotextiles.
#4: Construction of wall drainage step by step
In order to get a clear idea of the process of installing drainage around a country house, let's look at an example. The area shown in it required the installation of a groundwater drainage system, because Under the soil-vegetative layer there are loams and sandy loams, which are extremely poorly permeable to water due to their low filtration capacity.
Image gallery
To install drainage, we develop a trench around the house. Since the work was carried out with a mini-excavator, we retreated 1.2 m from the walls so as not to damage the building. If you save manually, you can do it closer. The bottom of the excavation is 20-30 cm below the foundation
The branches of the trench formed around the house must have a slope towards the common trench intended for the pipe for draining collected water to the collector well
Cover the bottom of the trench with sand. We compact it and form a slope of 2-3 cm per linear meter. We direct the slope towards the common trench, the bottom of which is also filled and tamped. In the case of communications crossing the trench, take into account that the drainage pipes must pass below them
We prepare drains, perforated polymer pipes, for installation in the trench. We wrap them in geotextile, which will prevent clogging of the system and filter groundwater
We cover the compacted bottom of the trench with a second layer of geotextile, pour gravel on it and lay drains
We lay channels for draining water from storm sewers and the drainage system in one trench. It is permissible to divert the water collected from them into one collector and use common inspection wells
Having wrapped the gravel backfill together with the drainage pipe with a second layer of geotectile, we fill the trench with quarry sand. We do not use the soil dumped during the development of the trench; sand will better allow water to pass through for collection by drainage