Hexagonal gazebos made of wood. Do-it-yourself hexagonal gazebo for a summer house or country cottage
Of course, you can purchase a ready-made gazebo and pay specialists for its installation. But this will cost a pretty penny, and a thrifty owner will most likely try to save money and build a hexagonal gazebo with your own hands. And in today's article we will tell you how to do this.

Stage 1. Equipment preparation
All necessary tools It is advisable to prepare in advance. These tools include:
- hacksaw for metal;
- electric drill;
- chainsaw;
- plumb line;
- electric plane;
- circular saw;
- hammer;
- screwdriver;
- nails;
- jigsaw (ordinary or electric);
- level.
Stage 2. Selecting a location
Ideally, any gazebo should be located in the shade of a big tree so as not to be heated by the rays of the scorching summer sun. If this is not possible, it should be built next to small trees or, alternatively, next to.
Stage 3. Drawings and cost calculations
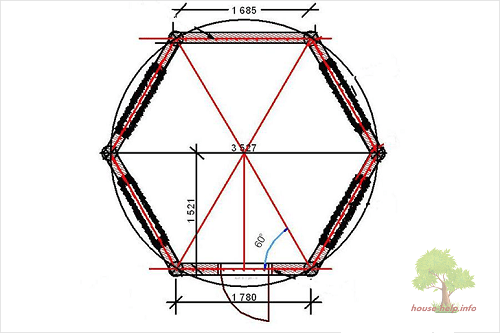
The dimensions of a classic hexagonal gazebo should also be classic. First you have to work on the drawings. If you draw up a diagram correctly future design, then half the job can be considered done. It is on the drawings that all further work, and the dimensions indicated on paper will allow you to correctly calculate the amount of building materials required.
Video – Hexagonal gazebo
The gazebo will consist of six identical elements, so you can only draw the roof and one of the wall elements. Do this with utmost precision, because any inaccuracy may cause the structure to fail to fold.
Note! If you are a person far from professional drawings, you can familiarize yourself with ready-made projects or sketch simple sketches indicating dimensions.
Next, calculate the amount of materials required and overall costs. As for wood, it is better to use pine or spruce - they are very durable and inexpensive. We also note that construction process will not be particularly difficult, since the gazebo itself will consist of:
- grounds;
- six supports;
- railing;
- roof, which includes six triangles.

Stage 4. Getting started
Having decided on the quantity Supplies, make markings. To do this, you can build a primitive compass using a pair of slats and a rope. Draw a circle. The size can be any, although the optimal option is with a radius of 175-200 cm (focus on the required capacity).
Stage 5. Support posts
On the perimeter, mark the points at which the support posts will be installed (there will be seven of them). To do this, mark a distance from the intended center that is equal to the future radius. Based on the marks, dig small holes 0.6-0.7 meters deep for supports. In addition, you need to remove the top fertile layer of soil along the entire perimeter.
Cover the bottom of each hole with a crushed stone “cushion”, on top of which add a 10-centimeter layer of sand. Compact it all thoroughly and install support pillars. Before installation, do not forget to treat those ends of the pillars that will be immersed in the ground with a protective waterproofing mixture, preferably bitumen mastic.
Make sure that the height of the posts above the floor is the same as the height of the gazebo. The pillar, which is located in the center, should be short - to the floor level. Fix the posts, fill them with concrete, and use a plumb line to check the verticality of each of them. Wait until the concrete is completely dry and begin creating the base.
Note! There is another construction option. After marking the six points, instead of digging holes, place the appropriate number of concrete blocks. To do this, drive in reinforcing bars 1.5 meters long in the places of future corners, then drill holes in the blocks and put them (the blocks) on the reinforcement. Then make a harness from the beams according to the “well” principle (as shown in the diagram).

Stage 6. Gender
Next, proceed to the floor. To do this, you will need logs, and, as you know, you can also make them yourself. Use 7x3 cm boards or 10x5 cm bars to create logs. Using nails or self-tapping screws, secure them to all posts. Then lay the waterproofing - it can be any suitable material, for example, roofing felt covered with plastic film.
You can lay the floor directly on top of the insulation. Use boards or composite materials for this. Do not forget about mandatory treatment with antiseptic and other protective equipment! Having prepared the floor, proceed to the partitions. It is worth noting that a hexagonal gazebo can have both solid partitions in the form of dense walls and meter-high railings.
Stage 7. Railing
Next, you need to install fences along the entire perimeter of the structure - the height of the railing should be approximately 90-100 cm. The vertical elements in this case can be ordinary boards, although if you wish, you can make them shaped - to do this, trim them with an electric jigsaw.
To make the railings look more decorative, apply two or three layers of varnish to them. Secure all the elements with self-tapping screws, then install a window sill board along the upper perimeter of the railing (it must be wide). Using special fastening angles, connect this board with the vertical elements. Now proceed to the final stage - construction.
Stage 8. Roofing
The roofing structure in our case will rest only on the corner pillars; the one installed in the center will not “take part” in this. In other words, everything is the same as when building a floor. With a view to more convenient work, and also for the sake of neat connections, cut out a small flat hexagonal piece and install it in the center. All support bars will subsequently be attached to this part.

Note! To make it more convenient to work with structural elements, build the roof sheathing on the ground, and then finished form lift it up and put it in place.
Saw the bars on the roof into the end bars at an angle of approximately sixty degrees. To fasten all elements, use the same self-tapping screws.
For greater strength and rigidity of the structure, secure additional ones between the sheathing bars, one per “gap”. Sheathing can be done either with sheet-type composite materials or on the top using small slats. It is characteristic that almost any of the existing roofing materials can be laid on top of the sheathing.

Often garden gazebos take cover different types tiles - both soft and ceramic. But do not forget that the roof sheathing will rest solely on the racks at the corners of the structure, and therefore when carrying out the work you need to use ladder or a stepladder. Ideal option there would be a meeting scaffolding, because this kind of construction will not be superfluous on suburban area.

Any person who spends most of his life in a noisy city sometimes wants to take a break from this hustle and bustle. In this case, it helps many people country cottage area. Having a gazebo can help you relax and unwind in nature as much as possible. And since not everyone has it, let's consider simple methods its construction.
A properly built gazebo will be able to perform several functions at once. IN rainy weather It will protect you from the rain, provide refreshing shade in the scorching sun, and most importantly, it will allow you to enjoy communication with loved ones in nature.
Let's divide the process into stages:
Site selection
The idea is to provide easy access for you and your friends or family to the gazebo. It will also be good if the structure is located under or near a tree. This way the roof will not get too hot under the sun, which will provide even greater comfort.
Foundation
Depending on the number of corners, pillar supports are poured. The photo shows the foundation for a hexagonal gazebo made of concrete and bricks.
But instead of bricks, you can also use racks. In order for the shape of the gazebo to be correct, draw a top view in advance and calculate required dimensions. After this, mark the area using pegs and twine. After this, in place of the stakes, dig holes about 50 centimeters deep. Next, place beams with a cross section of 20 by 20 centimeters there, so that they look 20 centimeters above the ground. Thus, you will need beams 70 centimeters long in quantity equal to the number of corners of the gazebo.
With exactly the same parameters, you can use a profile pipe for the base. If you do not plan to make a base, and the floor will be tiles or concrete screed, take into account the height of the pipe with the height of the gazebo.
It is good to use for mixing concrete. But if you don’t have it, you will need a trough in which you can conveniently make a batch and then fill the hole with it. The concrete solution is mixed in a proportion of 1/3/2/2 - 1 cement, 3 sand and 2 granulations, 1-2 water. It is important to maintain exactly this sequence, as this affects the quality of the solution. Add water periodically. For example, after mixing cement, add a little sand, then wait until everything becomes homogeneous and add again. The overall consistency of the mass should be similar to gray sour cream. Vary the proportions relative to the required volume.
During the process, while the concrete solution is still damp, use a thread and a level to check that all the posts create an even horizon. And do not forget about the need for central support for the rigidity and durability of the floor.
Base
If you made a support from wood, then use the example of the finished base in the photo to knock down the boards. After this, the floor is sewn up with a board 2.5-3 centimeters thick.
It is not recommended to carry out such an operation with metal, since it tends to bend. You can also make the floor from tiles or by making concrete screed. Large slabs will look very aesthetically pleasing. A more openwork option could be a marble floor.
Frame
In the version with metal, your frame is already ready and it only needs rigidity. It can be strengthened using partitions, but more on that later. For a tree everything is different. Bars 15 by 15 centimeters and at least two meters long are attached vertically in the corners. Installation is carried out using metal corners and self-tapping screws.
At the beginning, let’s mention what you can do if you wish. beautiful gazebo and without parapets.
If you want a fence, the approximate height will be 90 centimeters. And the choice of material will not be small:
- You can sew panels from wood or tree branches. In this case, the blanks are made according to the size of one side (from corner to corner).
- Polycarbonate. One of the most popular materials for making gazebos. Also cut into sections.
- . You can do it yourself if you have it the right tools or order.
- Hedge. Having created only a side, you can put a climbing plant, for example, grapes, along it.
- Metal sides. Attached using welding joints. Later you can decorate with decorative elements.
The photograph shows one example.
Please note that the fencing can be extended, which will not allow uninvited birds to interfere with your rest and will create additional shade.
Rafters and roof
Rafters are mounted on the ground in the form of modules and then installed on the roof. Both metal and wood are equally suitable for this. Only the assembly methods will differ. When installing wood - nails and bolts, and for metal - bolts and welding.
The schematic drawing clearly shows an example of the “skeleton” of a roof.
Roofing
There are enough materials for the roof big choice: profile flooring, polycarbonate, slate, tiles and other coverings. Before laying, install waterproof material so that the roof is effective in the rain. After this, the material is cut out, if necessary, and attached to the beams of the rafter frame. Calculate the overlaps and lengths to avoid waste of material and save your budget. 
paints and varnishes
Regardless of whether you choose metal or wood, it will be useful to cover the gazebo with paint or clear varnish. This will make the building more beautiful and extend its service life to you.
Don't settle on one color. Choose a color to match the color of the roof, plants, furniture inside, or simply to suit your own mood. If the roof is made of polycarbonate, then the number of color combinations only increases.
For a wooden floor, you only need to be treated with special insect and temperature protection products and coated with paint.
You can also cover the floor with ceramics. To do this, you need to have a more or less even screed. Next, it is laid out on the glue under the level. Remember that the stationary or floor will be outdoors 24 hours a day all year round. In this regard, choose a tile that can withstand the load. This will help protect yourself from unnecessary costs.
No less beautiful and convenient solution will choose paving slabs. The semblance of tiles like in the photo or flat tiles will look beautiful. For preparation you will need a pillow of granulation and paving slabs at your choice.
Tools
No matter what you need standard set: hammer, saw, hacksaw, drill. If you are making a gazebo with a metal frame, then welding the seams is best for fastening. Bolts and nails will only be needed to secure the roof and parapet cladding. In the wooden version, it is best to connect the beams with bolts, using wide washers so that the head does not push through the wood. For concrete, you will either need a container and shovels that are convenient for manual mixing. There will also be a need for consumable tools such as brushes, nails, bolts, electrodes for welding machine.
Materials
If the frame is made of wood, then the following materials will be needed:
- Beam 10 by 10 centimeters - racks and trusses.
- Slats 25*30 millimeters for covering the parapet or window grilles;
- For the roof, edged boards 25 millimeters thick will do.
- The floor is covered with a board no thinner than 4 centimeters.
- Fasteners - corners and screws;
- Roofing sheets – OSB is a good choice.
By choosing metal as the material for the frame, the entire structure can be assembled from one type of workpiece. Best suited for a gazebo profile pipe with a cross section of no less than 50 millimeters or a corner with walls of 25 and 50 millimeters. The roof in this case can be made of wood or polycarbonate.
In both cases, the footage is calculated independently, since it depends on the scale of the construction.
The squaring of cladding materials, such as roofing and cladding, is determined depending on the size of the frame. Consumables also vary depending on the assembly method.
Types of gazebos
Classifying gazebos in your home according to any parameters does not make sense, because in our time the variety in construction has reached unprecedented proportions. This is caused not only by fantasy modern masters, but also an abundance of materials. Combinations of plastic, concrete, wood, metal and brick are just the tip of the iceberg. In particular, plastic can help you inexpensively, but very beautifully decorate both the interior and exterior of your building, regardless of its design.
After reading the guide on how to make a hexagonal gazebo with your own hands, you have everything necessary knowledge for construction of any shape or design. All you need to do is apply this knowledge in practice
If you wish, you can build a closed gazebo. To do this, you will need additional means - insulation, windows and a door. Also, the floor in such a gazebo can be made of ceramic. And inside, a fireplace or barbecue with a hood built into the wall will add coziness.
Such a gazebo can easily turn into summer kitchen, if you have the necessary household appliances. In this case, a portable gas cylinder will not be superfluous; it can be connected to both the barbecue and the burner.

All of the above applies to rectangular or square shape. Forms can be with big amount corners or round. It all depends only on your imagination. Also for a quadrangular shape you will need additional supports, one in the middle of each side.
A gable roof for such gazebos is made in the same way as a multi-pitched roof, only with different shapes. Rafter structures are made in the shape of the letter “A”.
Quadrangular gazebos accommodate fewer people than rounded versions.
In addition to experimenting with the form, you can try different kinds covering the walls or roof of a building. You can make the roof semicircular and use polycarbonate or corrugated sheeting. It will look very original.
Don't forget about additional elements exterior. They may include a grill, street benches, tables, hanging flowers and everything else that comes to your mind. When building, keep in mind the main thing, the goal of the gazebo is to arrange it for you as much as possible. comfortable stay.
Advantages and disadvantages
Pros:
- Possibility to make the gazebo portable. In this case, you can install it with bolts, which can then be easily unscrewed and assembled. If the concrete is not permanent, then you can install the gazebo wherever you like or move it to free up the necessary space or simply change the situation.
- Wide scope for imagination. For inspiration, you can look on the Internet to see how you can decorate a gazebo. For example, if you get tired of the parapet sheathing, you can easily repaint it or replace it with something else.
- Independence from the budget. You can make a modest gazebo and gradually decorate it or cover it with more interesting materials.
- If the gazebo is collapsible, then you can remodel it, thereby increasing the covered area.
- By making the walls brick, the owner will reliably protect himself from wind and rain
Minuses:
- The tree is rotting. Therefore, wooden structures need to be treated with special means to prolong their life.
- Fire hazard. This applies more to wood and plastic. When using these materials, carefully follow fire safety precautions.
- Service. Nothing lasts forever, so repairing even the slightest chips will significantly extend the life of your building
- Polycarbonate coating, although practical, is also not cheap. In addition, it enhances the sound of falling drops during rain.
A suburban area is the dream of most city dwellers who love to spend weekends in nature. An important factor in a good mood on weekends outside the stuffy city is comfort. Lovers country life they build architecturally interesting and durable houses, as well as the necessary outbuildings to them. Careful owners pay a lot of attention landscape design plot. A specially trained specialist helps create beauty around the house, or the owner himself masters the necessary skills.
An example of a hexagonal gazebo on a country site, made of wood
You can often see a gazebo on the site. These structures are varied in type (closed or open); they are built from various materials(wood, brick). Hexagonal gazebo in terms of comfort and beauty it is not inferior to structures similar in their purpose. If you have the appropriate skills and follow construction technology, you can build a gazebo with your own hands.
Stages of construction of a summer building
The place for the gazebo is selected by the owner of the site based on his preferences. If, in addition to the gazebo, it is planned to add architectural elements in addition, then the structure is placed in an open space. Otherwise, if you want to retire to a cozy gazebo, you can place it in the shade of a tree. Not all plots have level ground. If there are unevennesses, the top layer is usually removed and the surface is leveled in order to determine the preliminary boundaries of the gazebo.
When building a gazebo, the builder goes through several stages:
- Creating a drawing.
- Preparation of materials.
- Marking the base and installing the foundation.
- Construction of walls.
- Floor arrangement.
- Covering installation.

Scheme of construction of a hexagonal gazebo, side and top views
The drawing is drawn up after determining the dimensions of the future structure. The construction plan also helps determine the amount of material required for construction.
IMPORTANT: The weight of the future gazebo plays a role important role, as it allows you to correctly assess the mechanical load on each point of the building. This helps give it stability. The choice of materials for the construction of a future structure also depends on the possible load on the structure. The same applies to the choice of foundation for a building.
What tools are used in the construction of a hexagonal gazebo?
The builder must have the following available tools:
- Machine (circular), hacksaw.
- Plane.
- Hammer and screws (nails).
- Roulette, level.
- Ladder.
- Wooden boards.
- Material for waterproofing.
- Beam.
A concrete solution is required for the foundation. For its production use:
- gravel or sand, cement composition;
- shovel;
- Master OK;
- container for solution;
- concrete mixer or drill with an appropriate attachment.

Hexagonal gazebo project from wooden beam
At the points of the circle outlined in the plan, pillars are mounted, playing the role of support. Planed timber (10x10cm) is most often used for supports. Crushed stone is poured into the holes, then a layer of sand about 10 cm is added and pillars are installed. On the one hand they are processed waterproofing material. Above level flooring the length of the supports is identical to the height of the gazebo. In the center the pillar should be shorter than the others. The holes in which the pillars stand are filled with concrete. The composition must harden: for this, the builder must give it some time, and only then proceed to arranging the floor covering.
The foundation is the basis of any structure
The foundation of the building is marked using a rope and a block of wood. You need to place a block in the middle of the gazebo and tie a rope to it. Connect its other end to a peg. The length of the string must correspond to the drawing (the radius that was calculated according to this plan). The corners of the structure are determined using pegs. After this, a recess is dug for the base of the gazebo. The type of base depends on what material the gazebo is planned from. If it is wood then the best option will create a strip type foundation. If the building structure is massive, it is not forbidden to use a columnar foundation.

The base can be made of durable wooden boards
Tape base type: To equip it, it is necessary to make 12 formwork panels. They are fixed on each other from 6 sides, which is equal to the indicator - a pair of shields on each side. A solution of cement and sand is prepared in a ratio of 1:3. Before pouring the solution, fittings are installed at the bottom.
Columnar base type: Gravel is added to the cement-sand mixture. In this composition, the mixture is poured into columns, the minimum number of which must correspond to the number of corners of the gazebo, plus one column remaining in the center of the building. Thus, there should be 7 columns.
Roofing material is laid on top of the columns, which is used as a waterproofing material.
Gazebo frame
The “skeleton” of the structure is made of beams small size, which are connected to each other horizontally. Grooves are created at the joints that connect the material. The grooves are cut so that their thickness is 50% less than the volume of the wooden beam. The frame, which is assembled, is secured with nails. After this, the frame rests on the reinforcement, which is the rods.

The process of assembling the frame of the future gazebo
In the place where the foundation and the pillar are joined together, metal plates are used using self-tapping screws. It is best to assemble the frame of the upper structure on the ground, and then place it on top of the pillars. It is attached in a similar way to the bottom: metal plates and a corner. When installing pillars at each stage, they need to be measured using a plumb line. The level is needed only after they are installed: they are checked for the possibility of skewing of the roof. After the pillars, railings are installed with grooves cut at a predetermined height in the pillars. The crossbars are inserted into the grooves and secured. After securing the crossbars, the skeleton of the future structure is sheathed. There are many materials for cladding. Consumers most often use the following:
- lining;
- edged boards;
- lattice (decorative).
IMPORTANT: If a builder plans to build a gazebo more than 3 meters in diameter, then it is better to create it in an octagonal shape, with a columnar type of foundation.
Gazebo roof: what do you need to know when installing the roof?

Hexagonal roof of the gazebo, view from the inside
The roof of any building plays an important role because it protects against moisture and the adverse effects of the atmosphere. To make a roof, it is better to use slats with dimensions of 5x7 cm. They are mounted on the base with an edge and fixed with self-tapping screws. For the end, pre-cut slats are used to form the correct insert. Their ends should be connected in the central part of the building: there they are secured with a post. In order to give the frame greater stability, additional slats are mounted, which are fixed perpendicular to the existing ones. This creates a timber sheathing for the installation of the material used in the roof deck. The materials most often used in roofing for summer buildings are tiles, ceramics, and soft corrugated sheets.
Barbecue in a hexagonal gazebo
Construction of a gazebo with barbecue is more difficult option, but such structures are very popular among consumers.
IMPORTANT: The drawing of a future gazebo equipped with a barbecue must include a plan for the foundation and chimney.
Since the grill is a heavy structure, it is installed near a wall or in a corner.
IMPORTANT: it is best to entrust the drawing of a gazebo equipped with a barbecue or grill to a professional. This is due to the fact that the structure must be built in strict accordance with fire safety regulations.

The grill in a hexagonal gazebo is best placed in the center
After the construction of all the elements of the gazebo, it does not matter - with or without a barbecue, it must be treated with special compounds that prevent rotting of the wood. Often the gazebo is varnished or the structure is painted in unusual shades.
It is not difficult to build a hexagonal gazebo. The main thing is to correctly draw a drawing of the future structure. To do this, you can contact specialists. In addition, choose the material for the gazebo wisely. The most common one is wood, but many summer residents and residents of the Moscow region build gazebos from brick, which are necessarily equipped with a barbecue or barbecue. The place for the gazebo must be chosen wisely: this is necessary so that the structure fits organically into the overall landscape.
Nothing is impossible, including building a hexagonal gazebo with your own hands, a very real task. A cozy gazebo is the dream of many homeowners, and the hexagonal gazebo has a special charm and stands out among all the others.
The hexagonal gazebo is very compact and can be made from a wide variety of materials: metal, wood, plastic, brick, timber, logs. It can be open or glazed. A hexagonal gazebo consists of six supports, and the supports can be the same size or, to achieve a special charm, sometimes two sides - the entrance and the opposite side - are made different from the others. The roof can also be monotonous - six equal flat triangles - or, to achieve exoticism, it can be decorated in the style of Feng Shui or any other (for example, photo below).
Start with drawing and calculation required quantity materials.


You will need the following tool (for a wooden gazebo):
- screwdriver,
- jigsaw,
- level,
- roulette,
- screws,
- cement mortar,
- wooden beams with a section of 150x150 mm,
- planed timber 100x100 mm,
- edged board 50x100 mm,
- floor boards,
- brick or cinder block for posts
- roofing material (soft, bituminous shingles will look great),
- primer,
- roofing felt,
- pencil,
- rope
Next, when all the materials are prepared, we proceed to marking. This is very important stage, so don't rush. The selected area must be cleared of vegetation and stones and leveled. We drive a stake in the center and tie it with a rope. We tie the second end to the rail and with the help of such an improvised compass we make markings - we draw a circle of the required diameter. We divide the resulting circle into six equal parts and place the beacons in the places where the support beams for the gazebo will be located.
In place of the beacons, we dig holes about half a meter deep. We fall asleep at the bottom of the hole river sand, the layer should be about 10-15 centimeters. We fill the same layer of crushed stone on top of the sand. Drive a steel rod (about 70 cm long) into the center of the hole and fill cement mortar. We lay bricks at the base in 3-4 rows.
After the supports are strengthened, we cut out beams of the same length - 6 pieces. We prime them and dry them. We lay and secure the beams in their places, and lay pieces of roofing felt between the beams and supports. When fastening beams, use metal corners for reliability.
After the beams are secured, we attach the logs inside the structure. The central joist is attached to the center of the structure and aligned horizontally, after which it is fixed with bolts and metal plates to the beams. Next, proceed as desired; after fixing the central log, it is recommended to install two more logs perpendicular to the central one, and then the rest at an angle. After all of the above, the logs are reinforced with timber lintels and sheathed with boards.
For the frame of the gazebo, six beams with a section of 100x100 mm are used. They are installed on supports and fixed anchor bolts. Walls are made depending on the design.
The installation of the roof is better described by this illustration:

The interesting shape of the hexagonal gazebo evokes surprise and admiration. Everyone is already quite tired of the classic “squares” and “rectangles”; they want something new and aesthetic. It is the structure with six sides that in this situation is the center of attention.

Wooden hexagonal gazebo idea
You can find more photos in the publication about.
In this article we will focus on the intricacies of construction, and also provide detailed instructions of 13 steps
There is absolutely nothing difficult about building a hexagonal shape. Even installing the roof is not particularly difficult, although some features are present.
In this article we will show you step by step the process of building a hexagonal gazebo.
Selection of building material
On at this stage you need to decide building material. The most popular options are wood and metal (profile pipe). In the case of wood, you can use a 100 by 100 mm beam, and with metal, a pipe with a cross section of 60 by 40 mm.
 Made of wood
  Made of metal
If you prefer reliable brick, then the entire construction technology will be noticeably different. It will be necessary to fill (tape or monolithic type), and then practice brickwork. There are no special design features here; it will be enough to lay out the walls on six sides.

Made of brick and stone
Drawings with dimensions and explanations
If you do not fully understand the structure of a hexagonal gazebo, then I suggest studying the drawings below. They clearly show the dimensions of potential buildings, area, dimensions of the rafter system, connections at the joints, names of the components.
The above projects are enough to give you a definite opinion about this form. The pictures do not show the roof sheathing, which is made for installation soft tiles, we will talk about this later.


Do-it-yourself construction
Marking the hexagonal shape of the base

Gazebo with an area of 6 sq/m. The length of one strapping bar is 1.5 m.
The first task that will need to be solved is to decide on the size of the gazebo and mark out a regular hexagon (hexagon). To do this, we need a tape measure, pegs and six identical bars of the lower trim.
- We make 6 bars of strictly the same size.
- We lay them out on a surface previously cleared of debris in the shape of a hexagon (picture below).
- We hammer in pegs at the joints.
- We remove the bars and prepare to lay the foundation.

Foundation
For the foundation, it is cheapest to use foundation blocks, which you can buy in a store or make yourself. If we really work “conscientiously”, then there is a more expensive, but very reliable option foundation with bored piles.
The main task is to create a flat (level) plane on top of which the bottom harness.

Connections in the bottom trim
To attach the bottom harness, you can use two methods:
- In half a tree (at the end of each beam we cut off half the section and place it on top of each other).
- By using metal corners.
In most cases, the corners are enough to secure the beam tightly. But if you want to make everything “forever”, then you can start sawing and add additional fastening. The photo above, which shows a block base, shows this connection in all its glory.

Installation of pillars
It is necessary to install six vertical posts and fix them at an angle of 90 degrees. It is most convenient to work with a partner who will hold the pole while you attach it to the lower harness.
By analogy with the strapping, we use metal corners and screws. In the photo below you can clearly see the finished result.
If metal corners are not enough for you, then for additional security you can use a connection using a tenon and socket. There will be a noticeable increase in work, but the stability of the pillar will increase significantly.


Floor
For the floor, you can use any type of board that will support people and furniture inside. Classic option is a fortieth edged pine board. A more expensive option is larch. there are several:
- Completely, parallel to one of the edges.
- In each of the six floor sections separately.
 Completely
 With a beautiful floor
Erection of the roof
A little secret right away: rafter system best collected on the ground. It's much simpler and more reliable. Then it will need to be lifted onto vertical posts and secured. This technique is used everywhere, so I recommend it to you too.
The rafter system consists of six beams (most often a 150 by 50 mm beam is used), which are attached in the center to each other using a wooden spire and a metal apron, as well as in each corner separately to the top trim.
 Roof assembled on the ground (without sheathing)

Selection and installation of roofing
You must proceed from whether you are ready to cover the roof with OSB slabs.
Having installed the rafter system and sheathing, you can lay, for example, metal tiles. If you want to lay soft tiles (such as Shinglas), then you need to additionally sheathe the roof with slabs, on top of which the roof will be laid.
 soft tiles
  Ondulin
 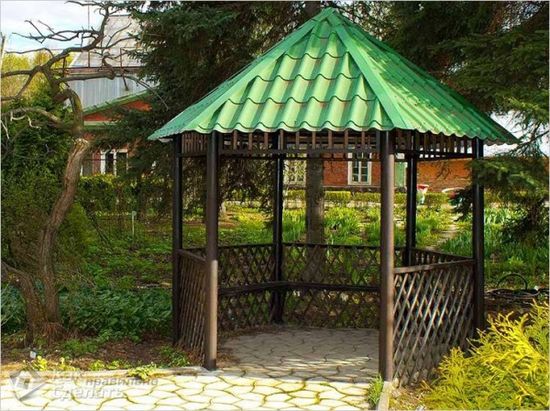 Shestiskatnaya
Step-by-step instructions with photos
Below is the construction of a hexagonal gazebo in 13 steps. Each photo is signed and describes the process that took place. The next paragraph will show a video in which this process shown even more clearly.


Step 2. Removing the block formworkStep 5. Finished bottom trim and railingsStep 8. Wall claddingStep 12. Making drainage

Video instruction
An interesting video on construction was presented by a channel on Youtube called “ Our whole life!" Using photographs, the authors of the video show their steps from the moment of building the foundation to laying soft tiles on the roof.