Carved window drawing. Do-it-yourself wooden carved window frames
Window trims, despite their simplicity, have great importance in the decorative design of the facade of the house. They not only create a neat look and add an element of individuality to the structure, but also perform the more prosaic task of eliminating the gap between the wall and the window frame. In addition, the platbands must withstand the influence of weather factors without losing their qualities.
The function of window trim and a little history
The architrave was first mentioned as an element of the house back in the 15th century. Nowadays, platbands have somewhat lost their relevance, but their function is still unchanged, regardless of the material of the building and its decoration. Due to design features windows of high-rise buildings and in cases where glazing is used, their presence is inappropriate.
Platbands appeared many years ago
In simple terms, the platband is a wooden frame 30-40 mm wide that frames the window.
The aesthetic function of this part is important, but the main task is to bridge the gap between the window frame and the wall, which increases thermal insulation and protects against the penetration of dust and moisture from the external atmosphere, and also reduces noise levels. In some cases, if there are shutters, they act as a frame.
Types and types of platbands for windows
Their form can be:
- curly;
- flat;
- rounded;
- convex.
Flat-shaped platbands are characterized by ease of production and low cost. Convex platbands are made using special machines and, in connection with this, the price of products increases significantly. Carved platbands have great aesthetic value and significant cost.
Platbands are classified according to the installation method:
- telescopic. They have special projections that fit into the corresponding cavities of the box;
- invoices.
An important factor when choosing the profile of this window element is the slope, which is performed at the top of the casing. Its purpose is to remove sediment.
Modern materials and requirements for house elements have determined the trends in homeowners' requests. The leaders in popularity are carved platbands made of plastic.
Requirements for platband material
In addition to high aesthetic qualities, the platband must meet practical requirements. Its important qualities are its ability to withstand temperature fluctuations and high humidity. In addition, the material must withstand wind loads.
It is important that the material has sufficient strength and is not subject to chipping and cracking. ABOUT application of MDF or plywood is out of the question. The properties of these materials are such that they are able to absorb moisture, are prone to cracking, and the paint on them peels off over time. All this is a sign of the fragility of products made from these materials.
In this regard, MDF as a platband material can only be used inside a home. The manufacturability of the material determines its simplicity and relatively low cost. In addition, it does not take much time to receive ready-made platbands. Such platbands on the facade will require constant care and additional processing.
Our ancestors have been making frames from wood for many centuries. Oak and beech are the most common types of wood used for this. Pine and birch have found less use for the production of platbands. Wood tends to absorb moisture, so to increase the service life of the product and its appearance application required protective coatings. In addition, over time, wood tends to darken, so restoration of the original shade of the material is required.
When using gypsum as a decorative facade element, they also face the problem of interaction of the material with moisture. When water that penetrates inside the plaster freezes and thaws during temperature fluctuations, such architectural details are destroyed.
 There are certain requirements for materials
 The use of glass fiber reinforced concrete and polymer concrete makes it possible to avoid negative influence exposure to temperature and moisture. Their use is limited by the significant mass of products. In some cases, when installing such platbands, the increased load on the wall is taken into account and made more powerful.
Polyurethane compares favorably with other platband materials. This is due to the fact that its use does not allow the problems described above, and its characteristics make it possible to create additional thermal insulation. In addition, its weight is comparable to the weight of wood, which facilitates the installation of these facade parts.
How to make stencils for window trim?
Wood selection
Wood for the production of platbands can be used in various ways. This may be certain types of it, a combination of rocks by gluing or other connection.
Simple and shaped stencils for window frames are best made from pine.
Production carved frames requires the material to be soft. Linden has this quality. The requirements for the material are determined by manual processing of wood.
 The choice of wood must be done carefully
 Climatic conditions associated with high humidity or significant dryness, as well as significant temperature fluctuations during the day, determine the use of wood with a dense and hard structure. These include oak and birch. Manual processing is difficult, so the use of milling machines is necessary. Such products have a long service life.
Required Tools
Before solving the problem of how to make carved platbands, you need to decide on the tool used for this work. The main tools for this are knives and chisels, various in shape and size.
 Tools for work
 For independent production of platbands, manual milling devices, jigsaws, and drills are used. A jigsaw is practically indispensable when performing such work, since with its help you can create almost any pattern. In some cases, a homemade device can be used, which includes a step-down transformer and nichrome wire.
In addition, you may need to make a tool for filing corners. To make such a device, it is necessary to fasten two wooden slats between three hacksaw blades with small teeth. When using this device, the spikes are filed with one blade, and the eyes of the product with the other.
How to choose patterns for the platband?
Using technology slotted thread suggests that aspen, alder, linden or coniferous species. The thickness of the board should be in the range from 5 to 50 mm. It is necessary that the selected pattern for the platband be clearly distinguished from a distance, and act as a single whole of the architectural ensemble. Therefore, it is not advisable to create an image with a large number of small elements.
 Platband options
 For a long time, at the top of the casing there has been a kokoshnik with the image of the Sun. If desired, the top of the casing can be extended using tenons as a connection. Towels - this is the name given to the bottom of the platband. The design must include a drainage slope. The bottom plank should be 10mm thicker than the size of the plank at the top of the plank. It is important to maintain the unity of style of both parts.
To avoid cracks in the threads, parts should be placed along the grain of the wood. As a rule, ends and openwork bends, which are thin, have significant fragility.
 Structural diagrams
 The simplest cut can be made by drilling a round hole using a drill. That is why it is advisable to choose a pattern with a predominance round holes. In most cases, the ornament is made up of repeating elements, each of which is made up of holes and cutouts that have a more complex configuration.
Window trim drawings contain the following elements:
- bottom bar or profiled belt;
- vertical slats or frame;
- top bar.
 Part names
 To obtain a stencil, you need to stretch the pattern along its length. For this purpose, a life-size image is applied to paper. Places that suggest the presence of slots should be highlighted in color. Then, the resulting drawing is pasted onto the workpiece. Using a drill, drill holes of the appropriate diameter. If it is necessary to work with a jigsaw, make small holes where necessary.
Manufacturing window trims
 Platband
 The direction of opening the window must be taken into account. In the case when it opens outwards, the platband should be installed at a distance of 30 mm from window sashes. In addition, the platbands should not become an obstacle to opening the window frame. Other parameters depend on it geometric dimensions windows
On initial stage for the production of platbands, it is necessary to plan a dry board, the dimensions of which are within the range: thickness up to 30 mm and width 75-150 mm. In this case, the width of the platbands should exceed the corresponding size of the window frame by 25-50 mm. For a better fit of the platbands to the wall surface, select a groove or make a gap of no more than 2 mm so that it is at a distance of 10-15 mm from the edge.
When working with a power tool, you should not make excessive efforts, as if helping it. This may cause it to fail. If you encounter difficulties cutting wood, you should pay attention to sharpening the blade. It is recommended to make long cuts using a wide blade.
How to make fastening of carved platbands
Fastening of platband parts is carried out using blind or through tenons. Moreover, it is believed that the use of the first of them is preferable, since there is no need to decorate the places where the connection occurs.
The grooves for the tenons are made by drilling several holes, the depth of which is slightly greater than the tenon. Removing the partitions between the holes is done with a drill designed for metal. The entry of the spike should be tight, however, without the use of force.
The spikes are secured with dowels made of hard wood. It is not advisable to use glue. This is due to the fact that adhesives are not able to work for a long time under the influence of an aggressive atmospheric environment.
Installation of platbands: features
Installation of platbands is carried out without the use of glue using nails. They are driven in at intervals of 400-500 mm so that the head is recessed into the wood. Most often, the platbands are attached tightly to the box. In some cases, an indentation of 5-20 mm is made on the side, which depends on the direction of opening of the valves.
 Platband drawing
 The window sill board at the window opening and the platband are installed closely. This design allows you to install bedside tables that protect the lower part of the platbands.
Upon completion of installation work, it is imperative to carry out protective treatment of the platbands. You should also apply paint or varnish, which needs to be renewed from time to time.
Photos of platbands of an interesting design
 Beautiful rose frames
  Platbands
  Platbands are an important part of the architecture of the house
  Beautiful platbands
  Original platbands
Putting platbands on windows with your own hands is the easiest and cheapest way to give the outside appearance of a house individuality and express its character, which has survived from antiquity to the present day, see fig. In the old days, an illiterate stranger, guided by the platbands, could find the home of the desired craftsman, specialist, official, government office or hotspot. Nowadays, the functions of window frames are mainly decorative, but the patterns on them have not lost their meaning, see below.

Story
The platbands on the windows of the dwellings of peoples who practiced mass wooden architecture appeared simultaneously with windows “glazed” with fish bladder and mica. Initially, their purpose was purely functional: to cover the insulation and windproofing - to caulk - in the gap between the window and the frame.
Platbands with sacred patterns were first noted among the ancient Celts, but the true flowering of the art of creating carved platbands is associated with the unification of the reviving Rus' under the leadership of Moscow and the overthrow Mongol yoke; Russian masters in wood carving had no equal. The Bolsheviks wrote down window frames as relics of philistinism and declared a war of extermination on them, but nowadays artistically designed window frames are experiencing a rebirth.
This article is intended, as far as possible, to satisfy the reader’s demand for how to make beautiful window frames with your own hands, how to give them artistic expression and install them in place.
Design
Kinds design window casings shown in the photo. Overhead trims (item 1) are attached to the wall; plug-in or box-shaped (item 2) - to the slopes of the window opening (this is better) or in the window frame (worse). Overhead trims are placed on windows flush with the wall; insert - on windows in niches.

Based on the capabilities of insulation and protection of the window insulation, the platbands are divided into a frame (item 3) and a portal, item. 5. The portal frame is often complemented by a visor. The frame frame practically does not protect the window insulation/seal from getting wet and is placed on windows from the inside or on windows facing under a canopy, for example, onto a veranda.
Installation
Traditionally, the installation of platbands is carried out by fastening them to the wall or window slopes. Now for this it is best to use self-tapping screws (4.2-6)x(80x150), if the wall is not wooden, use propylene dowels. The attachment points are placed as evenly as possible at the rate of 1 point per 5-7 square meters. dm of the surface of the clypeus, outlined by its outer contour. When attaching to slopes, the attachment points are placed in a row with a pitch of 150-300 mm (depending on the mass of the platband, which, in turn, depends on its artistic execution, see below) along the center line of the part of the load-bearing (base) wall protruding outward. The holes with fastener heads are either hidden in the ligature of the upper levels (see below), or they are puttied and painted over with the main tone.
Platbands-"telescopes"
IN modern houses, externally insulated and covered with siding/lining, the windows are often placed flush with the base wall, otherwise the window will completely sink into the wall. In this case, there is nothing left to attach the platband except the window frame. For such a case, the so-called. telescopic frames, but they will remain quite securely only on windows in reinforced frames intended for regions with harsh climates; frame material – reinforced PVC or modified wood (see below), special significance does not have.

The whole “telescopic” nature of the platbands comes down to installing them on locally cut additional elements, rigidly connected to the window frame. The most reliable platbands are on grooved extensions, on the left in Fig. Telescopic platband systems with a groove in the frame (e.g. on the right in the figure) are not intended for outdoor installation: a gust of wind can break the casing, breaking the frame at the same time.
If the window frame is modern, wooden or PVC with a groove for a key, telescopic platbands can be installed on such a window without removing it. If a PVC window on a wall with an inaccessible base surface is not intended for installing a casing, then there is no other option but to remove the window, place a box under the casing in the opening, attaching it to the base wall, and reinstall the window. In this case, the platband box must have grooves that fit into the places where the window anchors are attached.
Wood for platbands
Painted, carved and slotted wooden platbands (see below) are made from high-quality straight-grain pine or larch without knots. The thickness of the boards is from 30 mm. A knotted spruce is not suitable: the outside knots will soon appear under any covering, and then they will begin to fall out.Carved frames require wood suitable for carving - fine-grained, viscous, fairly dense - and resistant to external conditions. Best breeds for this purpose - oak and beech, but they are quite expensive. Linden, alder and aspen are suitable after 2-fold impregnation (the first impregnation is until it penetrates through) with a water-polymer emulsion; oil, silicone and mineral (borax solution) impregnation against rotting does not increase the viscosity and surface strength of wood. Birch is absolutely unsuitable: no amount of impregnation on the outside will save it from being damaged by fungi.
Note: a magnificent carved frame is very easily obtained from the cheapest plywood, twice impregnated with a water-polymer emulsion. For more information about plywood trims, see the end.
Shield for platband
Sometimes one board is not enough for the desired width of the platband, but fastening 2-3 boards into a shield with steel fasteners in this case is a gross mistake. A wooden panel on the steel outside will soon split, then the fasteners in the gap between the platband and the wall will rust and crumble. But it is also impossible to assemble boards into a panel for a platband like furniture without additional reinforcement, because a cabinet or table is not designed to withstand strong winds, rain and snow. Shields are made from boards for the casing. Thus, see also Fig. below:
- On a table or workbench, spread a plastic film with a 3-fold margin along the width of the future shield;
- The boards are placed in a bag on film and glued with PVA or waterproof wood glue;
- When the glue sets, the package of boards is wrapped in film;
- Plywood cheeks are placed under the bag in film and placed on it;
- The package with the cheeks is tightly wrapped with linen cord;
- Pairs of wooden wedges are placed under the turns of the cord so that the cord is stretched as tightly as possible;
- After 2-3 hours of complete drying of the glue, the cord, cheeks and film are removed;
- From the underside (back side) the shield is further reinforced by stuffing 40x20 bars, laid flat across the boards.

Note: the boards are assembled into a package, observing the rules for alternating the orientation of the layers of wood, just like furniture panels, see on the left in Fig.
Not a tree
Unpainted wooden trim does not look good on any non-wooden wall, even if its material imitates the color of wood well. In such cases, it is better to either install simple PVC trims complete with the window (on the left in the figure), or more expensive polyurethane trims, the rest pos. in Fig. Polyurethane trims can imitate external stucco molding and painted multi-level cutout trims (on the right in the figure); the latter option can be assembled using glue from elements purchased separately.

Various arts
Artistically designed window frames can be made, firstly, framed (item 1 in the figure below) or in a frame, pos. 2; functionality, i.e. window seal protection, both are the same. Platbands in salaries are the most informative and sacredly significant, which we will discuss below. In addition to functionality, frame trims are mainly decorative.

From the point of view of woodworking, frame platbands, in order of increasing complexity, are divided into:
- Cut-out - boards or panels are cut along a figured contour, pos. 3.
- Slotted, pos. 4 – a pattern is cut into the boards/board. They are relatively rare, because fragile.
- Multi-level slotted, pos. 5, up to 5 or more levels - sawn patterned modules are attached to a durable simple or cut-out base. In addition to strength, multi-level platbands are good because powerful fasteners to the wall are hidden in the ligature of the upper levels, and the upper levels themselves can be fastened with small, inconspicuous fasteners.
- With applied relief details, pos. 6. Nowadays, technologically they may turn out to be simpler than cut-out ones, because looks quite appropriate on a tree, respectively. painted purchased polyurethane relief.
- With low convex thread, pos. 7 – they look great, but are very labor-intensive, you need to choose a lot of wood.
- With low pressed thread, pos. 8 – less labor intensity, but the work is more difficult, because It is very difficult to correct visible flaws.
Note: on pos. 8 shows a casing with the so-called. pillow carving - the corners of the protruding fragments are smoothed. Platbands with cushion carvings look almost as luxurious as those with convex carvings, but they are almost as labor-intensive.
As for the colorful decor, the platbands can be painted, pos. 3, unpainted varnished, pos. 4, or natural look, pos. 7, painted in different colors by level, pos. 5, 6, and entirely painted, pos. 8. Painted frames are almost exclusively made from carved frames, while natural frames are made from particularly resistant wood species ( bog oak and so on.)
About the sculpture of platbands
In general, platbands with sculptural carvings, high (round, semicircular) and low, see Fig., could not be mentioned in an article with the tag “do-it-yourself”. Anyone who knows how to carve wood like that doesn’t need an explanation on how to make and install a frame on a window. But there is one point that is little known to experienced craftsmen.

MDF - have you heard? In fact, this is tracing paper with MDF, medium density fiberboard, wood board medium density. The well-known fiberboard is low density fiberboard, low-density wood board. And there is also HDF, high density fiberboard high density, little known in our country due to its relative high cost. All these materials are completely environmentally friendly, because... are obtained by hot pressing of wood pulp without a synthetic binder, the only difference is in the temperature and pressure of the press.
So, HDF, firstly, subject to 2-fold impregnation with a water-polymer emulsion, is resistant in outdoor conditions. And in terms of viscosity and density, it is suitable for fine wood carving, but is much cheaper than wood species for artistic carving and is produced in large, absolutely homogeneous slabs. HDF does not cut as well as walnut, but quite similar to oak and beech.
Salary
The full set of elements of the Russian frame frame is shown on the left in Fig. The names of its parts are also given there. Certain modules may be missing in specific products, because they duplicate each other in significance.
Main sacred meaning have a tower with a kokoshnik and an apron; As a rule, the heads and overhangs carry the informational and functional load. A tympanum with an apron is usually amulets against evil, and a kokoshnik with a frill, chasuble and a window sill are talismans that attract goodness. In old Rus' there were specific figures for both, not only in every village, but in almost every house. What is common to good is a circle with radii, rays or wings (the Sun), a bird (the firebird is the heir of either the phoenix or the simurgh), the horse is a symbol of prosperity and social status, and the fish is the original positive symbol of Christianity. Universal amulets against evil - a stylized floral ornament based on useful plants.

Note: the wing, as the part of the bird that carries it in the sky, has the same sacred meaning as the bird. The Winged Sun is a good messenger. The Christian six-winged seraph is nothing more than a pagan winged Sun with an angelic face.
In the European-Eastern tradition, universal symbols of goodness are the cartouche and the medallion. The medallion, of course, is the Sun, and the cartouche is either a stylized tree of life, or there is a phoenix bird on it. Both of these in no way contradict Christianity or ancient Slavic beliefs. In Rus' they even undertook to combine the cartouche with the medallion, for which the casing chamber was made split, on the right in Fig.
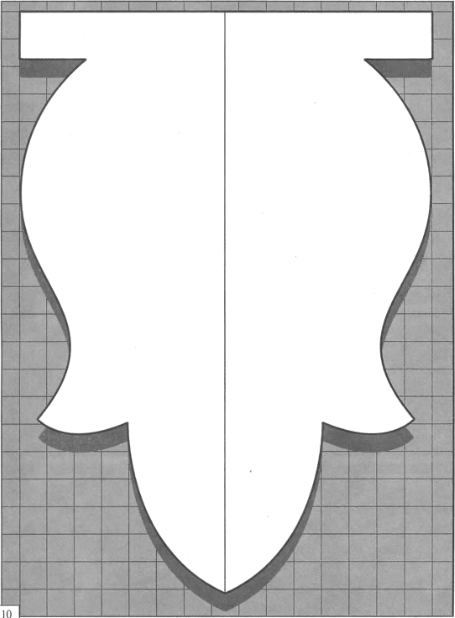
Charms
In the city, the amulet on the tympanum and the kokoshnik were of greatest importance; they protected against damage, the evil eye, etc. Templates for the upper amulets of the casing of a city house window are shown in Fig. The top one has a cartouche, stylized birds, fish (the tails are clearly visible) and no less than 12 other positive elements noticeable to a knowledgeable person.

The lower one is more for adherents of primordial beliefs. There, in a stylized solar circle, there is some ancient Slavic deity. Which one is not entirely clear, but it is definitely good. Good tramples evil in the form of a serpent: note that the lower elements of this board are asymmetrical.
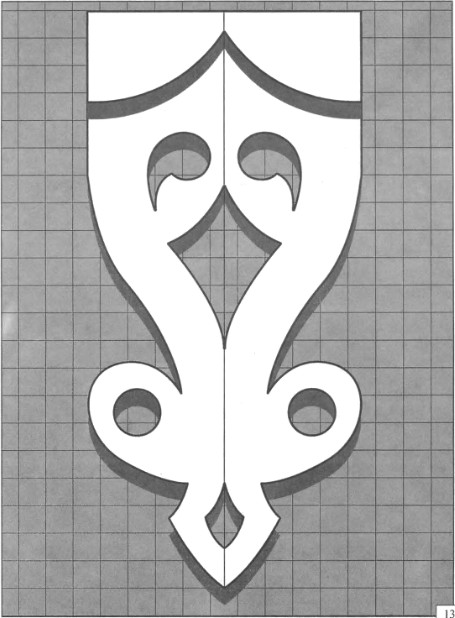
In the countryside, and especially in the forest, it was considered necessary to protect oneself equally from the upper (evil eye, slander, etc.) and lower evil: creeping reptiles and forest evil spirits. Platbands with a weighted or heavy apron, equal in height to or greater than the top amulet, were called upon to help with this. An example of the upper and lower boards of the platband-bereginya with a weighted apron of a village house is given in Fig. You can try to decipher it yourself.

Ornament
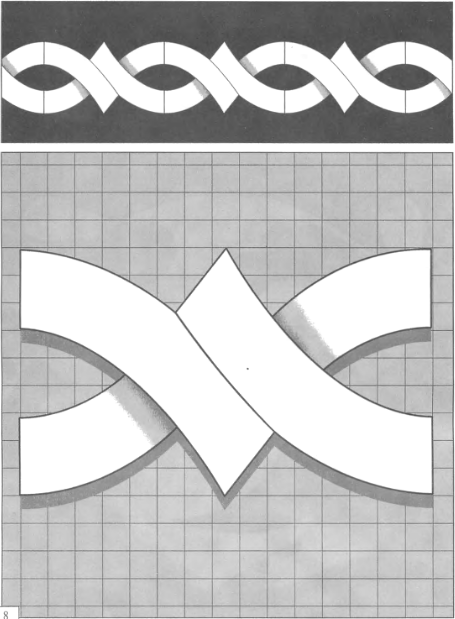
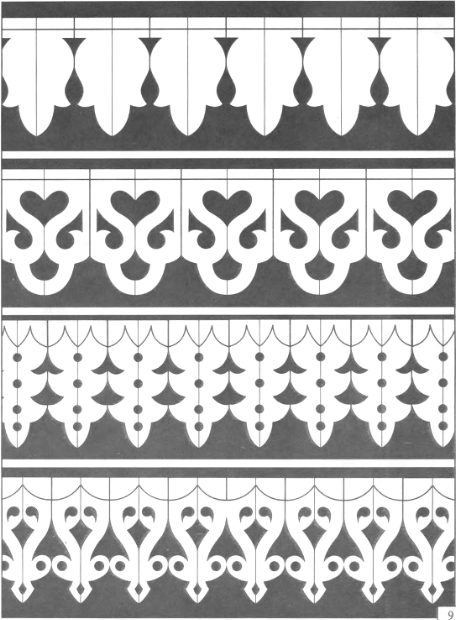
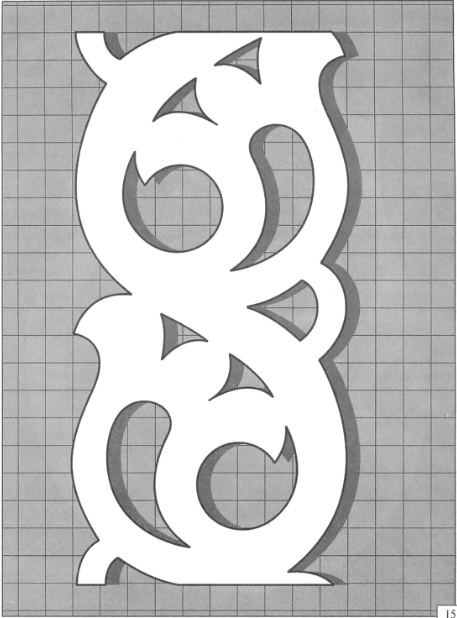
Window trim patterns are usually built on the basis of the so-called. repeats - elements self-conjugate in one direction, forming a linear seamless pattern, on the left in Fig. By changing the size and number of repeats, you can quickly develop a slotted casing for any window. By combining only 2-3 rapports, it is possible to get big variety patterns; stencils of several types of fully conjugated repeats are given on the right in Fig.

The repeats of the pattern do not have to completely match each other; this will make the pattern visually more complex and effective. For example, the pattern of the top row on the next. rice. is constructed by turning each subsequent fragment “upside down” relative to the previous one. Rapports of other ornaments in Fig. are conjugated either along broken or curved lines (marked in red).

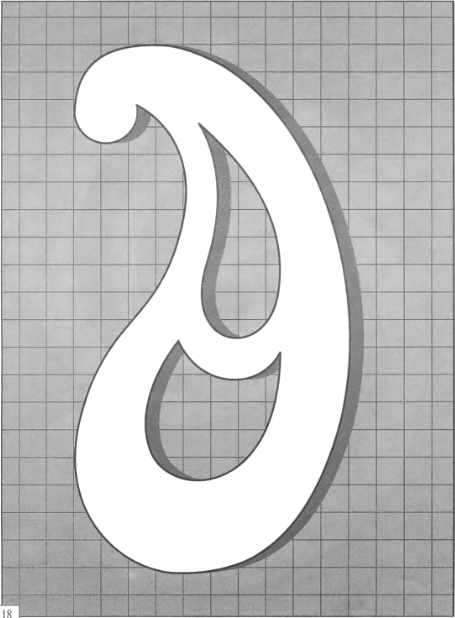
Note 5: decorating the corners of frame trims with the usual end elements for rapport lines often turns out to be difficult, there is simply not enough space at the corner. In such a case, next. rice. Templates for isolateral ends of the ornament are given. By rotating them 45 degrees, you can also use them to create linear patterns. These parts are best cut out of plywood, see at the end.

Thread
If you want to make yourself unique carved platbands, then the main difficulty on this path is the selection of tools. In addition to flat chisels of 5, 10, 16/18 and 24 mm (pos. A in the figure), you will need oblique chisels of the same widths, but always in pairs - right and left, pos. B. Angle chisels 6, 12 and 18/24 mm at an angle of 90 degrees will be enough, pos. IN.
Much more semicircular chisels will be required, pos. G: for starters, 4, 8, 13 and 16 mm normal, with a gutter depth equal to its width. 4 and 8 mm chisels will also need deep, so-called. U-shapes, and 13 and 16 mm are also sloping.

For fine artistic carving you will also need curved chisels, normal, sloping and 60 degree angled, pos. D1, D2, D3. For cushion carving, you can’t do without reverse crimpers for smoothing corners, pos. D2a. The minimum required standard sizes are marked in pos. D red.
You need to look for chisels for wood carving in art stores, but buying everything initially needed randomly will be very expensive. It’s better to immediately take a set for wood carving, but not for a fine sculpture of 40-60 items (item E), it won’t cost any less, and at first you simply won’t understand what to do with most of these tools. You need to take a beginner's set of 12-15 items, pos. Well, for it you will only need to buy jamb knives at 90 and 60 degrees (shown by arrows in position E). With the tools from such a set it will be possible to refine cut-out overlay elements and perform rather fine geometric carvings, see fig.:

Note: if you have the opportunity to use manual milling machine on wood, then the carved or slotted platbands can be significantly improved visually by running a shaped chamfer - molding - along its edge with a shaped cutter, see fig. on right.

Plywood
The crappiest packaging plywood, after being impregnated 2 times with a water-polymer emulsion, becomes suitable for medium-level artistic carving, and when painted with water-dispersion paint and varnished with acrylic varnish, it turns out to be resistant on the outside, like oak. But what’s even more important is that the strength of plywood, unlike boards, is almost equal in all directions. Required for platband minimum thickness 30 mm is 5 layers of plywood and 5 levels decoration clypeus. In this way, you can make plywood trims that are visually almost as good as the masterpieces of the masters of the past; compare left and center in fig.

Antique carved trims, modern plywood trim and a jigsaw for cutting out plywood
However, cutting so much plywood with a hand jigsaw will take a long time and be inaccurate, and a carpenter's jigsaw is unacceptably rough for such thin lace. You need a jigsaw machine, also known as a stationary jigsaw, on the right in Fig. Branded jigsaw machines are expensive, but they can be made with your own hands from a manual jigsaw (which does not deteriorate and remains suitable for basic work), an old sewing machine, and other methods, see for example. track. video.
Video: homemade jigsaw for wood carving
Note: Sewing machine machines are the safest and may not be electrified if the machine is foot driven. In this case, the frequency of the saw strokes is regulated simply without any electronics: you just need to jerk your legs more often or less often.
We will send the material to you by e-mail
The platband is a decoration and functional part of a window on the facade of a building. This tradition has been going on for a long time and does not lose its relevance today. You can make beautiful window frames in wooden house on one's own. Moreover, many products are made not only from wood, but also from other materials. Creating such elements requires certain knowledge and skills, as well as suitable tools.
The extraordinary color and style make the carved platbands a real decoration of the building
Currently, the installation of platbands on windows in a wooden house is again in demand. The photos below allow you to see the best examples. This element emphasizes the desire to revive traditional decor.
To the advantages of this element the following can be included:
- performs a decorative function and helps to visually expand or stretch the building;
- complements the overall style of the architectural solution;
- protecting the space between the window opening and the wall surface from moisture and dust;
- reduction of heat loss and noise levels;
- emphasizes the individuality of the building and the style of the era you like.

This design also has some disadvantages:
- wood requires certain treatment to prevent high humidity and swelling;
- the need for constant processing and regular care;
- not compatible with metal-plastic windows.
Helpful information! When combining wood with metal-plastic, they must be made in the same color scheme.

DIY carved window trim templates
There are various platbands for windows in a wooden house. Their varieties often depend on the method of attachment to the window.

Based on the type of fastener, two types can be distinguished:
- telescopic products have L-shaped protrusions that coincide with the grooves of the window frame;
- Overlays are installed on the window frame using construction adhesive or nails and screws.
The original solution is the installation of carved platbands. At the same time, on the Internet you can find a lot of templates for carved window frames. Such structures can be made with your own hands only with the help of special equipment.

You can consider the following types of materials to create such structures:
- wood is considered a traditional material;

- plastic models are resistant to temperature changes and ultraviolet rays;

- MDF is made from wood waste, therefore it is more environmentally friendly than plastic products;

- polyurethane varieties are characterized by practicality.

How to choose the right wood?
Wooden frames are popular. At the same time, the performance of the product depends on the type of wood chosen.
The following options are worth considering:
- Ash, beech and oak are hardwood varieties. They are durable, but difficult to cut patterns on;
- It is much easier to process soft hardwoods - linden, aspen and alder. You can even carve patterns on their surface by hand. Such surfaces must be carefully treated with special compounds;
- It is recommended to create small elements from cherry and apple trees that can be attached to the base;
- Pine and birch are characterized by ease of processing and good performance properties.
Helpful information! Different combinations of wood types can be used. In this case, special protective impregnations should be used.

Secrets of making templates for window frames with your own hands: stencils and design
You can find various window trim templates on the Internet. You can print stencils with your own hands. The chosen ornament must be combined with the overall style. However, you should not mix geometric and floral patterns.
When making platbands, it is worth considering the following points:
- the color palette of walls and decorative items should be combined;
- It is important to choose the right size. Products should not be too small or wide;
- it is necessary to choose a high-quality coating option. In this case, special paints and varnishes are used;
- a template is required to create external carved elements.
Helpful information! The design must be placed correctly on the workpiece. The parts should be located along the grain of the wood.

Platbands for windows in a wooden house: stages of production
Before you start creating window decor, you can select carved frames for windows in a wooden house based on the photo. A template is first made, which must be the same for the design of all window openings.
There are two main ways to create patterns:
- applied thread is distinguished by individual pattern elements that are attached to one base;

- with slotted carving, a through ornament is created that looks like lace made of wood.

For any manufacturing method, they must be used. You will also need special tools: a hacksaw for wood, a set of knives and chisels, and a drill. Window trims are made in a wooden house from prepared materials. The product creation process includes several stages:
- accurate measurements are taken;
- The selected wood must be dry. The width of the boards depends on the dimensions of the window opening. The thickness of the material must be at least 30 mm when making slotted threads and at least 10 mm when making overhead threads;


- the resulting holes are rubbed with sanding paper;

- the prepared parts are attached to the base. In this case it is used adhesive composition or special nails.
Helpful information! When installing platbands, you cannot use self-tapping screws, as such fasteners cause cracking.

Installation features
The finished casing is mounted to the window opening in the following ways:
- installation on a blind tenon. Such parts are installed on inside. Special holes are created in the frame for them. Glue is applied to the tenon and it is inserted into the groove. Such fasteners protect the platbands from dust and moisture;

- a through tenon is used. In this case, the joint must be carefully treated with varnish.
Similar techniques are used if the window is wooden. For installation on metal-plastic, special liquid glue is used.
What kind of care is needed?

Carved products are primed, varnished or painted. Such treatments are carried out every few years. This will extend the life of the products and also maintain their attractive appearance.If plastic or metal products are installed, they do not require special care. It is important to protect products from corrosion and occasionally renew the paint.

Manufacturing beautiful platbands with thematic patterns with your own hands will allow you to decorate window openings in an original and unusual way and bring a special zest to the intended architectural style.

Save time: selected articles delivered to your inbox every week
Carved platbands framing window openings organically fit into architectural styles wooden cottages. They emphasize the originality of log buildings, frame buildings, timber houses. Originality of elements facade decor They add light patterns, ornate ornaments, and interesting designs. They are applied to the surface of the wood using convenient stencils.


Functions of window frames
Supporting the traditions of wooden architecture, carved details enrich noble look estates add expressiveness to simple buildings. They save home warmth and comfort, they delight when viewed from the outside. Window trim stencils, selected in accordance with the preferences of the home’s inhabitants, help create a harmonious appearance of a new home and enliven the façade of an old building.
When used on shutter windows, decorative trims can serve as a frame. Playing a decisive role in design window openings, they solve a number of important problems:
- reduction of heat loss by eliminating “cold bridges” along the perimeter of the window frame;
- reducing noise levels in rooms;
- reducing the amount of moisture and dust particles penetrating from the street;
- giving facades uniqueness and style orientation;
- creation of a single architectural ensemble of residential and commercial objects on the development site.
Regardless of the shape, size, appearance, wooden platbands must be strong enough to meet operational requirements. Manufacturing using stencils with calculated geometric parameters allows them to be securely attached to the walls. It provides resistance to wind loads and temperature fluctuations. To increase service life, effective protective coatings are used.
Traditional and original ornaments
The choice of design elements for window openings should be approached with an understanding of styles and design techniques. With their help, you can give the window an elegant or strict shape, make its outline more expressive, and achieve a delightful visual effect. By choosing life-size stencils as templates for window trims, the buyer receives the most advantageous decor option. Convenient dimensions allow you to proceed directly to the manufacture of products.
The attitude towards wood as a material of art is traditional for the culture of Russian architecture. With the repetition of individual structural and decorative details, it provides for the creation of a unique architectural image. Carved platbands have long been considered not only a means of decoration, but also a kind of amulets for the home. Based on the study of surviving ancient buildings, unique images of symbols, animals, birds, and plants were recreated.
Samples of stencils for platbands were developed in different styles and for every taste. They help express certain traditions and personal preferences. The use of ready-made ornaments allows buildings to be decorated in accordance with ethnic and classical trends in art. Clear geometric patterns are more in line with modern architectural trends.
Ornaments for slotted and applied platbands may contain a solid pattern or repeating elements of a general motif. To create a complete outline when marking parts, you need to take into account the dimensions of the window opening, the diagram and sequence of patterns. High-quality stencils make it possible to accurately apply cutting lines to the workpiece and determine the boundaries of further processing of the material.

In a hotel company, great attention is paid to safety issues. Guests must be confident in the safety of their belongings in order to use the services of the establishment without fear. For changing mechanical systems, which are easy to hack, have come electronic locks for hotels. They are technologically advanced locking devices that not only provide a high level of security, but also perform auxiliary functions. Enterprise equipment...

We all know what swing doors are. This is not at all surprising, since they have long been used in many residential premises, offices, shops, etc. High sound insulation and reliable design makes such doors very popular in the market. So the system swing doors is perhaps the most common due to its obvious and numerous advantages. On the website raumplus.ua you will find…

Niove (Staudtia conditionitata) Family: Muscataceae Other names: kamashi, nkafi (Zaire); Oropa (Nigeria); Ekop (Cameroon); menga-menga (Angola) Distribution: Tropical West Africa, Cameroon, Gabon and Zaire Description of Niove Wood The wood is red-brown to orange with darker brown streaks of color. The grain is straight with a very fine texture. The surface is slightly shiny and sometimes oily. Weight 830 kg/m3; specific gravity…

Niangon (Tarrietia utilis) Family: Sterculiaceae Commercial names: niankom (Ghana); Wishmore (Liberia); Ogue (Gabon) Distribution: West Africa Description of Niangon wood The color of the heartwood varies from pale pink to reddish brown. The grain is interlocking, wavy or irregular. The texture is quite rough with a conspicuous ray figure. The wood appears greasy due to the presence of resin. Weight varies from 510 to 620 kg/m3. Mechanical properties…

New Guinea walnut (Dracontomelum mangiferum) Family: Anacardiaceae Other names: Pacific walnut, Papuan walnut (UK), lup (Papua New Guinea) Distribution: Papua New Guinea and neighboring islands New Guinea walnut - wood description The wood has a gray-brown background with an orange tint. The grain is moderately cohesive. The texture is medium and smooth. Weight 740 kg/m3; specific gravity.74. Mechanical properties New Guinea walnut has…
In most cases, carved platbands are used to decorate windows wooden houses. But due to the fact that buying a ready-made platband today is quite problematic, it is easier to make it yourself.
Important! All platbands, even the highest quality ones, have one significant drawback - they need protection from precipitation. The production of window trims traditionally begins with the preparation of everything necessary.

Stage 1. Equipment
During the work you will need the following tools:


Stage 2. Material selection
For ordinary frames it is better to use pine, while for carved products it is recommended to take soft wood, for example, linden (the latter, moreover, is much easier to process by hand).


Important! The only disadvantage of linden is its hygroscopicity, which can be easily eliminated by applying several layers of paint and varnish.
Hard wood species should be chosen in three cases:
- with high climate humidity;
- when the air is too dry;
- in the presence of significant temperature fluctuations.
Hardwoods include birch and oak. They are quite difficult to process with hand tools, so you will need a milling machine, but such wood will last several times longer than linden.

Stage 3. Important points during manufacturing
Finished wooden trims should not prevent the doors from opening by at least 90ᵒ. Regarding other parameters, they are selected individually in accordance with the size of the opening. For fastening, you can use spikes or connect elements in half a tree.

Important! In the future, for printing large images on the surface top part the platband can be increased. Spikes are used for fastening, and the decoration itself is popularly called “kokoshnik”.
The lower part of the product is made in the same carved way and must include the bevel required for the drainage. It is typical that the thickness of the lower part should exceed the thickness of the upper by at least 1 cm.

Small slats are nailed on both sides of the opening - they will hide differences in the walls (if any). The thickness of the slats should match the width of the gap, at least approximately. The final fastening is carried out only after careful adjustment of the joints.
Important! If the shutters open to the street, then the platbands need to be installed 3 cm above the window itself.
Stage 4. Pattern selection
Since ancient times, platbands have been decorated with the most bizarre patterns, which were believed to protect the house from evil spirits and the evil eye. Today, the production of carved frames is carried out mainly by qualified craftsmen.
Important! To dodo-it-yourself window platbands, you first need to choose a good stencil that will allow you to create a pattern of any complexity, even without special wood carving skills.
Often, professionals themselves use stencils; without them, only one-time individual orders are carried out.
Stencils today are freely sold in quite wide range. They consist of the following components:
- bottom bar;
- top bar;
- vertical slats.
In addition, there may be additional decorative details - hangers, etc.


Stage 5. Making the frame
First, a frame is formed from pre-cut elements. Fastening is carried out using spikes, which are fixed in the hole with nails. A jigsaw is usually used to create the tenons, although a regular fine-toothed hacksaw will also work. A small knife is used to remove sawdust.
The width of the finished frame, as well as the platbands described above, should not interfere with the free opening of the sashes by 90ᵒ. The frame itself should be at least 2 cm larger than the window.
Stage 6. Manufacturing of platbands

Step 1. First, the design from the stencil is transferred onto the wood using carbon paper.

Step 2. Then take a jigsaw with a thin blade and cut out small curly elements.
Step 3. C outside the contours of the pattern are cut out so that the fabric runs along the edge of the workpiece.


Step 4. In any case, you will have to turn the saw in the workpiece. This is quite simple to do; you just need to use one of two existing methods:
- upon reaching the turn, several mutually parallel cuts are made (the saw should be able to turn to any angle inside the hole);
- you can go the other way - make a small loop that will allow you to enter from the other side.
Important! Modern jigsaws allow you to make cuts at an angle of 45-90ᵒ, thanks to which you can not only make the smallest cuts, but also give the decorative element a more saturated and voluminous shape.
Step 5. If it is necessary to cut out a closed figure in the center of the product, then a hole is drilled in the middle of the part to be removed. After this, the jigsaw blade will be easier to move in one direction or another.
If the workpiece is thin enough, then when processing it you can do without an electric drill. To do this, take a jigsaw and press it against the workpiece at a right angle. Next, the tool is turned on and the hole is scratched as the blade deepens into the wood.

These are all key aspects of making window casings. Actually, the whole procedure comes down to repeating the steps described above many times, but their specific combination depends only on the skills and complexity of the pattern.


It is worth noting that there are other manufacturing methods that differ from those described above. For clarity, we recommend watching the thematic video.
Video - Production of window casings
Find out which ones are best to choose, and also consider the types and installation methods from our new article.
Prices for platbands and accessories for windows and doors
Platbands and trims for windows and doors
Basic Rules. What not to do
Below is a list of rules that will help you avoid the most common problems.
- It is recommended to use a board 3-4 cm thick as the starting material.
- Don't jump into complex patterns right away. First, it is better to practice on ordinary round parts that are easy to make with a drill.
- The width of the workpiece should be such that it is enough to cover the ends of the walls and protect it from moisture.
- Carved elements should be placed along the grain of the wood - this will prevent cracking.
- When choosing a stencil, it is better to pay attention to patterns with large elements, since small ones will look crumpled, as a result of which the finish will not have the desired decorative effect.
Important! Before starting work, you should calculate the future costs of time and money, as well as the feasibility of the idea itself. In the absence of high skills in working with wood and interest in the process itself, it is easier to buy ready-made platbands.
Moreover, it is advisable to first familiarize yourself with photographs of different products. So you can find suitable option or get inspiration for creating something yourself.

Stage 7. Installing the product on the window
Now all that remains is to install the finished carved platbands on the windows, for which special glue is used. It is important that it is not organic, otherwise, due to its susceptibility to biological influences, it will harm the products themselves.

You can also use plumbing glue - there should be no problems with it.
Important! If the fastening will be carried out using nails, then the spikes and joints should be coated with an adhesive solution in advance.
Another option that can further simplify the installation procedure is to use self-tapping screws instead of nails. It will be easier, if only because there is no risk of damaging the casing or surrounding surfaces with a hammer.

Important! Self-tapping screw caps are very easy to disguise. It is necessary to mix sawdust with glue and spread the resulting mixture on the caps. It is advisable to do this before painting the windows so that the hidden fasteners also acquire the required color.
The final painting procedure is also quite simple. Some protective material is applied over the finish (not only paint, but also, for example, varnish, impregnation). It is advisable to do this in any case, since such a coating significantly extends the service life of the products.

Paint is known to peel, so it is advisable to use it instead. It is much easier to periodically renew the impregnation than to remove cracked paint. And the latter, as you know, will definitely crack.
As a conclusion

It is commendable that people strive to follow the traditions of their ancestors, because this is especially important in the current conditions of active urbanization. For self-made Window trim will require a little time and appropriate equipment. The procedure is complicated, but the result will more than pay for all the costs. Moreover, this way you can save a considerable amount of money, since making custom-made trim for one window will cost an average of 2.5-15 thousand rubles.
Video - Platband options