Various tricks for the garage. Garage Ideas: DIY Tools for the DIYer
Do-it-yourself garage DIYs are almost innovative developments with important effects that help car enthusiasts when servicing their cars. This article will tell car owners what they can do in the garage with their own hands.
Here we briefly describe the design of the structures, useful tips on their use.
How to arrange a garage
Any garage must provide convenient storage all frequently used tools and close arrangement various little things"in reserve." Here it is good to have not only a place to place the car, but a workshop with a convenient system for laying out all the items, as shown in the photo.

The first homemade products in the garage - convenient racks(see), shelves, all kinds of drawers where spare parts for the machine will be placed, the most necessary tools.
Tip: For these purposes, you should use the entire height of the room. On the floor and right at the ceiling in plastic boxes you can put things you need from time to time.
Convenient homemade products for the garage are:
- A stand on the entire wall for storing all sorts of small things.

- Open shelves.
- Boxes for storing unnecessary things.
- Closable stand-box.
- Metal mesh for storing all kinds of cans and bags.
- A special stand for storing power tools.
- Additional space for tools can be provided by sliding panels.
The video will show you how to equip your garage and what homemade items you can make with your own hands in the garage.
How to make a drill stand
Crafts for the garage with your own hands can be made not only for, but also to facilitate repair work. It is very convenient to have such DIY products in the garage, for example, racks for various power tools.
An example of such a homemade product for the home and garage is a drill stand.

Often, when doing homework, you have to drill holes that must be smooth so that their axes are strictly perpendicular to the plane of the part, which is quite difficult to do with a regular drill without distortions in any direction. A DIY drill stand made helps solve this problem.
To make the device you will need:
- The base is from a milling machine.
- Calibrated tube or rod.
- Plywood.
The base for the device is a platform from a worn-out hand router.
Its advantages are:
- Flat plane.
- There are guides that can be replaced with longer tube elements.
- A box is made from thick plywood, the size of a drill.
- Using wing nuts, the drill is firmly attached to the box.
- Two holes are drilled in the box.
- Through them, this element is mounted on the guide bases. In this case, the movement of the drill will only be vertical.
Video from the channel “TEXaS TV”. Topic: gadgets and more for the garage. At one time, when the master was just starting to repair cars, money for good tool and there wasn't. Complex and expensive designs had to be made by myself. The author of the channel decided to prepare a review of homemade devices.
Watch the YouTube channel video “Hands from Shoulders”. Excellent devices for the garage and cottage.
If you have an old vacuum cleaner lying around, you can put it back into service by repurposing it, for example, a blower. With its help, you can quickly clean dust from some equipment or restore order on the street. Will be needed sealing rubber bands, motor and part of the housing. We redesign the button, leg, handles and get a compact and convenient device. To focus the flow in this case, the fire extinguisher socket. There are probably plenty more alternative options.
This summer we plan to build a similar dryer at our dacha. It can be used not only for fish, but also for meat, apples, and mushrooms. Cool option. There is a thermostat that maintains the required temperature in the chamber. Air intake from 150 ventilation pipe. It has a built-in heater consisting of two incandescent lamps. Top filter from mosquito net. Fan from a server rack. The outlets are directed to the street.
An interesting design of a milling copier. Movement along shafts with a diameter of 20 mm is carried out using linear bearings.
If you build something from foam blocks, then you have probably felt the beauty of lifting them to the floors. It's still a pleasure. Weight more than 30 kilograms. A simple grip design together with a winch or electric hoist will make work easier.
An improved version of the vice for welding work. Added to the device additional instructions, which made it possible to connect parts in 3 planes at once.
At the beginning of May, the busy season begins for summer residents, including potato growers. If you have a walk-behind tractor, then it makes sense to think about automating the harvesting process. Moreover, we have a whole summer to prepare. This digger is of a screening type, but there is no sound in it as such. This greatly simplifies the process of making the device. Instead, the rods on the ploughshare were extended. The soil with potatoes is picked up by a ploughshare and served on a table made of twigs. The latter vibrates, the soil wakes up through the cracks, and the root crops on the other side fall to the ground. All that remains is to pick it up and put it in a container.
In a private house garden shredder – useful thing. There is no need to think about where to put the cut branches. Secondly, your garden will repay such fertilizer with an excellent harvest. The knives are mounted on disks 16 mm thick. Cutting elements made from springs. Hammers for chopping branches to the required size.
A variety of accessories for the private garage, designed and manufactured on our own, allow for better and more efficient vehicle maintenance. Their creation requires minimal financial costs. Wherein homemade equipment in most cases, its capabilities are in no way inferior to expensive factory analogues.
Stand for electric drill - simplify the drilling process
In a private garage, over time, more and more different tools and equipment used for maintenance appear vehicle. The owner should ensure their convenient and rational storage in such a way that the most necessary equipment were always at hand, and rarely used ones were hidden away. To solve this problem, you need to draw a basic sketch and create shelves or. Ready-made options There are many such designs on the Internet. And it’s not at all difficult to come up with a shelving system yourself.
More problems arise when you need some rare homemade items for the garage. For example, many car owners use when servicing their car and performing various works around the house with an electric drill. Often, with its help, it is necessary to make perfectly even holes with axes strictly perpendicular to the plane of the workpiece. Anyone who has tried to achieve such a result knows that it is not at all easy. As a rule, the holes are skewed. A drill stand can solve this problem. To build it with your own hands, you need to stock up on:
- rod or calibrated tube;
- a platform from a milling cutter (manual), which has not been used for its intended purpose for a long time due to its wear and tear;
- sheets of plywood.
It is also permitted to use another suitable platform as a base for the stand. The main thing is that it is level and has areas where you can install new long guides. The function of the latter in our case will be performed, as you already understood, by metal rods or calibrated tubes. The process of building a rack is truly simple. Let's describe it.
First we cut a box from a sheet of plywood. It must be done clearly geometric parameters available drill. Then it is necessary to secure our power tool as securely as possible for drilling holes in the box prepared for it. Fixation is best done using special wing nuts. After this, we make two holes in the box and pass tubes (rods) - guides - through them. We mount a handle on top of them. With its help, we will move the drill to drill holes vertically.
Advice. If you want to control the drilling depth, it is advisable to additionally equip the design with a quick-release clamp. It will act as a movement limiter for the drill. All the work described was done by a more or less experienced home handyman will not cause the slightest problem. And in the end we will get easy-to-use and very useful homemade equipment.
Mini knife sharpening machine - reliable and compact
Now let's try to make a device that will allow you to sharpen kitchen and any other knives. We proceed like this:
- 1. Take an unnecessary sheet of metal (in any garage it is sure to be lying somewhere in the corner and waiting in the wings).
- 2. We fix a threaded bolt at the bottom, and at the top metal plate weld a small corner.
- 3. Place a nut on the bolt thread. It serves as a hinge for the lateral movement of our device. With its help you can change the sharpening angle of knives.
- 4. We weld another one to the described nut. We got a ready-made hole for the rod in the bolt. It is easy to make from thin wire.
The clamp in the machine will be top part leaf. We make two holes in it. We apply a clamp to the frame. Then we cut another hole. It must be end-to-end (common to the plate and clamp). Next, we make carvings in the bed, taking into account the length of the bars for turning. They are optimally made from artificial diamonds. There is no more wear-resistant and at the same time inexpensive product in nature. And we’ll make clamps for the beams in a couple of minutes from a piece of ebonite or plexiglass.

All that remains is to drill an additional hole on the plate, placing it away from the knife, and cut a thread for the bolt, which will be used to tighten it. Compact and quality tool ready for sharpening! We put it on a shelf in the garage and use it as needed. Machines made according to the described scheme can be taken with you even on a hike. These garage sharpeners weigh little and take up minimal space.
Crane beam for the garage - let's make vehicle repairs easier!
Maintenance and simple car repairs in home garage are significantly simplified if there is a crane in the room. Look at the photo below. It shows how convenient and useful a garage structure can be constructed without much effort.

We will make the transverse rod from a pipe with a cross-section of 10 cm, the supports for it from pipes 11 cm. Important! It is recommended to make homemade racks from square profile pipes with dimensions of 10x10 cm. They will provide the device with good stability. We attach the rod to the supports with M16 bolts (you can use other fasteners), fix the bevels and the base using a 10x10 cm corner.
We buy a lifting cable at the nearest construction store. We take the rollers for it from the elevator door drive mechanism. Notice! The rollers need to be well secured. This operation is best performed using a narrow (5 cm) metal strip. Lifting of objects on the crane beam will be ensured by a worm hand winch. And don't forget to attach another set of rollers to vertical posts. They will allow you to move the crane beam throughout the garage without any problems.
DIY compressor - homemade for advanced drivers
Workbenches, hanging shelves and others useful crafts Any car enthusiast can build it for storing equipment. It is more difficult to make machines and special equipment yourself. But when the right approach to really cope with such tasks. Let's assemble a compressor that can be used for blowing vehicle components and mechanisms, painting a car, and monitoring tire pressure.

We will need a 10-liter air receiver (a device with a slightly larger or smaller volume is suitable), a refrigeration unit (old, not used for a long time), and also:
- adapters;
- inexpensive filter regulator (feel free to purchase the cheapest one);
- oxygen pressure gauge for the receiver;
- fastening clamps;
- hose (approximately 200 cm) designed for 20 bar pressure.
The compressor assembly process is simple. The receiver has outputs at the bottom, middle and top. The bottom one is necessary for draining oil and condensate, the middle one is for installing a pressure gauge. The flow is supplied to the consumer through the upper compressed air. We connect all the required elements to the outputs of the device and secure them with clamps. We connect the filter regulator to the receiver panel. Next to it there will be a button to start the unit. Maximum pressure regulator on homemade device should not exceed eight atmospheres, the minimum is two.
It is advisable to additionally equip the compressor with an emergency valve. This inexpensive item will be fully guaranteed safe operation homemade device.
We will place the completed compressor near the wall on a rack or shelf. It will not interfere when moving around the garage, while at the same time being always at hand home craftsman. Advice. Old compressor Before use, it must be thoroughly cleaned of rust. And then buy aerosol can with paint and paint the unit.
Pulley for adjusting the speed of homemade machines and other crafts
We will briefly describe other popular tricks that are easily made from used tools and unnecessary things. Let's make, for example, a pulley for any machine in the garage. The material for its assembly can be textolite, metal, or plywood sheets. The last option is the simplest:
- 1. We cut out two larger and one smaller circles in a plywood blank. The diameter of the holes made must correspond to the cross-section of the shaft installed on the machine.
- 2. Place all the circles on the screw, use a nut to tighten them firmly. Instead of this fastener, it is allowed to use good glue. It will securely fix all the elements into a single structure.
- 3. Additionally, we tighten the details of the craft with screws.
- 4. Use a file or sandpaper to process the homemade pulley, apply a couple of layers of drying oil to it.
- 5. After drying, place the made device on the chuck of any mini-machine (for example, an electric drill). And we use the tool for our own pleasure, because now we can choose its rotation speed and control the load on the electric motor of the unit.

If necessary, it is possible to make a toothed pulley. To do this, it is enough to cut narrow grooves (tubules) in a small circle. This part of the operation must be completed before assembling the pulley.
if you have electric jigsaw, which is not used because the file holder is broken, does not need to be sent to a landfill. There are small tricks that allow you to give your instrument a second life. On its platform it is possible to assemble a simple table jigsaw. We take a square of metal and solder a bolt into it. We get a new saw blade holder! Solder it to the old holder.
Then we make a stationary desktop. Let's take it plywood sheet, cut it to the size of the jigsaw. We attach a stand made of wood (we use hard grades) to the back plane of the working surface, and install furniture legs on the front plane. Next, we mount the working structure on a suitable base plate. Use a refurbished and improved jigsaw to your health.
Order in the garage means convenient open storage all frequently used tools and compact storage of various small items “in reserve”.
Often the garage and home workshop are combined, so all tools and consumables should have a convenient storage system.
As soon as the storage system becomes not very convenient for regular maintenance, the garage again turns into a spontaneous warehouse.
It is better to use open shelves to store tools in the garage. It will be very convenient if these shelves are removable.
In the garage of the workshop it is necessary to place not only the usual set of tools for a car enthusiast and a home craftsman, but, sometimes, garden tools, and travel equipment.
Make the most of the entire height of the room. In plastic boxes just under the ceiling and on the floor you can put those things that you use from time to time.
The tool storage system in the garage uses the entire wall area as a stand. Separate sections-shelves for storing tools and Supplies.
Wooden guides are used here, but it is better to use metal pipes. If over time the guide we see in the photo crumbles, a box with a heavy tool could fall right on your foot.
You can make such an organizer for storing consumables yourself from sheets of plywood, which are connected with hinges in the form of a book.
A lockable stand-box for home craftsman's tools will allow him to easily maintain the necessary order in the garage.
Metal mesh is convenient for storing paint cans, fertilizer bags, etc.
Metal guides and metal shelves not only ensure safe tool storage, but are also easy to clean.
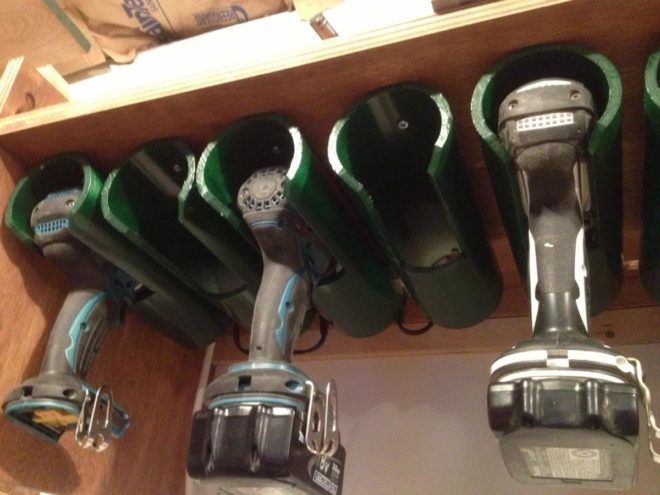
It is inconvenient to keep a power tool in a company suitcase; it is much more convenient to make such an open stand for storage.
The owner has a lot of necessary little things in his garage, and each of them has its own storage method.
Most tool storage methods are simple, but still more effective.
Very convenient design for storing consumables! The box with self-tapping screws that you use is secured to a separate panel, and upon completion of work, it is pushed into a common organizer.
Each owner has his own scope of activity and different quantities tools. But a convenient organization of work always makes you want to do something more. Take the time to tidy up your garage.
Sliding panels provide additional storage space for tools. Make sure that they will work reliably without getting stuck in the grooves, otherwise this storage method will not be practical.
Simple and convenient. Store your instrument wisely! If you don’t have a garage, and you store all your tools in a small box on the balcony, then even there you can organize a small work cabinet.
Let's continue for the happy owners of the garage. Before us convenient way storage of clamps.
Some storage ideas can be found in stores that sell tools.
But our garage contains more than just tools. We also have pipes, planks, and the necessary pieces of plywood and plastic.
It’s not at all difficult to assemble such a ceiling structure from pipes in your own garage.
It is better to store large sheets of plywood and drywall this way - in vertical position.
For scraps of plywood, plastic, etc. You can make a wall rack like this.
Even a dozen boards can create a mess in your garage. Let's do it simple design for storage.
Another convenient way to store long pipes and all kinds of strips in the garage.
A small workbench can also serve as a storage place for boards and pieces of plywood.
You don't have to clean out your garage in one day. All this can be done gradually, step by step.
With proper arrangement of space, a garage can serve not only for parking a car, but also as a workshop for its maintenance. In addition, a properly planned space will easily accommodate the required tools and provide storage of technical fluids and wheels during the off-season. The functionality of the premises will allow you to expand, which can be made from scrap materials or purchased in specialized stores with subsequent modification to suit your needs.
Considering the fact that the number of things in the garage will increase over time, it is worth rationally using the walls, floor, basement(if available) equipping them maximum number shelves, hooks, racks. For skilled people they define workplace, equip it according to your needs.
Storage of large items
All items occupying garage space are conventionally divided according to several characteristics: large and small, required constantly or used once or twice a year. Depending on this, before starting to arrange the space, they work out a list of large things that are not often used, which include:
- winter, summer wheels;
- bicycles;
- skis.

The list may be longer, perhaps the garage owner likes to do mechanics, then in his arsenal there will definitely be long pipes(plastic and metal) different sections, bars and boards. For compact, orderly storage of large items, garage homemade or purchased devices are used, for example:
- Purchase wall-mounted bicycle holders that allow you to store them in a vertical position, which provides significant space savings;
- For sets of tires, special shelves are installed on which each wheel lies separately. They are located in any convenient location, for example, under the ceiling, along the wall or, capturing a corner space, or suspended from the ceiling or wall on an appropriate support, having previously been cleaned of dirt and packed in special cases. This method of storing tires is only suitable for sets on rims.
Considering cases where tires are stored without rims, a metal rack is welded on which the tires stand vertically in one row. Place the device under the ceiling or on the floor, securing it securely; - Using homemade bindings, they provide a compact arrangement of skis, ski poles and other sports equipment.
Attention! It is necessary to provide in advance a place in the upper third of the wall for storing a removable trunk.
In addition, craftsmen make various hanging ceiling structures, located parallel to the floor, for placing long objects, such as pipe scraps or beams.
Devices for small things

For many craftsmen, the number of different-sized screws, nuts, bolts, and washers is measured in a bunch of boxes and buckets, in which it is extremely difficult to find the right part. To solve the problem, garage gadgets have been invented that allow you to organize small things and ensure that you can quickly find the right part, for example:
- special portable boxes with compartments. A convenient option that allows you not only to store, but also to transport the required parts if necessary. It should be noted that the cost of the boxes is relatively high, so the ideas proposed below will help reduce costs;
- craftsmen sort small nuts and other parts into jars with screw-on lids, and the lids themselves are securely attached to hanging shelves. All that remains is to screw the jar into the lid and the parts will always be in sight and at hand.
If you have the financial means, purchase compact storage systems for hardware, nuts and other parts of different sizes and different fastening capabilities.
Tool storage
Working tools are divided into large-sized and small-sized, respectively homemade devices for the garage will be different. In most cases, owners prefer to store cutting machines, hammer drills, and other large tools using their “original” drawers. Therefore, for their convenient location along the wall, a rack is made from scrap materials, taking into account the total load on the shelves (for homemade structures weight should not exceed 150 kg).
Attention! Available in stores big variety models of shelving made of both wood and metal that can withstand loads of up to 500 kg or more. At a relatively low cost, it is convenient to purchase a ready-made shelving for the garage to the desired size, securing it to the wall.
For small tools such as keys, screwdrivers, pliers and others, organize space depending on their number:
- the sets are stored in purchased boxes, placed on a rack;
- for single items, either cabinets are set up in which each tool is fixed in a corresponding niche, or a perforated surface is prepared (as in a store) mounted on the wall and a specific place is determined for each of the tools.
Some craftsmen place their instruments using designs from plastic pipes, in which holes of the appropriate diameter are made.
Homemade machines for garage work
To carry out repair work comfortably, space is provided for a workbench (it can be folded to save space). To begin with, they work out a drawing of the table, considering the presence of retractable shelves, then make it from boards or metal sheets, equipped with a vice and a sharpening machine.
In some cases, craftsmen cannot do without homemade machines and other devices made independently and improving the quality of the manufactured item.
Press from improvised tools

One of the most popular DIY garage gadgets is. To create it you will need a hydraulic jack, a metal surface that will serve as the basis for the moving part of the press, springs and profile pipes or channel to create a frame. Further:
- create a frame by welding channels and reinforcing the structure with transverse stiffeners; transverse corners are also welded downwards for stability;
- the movable platform is attached to the upper frame with springs, and a jack is installed.
The press forces are regulated by a jack.
Depending on the needs of the garage owner, other useful homemade machines, for example, drilling, made on the basis of a drill, secured with clamps and moving along a rack using a gear, or cutting, or turning.
In addition to the devices listed above, you should take care of the location of the work clothes, provide for the presence of a fire extinguisher or sand (based on fire regulations safety), consider ventilation and lighting systems.
Thus, with a little ingenuity and thriftiness, you can make accessories for the garage with your own hands, thereby ensuring compact storage of things and freeing up enough space for organizing minor repairs car and work related to the maintenance of certain home appliances.