Glue the ceiling plinth to the cold wall. How to glue a ceiling plinth with your own hands: preparing materials and tools, gluing and finishing
When the renovation of a room is almost complete, home craftsmen have to deal with gluing the ceiling plinths. This procedure is much easier finishing walls or, for example, ceilings, but, nevertheless, it contains its own nuances that you need to know. The fact is that carelessly glued skirting boards can seriously spoil the impression of the entire renovation.
The nuances of gluing skirting boards
The process of gluing skirting boards can be divided into several stages:

Preparation of materials and tools
To install the ceiling plinth, you first need to select an adhesive. It must be said that there are quite a lot of compounds that can be used to fix fillets. Therefore, you should choose depending on the type of skirting boards:

In addition to glue, you may also need:
- starting putty for sealing joints;
- acrylic interior paint if you plan to paint the fillets.
As for the tools, you need to prepare:
- sharp mounting knife;
- hacksaw for metal;
- pencil;
- roulette;
- miter box;
- putty knife;
- sponge.
After preparing the material, you can begin further finishing.

Preparing the baseboards themselves
Before gluing ceiling plinth, you need to prepare it. To do this, first measure the walls and cut the fillets into pieces of suitable length, leaving about 5-10 cm of margin for trimming the corners.
This work, as a rule, does not cause any difficulties. The situation is completely different with cutting corners, which, as a rule, raises a number of questions for beginners. The easiest way to cope with this task is with a miter box.
It must be said that the price of the simplest miter box is 200-300 rubles. Since it can be useful to you not only for installing ceiling fillets, it makes sense to purchase it.

Working with this device is carried out as follows:
- Place a miter box in front of you and lay the plinth in it. The left plinth should be placed on the left, and the right one, accordingly, on the right;
- turn the fillet so that its lower part is on top and the upper part is on the bottom;

- then press the strip against the edge and cut at 45 degrees, as shown in the diagram above.
It must be said that corners in rooms rarely correspond to 90 degrees, as a result of which, after gluing fillets, gaps form between them.
There are two ways to solve this problem:
- fill the resulting gap;
- adjust the joint after trimming in a miter box.

Let's look at how to fit skirting boards without a miter box.
If the corner is internal, then the instructions are as follows:
- attach the left fillet to the ceiling in the position in which it will be installed and draw a line along it on the ceiling;
- then attach the right bar and draw a line in the same way;
- after that, again attach the left and right strips in turn, and transfer the points of intersection of the lines to them, as shown in the photo above;
- now cut the fillets with a knife or hacksaw (depending on the type of baseboard) from the top point to the bottom edge.
The outer corners are adjusted using the same principle, the only thing is that in this case the lines should be drawn from below on the wall.

Preparing the walls
After preparing the baseboards, you need to prepare the walls. The most common question that beginners ask is what to glue wallpaper or fillets first? If the planks are made of polystyrene foam, then they will stick to any wallpaper without any problems.
Heavy fillets, for example, made of polyurethane or gypsum, of course, cannot be glued to wallpaper. And this is where the opinions of experts differ. Many people recommend installing the baseboard first and then gluing it.
From my experience, I will say that it is more advisable to first paste the wallpaper, and then apply markings, i.e. line where the wallpaper is located, and carefully cut the wallpaper along it with a thin knife. This is easier than trying to fit the canvas to the glued baseboard. In addition, this finish looks more neat, since the edge of the wallpaper can be hidden under the baseboard.
After removing the wallpaper, you need to wipe the wall with a damp sponge to remove any remaining glue. Also, carefully brush on a thin layer of primer. Squeeze the brush thoroughly to avoid drips.
Before priming the surface, cover the edges of the wallpaper with masking tape, just in case.

Gluing the baseboard
The next step is directly gluing the ceiling plinths.
There are no difficulties in this procedure:
- Start gluing the strips from the corner. To do this, apply adhesive to the back of the fillet;
- then press the fillet against the wall and ceiling. At the same time, try to position it correctly the first time. If the plank is glued with glue, then it must be held in this position for some time until the glue sets.
In this regard, it is more convenient to work with putty, since the fillet is fixed immediately, so there is no need to hold it while waiting for the composition to set; - any putty that appears must be carefully removed immediately;
- All other skirting boards are glued using this principle.
Here, in fact, are all the nuances of gluing.

Skirting finishing
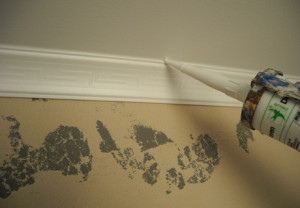
If cracks have formed at the joints of the fillets, they must be sealed with starting putty. This can be done with a narrow spatula or even your finger.
It must be said that in some cases the finishing of the fillets does not end with puttying the joints. For example, if this element is made of polystyrene foam, then by itself it looks unattractive. The problem can be solved by painting.
In this case, work is carried out in the following sequence:
- If there is already wallpaper on the walls, protect their edges masking tape so as not to stain them during work;
- if the surface of the fillet is rough, no primer can be applied. Otherwise, carefully coat their surface with a primer using a thin paint brush;
- after the soil dries, the fillets need to be painted. For these purposes, it is best to use water-dispersed polymer paint based on acrylic or latex.
Apply paint in two or three layers using a paint brush.
For achievement special effects For example, when applying gilding to patterns or patinas, glazes should be used. As a rule, they are worked with using a thin brush or even a sponge.

This completes the process of finishing the skirting boards. I must say that it is much easier and more convenient to paint them before installing them on the ceiling. However, in this case it will not be possible to fill the joints and obtain a continuous surface.
Even if you subsequently putty and paint over the filled areas, the transitions will still be visible. Therefore, it is possible to paint fillets before installing them on the ceiling only if the joints are properly fitted.
Conclusion
See the video in this article for more information. If you have any questions about the topic discussed, ask them in the comments, and I will gladly help you "width="640″ height="360″ frameborder="0″ allowfullscreen="allowfullscreen">
Conclusion
Gluing ceiling plinths is quite a responsible job, however, there is nothing complicated about it. The only thing you may have to tinker with is adjusting the corners, and only until you get the hang of it. Otherwise, you just need to follow the recommendations outlined above.
See the video in this article for more information. If you have any questions about the topic discussed, ask them in the comments, and I will be happy to answer you.
When communicating with builders, do not be embarrassed if they talk about fillets - by this unfamiliar word, experts mean nothing more than ordinary skirting boards for the ceiling. When talking about how to glue skirting boards to the ceiling, builders can slightly inflate the price - in fact, there is nothing easier than gluing fillets, so you can completely calmly do it yourself.
Ceiling skirting boards - options
Ceiling plinths are very convenient way give a complete look to the interior. Fillets, as they are called in a professional environment, can serve as additional element, closing the gap between the wallpaper and the ceiling, and independently, giving the atmosphere a special atmosphere. Manufacturers produce ceiling plinths from materials such as polyurethane, polystyrene foam and PVC, the length standards for them are from 1.3 m to 2 m. Manufacturers often produce ready-made corners for convenience. However, making corners yourself is also not difficult.
The highest quality type of ceiling plinths is made of polyurethane. It has great lightness, strength and is not afraid of moisture. Builders love polyurethane fillets for their high elasticity, which allows them to be used in the design of almost any interior. The second most popular type of fillet is made from polystyrene foam. They are also lightweight, moisture resistant and have soundproofing properties. However, when exposed to artificial light sources, they may darken over time. In addition, they have rather weak strength characteristics.
The site’s masters have prepared a special master class on the topic for you. Step-by-step instruction With exclusive photos and video materials.
The cheapest ceiling plinths are PVC products. They are presented in different colors, however, they have the lowest strength, so it is quite difficult to work with them - as soon as you press a little, a dent immediately appears. They are not particularly flexible, and high humidity is simply dangerous for them.
So if you are asking the question for the first time: “How to glue ceiling skirting boards?”, and decide to do it yourself, it is recommended, the most reliable and affordable option.
You can view and purchase a large assortment of ceiling skirting boards and more on the website www.ext-decor.ru
How to glue skirting boards to the ceiling - step by step
So, you have painted the ceiling and are ready to wallpaper the room. However, think about the wallpaper edging option in advance. If you have chosen fillets for this, then it is better to postpone gluing the wallpaper until last - this type of edging glued to the wallpaper does not hold up as well.
How to glue skirting boards to the ceiling - step-by-step diagram
Step 1: Do the calculations
First, calculate the required amount of material. If you glued the wallpaper yourself, then you can handle this task easily, because required values you already have. The perimeter of the room is the total length of the ceiling skirting boards. It is best to take products 2 meters long - with them you will have fewer joints. So, divide the perimeter of the room by the length of the baseboard and get the required amount. We round the resulting number upward, and even if it is even, we buy one spare two-meter, since their price is quite affordable. We may need a spare plinth in cases where we get an uneven cut or a dent.
Step 2: Let's go shopping
In the store, be sure to inspect your purchase - they may give you fillets with visible dents and scratches; we reject these. Check whether the skirting boards they sell you are from the same batch - they are similar in appearance, products from different batches may differ in size. Don't forget to buy glue (usually liquid nails or special assembly glue is used, the main thing is that it dries quickly) and the tools that are needed for the job. These tools will come in handy more than once around the house, so don’t skimp on purchasing a tape measure, a mounting knife, a miter box, plaster tape and white sealant. You will need a miter box to properly adjust the corners of the baseboards, and with the help of sealant you can seal the cracks, giving them the perfect look.
Step 3: Getting Started
Before starting work, wash your hands well and dry your tools - white baseboards get dirty very easily. Determine the angle from which you will start working. It is recommended to start gluing from the corner, in this case you will have less scraps. First, practice cutting the baseboard at a 45° angle. A miter box will help you with this. If you have never practiced this before, the result is unlikely to be satisfactory on the first try. However, do not forget that you have one backup option, so you can practice. It is best to prepare templates with internal and external joints, and with their help it’s time will go wherever faster, and the quantity unsuccessful attempts will decrease sharply.
Step 4: Glue the baseboard
So, you have two even cuts at the right angle, it’s time to start gluing our fillets. The glue must be applied both to the surface adjacent to the ceiling and to the surface adjacent to the wall - saving is not the place here. Apply the glue in one continuous strip. Once an even strip of glue is on the baseboard, you can put it aside and proceed to the next one - before gluing it will be better for the glue to cure a little. Prepare a dry, clean rag with which you will remove excess glue.
Carefully bring the baseboard to the ceiling and press it into the corner, then run your hand along its entire length. It takes about a minute for the glue to set properly. Wipe off any excess glue that has come out from under the baseboard with a rag. Having glued the first strip, proceed to the second, the one that goes end-to-end in the corner. When the first corner is completed, proceed to the next corners - after gluing the corner fillets it will be much easier to mark and close the empty spaces between them.
In old houses, and not only, the walls and ceilings may be uneven, which is why the baseboards often come off. To secure them, you will need plaster tape, which does not leave marks on the surface. After gluing the fillets, seal the gaps with white sealant. To do this, it is better to use a special skeleton gun, which allows you to extrude a thin and clear line. Apply the sealant to the gap, and then run a wet finger over it, as if pressing it inward. Thanks to this simple technique, the edging will look just perfect! After completing all the steps, you will become a real expert on how to glue skirting boards to the ceiling!
How to glue fillets onto a suspended ceiling - gluing features
If you decide to combine fillets in your interior, you will have to take into account some of the features of this “duet”. In this case, the question is not entirely correct - in principle we will not glue fillets onto a suspended ceiling! Since a stretch ceiling is a synthetic film, it is unknown how the composition of the adhesive may affect it. At best, the glue can deform it, at worst, even dissolve it. In addition, the stretch ceiling is not firmly fixed to the surface, and its slight vibrations can damage the adhesive seam between the ceiling and the baseboard.
And yet, how then to glue fillets onto a suspended ceiling? The way out of this situation is quite simple - we glue it not to the ceiling, but to the wall. In specialized stores you will even find special skirting boards with a larger lower part. A small gap should be left between them and the ceiling. Although you can do it big - inside the baseboard you can put an LED lamp (namely LED - it doesn’t heat up!), illuminating the ceiling.
We will send the material to you by e-mail
When the ceiling covering is ready, it remains last step to his decorative design- you need a perimeter edging in the form of a baguette. At first glance, this is easy to do, just attach it and glue it. In fact, not everyone knows how to glue ceiling plinths. The editors of HomeMyHome can help with advice, so let’s immediately study this topic and learn all the secrets of masterfully gluing fillets.
How beautiful it becomes
PHOTO: dekormyhome.ru
Ceiling plinth is called baguette, frieze, fillet and is used in decorating ceilings. These products go well with any wallpaper, ceiling coverings, plaster, painted walls and ceilings.
Skirting boards are used in almost all styles, but where they are definitely superfluous is in high-tech.
We will discuss below how to properly glue a foam ceiling plinth, but now we will look at what fillet options are available and clarify what their meaning is.
You need a baguette if:
- there are defects that stand out at the junction of the walls and ceiling;
- wallpaper cut unevenly;
- I want more decorativeness;
- the interior requires a clear perimeter outline;
- I want the finish to have a finished look.
Now let's discuss the range of fillets.

PHOTO: nikovera.ru
Material for baguette:
- Styrofoam: the most affordable option with light weight and easy installation. The products have many advantages. They look good, and moisture is not a problem for them, and they do not rot, and can be easily cut with a utility knife. But they also break easily from mechanical damage;
- gypsum: Very decorative items, but they are used only on perfectly flat surfaces, because gypsum is not at all famous for its flexibility. Baguettes will weigh a lot and absorb moisture, but with them the room will take on a royal look;
- extruded polystyrene: the structure of this material is denser and smoother than that of foam plastic. The joints are smoother and more invisible, but the cost of the models is higher than that of foam plastic ones;
- tree: wooden models durable and beautiful, but not suitable for every interior. The cost of such skirting boards is high, and their service life is limited by the influence of indoor humidity.

PHOTO: percpektiva.prom.ua

PHOTO: potolokjournal.ru

PHOTO: sdelaipotolok.com

PHOTO: sdelaipotolok.com
How to properly glue ceiling plinths: glue or putty
Before considering the question of how to glue fillets, let’s find out what exactly they are glued with. There are several ways, let's look at the two main ones.
How to glue ceiling plinth to putty
An excellent adhesive composition is finishing putty, which was previously used to treat the walls. This method is used on plastered and plasterboard walls.
Important nuance! You can glue the baseboard with putty before wallpapering the room and painting the walls and ceiling.
The fact is that if you perform installation already on finished walls, then white marks from the putty mixture will remain on the wallpaper.

PHOTO: couo.ru
Preparatory work and installation
The putty is prepared as prescribed in the instructions, but reducing the volume of water by 6-10%, which will give it the desired consistency.
Installation can be started from any corner. On internal sides The baguette should be applied with putty in one layer and the element should be installed in its designated place. Fixation is done by hand for 1-2 minutes.
Excess composition will most likely protrude from under the fillet and should be removed. If the resulting uneven joint occurs, it is corrected with a solution.

PHOTO: stoiportal.ru
Installation with glue for ceiling plinth
How to properly glue a foam plastic ceiling plinth? Here it is better to use special glue.
Selecting adhesive for ceiling plinth made of foam plastic, polyurethane, PVC profile
For this purpose, polymer glue “Dragon” or the more common “Titan” is purchased. Application is carried out on the inner sides by drop method. The step between the drops is approximately 3-5 cm. They are applied in a checkerboard pattern on each side.

PHOTO: alloya.ru
This way some of the glue will transfer to the wall and ceiling. Remove the glue threads and wait 2 minutes: during this time the glue will wear off and you can press the baseboard again, but you need to hold it for about a minute.
Advice! If the walls are uneven, do not be zealous when pressing the baseboard: the cracks are then sealed using acrylic sealant.
You can buy an adhesive called liquid nails. It is also applied in a checkerboard pattern on the internal edges, but the baseboard is glued immediately after application.

PHOTO: blog-potolok.ru
We bring to your attention a video on how to glue ceiling tiles made of foam
For perfection in detail: how to form corner and intermediate joints
How to glue a foam plastic ceiling plinth if there are corners in the room and molding joints form? But there will be joints, because the length of the moldings will still not be enough. In fact, there is nothing complicated, let’s study this process more carefully.
How to properly cut corners of ceiling plinths
How to correctly cut a corner on a ceiling plinth? This is best done with a miter box, which was created for such purposes. It allows you to cut the strip at a precise angle.

PHOTO: youtube.com
For such cutting, you need to prepare the moldings themselves and a number of tools: a hacksaw or a stationery knife, a miter box with a protractor, a ruler and a pencil. If the angles are non-standard, then you will need to work with a construction knife with replaceable blades.

PHOTO: youtube.com
Unfortunately, if the angles are not at all straight, then the miter box will only help approximately; you will have to be content with constant live measurements. But anyway, first they cut two baguettes that must be joined, and then they are adjusted with a construction blade. Processing is done on two elements at once.

PHOTO: guruotdelki.ru
How to glue skirting boards to the ceiling in corners and intermediate joints
With external corners it is more difficult; treatment with putty and abrasive is often required. After this, there is nothing left to do but glue the ceiling plinth in the corner and move in a straight line.

PHOTO: ukrsmeta.ua
For internal corners, you need to keep in mind that the bottom part will protrude above the top. In the case of an external corner, the opposite is true.
If the plinth is glued on the left, then the cut is located on the right; accordingly, with a right-handed plank, the cut will be on the left.

PHOTO: corpsnab.com
What to glue first: wallpaper or ceiling plinth
This question is serious and worries many. In both options, you need to perform the same preparatory work:
- remove everything unnecessary from the room;
- dismantle unnecessary coverings;
- if necessary, change the electrical wiring;
- make slopes;
- level the walls.
As for the rest, you need to weigh the pros and cons.
If you glue skirting boards to ready-made wallpaper, then it will not be possible to hide the cracks under gypsum putty or sealant.

PHOTO: pilorama-chita.ru
But if you are not a master of precise trimming of wallpaper, it makes sense to hide it under the baseboard by gluing it on top.
Tips on how to glue skirting boards to different types of ceilings
Let's look at the nuances of gluing ceiling moldings to suspended, plasterboard and plastered ceilings.
How to properly glue skirting boards to a suspended ceiling
How to glue ceiling plinth to suspended ceiling, we will tell you first of all, today this is the most popular coating.

PHOTO: vseprokley.com
If the corners are not used, you will need a miter box, in addition, standard set tools. Don't forget about the stepladder.
Pasting is done from any angle: it is better to mark the lower border of the plinth with a pencil. The glue is applied to the surface of the molding adjacent to the wall, the time specified by the manufacturer is waited, and it can be applied to the designated area. No glue is applied to the edge adjacent to the ceiling.

Expert's point of view
Dmitry Kholodok
Technical director of the repair and construction company "ILASSTROY"
Ask a Question“It is always better to glue moldings together - this will allow you to withstand the same pressure along the entire length.”

PHOTO: youtube.com
Then the tape can be removed without any problems. Gradually cover the entire perimeter. For accuracy, you will need to measure the distance to the corner in order to know what length you will need.

PHOTO: givewhereyoulivehamptons.org
Advice! Corners are cut with a small margin, this will help if there were errors in the measurement.
When gluing moldings, glue is applied to the end of one of them. Excess glue is immediately removed with a dry cloth.
On drywall
What glue should I use to glue foam ceiling skirting boards if they need to be placed on drywall? The steps are generally the same as when gluing a baguette in the case of a stretch ceiling.
The molding is glued onto the plasterboard before the wallpaper, and so that the molding becomes one piece with the surfaces, all joints are coated with putty and painted to match
On a plastered surface
A few words about how to glue baguettes to a plastered surface. It is better to use finishing putty rather than glue, applying it in a thin layer to the inner edges of the molding. But this can only be done where there is still to be decorative finishing surfaces with wallpaper, because almost indelible stains will definitely remain on the walls.
How to finish a ceiling plinth
Baguettes under the ceiling can be painted if desired. This helps to achieve greater decorativeness and disguise the putty in the cracks.

PHOTO: nashaotdelka.ru
The work is carried out like this:
- the baseboard needs to be primed;
- apply the first layer of paint, wait for it to dry;
- If necessary, everything is painted again.

Ceiling plinth, which is properly called fillet, gives the room a neat and finished look. If it is glued correctly, painted in White color and make an even seam, the baseboard will visually expand the room.
How much skirting boards do you need to buy?
It is necessary to measure the perimeter of the room. For example, let's take a room 5 by 4 meters (20m2). The perimeter of the room is 18 meters. The length of one fillet is 2 meters, which means you need to buy 8 fillets + 1 in stock, for a total of 9 pieces.
The higher the ceiling, the wider the fillet you can buy, and she won't seem overweight. If the ceiling is about 3 meters high, then a fillet 5 cm wide is quite suitable.
Types of skirting boards and their costs
- polyurethane 300-500 rubles per piece
- plastic from 40 rubles per piece
- expanded polystyrene from 20 rubles per piece
When purchasing planks you need to pay attention to:
- So that the skirting boards are the same color from the same batch
- Without defects
- No curvature
Step-by-step instruction
We will need:
- fillet
- roulette
- Can you use a laser builder?
- miter box and hacksaw for metal (or miter saw, or sharp knife, or grinder)
The blanks are cut using a miter box and a hacksaw according to the markings.
If you haven't hung wallpaper yet
- PVA glue
- container for stirring the mixture
- putty knife
- putty (read about and)
- water-based paint and brush
- sandpaper
If wallpaper is glued or there is a baseboard in the bathroom between the tiles and the ceiling
- white acrylic sealant
- mounting adhesive Moment Montazh Express decor white
- mounting gun
- rags
How to cut a corner and make a blank?

First you need to understand which corners are in the room and mark out your blanks for each type (they are different!).
- External corner- in this case, the length of the base of the workpiece will be equal to the length of the span, and the cutting angle will be obtuse (that is, the upper edge of the workpiece will be longer than the length of the lower edge, 135 degrees).
- Internal corner- in this case, the length of the base of the workpiece will be equal to the length of the span, and the cutting angle will be acute (the upper edge of the workpiece is shorter than the lower edge, 45 degrees).
The saw must be used carefully and accurately to prevent chipping.
The blanks are cut using a miter box and a hacksaw according to the markings. To check the correctness of the cut blanks, you can dock “your creation” on the floor. If all the corners meet correctly, then you can start gluing and join them in place.

To check the correctness of the cut blanks, model “your creation” on the floor. If all the corners meet correctly, then you can start gluing.
If the corners do not meet, we make a new blank - this is why we bought fillets with a reserve.
Often the angles between the walls in rooms are not equal to 90 degrees. In such cases, you need to mark the workpieces “in place” and cut the corner without using a miter box. For this purpose they are made paper and cardboard templates, and then a fillet is cut along them with a sharp stationery or shoe knife.
How to glue a ceiling plinth before wallpapering
Advantages:
- You won't stain the wallpaper
- It is more convenient to glue the plinth evenly if the wall is uneven, leveling it as you go with putty (about finishing putty under the wallpaper we wrote in)
- To change the wallpaper, you do not need to dismantle the baseboard (by the way, read good article about liquid wallpaper)
- The fillet sticks to a bare wall more strongly than to wallpaper
Preparation of putty mixture
We prepare a mixture of putty and PVA glue for gluing the ceiling plinth to the wall and ceiling, as well as for sealing cracks and corner joints. 4 parts plaster and 1 part PVA glue mix with water until creamy, let it sit for 5 minutes and stir again. After this, you can use the mixture for 1.5 hours.

- Dust the workpiece and the wall/ceiling area before applying the glue.
- Apply putty in the center of the fillet along the entire length, press for 10 seconds, release, remove excess mixture.
- We start gluing from the corner and from the wall that is opposite the door.
- You can draw a line around the perimeter using laser builder and glue the fillet along it.
- We join pre-made blanks in the corners. If spans more than 2 meters, we make a straight joint of fillets.
- Seal the cracks with the prepared mixture along the gluing process.
- The next day, after the putty has dried, we sand down the uneven areas and cover the baseboard with water-based paint.
You need to press the ceiling fillet gently and smoothly so as not to leave fingerprints or breaks on it.
Ceiling plinth is used during renovations in apartments, offices and other premises. It separates two planes - the walls and the ceiling itself and sometimes hides an error in gluing wallpaper or trim. May hide wiring, which is often located under the ceiling. Difficulties arise when you have to join the material in the corners. This task is not easy for beginners. Let's consider whether it is possible to do this kind of work yourself without involving professionals.
Materials for making ceiling plinths
Ceiling plinths are also called baguettes, moldings, fillets and are made from the following materials:
- Trees;
- Polyurethane;
- Plaster;
- Expanded polystyrene.
Wooden models
Wooden baguettes are rarely purchased due to their impracticality . They only look good with the same wall and room design. The price for such a product varies widely. Disadvantages: complex installation and processing process, difficulties in masking the gaps that arise as a result of joints. The tree begins to rot, mold and insects appear. To avoid these troubles, it is necessary to treat the wood with varnish and antiseptic.
Types of wooden baguette
Plaster models
Plaster, like wood, is rarely chosen due to its heavy weight. In addition, they are difficult to dock and glue.
 Plaster baguette
 Models made of polystyrene foam
Foam products are easy to use, inexpensive and light in weight.
Cons: they have low strength, break easily and leave dents on them. Not all types of glue and paint are suitable for installation. The material is fire hazardous.
 Expanded polystyrene baguette
 Polyurethane models
Basically, buyers opt for this type of baguette, although compared to foam ones, their cost is higher.
They are flexible, strong and durable. There is variety in color choice, although white is generally the preferred color.
Pros: the product does not burn and its strength is higher compared to the previous type.
 Polyurethane baguette
 For rooms designed in a minimalist style, it is preferable to choose products with straight lines. To highlight the pomp of the room, choose products with patterns and complex relief. The same baguettes are chosen for rooms decorated in classic style, especially if there is antique furniture or design. Note that fillets with patterns are more difficult to join in the corners.
Tools and materials for cutting and gluing fillets
Before you start gluing the ceiling plinth in the corners of the room, you should prepare the following materials in advance:
- Plasterboard knife, or hacksaw;
- Ruler;
- Miter box for cutting;
- Goniometer;
- Putty knife;
- Glue gun;
- Roulette;
- Pencil for marks;
- Assembly adhesive.
Trimming corners
You can do this in two ways:
- using a template or miter box for sawing;
- use factory cast parts.
How to make a cut with a miter box
 Miter box for cutting baguette
 Most rooms tend to have a room angle of 90 degrees. Therefore, it is necessary to trim the plank at 90 or 45 degrees. To do this correctly, you will need a tool - a miter box. It has several slots, each with its own angle of inclination.
Fillet cut into the inner corner:
- To do this, you need to take a baguette and place it in a miter box. The hacksaw is inserted into the grooves and a cut is made on the workpiece. The left groove should be closer;
- The second baguette is cut according to the same pattern. Only the right groove is closer, the left one is further.
The fillet is pressed tightly against the far wall of the miter box and held with the inactive hand. The handle of the hacksaw or saw should be as close as possible to the hand that holds the workpiece. The saw should not be pressed too hard.
Fillet cut at external corners
- It is preferable to make markings first. To do this, attach the bar to the ceiling and mark the dimensions;
- We press the workpiece against the wall, hold it with one hand, and mark it with a drywall knife;
- Select a 45 degree position for the hacksaw;
- Cut the fillet;
- Place the second baguette on the other side of the miter box and cut it in the same way.
If the walls are not perfectly smooth, it is better to use other methods without using a special device.
How to make a cornice cut by hand using a template
Draw a straight line on a piece of paper. Use a pencil to mark a dot on the workpiece. Mark the 90 and 45 degree angles using a protractor. Draw straight lines through the marks so that they are clearly visible when working with the saw.
 The baguette is pressed against one of the parallels at the desired angle and cut with a hacksaw
 There is another simple option to trim the cornice “by eye”. You should take part of the product and attach it to the desired corner. During application, carefully observe and mark the location with a pencil.
 Trimming the baseboard using the pencil notching method
 Using Factory Elements
In order not to join two workpieces, which is quite difficult, you can use corner elements, which greatly facilitate the work. They are sold with fillets and are available internal and external. At the same time, it must be taken into account that the angles must be slightly changed and adjusted to suit if they are more or less than 90 degrees.
- If there is a relief, it is necessary to ensure that at the joints there is a harmonious transition from one model to another;
- Start gluing the product from the corner;
- The gap at the connections should not exceed 1.5 mm. If the gap between the moldings is larger, a sealant will help eliminate this problem. If the gap is large, you can close it with a strip of material and then secure it with glue.
Part of successful work is determined by knowledge of the characteristics of angles - internal and external. The corner joint combines two parts: left and right.

Let's figure out how to properly connect the ceiling plinth in different corners of the room.
Joining the internal corner
The peculiarity of these corners is that the bottom edge is longer than the top. That is, when the cornices are attached to the ceiling, the lower edge is pressed against the walls, and the upper edge goes inward. Therefore, the upper perimeter will be smaller than the lower one and when cutting, the ceiling part of the fillet will be shortened.
The side of the cornice that stood on the side of the miter box is glued to the wall. The side that was at the bottom of the instrument is glued to the ceiling.
Before gluing, the corners of the room are measured with a protractor.
The workpiece is cut at 45 degrees when the angle is right.
The cornice is glued to the left side of the corner if it was cut on the right. If you cut it on the left side, you need to glue it on the right.

Both corners are cut with a miter box, the pieces are placed in the corner for fitting. If everything is fine, you can glue it.
Joining at external corners
The procedure for joining such corners is simple. However, they do not occur often.
- To trim the model, first mark the cut location with a pencil;
- Place the bar in the miter box. On the left side of the long part, an angle of 45 degrees is cut;
- The part of the product that is located near the side wall of the instrument is glued to the wall.

Gluing ceiling cornices
First you need to wash and remove dirt and dust from the ceiling and walls. To level the surface, putty is used. If the walls have small errors, use models with soft edges so that the differences are invisible.

Work begins with measurements of footage and number of products. The usual length of the model is 2 meters.
Cornices are glued using the following methods:
- On acrylic;
- Special putty;
- For wallpaper and sealant.
Sealants for gluing cornices
The most suitable - silicone sealant. Its advantages are that the baguette will hold up perfectly and is suitable even for those who have crooked walls. It can also be used to cover cracks that arise due to the curvature of the walls.
It is recommended to level the walls with putty before gluing wallpaper and baguettes. As for the sealant, craftsmen choose acrylic. They can be used to mask cracks and corners. The advantage of acrylic sealant is its cost. Its price is 100-150 rubles.

Direct docking
After gluing the corners, the straight planks are joined to the corner ones and secured. The moldings are attached to each other and you need to ensure that their joints are level. To ensure perfect joints, sections of the plinth are pre-sanded.
- Apply the model to the installation site;
- Remove excess glue using a spatula;
- Wipe gently damp cloth until the composition dries completely;
- The next day, use a spatula to apply plaster putty at the joint. This procedure should be repeated two more times after the composition has dried.
Painting and masking joints
It is possible that after gluing the ceiling cornices there will be small gaps between the sections. This can all be fixed with white sealant.
Use light putty as a sealant; you need to walk it over the area of the product. After it has dried, it is recommended to remove the residue with a sanding sponge.

Conclusion
Before gluing the planks, follow the saying “Measure twice, cut once” and then there will be no mistakes.
You can watch the video for practical reference: