Planting strawberries under film in August. How to plant strawberries or reveal the secrets of a rich harvest
It will be useful for gardeners and gardeners to learn how many seedlings to buy, how to plant strawberries using know-how, about the best varieties of raspberries and currants.
Planting strawberries in August: what you need to know

Strawberries, or as professionals call them, garden strawberries, are best planted annually. Then you will have bushes of different ages. This can be done as early as the beginning of August. The sooner you manage to plant garden strawberries, the better they will have time to take root before frost.
First-year trees do not bear fruit abundantly; they produce few, but large, berries. Large harvests are harvested from 2–3 year old bushes. From those over 4 years old, you'll also get quite a few strawberries. But in the fifth year the root system comes to the surface, and the yield decreases. Of course, you can sprinkle it with fertile soil or humus, but it is better to remove the bushes, dig up this area and plant green manure here, which enriches and heals the soil.
Strawberry “whiskers” cannot be placed in this place for the next three years. After all, spores of diseases that cause damage to this particular crop have accumulated here, and some pests have also been found here permanent place registration and can destroy new bushes.
Find a place where nightshades have not grown for 3-4 years, dig up the soil in advance so that it has time to settle.
Speaking about what to plant strawberries after, we can say with confidence - after garlic. By this time it has just been dug out, so it is better to occupy this empty area.
The best time to plant strawberries is from the beginning of August to the first ten days of September. A week before the chosen day, dig up the soil, selecting weeds. When you arrive next weekend, land.
Since strawberries will grow here for 4 years, weed control becomes difficult. After all, during this time you will not dig up the allocated beds, but only loosen them. But gardeners saving their energy have figured out how to deal with weeds and make their work easier.

To cover the soil before planting strawberries, you can use the following materials:
- black film;
- tarpaulin;
- linoleum;
- geotextiles;
- underlay for laminate;
- roofing felt
Use good film high density, a weak one can quickly tear and not last as long as it should.
If you have from the device garden path There are geotextiles left, and after renovations in the house there is linoleum, do not throw them away. Under such shelters, weeds will also have no chance to grow. In addition, a “cheerful” pattern on the linoleum will add additional charm to the garden.
To prevent the tarpaulin and film from looking dull, lay a backing layer on top of these basic materials, which is placed under the laminate. It is cheap and comes in a nice blue or light green color. Arriving at the site in the spring, when it is not yet decorated with variegated flowers, you can admire the beautiful strawberry beds.
Such shelters not only save landowners’ energy and prevent weeds from growing, but also retain moisture. Therefore, if you cannot go to the dacha often, even in the heat without watering, garden strawberries will not wither.
Under such cover, the berries ripen 10–14 days earlier and remain clean. They don't touch the ground, and even in rainy weather they are not affected by gray rot.
Subtleties of rooting, planting strawberries

If you have your own strawberry tendrils, take only those that are located closer to the queen cell. Cut off the “crown” ones. Experienced gardeners mark in advance the healthy bushes that bore the largest berries and take planting material from here.
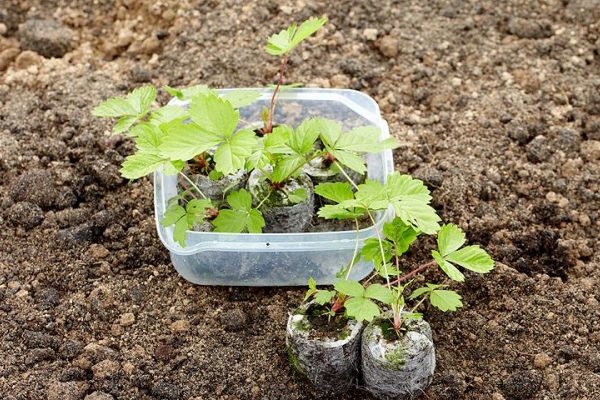
To make rooting painless, they pour soil into plastic cups, place the “whisker” there without tearing it away from the mother plant, and water it periodically. When it takes root, cut off the junction with the mother plant and plant it on the bed, removing it from a cup with a lump of earth.
To save space, it is better to place the “antennae” in a checkerboard pattern. Using scissors, cut holes in the prepared shelters - according to a 30x40 cm pattern. Spill the holes. Plant the strawberry tendrils so that the roots are in the ground and the central core leaf of each is above it. Gently compact the soil. If it’s hot, you can temporarily cover the garden bed non-woven material, and let the “whiskers” take root so that they can take root well, overwinter and become the key to future abundant harvests!
It is necessary to have time to plant not only strawberry seedlings, but also other perennial berries, fruit plants. They will be the key to abundant harvests for many years.
The most favorable time is coming for planting bushes and trees. There are a lot of types and varieties of fruits. How not to get confused in this variety, buy only necessary plants for garden? About this, right now.
What trees should I plant in my dacha garden?

If you are just planning it, base it on what fruits and berries your family likes. Based on this, buy seedlings. Typically, for a family of 4 people, the following are placed on the site:
- 3–4 apple trees;
- 2–3 pears;
- 3 plums;
- 3–4 cherries;
- 3–5 bushes of black and red currants and gooseberries.
Rarely does a plot go without raspberries, so don’t forget to purchase this plant too. 5–10 seedlings are enough. They will produce many shoots, and from next year you will have your own planting material. The same goes for blackberries.
Apple and pear trees

Let's decide on the ripening time. So, there are apple trees of summer, autumn and winter varieties. The first ones ripen earlier than the others and make it possible to feast on apples from the end of July. But they don't last long. This function is perfectly performed by apple trees of the other two groups, and winter ones can last until the beginning or end of spring!
Therefore, if you want to eat plenty of sweet apples not only in August, but also in autumn and winter, then buy 1-2 varieties different periods maturation. This also applies to pears.
But for a good yield, you need to buy at least 2 trees of the same ripening period. They bloom at the same time, which is necessary for normal pollination, as well as for cherries, cherries, and apricots. It is necessary to purchase at least 2 seedlings of each type, since most varieties of these trees are self-sterile.
The best varieties of raspberries and currants for the garden

WITH large plants We have decided on the garden, now we move on to the shrubs. Sweet, aromatic raspberries are enjoyed by many. But not all novice gardeners know that there are not only red-, but also yellow varieties. There are also those that bear fruit before serious autumn frosts; they are called remontant. To have scarlet berries in the garden in September and even in October, plant “Indian Summer” or “Hercules”. The latter is more suitable for the Moscow region, and the first for more southern regions.
If you want to collect record-breakingly large red berries, purchase the Cardinal variety. And among the yellow-fruited ones, we can recommend “Yellow Giant”. This variety has sweeter berries than Cardinal and more growth.

So, raspberry varieties for the Moscow region (one of the best) are:
- Hercules;
- Indian summer;
- Yellow Giant;
- Cardinal.
Raspberries tend to grow a lot. You can limit its habitat by planting garlic on the border beyond which new shoots will not go.
Red currants are also a permanent resident of many gardens. “Rondom” will delight you with its long tassels, from which it is convenient to collect scarlet beads. The Versailles Red variety has very large berries (up to 1.5 g). By planting “Natalie”, you can be sure that the bush will overwinter well and give a bountiful harvest in mid-July.
Blackcurrant varieties can be distinguished:
- early ripening - “Selechinskaya 2”, “Exotica”;
- medium ripening - “Perun”, “Izyumnaya”;
- later ones - “Venus”, “Mermaid”.

If you have low-lying areas on your site, you can plant cranberries here, as other trees and shrubs will get wet here. She loves moisture and is frost-resistant.
What is the most important work in the garden in August?

Besides landing perennial crops, this is this year's harvest. In the garden in early August you need to dig winter garlic. Exact time It's quite easy to determine. During the period of formation of arrows on garlic, they must be removed. But leave it on one or two plants. When the film at the end of the arrow bursts and the seeds appear, then you need to dig up the garlic.
The onions are harvested a few days later (but before August 10). When this needs to be done, the feather will tell you, it will lie down and turn yellow by about a third. The scales on the heads will dry out. Onions are dug up only with a shovel, scoop or pitchfork. You cannot pull it out of the ground by the greens with your hands - you can damage the bulb. Next, the onions are dried in the sun on a mat for about a week, bringing them under cover at night. Then keep in a ventilated, dry place until the feather is completely dry.
In August, especially if the weather is damp and the nights are cold, one of the most dangerous diseases for them, leading to darkening of the fruits, can destroy the tomato crop. At this time, it can no longer be used against late blight on tomatoes. chemicals Therefore, they use products that are harmless to people. They are applied to the bushes by spraying. Here are the ones:
- Iodine solution. Take 50 mm of iodine with a concentration of 5%, dilute it in 10 liters of water. Spray the tomatoes, and a second time after 3 days.
- Dilute 4–6 drops of Zircon in 1 liter of water.
- Dissolve a stick of fresh yeast in 10 liters of water and process.
- Every 10 days, treat with Fitosporin M - an excellent remedy against late blight. First, the contents of the package are dissolved in 400 g of water (this suspension can be stored in a sealed container all summer), then 2 tsp is taken. such a slurry is placed in 10 liters of water.
If you dissolve 1 tbsp. l. the resulting suspension, the solution can be poured over 50 kg of compost. To disinfect the soil when digging, spill 2 sq. m area with a product prepared from 1 tbsp. l. suspension of “Fitosporin M”, diluted in 10 liters of water.
Speaking about what work in the garden is the most important, it should be noted that there are several of them. Here's what else needs to be done during this period:
- Pinch the growing points of the pumpkin vines. There should be no more than one or two fruits on one stem.
- Mow potato tops a week before harvesting. Burn it or dispose of it in another way, but do not compost it.
- Pinch the tops of the tomatoes, leaving 2-3 leaves above the top fruit cluster. Remove stepchildren, lower leaves until a formed bunch of tomatoes. This will speed up the ripening of fruits and promote better ventilation of the bushes.
- Remove leaves of strawberries and strawberries damaged by pests and diseases and dispose of them.
- In a vacant greenhouse or greenhouse, sow lettuce, spinach, radishes, arugula, and dill for autumn consumption.
- At the end of the month, prepare the beds for winter garlic and onions so that the soil has time to settle before planting these crops.
In rainy weather, do not apply potassium chloride, especially to gooseberries, otherwise they will shed their leaves prematurely.
What flowers should I plant in my dacha at the end of summer?

But not only work on planting new plants in the garden and vegetable garden needs to be carried out in August. This month there will be enough pleasant worries for flower growers.
Here rough plan works:
- Provide supports for tall dahlias, gladioli, tie heleniums, hollyhocks, and rudbeckias.
- Trim wild rose growth. If you see sprouts appearing from the bottom of the bush below the grafting site, remove them with pruning shears.
- Don't forget to collect annual seeds. If cornflowers, marigolds, or rudbeckia are not ripe, cut off the heads and place them in a dry, ventilated place. The seeds will ripen there.
- In the second half of August we divide the rhizomes of peonies - this best period for such work.
- After August 20, you can plant flower bulbs: tulips, hyacinths, daffodils, hyacinths, muscri, etc.
- This month it is necessary to water, fertilize, and loosen the soil under annual and perennial flowers.
This is what kind of work in the vegetable garden, garden, and flower garden awaits summer residents in August. You can do all this in a whole month if you make a plan and stick to it. Such works on fresh air are useful and will certainly provide gardeners with environmentally friendly berries, vegetables, and fruits.
If you want to see how to plant strawberries in warm beds, please - this story is for you!
And this video tells you what measures to take against late blight on tomatoes:
Many people started creating a new bed of strawberries already in July, and in August the planting of strawberries must be completed - otherwise the strawberry tendrils will not have time to prepare for winter. How to plant strawberries so that they produce next year good harvest? There are several ways to plant strawberries. First, we will discuss planting purchased strawberry seedlings, and then a scheme for planting strawberry tendrils from our own collection.
How to treat strawberry mustache before planting
Seedlings of any kind brought from the nursery fruit crops in about half of the cases they are infected with some pest or disease (on raspberries - gall midge, on currants - kidney mite, on gooseberries - sphere library, etc.), and strawberries are no exception. It's worth warming them up just in case. hot water at a temperature of about 50°C, immersing the whole pots in a bucket for 15–20 minutes. At this temperature, root aphids, nematodes, mites and others die possible pests: it’s just that in nurseries a huge amount of them often accumulates in the soil - this is an “occupational disease” of all nurseries.
But as practice shows, there is often no time to warm it up, so you plant it like this, hoping for chance. In this case, you need to apply the rule of planting purchased strawberry tendrils at a great distance - at least 1–1.5 m, so that they do not infect each other if someone turns out to be a carrier of the pest. This makes it easier to get a mustache from them.
The purchased mustaches of each variety can be planted in a line, or in nests of 3 (triangle) or 4 (square) - as long as there is at least a slight spatial isolation between the varieties and the mustaches do not intersect.
How to get a good strawberry mustache
Confusion with strawberry varieties should be avoided at all costs. When we receive stock of each variety from one leader, we can be sure that it is entirely one variety. And so we must take care of it in the future. Although sometimes it is easy to distinguish one variety from others: by early or late reddening of the berries, by five blades on a leaf instead of three, and finally, by color and general appearance berries, and sometimes even pink flowers.
The entire space between plants should be completely free of weeds. The mustache should grow absolutely freely, without encountering root obstacles. Then they imperceptibly and quickly turn into long garlands. Under no circumstances should you cut off the mustache, otherwise the synergy effect is lost, when each mustache with its roots strengthens the next, and all of them are strengthened by the roots of the mother plant.
This is only possible on clean fertile soil, with frequent but moderate nitrogen fertilizing and good watering. Under such conditions, the garlands grow rapidly, and by September the bush gives us dozens of mustaches. The only method of shaping with pruning shears is to cut off the lateral branches of the mustache, or bites (this is when the rosette, in addition to the main continuation of the mustache, gives an additional thinner mustache to the side). Such priuski have less strength and are not used in reproduction.
Propagation of the starting mother bush-leader is the only case when we allow ourselves to plant in September. We wait until September without touching the mustache so that it gains as many rosettes as possible.

Strawberry planting scheme
Now let’s look at the usual planting of strawberries, using our own mustache. Whether we plant strawberries in September or July, there are optimal standard distances between plants in a row and between the rows themselves. They are quite “floating”. Over time, you will adjust them for yourself, for your case.
The general strategy is to have strawberries grow at the following density during peak yield (2nd and 3rd fruiting years).
>When planting in a single row
Early varieties: 30x60 cm (the distance between plants in a row is 30 cm, and between rows - 60 cm).
Mid-season and late varieties: 40×70 cm (the distance between plants in a row is 40 cm, and between rows is 70 cm).
On highly fertile areas, including chernozem soils They are planted somewhat more spaciously: here late-ripening varieties are placed according to a 45x75 cm pattern.
When planting in beds, when plants are planted in two rows:
Early varieties: 30x40 cm.
Mid-season and late varieties: 40×50 cm.
Row spacing is 25–30 cm.
Thus, in a garden bed of 1 sq. m of area are placed 6 bushes of mid-season or late varieties.
The tallest and largest-fruited varieties of strawberries, such as Gigantella, are planted even less frequently: 4 plants or even 3 are placed per square meter. If you decide to get extremely large berries, then you need to plant them spaciously.
Planting strawberries: how to do it correctly?
This is the general strategy. This can be achieved in two ways: either plant it right away, trying to choose obviously successful strong mustaches, with which there will be almost no attacks for three seasons, or first plant the mustaches in a row twice as densely, after 20 cm (with constant distances between the rows), so that the first obtain a sufficiently high harvest, and then immediately after picking the berries, carry out the usual pulling (thinning) of the bushes to the desired rate.
Both methods of planting strawberries are good in their own way. For industrialists, the second method is considered more expensive for planting material, but for summer residents it is quite feasible. On poor soil, dense planting of strawberries benefits, but on fertile soil it is better to immediately plant according to the norm, otherwise large strawberry bushes will be too crowded in the first fruiting season.
When choosing a solution, you should also take into account the size of the bushes of each variety. There are varieties of strawberries with a medium-sized head of foliage, which are even recommended to be planted densely at first in order to obtain a higher first harvest, for example, the mid-season Tsaritsa variety.
Our main strategy - to have an optimal planting density on a mature plantation - has two enemies: attacks of individual plants and excessive density. Both come from the inexperience of the beginner. He has a way to overcome both difficulties - this is to deliberately plant about twice as densely and then apply thinning at the appropriate time.
There is a psychological side that forces beginners to create thicker rows: when you first plant, you involuntarily want to place everything denser than required, because the gaps in the ground seem huge. When everything finally grows and is closed in by leaves, there is nowhere to walk, and the plants produce small berries - it’s cramped. However, it is not for nothing that a beginner is afraid of a sparse planting: it is easy for individual plants to fall out.
Thus, thinning is a lifeline for everyone who wants to insure themselves in case of unexpected attacks. But then it must be done! You cannot plant densely, reap a high harvest in the first season, rejoice, and leave it that way. But you want to... It may very well happen that the first season will be fruitful for strawberries, and this always means that there are fewer harvests than usual. And then the tight fit will amaze you with its effectiveness, and you will be sure that it will remain the same in the future. It is very difficult to remove strong bushes through one, but you have to.
In general, skillfully distributing the required number of strong plants per unit area is one of the most difficult activities, but it gives a sharp increase in the quality and quantity of the harvest. I will say this: in your gardening, always consider only the strongest plants and leave only them, give them space - the result will exceed your expectations.
When thinning, you will encounter another difficulty: ideally you need to remove through one plant, and ideally you need to remove weak plants and leave strong ones. How to reconcile these two requirements when the weak and the strong can grow unevenly?! Yes, you will again want to leave thinning unfinished under the pretext of preserving strong plants, but it makes sense to overpower yourself and leave bushes of a modest size in some places, and sacrifice some of the strong plants in others, but bring the planting at least approximately to the recommended norm.
Aug 29, 2018 azarova
Good day, our readers. Today we will talk about strawberries.
This is one of the most favorite berries of children and adults.
Eating this berry is a pleasure, because it has a pleasant aroma, sweet taste and juicy pulp.
And jams and compotes are an integral part of the stock of almost every basement. Who has dachas or personal gardens land Necessarily .
In this article we will talk about why you should plant strawberries in August. How to choose the right seedlings. And how to care for strawberry bushes.
Preparing strawberry seedlings
There is one belief. In order for strawberries to grow well and produce big harvest, it should be stolen from someone else’s garden or front garden.
But as we understand, in order to get high-quality and sweet harvest strawberries, you should purchase healthy strawberry bushes. And especially if it concerns elite varieties. They, in turn, are expensive.
Frigo-seedlings
IN Lately frigo seedlings have become popular .
These are the best selected bushes that undergo hardening at negative temperatures. To do this, seedlings are dug up late autumn, placed in bags and stored at low sub-zero temperatures.
Despite its prevalence, berry bushes should be carefully looked after and monitored. You should buy seedlings from trusted places; it is best to do this in large nurseries and greenhouses.
Seedlings are usually sold from July to August. Before purchasing, you should carefully inspect each bush.
Bush selection criteria
It must meet the following criteria:
- Leaves have a rich green color; the presence of dots, spots, and dryness is not allowed.
- Horn. The thickness of the seedling horn should not be less than 7 mm.
- Bush has an elastic, strong green center.
- Roots. U open seedlings the length of the roots should be 5-7 cm. If you take strawberries in peat pot, then the roots should stick out at the bottom of the holes in the pot. If we choose seedlings in plastic cups, then the roots should be throughout the entire volume of the glass.
As you understand, this is the sequence of choosing seedlings when purchasing from nurseries and greenhouses. But often friends and neighbors exchange different bushes and varieties of strawberries. In this case, an inspection should be carried out according to the same criteria and the best samples should be selected.
Bush restoration
And before landing, resuscitation measures should be taken.
To restore the roots, they should be placed in water. To speed up root formation, you can add specialized compounds to the water, for example, root or heteroauxin. Professionals recommend using natural products instead of special products: honey (a teaspoon) or aloe (one crushed leaf).
In order to increase survival rate, we leave 2-3 leaves on the bush and this is enough. If you leave a lot of leaves, then a lot of moisture will be lost through their surfaces, and since we still have a weak rhizome, the bush will take a long time to acclimatize and get sick.
We trim the roots up to a length of 4-5 cm. This is enough.
Young roots will give fast growth the whole strawberry bush.
Preparing the landing site
The soil
Strawberries grow well on chernozem soils with an acidity of about 6%, on soddy-podzolic soils, clay and sand. Adult bushes are not afraid of drought. It is unacceptable to use low-lying or enclosed areas of land.
Plant strawberries near water bodies and surface groundwater, are not recommended. Dark gray forest soil is ideal for strawberries.
The most important thing is that strawberry bushes love the sun, but in the shade you won’t get normal fruits.
Place
Before you start planting seedlings, you should clear the ground of weeds. Inspect for the presence of pests and, if necessary, treat with special preparations.
If necessary, the plot of land allocated for strawberries should be dug up. Two weeks before planting the seedlings, we fertilize the area.
Fertilizer
Can be used as fertilizer humus, compost or droppings.
Typically this mixture contains:
- compost +
- ash +
- manure (horse or cow, rotted).
You will need 1 bucket of this fertilizer per 1 square meter. m.
Also, one should not forget about phosphates(potassium sulfate and superphosphate).
They are added according to the instructions on the package.
Recently they have been using ready-made combined fertilizers, which contain everything necessary for the growth and development of plants. Consultation with store sales staff will be required.
10-12 days after applying fertilizer, our soil is ready for planting strawberry bushes.
Treatment of the old site
If you have space that does not allow you to transplant the strawberries to a new place, then you will need to first treat the land before planting.
First, let's break it down baking soda 200 gr. (pack) in 10 liters of water, and spill a piece of land.
We wait about three days and prepare a solution of potassium permanganate. Add 2-3 grams to a bucket of water. potassium permanganate.
These two compositions will help disinfect the soil from pests and diseases. Also, after 2-3 days you can start planting strawberry bushes.
Place of strawberries in the crop rotation of the site
If you have a large plot, then strawberries should be replanted using the rule of crop rotation. That is, we alternate planting different crops on the site.
The best predecessors will be onion and garlic. Then come dill, parsley, radish, oats, lettuce and so on.
You should not plant strawberries in places where cucumbers, cabbage, potatoes, eggplants, and peppers are planted.
Planting strawberry bushes
Basic planting patterns
There are several schemes for planting strawberries:
- Single-line planting. From the name everything is clear: we plant strawberries in one row. The distance between the rows is approximately 60 cm. And the distance between the bushes is 15-20 cm.
- Two-line planting. The stripes consist of two rows. The distance between the stripes is approximately 60 cm. And in the strip, the distance between the rows should be 30 cm, and between the bushes the same as with a one-line pattern.
Bury the strawberry bush into the prepared soil so that the middle of the bush protrudes slightly above the surface of the ground.
- If you deepen it too much, the middle will begin to rot and the bush will die.
- If the roots are left on the surface, the middle will dry out, which in turn will lead to the death of the bush.
Most best option- planting seedlings on mounds.
After planting, be sure to water thoroughly. Don’t forget to cover the young seedlings with straw, sawdust, and then cover them with film to create greenhouse effect. Subsequently we weed and water.
To save space, strawberries are planted in pyramids different shapes and type, use hanging pots.
Step-by-step instruction
How to replant strawberries in the summer in August by division and tendrils?
As experts say, it is best to plant strawberry bushes on a warm, cloudy evening. Before we start planting, let’s look at the main types of strawberry propagation.
Reproduction by mustache
This method is the most proven and frequently used. Some people simply buy a few bushes of an expensive variety of strawberries and then propagate them.
The process of reproduction by whiskers:
- We plant purchased specimens of strawberry bushes and cut off all the tendrils. We collect the first harvest and select the best bushes.
- After this, in August we plant these bushes separately. They are also called uterine. Then in the spring, when the buds begin to set, we simply cut them off.
- We leave the antennae, only the largest ones, and get rid of the rest.
- Around June, rosettes form on the tendrils (new leaves are brought in).
- We dig these rosettes into the ground lightly and water them.
- We wait 3-4 weeks and the new seedlings are ready, we continue to hill up, water and loosen the soil.
- When you decide to transplant the seedlings, you should cut off the tendrils from the mother bush 10-12 days before.
- After this, the young seedlings switch to their own root nutrition. And the bushes are already ready to be transplanted to a permanent place.
The strawberry propagation sequence described above shows how simple and convenient it is to get seedlings of your favorite strawberry variety with your own hands.
Transplanting
Seedlings should be planted in prepared soil.
- We divide the plot into rows, the distance between which is 60–80 cm.
- It is better to make rows in bulk.
- The bushes are planted in prepared holes at a distance of 20 cm from each other.
- The depth of the holes is approximately 15 cm.
- Each bush is placed in a hole so that the middle of the bush is above ground level.
Dividing the bush
There is a second way to propagate strawberry bushes - this is by dividing the bush itself. This method is usually used for strawberry varieties such as repairable strawberry. Since these varieties have practically no mustache.
U young bush At the end of the season, several growth points appear. The bush should be carefully divided without damaging the leaves and roots. The selected seedlings should have the best and strongest roots, and not damaged leaves.
Planting strawberries using agrofibre and black film
Recently, gardeners have begun to use agrofibre or black dense film when planting strawberry bushes.
Advantages of the method
This method has a number of advantages:
- Berries receive the greatest protection from pests.
- Under agrofibre or film, moisture is retained for a very long time.
- Protects well from frost.
- Weeds do not grow under the films.
- After rain the berries are not dirty.
Process step by step
We calculate how much film we need, buy it and begin laying agrofibre over the entire area of the land plot.
- The soil under the film is prepared as indicated above. We secure the edges of the film with stones or sprinkle it with earth.
- Then we mark the places for planting the seedlings and make neat cross cuts.
- We dig holes by hand and plant seedlings. The cut should be small so that weeds do not break through it.
- After planting, water thoroughly. Do not water a little at a time, this will lead to the appearance of fungus. D
- For convenience, boards are placed on the film or fiber, on which it is easy and convenient to move, without damaging the film.
In cases where we plant strawberries in open ground without film, it is recommended to plant parsley between the rows to protect against slugs.
Strawberry bushes should be fed in a timely manner.
Conclusion
Now not only experienced gardeners, but every amateur knows almost all the intricacies of growing strawberry bushes.
Thanks to these techniques, you can get a rich harvest of these unusual, aromatic berries every year. Strawberries should be replanted in the summer, around August after flowering.
Behind winter period it will take root firmly, and next season you will get your very first harvest. It should be noted that strawberries are a very delicate berry. And if you follow all the rules of planting and care, you will be able to get a stable good harvest on your site for many years.
Growing strawberries in the country has long become a tradition. The development of a new territory near the house usually begins with planning and distributing the best areas among favorite crops.
According to all the rules, strawberries are given the sunniest place. Even a slight shadow has no effect better side on the fruiting of garden large-fruited strawberries, or strawberries - as they are used to calling them.
It may seem strange, but Strawberries are an evergreen plant; they do not have a dormant period.. Growth continues under the snow, but not as quickly as in the spring.
Almost strawberries can be planted at any time of the year - the bush will not die.
It is permissible to reason this way in two cases:
- it is urgently necessary to identify seedlings for the garden;
- an opportunity arose to develop a new site.
Planted at the wrong time, strawberries are likely to survive. Perhaps it will even bloom and produce berries. But their quality and quantity will make you doubt either the planted variety or your talent as a gardener.
It is necessary to remember: the yield of garden strawberries directly depends on the number of planted flower buds that develop in the autumn-winter period.
Their number is related to general development bush, the condition of the roots and adequate nutrition in the second half of the year.
Strawberries planted in spring will take full advantage of the supply of melt water and by August will form a powerful plant, but flower buds (even if there were any) will produce few berries. All the plant’s forces were aimed at acclimatization in a new place.
Positive point- powerful Victoria bush with large leaves During the summer it synthesizes a lot of nutrients. These sugars are not only deposited in the false stem (called “horns”), but also allow the plant to form fruit buds. In other words, you are laying the harvest for next year.
Strawberries can be planted at any time - in autumn or spring - the bush will take root and even produce berries
In the second half of summer, strawberries usually already have time to form tendrils with rosettes of new plants - high-quality planting material.
Typically, the first two rosettes are used to propagate the variety.- they produce the strongest and most productive strawberry bushes. Outer rosettes can also be planted, but they are stunted in growth.
Such planting material is used only when there is a shortage of seedlings; they require more careful care and increased attention after transplantation.
Advantages and disadvantages of planting in August and autumn
Important benefits for autumn:
- availability of high-quality planting material;
- usually at the end of summer some of the beds are vacated;
- strawberry seedlings manage to take root well in their new location.
Autumn planting of berry bushes also has a drawback.. Late summer in continental climates is usually a dry and hot period. In order for the planted plant to take root normally, it is necessary to control the situation.
Until new leaves clearly grow, the strawberry has not yet taken root. The entire period of time before this requires careful care (this is approximately two weeks):
- watering(only deep, otherwise the roots will remain on the surface, and the bush will constantly suffer from a lack of water);
- loosening row spacing(it is necessary not only to conserve water, but also to deliver air oxygen to the growing roots).
Choosing a Good Growing Site
First of all, you need to prepare a bed to plant strawberries:
- Considering that its root system penetrates a maximum of 20-25 centimeters, the area must be dug up using a shovel.
- It is very important to remove the rhizomes of perennial weeds as much as possible.
- If the area is damp, it is better to immediately organize " raised beds"or at least plant on the ridges.
For planting, you must choose the evening or a cloudy day. You can, of course, shade the plantings with agrofibre or something else.
These preparatory operations for planting a bed of strawberries will save you from “extra” work for at least two to three seasons.
It is best to plant strawberries in narrow strips oriented “south-north”- with this arrangement of plants, sunlight occurs evenly throughout the day.
If your plot is located on a slope, then the rows should be placed only along the slope (no transverse rows - the first rainfall will wash away your plantings).
Bushes are best planted and replanted at a distance of approximately 25 centimeters. If the seedlings are weak, you can plant two seedlings in one hole.
Master class on planting strawberries (strawberries) in the fall:
How and where to plant seedlings: stages, timing and more
The most important thing is to plant the bushes so that they grow as quickly as possible. Then by winter they will have time not only to store up a supply of nutrients, but also to lay flower buds for the next season.
Nothing will work if the strawberry bush is planted too deep or, conversely, too high. Such bushes will lag significantly behind in development and, most likely, will not bloom.
A properly planted bush should have roots covered with soil level with the growth bud.
Preparation of seedlings
Most often, purchased seedlings go a long way before they reach the garden bed. They need to be revived before landing.- put in water to restore the condition of the roots.
You can add root formation stimulants to the water:
- drugs such as heteroauxin, Kornevin, succinic acid;
- a teaspoon of honey;
- crushed aloe leaf.
For better survival leave only 2-3 leaves on the bush. Here, the expression of pity is unjustified - through the surface of the leaf, the plant only loses water, which the roots are not yet able to supply to the bush.
These seedlings will take root with great problems and will be sick for a long time.
The roots should also not be too long. If you shorten them to 5-6 cm, they will even recover faster. Young roots contribute to the growth of the bush and its accelerated development.
Selecting a location
Strawberries can grow practically on sand and clay, they are not afraid of drought and can withstand the roots getting wet, but in the shade you will not get normal berries.
If the first three problems can practically be solved, then garden strawberries planted in the shade will delight you first with powerful bushes with huge leaves, and then a small amount of very sour berries (also larger than usual), susceptible to all kinds of rot.
We choose only a sunny place - in middle lane Even light partial shade is unacceptable.
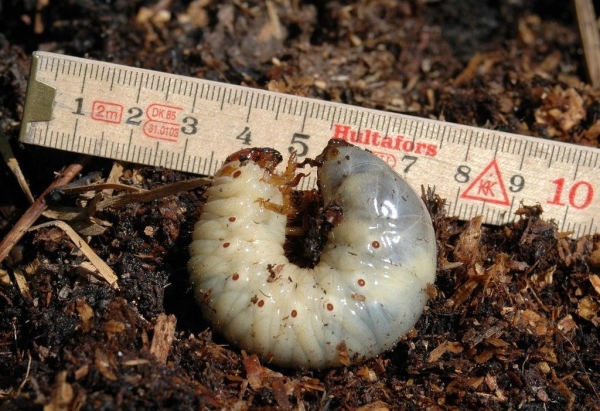
Garden strawberries have the most formidable enemy - the larva of the cockchafer.. Gardeners themselves often provoke its appearance on the site. With the best of intentions, in the struggle for environmentally friendly berries, they uncontrollably fertilize the beds with humus.
During spring summer female cockchafers lay eggs directly in fertilized beds. And the larva lives in the ground up to 4 years of age and is capable of chewing the root of a 5-year-old apple tree, not like a strawberry one.
When preparing the soil for garden strawberries, it is necessary to take this into account - chemicals They are ineffective against larvae, since they live in a layer of soil up to 1 meter.
It must be remembered that the strawberry patch will still have to spend the winter. Anyone who doesn’t want to deal with covering strawberries for the winter should take care of this in advance.
The best protection against frost is snow. No shelter strawberry bushes They survive -20 degrees and short-term drops to -25-30 degrees below zero (depending on the variety) without damage.
Snow cover of even 15-20 centimeters can reliably cover strawberry patch even from frost -30-35 degrees. Everyone knows where the stable snow cover usually lies in winter. That's where strawberries should grow.
You can plant!
If fertilizers have not been applied to the garden bed beforehand, it is better to carry out all fertilizing later, when the seedlings have already begun to grow.
You can add wood ash under the root - garden strawberries love it, and phosphorus and potassium promote the development of the root system.
If you don’t dig holes for each seedling, you can organize the work in such a way that you can plant up to 200 strawberry bushes in a maximum of an hour.
- Mark the rows on the pegs with laces.
- Using the markings, make grooves approximately 10-15 centimeters deep.
- Water the rows with water.
- If there is ash, sprinkle it in the rows.
- Place the seedlings at a distance of approximately 25 centimeters from each other.
- Cover the roots of the seedlings halfway with soil.
- Water these half-buried roots.
- Fill the groove with dry soil up to the outlet.
That's it - the garden bed is ready. After such planting, you can not water for 2-3 days. Dry soil will act as mulch.
 When planting strawberries at the root, you can add wood ash - strawberries love it very much.
 Care after transplanting and harvesting
Transplanted and fertilized strawberries (after picking the berries) have only one thing in common - these bushes need to be “restored”. To do this, foliar feeding is carried out with complex fertilizer for berry fields.
The most effective are modern water-soluble fertilizers based on chelates of various micro- and macroelements.
Their advantage over root nutrition is that the substances are absorbed by the leaves within a couple of hours and quickly begin to act.
However, the transplanted Strawberries need not only potassium and phosphorus supplements. She needs to have time to increase the mass of the bush to the maximum in order to stock up on nutrients from photosynthesis products for the winter.
Nitrogen fertilizing after September Strawberries will no longer be of any use. Part autumn fertilizing the presence of phosphorus is vital - the development of the root system depends on its presence.
Watering and fertilizing strawberries:
How to replant?
If you need to replant garden strawberries within one area, this can be done completely without harm to the plants:
- The day before, it is necessary to carry out high-quality watering (if the soil is very dry) in order to reduce damage to the root system.
- On new garden bed dig a groove at the bayonet depth of the shovel.
- Sprinkle with water and add fertilizer if necessary.
- Use a shovel to cut out clods of earth with strawberry bushes (the more, the better).
- Immediately move these bushes with soil to the prepared place.
- Water and level the ground.
Bushes transplanted in this way will not lag behind in development.
So as not to worry about winter hardiness strawberry patch , around September you can feed it with phosphorus-potassium fertilizers (and not only transplanted bushes!).
Proponents of organic farming can do it even simpler: scatter wood ash directly over the plants as fertilizer.
An overdose of ash is impossible In addition, ash repels ticks and others. And rain and snow will introduce the solution into the soil.

Instead of a conclusion
Contrary to popular belief, caring for garden strawberries is not so difficult. The main thing is to choose a zoned variety and appropriate place for the garden bed.
There are simple rules:
- create a bed only in a sunny place;
- In winter, there should be a layer of snow of at least 20 centimeters on the garden bed;
- the distance between rows is at least 70 centimeters;
- Apply organic fertilizers sparingly;
- where possible, use mulch (at a minimum, loosen the soil);
- phosphorus-potassium fertilizers (they are more important than nitrogen fertilizers for berry growers);
- watering only deep (excluding the fruiting period).
It is always necessary to remember that healthy plant will deal with problems on its own. But this health must be ensured by proper planting.
First, let's figure out how strawberries differ from wild strawberries. Strawberry bushes are taller, the leaves are wrinkled, and the flower stalks rise above the light-colored leaves. The berries are smaller than strawberries. Gardeners often call garden strawberries strawberries. The technology of planting and growing is absolutely the same, so in our article we will not pay attention to the difference between crops. Whatever you call this sweet, juicy berry, its taste will not change.
Rules for success:
- High-quality planting material.
- Properly organized planting area.
- Proper landing.
- Varieties of strawberries (small-fruited, large-fruited, remontant - continuously bear fruit all spring, summer and autumn);
- The best predecessors: garlic, onion, dill, petunias, marigolds. The berries are returned to their old place after 5 years. If there is little food, the first collection is the largest, then the smaller ones.
Planting material can be obtained in several ways:
- buy;
- grow it yourself from seeds;
- take mustaches from other bushes;
- dividing the bush (if the variety does not produce a mustache).
Here you need to decide on the timing of planting. The berries are planted in autumn, spring and summer. When is the best time to plant strawberries? We think it is better to plant it in May, mid-July - early August. During these periods it is not very hot, the seedlings take root well and produce a good harvest the next year. All you need to do is water and feed the plants.
If we buy seedlings, then we give preference to plants with a closed root system, that is, in cups. It should be an annual seedling with roots at least 5 cm long and 2-3 well-developed leaves. If there are flower stalks on the bush, it is better to remove them so as not to deplete the plant. The goal is to get a large, strong bush in the first year, and only then a harvest.


Growing strawberries from seeds
Good varieties: Baron Solemacher, Yellow miracle, Fresco, Sashenka, Moscow delicacy. Strawberry seeds germinate only in light. With artificial supplementary lighting, you can start sowing seeds in January. They are usually sown in March, when the day length increases. Spread it on the surface of the soil without sprinkling it with anything. It is convenient to sow in transparent food containers with a lid. It turns out to be a mini-greenhouse. Seeds can germinate for a month, sometimes a month and a half. To stimulate germination, it is recommended to spray the seeds with a solution of HB-101 (1 drop per liter of water). Water the soil with the same solution.
Supplemental lighting for seeds can and should be done using table lamp. An ordinary light bulb incandescent lights are replaced with energy-saving cold glow.
The table lamp is placed at a height of 15 cm above the bowl or container with seeds and is illuminated for 12, or better yet, 14-16 hours a day.
We must warn you that on a cold windowsill the seeds are in no hurry to germinate and die in the ground. To do this, organize a “warm” window sill - pieces of foam plastic are placed under the containers.
Large-fruited varieties can be sown in peat tablets. There are usually 5-10 seeds in a bag, so the tablets won’t take up much space. The tablets are soaked in water or a solution of the drug HB-101, diluting a drop per liter of water. They are also placed in a bowl under a film, creating greenhouse conditions.
When cotyledon leaves appear, you cannot immediately open the mini-greenhouse - the sprouts will fall and die. There was a certain humidity in the container under the lid, and the apartment air was dry - the leaves could not cope with the evaporation of moisture and dried out. The film (cover) is removed only when real leaves appear. Open gradually over several days so that the sprouts get used to the low humidity of the surrounding air. Drops of condensation from the lid must be removed daily.


Site preparation
Before planting strawberries, prepare the place. The area for strawberries is set aside in a sunny, ventilated place. There are traditional and natural agricultural techniques for growing crops. Traditional planting (ordinary) involves growing strawberries and obtaining maximum yield on one site 3-4 years. The bush bears fruit until it completely exhausts its strength. Then we usually say “the berry has degenerated” and almost completely renew the strawberry by replanting it in another place. Natural agricultural technology allows you to obtain a full harvest for up to 7-8 years in one place due to constant fertilizing and special care.
According to tradition, they are planted in ribbons of two rows with a distance between rows of 30 cm, between ribbons 60 cm, keeping a distance of 15-25 cm between the berry bushes. Or in beds 100 cm wide, the bushes are planted in a checkerboard pattern every 50 cm, leaving a gap of 50 cm between the rows .
Natural agricultural technology involves a slightly different planting pattern. The beds are made 50 cm wide. The bushes are planted in one row every 50 cm. The gap between the rows is 50 cm. Yes, no matter what method you choose, place the beds from north to south. At first it seems that there is a lot of space left for seedlings. But remember, the berry will grow in one area for 5-8 years, the bush will grow and occupy all the free space.
The area is cleared of weeds. Rotted organic matter is added at the rate of 3 buckets/m2. You can add organic matter directly into the wells. Pits measuring 25x25 cm and the same depth are dripping. The wells are filled with the mixture:
- compost bucket;
- a bucket of horse manure (rotted);
- a bucket of soil from the garden bed;
- 2 cups of ash.
Instead of manure, you can take a bucket of compost mixed with 2 liters of vermicompost.


How to plant strawberries correctly
If seedlings:
- in a plastic pot - spilled an hour before planting;
- V peat tablet– immerse in water for 30 seconds;
- open root system - kept for 10 hours in a solution of HB-101 (3 drops per liter of water).
The length of the roots is left to 10 cm, the excess is cut off. If you have seedlings with a closed root system, then you can plant them throughout the summer. Seedlings with an open root system are planted in spring and August.
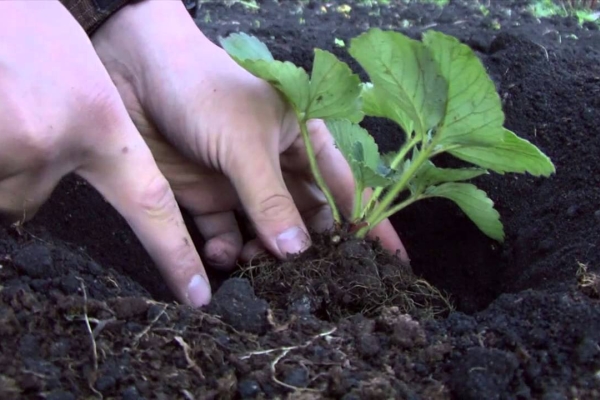
Although strawberries are the most common berry on plantations, many gardeners make mistakes when planting them. At the bottom of the planting hole we make a mound and place the plant on it. Make sure that the roots do not bend. As a rule, this happens when they are too long. In this case, we boldly cut off the excess with pruning shears, shortening the roots to a length of 10 cm. We also make sure that the roots do not bend upward, which is also wrong. Ideally, they should go straight down the mound.
Another important point. Many people deepen the plant too much. With deep planting, the central bud (heart) is below the soil level. This should not be allowed under any circumstances, as the heart will begin to rot and rot. The plant will most likely die. In the case of small planting, the seedlings are also doomed to rapid death, as the heart dries out. The central bud should barely protrude above the soil level. After planting, the seedlings are watered abundantly, plus 0.5 liters of HB-101 solution (93 drops per liter of water) is poured under each bush.
Next, the strawberries are mulched with compost and covered with the thinnest covering material No. 17 (2 layers) or No. 30 for two weeks. It is simply thrown over plants without arcs. Why cover? Root system hasn't launched yet. The leaves evaporate moisture, but the roots cannot yet deliver water from the soil to them. Plants may dry out. A greenhouse effect is created under the covering material, and seedlings take root better.
The question is often asked what materials can be used as mulch. You can take grass, hay, straw, pine branches, rotted sawdust, rotted compost. The thickness of the compost layer should be 5-6 cm. The thickness of the layer of hay, straw, dry grass should be 10 cm. Mulch is added every month throughout the season.


Methods for planting strawberries
We have decided on the varieties, everything is clear with the planting schemes, and we have chosen the dates. Now let's talk about in various ways growing garden strawberries.
Planting with mulch film
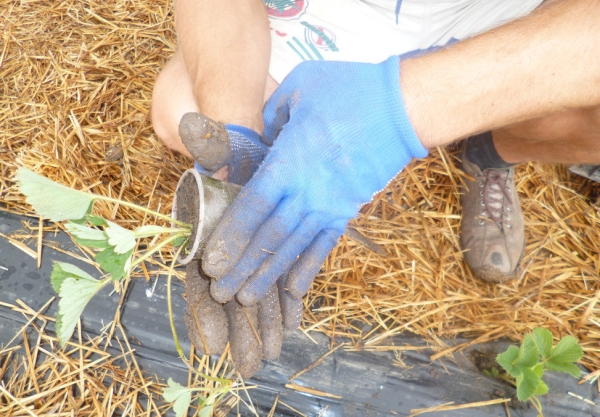
We lay agrofibre. We place the corners of the mulching film in the holes and sprinkle earth around the perimeter. After we have laid the agrofiber, we begin planting strawberries. We make a small cross-shaped cut just enough to barely push the roots through. Then, with our hands under the film, we tear a small hole and lay the roots of the seedling. Fill with compost and water.
If you make a big cut, weeds will come out and draw all the moisture from the soil. Large seedlings should not be planted under mulching film. Attention, if you decide to plant berries this way, you must provide the plant with food for 4 years in advance. For this purpose, for each square meter add 2-3 buckets of rotted compost.
Planting strawberries on a straw mattress
We'll tell you interesting way planting garden strawberries on pea straw. After harvesting the peas, the tops are dug into the soil, forming straw mattress. The soil is watered with nitrogen fertilizers. Nitrogen ensures good compatibility of pea tops. After about 3 weeks, strawberries are planted in this place. Important high quality mustache A large mustache produces large berries the next year. The larger the planting material, the taller the plants will be and the thicker the flower stalks.
Strawberry seedlings are planted at a distance of 40 cm from each other. The row spaces are not dug up, but cleared of weeds. You can plant directly from the edge of the bed so that further plant could use inter-row soil. 3-4 rows of berries are placed on the garden bed. The width of the bed is calculated so that on each side you can easily reach the middle for caring for the plantings.
After planting, water the soil well to create dirt. It’s not for nothing that there is a proverb about strawberries: “If you plant them in the mud, you will be a prince.”
Antennae often have underdeveloped roots. The next day after planting, the seedlings may wilt in the sun. To make the rooting process a little easier for them, the ground around them is sprinkled with hay for the next 3-4 days for shading. You can remove the hay later, or you can add more, to create a nice thick layer of mulch.
Pyramid bed
Beds located upwards and taking up little space are relevant for small summer cottages. To organize a pyramid bed, you need 4 wooden bottomless boxes and a piece of pipe with a diameter of 40 mm and a length of 2-2.5 meters. You can make the boxes yourself.
The pipe is secured and holes are drilled along the entire length of the pipe using an electric drill. They are needed for watering the pyramid beds. No need to do large holes, they can become clogged with soil. Water will find any hole anyway.
Choose a place for the pyramid and drive the pipe to a depth of 80-90 cm so that it holds tightly. By the way, no holes are made in the part of the pipe that will be underground.
Then they take the largest box and put it on top of the pipe so that it runs exactly in the center, and we fix it in the ground. The box can be buried or propped open with pegs: drive stakes into each corner from the inside of the box.
Next, pour good fertile soil into the box, filling it to the brim and compacting it moderately. So all the remaining boxes are strung on the pipe. On each subsequent one a smaller box is placed. Four to five tiers will be enough to maintain the stability of the pyramid and avoid problems with watering, caring for berries, and harvesting.
In addition, you need to ensure that you remain free place for strawberry seedlings. There should be a piece of pipe sticking out above the last tier. It is easy to water the plants from above through the pipe by inserting a hose. Opposite each tier there are necessarily holes through which the soil will be moistened.
Your berry will grow no worse than in an ordinary garden bed. In summer, the bushes will bloom and the pyramid will turn into a pink and white flowerbed, pleasing to the eye.
If you follow all the rules, the plants planted for you will take root well, take root, and you will be guaranteed an excellent strawberry harvest. By the way, do not forget that strawberries are recognized as one of the most delicious and healthy berries in the world!