Pie of insulation of the loggia wall. What is the best way to insulate a balcony? Choosing the best insulation! We will have to solve a number of problems
By insulating the balcony, you can achieve two goals at once: expand the living space and improve the degree of thermal insulation of the apartment. It is best to carry out external insulation, but this cannot be done without the services of industrial climbers and the corresponding costs. Insulating a balcony from the inside will cost much less, especially if you do it yourself.
How to insulate a balcony inside
A positive result of the work performed is considered to be an equally comfortable temperature inside the room and the adjacent balcony. There is no point in investing effort and money in insulation that does not protect against the penetration of cold onto the balcony and forces you to tightly close the doors leading to the loggia in winter.
As a rule, for internal insulation of balconies the following is used:
- foamed polystyrene with a density of 25-35 kg/m 3, otherwise - polystyrene foam;
- based on basalt fiber 80-110 kg/m 3 density;
- extruded polystyrene foam (one of its varieties is).
Note! For additional thermal insulation thin foil polyethylene foam insulation - Izolon or Penofol - is often laid on the base layer.
In addition to the listed insulators, there is another insulating material - ecowool, made from cellulose waste. Simply put, waste paper. The rules for handling it and the installation technology used are the same as with basalt wool. Ecowool is not very popular due to its high cost.
Brief characteristics of insulation
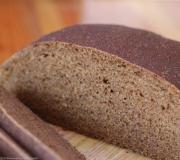
Foam plastic is the most cheap material for insulation, produced in the form of slabs of various thicknesses.
Like all foamed polymers, it repels moisture well and has sufficient strength (at the specified density). It is characterized by high resistance to heat transfer and flammability, which is why it requires protection from an accidental spark.
The thickness of the foam for insulating a balcony in the northern regions should be at least 100 mm; in the southern regions, 50 mm may be enough.
Unlike polystyrene foam, mineral wool does not burn at all, but it is able to absorb moisture, after which its thermal conductivity increases sharply. The problem is solved with the help of protective layers of special films, which will be discussed below.
The heat transfer resistance of mineral wool is not very high, so it makes no sense to use material less than 80 mm thick. The insulation is offered in rolls and slabs, and is more expensive than polystyrene.
Advice! You should not insulate your balcony with fiberglass wool (glass wool) intended for outdoor or roofing works. The use of such materials inside residential premises is unacceptable.
The best option for internal insulation of a balcony is extruded polystyrene foam, sold in slabs.

Expanded polystyrene is durable, lightweight and has the best thermal insulation properties.
Where you need to lay mineral wool 100 mm thick, 50 mm of penoplex is enough.
In addition, the polymer does not allow moisture to pass through at all and is so strong that the slab can be screwed on with self-tapping screws if necessary. There is only one drawback - the high price of the material, which is compensated by the long service life of the material - up to 50 years.
Technology for insulating a balcony from the inside
It is necessary to carefully prepare for thermal insulation on the balcony. This includes not only the acquisition of materials and preparation of tools, but also the performance of a number of preliminary works:
- Construction of a reliable parapet. There are 2 types of structures in practice: a welded metal frame with fastening to the wall or masonry made of foam blocks. How to strengthen a parapet - .
- . Sometimes the balcony is made panoramic by installing metal-plastic blocks to the full height, without a parapet. Then all that remains is to insulate the floors and ceiling.
- Elimination of all cracks and leaks leading to the street, removal of excess polyurethane foam.
- Pad electrical wiring for lighting, as well as drainage and lines with freon to (if available).
Before insulating the inside of the balcony, you need to level all surfaces, removing obvious sagging or filling in depressions and cracks with mortar.
Interior wall decoration
The technology for insulating balcony walls, done with your own hands, depends on the design of the parapet and the heat used insulating material. Metal carcass, trimmed on the outside with plastic or, it is better to sheathe it with 2 layers of thermal insulation so that the second row of insulation covers all metal racks that are cold bridges. And with outside, between the cladding and the insulation, a windproof film should be laid.
When insulating a balcony with mineral wool, it is necessary to use not an ordinary film, but a diffusion membrane as a wind barrier. It will let out the moisture that arises in the thickness of the cotton wool, but will not allow it to get wet from precipitation or fog on the street. For polystyrene foam and expanded polystyrene, the use of a membrane is not necessary; ordinary film will do.
To attach the mineral wool, you will need to assemble with your own hands an additional wooden frame from beams, the width of which is equal to the thickness of the insulation. The pitch between the bars is selected according to the width of the material, the latter is placed between them at random. On last stage the thermal insulation layer is overlapped vapor barrier film, after which the frame is covered with clapboard or plasterboard.
Headlining
And the balcony ceiling can be insulated in 3 ways:
- If you plan to do wallpapering at the end, then the method of gluing slab insulation is suitable mortar. Insulation, accompanied by “wet” processes, is carried out only in the warm period of the year at above-zero temperatures.
- For a similar finish, you will have to attach wooden blocks to the walls and ceiling, and lay rolled or slab material between them.
- When insulated with polystyrene foam, the slabs can be directly attached to the walls and ceiling with dowels. After which the surfaces are leveled with putty and painted, or lathing is installed by attaching the bars to foam blocks or concrete through the insulation. Cladding, plastic, plasterboard and other finishes of your choice are easily attached to the sheathing.
Note! For fastening the sheathing to concrete ceiling through polystyrene foam you need to use special concrete screws - frame dowels.
When insulating a balcony with mineral wool without wooden frame not enough. You can glue cotton wool, but it is quite difficult. The best option is to insert it between the beams attached to the wall and ceiling, protect it with a vapor barrier and cover it with a suitable material.
The gluing method is convenient when working with polystyrene foam, but after 2 days it must be additionally secured with dowel umbrellas and a layer of plaster applied over the fiberglass mesh.
Video:
Floor insulation
The technology for thermal insulation of balcony floors differs from walls and ceilings, since the insulation “pie” must bear certain dynamic loads and have a flat surface. Leveling is carried out by laying wooden logs, between which insulation is laid, and on top fine coating. The sequence of actions is as follows:
- Cut the wooden beams into cross members along the width of the balcony and secure them to the floor with anchors or self-tapping screws and dowels using steel corners.
- Attach 3 longitudinal logs to the crossbars with self-tapping screws. During the process, they must be aligned horizontally, starting from the highest point. Using building level, the beams at the intersections with the crossbars should be raised and plastic or wooden wedges placed.
- Place insulation tightly between the crossbars and the joist. In the case of mineral wool, a vapor barrier must be laid on top of it.
- Lay the flooring with fastening to the joists.
It is typical that the length of the crossbars and joists do not need to be adjusted to the dimensions of the balcony. It would be more correct to make them 10-20 mm shorter so that the ends do not rest against the walls. Wood has the ability to “breathe” and deform slightly; if the fit is tight, the floor surface may later bend in an arc.
Moreover, walking on such floors will be accompanied by an annoying squeak. The resulting gaps near the walls will hide under flooring and will become invisible.
When using slab insulation, it is worth choosing the correct spacing of the crossbars so that you do not have to cut the slabs again. Standard width– 600 mm, this is what you need to focus on. After laying polystyrene foam or expanded polystyrene, all joints and cracks must be filled with polyurethane foam.
Useful training video:
The mineral wool is protected with a vapor barrier as tightly as possible so that moisture from inside the room cannot seep into it. Here you can also use foamed polyethylenes such as Penofol, but pay attention Special attention gluing joints.
If you take a serious and scrupulous approach to the procedure for internal insulation of a balcony, then it is not at all necessary to hire craftsmen and pay them money, which is never superfluous. You will spend twice as much time on completing the work, but you will do everything efficiently and in accordance with your personal wishes. In addition, you will save money on your family budget.
By insulating the balcony, we create a buffer zone on the path of cold air into the living quarters, adding a little square meters to create a pantry, or even a small room - but this is only if you connect a heater. In our step by step instructions we will tell you how to properly insulate a balcony with your own hands and what materials are used for this.
Insulating a balcony begins with checking the supporting structures. To do this, it is advisable to look at the balcony slab from the balcony of the neighbors below: if the beginning of destruction is visible to the naked eye, then you can strengthen the concrete and reinforcement layer as shown in the figure. If you doubt the strength of the slab and the ability to carry an increased load of glazing, insulation, or flooring, it is better to seek an expert examination. Although, as practice shows, balconies can easily withstand increased loads and collapse - this, fortunately, is an extremely rare exception to the rule.
 a - concrete is knocked off in damaged areas. b - the surface is cleaned and repair compounds are applied: 1 - contact layer; 2 - anti-corrosion protection; 3 — repair solution; 4 - leveling putty
Before starting work, you need to remove the old trim and frames (if any), clean all surfaces from collapsing elements, if necessary, make a small concrete screed or seal the cracks in the slab with concrete mortar.
Insulation work can be divided into:
- external cladding;
- glazing;
- internal insulation;
- finishing.
Outside parapet siding
The easiest way to make the outer cladding of a balcony is vinyl siding.
Outside the parapet is being assembled vertical sheathing so that it forms a single, even area (test with a taut thread). The bars or metal profile of the sheathing are fixed at a distance of about 40 cm from each other. Next, siding guides (closing profile) are installed along the lower and upper perimeter, and the corners are decorated with a special vinyl profile - “outer corner”.

The siding starting strip is attached with its long side to the bottom guide using self-tapping screws. It’s better to start from the side wall - the panel is shorter and less visible from the street - you can practice. Between the siding and the balcony grille you can immediately lay soft mineral wool slabs. A drainage system must be installed at the top of the parapet.

A very short video about the main stages of cladding:
Glazing is a mandatory stage of insulating a balcony. In this case, you can independently make frames from wood, aluminum or steel profiles (corner, profile pipe) and glaze, or you can purchase ready-made double-glazed windows. The first option will be cheaper, but it is more labor-intensive and, most importantly, will only slightly raise the temperature on the balcony in winter. You are unlikely to get sealed windows without the use of double-glazed windows; you will have to insulate them for the winter or not insulate them and leave the balcony basically cold, which will only reduce wind load. So it is better to order ready-made double-glazed windows for glazing.
If the balcony was not glazed and you are not insulating the loggia, then the parapet for installing the frames is most likely missing or insufficient. You can create a retaining wall in the form reinforcement cage with concreting or brick. To lighten the structure, expanded clay can be added to the concrete, reducing the overall load. The top of the parapet must also be reinforced with a metal profile.

If the protective grille of the balcony is strong enough, and the double-glazed windows are single-chamber, aluminum - very light, then they can act as a support wooden boards under the window sill, which are attached to the top of the grille.
If the balcony has a small area, then you can weld a frame on brackets that protrudes beyond concrete slab. At the same time, the window sill will not “eat up” the valuable volume of the balcony. This arrangement of a balcony is called a take-out.

After this, the window sills and frame of the future glazing are installed - without frames and sashes, which will be installed later. To do this, the metal structure is welded to the metal profile of the parapet and supports attached to the balcony slab of the neighbor above. If you live on the top floor, the design will be more complex, since you will have to make a canopy-roof, for example, from corrugated sheets, polycarbonate, etc. At the same time, the racks must be more durable.

After the frame is secured, the upper drains (canopy) are installed and double-glazed windows are installed according to the instructions.

About the features of glazing small balconies without increasing the area, look at the video:
Insulating the balcony from the inside
From the inside, the balcony is insulated from the walls, floor and ceiling. For this, you can use various thermal insulation materials.
Materials for thermal insulation of balconies
The thermal conductivity of building thermal insulation materials varies widely, so it is impossible to clearly state the recommended thickness. For information, see how they differ optimal thicknesses to achieve the same thermal resistance when using popular materials.

The basic requirements for materials also include:
- long lasting strength;
- non-hygroscopic;
- fire safety.
Most often used:
- mineral or stone wool— fiber insulation;
- lightweight polystyrene foam and Penoplex ( different types expanded polystyrene) - board materials;
- polyurethane foam or "Penoflex" - polyurethane foam.

Sometimes a composition of these materials is used.
Fiber insulation is easy to install when it is made in the form of soft slabs or blankets with a foil surface.

Polyurethane foam is applied using special, preferably professional, equipment.

For comparison consumer properties materials, we have summarized their main characteristics in a table.
Stages of insulating a balcony from the inside
Now that the basic properties of thermal insulation building materials we know, we will consider the order of work.
Advice! If lighting or connection is expected on the balcony heating devices, do the wiring to the lamp, switch and socket in advance, placing the cables in plastic boxes. This way the wiring will be hidden, which is much more attractive than open wiring.
Before work, make sure that dust, small particles of insulation or solution do not pollute the apartment - cover the openings with film.
Floor insulation
Insulation should begin from the floor. First, you should lay a layer of waterproofing on the balcony slab. It can be ordinary polyethylene or foil insulation. At this stage waterproofing material Can also be mounted on walls.


To protect against condensation, a layer of vapor barrier is laid on top. If you purchase an embossed film, then you need to lay it with the embossed side up.
The subfloor is completed with 10 mm thick plywood in two layers. It is attached to the joists with self-tapping screws. Instead of plywood, you can use fiberboard or chipboard sheets.
Ceiling insulation
Apply a layer of antiseptic to the cleaned ceiling. For thermal insulation, you can take foil mineral wool or polystyrene foam. Good decision will use penofol - a foam material covered aluminum foil, which is glued to PVA, and nailed on top with lathing to attach the finishing layer of finishing - a set ceiling, plasterboard or siding.

Polystyrene foam can be fixed to the ceiling using polyurethane foam.

Mineral wool is laid on a false ceiling made of plasterboard, which is fixed to a frame made of aluminum profile or a wooden block 40x40 mm.

If required, we fix the lamps.
Wall insulation
Waterproofing has already been completed at the first stage, so a vertical or horizontal timber sheathing is immediately installed on top of it. The distance between the bars is equal to the width of the heat-insulating material. For walls, it is better to use polystyrene foam or mineral wool boards.

PPS can be glued with special glue or polyurethane foam, making sure to blow out all the joints and cracks with it.
A vapor barrier film is fixed over the insulation.
Finishing work
There are many materials that can be used to decorate a balcony. This includes drywall, which can be plastered or covered with wallpaper, tiles, and vinyl siding, and lining.

Most balconies have stationary or mobile clothes dryers that can rise to the ceiling.

If the space allows, you can install compact furniture or transformable furniture on the balcony: reclining tables and seats, and some lucky owners of wide balconies even equip sleeping area. The window sill can be made wider and turned into a tabletop - for morning coffee or doing business.
If desired, you can install a fan heater on the balcony, which will allow you to use additional area in spring and autumn or install an electric convector, which will make the balcony all-season for equipping an office or winter garden there.

In conclusion, we invite you to look at photos of designer finishes for the balcony space - for inspiration and a source of ideas.


Insulating the loggia with your own hands will allow you to significantly expand the living space of the apartment: a room previously used as a storage room or drying room will turn into a full-fledged room.
Insulating a loggia means creating a so-called thermal effect around the entire perimeter of the room. This process involves carrying out a whole range of work:
- glazing;
- preparatory stage;
- floor insulation;
- ceiling insulation;
- wall insulation;
- installation of waterproofing;
- insulation of external surfaces;
- fine finishing.
Each stage is discussed in more detail below.
Glazing of the loggia
Obviously, insulating an open, unglazed loggia makes no sense, so the process should begin with the installation of windows.
Glazing of the room is carried out according to standard algorithm, but using an additional (additional) profile to change sizes window opening. Framing the entire structure around the perimeter, it is intended to ensure that subsequently the surfaces thickened with insulation (walls and ceiling) do not cover the glass.
Important! Do not try to save money when choosing profiles and double-glazed windows: “cold” glazing using inexpensive structures can protect the loggia from precipitation, but will not cope with the drop in temperature outside.
You can find out how to choose and install a plastic frame on a loggia by watching this video.
Insulation of the loggia from the inside
After installing the double-glazed windows, you can begin insulating the loggia floors. However, this stage also requires a number of preparatory work.
Preparatory stage
First of all, you must determine which surfaces on the loggia require insulation and which do not. As a rule, only “cold” floors are covered with thermal insulation; “warm” floors are not “treated” to save usable space.
“Warm” floors are surfaces bordering heated rooms.
The next step is choosing a material for thermal insulation of the room. and its thickness is selected based on their climatic conditions. A description of the materials on the market, their characteristics, advantages and disadvantages is given in the next section.
Important! In cold climates, it is better to give preference to tiled thermal insulation, which is connected using a tongue-and-groove system.
The final stage of preparation is foaming the cracks and voids in the ceilings. This procedure is necessary: it will help protect the future from negative impact natural factors.
Materials for thermal insulation
When choosing thermal insulation materials, pay attention not only to their thermal conductivity, but also to their thickness: in a small loggia area, saving space also means a lot.
Many people who insulate balconies and loggias still use traditional, but already obsolete materials, while modern industry offers a wide range of insulation materials.
Extruded (extruded) polystyrene foam. This material Available commercially in the form of panels (slabs) or rolled fabric. It has excellent thermal insulation characteristics, low specific gravity and provides a good level of moisture insulation. The only drawback of polystyrene foam is its mediocre vapor permeability. This circumstance imposes additional requirements on the organization of ventilation of the room: if condensate is not removed from under the thermal insulation, the loggia has every chance of “moldy” from the inside. Due to the low vapor permeability of the material, before insulation with polystyrene foam, the surface should be treated with a special antifungal compound, and a vapor barrier material should be attached to the thermal insulation itself with tape.
When insulating a loggia with polystyrene foam, you must remember that it is a fire hazardous material and releases toxins when burned.
Expanded polystyrene in the form of panels and slabs is sold under the name “Penoplex”; it is most convenient for them to insulate ceilings and walls, while rolled material can also be used for floors.

Thanks to the standard panel sizes, it is very easy to calculate the required number. Insulating a loggia with penoplex yourself will not cause any difficulties: holes for dowels are drilled in the slabs, and the material is fixed. The hole is filled with foam, the excess of which is cut off with a knife (then the surface in this area is sanded with sandpaper).
Polyethylene foam. This material is characterized by a porous internal structure and, due to this, has excellent thermal insulation characteristics. The surface of the polyethylene foam is smooth: this circumstance prevents moisture from getting inside. This type insulation provides not only heat retention, but also good sound insulation; Available in the form of slabs (panels) or rolls.
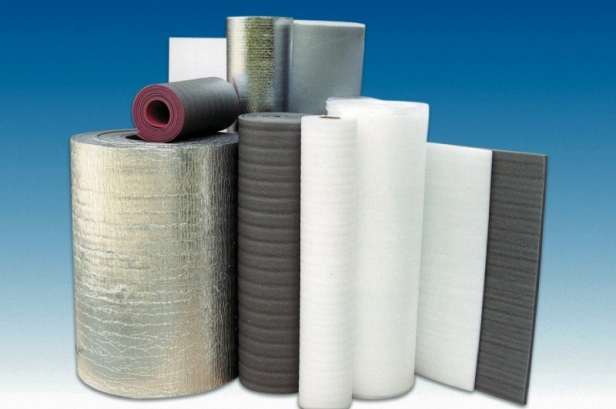
Today, it is easy to find improved polyethylene foam on sale, which has even higher heat and moisture protection properties. Laminated with a layer of foil on one or both sides, it is produced in rolls under the names “Penofol” or “Izolon”.
Penofol is indispensable in humid climates, as it is an excellent vapor barrier and moisture insulator.
Polyurethane foam. This material is widely known as foam rubber or PPU. It has a low specific gravity, is characterized by high thermal insulation properties, good protection from noise and moisture. One of the main advantages of polyurethane foam is the presence of a continuous film on the surface. This is what prevents the penetration of moisture.
Today you can use a progressive technology for insulating a loggia with polyurethane foam - spraying. The material is not mounted, but sprayed with water high pressure on the wall in the form of a powder, which immediately after hitting the surface sticks together and forms a solid heat-insulating layer.
Advantages this method are obvious: work on insulating a loggia of any size can be done in as soon as possible. In addition, the use of this method allows significant savings. usable area: The thickness of the insulating coating is minimal.

Styrofoam . One of the most common and accessible materials is polystyrene foam. It demonstrates high heat and sound insulation properties, is not susceptible to fungi and can be used even in humid climates. The only disadvantage of this material is its absolute instability to chemical liquids. However, they are not used in everyday life, so this property will have to be taken into account only during repairs on the loggia.
Insulating a loggia with polystyrene foam is quite simple: the slabs of material are attached to dowels.
Important! In addition to insulation, you will need a number of other materials. Before you start work, prepare polyurethane foam and a cleaner for it, foil tape, an antiseptic (antifungal composition), dowels with a plastic and metal core, self-tapping screws, nails, timber for joists and linings for joists, metal profiles and drywall.
Tools needed: level and tape measure, foam gun, screwdriver, pliers, hand construction tool, metal scissors, shoemaker or stationery knife.
Insulation of the vertical surfaces of the loggia (parapet, area above the windows and walls)
Let's consider one of the simplest options - insulating the loggia with penoplex in slabs or rolls. This material is really easy to install and does not require any special skills. The algorithm of necessary actions is below.
First of all, treat the surface of the walls with a special antifungal compound and a layer of waterproofing. While the applied layers are drying, we will prepare the material.
According to his calculations made on preparatory stage, cut the insulation. To do this you will need an ordinary stationery or shoe knife.
It is advisable to make grooves at the ends of the slabs. Making them is very simple: cut the plane and the end, and then remove the unnecessary piece.
If you live in a cold climate, prepare the material based on the fact that it will be attached in 2 layers, and the seams of the first should overlap the panels of the second by at least 5 cm.
Important ! The minimum width of the insulation strip (if you purchased Penoplex in a roll) should be at least 30 cm, the length should be the height of the wall.
Proceed with the installation of Penoplex. The first layer of insulation is attached to mushroom dowels, “targeted” with a special hand tools. The second layer is placed on the mounting foam or also “targeted” to the first.
Insulation of the loggia with polystyrene foam is carried out according to the same principle.
Insulation of the loggia ceiling
- Insulation of the loggia ceiling begins with the installation of suspensions.
- Then galvanized profile guides are installed.
- Before fixing the insulation boards to the ceiling, the holes necessary for hanging are cut in it.
It’s okay if the slots turn out to be larger than necessary: a little later their size can be changed using polyurethane foam or pieces of insulation.
- Insulation boards are mounted using polyurethane foam or dowels. Depending on the specific gravity material, dowels with a plastic (for lightweight panels) or metal (for heavier panels) core are selected.

Insulating the loggia floor
It is the floor of the room that is considered the “coldest” surface and needs maximum insulation. Even if the insulation on the walls of the loggia was installed in one layer, the floor is made “double”.
The technology for insulating the loggia floor is as follows.

Vapor barrier
After completing the thermal insulation of all surfaces of the loggia, the already insulated surface must be covered with a continuous layer of vapor barrier. This will protect the materials from moisture and, as a result, the formation of mold and rot.
Penofol, previously discussed, can be used as a vapor barrier material. You can attach it with glue (by the way, you can also find a self-adhesive version on sale) or using a special stapler with the foil surface to the living space.
Don’t know how to insulate a balcony to spend minimum funds and get great results? Then this review is for you; it describes simple options for carrying out work that anyone can do. If everything is done correctly, your balcony will be warm even in the most severe frosts.
Preparatory part of the work
First of all, you need to prepare the room for insulation.
At this stage, several important activities are performed:
- The space is freed from all unnecessary. It is best if the balcony is completely empty, then nothing will interfere with the work. In the presence of old decoration it is worth removing it in advance;
- All cracks and voids are sealed. This is very an important part work, since a lot of heat is lost through loose joints. Small cracks are sealed with weatherproof sealants. It is best to fill larger joints with polyurethane foam; it will not only prevent moisture from entering, but will also serve as an additional heat insulator;
- The floor and, if necessary, walls are waterproofed. In new buildings, this part of the work may not be required, but if your balcony is damp, then extra protection will not hurt. The easiest way is to use a special mastic based on bitumen, which is applied in a thick layer to the floor and adjacent walls to a height of 20-30 cm. The composition dries for about a day, during which time you cannot walk on the surface;
- Cracks and irregularities in the ceiling and walls are sealed with cement mortar. The smoother the base, the easier it will be for you to carry out the work. There is no need for special care; the main thing is to repair all the unevenness and level the surface.
Floor insulation
Considering the question of how to properly insulate a balcony from the inside, we will begin with this part of the structure. Work can be carried out in two ways: by laying insulation between the joists and by pouring screed. I'll talk about both options, and you choose the one that best suits your situation.
Let's start with the option of insulation using joists; instructions for doing the work yourself look like this:
- The following materials are required for work: timber for logs, waterproofing for the base, insulation, vapor barrier and finishing coat. I recommend using foam plastic as insulation; its price is low, but the quality is quite suitable for such work. There will be no load on the material, so you can choose sheets with a low density;
- Waterproofing material is laid on the floor. Even if you applied a mastic coating, an extra moisture barrier will not hurt. The film should extend onto the surface of the walls by 20-30 cm, and have overlaps of at least 100 mm at the joints. For additional reliability, I recommend all connections with regular tape;
- The logs are being laid. The distance between them should be equal to the width of the insulation so that you do not end up with waste, usually it is 50-60 cm. As for the height, it should be no less than the thickness of the insulation, I recommend laying a layer of 10-15 centimeters to reliably protect surface from the cold. After placing the elements, all joints are filled with polyurethane foam; it serves as both insulation and fastening;
- Insulation is placed in the spaces between the beams. If you have several layers of material, then the joints between the sheets, if any, should not match. Try to lay the foam as densely as possible so that there are fewer voids and cracks on the surface;
- All gaps between foam sheets and beams are filled with foam. This allows you to achieve best quality insulation. The foam is carefully applied wherever needed; 2-3 hours after it has dried, the excess can be cut off with a construction knife;
- The flooring is attached. You can lay a vapor barrier under it, or you can immediately lay a board or sheet materials. If the base is reliably waterproofed, then there is essentially no point in an additional protective layer.
Let's consider the second option for carrying out the work.
In this case, floor insulation is done completely differently:
- All are purchased necessary materials . For simplicity and clarity, all information is presented in the table;
| Material | Recommendations for selection |
| Insulation | It is best to use Teploplex insulation (it is also called Technoflex, Teploflex, Penoplex, etc.). It has a very high density and has higher heat retention rates than polystyrene foam. You can also use foam high density, but it is still less effective |
| Waterproofing | Any can be used suitable material this type. The film must be laid both under the insulation and on top of it |
| Reinforcing mesh | To make the screed strong, it is worth laying a special metal mesh. Also purchase beacons for pouring screed; you can take both special elements and a metal profile for drywall |
| Screed mortar | The easiest way is to purchase ready mixture in bags, which is simply diluted with water before use |
To make the screed even more reliable, use a special damper tape. It is laid around the perimeter and allows you to create an expansion joint.
- Stacked waterproofing film . It is placed with overlaps on the walls, and overlaps of 10 cm are made at the joints;
- Insulation sheets are laid on top. They need to be placed as tightly as possible to ensure high-quality thermal insulation of the surface. Extruded polystyrene foam is more convenient than polystyrene foam, since it has grooves at the ends that allow the sheets to be aligned very accurately;
- The film is laid, and a mesh is placed on top of it. Everything is simple here, first the surface is waterproofed, and then a mesh is placed on it. To make the surface durable, make overlaps of 5 cm at the joints of the mesh;
- The beacons are attached and the screed is poured. The beacons are leveled and fixed to the same solution that will be used when pouring the screed. After this, you need to wait at least 12 hours, after which the solution is poured. Everything is easy here: it is evenly distributed over the surface and leveled using a rule or a flat wooden slat.
If you are making a warm floor on the balcony, then after laying the insulation, instead of film, it is better to use a material with a reflective layer. A heated floor system is placed on top of it, after which the beacons are placed and the screed is poured. The layer thickness must be at least 3 cm to ensure strength.
Ceiling insulation
This part of the structure can also be thermally insulated in two ways: with and without a frame.
First, let's look at the process of insulation along the sheathing:
- Collecting necessary materials. Needed for work wooden block, insulation, polyurethane foam and finishing material. The height of the bar must correspond to the thickness of the insulation;
- Lathing on the ceiling is being constructed. The elements are fastened using dowels quick installation appropriate length. In order to level the structure strictly, slats or pieces of boards are placed under the bars. The installation process itself is simple: holes are drilled in 50 cm increments, after which dowels are inserted and expansion screws are driven in;
- Insulation is placed in the sheathing. Foam or extruded boards are cut exactly to size so that the elements are held in the structure without additional fixation. Can also be used mineral wool, in this case it is better to choose products of medium density;
- All cracks are sealed with polyurethane foam. All voids are filled with the composition so that the cold cannot penetrate through the cracks. Don’t worry about being careful, all excess can be cut off with a construction knife after the composition has hardened;
- Lastly, the finishing is fixed.. The frame can be sheathed plastic panels, wood, plywood or moisture-resistant plasterboard. It all depends on what kind of interior was planned and what you want to see in the end.
Now let's figure out how to insulate a ceiling without a frame:
- First of all, prepare the ceiling surface. At this stage, you need to clean the base from dust and dirt. If there are cracks at the joints of the slabs, it is best to seal them with polyurethane foam. The surface is also treated with a strengthening primer, it will improve the adhesion of the adhesive composition and provide more reliable fixation of the insulation;
- Special adhesive composition applied to Penoplex. Glue is used in cylinders, which is reliable and easy to apply. There is no need to apply it completely - spread a little of the composition around the perimeter and in the middle. An example is shown in the photo below;
- The sheet is glued to the ceiling. Everything is simple here: the element is located where it is needed and carefully pressed against the surface. Usually you should hold the sheet for 20-30 seconds, after which it will hold normally, and you can continue working and attach the next fragment;
- For reliability, the material is additionally fixed with dowels. Special fasteners with a wide pressure washer are used . The fungi are attached according to this scheme: two elements at the seams and one in the middle, so the consumption will be small and the reliability of installation will not be affected. Holes with a diameter of 10 mm are drilled for the dowels; the layout and the finished result can be seen in the picture below;
- The cracks and joints are foamed. Everything is clear here: if necessary, the junctions with the walls and the joints of the sheets are sealed with polyurethane foam. It is applied wherever it is needed. After drying, the excess can be cut off with a construction knife;
- Lastly, it is attached finishing . Personally, to me the most practical solution Seems suspended ceiling– it doesn’t cost much now, the craftsmen will come and install it in a couple of hours. If you want to attach the trim to the sheathing, then the block will have to be nailed to the ceiling through the insulation.
Wall insulation
When considering the question of how to properly insulate a loggia from the inside, one cannot help but talk about the walls. They need to be insulated very carefully, especially those surfaces that face the outside (most often this is the space under the window and one or two side walls).
The wall insulation technology is as follows:
- First of all, materials are prepared. We need a block for the frame, insulation, and a waterproofing membrane. To improve the effect, you can attach a material made of foamed polyethylene with a reflective layer, called Penofol, on top of the insulation;
- A waterproofing, vapor-permeable membrane is attached to the external walls. There is no need to mount it on walls adjacent to living spaces, since cold air does not come from there, which can cause condensation. The material can only be fixed at the top and the joints can be glued. Its final fastening will occur during installation of the sheathing;
- A block is attached to the surface. Its height should be the same as the thickness of the insulation. On interior walls You can attach thinner material, and on the outside it is advisable to lay at least 10 cm to create a reliable barrier to the cold. Accordingly, under the window the sheathing is made indented from the base, and on the remaining walls it can be nailed with dowels directly to the surface;
- Insulation is placed in the resulting structure. Everything is simple here: polystyrene foam or extruded polystyrene foam is cut into pieces of the required size and carefully placed in the sheathing. There is no point in attaching it additionally. It is important to remember that if you lay the material in two layers, the joints should not match;
You should not use mineral wool for work. It is both more expensive and less resistant to changes in temperature and humidity, which often occur on balconies.
- All joints are filled with polyurethane foam. Apply foam into all the cracks you find, the composition will not be superfluous and will help achieve best result when insulating a balcony or loggia. The advantage of foam is that it can fill both small cracks and voids up to 10 cm in size, which is especially important on balconies of complex shapes;
- Reflective material is attached on top of the insulation. This stage is optional, but I recommend that, if possible, you cover at least the outer walls in this way, and better yet, all surfaces. The material is carefully straightened and fixed using a construction stapler or self-tapping screws. To provide best effect the joints are glued with special foil tape;
- A counter-lattice 20 mm thick is attached on top of Penofol and finishing material is attached. Everything is simple here: the frame is nailed on top of the main one load-bearing structure. Any finishing you choose is attached to it - from lining and PVC panels to plasterboard or other sheet materials.
Conclusion
Anyone who reads this article will easily figure out how to properly insulate a balcony themselves. The process is very simple, and the video in this article will clearly show some of the stages of work and help you understand them even better. If you need to clarify something on a topic, then write all your questions in the comments at the bottom of the page.
Those who have an apartment in apartment building, understand the need to insulate the balcony. This question remains relevant at any time, since the basic, “draft” option, which is installed by default in most homes, does not have any advantages. In summer it is unbearably hot on such balconies, and in winter it is very cold. Accordingly, the microclimate in the adjacent rooms is also disrupted. In this case, the owners come to the conclusion that insulation and insulation are necessary. So how to properly insulate a balcony from the inside and what is needed for such work?
It all depends on the location of the apartment in which the balcony is planned to be insulated. As a rule, the owner himself can answer this question. But if the apartment was purchased recently, and the owner has not encountered such issues, you need to pay attention to the following nuances:
- The apartment is located on the top floor. IN summer time on the top floors, as a result of heating the roof, Greenhouse effect, which leads to overheating of the premises. In particular, the balcony heats up the most.
- The balcony faces either the sunny or shady side. If you are on the sunny side, there will be severe overheating; if you are on the shady side, the balcony will be very cold in winter.
- The balcony is of poor quality; the main slabs are cracked and do not provide reliable protection from weather conditions.
It should be noted that thermal insulation of a balcony implies the implementation of indirect, but no less useful functions- when installing slabs noise and moisture insulation increases.
The conclusion is the following: the balcony must be insulated as soon as possible. Disadvantages when correct installation are absent, but the advantages are obvious.
Preparing the balcony before insulation
Before you insulate the balcony from the inside with your own hands, you first need to carry out preparatory work. The entire surface, from the floors to the ceiling, is thoroughly cleaned of large and small debris, the covering on the floor (if any) is dismantled and all decorative elements(shelves, cabinets, fixtures, etc.).
The next step is to check the integrity of the structure. Very often, balcony slabs have a large number of chips and cracks. If any are found, it is necessary to remove the deformed areas (if the damage is extensive), then use cement mortar close all cracks and holes. The result will be a rough floor and walls that are ready for insulation work.
Some craftsmen carry out finishing plastering of surfaces before carrying out insulation work. This procedure should be performed in cases where the surfaces are uneven and interfere correct installation insulating material.
Insulating a balcony: detailed instructions
Is the balcony ready? In this case, you can begin to answer the question of how to properly insulate a balcony. First of all, it is necessary to install high-quality double-glazed windows. It is recommended to use double designs, ideally with argon filler. If the reader lives in a region where average winter temperatures drop to -30 degrees, then you need to think about installing three-chamber double-glazed windows.
The technology of insulating a balcony can be divided into the following stages:
- After installation of metal-plastic bags All cracks and gaps must be eliminated. To do this, you can use any sealant or polyurethane foam. If the cracks and gaps are large, improvised materials are used to reduce their size.
- Waterproofing inner surface balcony. Can be used various materials — bitumen mastics, roofing felt, liquid penetrating materials (like Penetron), etc.
- Insulation is attached. We will dwell on this point in a little more detail below.
- Placed on insulation vapor barrier material.
- The interior surface is being finished.
- Floors are installed (depending on the preferences of the master).
Balcony insulation using Penoplex

Penoplex belongs to the group of expanded polystyrene, has excellent moisture resistance and resistance to mechanical deformation. Side surface slabs can be either smooth or ribbed, for better fixation of layers to each other.
Methods of attaching the material depend on what kind of finishing will be done. If as finishing materials If clapboard or drywall will be used, then you can use mushroom-shaped plastic dowels. If, after insulating the walls, plaster is applied, then it is recommended to use adhesive materials for additional fixation.
The Penoplex insulation technology is as follows:
- Penoplex slabs are attached to the prepared primed surface, which are connected to each other joint-to-joint or using a “tenon-to-groove” system.
- Each slab of insulating material is fixed to the wall using special dowels.
- The joints of the sheets should be taped, while the joints with other structures should be sealed with polyurethane foam without toluene impurities.
- Next comes the vapor barrier layer, lathing and finishing.
Important: You can insulate the balcony with Penoplex with preliminary installation of the sheathing. Then the material is laid between its bars.
Penoplex is considered one of the best materials for thermal insulation works. First of all, this is due to its strength. If this indicator is not important, you can use regular foam.
Insulation using foam plastic

This material is known to all ordinary people. As a rule, insulating foam plastic is produced in the form of sheets, the thickness of which ranges from 5-15 cm. To insulate a balcony, it is enough to use slabs whose thickness is 10 cm.
The process of insulating a balcony or loggia is carried out as follows:
- The surface is treated with a deep penetration primer;
- Using special glue, foam sheets are attached to the treated surface;
- Plastic dowels can be used for additional fixation;
- The joints between the sheets are glued using polyurethane foam. After drying, the seams on top are additionally taped;
- A reinforced fiberglass mesh is mounted on the surface of the installed insulation using a special adhesive solution;
- After installing the mesh, finishing work can be carried out.
Also common is the option of pre-installing the sheathing, as we discussed earlier when talking about Penoplex.
Insulation using lining
Of course, wooden planks cannot be high-quality insulation. Lining can be used as insulation only if the balcony is a well-heated room. Otherwise, before installing the lining, it is necessary to install the basic insulation.
The balcony is insulated with clapboard as follows:
- Installed wooden sheathing, on which the lining will be attached. Usually the sheathing is installed horizontally.
- In the gaps, foam plastic sheets are installed by analogy with the previous insulation option.
- After installing the foam plastic, you can install the lining, which is attached to the surface of the walls on a wooden sheathing.
Please note that such work should only be carried out if the balcony structure is strong enough. That is why before installing it it is necessary to carry out calculations for the strength of the surface.
Insulation with mineral wool

Mineral wool is often used as insulation for balconies due to its structural features. Benefits of mineral wool obvious - high-quality thermal protection, low cost and vapor permeability. But there are also disadvantages. Thus, mineral wool, if installed incorrectly, loses about 40% of its properties, and sheets of material are fragile.
We will provide our reader with the option of mineral wool insulation:
- Mineral wool slabs are glued onto a pre-waterproofed surface that already has lathing on it and are additionally fixed with dowels.
- The material is tightly and carefully fixed in the spaces between wooden beams lathing - mineral wool is fragile.
- The last step is to install a vapor barrier, after which you can begin laying the finishing material.
Note that it is very easy to insulate a balcony with your own hands - this does not require special knowledge and skills. If you have detailed instructions, which allows you to carry out glazing correctly, you can do it yourself - it all depends on your desire.
Insulated balcony photo
Here you can look various options insulated balconies. All photos are clickable.
Balcony insulation video
We invite you to watch videos on how to properly insulate a balcony. The video uses penoplex as insulation and shows the entire sequence of work with this material.