Laying floors on the ground inside the tape. Recommendations for installing water heated floors on the ground
If the house plan does not provide for the construction of its underground part (basement), then the most profitable solution There will be a floor arrangement directly on the surface of the earth. By observing all norms and standards, you can build a high-quality site on your own. This, of course, is far from the cheapest and easiest option, but, of course, everything is relative. In this case, the use of special equipment and very expensive materials, which makes the process easier and cheaper.
What are the advantages of the correct floor pie on the ground and does it have any disadvantages?
Before you start studying the structure of a proper floor pie on the ground, you need to familiarize yourself with its advantages and disadvantages. So to obvious advantages can be attributed:
1. If built well, it will reliably protect the room from the penetration of cold from the ground.
2. If you wish, you can significantly reduce costs by choosing budget options for insulation materials. This will reduce the quality of the structure, but not very significantly.
3. When performing such work, there is no need to make complex technical calculations, which are necessary in other more complex cases.
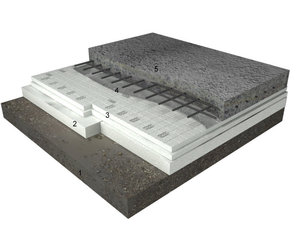
 filling concrete mixture for finishing the rough layer
  insulation with polystyrene foam
4. On a site built according to this principle, it is very easy to install a “warm floor” system.
5. This design has very high sound insulation rates.
The disadvantages of proper ground pie include the following:
1. If the sum of all the heights of the levels is incorrectly calculated, then such a design will significantly reduce the height of the premises.
2. Such a system cannot be built in very close proximity groundwater to the surface of the earth, as well as on unstable soils.
3. Dismantling, if necessary, is a very labor-intensive and expensive task.
Our article about how and what to install a wooden floor in a house will be useful. all year round it was warm and dry.
We make the correct floor pie on the ground in compliance with all necessary insulation standards
 the right pie floors on the ground
In order to avoid problems such as the parquet becoming damp during operation (pulling moisture from below), household members often getting sick (constant cold in the house), and the furniture being skewed (the platform on which they stand is “damp”), it is necessary to be very meticulous in recreating all layers of the correct floor pie on the ground. To obtain a dry, warm, smooth and strong surface, proceed as follows:
1. On average, at the first stage (removal of the top layer of soil) they go about 50 cm deep. The thickness can vary depending on how saturated the ground under the building is with water, how low the temperature can drop in winter, whether heated floors will be installed around the perimeter of the first floor and much more. We will build on average statistical indicators, which can be easily adjusted to individual needs.
2. After collecting excess soil, it is necessary to check the horizontalness of the surface. And then carefully compact the bottom of the recess that you dug. It is almost impossible to do quality work manually; to save money, it is better to use a vibrating plate.
3. After this, the first mound of sand should go. Its height can be from 4 cm to 8 cm. In our case, this figure is maximum. After leveling the top layer of the embankment, it is compacted.
 laying reinforcing mesh
  screed
4. The second layer is a mound of small stones. Crushed stone or gravel is suitable for these purposes. Tamping on at this stage is not needed, unlike layer leveling. Its height is similar to the height of the previous layer.
5. Next, the concrete mixture is poured to make the rough layer. It can be made either with or without reinforcement, but it is better, of course, not to save money. Laying it down reinforced mesh and fill it with the mixture. The level of the solution rises 10 cm above the surface of the previous layer (under certain conditions it can be reduced to 5 cm).
6. Now it is necessary to protect the layers that will be laid later from moisture penetration into them. We spread the insulating material (membrane or film) over the entire surface; it should be laid not only on the site itself, but also on the bottom of the walls adjacent to it. The overlap between the wall and one canvas onto another is 20-25 cm.
8. Moisture insulation sheets are spread on top. This is done so that the thermal insulation material does not deteriorate not only from the penetration of water from the ground, but also from the floor surface (in the event of a flood, for example).
9. The last layer is screed. Now reinforcement is not just desirable, but mandatory. The thickness of the final layer is about 10 cm. How to properly make a screed yourself.
It is difficult to build such a structure only physically, since the work is heavy and labor-intensive. In certain cases, the use of this particular option is absolutely justified, especially considering that it has an order of magnitude fewer disadvantages than advantages.
The floor is a surface with which every homeowner is in constant contact. Floors have an impact on health, so it is vital that they are done correctly. It is necessary to take care of the installation of high-quality and heated floors at the stage of repair work in the house.
One of the most budget-friendly and optimal options for arranging flooring is considered to be flooring on the ground. It is advisable to lay it only if there is dry underlying soil, since otherwise it will be necessary to carry out a number of waterproofing measures. Floors on the ground do not require the installation of beams or floors, but require careful preparation of the surface.
A little about the technology of making a cake for a ground floor
At correct implementation thermal insulation work, the floor on the ground can create warmth, coziness and a comfortable microclimate. A guarantee of a reliable result of this event can only be called adherence to a clear plan. If you disturb the order of the stages of making the cake, you can completely forget about the effectiveness of the floor covering. The pie laying technology involves the following steps:
- site marking;
- preparing the soil for laying the floor;
- waterproofing or laying the underlying layer;
- installation of insulation;
- concrete reinforcement;
- screed alignment.
A classic pie must be multi-layered and must include the following components:
- compacted soil surface;
- river sand pillow;
- backfill made of crushed stone or expanded clay;
- waterproofing layer;
- rough concrete screed;
- vapor barrier layer;
- insulation;
- reinforced rough screed;
- flooring.
To lay the correct floor pie on the ground, use video instructions. It should be noted that the technology of flooring and the design of the cake directly depends on the type of floor covering used. Let's look at a few popular options.
Concrete floor on the ground

Before carrying out work, it is necessary to divide the room into strips 100 cm wide. Laying the floor will begin with the segment farthest from the entrance. If such a floor is properly concreted, it will require virtually no maintenance. It is advisable to break the old floor layer only if the coating has already cracked or begun to crumble. The main advantage of a concrete floor is strength and durability; in addition, it is the most a budget option flooring devices. The availability of materials and the ease of preparing the mixture make concrete floors popular today.
The installation of such flooring takes place in stages, and it is important to follow the order and not skip steps. So, a concrete floor involves the use of the following laying technology:
- level marking;
- cleaning and compacting soil;
- laying a cushion of crushed stone, sand and gravel;
- waterproofing layer;
- insulation;
- laying the reinforcing layer;
- installation of guides;
- installation of formwork;
- preparation and pouring of concrete mixture;
- concrete leveling;
- execution of the screed.
Concrete floor on the ground is durable and reliable option home improvement, but the installation process requires technology and is time-consuming.
Wooden floor on the ground

The main feature and advantage of wooden flooring is a ventilated underground; in addition, such floors can provide warmth, comfort and provide a home with coziness. For normal circulation of air masses and reduction of heat loss, the height of the ventilated underground should be 20 cm. The technology for making a wooden floor cake involves the following steps:
- soil preparation: leveling the soil, laying a cushion of crushed stone and compacting the soil;
- pouring a thin layer of concrete
- installation of beacons and determination of locations for brick pedestals;
- styling concrete screed under a brick bedside table on top of the underlying layer;
- arrangement of bedside tables made of solid brick;
- waterproofing using two-layer roofing material;
- styling wooden beams, pre-impregnated with antiseptic;
- thermal insulation of the floor on the ground;
- laying timber on brick tables;
- installation of floor joists;
- leveling the flooring using a plane;
- Puttying the locations of mounting nails.
A wooden floor on the ground is the most optimal option for installing flooring in your home with your own hands. Anyone who can hold a hammer in their hands can cope with this process.

- Professional builders note that when making a pie, it is necessary to remember that the finished floor covering must correspond to the level of the door threshold.
- Floors on the ground with strong limited budget, allocated for their installation, is recommended to be carried out in outbuildings, non-residential premises, basements, etc. Here you can save significantly on the building materials used.
- If there is a sufficient amount of cement, first of all, you should make a screed from a concrete-crushed stone mixture. After this, thermal insulation - expanded clay or slag - can be laid on top of the screed.
Floor arrangement is one of the most important points during renovation or construction. And if we're talking about about a private house, this question becomes even more acute. In many house projects, floors are often designed on the ground; this is quite reliable and one of the most practical and inexpensive options. Currently, heated floors are becoming more and more in demand and popular every day, so many people prefer this type of heating in the house. Reliable thermal insulation of the floor will provide warmth and comfort in it, and will also significantly reduce the cost of its maintenance. After all, heated floors perfectly retain heat in the house and create comfortable conditions for living, and in some cases they replace central heating.
What is a heated floor pie on the ground?
When arranging floors on the ground, it is imperative that they thermal insulation, thanks to this, a multi-layer structure is obtained, which is very often called a heated floor pie. This design reminds me a lot layered cake, since it consists of several layers. I would like to say that the construction of a floor on the ground largely depends on the condition of the soil. It must meet certain requirements. For example, the groundwater level should be at a depth of 5-6 meters, the soils should not be loose, for example, sandy or black earth. In addition, it is necessary take into account the load on the floor. It should be noted that the heated floor pie must provide:
- thermal insulation of the room;
- protection from groundwater;
- soundproofing in the house;
- prevent the accumulation of water vapor inside the floor;
- provide comfortable living conditions.
What does a heated floor pie on the ground consist of?
By its design, a heated floor pie on the ground consists of several layers, each layer is laid in stages.

Depending on the design features floor and some other important factors, the underfloor heating layer on the ground may have a different composition and different thickness.
Advantages and disadvantages of underfloor heating
Advantages:

Flaws:
- heated floors, depending on the design features, can significantly reduce the height of the room;
- in the event of a malfunction of this system, it will be very difficult and expensive to dismantle the floor layers;
- sometimes it's quite a long and complicated procedure which it is advisable to perform during the construction of a house;
- need to take into account groundwater position.
Options for laying a heated floor pie
There are several options for laying a heated floor pie on the ground. This may depend on the level of groundwater flow, operational loads on the floor, the type of heated floor and some other factors. The above option can be considered the main one, where the main underlying layer is concrete layer. The pie is laid in another way, where the concrete layer is replaced by a sand cushion, its thickness is 100-150 mm. The sequence is the same, although ensuring a level base is much more difficult than with a concrete screed.
Depending on the thermal insulation materials, may also be various options warm floor pie. Choosing as insulation expanded polystyrene, the laying of the pie will be as follows:
Excellent insulation - mineral wool slabs , which have high density, are resistant to deformation and are durable. This material It is recommended to lay it in two layers. To reduce moisture absorption, they are treated with a water-repellent compound. Expanded clay is also used as an insulating layer in underfloor heating. It's quite simple and inexpensive option. When laying the cake using expanded clay, as insulation, you don’t have to lay additional waterproofing; expanded clay also replaces a layer of gravel and screed. There are a few more pretty effective ways laying a heated floor pie using some other thermal insulation materials.
Installation technology for underfloor heating

Floors installed on the ground are one of the most good options, which reduces the costs of their construction, saves time and labor costs. A well-equipped heated floor will provide warmth, comfort and coziness in the home for many years.
Externally similar to a slab foundation, the ground floor structure is less massive and cheaper to manufacture. Instead of two reinforcing mesh one wire one is used, stiffening ribs are needed only under heavy partitions. Ground flooring is not load-bearing structure, is created exclusively for the installation of floor coverings.

Layer-by-layer scheme of the floor on the ground.
IN classic scheme concrete floor, a regular and complete pie of several layers with insulation is laid on the ground:
- sand;
- geotextiles;
- layer of crushed stone 0.4 m;
- footing;
- waterproofing;
- insulation;
- a concrete screed with a wire mesh in its lower third, separated from the base, grillage or foundation by a damper tape around the perimeter.
Depending on the layout of the building, soil conditions and compliance with technology, the composition of the floor on the ground may vary. For example, sand and geotextiles are not needed on coarse sandy soil.

The footing can be replaced with a leveling layer of sand on top of crushed stone. To reduce the construction budget, the foundation is often not poured under the partitions, so stiffening ribs reinforced with reinforcement frames appear in the floors along the ground. In any case, before starting the production of a floating screed, it is necessary to prepare the existing foundation and plan it in a single horizontal level.
Preparing the base
Despite the fact that concrete is the strongest structural material, soil heaving and foundation subsidence are dangerous for screeds. Therefore, the arable layer in the building spot should be completely removed: black soil or gray soil is saturated with organic matter, which will rot, after which the entire pie will sag, unevenly in individual areas, cracks will open in the screed, or the concrete floor will collapse along the ground.
For communications, it is necessary to dig trenches with a slope, bring them outside the foundation and near the walls inside the house.

Wiring of engineering systems.
Important! The correct ground floor is made in the form of a floating screed, separated from the elements of foundations and plinths by a damper layer. It is forbidden to rest the slab on protruding parts of these structures.
Separating layer
To avoid mutual mixing of the layers of the floor pie on the ground with the soil of the base, the pit is lined non-woven material(geotextile or dornite). The edges of the separating layer web are launched at lateral surface and pressed against a brick, wall blocks. Additional function geotextile is to prevent weed roots from growing through a concrete floor on the ground during operation.
Advice! Geotextiles with a density of 100 g/m2 or more can be laid under a floating screed, since the structure is considered not responsible, unlike slab foundations, which will require needle-punched material with a density of 200 g/m 2 or more.
Substrate
The concrete floor layer on the ground must rest on a hard layer to avoid soil subsidence. Therefore, depending on the ground conditions, non-metallic materials are used:

Natural soil (coarse sand or gravelly soil) is less often used. If the developer still has expanded clay after dismantling the building or this material is cheaper in the region than crushed stone, this material is also suitable as an underlying layer.

Advice! A prerequisite is high-quality compaction of every 15 cm of the underlying layer with a vibrating plate or manual tamper. It is not recommended to spill sand with water; the material should be moistened with a watering can before backfilling and compaction.
Footing
The classic floor pie on concrete soil includes a concrete screed made from a thin B7.5 mixture. It is necessary to solve several problems:

However, to reduce the construction budget, the concrete base is replaced with other technologies:

Important! The footing is not reinforced, but is necessarily separated from the elements of the foundation or plinth along the perimeter by a damping layer (pieces of polystyrene foam on an edge or a special tape).
Waterproofing and insulation
The next step is to insulate the cake from moisture, prevent heat loss in the floors and retain geothermal heat under the building. For this, waterproofing and insulation are used. Their relative position inside the structure pie is as follows:

The main mistake developers make is laying a vapor barrier over expanded polystyrene:
- the air temperature in the room is always higher than in the ground under the screed (true for heated rooms);
- therefore, when laying flooring that does not have vapor barrier properties (floorboards, parquet, cork covering), the direction of steam will always be from top to bottom;
- the vapor barrier membrane will accumulate moisture on the surface, inside the cake, at the insulation/concrete interface;
- the screed will collapse and the wire mesh inside will corrode.
Apart from an unreasonable increase in the construction budget, this scheme does not provide any advantages. The accumulation of harmful gas - radon under the floors on the ground is impossible, since there is no underground in this design.
The following materials can be used as waterproofing:
- built-up rolls - Technonikol, Gidrostekloizol, Bikrost or roofing felt;
- film - made of polyvinyl chloride or polyethylene;
- membranes – have high density and strength, can be laid without making a concrete base.
- Admix mixture - an additive is added to concrete during mixing, the structural material becomes moisture-proof;
- Penetron - the floor on the ground is processed AFTER concreting, the effect is similar to the previous one.
For these waterproofing materials no need for a footing either.
Of all existing insulation materials the best option for the floor on the ground, high-density extruded polystyrene foam of the XPS or EPS grades (for example, Penoplex) is used. The thickness of the layer depends on the climate of the operating region, ranging from 5 to 20 cm. The sheets are laid with mixing joints in adjacent rows, large gaps are filled with polyurethane foam with similar properties.
Damper layer
Floors on the ground are prohibited from being rigidly connected to the elements of the plinth or foundation, so along the perimeter it is necessary to install polystyrene foam strips on the edge, pressing them against the vertical enclosing structures. However, more often a special damping tape made of latex, rubber or foamed polymers with an adhesive layer is glued to the walls.

Important! The height of the cutting layer should be slightly higher than the thickness of the floating screed. After the concrete has hardened, the material is cut off with a knife, the junction points are decorated with plinths after laying the floor covering.
Floating screed
The main nuances of concreting a floor on the ground are:
- It is recommended to fill in one step;
- areas larger than 50 m2 (relevant for studio rooms, sheds and garages) should be divided special corner to create expansion joints;
- internal load-bearing walls and heavy partitions must be erected on a separate foundation;
- partitions made of gypsum plasterboard/gypsum plasterboard must be partially erected so that when the screed dries, moisture is not absorbed into the plasterboard or gypsum fiber sheet, destroying these materials;
- It is preferable to pour along plaster beacons or profiles for gypsum plasterboard systems installed in a single horizontal level on quick-drying putty solutions;
- screed thickness 5 - 20 cm, depending on operational loads and the planned floor covering, as well as the need to install underfloor heating pipes.

Partial construction of plasterboard partitions is carried out using the following technology:
- installation of racks and horizontal jumpers;
- covering them at the joints of the floor on the ground with strips of plasterboard 10–20 cm high along the entire length.
For flooring on the ground, you can use ready-mixed concrete B12.5 and higher; the filler is gravel, dolomite or granite crushed stone. Reinforcement of the screed is carried out in lower level wire mesh.
Important! If the technology is broken, heavy partitions are planned to be supported on a screed; in the places where they pass, stiffening ribs are needed, which are created by analogy with the USHP slab (insulated Swedish floating foundation slab).
Floor reinforcement on the ground
The industry produces welded wire mesh BP in accordance with GOST 8478 from 5 mm wire with a square cell of 10 - 20 cm. Do-it-yourself knitting on site is more expensive due to high flow knitting wire and increased labor intensity. The grids are laid using the following technology:

Unlike reinforcing mesh, wire cards have much less rigidity; walking on them when laying the mixture is strictly prohibited. Therefore, the following methods are used:
- ladders - halves of bricks are placed in the mesh cells, on which boards rest, which are moved along with spacers as the structure is ready;
- “paths” - concrete is piled from the entrance of the room to the far corner, after which you can walk along these paths without shifting the grid.
IN small rooms Typically, grid maps of appropriate size are used. If the room has a complex configuration, additional pieces need to be cut. In this case and when reinforcing large areas, the overlap of cards/rolls is at least one cell.
Stiffening ribs under the partitions
To create stiffening ribs under the partitions, intermittent laying of extruded polystyrene foam or its top layer is used. The resulting voids are filled with reinforcement cages from square clamps (smooth reinforcement 4 – 6 mm) and longitudinal rods (“corrugated” 8 – 12 mm).

Heated floor contours
To reduce energy consumption in the heating boiler and increase living comfort, heated floors are used. Their contours can be embedded in the screed by laying the pipes directly on the reinforcing mesh.

To connect to the collectors, the underfloor heating pipes are routed outside near the wall. In this place they must be covered with damper tape. Similar technology expansion joint necessary for all communications passing through the screed (heating risers, hot water supply/hot water supply).
Thus, the composition of the floor on the ground can be modified depending on the construction budget and specific operational and soil conditions.
Advice! If you need repairmen, there is a very convenient service for selecting them. Just submit in the form below detailed description work that needs to be done and you will receive offers by email with prices from construction crews and companies. You can see reviews about each of them and photographs with examples of work. It's FREE and there's no obligation.
When building a house, the question of installing a floor in the basement arises. This type of do-it-yourself work has its own characteristics, so before you make concrete floors on the ground yourself in a private house, you need to study some of the features of the event and the technology for performing the work.
Application area
The installation of floors in the basement is limited by several factors, such as:
- foundation (its type);
- ground water level;
- purpose of the room.
Most often, basements have buildings built on supports such as tape and slab, but when used monolithic slab, it serves as a ceiling and the installation of a floor on the ground is not required. The pie is made as for an interfloor ceiling, with the only difference being that they pay attention to the purpose of the room and, based on this, take measures to insulate the structure. Floors on the ground are made using strip foundation made of concrete.
Floor installation in the basement
The groundwater level is essential. If it is high enough, there is a possibility of flooding of the room (especially in spring period), therefore it is better to abandon the arrangement of exploitable areas in the basement.
The design of the floor depends on the purpose of the basement floor.
If it is unheated, it is enough to leave a rough version - compacted sand. If the purpose changes, you can always make a full-fledged floor pie. If you plan to install a strip foundation in a private house ground floor or a heated basement will require another design that can prevent heat leakage into the ground. To do this, they arrange a full-fledged concrete floor pie with insulation.


From this we can conclude that the need to use technology arises when the following conditions are simultaneously met:
- strip foundation;
- low groundwater level;
- heated and operated volume of the basement, basement or first floor in the absence of the first two.
The installation of floors on the ground for the first floor is required in the absence of a basement and, accordingly, a basement floor, which in a normal situation serves as a floor. The question is also relevant for outbuildings and garages.
Technology and instructions
The technology for manufacturing a concrete floor slab in the basement can be divided into several stages:
- preparatory activities;
- insulation;
- subfloor ( cement strainer).
We can stop there. If the earth serves instead of a basement floor, and it is planned to install a floor on the first floor, wooden floors are laid on the ground. To achieve this, all the above activities are carried out, and next step becomes wood flooring.
Preparatory stage
It is designed to prepare the soil for the insulated screed to be laid on it. In this case, do the work with your own hands in the following order:
- Marking. Determine the floor level of the basement or first floor. This mark will be the top of the floor structure. That is, exactly the surface on which they will walk. The vertical reference point will be the entrance threshold in a private house or basement. The pre-designed thickness of the concrete slab layers is subtracted from this mark. After this, two marks are made on the strip foundation along the entire perimeter: the bottom and top of the floor. Marking can be done with a level ( laser level), this will significantly increase accuracy and speed up the process.
- Preparing the base for further work . The base for the concrete floor slab in the basement will be compacted soil. It is compacted by vibration or using various cargoes. For the first one you need a vibrating platform. The second option assumes the presence of a massive device with a wide bottom surface (for example, a log with a board nailed to it).
- Preparation. Preparation for a concrete slab with a strip foundation consists of backfilling over the entire area of the basement. For its manufacture, materials such as gravel or sand can be used. It is important to note that sand for making the base should be taken of a coarse or medium fraction; the use of fine sand is unacceptable. The thickness of the backfill is on average 30-50 cm, depending on the heaving of the base soil. The function of the cushion is drainage and uniform transfer of load to the underlying layers. Laying is done in layers with compaction. The compaction methods are the same as in the previous paragraph. For sand, you can also use water pouring. The surface of the concrete slab pad is leveled and the next stage is started.
- Very important part work on a strip foundation involves the installation of reliable waterproofing. The material used is ordinary polyethylene film. high density or more modern waterproofing membranes. The screed is poured after the waterproofing film is laid out over the entire floor area in the basement, overlapping the walls above the level of the finished floor. All joints of the material are overlapped and taped. Manufacturers produce special connecting tapes for membranes.


After this, the base is prepared for further stages of work.
Insulation
 Floor insulation according to concrete base penoplex
 Important point with a heated basement or ground floor floor. To do the work yourself, you will need to choose the type of insulation and its thickness. It is important that the insulation of the slab has high strength and rigidity and does not wrinkle under load. Otherwise, the cement screed on top of it will crack, and the surface of the slab of the entire floor pie will become uneven.
Thermal insulation can be installed using the following materials:
- expanded clay gravel (the required thickness depends on the climatic region, on average 30-50 cm, has low thermal insulation properties);
- polystyrene foam (thickness approximately 100 mm; foam plastic will require the installation of a particularly strong reinforced screed, since it is not very durable);
- extruded polystyrene foam (penoplex, thickness like foam plastic - 100 mm, has increased strength and moisture resistance).
For increase waterproofing characteristics and evenness of the base is strongly recommended before laying insulation (under waterproofing film) pour a layer of “skinny” loaf (brand B7.5). No reinforcement is performed. A concrete footing thickness of 6-10 cm is sufficient.
Subfloor
 Installation of cement-sand screed for subfloor
 As of this coverage will serve in a private home cement-sand screed. It is performed on top of thermal insulation material.
To increase the strength characteristics of the slabs, reinforcement is made. A mesh of rods with a diameter of 3-4 mm with a cell size of 100 mm is suitable as materials for reinforcing work. You can use both steel and plastic fittings, but when high loads are likely, preference is given to proven steel.
Pouring the floor involves laying the mesh directly on the insulation or on supports, it all depends on the thickness of the concrete layer. If the slab is significantly thick, it is recommended to place the grids on supports.
The rough layer is poured from concrete of a higher strength grade than the preparation for insulation. A high grade of flooring in a residential building is not required; B20 concrete can be used to ensure particularly durable flooring. But on average B15 is enough. The screed is required to be at least 5 centimeters thick, but it all depends on the characteristics of the soil. If the foundation is installed on highly heaving foundations with poor characteristics, the screed thickens.
To ensure evenness of the filling, special beacons are used. They are leveled to the level of the floor mark (the top one on the foundation, made during the preparatory stage).
Completion of work
When making a floor on the ground in a residential building, it is important to remember the curing time of the concrete mixture. The cement-sand mortar gains full strength within 4 weeks (may change with strong changes in humidity and temperature). After pouring, wait for the hardening time and begin installing the clean floor (floor covering). If the foundation limits a room that will be used for household needs, then a clean floor may not be installed.