Installation of tongue-and-groove slabs with your own hands. Installation of tongue-and-groove partitions: types of slabs and step-by-step installation instructions
Partitions made from tongue-and-groove slabs have been used in construction for a long time. But my new life they received relatively recently, when life became better, citizens began to carry out repairs and redevelopment of apartments and houses using modern materials. The latter did not always turn out to be easy to use, especially for inexperienced craftsmen who did the repairs with their own hands. In this regard, tongue-and-groove slabs are better because their installation is a simple process.
Partitions made of tongue-and-groove panels
This wall material for the construction of partitions there are two types of building materials on the market: gypsum and silicate. The first is pure gypsum with the addition of plasticizers. The second is lime mixed with sand, formed into slabs and dried in an autoclave under high temperatures.
The dimensions of the gypsum tongue-and-groove slabs are 500x667x80 mm. They have higher thermal insulation properties and good noise insulation qualities. Standard dimensions of silicate slabs are 250x500x70 mm. They are inferior in the two parameters indicated above, but in terms of strength they are much better. In addition, silicate material withstands moisture loads well. Although we must pay tribute to the manufacturers of gypsum panels, who today offer moisture-resistant boards painted greenish. So you can't go wrong when choosing. The dimensions of the hydrophobized blocks are 300x900x80 mm.
Let us add that silicate tongue-and-groove blocks are produced in different thicknesses, which is convenient in terms of selecting material for the partition relative to the strength of the structure and such indicators as load bearing capacity designs. Thickness options: 70, 88, 115 mm.
In all other respects, the two varieties have almost identical characteristics:
- don't rot,
- are not deformed,
- don't burn
- do not emit substances harmful to humans,
- have a smooth surface.

Tongue-and-groove slabs
Installation technology
It is necessary to immediately make a reservation that the installation of tongue-and-groove slabs must begin after the construction work associated with the alignment of load-bearing structures: walls, floors, and ceilings has been completed. To carry out the work you will have to prepare.
Materials:
- tongue-and-groove slabs,
- gypsum glue,
- primer,
- brackets for attaching material to walls and floors,
- screws and dowels.
Tools:
- spatulas,
- building level,
- container for diluting the adhesive composition,
- construction mixer,
- hacksaw,
- screwdriver
Preparatory stage
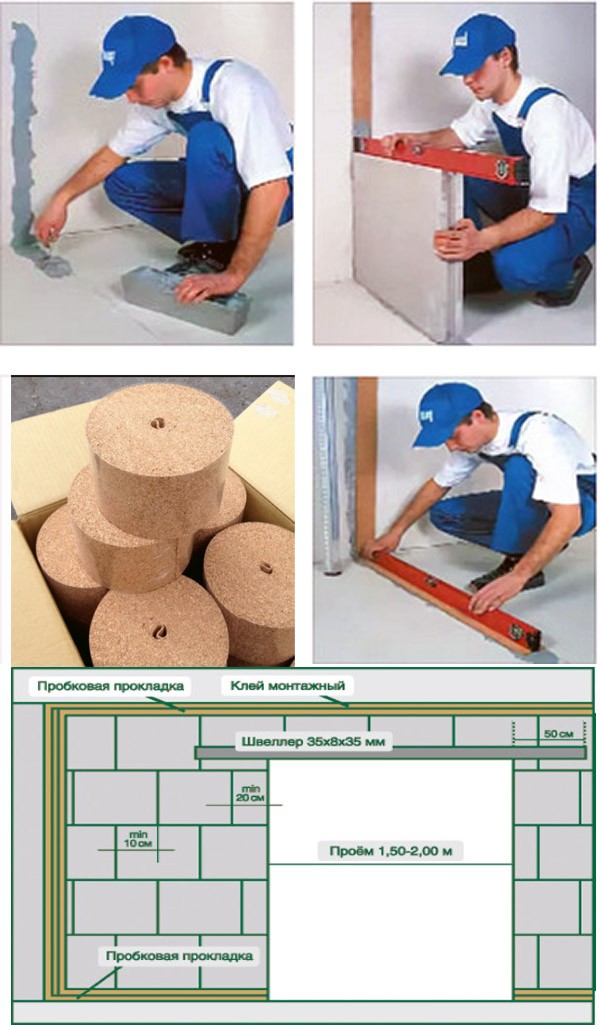
In addition to preparation necessary materials and tools you need to prepare the floor. It is already leveled, all that remains is to mark it with the location of the future partition, remove dust and prime it. This is always done regardless of whether the floor is concrete or wooden.
Regarding the marking, it can be carried out directly on the surface of the floor base and along the walls, drawing parallel lines with a marker or pencil that determine the thickness of the tongue-and-groove slab. Additionally, you can stretch a strong thread on one side at a height of 30 cm, which will show the plane of the installation boundary of the first row of slab material.
Installation process
The main requirement for the installation of tongue-and-groove slabs is to correctly lay the first row, taking into account the horizontal and vertical arrangement each slab, which will form the basis for the location of the partition. But you have to start by preparing the glue. It is simply poured in portions into a bucket of water, stirring construction mixer. The proportions are indicated on the packaging of the adhesive mixture.

Preparation of the adhesive composition exactly according to the recipe indicated on the bag
Apply the adhesive solution in small strokes using a small spatula to the wall and floor where the first tongue-and-groove slab is installed.

Applying adhesive to walls and floors where slabs are installed
Now you can install the slab with the ridge up, checking it for horizontal installation using building level. The panel is pressed against the wall and the floor. Rivne floor base– guarantee of accurate horizontal alignment of the panel.

Checking the tongue-and-groove slab for horizontalness using a level
The end of the plate is treated with glue. It is also applied to the floor for installation of the second element for laying the partition.

The end of the first plate is coated with glue
Both slabs are checked by a long rule for evenness in the same plane. This must be done, even if slab material strictly fits along the marked lines. A slight misalignment can lead to large discrepancies at the end of the septum. So it’s better to spend a couple of minutes checking it than to redo a large amount of work.

The slabs are checked against each other using a long rule
This is how the first row of the partition is laid from tongue-and-groove slabs with the installation of all elements along the intended lines. After which you can collect the next rows. Installation of the second row begins with a solid slab, which is installed so that subsequently the joints between the panels do not coincide in different rows. That is, the installation is carried out with an offset, preferably half a panel.

The top plate is laid in the second row so that the joint of the two elements of the first row falls in the middle
The space between the wall and the partition is filled with a piece of tongue-and-groove plate, which is cut out of a single piece with a hacksaw. You just need to accurately measure the size for installation.

Tongue-and-groove slabs can be easily cut with a regular hacksaw
To strengthen the structure, it is recommended that the slabs located near the walls and resting on the floor base be secured to load-bearing structures metal mounting angles (brackets), screws and dowels. To do this, you need to place the corner, for example, against the wall, attach it to the plate with one self-tapping screw and a screwdriver, and with the other to the wall surface.

Fastening the tongue-and-groove plate to the wall using a mounting angle and self-tapping screws
Construction of a doorway
Installation of partitions made of tongue-and-groove slabs also involves the construction of a doorway. To do this, at the marking stage, it is necessary to indicate the location of the opening. It is up to this point that the partition will need to be assembled: on one side or on both. The main task after assembly is to mark and form the top row located above the doorway. To do this, grooves must be made in the two erected walls for the embedded beams (lintels). They are simply cut out with a hacksaw.

Groove for embedded beam
The jumper is placed on the adhesive composition, and the groove is completely filled with it. It is important at the stage of marking the grooves to align them so that the embedded part lies horizontally in them. After which you can proceed to the installation of the slabs. Everything is the same here, the beam end of the adjacent wall is coated with glue, after which the tongue-and-groove slabs are installed at their destination.

Formation of a doorway by installing tongue-and-groove slabs on a foundation beam
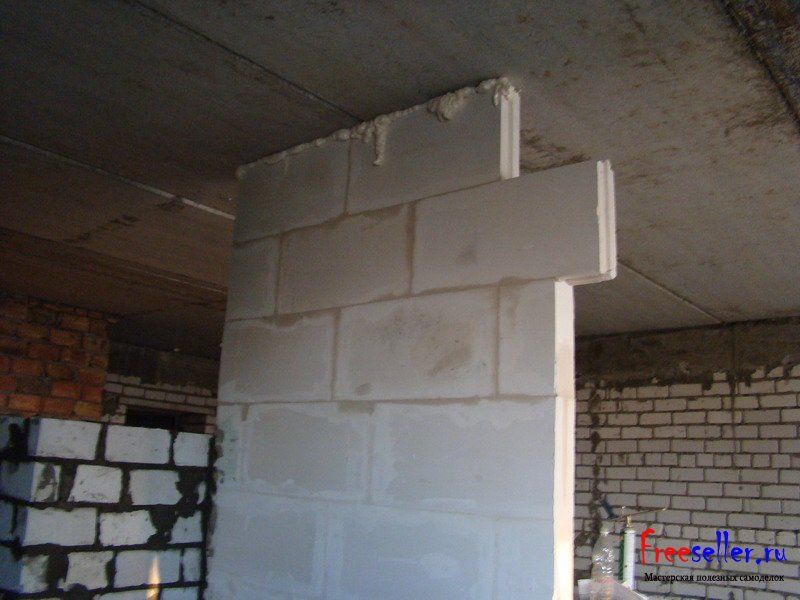
When the doorway is finished, you can move on to the last installation stage - sealing the gap between the partition made of tongue-and-groove slabs and the ceiling. Usually the gap is not very large, so the easiest option is to foam it polyurethane foam. You can use adhesive or putty.

Filling the gap between the partition and the ceiling with polyurethane foam
If you need to bring a wall made of tongue-and-groove slabs exactly to the ceiling and then finishing, then on one side the gap is covered plaster mortar, on the other side it is filled with foam, and covered with plaster there. Simple foaming is used only when the room, divided by a partition, will be decorated with a suspended or suspended ceiling structure.
A partition made of tongue-and-groove slabs is a flat surface that does not need to be leveled with plaster. It is prepared with a small layer of putty, which gives the surface maximum smoothness.
Nuances of the installation process
Any partition requires the presence of corners: external and internal. They are subject to certain loads, and there are always complaints about them in terms of finishing. Therefore, it is recommended to cover the external corners with perforated plastic corner profiles, which will not only create the evenness of the external corner, but will also be a kind of protection against chipping during minor impacts.
Use a corner measuring 30x30 mm.
- A layer of putty is applied to the corner of the partition doorway.
- The corner is pressed into the solution until it stops.
- Another layer of putty is applied on top until completely leveled.
To carry out this operation, it is recommended to use an angle spatula. If the length of one corner is not enough, the missing section is cut 3-5 cm longer than the required length. Because the two are dockable plastic element overlapped.
The problem with internal corners is cracks. There is only one way to fight them - with sickle tape.
- First, a layer of putty is applied to the corner.
- A serpyanka is immediately laid over the not dried solution, which is pressed until it stops.
- Top leveling putty layer.
Self-adhesive tapes can be used to seal internal corners. When using them, you don’t have to use putty.
If the partitions are constructed from several walls, which together form a broken structure at right angles, then they must be joined together not only with the help of an adhesive composition, but also with the help of the tongue-and-groove blocks themselves. They are installed in perpendicular planes Each other. To do this, the ridge of the lower panels is cut to fit the grooves of the upper ones so that the upper blocks fit tightly onto the lower ones.

Rules for joining tongue-and-groove panels at the junction of two walls
If a partition made of tongue-and-groove blocks is assembled onto concrete floor, then there is no need to attach it to the base using metal brackets. Adhesive composition- guarantee of strong fastening. If the floor is wooden, then you cannot do without mounting angles. In this case, you don’t even need to use glue between the blocks and the floor.
Be sure to watch the video:
It was time to erect partitions. Let's start laying the first row. To do this, you will need prepared slabs with a cut tenon. Installing a tongue-and-groove slab with the tongue-and-groove up or tongue-and-groove up is not important, but installation with the tongue-and-groove up is recommended; in this case, it is more convenient to apply the bonding solution to the end of the slab, and a high-quality layer of mortar is obtained, which ensures a strong connection between the tongue-and-groove slabs.
The prepared binder solution is applied to an elastic tape or to the floor surface if the partitions are installed without a soundproofing gasket. The recommended length of the applied mortar (A) with a slab length of 667 mm can be 680...700 mm. When starting the laying of the corner of the partition from PGP (node No. 1), the binding solution is applied immediately under the installation of two slabs (B and C).
Installation procedure for partition corner slabs:
- Installation of the plate (B). The slab is oriented according to the markings and the metrostat. The adjustment of the slab, as well as its horizontal alignment, is carried out by tapping its end with a rubber hammer, as shown in footnote 1.
- Installing the slab (B) with a sawn tenon. A binding solution is applied to the end of the slab, with which it will adjoin the slab (B), the slab is set in place and the slabs are tightly connected to each other (footnote 2). All directions of blows with a rubber hammer are indicated by arrows.
After the slabs are installed, remove the excess binder solution and begin to install a nodal connection of the slabs at the site where the partitions are separated (node No. 2).

The connection of gypsum tongue-and-groove slabs at the point of perpendicular connection of the partitions can be carried out as follows. From the corner of the partition (plate B), measure the distance for constructing a doorway, for example, 900 mm wide, and install the slab (D) after cutting off the tenon using a hacksaw.
Afterwards, a solution is applied to the end of the slab and the slab (D) is installed. The installation of these slabs is carried out according to markings and in addition to controlling the horizontal and vertical installation of the slabs, it is necessary to control the internal angle of connection of these slabs, which should be equal to 90°.
There is another way to perpendicularly connect partitions from PGP - without serial ligation. With this method of perpendicular connection of partitions, partitions (A) are first erected, separating total area bathroom (if we take the example considered in our case), and only after that a partition (B) is erected dividing the bathroom into two separate rooms. This partition is fastened without ligating the rows, by an end connection through a binding solution (B) and additional fastening steel corners (D) to the wall of the main partition.

Now it is necessary to install the slabs of the lower row of the partition, which is adjacent to one of the walls of the house. To do this, first install a plate (F), which is directly adjacent to the surface load-bearing wall Houses. The slab can be installed either with the groove against the wall or with the end where the tenon was. A solution is applied to the end of the slab and pressed with this end against the wall of the house, sealing the joint by tapping the end of the slab with a rubber hammer:
1.jpg)
After the slab is installed and leveled, it is fixed to the wall using a steel angle (rigid connection). How to attach the slab to the wall is shown in footnote 3. Throughout the entire work on installing the lower row of partitions, it is necessary to control the horizontal and vertical position of the row of PGP using a building level.
Then continue laying the slabs of the first row to the location of the second doorway. If a doorway with a width of 900 mm is required, and when installing the last slab (3) the distance between it and the slab (E) is less than necessary, then in this case the slab (3) is cut, but it is not recommended to leave the trim for installation in place of the doorway less than 250 mm.
If there is a need to zone a room, then one of the options for creating a partition is to use tongue-and-groove slabs.
It's relatively new construction material, which allows you to simplify the construction of the partition as much as possible, its installation is simple and quick.
The specified building material has the form monolithic slabs, which have accurate geometric parameters, they are connected to each other using a tongue-and-groove lock. For the manufacture of such slabs, building gypsum is used, they can be regular or moisture resistant.
 Since building gypsum is used to create such slabs, they can “breathe”, do not burn, and do not emit harmful substances, have no odor, therefore are ideal for construction interior partitions and decorative for.
Standard plate size 667x500x80 mm, they have area 0.333 cm2, weight about 29 kg.
To create one square meter plaster partition You only need 3 slabs, which makes installation of partitions simple and quick. Unlike, there is no need to mount the frame and fillerDignity of this material and the fact that you get a flat and smooth surface, you just need to seal the seams and you can glue wallpaper, paint or lay tiles.
Installation
Before installing the slab partition, you need to check the condition of the base. It must be strong, horizontal and motionless. If old screed does not meet these requirements, they make a new one. The installation technology resembles
Differences in the height of the base should not exceed 1 cm; if this is not achieved, then it should be leveled.
To install a tongue-and-groove partition, you need to have the following tools and materials:
- tongue-and-groove slabs;
- adhesive composition;
- gaskets, they can be felt or cork;
- putty;
- construction mixer or drill with a special attachment;
- hacksaw;
- level;
- plumb line;
- rule;
- measuring instruments;
- rubber hammer;
- putty knife;
- wedges
 Before starting the installation of slabs, the base must be cleared of debris, dust, after which it is covered with a layer of primer.
 Marking the future partition can be done after the primer layer has dried.
Mark the doors, and to facilitate execution installation work, you can tighten the cord.
 Markings are applied to the walls and ceiling, for which a plumb line and level are used.
Now you can prepare the solution, to do this, fill the container with water and gradually add the dry mixture, constantly mix everything well, do this with a mixer or a drill with a special attachment.  The composition should sit for a few minutes and you can begin installing the slabs.
You need to prepare the glue in small portions so that you have enough for 30-40 minutes of work.
You can lay the slabs directly on the floor, then you will have a rigid fastening. The glue is carefully applied to horizontal and vertical surfaces, on average to install 1m2 of wall you will need 1.5-2 kg of glue.
When using the second method, the slabs are laid on a special cork pad, which increases the sound insulation of the walls. For this use tape 7.5 cm wide, which is glued along the perimeter of the partition.
 The gasket is mounted with glue, its horizontalness is checked and it must be given 20-30 minutes so that it is well fixed.
The slabs can be laid either up or down with the groove, but it is more convenient to place it up, since it is easier to apply glue in the groove than on the ridge.
In this case, on all slabs used for installation of the first row, it is necessary to remove the ridge; do this with a chisel or hacksaw, and then level the plane with a plane.
Laying slabs is carried out similarly to laying brick or cinder block: glue is applied to the base, the slab is installed, pressed down with a rubber hammer and its horizontalness is checked. If leveling is necessary, wedges can be used.
When installing the next rows, glue must be applied to both the horizontal and lateral sides so that the slabs are securely connected on all sides. 
The seam thickness is about 2 mm, all excess glue that has protruded beyond the slab is removed using a spatula.
For wiring, grooves are made in such partitions, and to install sockets, holes are drilled with a special attachment mounted on an electric drill.
 If pipes need to be installed large diameter, Then install a double partition.
Soundproofing device
Manufacturers indicate that sound insulation coefficient standard tongue-and-groove slab 80 mm thick, 43 dB, which is a sufficient indicator to create comfortable conditions in the room.
In practice, this figure is often lower, therefore, to increase the sound insulation characteristics of such a structure, it is recommended to carry out additional sound insulation.
 For this purpose, materials that have good sound insulation characteristics are used. Special membranes Can be glued directly to the wall surface.
To protect the room from noise as much as possible, such membranes glue on both sides of the wall. This allows you to increase the sound insulation coefficient up to 30 dB.
If you have the opportunity to create wide walls, That create a double partition Insulation is laid from tongue-and-groove blocks and between the walls, usually mineral wool.
This method allows you to obtain high sound insulation characteristics and reliably protect the room from extraneous noise.
Building a strong and reliable gypsum partition with your own hands requires experience in construction work; if you don’t have it, follow the following expert advice:
- during the installation of partitions made of gypsum boards, no need to rush. Some people indicate that a partition from tongue-and-groove slabs can be made in a day. It is better to let the first row harden well, and then move on to installing the next rows;
- Please note that when cutting slabs Quite a lot of dust is generated, so be prepared to have something to clean it with;
- the strength of the material allows you to hang shelves or a TV on such a wall, but they can no longer bear the weight of the cabinet.
Conclusion
If the soundproofing characteristics of the wall are very important to you, then they can be increased by creating double partitions, between which insulation is laid or the wall can be covered with sound-absorbing materials.
Follow the instructions, and you will be able to create an interior partition in your house with your own hands, which will have high strength and soundproofing characteristics. Or perform decorative
Useful video
See the video for installation technology for VOLMA tongue-and-groove slabs:
In contact with
Tongue-and-groove blocks are a building material that is used for installing interior partitions. They are made from gypsum by low-temperature processing of natural gypsum, which is why their second name is gypsum slabs. This building material is characterized by high dimensional accuracy.
Types of tongue-and-groove blocks
There are ordinary and moisture-resistant gypsum boards. The gypsum board groove can have a trapezoidal or rectangular shape. There are solid and hollow plasterboards. For the construction of walls indoors with dry or normal humidity conditions (apartments, hotels, offices, schools, industrial building) use ordinary gypsum boards, and for rooms with high humidity - moisture-resistant gypsum boards. Moisture-resistant gypsum boards contain hydrophobic additives.
Gypsum slabs are a very affordable building material. And thanks high quality their front surface does not need to spend a lot of money on finishing work. A plasterboard wall can be covered with wallpaper, painted or tiled with ceramic tiles.
Installation from gypsum is very simple and easy. And thanks to the low price, the use of gypsum boards provides a significant advantage over construction interior walls made of brick in apartments or dachas. Another advantage of gypsum boards is their resistance to fire.
How to install tongue-and-groove blocks
In order to build one square meter partitions, you will need 5.5 gypsum blocks and approximately 1.5 kg of glue. In order to enhance sound insulation in the place where the partition adjoins the wall, use a cork gasket. If there are no strict requirements for sound insulation, then the blocks can be mounted to the enclosing structures directly on the adhesive mortar.
First, the surface on which the partition from tongue-and-groove blocks will be built is cleaned of dust and dirt. It is built before the finished floor is installed. Then markings are made - using a cord or laser level. The marks are transferred to the walls using a plumb line. If the floor is uneven, you need to apply a leveling layer. Styling can be done no earlier than in a day.
Before starting installation, you need to prepare an adhesive solution, which was recommended by the gypsum board manufacturer (usually it is quite affordable). To do this, pour the dry mixture into a bucket with required quantity water. Then mix thoroughly and leave for 2-3 minutes. It is necessary to take into account that the viability of the composition is only 1 hour, and the glue consumption per 1 m2 of masonry is only 1.5 kg.
Foreman's advice: When mixing glue, use only a clean container and clean cold water.
In order for the blocks in the masonry to adhere better, they must be laid with the groove facing up. To do this, the ridge is removed from the tongue-and-groove blocks of the lowest row of masonry. The laying of the first row is done according to the level and carefully leveled in one plane. When laying the next rows, the glue is applied and distributed along the grooves of the already laid row. The vertical seam of each tongue-and-groove masonry block also needs to be filled adhesive solution. The thickness of the seams should not exceed 2 mm. During installation, the gypsum blocks in the masonry are settled using a rubber hammer. Laying is done in staggered steps - at least a third of the length. Additional elements easily obtained using a hand stove. The elements of the last row of masonry are sawn at an angle so that there are no voids left between the partition and the ceiling.


Foreman's advice: if there are potholes on the tongue-and-groove blocks, they need to be filled with putty.
If you need to make an opening in the partition, the width of which does not exceed 800 mm, and above which there is only one row of masonry, then it is not necessary to install a lintel. In this case, it will be enough to install and leave the support in the opening until the glue dries.
If the width of the opening exceeds 800 mm, then a metal or wooden lintel must be installed above the opening. To give external corners structures have additional rigidity, they need to be strengthened metal profile. Internal corners can be strengthened with reinforcing tape.

Installation of gypsum boards can be carried out not only by a professional, but also by a novice builder. At the same time, an experienced worker can make 20 m2 of wall per shift.
Foreman's advice: when attaching objects that exert a light load (mirrors or bookshelves), you can use wedging corrosion-resistant dowels. When installing wall-mounted cabinets or sanitary fixtures, it is necessary to use corrosion-resistant bolts that go right through the wall.
Gypsum slabs are an affordable, cost-effective building material for building walls indoors. To build a wall from gypsum boards, you don’t need special knowledge, you just need to look detailed video laying gypsum blocks.
Video
Tongue-and-groove slabs in Russia are produced by 3 enterprises: KNAUF, Volma, and Samara Forman.
The tongue-and-groove slabs themselves can be:
Full-bodied and empty.
Regular white for the construction of interior partitions), and with water-repellent additives (green for the construction of partitions in bathrooms and other rooms with high humidity).
Main dimensions of tongue-and-groove slabs:
Forman produces slabs in the following sizes:
600x300x100 mm;
- 600x300x80 mm.
Volma and Knauf:
667*500*80;
- 667*500*10.
To install tongue-and-groove slabs you will need
Necessary materials:
Tongue-and-groove slabs;
- Straight hangers for drywall;
- Dowel nails or anchor wedges;
- Assembly adhesive for gypsum boards or tongue-and-groove boards, for example fugenfuller, forman41 or any other;
- Cement mortar, can be used ready mixture or mix cement with sand in a ratio of 1 to 3;
- Pistol mounting foam.
Required tools:
Level;
- Mallet or hammer;
- Hacksaw;
- Rotary hammer with drill bit 6;
- Roulette;
- 2 spatulas;
- Foam gun.
Installation technology of tongue-and-groove slabs
Tie and mark the future partition, and lay the first row of slabs on a bed of cement-sand mortar; the side joints are glued together using gypsum glue, while making sure to control verticality and horizontality.
In general, laying out the first row of slabs is the most labor-intensive task.

Starting from the first row, we fasten the slab to the wall using a direct hanger, and then shoot direct hangers across the row.

On the second and subsequent rows, apply gypsum glue to the horizontal and vertical parts of the block, place the slab, and press it against the previous slab and row using a hammer with a block or a rubber mallet, do not forget to control the horizontal and vertical.
We cut the slabs using a hacksaw.


So, row by row, we build a partition from tongue-and-groove slabs to the top (At the same time, do not forget to bandage the seams, as on a regular brickwork, preferably at least 1/3 of the slab.
To install the last row, the tongue-and-groove slab must be cut into several centimeters so that it fits into the groove and can be pressed against the previous rows. Subsequently, the resulting void is sealed with polyurethane foam.
Also, the slabs of the last row are attached with direct hangers to the ceiling through 1 block.


In some cases, a slab partition can be assembled without using lintels, but in our case we used a lintel. making it from a board from an old pallet.