Installation of Velux roof windows. Installing a roof window in a soft roof What is needed to install a roof window
A roof window is a very important part of the roof structure. Incorrect installation or weak waterproofing will negate all efforts to build a roof, jeopardizing a comfortable existence not only in attic floor, but also throughout the house.
That is why beginners take on self-installation Skylights are not recommended; it is better to contact specialists. For those who already have experience construction work, if you follow the instructions and the rules outlined below, this task will be completely within your power.
Set of tools
Before starting work home craftsman You should stock up on the following tools and materials:
- Hammer
- Plumb
- Nail puller
- Hacksaw
- Drill
- Screwdriver
- Construction stapler
- Level
- Marker
- Nails
- Self-tapping screws
- Edged board, the cross-section of which corresponds to the cross-section rafter leg
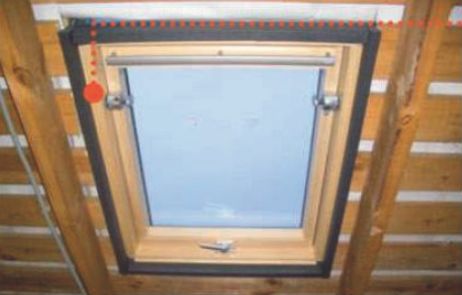
 Part of the tools for installing metal roof windows
 Installation location and window dimensions
Maximum allowed width dormer window should be 80 - 120 mm less than the opening between the rafters. If the rafter legs are located with a small step, install two windows in adjacent niches or through one.
The installation height of the window is determined based on the method of opening it and the angle of inclination of the roof. In steep roofs it is better to place it in the lower part, in flat roofs - in the upper part. Windows with bottom position fittings are installed at a height of 1200 - 1300 mm, with the top - at a height of 1000 - 1100 mm.
Work order
Preparing the opening
 The installation of a roof window should begin after the installation of the roofing pie, but before the interior decoration premises.
First of all, the boundaries of the future opening should be marked with a marker on waterproofing film. In this case, at least 40 mm should be retreated from each rafter leg, and if possible - 60 mm or more.
When the boundaries of the installation are drawn, 200 mm are retreated from them and only now a cutout is made. This leaves a 20cm margin on each side of the hole. It should be bent inside the room.
Securing the mounting beam
The mounting beam is made from the same board from which the roof rafters are made. It is attached between the rafters under the window opening, and the gap between the beam and the sheathing should be 80 - 100 mm.
The mounting beam must occupy a strictly horizontal position, so the correct installation is controlled using a building level.
After securing the timber to it using a stapler, the lower edge of the waterproofing film is nailed to it.
Frame installation
 Before you begin installing the frame, the side edges of the waterproofing film should be pulled out, and its upper edge should be stapled to the sheathing above the opening.
The frame is freed from the sash and frame, after which a section is nailed to its upper part with a stapler mineral wool insulation. A fragment of heat insulator intended for insulating the lower part of the window must be secured to the mounting beam. Now the frame can be installed in the opening, following the instructions provided by the manufacturer.
Tip: When installing the frame, leave the top brackets slightly loose. In the future, this will make it possible to correct its position.
After installing the frame, the insulation attached to the mounting beam must be pressed tightly against the opening and secured with a stapler.
Sash installation
 The procedure for installing and dismantling the window sash is described in detail in the instructions from the manufacturer.
After installing the sash in place, check how well it fits to the frame. Detected distortions are eliminated by adjusting the position of the frame, after which all brackets are securely fixed.
At the final stage, insulation is laid and secured on both sides of the opening, and the side fragments of waterproofing are nailed to the frame, removing excess material.
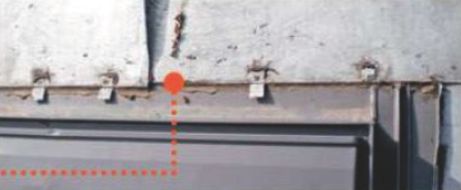
External waterproofing
 At the top of the window opening, the sheathing is removed so that a drainage gutter can be installed in the free space. Pre-cut roof waterproofing is placed under it. If everything is done correctly, then rainy weather water from the roof section located above the opening will flow from the waterproofing into the gutter without falling on the window.
Tip: use only those accessories that are designed specifically for your window model. Even minor inconsistencies, unnoticeable at first glance, can lead to leaks in the future.
The apron is attached to the frame with a stapler, then it is brought inside the attic and attached in the same way to the rafters, mounting beam and sheathing. The top edge of the waterproofing apron should be under the drainage gutter.
The finishing touch is to restore the roofing at the bottom of the window.
Salary setting
 Installation of the flashing begins with the installation of the lower corrugated apron, which is fastened around after that. Then the same apron is installed on top and only then on the sides. When everything is ready, the covers are attached to the window. All flashing elements should be attached to the sheathing and frame.
This operation largely depends on the design of the window and frame, so its implementation should be coordinated as closely as possible with the manufacturer’s instructions.
Tip: to seal the gaps between the frame and the opening, use only special roofing sealants. Conventional polyurethane foam quickly breaks down under the influence of UV radiation, thereby losing its waterproofing qualities.
Installation of slopes
 The circulation of warm air in the window area depends on the correct installation of slopes inside the attic.
The lower slope should be positioned vertically, that is, perpendicular to the floor. The top one is horizontal.
If the technology is violated, the window will not be blown with a stream of warm air, which will lead to the formation of condensation on the glass. After installation, the slopes should be properly insulated.
Advice: slope insulation should be quite effective; it is best to use good layer mineral wool. Novice craftsmen often underestimate this point, preferring to make do with materials such as penofol. This can also trigger the process of moisture condensation on the surface of the slopes.
As you can see, installing a roof window does not involve any highly complex operations. The main rules remain the same: thoroughness, accuracy, lack of haste and compliance with all points of the instructions. Stick to them, and your attic will always have enough light, warmth, and therefore comfort.
 After installing the roof window, you can move on to installing other elements. Mandatory. Because it is a significant element of the roof that provides roof ventilation.
 Next, it is necessary to install snow guards on the metal tiles. The installation process is described. Snow guards on the roof ensure safe snow removal. They are also necessary to prevent the roof from deforming under the mass of icy snow.
Video about installing a roof window in metal tiles
Two videos. The first shows the installation of a window in a finished roof, the second shows installation instructions step by step.
The attic floor can be made from a regular attic, but this will require the installation of attic windows, since without them the room will not be lit, it will not be possible to ventilate it, and it will not be used as a living space. It is not necessary to pay a lot of money for the work: you can always handle it yourself if you know the basic principles.
What calculations need to be made?
Before installing a roof window, you need to correctly calculate its dimensions and choose suitable model, otherwise you will simply waste your money and the window will not suit you. You need to choose a design, first of all, based on what material your roof is made of. You need to think about where the window will be located and at what angle. Typically, the window area is calculated based on the area of the room: for every 10 m² of floor there should be at least 1 m² of glazing.
It is worth considering that the higher the opening for the attic window is, the more light it will give. You should not place the window too high: it will not be convenient to use. The only exception is the roof, the angle of inclination of the sides is 15-20º.
If the roof has round slopes, it will look best and give good lighting windows installed 1-1.40 m from the floor. It is acceptable to place the window lower, for example, 80 cm from the bottom surface, but this is not always aesthetically appropriate. If it is higher than 1.9 m, it will be inconvenient to use. Put one big window or several small ones - this is a personal choice of the owner of the premises, it is worth noting that what more windows and the larger their area, the brighter the attic space will be.
Getting started, tools
If you want to install roof windows, DIY installation is quite possible. You will have to act according to the instructions:
- First of all, you need to prepare the window opening, then install the frame.
- Provide hydro- and thermal insulation.
- Build a drainage system.
- Set salary.
- Insert the glass unit.
- Install a vapor barrier.
- Install slopes.

To carry out the work you will need to have the following tools:
- Screwdriver or small drill.
- Set of self-tapping screws, nails.
- Beams and wooden slats.
- Building level.
- A circular saw.
- Insulation materials.
How to install?
Before installing a roof window with your own hands, you need to choose a suitable place for it, mark it for installation preparatory work. After the area has been outlined, you need to make holes in the roofing material using a drill. This is done with inside roofs. The holes are needed so that the material can be cut without damaging the rest of its parts. The hole is made using circular saw, the cut must first be made diagonally, cutting out triangles, and they are carefully pulled out and an opening is obtained. You cannot cut along the contour: you can damage the roofing material.

Distance from the bottom line of the window to the line of the roof covering
After the opening for the attic window is formed, you can go to next stage installation - installation of the frame. It is worth noting that you do not need to dismantle the roof. The exception is a seam roof, in which the material will have to be dismantled.

Construction of an opening in an existing attic
How to install and adjust the frame?
Before installing a roof window , you need to remove the glass unit. This will not only make the task easier, since without it the frame weighs much less, but will also make the work safer. The glass unit is inserted after all work is completed. To begin with, fix the brackets located in the delicate part of the structure. They need to be secured securely, but the top ones should not be completely tightened. They should hold, but be relaxed: this is necessary so that the frame can be adjusted.
You will need building level: Measure the inserted frame with it. If it is skewed, it is straightened using plastic corners, which are sold complete with the window. Once you are sure that the frame is level, the screws of all fastenings can be tightened completely.

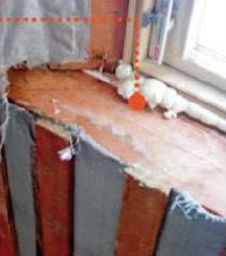
Preparing insulation and drainage
Installation of roof windows is a somewhat more complex process than the installation of a conventional product, since the structure is located in the roof, it requires reliable vapor and waterproofing, otherwise water will enter the room. Materials are usually fixed using a construction stapler.
In order to remove excess moisture, use a drainage gutter. It is placed in the upper part of the frame; to do this, you will have to remove two pieces from the lining that will correspond to the size of the gutter. After this, you will need to cut off the material for waterproofing. The gutter is carefully placed under the edge and secured to the sheathing. To avoid damage to the seal, the part is placed at an angle.

Installation of a waterproofing apron
How to install the flashing?
Correct installation of roof windows involves the installation of a special flashing. One of three types of construction can be used; choose it depending on the type of roof on your roof. The following options are available:
- Seam, if the roofing is flat.
- Special for roofs covered with any corrugated material. Most often, when ordering a window from the manufacturer, such a frame is included in the package. You just need to indicate what kind of roof you have.
You need to work with both types of flashing in the same way, so you don’t have to rack your brains about how to install roof windows , unless you have a flat roof. The salary is set as follows:
- First, fix its lower part. In this case, you need to make sure that the waterproofing with the apron extends not only beyond the frame, but also roofing material.
- Next they work on the sides. The edges should be laid on the window frame.
Installers of dormer windows, as a rule, attach the flashing to the frame sheathing, after which the outer part of the structure is covered with insulation. Any one can be used. Most often, you don’t have to look for insulation and fastenings anywhere, since they are sold together with the window, and you just need to assemble and install the structure.
Before installation, be sure to check each part, sometimes manufacturers put parts in the wrong size or something is missing. Some parts may be broken during transit. These problems need to be resolved before installing the window. It is advisable to install double-glazed windows after all interior work or glass is recommended to be protected with film.
After the flashing is secured, you can begin installing the double-glazed windows.

How to install glass?
After the window is installed, you need to insert the double-glazed window into the frame, which was removed before all the work was carried out. To do this, you will need to insert it into the frame, secure it with beads and seals; instructions are usually included with the window. The process of installing a double-glazed window may differ if the manufacturer has provided a different method. The glass unit should be installed last, as there is a risk of breaking it during the work. The presence of glass on the frame may interfere with any actions.
It is advisable to install double-glazed windows after all internal work has been completed or it is recommended to protect the glass with film.
Interior decoration
It is important not only to install the roof window correctly, but also to complete the appropriate finishing. If you do not make the lining and do not properly insulate it from the inside, the window may be cold, condensation will begin to form in the room, and the heat will go outside. To combat these phenomena, sealant, insulation and cladding are used; which one to choose is a personal matter for the owner of the premises.
Quite often, the manufacturer offers plastic parts along with the window. This is an inexpensive and simple way to solve the problem. Plastic curtain rods will cover the joints, give the interior a finished look, and prevent drafts from entering the room. You can use drywall and lining for the same purpose.

Finishing and insulation of the attic window
How to properly insulate a window?
It is very important that the insulation of the structure is done correctly. Some builders use polyurethane foam and do not use insulation, however, this approach is not entirely correct, since the material is winter time It narrows and expands in summer, so the structure may sag.
The most convenient insulation for a roof window is mineral wool. It comes off easily and is installed in its place. Should not be placed under attic windows heating devices. Unlike a regular window, a dormer window is tilted, so condensation will form on it due to rising warm air.
Conclusion: knowing how roof windows are installed, you can perform this procedure yourself, significantly saving your budget. The procedure is simple and requires only strict adherence to the instructions.
Last winter was a severe test for skylights. The mistakes of the installers, the mistakes of the finishers and the omissions of the owners manifested themselves in the most unpleasant way - in the form of leaks, ice and damage. Eliminating defects takes time and money. Isn't it better to do everything right from the very beginning?
Let's start with the fact that there is a huge difference between facade (vertical) and inclined roof windows (dormer). The first ones are mounted in a solid wall opening using special fastening elements — anchor bolts. By and large, the risk zone in this case is only a small gap between the wall of the opening and the window frame, which is filled with heat-insulating foam and insulated with special materials (self-expanding vapor-permeable tape PSUL, waterproofing tape, etc.).
Dormer windows are built into truss structure pitched roof(installed between the rafters, mounted on the sheathing). Thus, they become an integral part of the roof. To prevent leaks, it is necessary first of all to ensure that the junctions of the roof covering to the cocoon block are watertight. This problem can be solved by special external flashings. Similar products are produced for different types roofing coverings (flat or profiled). It is important not to confuse and install the salary that is optimally suited for specific situation. To prevent freezing, the area of the attic window is carefully insulated with soft thermal insulation - mineral wool from basalt fiber (Rockwool, etc.). The joint with the under-roof hydro- and vapor barrier of the pitched roof is provided by insulating flashings and special elements and products.
Another significant point in installing roof windows is the formation, insulation and finishing of slopes. Errors at this stage lead to freezing, abundant formation of condensation, and subsequently to damage to finishing materials and even deterioration of living conditions in the attic. First of all, you need to make sure that the lower slope is perpendicular and the upper slope is parallel to the floor. Soft thermal insulation should be laid under the rough sheathing (but in no case polyurethane foam!). We have already mentioned the vapor barrier apron (flashing).
Meanwhile, in order to properly install a roof window, you do not need to be a narrow specialist in this field. The main thing is to strictly follow the manufacturer’s instructions, which, by the way, are included with the product. You just need to open the book and carefully study the installation process, and not according to written recommendations, but according to intelligible pictures. There is almost no text in the instructions; all explanations are given in clear pictorial form.
If desired, any careful and thoughtful roofer can handle the installation of a roof window. However, in practice, all roof installation work is carried out either by careless amateurs or outright unscrupulous hacks. In other words, the main reason for problems with sloping roof windows is poor-quality installation and complete disregard for the manufacturer’s recommendations. At the same time, unscrupulous installers cover up their unprofessionalism with fairy tales that roof windows are doomed in the Russian climate. They say this is not Denmark with Germany and Poland. In fact, inclined roof windows have proven themselves in the most different regions our country, including Siberia and even the Far North.

The dormer window resembles layered cake. Moreover, all the “cakes” and “fillings” are produced by manufacturers of window products. After all, in addition to insulation and sealing, sloped roof windows need shading and darkening. From ordinary curtains in the attic with its inclined walls and ceilings little use. Fortunately, curtains, blinds or roller shutters can be selected “exactly to fit” all roof windows. Consumers are offered a wide selection of accessories, as well as many products and devices that make it easier to open and close the doors.
Do not forget that under the attic windows it is necessary to install heating devices that will provide convection warm air in the area of double-glazed windows, otherwise in winter the glass will fog up and even become covered with an ice crust.

Dormer windows can be built into slopes with a slope of at least 15°. However, for some owners of houses with almost flat roofs (or owners of apartments located on the upper floors of old five-story buildings), this rule is not a decree. They carelessly build inclined windows into the horizontal plane reinforced concrete floors. Leaks and destruction of window structures will not take long to occur. Meanwhile, there is a technology for installing roof windows in flat roofs using lining elements. In addition, you can purchase specialized sets of clerestory windows.
Installers often forget to set the gaps, that is, to adjust the position of the frame relative to the swing sash. As a result, gaps appear that cannot be eliminated during the operation of the window. And one more nuance. The well-being of roof windows directly depends on the general condition of the pitched roof. As a result of errors made during laying the coating and installing hydro-, steam- and thermal insulation, the roofing “pie” accumulates a large number of moisture. Water flows to window structures and seeps through the finishing of the slopes and along the adjacent sections of the walls.
The owners reason like this: if leaks left marks on the slopes, then the windows are to blame. And they call the employees service department manufacturer. After dismantling the finishing, it turns out that there is no vapor barrier, ordinary polyethylene acts as waterproofing, and the insulation is wet, at any rate. In such a situation, urgent major renovation roofs with subsequent reinstallation of roof windows.
 | This window was installed with such large geometric deviations that the resulting distortion caused the formation of a huge crack in the frame, that is, in fact, it destroyed the base structural element. You will have to completely replace the window unit. |
 | This roof window also had a problem with its geometry. Due to the distortion, a gap formed between the sash and the frame. To eliminate the defect, you will have to dismantle and reinstall not only this block, but also the adjacent cornice window. What’s especially offensive is that renovation work will entail dismantling high-quality and expensive finishes. |
 | Here the installers did without rivets. They cut the steel at random with dull scissors and didn’t even turn the edge - let it rust! And the joints were carelessly covered with sealant of unknown purpose. After such installation, you need to prepare for early roof repairs and reinstallation of roof windows (if they are still in working condition) |
 | This window has a chance for a happy future. The product is displayed accurately. Mounted around the perimeter warm contour. However, builders often forget to insulate the gap between the window and the rafters. Two strips of mineral wool - and the window is saved from freezing! |
 | Here is an example of a classic leak. The installers did not adjust or level the position window frame. They didn't even bother to check if the window was closing. And the owners are forced to take measures to get rid of the gap between the frame and the sash. |
 | This is what the frame of an obliquely installed roof window looks like shortly after installation. Water stains appeared, the varnish peeled off, and the wood turned gray. |
 | The roof window is built into the seam roof. At the same time, a reliable and hermetically sealed connection of the window unit to the roof covering is not ensured. The joints of the outer flashing and sheet steel are filled with sealant and fastened with clamps (must be under the roof), nailed with ordinary nails (through damage to the coating). |
 | Another example of incorrect installation of roof windows in a seam roof. Probably, components from dismantled units were used during installation. The salaries seem to have been collected piecemeal. For example, we took corrugated aprons intended for installing roof windows in profile roofing coverings (natural tiles, metal tiles). At the same time, the metal frames of the flashings are simply placed under the steel sheets. This means that leaks and dampness cannot be avoided. According to the instructions, these frames must be rolled into a kind of fold - a waterproof seam. its tightness is not inferior to seam joints of the main covering. |
 | You cannot thoughtlessly use polyurethane foam, forgetting that roof windows are held on by ordinary self-tapping screws. During the polymerization process, the foam expands and puts pressure on the frame. The window is deformed. cracks appear through which water rushes. |
 | Probably the finishers thought they were doing a good deed by covering the slopes with foil foam. However, in this situation, this material serves only as a vapor barrier. It does not provide complete insulation. Without soft thermal insulation, which should have been located under penofol, the slopes will freeze. Due to fastening with staples, the integrity of the foil vapor barrier is compromised. Tiny holes are enough for vapor to penetrate under the penofol, condense there and flow down in drops of dew onto the plasterboard sheathing. |
 | The gap around the perimeter of the window block was generously filled with polyurethane foam. When it expanded, it compressed the frame, which led to the window being skewed. The slopes are roughly hemmed regular board. There is no room for insulation, and without it the finishing will be ruined by condensation. |
 | It’s definitely not possible to make high-quality slopes for skylights. Board over window block nailed almost vertically. Meanwhile, in order to ensure full convection of warm air in the double-glazed window area, the upper slope must be parallel to the floor. |
 | TO polyurethane foam no complaints. It was applied in layers, and spreading was avoided. But without soft insulation the slopes were frozen and signs of leaks appeared on the drywall. The window was left without a vapor barrier apron, which increased the formation of condensation. |
 | But here are the consequences of unscrupulous installation and finishing of roof windows. Plasterboard sheathing hopelessly damaged by leaks. resulting from the formation of condensate in the slope area. Unscheduled attic repairs are provided. |
 | The slope is made roughly. The basic sheathing is made from rough boards. Finishers don’t even think about vapor and heat insulation. Correctly install the insulation, vapor barrier apron and finishing almost impossible. |
 | The finishing of the slopes did not withstand operating conditions. Moreover, the problem arose not so much because of errors made during the installation of inclined windows, but because of a systemic violation of the rules and regulations for the arrangement of the attic. |
 | Due to improper installation of the external flashing, rain and melt water penetrated into the area where the window unit adjoined the roof. This led to destruction and frame structure windows, and roofing system. We're not talking about leaks. |
 | In the spring, ice on the glass unit will cause stagnation of melt water, which will inevitably lead to leakage. The unpleasant development of events could have been avoided. if the owners regularly cleared the skylights of snow. |
In conclusion, small, but visual video for installation of roof windows:
The use of roof space as additional living space is at the peak of popularity today. It's not difficult to explain.
Enough for a long time My compatriots used the attic instead, storing old and unnecessary things there. Fortunately, the homeowners realized that this area could be used to much greater benefit. This is an excellent place to arrange a bedroom, billiard room, office, nursery or workshop. A well-equipped room in terms of its operational qualities is virtually no different from other premises of the home, and is a completely full-fledged additional floor.
 Like any other living space, the attic needs natural, and, accordingly, in.
The construction and installation of windows with their own hands often allows the owners of the building to noticeably carry out the necessary manipulations. Those who like to do everything with their own hands can study the features in theory and cope with it on their own.
With a thorough study of the theory and a competent approach, such installation is considered not such a difficult undertaking. If the homeowner completely lacks construction skills, then it is better to entrust this activity to professionals.
 Illumination of windows from roofs
 If the attic has a sufficiently large area, then the windows in the gables will not be able to provide quality lighting. This problem is solved by installing special roof windows into the roof slope.
Experts are convinced that a well-made and selected window increases the amount of light transmitted by up to 40%. Among other things, the ventilation of the room is noticeably improved. Windows ennoble the room, making it more lived-in, cozy and elegant.
Dormer windows: types and types
 On the attic floor it is quite possible to use different kinds windows The simplest design– ordinary windows are vertical, in fact not much different from traditional front windows. They are placed on the very gable of the house or in a special remote structure, in the roof slope (often called a birdhouse). These windows look quite aesthetically pleasing and decorate appearance, but not very functional: they don’t let in much light.
The roof windows are slanted.  This is a kind of challenge to the natural elements. They are able to transmit 40% more light.
They are mounted at the same level with the roof slope; they are divided among themselves according to the type of construction, opening method and material. Wood is used to make windows High Quality, aluminum or PVC profile.
Windows from natural material preferable for rooms with normal humidity - offices, bedrooms, living rooms, etc. Where the humidity level is significantly increased, it is better to use plastic products , more resistant to impact aggressive environments , . In their designs, roof windows can differ markedly. Depending on their characteristic characteristic features
 they are classified as follows.
 Square Windows are standard square or rectangular.
These types are in particular demand and are chosen most often.
The window consists of a solid double-glazed window, or may consist of a frame with a sash. The market is saturated with various modifications of products with pivoting sashes, and products with fixed double-glazed windows are usually made to order. The windows are balcony.
This is a special design that looks like an inclined window in a slope, on the side of which or under it there is a vertical window.  Both of them can open: vertical - down or to the side, as usual, inclined - up.
This clever design creates a balcony that you can go out onto. The lower element under the window is inclined.
It is a small blind window under a sash that opens. It is used when the height of the slope is not enough to install two windows, one above the other. One thing is clearly not enough for full illumination. The top element is extensions. Most often used as a special decorative element , located above sloping window
. It may have a triangular or round shape. With the help of extensions, more harmonious combinations are achieved.
The windows are cornice. Their use is advisable in cases where the wall in the attic is too high and it does not allow you to look out of the inclined window. The situation is corrected as follows. An opening is arranged under the window vertical window
, the design of which reveals the landscape in the located dormer window. Light tunnel.
It is still used quite rarely in our country. It is mounted in a place on the slope that does not have direct contact with the room. A reflective tunnel (usually played by a pipe) connects it to the room that needs additional lighting. There is a special light-diffusing lamp there. All existing species Dormer windows are produced industrially, using special factory equipment, undergo quality control and are tested for strength. Quality materials
Dormer windows are also divided according to the method of opening:

Which window in mansard roof preferable?
 Attic windows
 When choosing, you should proceed from the design features, the parameters of the attic room itself, as well as the requirements for ease of use.
For example, the height of the room and the slope of the slope directly affect where the window will be installed - in what place, and at what height. Accordingly, which of it is possible to review.
Size and structure of roof windows
Any roof window- enough complex design, and this is understandable. It will be used in the most different conditions, often quite tough and complex. The impact of snow, wind, rain, and hail can be enhanced by the specific location of the window plane at an angle. To provide the device required strength Manufacturers use special, heavy-duty glass that can easily withstand high pressure.
 Existing window sizes
What does a regular window consist of? These are the doors, the frame and the one that ensures its functioning. A glass unit is inserted into the sash, which contains an inert gas inside. In addition, the kit includes a vapor barrier and aprons, a drainage gutter to avoid leaks, which is necessary for our climate, a special protective flashing that directs water down and protects elements from damage, and internal slopes. The final cost of installing such a window depends on the amount of work to be done and on the availability of certain components in the kit.
When choosing the appropriate type of product, it is advisable to consult with a specialist who is better informed about the most suitable frame and protective accessories for it.
How to install a window in the attic

What size window is best to choose for an attic? This depends on the distance between adjacent rafters of the building, and the area of the entire attic space. There are rules according to which the window area must be at least one tenth of total area the entire attic space. Its width is determined by the distance between the individual rafters: it should be six centimeters less than the last one.
If it is too small, a little more than half a meter, and you want a large window, you will have to make two windows side by side: between the rafters, in adjacent sections. By the way, two windows can provide more light compared to one large one.

The height at which it is planned to place the future window depends on the location of the handle on it, as well as on the slope of the slope to the roof.
If it is steep, then windows located at the bottom are more suitable for it, but if it is flat, then it is better to make windows at the top.
The most optimal window height in the attic is considered to be from 80 to 130 centimeters from the floor. When the handle is located at the top, it is mounted at a distance of 110 centimeters, if the handle is at the bottom, then at 120-130.
Also, the height of the planned window depends on the type of roofing used.
 The type of opening is selected based on the wishes of the owner and his requirements for ease of use. After calculation required quantity windows, their location and size, the location of their future location is marked from the inside of the attic.
The window frame must be selected correctly. Although all roof windows seem alike, different manufacturers They produce products of different configurations and with various features.
Installation of a roof window: preparation for installation
Let's imagine that our roof is ready, but the interior finishing is not yet done. Inside, on the film, the location of the window is marked. It should be between the rafters, the distance to them should be about three centimeters.
The window is installed on the mounting bottom beam and on. To mark the lower boundary of the window location, you need to step back from the beam 6 cm up to flat materials roof covering, and 9 for profiled covering. After finding the top point of the window, you should move up another 9 to 15 centimeters.

Waterproofing material cut out with a margin of 20 cm on all sides. The remaining canvas is temporarily wrapped inside the room. The roof covering is cut or removed. Having retreated a couple of centimeters from the rafters, we cut off the sheathing itself. A mounting beam of five centimeters thick is nailed at the bottom of the window, about 10 centimeters from the sheathing, strictly level. The distance depends on the type of roof covering used. Waterproofing film using a stapler, it is attached with its lower edge to the beam, and its upper edge is attached to the sheathing. The side parts of the insulation are pulled out.
Installation of a roof window frame
The delivery set always contains instructions for proper installation of a roof window. You must use it during installation. Windows from different manufacturers differ somewhat from each other: the mounting brackets can be attached to the rafters and be rectangular, or they can be angular and attached to the sheathing and rafters. They are attached to the frame in various positions. Therefore, this issue should be discussed in advance.
 Roof box and its installation
 To facilitate the installation procedure, it is better to remove the sash before starting it. If there is a frame on the window, it is also removed. There is only one frame left, without everything. Special mounting brackets are placed on it in the designated place. Then it is attached to the top of the frame with a stapler, which is placed on the mounting bracket at the bottom of the window. The frame is inserted into the opening, the insulation is pressed against the beam.
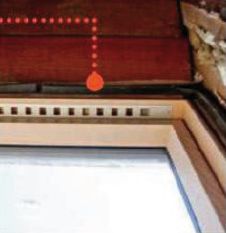
 insulation of attic window
 The upper brackets are not fully tightened, but the lower ones are tight: The frame still needs some trimming. The sash returns to its place, its operation is checked, and the absence or presence of distortion is determined. Adjustment is made via the top mount.
The window should be positioned perfectly straight, its sash should fit evenly on all sides, and the existing gaps should also be equal.
All this must be adjusted immediately, because it will be impossible to correct it later. Then all the fasteners are tightened all the way, the side waterproofing is attached to the frame, and the excess is cut off. laid in the side openings.
Installation of waterproofing
 Waterproofing attic windows
 The window kit includes a special insulating apron. But you can make it yourself from suitable material. Above the future window, at the top, a layer of sheathing is cut out on both sides, the width being equal to the size of the drainage gutter. The waterproofing film in this place is cut in the middle. A drainage gutter is placed under it, which is installed in the gap of the sheathing. Water from the waterproofing will not flow onto the window, but into this gutter.
Anyone who wants to make a full-fledged living space out of their attic at home or cottage should first of all think about how they will get there. Fresh air and sunlight. The only solution for this is to install skylights. But, if you call a master or even a group of craftsmen, the work will be quite expensive. Therefore, now we will tell you how to install such windows yourself and what mistakes a beginner should not make.
The installation process directly depends on what windows you decide to install in your attic. Experts recommend the following designs:
- Windows must have triplex glass. Tempered glass is also a good option;
- With an energy-saving element that allows daylight to pass through;
- With a durable frame that prevents exposure to ultraviolet rays;
- With seals and linings;
- With devices that can significantly simplify operation, with a good ventilation system and protection. Choose those that prevent dust and water from entering the room.
It is also better to choose windows that are not too demanding to maintain. Constantly foggy windows and damp finishing material could become a real problem for you in the future. But here everything largely depends on how correctly you install them. Therefore, we begin with the calculations first.
Constantly foggy windows and damp finishing materials can become a real problem for you in the future.
To ensure that you do not waste your money, the calculations must be accurate and mandatory. Without them, you simply cannot install a window. First, you need to measure the floor area in the attic. For 10 sq.m. area you will need 1 sq. m. lightening. It doesn’t matter whether it’s one large window or several small ones. Please note that the higher the window is located, the larger sunlight it misses. But it is also not recommended to set it too high. These should not be “holes in the ceiling.” Windows can be installed this way only if you have a flat roof in the attic and the slope of the slopes is up to 20 degrees.
If the slopes on the roof are steep, then it is recommended to install windows in the attic roof with the bottom line of the frame from the floor 1-1.5 meters, no more.
The main thing is that it is no closer than 0.8 m from the floor. The upper limit is 1.9 m. In this case, let’s say right away that the height has practically no effect on the amount of light transmitted by the window. Therefore, estimate the area of the glazed surface using the formula indicated above.
But if there are small children in the attic from time to time, make sure that the handles are no lower than 1.3 m from the floor
Advice! When thinking about what height to place the window, pay attention to where the handles are. If in the upper part, the distance should be no higher than a meter from the floor. The handle in the middle is one and a half meters. The handle at the bottom is not lower than 0.8 m.
But if there are small children in the attic from time to time, make sure that the handles are no lower than 1.3 m from the floor.
- When you have calculated how many windows you will need and where you will install them, you can get down to business. We recommend doing all the work in stages:
- Preparing the window opening;
- Removal of double-glazed windows and installation of frames;
- Waterproofing, laying insulation;
- Fastening the factory gutter above the structure;
- Fastening the frame parts;
- Installation of the double-glazed window in its place;
Most modern window manufacturers provide installation instructions for their equipment. However, there are times when it is too superficial for a beginner to understand, or it is not there at all.
Leave a gap between the roofing material and the bottom line of the window
Here are some preliminary tips that you should remember before starting work:
- The entire perimeter between the opening and window frame you will fill with insulation. Don’t forget to leave a margin of 2-3 centimeters depending on the characteristics of the insulation itself;
- Leave a gap between the roofing material and the bottom line of the window. Usually it is up to 10 cm;
- The distance from the roofing material to the upper mounting beam should be from 4 to 10 cm. Thus, if the structure shrinks over time, they will not deform;
- The size of the slats to which the frame will be attached must be identical to the size of the sheathing beam;
- The waterproofing is not cut along the contour, but like an envelope, leaving a margin of overlap of up to 25 cm. This is necessary so that you can secure them to the sheathing with a stapler. remember, that better later cutting off excess rather than not being able to properly secure the waterproofing layer.
Let's start installing skylights with our own hands
Initially, you must remember that the window must be attached to the rafter system, and not to the sheathing. Some rafter systems are equipped with special beams on which the window frame must be installed. First, locate the attached mounting brackets on the frame. Before fixing them, we recommend removing the glass unit to facilitate the installation process. Some window manufacturers, however, advise removing the double-glazed window only when the brackets are secured and the frame is already “attached” to the opening.
At this stage, it is important not to forget, before installing the frame, to lay thermal insulation in the opening, securing it to the beams.
Installation and installation of roof windows occurs according to the following points:
- Securely secure the bottom brackets. The upper ones should not be pressed all the way. This is necessary so that you can make adjustments without problems in the future;
- Take a building level and check how level the window is. Look at both vertical and horizontal positions. If there is a slope, it can be eliminated using plastic corners;
- Make sure that the distance on both sides of the frame to the opening is the same;
- When the adjustment process is completed, you can tighten the upper brackets. Now your window will be fixed straight;
- Attach thermal insulation to the sides of the frame and lay a waterproofing apron around the perimeter.
Now you need to install the drainage gutter. To do this, cut two pieces in the sheathing to the size of the drainage fasteners. Cut to the same dimensions waterproofing coating. The gutter is placed under this waterproofing and secured to the sheathing. Do not forget that the angle of the gutter should allow moisture to quickly drain into the ventilation gap.
When you complete the main stage of work, installing roof windows yourself will not cause you any problems in the future. But don't forget that there are still a few steps to take.
The installation of the flashing must be done strictly according to the scheme provided by the window manufacturer
The installation of the flashing must be done strictly according to the scheme provided by the window manufacturer. Always start from the bottom element. Strengthen it properly, place all parts under the seal. Please note that if your attic has a soft roof, then before installing the flashings, you need to nail a thin strip under the window. It will lie on the profile as smoothly as possible. All joints between warehouses and roofing materials must be insulated with sealant. It is almost always included. If you don’t have it, you can find adhesive tape suitable for these purposes at any hardware store, and maybe even at home.
An important stage is insulation. One of the best materials– mineral wool. It is easy to use and safe for health, unlike some other materials. Just slip it around the perimeter of the window frame and cover it with a foil layer on top. Do not forget also about the need to insulate on the side of the slopes.
A vapor barrier is installed on the inside, after which the slopes can be installed. Make sure that the lower slope is completely parallel to the floor, and the upper slope is strictly vertical. Please note that in most cases you can install rough slopes to save your own time and money. Almost always they will be covered by finishing the entire attic. To install rough slopes, you just need to determine their dimensions and angles, and then install them, adhering to the requirements described above.
A vapor barrier is installed on the inside, after which slopes can be installed
Do not forget about the instructions that the manufacturer himself gives you. The fact is that some nuances may differ from general rules, and you need to take them into account. Before you install your roof window, make sure you have everything necessary materials and tools, and you have definitely studied all the points of our article and the instructions included. If so, get to work. Now you are prepared.