Laminate on the wall - is this use of material justified? How to properly decorate walls with laminate vertically, horizontally or herringbone with your own hands: options, techniques, step-by-step guide Laminate on the wall, how to cover the edges.
Sometimes when creating an interior, unexpected decisions are made regarding the use of one or another finishing material. An example is the use of laminate flooring to finish a section of a wall, a niche, or even a ceiling. Laminated plates imitating valuable wood bring a certain charm to the interior, adding sophistication and comfort. If you decide to add some zest to the decoration of the room, you just need to find out which mounting method to prefer and how to lay the laminate on the wall surface.
Material for wall mounting - rational selection without overpayment
The idea of finishing walls with laminate arose due to the similarity of this floor covering to natural wood, the texture of which this material is intended to imitate. Can be used for interior wall cladding and natural wood in the form of lining - special boards equipped with locking joints, but many are stopped by the complexity of installing this material, the need to treat it with various impregnations, paint and varnish it. Laminate flooring does not require any additional measures: after installation, the surface is ready for use, while the floor board is practically not inferior to natural wood in terms of external qualities.
Another common option for wall cladding with imitation wood texture is the installation of decorative plastic panels. Forming a finishing surface from PVC does not present any particular difficulties; the money is much cheaper. But the strength of plastic panels is low (easily damaged by mechanical stress), appearance and a choice of different decorative designs- so-so. In addition, plastic is flammable, no matter what its manufacturers say about it, and there are also questions about its toxicity. That's why laminate is preferred on the wall, especially if we're talking about about living rooms.
We found out that the material in question is quite appropriate for decorating walls. All that remains is to choose the right floor board from the variety that is offered in a specialized retail chain. It’s worth immediately drawing attention to the fact that there is no such thing as a wall laminate - all types of material models are initially intended to form a floor surface. Can any laminated boards be mounted on a wall surface? In fact - any. But there are still purely practical nuances that should be taken into account when choosing a material.
Firstly, this is the wear resistance class. The higher this indicator, the stronger decorative surface and is less susceptible to abrasion, scratches, chips and other mechanical damage. With the wall mounting method, the importance of this criterion for the quality of the laminated board is leveled, because for obvious reasons, hardly anyone will walk or move furniture on the wall. For a laminate on a wall, a wear resistance class of 21-23 is quite sufficient; purchasing plates with a more durable surface is not advisable, since as this indicator increases, the cost of the material increases sharply, although this does not affect its decorative properties in any way.
Secondly, this is the quality and type of locking connections. At floor mounting laminated boards, which is carried out in a floating way, the reliability of the locks plays a role important role, since only through these devices the entire structure is held together. When attaching a laminate to a wall, in any case, additional fasteners are used, which bear the main load. In this case, the lock only helps to tightly fit the individual structural elements one to one, making the joints between the boards unnoticeable. The quality of the locking connections also affects the cost of the laminate, so you should not overpay when trying to choose a material with durable and functional locks.
When choosing a laminated board for wall mounting, the main criterion is the decorative component. The main thing is to choose a material with a texture that will optimally fit into the intended interior design.
Using laminated boards – where is this option appropriate?
Creative imagination when developing interior design options is not limited by any boundaries, so there are no specific recommendations on where you can make a wall, panel or niche from laminate, and where it is better to abandon this idea. But this is from the point of view of design creativity. A practical approach to the question of the feasibility of covering a wall surface with laminated boards indicates some limitations of this method of wall finishing. It is not recommended to use laminate for any cladding in rooms where there is or may be high humidity or direct contact with water, therefore this cladding method is not used in bathrooms, toilets, kitchens, open or uninsulated balconies and loggias.
In rooms with a normal microclimate, the use of the floor covering in question for wall cladding is not limited, but attaching laminate to the wall all the way is not quite right. First of all, it's expensive. Secondly, this material looks much more interesting when it is allocated a specific area. For example, a panel in the bedroom behind the head of the bed is often formed in this way. Another option is a niche or a kind of shield that highlights the area on the wall where the TV is installed. This solution is interesting - the same material with the same decorative texture that is laid on the floor. This design option visually increases the space by continuing the floor into the wall without a visual transition.
The traditional way to decorate a hallway is to form panels at the bottom of the wall. For these purposes they use various materials– , MDF, wooden lining, plastic cladding products. We can also use laminate in this case - the material is quite durable, easy to clean and care for, and this is exactly what is needed for panels in the hallway. In addition, laminated boards, which have high decorative qualities, are good for highlighting individual interior elements in bedrooms, living rooms and even children's rooms. In fact, in rooms with a normal residential microclimate, laying laminate on the wall can diversify the interior in various options, as long as it is appropriate from the point of view of visual perception and combination with other finishing materials used in this room.
How to create a base for wall mounting of floor plates
When covering walls with laminate, the requirements for surface quality are the same as for the subfloor when using this material for its intended purpose. The base on which it is planned to lay the decorative cladding should be as level as possible. The laminated board lacks elasticity; the smoother the surface, the greater the contact area of the facing plates with the base. The permissible curvature of the wall on which installation will be carried out should not exceed 2-3 mm per linear meter, wherein base surface must be vertical and lie in the same plane.

How is the required result of preparing the base surface for wall installation laminated board? There are several options:
- plastering along guide beacons;
- installation of gypsum boards using a pre-created sheathing;
- assembly of a load-bearing or wooden beam for subsequent laminate cladding.
The first option for preparing the base is the most economical in terms of materials costs. Plaster can be made with various compositions - gypsum mixture, lime and cement-sand mortar, polymer-cement plaster materials. Taking into account the fact that we are talking about interior decoration, it is preferable to use it inside the building to level the wall surface. plaster mixtures gypsum-based, although the other listed options for working solutions are also appropriate and applicable. If you plan to install the laminate on the wall using an adhesive, after the plaster has dried, it must be impregnated with a primer - the treated surface will hold the glued facing material much better.
Regarding the plasterboard base. Why is it preferable to sheathe gypsum boards using profiles, but not glue them plasterboard sheets glue? A plasterboard false wall based on the created sheathing is much stronger, but the weight of the laminated plates is considerable. If, however, the base is formed from plasterboard glued to the base surface, the sheets must be additionally secured with dowels or self-tapping screws (depending on the structure of the mounting base). Laminate is much heavier than gypsum plasterboard, if we take the same area of both materials, so the adhesive alone to which the drywall is attached may not withstand the proposed operating load. The plasterboard surface also needs to be prepared. First, all seams are reinforced and filled with mortar, then the gypsum board is primed, and only after that (when the primer has dried) the laminated cladding is laid.
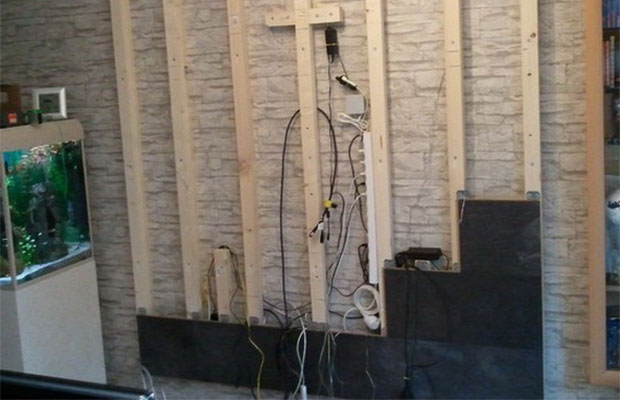
You can attach laminate directly to the wall if it meets the requirements. If the base surface has significant curvature, there is an option to do without leveling it. To do this, a sheathing is created, the load-bearing elements of which can be used metal profiles or wooden beams. With the expected horizontal installation laminated boards, the racks are installed vertically. If there is a desire to lay the facing plates vertically, the load-bearing elements of the frame are mounted horizontally. The pitch of the racks or horizontal crossbars is made within the range of 40-60 cm. Taking a smaller step is not rational due to excessive consumption of material; more than the indicated limits is not possible for reasons of the strength of the base.
If wooden beams are chosen as load-bearing elements, do not forget to treat them with antiseptic and water-repellent impregnations - this will greatly extend the service life of the created sheathing.
Methods of attaching laminate flooring - glue, clamps or nails?
There is no single technology for fixing floor boards to the wall surface, because no one has developed it. Laminate is a floor material, and its installation on other surfaces is not provided, therefore all methods of attaching such cladding to a wall or sheathing are the fruit of the practical conclusions of craftsmen who had to do this. True, relatively recently, manufacturers, having learned about the growing popularity of the wall use of laminate, began to produce special fasteners for these purposes - clamps. Fixing a floor board on a vertical surface using clamps is one of the ways to secure laminate flooring to a prepared wall.
The second method of fastening the cladding in question is to use special nails with a very small head (so as not to interfere with the snapping of the locking joints), which are driven into the base using a special pneumatic gun. Such nails are mainly intended for fixing wooden lining, but the craftsmen have adapted this method of fastening for laminated boards. Fixation with nails is reliable, but causes complaints from many specialists. The fact is that the nails fix the plates too rigidly, and the laminate is created by manufacturers taking into account its floating installation, which provides for the possibility of free mutual displacement of the boards relative to each other under mechanical load or temperature deformation. Be that as it may, there is such a way. It is up to the owner to use nails or choose another method for fixation, especially since there is a choice of how to attach the laminate to the wall.

One of the installation methods is with “liquid nails”
If the laminated board is fixed to the sheathing, you will have to choose from the methods described above (clippers or nails). When it is a smooth plastered wall or lined with plasterboard, it is better to use the adhesive installation method. As glue (again, guided by practical experience), it is convenient to use some varieties of “liquid nails” - universal adhesive compositions for polymer based, which are packaged in tubes designed for special pistols. The polymers that form the structural basis of such adhesives have sufficient elasticity even after complete hardening, which corresponds to the principle of floating laminate installation on the wall.
Some craftsmen share their successful experience of gluing cladding boards onto polyurethane foam. This turns out to be much more economical when compared with liquid nails, and much faster. However, polyurethane foam can lose its properties over time, gradually deteriorating, so there are not many guarantees regarding the durability of this method of fastening. Does it make sense to combine the use of foam as glue with additional fasteners, clamps, for example.
Decorative cladding - 3 main principles
There is also a way to put laminate on the wall - first a solid board required sizes assembled on the floor, after which it is lifted and glued to the wall surface. The method is original, but has disadvantages. Firstly, this can only be done when the cladding area is small. Secondly, this method does not work if you need to attach the laminate to the sheathing. Another disadvantage of this technology is that you need an assistant, or better yet, two, so methods using floor boards directly on the wall or sheathing are much more often used.
When installing laminated plates, work begins from below one of the corners. It will be more convenient for right-handed masters to start from the left corner, for left-handers - vice versa. Before gluing the laminate, or rather its first board, you need to make a stand for the entire length of the wall being tiled. The thickness of the stand is about 10 mm. After finishing the work, the stand is removed, and a deformation gap is formed, preventing contact of the created cladding with floor surface. The same gaps are made with adjacent walls and ceilings.
To install it on the wall, you need to follow the same basic principles as when installing the material on the floor.
- 1. First of all, this is the spacing of the seams in adjacent rows (the seams cannot coincide or be too close). Usually they make sure that the seam of the adjacent row falls in the middle of the board or with a slight offset from the center.
- 2. Taking into account possible deformation displacements of the plates relative to each other, so that tension does not arise between the fixed material, we recommend treating the locks with a special gel, which significantly reduces friction and additionally protects the seams from moisture entering them.
- 3. When used simultaneously glue method installation and mechanical fixation (some craftsmen consider the combination of glue and metal fasteners to be the only the right technology when attaching a laminate to a vertical surface), it is advisable to use clamps that allow the facing plates to move. First, we put the board into locks, glue it, then put on the clamps and fix them to the base.
Covering a wall with laminated boards is not very difficult. The main thing is to approach the work responsibly, not to rush anywhere, and to choose the right base material and means of fixing the laminate. If you follow the simple rules described above, finishing activities will not take much time, and the boarded wall surface will long years will add sophistication to the interior, delighting the household.
Wall finishing with laminate can be done in several ways, both with a horizontal arrangement of panels and with a vertical one. Before moving on to describing the intricacies of technology, let’s get acquainted with the types of laminate suitable for wall decoration.
Which laminate is suitable for walls: adhesive, tongue-and-groove or click?
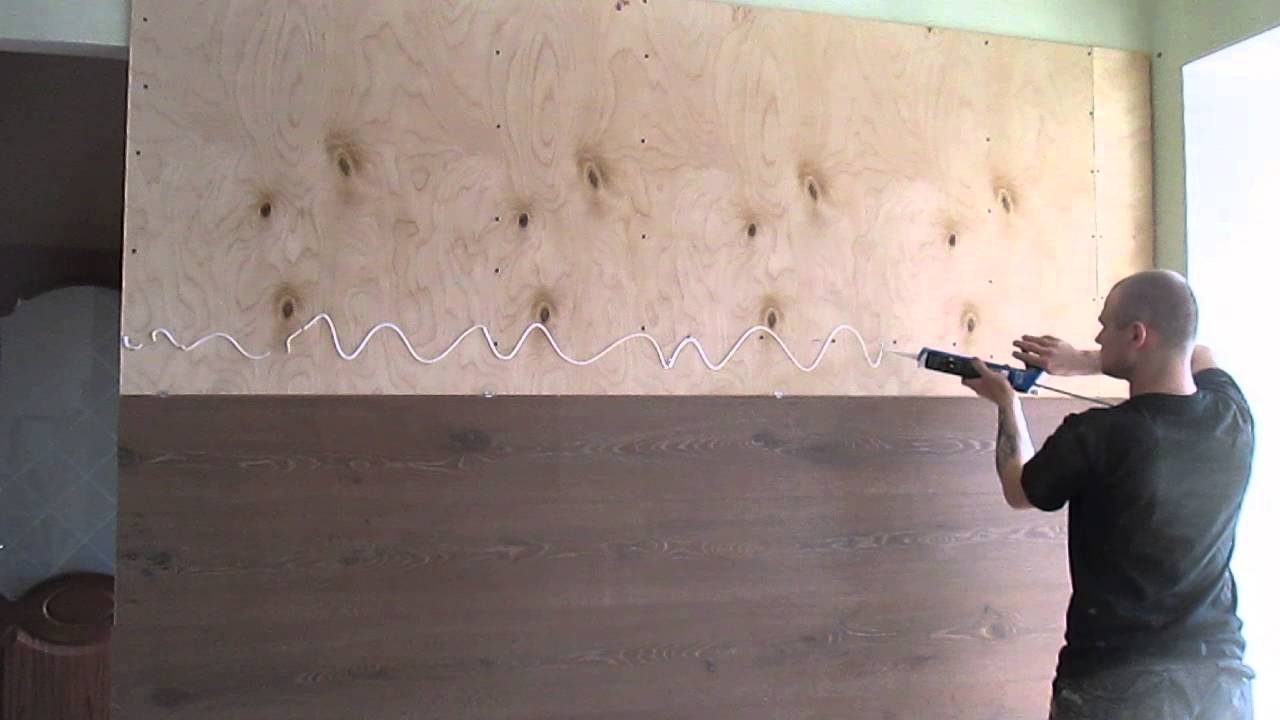
- For adhesive laminate The edges are smooth, without a lock. The adhesive laminate is laid on a flat surface on liquid nails or construction silicone: glue is applied to the back of the panel in a zigzag pattern, the strip is laid, glue is applied to the end, the next one is laid, etc. The glue drips that appear at the joints are immediately removed with a cloth lightly moistened with table vinegar. An adhesive laminate is not suitable for laying on sheathing due to the small contact area with the underlying surface. Floors are laid with adhesive laminate.
- Tongue and groove laminate panels equipped with a tongue and groove lock. It can be laid with glue without gluing the tongue and groove, so that the joints come out dry and always neat. When laying dry, the strips are secured into the tongue groove like lining: with small nails (only for wooden sheathing) or glue brackets (for wooden and metal sheathing). Tongue and groove laminate is suitable for all surfaces of the room: floor, walls, ceiling.
- Click laminate– improvement of sheet piling. The comb in cross-section is pear-shaped; the groove profile matches it. When laying it, the adjacent panel is tilted at about 20 degrees, the ridge of the lock is inserted into the groove, and, turning it towards the base, pressed - the lock snaps into place. Click laminate cladding has increased strength and resistance to warping. In addition to the glue, the click laminate is secured with nails into the grooves of the lock. Clayers cannot be used - the lock will not latch. Click laminate on the walls can be attached with glue to wooden sheathing.

Laminate is also called MDF panels of the same size as laminate panels. This is very good material, but expensive, so it is not discussed in this article. But all the working techniques and subtleties for laminates based on fiberboard and chipboard are also suitable for MDF. And more detailed description works with MDF can be found.
Tool for work
To cover walls with laminate, you will need some tools used for laying floors. There is no point in using them on the ceiling, because... everything is done there by weight. Click laminate strips can be precisely adjusted when laying using just a tool. It will not be possible to move them with your hands - the comb sits very tightly in the groove.
- Boss. Using a hammer, the strips are tapped through the boss as they are laid.
- Rule (emphasis on “and”), or hook. It is sometimes incorrectly called a clamp. The rule is to tighten the last strips, either by hand or by hitting the “flag” with a hammer.
- Spacer wedges maintain the indentation along the perimeter. You need at least two sets of wedges to work. Wedges are mainly used for flooring.
Technological subtleties
Where laminate is not suitable
The kitchen is not suitable for laminate finishing. Fiberboard and chipboard are inexpensive materials; the raw materials for them do not undergo complex processing. Therefore, the laminate swells and warps due to excess humidity and temperature changes. In the kitchen, fluctuations in temperature and humidity are not only large, but frequent and sharp.
For the same reason, basements, cellars, and closets cannot be finished with laminate. But the hallway is possible. Here the deviations of air parameters from sanitary standards They don’t last long and happen infrequently.
But for a balcony, even a very carefully equipped one, laminate is even less suitable than for a kitchen. On the balcony there are large seasonal fluctuations in temperature and humidity. Therefore, the balcony needs to be sheathed plastic lining, eurolining or MDF.
Gaps
Due to the tendency of laminate to swell under high humidity, it must be laid with a gap (indentation) from the corners of 15-20 mm around the entire perimeter for any installation method. It is difficult to support it when installing it on a wall with spacer wedges, especially from below, so it is better to do this: lay a flat board or batten along the bottom required thickness. If installation is done using glue, we wrap this board or batten with one layer of thin plastic film. And from the sides you can already use wedges - here they are not loaded with the weight of the skin and will not slip off. Once the sheathing is finished, the gaps are closed with glued plinths.
Glue or lathing?
Most often it is recommended to lay laminate flooring on the sheathing. At the same time, the strength of the finish on any wall is guaranteed and additional sound and heat insulation can be made. But the artistic possibilities of finishing when laying on the sheathing are very limited. To obtain a cladding of an original design, the laminate is laid with glue (liquid nails, silicone) on a flat, dry wall without plaster.
About the nuances of forming wooden or metal sheathing.
Advice: Many flooring manufacturers, knowing the desires of customers, are already producing special systems for attaching parquet and laminate to the wall. An example of such a solution is in the video below:
How to check if a wall is level?
To do this, you need an even strip as long as the height of the wall without a plinth. Before checking, plaster, baseboards, door and window frames are removed. The rail is led vertically along the wall; protrusions and depressions are marked with a pencil. The protrusions are scraped off or knocked down with a chisel to a shallow depression. Then all the depressions are filled with starting putty and rubbed down.
How to check the “evenness” of the rack itself? Right on the wall. Place the batten flat against the wall and draw a line along it with a pencil. Then we turn the rail 180 degrees and apply the ends to the ends of the line. If the line along its entire length coincides with the edge of the slats, it is even. If a deflection/kink is noticeable, you need another one. This method of checking a ruler is described in a school geometry textbook.
Where to start?
Most often it is recommended to start laying laminate flooring from the far left corner and proceed clockwise. There is nothing to object to here, but you can add: if you are left-handed, then it will be more convenient to start from the far right corner and go counterclockwise.
Horizontal or vertical?
Laying laminate on the wall is possible in both vertical and horizontal stripes. We’ll talk about the possibilities of vertical installation later, but for now we will describe the methods of horizontal installation.
At first glance, laying in solid strips is simpler and cheaper, but it only seems so. The joints, which are in one line, must be covered with plinths, and the plinths themselves must be attached to the wall with mounting nails (dowel nails). Fastening holes for nails are drilled directly through the joints of the panels. Even if the cladding comes in solid strips along the length of the wall, it still needs to be installed at least every 1.7 m.
Why such complexity and additional costs? The fact is that solid panels will only lock each other in one direction. Without additional reinforcement, such a cladding will tend to fold like an accordion. Mechanical stress on fasteners (glue, nails, gluers) will be concentrated in some places, and in general the cladding will be unreliable.
For good strength, the cladding is laid with a “comb”: the number of strips is cut exactly in half, equal to half horizontal rows. If, say, 10 rows are laid along the height of the wall, we cut 5 strips. We carry out the laying, starting the rows alternately with a whole strip, then with a half. Joints spaced halfway across the length of the strip will evenly distribute the load on the fasteners.

In some cases, laying laminate flooring diagonally looks interesting. To do this, it is better to use a coating of two colors. Naturally, such work will require certain skills and experience.
Variations of vertical laying
The possibilities of showing your creativity in wall coverings increase immeasurably if you lay the laminate on the wall vertically, with glue on a flat, dry surface. The tedious and dusty work of cleaning and leveling the walls is offset by the cost of lathing.
For examples, we will use panels of only two types: long (or solid, if the height of the room exceeds 3 m) - the main ones, and pieces the size of the remaining height of the wall - complementary. Let's take the main and complementary panels of contrasting tones, say, dark and light. Let's see what can happen:
- We will lay out a strip of complementary panels 60-80 cm long along the bottom; We will sew the main ones up to the ceiling. Place a plinth on the horizontal joint. Vertical joints at certain intervals (say, after 3-4 joints) can be additionally secured with pieces of the same plinth, and the same can be run along the ceiling, also lined with laminate. What happened? Romantic, medievalist (medieval-looking) room with imitation ribs and ceiling beams. Instead of torches, linear fluorescent or freon lamps can be installed on the ribs instead of torches.
- We will sew only the bottom with the main panels, and leave a clean bleached strip along the top. For what? Or at least as a screen for LED strips. Who said that lighting design is only possible on the ceiling? There is no such law, and that’s it.
- We will place a strip of dark complementary panels in the middle light wall and decorate it with skirting boards. We will place paintings, photographs, decorative plates, souvenirs, straw appliqués, macrame, a collection of decorative weapons, etc., etc. on it. Aesthetic and original.

As an option, cover the wall at the head of the bed with a laminate that matches the tone of the floor.
- We cut the complementary strips to length in a ratio of 1:3 (cut in thirds). We will lay them out along the top and bottom with a comb, and between them there will be the main ones. The result is a light (or dark) surface between two combs - minimal in labor intensity and economical in material, but quite a decent design solution.
- We will purchase the main and complementary strips in equal quantities and cut them into squares. The idea is clear: the walls are in the form of a chessboard. It is not so trivial if you stick flat symbols of chess pieces made of thick sheet plastic onto some squares. You can depict a collection of chess studies.
- Let's cut both the main and complementary strips in a 1:2 ratio, and lay out a pattern from them, or simply scatter them in artistic chaos. The result is complete freedom of expression.
In the last option there is a stumbling block: if you lay it down as you please, then there will not be enough space for some fragment at the top, or there will be a gap. Therefore, the pattern (or artistic disorder) must be laid out on the floor in advance, just like that, without fastening, and transferred to the wall in pieces.
What if the room is narrow? In this case, you need to simulate the pattern on a computer in any computer design program, at least in the well-known CorelDraw, number the real fragments accordingly and arrange them in numerical order horizontally.
If you only have basic computer skills, then perhaps it will be easier to cut pieces of thick multi-colored paper to scale, lay them out on the table, and then transfer the numbering from there to the “living” pieces. Numbers, of course, need to be applied to their back side.
Conclusion
As you can see, covering walls with laminate is not only possible for almost anyone. Laminate also provides ample opportunities for manifestation creativity people who do not have artistic education and skills. Even the cheapest laminate of only two tones allows you to express the individuality of its owner in the design of an apartment.
Video: example of complex laminate cladding of a loggia
Despite the fact that the video is made full skin balcony with laminate, we remind you once again that such a solution should be resorted to only if you are deeply confident in the good microclimate of the room, or use more serious laminated panels based on MDF.
Reading time: 4 minutes. Published 10/29/2016
Decorating walls with wood allows you to create an extraordinary atmosphere and original interior any room. Only the price of natural wood is very high, which reduces the possibility of using it for ordinary people. You can get out of this situation by finishing the walls with laminate, which combines low cost and excellent quality of finishing. Let's look at how to attach laminate flooring to the wall below.
Advantages
The following types of advantages can be attributed to laminate:
- low cost of building materials;
- practicality of using the product;
- environmental friendliness;
- excellent external features materials that imitate natural wood;
- ease of installation and fastening work.
When decorating walls made of laminate, the latter allows you to maintain the main features of functionality over a long period. Laminate is resistant to external factors and also minimizes wall loads.
Finishing walls with laminate allows you to be guided by the unlimited possibilities of the designers' imagination. If we compare laminate with other finishing materials, it is determined not only by durability and strength, but also by low cost.
How to fix and lay laminate flooring on a wall
Depending on the chosen option for laying building materials, this procedure should be performed very carefully. Laying laminate is divided into two methods:
 Installing laminate flooring on a flat surface
 - glue installation, but it is important to take into account that the laminate should be laid on a perfectly flat surface. This building material is laid directly on glue or liquid nails, and the surface for installation is pre-leveled and dried;
 Laying laminate flooring on sheathing
 - installation on a special lathing, as a result of which the laminate is laid on a pre-prepared frame made of slats and bars. This option provides an additional opportunity to install insulating wall materials on the walls.
Tongue and groove laminate used for wall decoration, as it is equipped with a special lock in its design. When installing laminate, glue is applied to the reverse side, while the joints of the material remain dry and also have beautiful view. When installed on a lath, this laminate is secured with small nails or staples.
Click view of laminate can be attached using an adhesive base to the sheathing. Laminate of this kind is determined by its strength and stability. You should choose it directly from such a factor as the installation position. When installed in a horizontal position, a click type with strong locks should be used. If you plan to install laminate flooring in vertical position, then you can use any type of laminate.
Wall decoration with laminate is in an unusual way decoration, since it has long proven itself as a strong and durable floor covering. However, laying laminate on the wall is increasingly replacing wall decoration with plastic or MDF panels, lining or plasterboard. In addition, the technology and installation methods are quite simple; you can do them yourself if you follow photo examples and video instructions.
Laying laminate on the wall
If you are wondering what arguments exist for laying laminate on walls, it is worth listing its advantages:
- Modern laminate – environmentally friendly pure material without harmful fumes.
- It is durable, strong, and has a service life of more than ten years.
- Laminate will hide any unevenness in the walls, so it can be used both in an apartment and in a private house.
- Laminate flooring should be chosen according to your choice. high class strength. But, using it as a wall covering, you can save significantly on this by choosing low classes, since the material on the walls is not exposed to the same influences as on the floor.
- Thanks to the wide variety of textures and shades, you can bring to life any design idea in the apartment.
- Antistatic – dust will not accumulate on the walls, and the ceiling can be washed.
- Working with this material is quite simple; you can do it yourself.
However, there are some disadvantages:
- The material is sensitive to high moisture.
- Sensitivity to temperature changes, which may have Negative influence on the appearance of the material.
Choosing a laminate
There are three types of laminate: tongue and groove, click and adhesive.

You can use it to cover a wall, but only if it is perfectly flat.
Laying methods
Before choosing a method for laying laminate flooring yourself, you should understand two questions:
- Glue or lathing?
- Vertical method or horizontal?
 lathing for laminate
 The first question reflects the methods of fastening - using glue or by arranging lathing on the wall. The adhesive method is quite simple, it is suitable for all types of laminate, but it places high demands on the quality of the wall surface - it must be uniform and even, otherwise gaps and joints will be visible, and for a long time the panels on such a wall will not be able to hold up. But this method is very simple, installation is easy to do with your own hands. The method of creating sheathing has advantages in that there is no need to spend time and money on leveling the walls, and it also creates additional sound and heat insulation of surfaces. If, when decorating the walls with laminate, the ceiling is additionally decorated, this will serve as good sound insulation from neighbors above.
 vertical laying of laminate on the wall
 The second question reflects how laminate flooring is laid - in vertical or horizontal stripes. Horizontal method, at first glance, seems to be the simplest - the panels are laid in horizontal rows one above the other. But all joints must be covered with skirting boards, which are attached to the wall with dowels. They need to be installed every meter and a half, otherwise the entire cladding, without additional fastenings, will form like an accordion. To give strength to the laminate with this installation method, you need to alternate half-sections, i.e. shorter panels, with longer ones, stacking them on top of each other (see photo). Shorter panels will allow the load to be evenly distributed across the mounting points.
The vertical method of laying laminate will create original design a wall, the design of which will also affect the ceiling, if, for example, you combine different shades or sizes of panels (see photo).
What will you need to install laminate flooring on walls?
When laying laminate flooring on walls and ceilings with your own hands, you will need the following tools:

To make the installation process and technology more understandable, you can watch the video at the end of the article for clarity.
 laying laminate on the wall
 Step-by-step instruction
- Preliminary calculation of the required amount of material. At the same time, do not forget to count the excess material for fitting and trimming.
- Preparing the surface for installation - first clean the wall or ceiling, level it, and dry it if the adhesive method is used. When creating the sheathing, wooden or metal slats with a width of 20–40 mm are used, fastened with self-tapping screws with a width between them of 30–40 cm. The location of the slats should be perpendicular to the location of the slats.
- Selecting the starting point for laying. If the entire wall is laid out, laying begins from the top left point, unless part of the wall reaches the ceiling - from the floor from the same point. You should mark the distance of one strip and start laying the cladding from this border, regardless of the method of laying the laminate.
- Installation of laminate panels. Using glue method The adhesive is applied to the back side of the panel and pressed tightly to the surface; you can also glue the locks. It is not recommended to rigidly fix the panels butt to butt. When creating the sheathing, the fastening technology is carried out similarly to working with lining and plastic panels, using clamps or small nails
- Installation of skirting boards. After the laminate is laid on the wall or ceiling, the joints with the wall or floor must be covered with baseboards and corners.
This article was prepared with the support of the online store
On the wall, at first glance it will seem unusual to a person uninitiated in the trend of modern renovation. However, there is no exoticism here. In fact, this type of finish is not only unusual, interesting view, but also very practical and durable. Laminate has been used for quite a long time for laying on floors in various rooms- Everyone is used to this. But cladding walls with this material is perhaps extremely rare. There are a lot of photos by which you can judge an interesting character this method room decoration.
In this article we will look at ways to cover walls with laminate with your own hands, the technical and aesthetic components of this method. The use of laminate for laying on walls is increasingly used in interior residential and office premises. Use of MDF panels and various types siding is becoming a thing of the past. In this article we will tell you how to attach laminate flooring to a wall with your own hands and show photo and video instructions.
Advantages of laminate for wall cladding
- The main advantage of laminate is its environmental friendliness. It does not contain toxic fumes, so it is ideal for wide use indoors.
- Laminate was originally designed as a floor covering, so it has excellent strength characteristics, which means it will last on the wall for a very long time.
- Since the cost of a laminate directly depends on the strength class, a low-class laminate is perfect for wall cladding, without sacrificing quality at all.
- A huge number of different textures and colors. This opens up great horizons for imagination when decorating walls.
- Easy installation of laminated panels. This means that even an inexperienced person can lay laminate flooring.
Flaws

Unfortunately, this method also has disadvantages. Fortunately there are few of them:
- The susceptibility of this finishing material to moisture. Therefore, prolonged contact of the laminate with water may cause deformation or swelling of the panels.
- Some sensitivity to sudden temperature changes. This drawback must be taken into account, for example, when tiling kitchen walls. In case of particularly unfavorable temperature conditions, the quality of appearance may decrease slightly.
That's all. It is enough to take some precautions, for example, it is not recommended to lay laminate on the walls of a bathroom, balcony, or kitchen. As finishing coating It is best to use traditional, proven methods for the walls of these rooms.
How to choose laminate for wall cladding

- Conventional shunt laminate. This view is familiar to everyone. This is what is most often placed on the floor. The convenience of its use lies in the fact that the laminated panels themselves are connected with a special shunt lock;
- Adhesive laminate. This type of panel is connected to the surface and to each other using construction adhesive or ordinary liquid nails.
- Laminate with click lock. This type has a more advanced lock that snaps into place, preventing the panels from coming apart. This laminate has higher strength.
Laminate is divided not only by color and texture, but the main indicator is its strength class. It is this parameter that determines the price of the material. You need to remember - the higher the class, the higher the quality of the laminate. The advantage of using laminate boards for wall decoration is also the possibility of using low-class panels 21-31. After all, there will be no mechanical load on the laminate.
How to attach to walls

So, to get beautiful finishes on walls, you will need to carefully level the surface. The beauty and neatness of the cladding depends on this. Treat this preparatory step as the most important. How to fix the laminate is also important. Laying laminate on walls is done in two ways:
- Fastening to the sheathing. Used in cases of large curvature of walls. The advantage of this method is that there is no need to level the walls. In addition, an additional layer of heat and noise insulation can be laid under the sheathing. In modern budget apartments with “cardboard” walls, this method may be preferable.
- First of all, you need to calculate required amount laminate To this amount you need to add another 10 percent for cutting and fitting.
- Prepare the wall for installation. The wall must be smooth and dry. If you decide to do the sheathing, it will require a little more effort on your part. The sheathing is made either from wooden bars, or from metal or aluminum profiles, which are attached to the wall with self-tapping screws. The distance between the screws should be no more than 40 cm.
- Gluing directly to the wall. Here, preparation of the surface for gluing is of particular importance. Various glues can be used: construction glue, liquid nails, titanium, etc. The glue is applied using a “snake”.
Work order

- First of all, you need to calculate the required amount of laminate. To this amount you need to add another 10% for cutting and fitting.
- Prepare the wall for installation. The wall must be smooth and dry. If you decide to do the sheathing, it will require a little more effort on your part. The lathing is made either from wooden blocks, or from metal or aluminum profiles, which are attached to the wall with self-tapping screws. The distance between screws should be no more than 40 cm
- The panels can be attached to the wall either vertically or horizontally. If you plan to cover the entire wall from ceiling to floor, it is better to start at the top.
- If the laminate is glued, it is treated adhesive composition, press it against the wall and fix it for a while until the glue sets. The panels are attached to the sheathing using staples, such as are used for mounting plastic panels.
- After finishing the walls, it is necessary to give them a finished look by installing ceiling and floor skirting boards.
Photo


Video
This video shows the process of attaching laminate to the wall, with explanations from the master performing the work:
This video will help you understand how to seal niches in the wall with laminate: