Cool DIY photo frames - new items and original decor ideas. Unusual DIY photo frame decor ideas DIY small photo frame
In this master class you will learn how to make a paper frame with your own hands. This is a very simple step by step lesson that can be learned in just a few minutes. The main advantage of homemade paper photo frames is the simplicity of the materials (we will even make them without glue!) and technique. The craft will turn out beautiful and original, it will look very decent.
If you need to give a photo to someone, make this DIY photo frame to go with it. You will spend 5-10 minutes of your time, and the presentation will look completely different. The same goes for the idea of decorating a wall with photographs: so as not to go broke on ready-made options, it’s easier to make a lot of paper frames at home and arrange them beautifully on a convenient surface. By the way, these frames can also be made hanging - it’s not at all difficult to thread a thread through them.
What do we need?
- template for frame
- cardboard or thick colored paper(A4 format will be enough)
How to do it?
First you need to print out the frame template. It looks like this.

If you don't have the opportunity to make a printout, then make a template for a homemade paper frame with your own hands. To do this, you need to place a photograph in the center of the sheet and trace its outline (or simply draw a rectangle of the appropriate size in the center of the paper). Then set the strips aside different sizes(alternate strips 1.5 cm and 1 cm wide). Make indentations at the top and bottom as shown in the template.


The short sides are folded first, followed by the long ones. We need to insert the corners of the long sides of the paper frame into the corners of its short sides to secure the structure tightly.

If the paper is very thick and glossy, it makes sense to insert the photo first, and only then fold the sides. This way it will “sit” tighter. If you are worried about the design, you can drop a little glue or use double-sided tape.
Paper photo frames often also include drawings or cards with your favorite motivational quotes.

In this thematic section you can find hundreds of interesting ready-made solutions on creating original photo frames and frames.
How to create with your own hands a truly exclusive frame for a bright shot from life or a worthy work of art, shown in illustrated step-by-step master classes. Table and wall frames, classic shapes or in the form of flowers, suns, hearts, boxes and other things. Made from cardboard, salt dough, pasta, plastic dishes, other improvised and waste material. And also unusual decorations that will help turn any, even the simplest frame into an exclusive one.
Author's frames for photos and drawings.
Contained in sections:Showing publications 1-10 of 379.
All sections | DIY photo frames and frames
C spruce: make together with moms photo frame"Pussy" made of napkin lumps. Tasks: to cultivate love and respect for the mother, a feeling of gratitude. Promote the rapprochement of children and parents, the development of positive emotions, a sense of mutual assistance. Move Events: The word “mother” is one of...
 For older children preschool age I like making functional gifts ( Christmas decorations, pincushions, flower pot decorations, etc. Such things are visible, they are actively used and it brings joy to the child. This year for Mother's Day we...
DIY photo frames and frames - Master class “Photo frame “Musical note” made from wooden clothespins with your own hands
Publication “Master class “Photo frame “Musical note” made of wooden clothespins...”  Really interesting things can be made from wooden clothespins. These crafts will delight children every day or they will come in handy as a beautiful gift. The main thing we need to master is the decor of clothespins, and our imagination will do the rest for us. What do we need...
 Image library "MAAM-pictures"
 In December, as part of the weekend club "Tsvetik - Seven-Tsvetik" the group "Rainbow" visited the Fire Station. The children were met by the unit duty officer. Under his leadership, the children walked around the territory of the unit, examined a fire truck and the necessary equipment for extinguishing a fire. Getting to know...
 I wanted to make something like this for a long time with a frame for congratulating children on their birthday, since the established tradition of placing congratulations on children’s birthday in the locker room, in full view of their parents, and writing the name of the birthday boy seemed wrong to me. Rather, in relation to...
Master class for parents “Making a photo frame from pasta” Master class for parents “Making a photo frame from pasta.” Goal: teach parents how to make a photo frame from pasta. Objectives: to develop knowledge about the technology of making photo frames from pasta; show ways of coloring pasta; Do you think they can...
Do-it-yourself photo frames and frames - Photo report “Do-it-yourself photo frame”
 Our group is located on the second floor. We decided to decorate the flight of stairs leading up to it with photographs of children. To make it look bright and beautiful, parents and children were invited to the DIY photo frame master class. Prepared for them necessary materials, talked about...
 "Play. Explore. Learn" Didactic games carried out with kids kindergarten, starting from the very early age. Exists a large number of exciting games through which teachers introduce little pupils to natural objects and objects, their color, shape...
In times of digital technology, the value of paper image media has dropped significantly. But in vain, photography is primarily a memory from the past. People are accustomed to keeping things dear to their hearts close to them. But storing photos in digital media is not always convenient, and the presence of an attractive frame with a favorite image on the table automatically attracts the eye and, accordingly, brings back pleasant memories. You can make a photo frame with your own hands from available materials, using natural materials for decoration.
You can make a photo frame with your own hands using available materials
Knowing how to make photo frames yourself at home is quite useful - sometimes a frame is required non-standard sizes to hang on the wall, for example, a poster from your beloved computer game, or photo large sizes, but buying a large frame can be quite expensive, and it’s not always possible to find a color and texture that matches the photo. A homemade frame will come to the rescue if you decide to hang a hand-embroidered picture on the wall, or certificate of honor, or a page of compiled handwritten text - at weddings and anniversaries, guests often write such congratulations and wishes as a keepsake to the newlyweds or celebrants. Photo from kindergarten, or from school line September 1st, wedding or just good photo from a walk - are there many reasons to hang one of your happy moments on the wall or put it on the table? Let's take a step-by-step look at how to make a suitable frame for them.
You will need:
- 2 sheets of thick paper measuring 30 by 35 cm;
- Old glossy magazine;
- PVA glue, a piece of cardboard;
- Multi-colored threads, colorless nail polish;
- Stationery knife.

This photo frame will be quite affordable.
How to do:
- Stepping back from the edges of the sheet, measure 5 cm. Draw lines along the marked points. Cut the resulting rectangle from the middle of the paper sheet. The result is the base of a photo frame.
- Roll one magazine page tightly into a tube and secure the edges with glue.
- Wrap thread around the curled page, securing the ends of the threads at the bottom.
- Make several of these tubes.
- Glue each piece to the base starting from internal corners products. To give the effect of a volumetric bend, bend the tube at the corners.
- Glue three sides of the second sheet of paper to the inside of the frame. The fourth side is necessary for placing photographs into the product.
- We form the frame leg from a piece of cardboard.
After drying, the craft can be carefully and easily coated with varnish.
Cool DIY photo frame in 5 minutes (video)
How to make a beautiful photo frame from cardboard
Necessary:
- Colored cardboard, colored paper;
- Stationery knife;
- Colored pencils, stickers.

A cardboard photo frame can be very simple
How to do:
- Cut out a rectangle of the given parameter with a stationery knife.
- Mark the dimensions of the photograph on the wrong side of the figure, deviate 1 cm from the markings, and place measurement points for the window. Cut out the inner rectangle.
- We cut out the inner side of the product from less dense paper.
- Glue both sides of the frame, leaving one side for inserting a photo.
- Draw the desired pattern with pencils and decorate with stickers. The edges of the photo frame can be decorated with golden chocolate wrapper.
We make the frame's stand from cardboard. Cut a thin rectangle, fold it in half, and glue it to the craft with the base.
Original design for a photo frame: master class
A very delicate and beautiful frame is obtained when decorated with artificial flowers, wallpaper, pieces of lace or braid.
Necessary:
- Wooden or plywood frame - base;
- Scissors, glue;
- Pieces of wallpaper, golden braid, lace, beads.
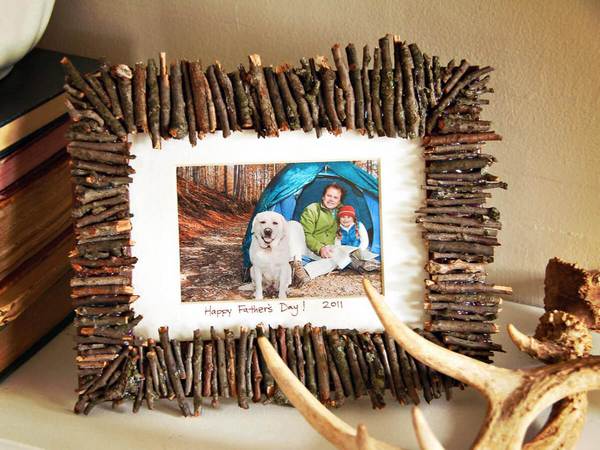
The photo frame can even be decorated with broken branches
How to do:
- Artificial lilac branches or other flowers with small fluffy flowers are ideal for crafts. Arrange each flower into inflorescences.
- Cover the base with wallpaper and let it dry completely.
- Place one inflorescence on a drop of glue from the top corner, bend the petal up a little and glue the second one next to it. Thus, fill the entire top corner frames.
- We decorate the lower opposite edge with lace, gluing it with glue.
- We glue golden braid along the edges of the inner frame.
- Place the beads on the glue like flower cores. Glue beads of the appropriate tone to the lace ornament.
- Glue a piece of starched lace along the top of the flower corner of the craft.
How to decorate a regular photo frame
Photo frame design options:
- Worn discs. Since the material, when broken, contains sharp corners, it is more advisable to wrap the discs in an unnecessary towel. Break it with a hammer. Place small pieces in an interesting mosaic on the frame using glue. After drying, apply black paint to the spaces between the fragments. acrylic paint under gloss.
- Wallpaper. Pieces of wallpaper remaining after renovation are very suitable for decorating crafts, especially if they have pictures. Cut out a wallpaper pattern or flower and glue it to the corner of the frame.
- Old buttons. Collect all unpaired buttons. Decorate the product with them, gluing them with glue from the outer corners.
- Sea pebbles and shells. They look great when paired with starfish decor made from salt dough, rope threads and a figurine of a sea anchor. Such a frame with a joint photo is a wonderful gift for a loved one.
- Satin ribbons. When gluing the ribbon as a decorative element, decorate it with the remnants of lace.
- Puzzles. Pieces of the picture, laid out randomly around the frame, will be an amazing addition to a child’s photograph. For variety, add toy figures cut out of paper to your decor.
- Decorate the frame in the New Year style with Christmas tree tinsel and shards of balls.
- Paints. To paint frame parts, it is better to use gouache or acrylic paint.
- Pieces of fabric. Here you can come up with both finishing each detail of the frame with a fabric base, and weaving decorative elements from fabric strips.
- Quilling and beads. Paper swirls will make the photo frame very interesting. And beads and beads give the decoration a fabulous look.
- Colored threads. They harmonize well as decoration when creating frames from magazine pages. Tie each page with thread and glue it to the base of the product.

The photo frame can be decorated however you like
If desired, crafts can be decorated with decorative small flowers, knitting threads, pieces of wool, dry herbarium, colored pasta or seeds.
What can you use to make a photo frame with your own hands?
If you plan to hang a framed photograph on the wall, it is better to use lightweight material for production - ceiling plinth, cardboard, paper.
- A very simple frame layout can be made from ceiling plinth. The smooth surface of the material will ensure that you do not make a mistake in size. Use a ruler to carefully measure the required measurements and cut with a utility knife. Further, according to inspiration, the product can be decorated with paints or decorated natural materials: shells, branches and leaves of a tree. After the glued decor has completely dried, carefully cover the craft with colorless wood varnish.
- Wooden frames are more durable in construction. For the craft, take two identical strips in size. Knock down with nails or glue in the form of a rectangle, open with varnish.
- A photo frame made of cardboard and yarn is a very easy craft to make. Fold into a rectangle or other shape geometric figure cardboard or thick paper in several layers. Carefully spreading PVA glue, we sequentially glue the frame with multi-colored yarn and buttons.
- The frame made of glossy magazine. Roll each page of the magazine into a tube and glue it into a geometric shape.
You can involve your child in creating a frame from dough. A fun activity It will amuse the little restless person, and the product will turn out to be unusual.
- Mix flour, non-iodized salt and water. We take salt in half the portion of flour, and half as much water as salt.
- After kneading the dough, let it rest, then mold the craft. Ready frame keep in the oven at 80 degrees until completely dry on both sides.
- The ornament for such a product can be molded together with the frame.
After drying, paint the craft with gouache and open it with colorless nail polish.