DIY cardboard scratching post. DIY cat scratching post: saving furniture from a furry prankster
All cats have a need to sharpen their claws. This leads to the fact that they begin to damage wallpaper and furniture. A special design - a scratching post - will help to avoid this.
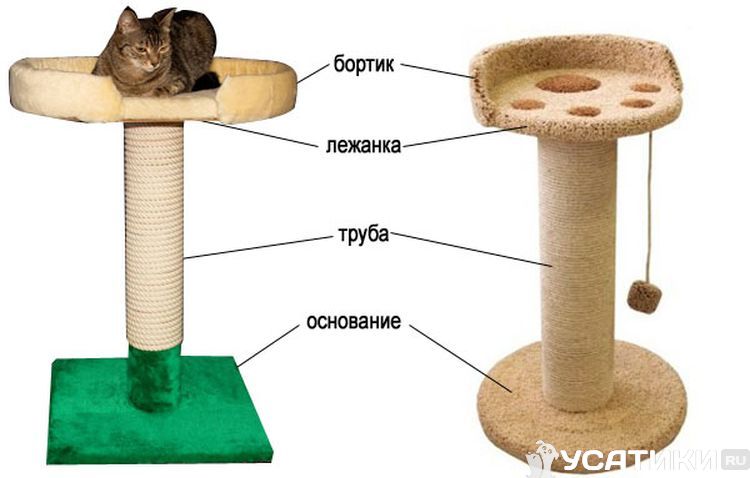
Scratching post with shelves
To create such a scratching post for a cat with your own hands, you will need to follow the following steps.
Stages of making a scratching post:
1. Manufacturing drawing, calculating dimensions and purchasing materials.
2. Jigsaw Parts of the required configuration and size are cut out of a furniture panel or sheet of plywood. Cut pieces of pipes to the required length.
3. On the board that will be the base, mark the place where the pipe is attached by tracing it. Suspensions for straight-shaped drywall, bend and attach with self-tapping screws to the base along the edges of the circle. They place a pipe between them and also secure it with self-tapping screws. This type of fastening is reliable.

DIY scratching post with a cat bed. Photo

4. The base is tightened cloth, making a hole in it for the pipe. Fasten the fabric using a furniture stapler.

5. Next, to make a scratching post for a cat, attach it to the pipe on top shelf. Awnings fixed to the pipe. Holes are cut in the shelf in the right places. Canopies are threaded through them, bent and fixed.

6. Two pipes of smaller diameter are installed on the shelf. Fastening is carried out in the same way as in the case of a large pipe.

7. Lay a layer on the surface of the shelf foam rubber. It is covered with fabric on top, making holes for the pipes. The fabric is fixed with a stapler.

8. A shelf is installed on the pipes and secured in the same way as the previous one. It is covered with a foam sheet and fabric.


9. All pipes are wrapped with rope, securing the ends with durable glue.

how to make a scratching post for a cat. Master Class

DIY cat scratching post with bed
To make a scratching post with a cat bed with your own hands, you first need to prepare. The master class below will help you cope with the task.

Since cats differ in height and size, the choice of design sizes must be approached individually. First, find out how much space the cat needs when lying down. Based on this, a material with the required parameters is selected. It will then be cut out oval bed.

For the lower base you will need a board with the same characteristics so that the structure is stable. You can take thicker and more massive material.

To determine the height, the cat is raised on its hind legs. The required height is the point where it reaches with the front ones. You can make it a little higher to make it more comfortable for the animal.

Cutting out the details
Next, in making a scratching post with a cat bed with your own hands, you need to cut out all the details. First, two rectangles are cut out according to the given parameters. Diagonal lines are drawn on them to determine the center. On the part for the bed - on both sides.

DIY scratching post with a cat bed. Photos step by step

Before sawing out the bed, make a paper sh ablon. It is applied to chipboard or plywood and outlined. The resulting oval is cut out, and the edges are cleaned with sandpaper if there are any roughness on them. You will need two such ovals, one preferably made of a thinner material. Using the same template, an oval is cut out of foam rubber.

The side for the bed is made from metal. First, it is cut out of paper to determine the size. And then with metal scissors from a metal strip.


Next, to make a scratching post for a cat, cut off a piece of pipe of the required length. The pipe is taken with a diameter of eight to eleven centimeters. It can be either a plastic or cardboard part, but it is quite durable.

To make the pipe more stable, two bars of the required size are inserted into it and secured with self-tapping screws.

Assembling the scratching post
You should assemble a cat scratching post with your own hands in the following order. First, the pipe is applied to the base board and the fastening points are marked. At these points, the material is slightly drilled out to deepen the heads of the screws.


Base board sheathed fabric or fur. To cut it, they place it on the material and measure out the necessary parameters, taking into account allowances for bends of four centimeters on all sides.

The rectangular piece is cut out, turned upside down and a circle is drawn in the center to fit the size of the pipe, and then cut out.

To save rope when winding, bottom part the pipes can also be covered with faux fur. Cats usually don’t use fifteen centimeters below.

The cut out rectangular part is glued to the pipe from below. A hot glue gun is used for this. Glue is required without a strong odor.

A piece of sheathing for the base is put on and glued. The cutout area around the pipe must be glued especially carefully so that the material does not come off.

The structure is turned over to glue the edges that bend to the other side. Additionally, they are secured with a furniture stapler.


Take one of the ovals (the one that is thinner), apply a pipe to the center and draw a circle. This circle needs to be cut out. The oval is placed on a pipe leg.

Attach the oval base of the bed according to the same principle as the base.

Glued on top of the bed foam rubber and cover it with fabric or fur. The bottom edges of the material are carefully glued and secured with a stapler.

Attach a rope to hang the toy. This is also done with a stapler from the underside of the bed.

The metal side of the bed is covered with foam rubber. Excess pieces of foam rubber are cut off.


The finished side is screwed to the bed with self-tapping screws.

The structure is turned over, the fur or fabric is pulled and straightened. Secure it with a stapler to the underside of the bed.

After this, the wooden oval that was put on earlier is lowered onto the lower side and carefully glued.

A rectangle of chipboard or plywood is glued to the bottom of the base, which will cover the edges of the fabric.

The structure is almost ready. Left wrap the post a fairly thick, wear-resistant rope. It is better to take cotton or jute rope. The first two and last two turns are glued to the pipe.


Scratching post with a house with its own arms
When planning how to make a scratching post for a cat, you should consider the variety of possible types. One possible option is a scratching post with a house.

Start making a scratching post for a cat with your own hands by selecting the material and cutting out the parts. On rectangular pieces Chipboard draw truncated circles with a radius of twenty-seven centimeters.

DIY cat scratching post step by step instructions. Photo
The circle for the back wall is solid, and on the front they draw the entrance to the house with a diameter of twenty-two centimeters and three decorative holes with a diameter of five and a half centimeters.

Below is a diagram of a cat scratching post and the location of the circles.

make a scratching post for a cat - drawings
Walls and holes are cut out jigsaw. You can cut out small circles using a drill with drill bits.

The walls are placed on top of each other, seven points are marked - the places where the slats are attached. To mark them, drill with a thin drill.

At the places where the slats are attached, recesses are drilled. The screw heads will be hidden in them.

Saw off seven slats 37cm long and with a cross section of 3x4cm. The bottom two may be a little thicker. The surfaces are treated so that there are no roughness or sharp edges.

The slats are screwed to the walls with self-tapping screws.

Parts for finishing the walls are cut out of the fabric, not forgetting about the allowances.

The walls are covered with fabric. The glue is chosen so that there is no strong odor. Can be used hot glue gun.

The fabric on the front wall is cut and the edges of the holes are carefully glued. To make the look neat, you can glue an additional fabric strip.

The house blank is tried on the base - a chipboard board measuring 44x61cm. Mark its position, cut out a piece of foam rubber to fit the bottom, and glue it to the base. Draw a circle where the pipe is attached.

Cut out a piece of fabric for the base, not forgetting about the allowances, and paste over its surface.

The upholstery can be additionally secured on the sides furniture stapler. The bottom is covered with a fiberboard sheet of the required size.

A piece measuring 40x122cm is cut out of fiberboard. This will be the roof of the house. It is covered with fabric.

Two pieces are cut out of the fabric that was used to cover the base. They are glued to the sides of the lower slats of the house.

The house is placed on the base and secured there with self-tapping screws. Recesses are first made on the slats so that the caps do not protrude. The remaining fabric covers the slats completely.

roof secured with a furniture stapler. You can remove the staples by straightening the fabric pile from underneath them.


Those side parts of the house that are visible from the outside are also covered with fabric.


To make a scratching post for a cat in this complex, you need to install a pipe on the base. To do this, take a pipe sixty centimeters high and eleven centimeters in diameter.

To fasten it with self-tapping screws, you need to insert dry wood blocks inside. Such wooden cylinders are inserted on both sides.

For the top bed, semicircles are cut out of chipboard and fiberboard.

A round hole is cut out of the fiberboard blank and placed on the pipe.

The chipboard part is screwed with self-tapping screws to the block, which is located in the pipe.

The house is turned over onto the back wall. Attach a pipe with a stove bench to the base. To ensure that it lies flat, objects of the required thickness are placed under it.

On the underside of the base, recesses are made for the heads of the screws. Then screw the pipe with the stove bench.

The lower part of the pipe is covered with fabric.

A piece is glued to the bed foam rubber. A rope for the toy is secured with a stapler on the bottom side.


The top of the bed is covered with fabric, and at the bends it is additionally secured with a stapler.

A piece of fiberboard is glued to the underside of the bed. The pipe is wrapped with rope and the first two turns are glued from the bottom and top.

For an inclined scratching post, take a board 18x41cm. For better support, the lower rib is cut at an angle of 45 degrees. The board is covered with fabric on both sides, and a rope is wound in the middle.


Cardboard scratching post
You can make a comfortable scratching post for a cat with your own hands from different materials. Below is a master class for making a structure from cardboard.

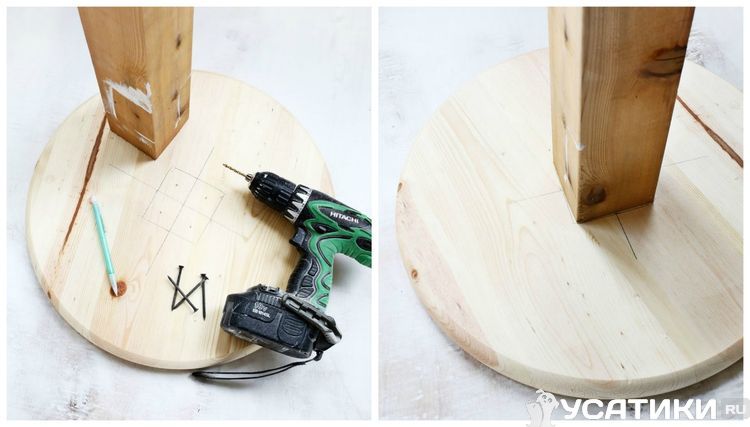
1. For the base you need wooden plank. A hole is drilled in its center.

2. The cardboard will be attached to wooden dowel. A hole is also drilled at one end.

3. The dowel is secured with a screw to the base. To do this, screw a screw into the base, and then screw a dowel onto it. The screw is held with a screwdriver.

4. Prepare and cut templates several levels of scratching post.

5. Using the templates, trace the required number of parts on thick cardboard.

6. Cut out the parts along the contour with a sharp knife.

7. The parts are put on the dowel one after another. There is no need to glue the layers, which allows you to replace damaged parts.

This instruction allows you to make a scratching post for a cat from almost waste material.
Scratching post options
. Conical scratching posts with rope wrapping. In the first option, a rope of natural color is used, and the base is also covered with it. In the second case, the rope is white and the base is covered with fabric.

Variant of scratching post in the form square post on the base. All sides are covered with hard fabric, which is comfortable for the cat. Symmetrical details at the top and bottom make the product more aesthetically pleasing.

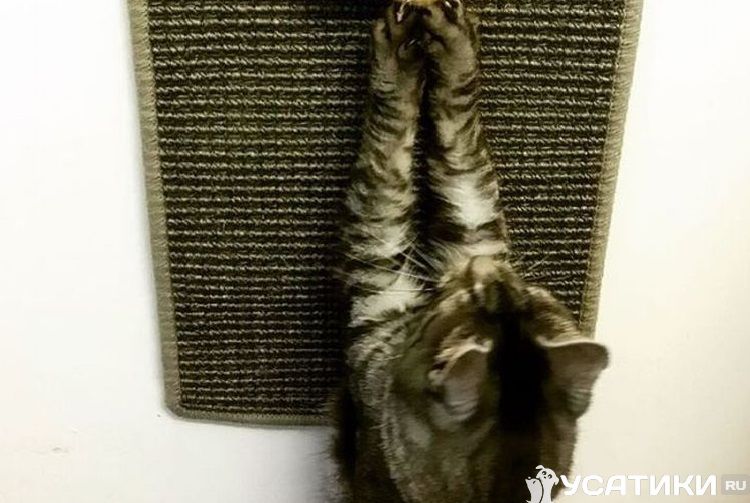
Wall-mounted scratching posts look like squares with fleecy fabric in the center. This option is convenient in cases where there is no space on the floor for the required structure.

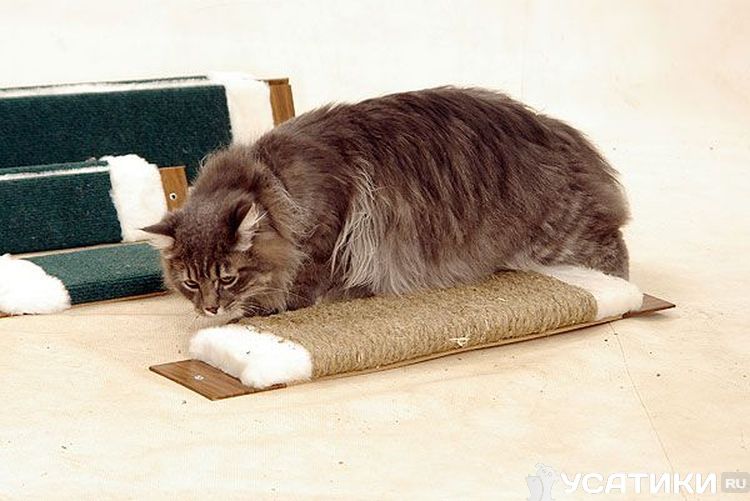
A simple flat scratching post in the form boards with wound rope. It can be placed on the floor, placed against the wall or hung on the wall. Such a scratching post can be attached to the place where the cat is used to sharpening its claws, for example, on furniture.

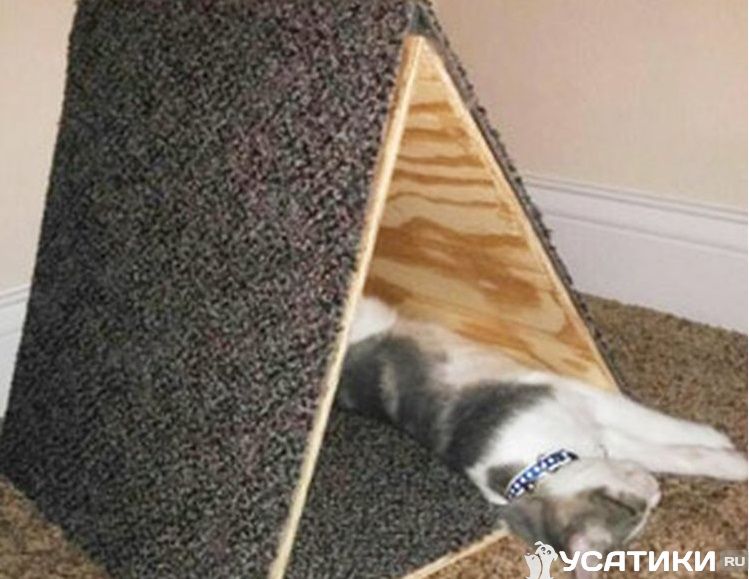
Interesting option corner inclined scratching post. It is compact and convenient for both adult cats and kittens. The spring toy makes the design even more attractive to animals.

Another option inclined corner scratching post. It looks more serious and representative due to its size and design. The black base contrasts with the light brown material in the center.

Interesting complex consisting of a spacious house below, two scratching posts and two beds. This option is perfect for several cats at once. The house and beds are covered with soft material, and the scratching posts are wrapped with rope.

Teaching a cat to sharpen its claws on a scratching post
A cat has natural instincts that must be taken into account. In particular, the need to sharpen claws. A scratching post will help protect furniture and wallpaper, but in some cases the animal needs to be accustomed to it.
First you need to observe where exactly the animal likes to sharpen its claws most. This will help you find a place for the scratching post, as well as choose the material for it.
If your cat likes to sharpen its claws on the wall, then it is better to hang the scratching post there. If you are more attracted to floor carpet, then a flat or inclined design will help.
To attract an animal to a scratching post, you can use catnip or a drop valerian. Even better if there is the smell of another animal. This will force the cat to leave its mark. During the training period, rewarding with a treat is mandatory.
You should not shout at the animal or punish it. This will not achieve good results.
how to train a cat to use a scratching post. Video
Today, the behavior of cats has been studied enough, so owners are familiar with their habit of sharpening their claws from personal experience. However, one should not think that they act this way only to annoy their masters. This happens on an instinctive level. Their nature requires this. Do not forget that cats are predators, although they differ in size from their wild relatives. This explains the urgent need to sharpen the claws. Owners who know what they will face before bringing a cat into the house must first purchase a scratching post so that it will help preserve the furniture in the house.
Living in the wild, cats and their relatives sharpen their claws use tree trunks. Since their claws are constantly growing, and at a high speed, they must sharpen them, otherwise it will be difficult for them to move while hunting. In some animals, claws can grow into their paws, causing cats to feel severe pain. Therefore, they need a hard surface so that they can sharpen their claws without experiencing discomfort.
Pets are limited in this regard, although if there is an ornamental tree growing in the house, they can use its surface to sharpen their claws. However, if there is no suitable item in the house, then the owners need to resolve this issue as quickly as possible and purchase or make a scratching post.
What is the purpose of this device? Many cat owners have the incorrect impression that their pets intentionally tear up carpets or sofas. However, in reality, everything is not so: cats only follow the call of nature, maintaining their claws in proper condition. A person cannot change this situation. All that remains is to do everything possible so that cats can do their “manicure” without harming their home environment.
If you realize the urgent need for a scratching post, then you should not rush to the pet store and choose a suitable device for sharpening claws. Any owner can make the simplest version of this device on his own. This will allow him to save a lot, as well as get an additional reason to be proud of himself.
Why is it better to make a cat house with your own hands?
If we consider the design of store-bought scratching posts, their stability is ensured by a retractable stop. In other words, most of these devices look like a house that is placed discord between floor and ceiling. Seeing such a pipe, young cats will definitely have a desire to climb onto it. However, if they do this too often, over time the device will begin to wobble and at some point fall.
Plastic pipes are used to make the supports of the scratching post, but it is not able to provide this device with sufficient strength. In addition, many devices are designed for use in apartments with standard ceiling heights. They are equipped with a stop of a strictly defined length. In apartments with a high ceiling, it will not be possible to use such devices, so the owner will have to think about purchasing a custom-made scratching post. Naturally, its cost will be much higher than ready-made models. However, it is not necessary to spend a lot of money on this device, because you can make a cat house yourself, saving a lot of money and time.
DIY scratching posts for cats
To begin with, it won’t hurt to take a closer look at the cat scratching post. You should know that the cat house must have certain characteristics so that it can effectively perform its functions:

Project planning
Before you start making your own scratching post, the following issues need to be resolved:
- draw up a design layout;
- prepare the necessary tools;
- purchase building materials.
You should definitely decide which version of the cat house you will make: portable or stationary. If a young, active cat lives in your home, it is recommended that the structure be secured to the floor to give it greater stability.
It is also worth paying attention to the color of the decoration of the cat house. To do this, focus on the design style of the room where you are going to install the claw sharpening device. Make sure that the upholstery material not only looks beautiful, but is also durable enough. Calculate the height of the device in advance, correlating it with the characteristics of the animal. The size of the scratching post should be sufficient for your pet to stretch out to its full height when it wants to sharpen its claws.
If you live in a small apartment, then you can choose one of the following options for making a cat house:
- rope post;
- personal rug on the wall;
- forest thicket;
- corner design.
How to make a scratching post for a cat with your own hands: materials for making
First of all, to you materials need to be prepared to make a cat house:

DIY scratching post: step-by-step instructions
Once the necessary tools and materials are ready, you can begin assembling the cat scratching post with your own hands. Master class on making a cat house with your own hands described in the following steps:
- Base of the structure. It will require wooden boards, the length of which is calculated taking into account the size of the pet. If you are making a scratching post for a short animal, then you can use boards 40 x 40 cm. To make it convenient for large cats to sharpen their claws, it is better to take boards 50 x 50 cm. We take the prepared upholstery fabric, for example, carpet, and spread it on the floor, remembering that that the wrong side should be facing the ceiling. We lay a board on it. Then we mark the required amount of fabric: to do this, the board must be positioned at a distance of 5 cm from the edge. Next, we treat the pattern with glue, and then apply it to the board. To ensure that the material holds well, we additionally secure it with nails.
- Vertical column. Here we need furniture corners. With their help we will install a plastic pipe to the base. However, first you will have to check the dimensions of the pipe and, if necessary, adjust them. When determining the height of the pipe, it is necessary to proceed from the size of the animal, but it should not be lower than 50 cm. When the pipe is installed, we wrap a hemp rope around it from below. At the very beginning, its free end must be fixed to any corner. During winding, the rope should fit as tightly as possible to the pipe, this guarantees its integrity during use by the animal. The other end of the rope must be fixed in a hole that will have to be made in the upper part of the pipe.
- Sun lounger. You can make the scratching post more functional by placing a lounger on top of the pipe. It is made by analogy with the base. The difference is that the space between the board and the fabric is filled with foam rubber. It will be pleasant for the animal to lie on this stand. When the bed is ready, it is fixed to the end of the upper pipe using furniture corners that are secured with screws or nails.
You can also offer many other ideas for making a scratching post with your own hands.
rope post
 If you don’t want to bother making the cat house described above, you can make a simpler option - rope post. The master class for creating it looks like this: we will need a wooden beam, a plastic pipe or a board. You need to wrap a rope around the base. This must be done very carefully so that each turn adheres to each other as tightly as possible. For greater strength, the rope is secured with nails, driving them in at a distance of 10 cm from each other.
By following these fairly simple steps, you will have an excellent tool for sharpening claws. So that the animal can start using the post, it is placed on a heavy, stable base and fixed to it. This will allow you not to worry that your cat will be able to turn the device over while sharpening its claws.
If desired, you can add a padded shelf to the end of the pipe. Having played enough, the animal will begin to look for a suitable place to rest.
Personal rug on the wall
 You will bring joy to your pet if you make for him such a version of a scratching post as personal rug mounted on the wall. This design will be of interest to those owners who do not have the time or desire to make bulky devices for sharpening claws. Making such a rug is simple, since you will need very affordable materials for it: wooden planks, carpet, felt or other dense upholstery material and self-tapping screws.
So, let's move on to the master class. First, we take the fabric and cut out a flap from it, which we hang on the wall, fixing it with strips. They are attached on all sides so that the structure takes the shape of a square or rectangle. When you get a small cat in your house, you can easily teach it to use this device. If you are making a scratching post for an adult animal, then you can let him know what it is if treat the rug with your pet's favorite scent.
forest thicket
You can also do it even simpler, without spending a lot of time and effort on making a special device for sharpening claws. While walking, try to find a dry tree without leaves or a thick branch with a lot of knots and branches. The branch will serve as an excellent material for making a scratching post, which can turn into a real gymnastic corner for an animal.
Corner scratching post
This version of a cat house for sharpening claws can act as a wall for your pet to climb on.
For greater clarity, we will describe a master class on making this device. To make it, you will need boards that must match the width of the door jamb. On top of them attach thick furniture fabric or wind rope. When the claw clipper is ready, it is attached to one side of the door frame. Usually it occupies the entire height of the opening. Having access to such a device, the cat will have the opportunity to sharpen its claws, as well as perform other movements necessary for development - to pull itself up, climb up and down the door frame.
The cost of a homemade scratching post
 Making a homemade scratching post is very profitable, since the costs in this case are 3 times less than if you purchased the device in a store. In addition, a homemade claw clipper is superior to its store-bought counterpart in terms of its performance characteristics. It is distinguished by such qualities as increased functionality, stability and reliability.
Conclusion
Every cat owner knows that their pet regularly has the urge to sharpen its claws. To prevent the animal from causing damage to the furniture in the house, it is recommended to ensure that there is a special device in the house - a scratching post. Moreover, you don’t have to go to a pet store for this, because you can make it yourself. If you follow the step-by-step instructions for creating this device, you can make it at minimal cost functional and reliable device for your pet. If the owner does not have enough time, then he can choose simpler options for scratching posts, which will allow him to save even more.


In situations where a pet begins to damage furniture and wallpaper by scratching them, a scratching post made according to a master class will be the best assistant. If you figure this out well, the task will turn out to be completely uncomplicated, especially considering how much benefit you will get from it.
Since this habit is inherent in the nature of the animal, you cannot scold your pet for its tricks. With a homemade scratching post, the cat will be able to calmly sharpen its claws, and the owner will forget about the problems with the scratched sofa.
You can choose the right scratching post for any apartment, based on its size and design concept. Our master class suggests making one of the following scratching post options for cats:
- scratching post in the shape of a cone, wrapped with ordinary rope, which is glued to the base

- a rectangular product covered with natural fabric to make it convenient for the cat to sharpen its claws on it

- compact scratching posts with fleecy fabric placed on the wall
- houses that combine both a place for a cat to sleep and vertical columns for sharpening claws

- scratching post resembling an ordinary board, which is tightly wrapped with rope
- corner design, which is placed at an angle for the convenience of the pet

Any option can be adapted to suit your apartment and make it convenient for the cat, and if necessary, the structure can be installed exactly in those places where the pet likes to sharpen its claws.
Our master class on creating a scratching post is very simple. If you do not have the opportunity to purchase any materials for its manufacture, there will be suitable things in the house to construct a scratching post according to the diagram. It can be:
- any remnants of coverings (fabric, carpet, etc.) that will be comfortable for the cat;
- small but stable plastic pipes;
- remnants of furniture that has already outlived its usefulness.
It is important to take into account the fact that for manufacturing you need to select materials that will not leave debris as a result of sharpening the claws. You can take a ready-made form as a basis or use cardboard, but it is better to wrap it with fabric or rope on top.
Step-by-step making of a cardboard scratching post
One of the simplest and most affordable materials for a scratching post is cardboard, because it can be found in almost every home. This product will serve your pet for quite a long time, so its production will be not only easy, but also practical. To work you will need to take:
- pencil;
- ruler;
- ordinary cardboard;
- stationery sharp knife;
- fabric or rope for decoration.
You don’t need to have any specific skills to make such a scratching post according to our scheme. Follow the steps below and construct it yourself, without much difficulty or expense:
- Drill a hole in the center of the board.
- Attach the cardboard to a wooden dowel that also has a hole drilled in it, right in the middle.
- Screw the screw into the base, holding it with a screwdriver, and screw the dowel onto it.
- Then, for several levels of the scratching post, you need to prepare templates and cut them out.
- Use these templates to get the pieces you need from cardboard and cut them out with a sharp knife.
- Assemble all the cut pieces onto the dowel.

All you need to do is spend a little time, and a scratching post for a cat from improvised means is ready for use.
Scratching post with a bed for your beloved pet
This design will require some sewing skills, and more complex materials are needed to make the scratching post, namely:
- timber is dry;
- plywood (thickness about 1 cm);
- rope;
- textile;
- self-tapping screws;
- plastic;
- foam;
- sharp knife or scissors;
- necessary construction tools.

Having selected the necessary materials and decided on the size of the future scratching post, you can begin to perform the step-by-step master class presented below:
- Based on the results of measuring the required characteristics, a stable board is selected, which will be the base of the product.
- Cut 2 rectangles to the specified dimensions.
- Determine their center by drawing diagonal lines.
- Make an oval template out of paper before cutting it out of a wooden board or chipboard, attach it to the base and trace the shape.
- Once you have the base of the desired shape, sand the edges.
- Cut another such oval out of plywood, only its thickness should be smaller.
- Make a side for the future bed using metal, and cut out another oval from foam rubber for the bed itself.
- For a scratching post, take a plastic pipe or wooden beam of the required length and diameter and attach it with self-tapping screws.
- Assemble all the received parts as follows: fix the pipe on the base of the scratching post with self-tapping screws, decorate the pipe with fabric or rope using special glue so that it is convenient for the cat to sharpen its claws on it and there is no debris left on the floor, and install the bed itself on top, in the same way , with which the pipe was secured to the base.


This version of the scratching post will be more versatile, since the cat will also have a place to rest. The structure can be placed anywhere, because it is quite compact.
Twine scratching post: step-by-step description
In order for a scratching post made according to our master class to be of high quality, the design and dimensions of the product must be correctly selected. Natural twine is perfect for a standard scratching post in the form of a vertically mounted tube wrapped in fabric or rope. You can do it as follows:
- Take a stable and strong base.
- Make a post of the required size, which can be a regular pipe or a wooden beam.
- Next, you should connect and fix the post on the base of the scratching post.
- Wrap the finished form tightly with rope, the skeins of which should fit tightly together, and secure them with permanent glue.

To make such a scratching post look more interesting, you can install a bed on top or attach some toys to interest the cat.
Making a flat or corner scratching post for a cat
The flat scratching post for cats, the photo of which can be seen above, is made from the same materials as the previous ones, except that it does not need to be mounted on a column.
- You can take any board or timber, the main thing is that it is flat.
- Then you should wrap the base with material that you find around the house.
- Using a stapler, you need to fix the material on the base of the scratching post.

This structure is attached to the wall or floor. Its main convenience is that it can be installed specifically in the place where the cat sharpened its claws before the scratching post appeared in the house.
As for corner structures, the process of its creation involves the use of the above steps, with the exception that it must be made in two planes. Attach it to two surfaces, the floor and the wall, and firmly fix it with self-tapping screws, and this scratching post will serve your pet for a long time.
Tips for making scratching posts at home
If you have never encountered master classes before, then perhaps the process of making a scratching post will seem complicated and time-consuming to you, but it is much easier and faster than you think. Follow the step-by-step recommendations and everything will work out, and small tips will help you avoid mistakes:
- in structures with a house, place it on a pole, since the cat can use this room as a toilet and relieve itself in the wrong place;
- if you have several cats in the house, and you decide to design a scratching post with several beds, then think through everything so that the resting places are at the same level from the floor, otherwise disagreements may arise between the cats;

- the height of the scratching post or the entire structure should not be higher than 1 meter;
- If you want to arouse your pet's interest in the scratching post using toys attached to the structure, make sure that your cat will be interested in it so as not to waste time.
If you take into account all the parameters of the room and the factors that influence the convenience of the cat in using the scratching post, you can create an excellent design according to our scheme and spend your time profitably, saving your own money on the purchase of the product.
Every cat owner sooner or later faces a problem in the form of scratched wallpaper or furniture. What should you do in this case? You can, of course, scold your pet or remove its claws, but it is best to give your pet a scratching post. And then the question arises: buy ready-made in a store or use a homemade version. This article will look at how to make a scratching post for a cat with your own hands at home.
Types of scratching posts
The most common type of scratching post is a vertical post, which is wrapped with twine. Additionally, such structures are equipped with various accessories for playing, for example, a ball.
In general, claw clippers are divided into the following types:
- in shape they can be floor-standing, hanging, corner, in the form of a ring, rug or column;
- by type of construction they consist of several tiers, made in the form of a house, with additional shelves, bridges or toys;
- the scratching stick can be made of cardboard, wood, twine or fabric;
- The size can be selected small, medium, large or solid.
What do scratching posts look like?
Important! There are quite a lot of options; if you are planning to make a cat house with a scratching post with your own hands, you should base it on the preferences of your pet.
Scratching post with shelves
When making a scratcher with shelves, you can make the structure entirely yourself or use some of the furniture for this purpose. Old floor shelves will do.
Several columns are covered with twine. Fabric with faux fur can be applied to flat elements. This way the animal will have a corner not only to sharpen its claws, but also to lie down.

Design with shelves
Scratching post with bed
A nail sharpener with a bed is a good option for those whose cat prefers a more passive lifestyle. Such designs are usually made in the form of a resting place, upholstered with material for sharpening claws.
During production, the main point that you should pay attention to is the dimensions of the animal. Based on this, the bed is made. If the pet is still a kitten, then the scratching post is being prepared for growth.
Scratching post with house
A DIY cat scratching post can also be made in the shape of a house. This option is the most interesting for pets because of their desire for privacy. The house can be of different sizes and shapes: round, square, have a gable roof or a flat surface.
Important! The size of the structure is also selected based on the size of the animal. If the house is too small, the pet will very quickly lose interest in it.

cat house
Cardboard scratching post
Making a scratching post from cardboard is the simplest and most affordable option, since this material is the most pliable and does not require special tools.
If you make it yourself, you will need cardboard from ordinary store boxes, a stationery knife and glue. You should also think about what kind of fabric or material the structure will be upholstered in the future. Absolutely any form can be chosen.
Properties of scratching posts
Before you figure out how to make a scratching post for a cat with your own hands, you should first think about its properties and the most important points. What, first of all, should the design be and what is most important for it?
Sustainability
Since the animal will need to regularly sharpen its claws (and seals do this several times a day), the structure must be in a stable position.
If a floor-standing option is chosen, it should not wobble or fall. Otherwise, your pet will refuse to use it. The same goes for wall scratches. They are attached securely; you can’t just hang the scratching post on a string and hope that the animal will like it.
Note! The most stable design is in the form of a house, with shelves or designed as a bed. However, you should also take your own capabilities into account. Not everyone is able to make a real gaming complex for their pet.
Compactness
The second point, no less important for the owner himself, is that the design must be compact. This is especially important if the cat lives in a small apartment and not in a private house.
If the living space does not allow you to go all out, you should use simple but effective options. For example, make a corner scratching post. It is placed on the floor or mounted on the wall in the corner of the room. This way the animal will be happy, and the owner will not constantly trip over it.
An even simpler, but at the same time effective and compact option is to place a board braided with felt on the wall. As mentioned earlier, the structure must be well secured.
Durability
Since the scratching post is designed for constant use, it should be quite strong, unless a person wants to regularly make new ones for his pet.
Cardboard, unfortunately, will not give a similar effect, and such scratching posts will last at most for several months with active use. The strongest option is wood.
beauty
The aesthetic component is of greater importance for the owner himself. It doesn’t matter to your pet how good and beautiful his scratching post looks. On the other hand, you can give free rein to your imagination and make a really interesting and beautiful design that will harmoniously combine with the interior.
Making at home
There are quite a lot of options for making a nail clipper with your own hands. First of all, a person should clearly decide on the model and material of manufacture and subsequent design.
Necessary materials
Listed below is what is required to make a nail scratcher using different types of material. If the structure is made of cardboard, then you need:
- cardboard or corrugated cardboard;
- stationery knife;
- upholstery fabric;
- thick paper;
- glue, you can use a gun for convenience;
- scotch.
If wood is used as the material (the British really like this option), then you will need the following:
- a small log or stump as a base. It can be found in your dacha or in the forest;
- leg-split;
- self-tapping screws;
- a board for a couch, if you plan to make this kind of structure;
- upholstery material.

Gift for a cat made of wood
Important! You can use a small piece of carpet as a material for turning. It has its advantages, it is more durable than twine, and the animal's claw will not get stuck during use.
Tools for work
The main tool used is glue. Everything else may already be required depending on what material is taken as a basis.
So, for example, when creating a wooden comb, you will need to additionally equip yourself with self-tapping screws and a screwdriver. If the planned design will have shaped elements or parts, you will need a jigsaw.
As already mentioned, the easiest option to make is a cardboard cardboard scratcher. The main tool in this case will be a regular stationery knife.
Assembly
Instructions for assembling a cardboard scratcher:
- Stripes 1 cm wide are drawn on the material used and then cut out.
- The strip is twisted and glued. This is how the middle or core of the future claw blade is made.
- The remaining stripes gradually wind around the core. Each layer is glued or fixed with tape. The last layer should be fixed most securely.
- The resulting pillow is wrapped in fabric or other selected material.
- The manufactured structure is placed on thick paper and outlined around the perimeter.
- The base is cut and attached.
Step-by-step making of a scratching post using wood:
- The selected branch or stump is pre-cleaned with a hard bristle brush.
- The processed workpiece is wrapped with twine, and the rope is fixed with glue. You can cover the entire surface of the tree or just a separate part.
- The workpiece is attached to a wide wooden base using self-tapping screws.
- You can also attach an additional surface to the top and cover it with fabric. It will be used as a bed.
- As an addition, you can tie small toys.

Assembly diagram
Interesting ideas for designing a scratching post
How to make a scratching post for cats with your own hands, diagrams and sizes are available in great abundance on the Internet, and you can always spy an interesting idea.
Craftsman owners can create entire towns from wood and greenery. Another, no less interesting option is to create a soft structure like a hammock, which is attached to the wall. Any cat will like this.
When drawing a drawing yourself, it’s worth using your imagination. You can make a carding machine in the form of several pipes fastened together and cover them with carpet.

Unusual option
When choosing the most suitable option, you should remember that it will be your pet who will sharpen its claws and use the structure, so the design should be made for its convenience and safety.
When a kitten comes home, your home is in great danger of becoming one big scratching post. Of course, this accessory can be purchased, but making a scratching post for cats with your own hands is much more interesting!
How to make the right scratching post yourself? Let's watch the video below.
Making a wall-mounted scratching post with your own hands. Step-by-step instruction
It is not recommended to attach a wall-mounted scratching post to the wall by itself. You will need a wooden panel on which you will attach the future cat accessory. The width of the panel depends only on your design taste, but the height should match the height of the claw sharpener. Or two panels, if you are planning to build a corner claw board.
For manufacturing, you need materials such as a wooden block or the simplest wall panel. The height of the bar is 50-70 cm. To know more precisely, measure the length of your animal (without tail). The height of the bar should be equal to two lengths of the cat, excluding the length of the tail.
Borrow an electric drill from a neighbor, prepare screws and hemp or jute twine (thread diameter is about 5 mm). Buy 2 skeins of twine. This should be enough for a standard scratching post.
Using a drill, drill 6 holes in parallel in the block and in the wooden panel - two holes each at the top, in the middle and at the bottom.
Wrap the twine tightly around the wooden block, carefully securing the ends of the twine. IMPORTANT! Before you tape around the holes left by the drill, insert screws into them!
Final steps - screw the wrapped block to the wooden panel on the wall with screws. Invite your cat to taste a simple wall-mounted scratching post. (Serve with grated catnip!)

DIY scratching post made of corrugated cardboard. Master Class.
A DIY cat scratching post made from cardboard is even faster than a wall-mounted or corner one. It is also more environmentally friendly and fashionable than its claw counterparts. The developers of the idea took as a basis the inexplicable fact that all cats adore cardboard boxes, therefore, they simply cannot pass by a corrugated cardboard scratching post! The service life of the eco-scratching post is approximately 2 months. Therefore, a thrifty owner will not include in the family budget the purchase of such a claw sharpener at a pet store, but will definitely find out how to make a scratching post for a cat with his own hands.

Necessary materials:
Corrugated cardboard or cardboard boxes, thick paper, adhesive tape, PVA glue, paper cutter, fabric for decoration.
Manufacturing diagram step by step
- Lay out the cardboard boxes on flat sheets and draw stripes of equal width on them. You can choose the width arbitrarily; it is better if the scratching post pillow is higher than 10 cm. But the arrangement of the stripes on the cardboard should be such that the folds of the boxes run horizontally with the stripes.
- Cut the cardboard into strips.
- Use your hands to begin rolling the cardboard strips.
- Twist the first one as tightly as possible and secure it with duct tape or glue. This is the core of the structure.
- Step by step, wrap other strips around the core, remembering to secure them with duct tape or glue.
- Fasten the tip of the last strip especially carefully.
- Wrap the cardboard with decorative fabric and secure it too.
- Place the resulting pillow on thick paper, trace with a pencil and cut out the bottom of the scratching post.
- Attach the base with glue or tape.
- Your DIY corrugated cardboard scratching post is ready!
P.S. The photo shows that corrugated cardboard ideas are not limited to pillows. Loungers and ottomans made of this material are also very practical.

Scratching post-post. We do it ourselves - the cat rejoices
This cat simulator is especially loved by our pets. The average height of such a claw sharpener is approximately 1 meter. And the main difficulty in making a column is to find the column itself!

So, your cat is lucky and the appropriate size pipe is already at home. What else you will need:
- wooden base-podium;
- carpet or twine (jute thread);
- construction stapler and staples for it;
- fabric for the podium;
- filling for the pipe (construction foam, heavy wooden beam).

Step-by-step instruction:
- Cover a wooden square podium with velvety fabric and use a stapler on the floor side to secure the fabric with staples;
- Cover the column with carpet or wrap it with jute;
- Fill the hollow pipe with construction foam or weigh it down with timber;
- Secure the pipe with a self-tapping screw exactly in the middle of the podium;
- Mask the top of the column with a pre-made “cap”;
- You should hang the ball on a long string.
The scratching post is ready!

DIY kitty house
A scratching post house for a pet is already aerobatics. In fact, this structure turns into a gaming complex, so the owner’s task is to take into account all the details at the design stage. But, as you know, if the handles are golden, it doesn’t matter where they come from!
Required building materials:
- OSB boards (8 mm and 12 mm). They can be replaced with plywood or chipboard sheets;
- a large piece of fabric, faux fur, carpet;
- self-tapping screws;
- hot glue gun;
- staples;
- metal pipe (or several pipes, depending on the final design);
- several skeins of hemp or jute twine;
- corners for furniture.
Required tools:
Tape measure, pencil, jigsaw, screwdriver, drill, compass, construction stapler, hammer, scissors, heat gun, knife, hacksaw, screwdrivers.
- Drawing a diagram
- We begin to cut OSB boards or chipboard boards.
In the video you can see how to draw patterns for a scratching post house.
- We assemble the patterns and the pipe(s) into a single whole, fasten it like a man and invite the cat to admire the unprecedented beauty.
- Wrap the posts with jute, carefully fixing its ends.
- Cover the remaining surfaces with fabric or faux fur; you can mix materials.
- Hang a decoy toy.
- Remember about!
Natural wood scratching post
A scratching post made of natural wood is a wonderful decorative element. If you are lucky enough to find a suitable wooden element in a nearby forested area or at your dacha, bring it into the house. Bring it on and laugh it off that you are not Lenin with a log, but a caring owner of a beautiful cat!
- Clean the wood piece.
- There is no need to wrap the entire wooden base with twine; just wrap random pieces.
- With the help of a crowbar and a strong word, or rather, with the help of a drill and a man's ingenuity, secure the tree-scratching post to the wall, hang up your pet's toys.

Finally, here are the four main qualities of a good scratching post:
- Sustainability. The structure should not collapse, but it must firmly withstand the weight of the animal.
- Compactness. In a standard apartment, large multi-level structures, of course, will appeal to cats, but they will push people out of their comfort zone.
- Durability. A cat's manicure is a destructive thing, the scratching post needs to be strong enough to withstand it.
- Attractive appearance. You will look at this work of your own for a long time, and therefore the process of contemplation should be enjoyable.