How to make a homemade jigsaw with your own hands from a regular electric jigsaw. DIY jigsaw machine - simple modifications! DIY jigsaw machine
The jigsaw has long ceased to be a rarity and is present in the tool kit of almost everyone. home handyman. It is convenient and capable of cutting various materials, relatively safe. The jigsaw is designed for cutting curved shapes, closed or with a complex configuration. It is indispensable when performing many works on home improvement, during construction plasterboard structures, boxes, on other works.
However, in some cases work hand tools it becomes difficult or inconvenient: poor visibility of the cut line interferes, it becomes necessary to hold the workpiece with both hands, etc. But the main problem with a manual jigsaw is that the file moves to the side, which is especially evident when cutting materials of great thickness and with small radii of curvature. In such cases, you need a jigsaw machine, which you can create with your own hands.
Purpose of the machine and operating principle
Picture 1 - Jigsaw machineThe jigsaw machine is designed to perform curved or straight cuts sheet materials along a pre-planned contour or along guides.
Unlike hand tools, where the file is attached only at one end and holds its shape solely due to its own elasticity, on jigsaw machines the file is attached at both ends.
Such a machine can become a woodworking, tabletop, saw, 4 in 1, made from a circular saw, drill and cutter, etc.
The main design elements are:
- frame with tensioned file;
- crank mechanism, providing reciprocating motion of the frame;
- work table and stand.
The jigsaw successfully replaces the crank mechanism, driving the frame with the saw. There are more simple designs, where the jigsaw is simply attached in an inverted position to the work table from below, and the file either holds its position during operation due to its own elasticity, or is fixed on top by guides or a spring-loaded bracket that moves with it during operation. This allows you to reduce power losses when transmitting movement to the frame, but requires the use of elongated saw blades, which are not often found on sale.
Advantage
The main advantage of a jigsaw machine is the ability to perform precise cuts without the file moving to the side. In addition, the advantages of jigsaw machines over hand tools are:
- more effective visual control over the direction and accuracy of the cut;
- possibility of using guides;
- it becomes possible to install special templates that allow you to obtain many identical blanks;
- A narrower file is used to reduce the radius of curvature and cut out parts of more complex shapes.
Along with these advantages, another one appears - the need to organize a workplace for sawing disappears, since the machine has an appropriate plane for this.
Important! Along with the advantages, there are also obvious disadvantages - cutting out internal parts becomes much more difficult or impossible, only trimming along the outer contour.
Basic design - drawings
There are ready-made platforms that allow you to quickly convert hand tools into machine tools. However, they are designed for jigsaws from a specific manufacturer and are not suitable for any device. In addition, the price of such platforms often far exceeds the cost of the tool itself. Therefore, it is much easier to make the machine yourself.
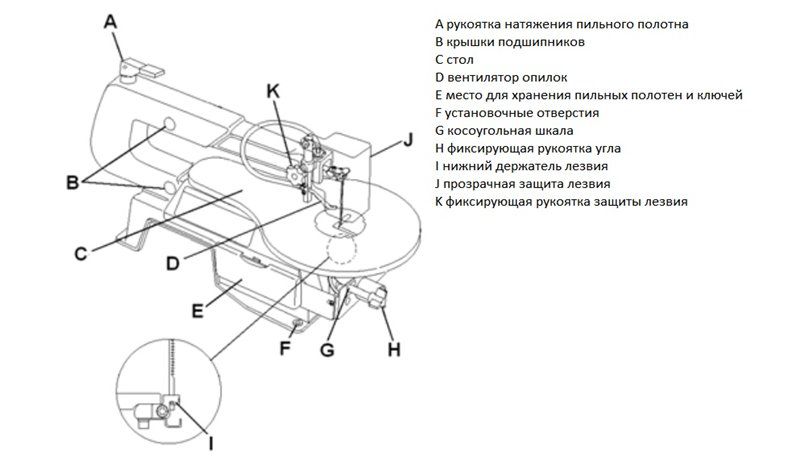 Figure 2- Design of a jigsaw machine
 The basis is the desktop.
It has been experimentally established that tables made of sheet metal- they are durable, ensure installation accuracy, and do not require frequent replacement and do not reduce the working length of the file.
The jigsaw is attached to the table through holes in the support plane; if necessary, it can be easily detached and used in the usual way.
The work table is installed on the bed. It can be made of wood, chipboard or other materials. The main requirement is strength, easy access to the jigsaw and a size (height) convenient for the master.
A rocker arm is installed at the end of the table, on which the second end of the file is attached with tensioner. The simplest option is a regular spring, which tensions the file and prevents it from being pulled to the side during sudden changes in cutting direction. The manufacture of this unit is one of the most difficult stages of work, since the quality and cleanliness of the sawing depends on it, as well as the amount of load on the mechanism and electric motor of the jigsaw.
There are two design options for the tensioner:
- Rigid rocker and spring block at its end with a movable saw attachment.
- A movable rocker with a spring at the opposite end and a rigid saw attachment.
Both options have their pros and cons; the choice is usually made in favor of the option that is the simplest and most accessible in terms of technical capabilities.
How to make a machine from a hand jigsaw?
Let's consider the procedure for making a jigsaw machine. The design consists of a work table with a jigsaw attached to the bottom. The rocker consists of a rigidly reinforced post with a movable spring-loaded lever. This option is considered affordable and reliable, devoid of unnecessary components and parts.
For simplicity and clarity, it is recommended to sketch out working drawings that will clarify some design features and answer questions regarding dimensions, connection points and other details of the assembly process.
The creation of a machine can be divided into three stages, which should be considered separately:
Preparatory stage
Before starting the actual manufacture of the machine, it is necessary to make some preparation. First of all, you should make a special adapter for installing the file. In most jigsaws, the seat end of the file is inserted into a socket and clamped with a screw.
The cutting element of the machine is a thinner and longer file with holes at the ends, which are placed on special pins (or through which mounting screws pass). Therefore, it is necessary to make an adapter, the lower part of which copies the shank of a standard file for a given jigsaw, and the upper part is equipped with a hole for a screw with a nut, with which the adapter is connected to the bench saw.
Here the procedure is not limited in any way - some grind a part of the desired shape from a metal plate, others take a piece of a finished file with a shank and weld a steel washer to it, followed by processing for accuracy.
In addition, you need to prepare necessary tools and materials, including:
 Figure 3 – Drawing of a jigsaw machine
 - Bulgarian;
- electric drill with a set of drills;
- screwdriver;
- welding inverter with electrodes;
- pieces of chipboard or multi-layer plywood for desktop and bed;
- connecting corners;
- fasteners(self-tapping screws or bolts with nuts).
This list is not exhaustive; additional tools or materials may be needed.
Creating blanks
The first step will be to make a desktop. A piece of plywood or chipboard of the planned size is sawn off. There are no special restrictions here, but you will have to take into account the size of the room in which the machine will be placed. Too much small table will be inconvenient for working with large parts, and excessive table space will take up a lot of space in the room (or workshop).
As a rule, when choosing the size of the table, they are guided by the size of the parts that will be processed on the machine. Holes are made on the table for attaching a jigsaw and for a file. To do this, unscrew the sole from the tool, apply it to the table and mark the centers of the holes for the connecting bolts.
Important! The connecting bolts that secure the jigsaw to the work surface must have a countersunk head so that they do not protrude from the plane of the table and do not scratch the workpiece during operation.
 Figure 5 – Jigsaw beam
 The second step will be making the rocker arm. It will require two elements:
- rack;
- movable lever.
Take for the stand profile pipe rectangular section and weld the support platform at the bottom.
Its size should ensure immobility, stability and reliability of the rack during operation under load.
The height should correspond to the length of the file in the maximum raised state, plus a small margin for the size of the attachment point.
The best option is that in the middle position of the saw, the movable lever is in a horizontal position.
The moving element is a beam mounted on a rack using a hinge joint. The length of the front part ensures that the saw blade attachment point is positioned exactly above the corresponding jigsaw element. The back of the lever is connected to a spring that provides tension.
Then you need to make a tension unit. It is a regular spring, which is tensioned using an adjusting screw. It is attached to one end of the spring, threaded through a special loop on the frame and tightened using a nut and washer.
Attention! Vibration can cause the tension nut to unwind, loosening the tension. It is recommended to secure it with a lock nut.
Assembly
The assembly process is not difficult. You need to do the following:
- Connect the work table and the bed.
- Install the jigsaw.
- Secure the stand with bolts.
- Install the lever.
- Attach the tension spring and secure on both sides.
If the calculations were performed correctly, the file will move exactly vertically without yawing to the sides. It is recommended that before starting the jigsaw, check its progress and make sure that no unforeseen situations are expected.
When working with a jigsaw, you should adhere to the following rules:
- do not put your hands near the moving saw;
- do not try to stop the saw or lever with your hands;
- change the cutting element only when the jigsaw is stopped;
- do not make much effort when feeding the workpiece to the cutting body;
- Do not work with workpieces that are too thick.
In addition, you should remember the rules fire safety and always unplug the tool from the socket after finishing work.
Making your own jigsaw machine is not fundamentally difficult, however, not every craftsman needs it. As a rule, such devices are used by people who perform a large amount of work and need to create a optimal conditions. Everyone chooses the design features of the machine according to their own considerations and preferences, available options There are many. The quality and safety of the product directly depends on the degree of care and accuracy of assembly.
Cutting small pieces of wood is done with a jigsaw. The device is small in size and usually has an electric drive. Factory models differ in their characteristics and cost. For small volumes of wood processing, it makes sense to make a jigsaw machine yourself, using improvised materials. This requires a few factory parts.
A factory-made jigsaw is reliable device, the operation of which is guaranteed by the manufacturer. Manual models are low cost. Stationary devices are expensive, but provide proper comfort when processing wood. The set of components in the device is largely the same for everyone.
The design consists of the following parts:

The part to be processed is placed on the work table. The size of the workpiece depends on its dimensions. Some models have Rotary table, which makes working with the part easier - visibility improves. The presence of graduations makes it easier to mark the material.
Average characteristics of factory machines:

 Models for specialized purposes may have radically different characteristics. There are no specifications large sizes, for processing small parts. As well as models of large sizes, the industry also produces them for retail sales. But such options will be very expensive.
In the middle class there is high competition for consumers, so the devices will be cheaper. The characteristics are also tailored to typical tasks carpenter Based on them, you need to make drawings of a jigsaw machine with your own hands. Complex components for it are purchased in the store.
Experts classify jigsaws by type of design. The design features of the mechanism determine the processing capabilities of wooden products.
The classification is carried out depending on the design of the jigsaws.
Device types:
- With lower support.
- Double-support.
- On a pendant.
- With degree scale and stop.
- Universal.
 Models with a lower support have become most widespread. The frame of the desktop factory device has 2 halves - lower and upper. The sawing and chip cleaning model is located on the top of the bed.
The lower frame contains a controller, an electric motor, a final drive, and an on/off button. This machine allows you to work with any materials and any size.
The presence of two supports in a jigsaw is advantageous in that the upper half of the bed has an additional rail. This jigsaw is ideal for cutting small parts. The thickness of the workpieces on both models should not exceed 8 cm. The worktable of such machines, as a rule, can be adjusted in height and angle of inclination.
Suspended devices do not have a fixed frame, but are distinguished by their mobility. The material being processed is set motionless, and the master moves the working module. since the latter is attached to the ceiling, the thickness of the material is not limited. The tool is moved manually, regardless of the bed. This allows you to make patterns of complex shapes.
The presence of a scale of degrees and stops is suitable for those craftsmen who carry out processing according to the drawings. Marking allows you to avoid errors when working. On the market there is universal models machines that allow you to perform several operations. This machine allows you to perform drilling, cutting, polishing and grinding. The cost of such devices will be much higher, but working with them will be more comfortable. These are industrial specimens.
 Designs and drawings of options presented on the network homemade jigsaw are different. This is due to the imagination of the authors and the desire to make a device that will stand out from the rest. Only the concept is the same in most cases - they take a manual jigsaw as a basis and repurpose it.
Home woodworking enthusiasts often look for information on how to make a jigsaw with their own hands without any special skills. You can use a ready-made manual jigsaw as a base. The mechanism does not require careful modification. The factory manual device is a drive. But the crank mechanism will have to be developed independently. Manufacturers are trying to offer consumers platforms for quick remodeling, but personal needs can only be satisfied with their product.
Assembly order:
- A support table is made. A sheet of metal is taken as a material and a hole is made in it. The shape is oblong, 3-4 times wider than the saw blade. Holes for fasteners are made nearby.
- The factory device is fixed at the bottom of the support table. Holes for fasteners are made next to the hole for the saw blade. Countersunk head screws are used as fasteners. This is necessary in order to ensure a perfectly flat plane of the table. Otherwise, the processed products will cling to the caps of the wines, which will cause inconvenience in work.
- The structure is fixed on a wooden table.
The advantage of creating a jigsaw machine with your own hands is that the factory tool can be disconnected at any time. When necessary, you have an ordinary manual jigsaw in your hands. Therefore it is better to purchase manual option tool that can be used on homemade machine- it’s cheaper that way. Stationary devices are expensive.
Comfortable work with wooden products can be achieved by installing guide rails on a homemade support table. Additionally, markings are applied to the table, which makes it easier to measure distances on parts during processing.
A manual jigsaw as the main device for a machine has disadvantages. the main problem lies in the file - it is too wide in manual models. Because of this, fine woodwork is difficult to perform with it - the curvature of the lines is limited.
The previous design is simple and has no additional details, which make working with wood easier. The direction of modernization is the possibility of replacing the file with a thin one.
Options for improving the design:
- Build a rocker. The structure will be tensioned by springs on one side. The second side of the rocker is fixed to the file.
- Secure the file between two rollers. They serve as guides for the thin file.
- A stationary factory device is used as a drive for a system of two rocker arms. A file is pulled between the latter. The movement is transmitted from the factory device to the lower beam of the saw.
 Design upon purchase or self-production you have to choose based on personal preferences and desire to tinker with technology. Using guide rollers is a less popular option - its reliability is poor.
Modernization by installing rocker arms is common. It is better that the factory device only serves as a drive for the jigsaw file. To do this, you need to turn off the pendulum stroke in the tool.
The heir to a grandparent's estate often gets an old sewing machine. It has already served its purpose for sewing clothes, since more precise equipment is now being produced. If you don’t have a jigsaw on your household, you don’t have to spend money on buying one. It is made with your own hands from a sewing machine.
Procedure:

Now the jigsaw for curly cutting on plywood is ready. It will be more difficult to work with a manual drive because your legs will get tired. An additional disadvantage will be vibrations from force on the tool. The electric drive of the machine, converted into a jigsaw, partially solves the problem of vibrations.
An expensive jigsaw can be replaced with a design self-made. It will not be inferior in quality and functionality if you approach the assembly process responsibly. It is important to make high-quality plywood mechanisms that serve as a support table. It is desirable that the table be able to rotate. For option with sewing machine it will be impossible to do this. If desired, markings are applied to the table to make it easier to measure parts during work.
- Hand tool
- Jigsaw
- Preparing the stencil
- Sawing process technology
- Defects in work
Wood carving with a jigsaw is rapidly gaining popularity: many people want to purchase interesting subject decor for decorating your home, furniture and even clothes! Carved items from various thicknesses organically fit into any interior style; people often purchase photo frames for photographs with ornaments, cut-out words and letters, or order intricate shelves and others interesting products. Few people know that artistic cutting out of plywood with a jigsaw is a task accessible to anyone, even the untrained and inexperienced. You just need to understand how to work with the tool.
What is a jigsaw: general description
A jigsaw is a tool designed for cutting various contours from plywood, including curved ones. It is equipped with a blade with fine teeth that can make an even cut of plywood without the formation of significant burrs.
Hand tool
The ancestor of this type of tool is a manual jigsaw. It consists of a metal arc in the shape of the letter “U”, between the ends of which a sawing blade is stretched and attached to clamps. They securely hold the file during operation and allow you to adjust its tension. On one side of the frame there is a handle.

The clamps on the tool can rotate, creating different planes for sawing, thereby providing the opportunity for wood carving of varying complexity.
When cutting from plywood with a hand jigsaw, you need to be careful: its design is quite fragile, and during intensive work, the blade often breaks from force and heat, so it has to be replaced. To do this, each master must have several dozen spare files.

When working with a jigsaw to carve internal contours, it is convenient to use such an auxiliary board as in the photo: it will help both protect the table and solve the problem of convenient placement of the workpiece.

Jigsaw
The tool runs on electrical network. It is a housing in which the working mechanisms are located, and there is also a handle for control on it. The sawing organ is located in the lower front part. The blade is often protected by a foot, which allows you to cut the contour exactly along the line without deviation. Advanced and professional models jigsaws have various attachments that facilitate the cutting process and straighten the edges of plywood.

Blades can have different teeth in shape and size. It is necessary to select files that match the material being processed to avoid damage and damage. plywood sheet when operating the mechanism.
Classification of jigsaws by power and application:

In the instructions on how to use a jigsaw, or in technical passport the main parameters of the tool that must be taken into account when using the mechanism should be described.
Wood carving tools
Sawing with a jigsaw is a creative process, but it requires preparation and additional equipment. What you will need for work:

Preparing the stencil
Drawings for cutting with a jigsaw can be different sizes, depending on the scale of the product being manufactured. To create a diagram of a shelf, a piece of furniture or a composite three-dimensional toy, you can take a large sheet of whatman paper A1 or A0; wallpaper left over after renovation will also work; for small figures, use regular A4 paper or another suitable format.

Using a bright pencil or marker, draw the outline of the future product on the surface, following the dimensions. This could be an element for assembling furniture, a shelf or another large product.

There are such a wide variety of templates for cutting with a jigsaw that it can be difficult to choose the right one. It is much easier to come up with your own cutting patterns and transfer them to paper.

Transferring an image to the surface of plywood or boards
Before you start cutting with a jigsaw, you need to transfer the image from the stencil to a piece of wood or plywood. To do this, cut out a shape from a sheet, apply it to the surface of the plywood and carefully trace it. It is desirable that the line be smooth and accurate. We use a simple pencil so that, if necessary, we can correct the line by erasing it with an eraser.
We apply the outline from the back side so that finished product no remnants of the lines were visible. The internal area can be shaded so as not to cut off excess and to mark untouchable areas.
It is important to transfer the design in such a way as to minimize cutting along the grain with a jigsaw - it is so difficult to get an even line.
Sawing process technology
Many people have probably heard how to use a jigsaw. Working with the tool will not cause difficulties if you prepare for it correctly.

Plywood carving begins with the inner contours of the design. To do this, you need to make slots for inserting the tool blade:
- The plywood is often taken thin, and when cutting a large contour there will be no problems, but tension may arise in a small remainder. Sawing with a jigsaw inside can damage the product - chips, burrs, cuts;
- It’s easier to work this way: you always have something to hold the workpiece by. A large sheet is much easier to handle than trying to hold a small sawn piece while shaping its interior.
How to saw with a jigsaw:

Working with a jigsaw is much easier than using a hand tool; there is no need for physical effort and the process goes faster.
How to saw with a jigsaw:

As you can see, there is nothing complicated in this process.
Defects in work
If you did not follow the technology or hold the tool incorrectly, the saw may simply move off the line. Why does a jigsaw cut crookedly:
- tilted the tool while working;
- the tension of the file has weakened;
- With an electric saw, the fastening of the saw may become loose.
To avoid such problems, before starting sawing, be sure to check the tension of the saw and the fastening of all working elements. If the blade is beveled and stuck, it is better to start over and make a line parallel to the defective one.

A little about safety
Safety precautions when working with a jigsaw for cutting plywood and wood are simple:
- Use protective equipment- glasses, gloves, robe. These things will protect you from dust and small chips.
- Sawing with a hand jigsaw should be done carefully so as not to damage your fingers with the file. Maintain a distance between your body and the tool.
- If you are a beginner, carefully read the instructions on how to use a jigsaw and the main characteristics of the tool. This information will help avoid accidental injury and unit breakdown.
Wood carving with a jigsaw requires care and attention. Both your health and the integrity of the finished product depend on these qualities.
What can be made from plywood: interesting ideas and drawings
Sawing wood with a jigsaw or hand tools is a creative process. You can create many decorative items different directions:

Drawings of plywood crafts do not have to be made in exact dimensions. Even taking an example from the Internet and changing its proportions, you will get a unique product that no one else has in this form.
DIY plywood crafts can be painted or left in a natural color; you can glue buttons, beads, ribbons and other decor onto them to liven up the product. To do this, it is worth involving children in the work; their imagination is a bottomless well of interesting ideas.

We offer you diagrams with photos for cutting out of plywood with a jigsaw.
You can think of yourself what can be cut using a hand or electric tool, make your own sketch and transfer it to paper, then to a piece of wood or plywood.
Carving plywood with a jigsaw requires certain knowledge and skills. If you don't have them, consider the following rules:

Making an even, straight cut with a budget jigsaw is not at all easy. The reasons are simple - backlash in the jigsaw, the file slipping, little experience of the craftsman. All these reasons can be easily eliminated with homemade bed with guides for the base of the jigsaw.
The presented design allows you to cut wood, sheet metal, plastic and even paper at an angle of 30, 45 or 90 degrees. Purely for the sake of experiment I cut old magazine and as you can see in the photo, the cut turns out almost like it came from a printing house.


Required materials and tools:
- Sheet of fiberboard or plywood 400 x 700 mm;
- Slats 30 x 50 and 20 x 30 mm;
- Self-tapping screws;
- M6 studs;
- Wing nuts M6;
- Furniture fittings (screw nuts) M6;
- Tools: jigsaw, screwdriver/drill, square.
Step-by-step instructions for making jigsaw guides
1. As a base for the village, I took a door made of DPV from an old cabinet. You can use a sheet of plywood. On the basis we mark the centers of future supporting elements from wooden slats– the distance from the edge should be equal to half the thickness, in my case 15 mm with a strip thickness of 30 mm.
2. Along the perimeter we make holes for screws with a diameter of 3 mm with chamfers so that the heads of the screws do not protrude above the plane of the base of the frame. There are 2-3 holes on each side.


3. The next step is to use wood screws to fasten the base supports from 30x50 mm slats one by one. Supports are necessary so that there is free space for the jigsaw file.

Finished base from the reverse side.

And from the working side.

4. Next, we make guides from two 20x30 mm slats and a base from 10 mm plywood, as well as jigsaw travel limiters from a slats of the same section.

The length of the guides must correspond to the length of the bed, and the width is selected individually for each jigsaw. Looking ahead, I will present a photo from which the principle of selecting the width of a plywood base is clearly visible.

5. First you need to dismantle the base of the jigsaw. Next, applying a 20x30 mm strip, we make markings for fastening with self-tapping screws.

6. Place the batten under the sheet of plywood, with the markings remaining on top!

We make three holes for self-tapping screws with chamfers to “hide” the fastener heads.

We attach the rail to the base of the guide.
7. We attach the second side rail only after trying on the base - it should move freely between the slats, but without play. After “trying on” the slats, we temporarily fasten it on top with two self-tapping screws, and then, by analogy with the sixth step, we fix the second slatting and unscrew the temporary screws.

8. We secure the travel limiters with two self-tapping screws.

9. Based on the completed markings, in the first step we make marks with a pencil along the edges of the guide.

Using the marks, we mark and make holes with a diameter of 6 mm.

10. Using the holes made in the previous step as a jig, we make holes in the base.

11. Use a 10 mm drill to make blind holes 10 mm deep.

12. Screw furniture fittings into the resulting holes using a hexagon. They can be purchased at hardware stores.


We screw M6 studs into the footings.

13. We perform similar operations on the guide.

Then we drill out internal thread futorki with a 6 mm drill.
14. Mount the guide on the studs.


The movement should be free, without jamming.
15. Using the markings, we make a through hole for the jigsaw file (don’t forget to take into account the protruding pin).

16. We carry out a longitudinal cut with a jigsaw; at this step it is important not to rush, performing the cut at low speed with the pendulum mode turned off (mark “0”) in order to get the most even cut without moving the file.

17. Using a square, we attach a stop from a 20x30 mm rail perpendicular to the guide.
In today's article we will look at extremely interesting homemade product, which will surely come in handy for every DIYer. Namely, today we will look at how to make a jigsaw. This tool is very useful on the farm and it itself very often comes in handy when building any homemade items. Today we will look at one of the cheapest and most accessible assembly options. The homemade product will consist of the cheapest and most available materials, which you probably have at home, and if not, then you can easily find them in your city, or you can order them from our Chinese friends. In general, the homemade product is very interesting, so let’s not delay with a long introduction, let’s go!
For this homemade product we will need:
- 775 class commutator motor. (these are usually installed on professional RC models).
- Wires
- Some kind of plastic flywheel (large flat gear)
- PVC pipe, the internal diameter of which will be equal to the external diameter of the electric motor
- Corner for PVC pipes
- Jigsaw blade
- Small metal plate
- A small (but thick) board
- Thick wire (or, for example, a bicycle spoke)
- Button
- Power connector
- Power supply (12-24v 1-2A)
- Not a large sheet of laminated MDF panel or plywood
We will also need the following tools:
- Soldering iron
- Solder
- Marker
- Hot-melt adhesive
- Wire cutters
- Pliers
- Round nose pliers
- Cold welding
- Self-tapping screws
- Screwdriver
- Heat shrink
- Drill and core drill (with a diameter equal to the diameter of the engine)
First, we need to select the most important structural element, namely the electric motor. In our case it should be with big amount turns (such an engine has a high torque). And also, in order for the homemade product to serve you for a long time, you should take into account that it is desirable that the electric motor shaft rests on bearings, and not on bushings, as is often the case. We also need some kind of flywheel; for this, the author of the homemade product took a large and flat gear that he had.

We put our flywheel on the electric motor shaft, and since the diameter of the internal hole of the flywheel is slightly larger than the diameter of the electric motor shaft, the author of the homemade product decided to strengthen the connection with a small piece cold welding. This connection turned out to be quite strong and reliable. Then, using a simple soldering iron, we solder two 15cm wires to the contacts of the electric motor and insulate the connection with heat shrink.


After which we will need to take a PVC pipe, the internal diameter of which will be equal to the external diameter of the electric motor. This pipe will act as both a motor mount for our engine and a handle for our tool. We also need one suitable PVC corner for this pipe.

To begin with, we need to make all the necessary holes in the PVC pipes. Namely on long pipe we should make a hole for the button. To do this, use a marker to leave a mark in a place convenient for you and make a through mounting hole for installing the button. And at the corner we should make a hole for installing the power connector (to make a hole, we repeat the same steps as we did with the pipe above).


Then we “press” the electric motor into the PVC pipe that we prepared earlier. Note that the engine must be installed so that there is a minimum gap between the PVC pipe and the flywheel (but the flywheel itself should not touch the pipe).


For the next step we will need to take a jigsaw blade (whichever you plan to use) and a small metal plate. We apply the canvas to the metal plate, as shown below, and trace it around the office using a marker. Then, using wire cutters, we cut out triangles from the metal plate so that we end up with antennae where the blade expands.


We apply the canvas to the plate in the same way as we applied it earlier, and using pliers we bend and press the antennae first, and then bend the plate, as shown below. Next, use round pliers to twist the same “roll” as in the photo (see photo).


The next step we will again need to take a small metal plate. We bend this plate using pliers so that we get a “T” shaped part with a groove inside. Inside the groove itself, the canvas that we previously prepared should move quietly.


After which we will take a small, but wide board with dimensions approximately as in the photo below. Then, in the indicated place (see photo), using a core drill, we make a through hole with such a diameter that a PVC pipe with an electric motor fits securely in it.


We apply another metal plate to the newly made workpiece in the place indicated in the photo. Metal plate should be slightly larger in width and length than the “T” shaped part that was made earlier. Then we apply the “T” shaped part to the plate that is already lying on the board and, having drilled holes, screw these plates to the board using self-tapping screws.


Then we need to take a thick and stiff metal wire or, for example, a bicycle spoke. And from this knitting needle we should make a kind of connecting rod (see photo). This part must connect the blade and the flywheel so that when the flywheel rotates, the blade moves “back and forth.” You should end up with a piece approximately the same as shown in the photo below.


Then we install the “connecting rod” first on the canvas, and then install the PVC pipe with the electric motor in its place (to the board, as in the photo below). And the second “connecting rod” goes into the flywheel hole. By rotating the flywheel by hand, we check the functionality of the mechanism.


Let's move on to the electronic part of the homemade product. Namely, we install the button. We solder one wire from the electric motor to the button, and the second wire is just a 5-6cm piece. We insert the button into its mounting hole and secure it with hot glue. Then, having inserted the wires through the corner, we will install the corner itself on plastic pipe, as it is shown below.


Next we should install the power connector. We solder the wires coming from the electric motor and from the button to the connector itself (the wires should be inserted through the mounting hole for the connector), and finally, we install and secure the power connector in its place using hot glue.


We insert a piece of the same PVC pipe to the second end of the corner. The length of the pipe should be such that when we place the structure on the table, the handle itself should be exactly parallel to the table. After which we will need to take some small sheet of laminated MDF panel or plywood, the main thing is that it glides well over the surface. From the panel we took you, we cut out a similar blank as in the photo below and connect it to our mechanism using hot glue, and in the place where it connects to the wood, we fix it with self-tapping screws.


All is ready! In the end we got very useful tool, which will definitely come in handy for you on the farm! All that remains is to connect the power supply and test it, you can see the homemade test below.