How to cook a stove for a summer residence with your own hands. The most efficient do-it-yourself potbelly stove, drawings, photos, tips
Heating technical rooms often turns into a real problem. Electricity is expensive, resulting in high heating costs. The best way is to use alternative sources energy. It can be firewood, coal, anthracite and much more.
For burning solid fuels, furnaces of various formats are used. One of them is a potbelly stove, characterized by extreme simplicity and cheapness.
In this review we will talk:
- About the features of stoves-bourgeois;
- About the materials needed for their assembly;
- O step by step assembly potbelly stoves.
The modernization of the potbelly stove will also be considered, which will help increase its efficiency. The article will be interesting - read and get acquainted.
What is a potbelly stove
Potbelly stoves have been known among our compatriots for a very long time. They gained their popularity due to their extreme simplicity. A simple metal box with a door and a blower - and the simplest version of the stove is already ready. Given the ingenuity of our people, this world has seen a lot of the most diverse bourgeois women, delighting their owners with the coveted warmth. Let's see what you can assemble such a furnace from:
You can make a potbelly stove not only from a used safe or a battered gas cylinder, but simply by welding several sheets of durable metal together.
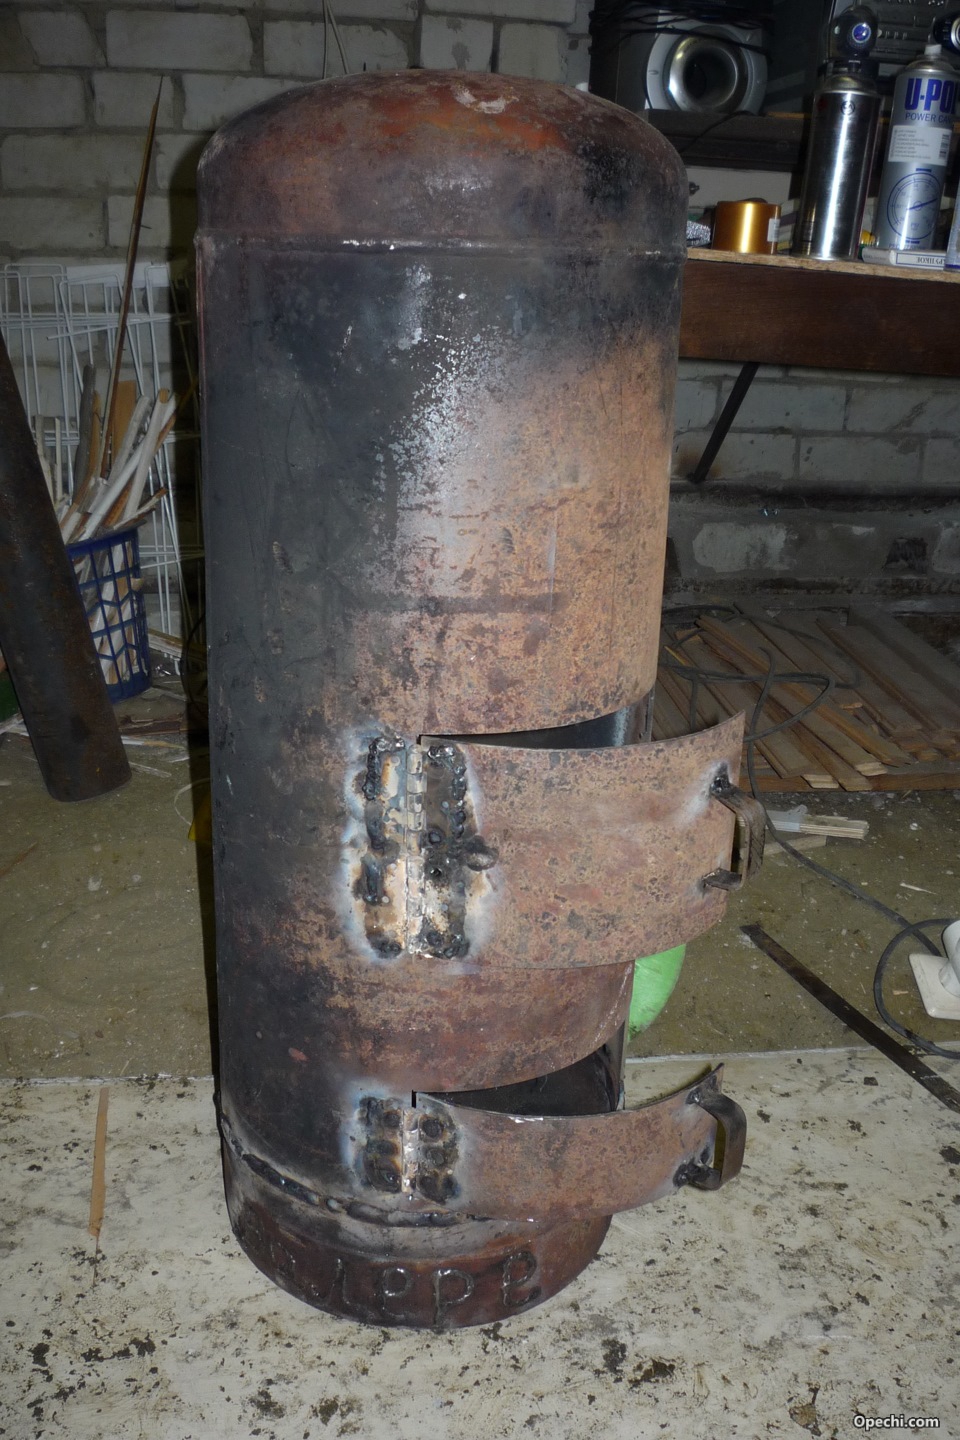
- From an old gas cylinder - great option, it remains only to find the cylinder itself (you will get a horizontal or vertical furnace). Plump modifications are suitable here, as thin and high oxygen cylinders too narrow;
- From an old flask - someone probably had such a thing lying around in a garage or in a barn. There is already a door, it remains only to attach a chimney;
- From old barrel- they often make home-made potbelly stoves of long burning, since the capacity of the barrels allows you to organize a large combustion chamber;
- From the old safe - there is no need to throw the old man away, he will still serve.
Homemade potbelly stoves can also be made from sheet metal - for this you need to arm yourself with the right tools.
The device of the potbelly stove is extremely simple. Its basis is a certain capacious capacity, which plays the role of a combustion chamber. A pipe is removed from its upper or rear part, to which a chimney is attached. Two doors are organized in the front part (less often one) - fuel is loaded through the large one, and ash is removed through the small one. Inner space it is separated by a metal grate, through which air is supplied - through the useless ash is removed, which is formed during the combustion of firewood.
The lower door simultaneously acts as a blower - by adjusting the degree of its opening, you control the intensity of the flame and the temperature in the room.
The dimensions of the potbelly stove can be very different, for example, 250x450x450 mm (WxDxH). A gas cylinder will make a larger and more efficient stove. The largest size will be at the stove from the barrel - after all, the internal volume of 150-200 liters can accommodate a huge amount of firewood. You can make a unit of almost any size - you don’t even have to bother too much with the exact observance of the dimensions indicated in the drawings.
Scope of bourgeoisie
These simple stoves are in great demand. For their work, they use firewood, coal, coke, wood waste and many other types of fuel, pleasing with their unpretentiousness and stability of work. Such a stove can be put in the garage - it will take up a minimum of space, but will provide the room with pleasant warmth. If there is a large supply of firewood or access to a cheap source of solid fuel, feel free to build a potbelly stove for long burning.

Wood is the simplest, cheapest and most widely available type of fuel for stoves. However, its consumption leaves much to be desired.
A mini potbelly stove can be used to heat a barn or home utility room that does not have heating. Agree, doing something in the winter here is not so comfortable - your teeth are chattering and your muscles are cramping. And with the stove, things immediately go smoothly - just have time to throw firewood so as not to freeze.
Long-burning potbelly stoves are useful not only for the garage, but also for any other premises, including residential ones - these can be temporary buildings, cottages, poultry houses, livestock facilities and much more. In general, the scope of their application is huge. They are most in demand in towns and villages where there is no gas, but you need to somehow heat residential and non-residential buildings.
Advantages and disadvantages
Let's see how good home-made potbelly stoves made by craftsmen are:
- Cheapness - most materials can be found for free or pay mere pennies for them;
- Omnivorous - in fact, any stove can burn in a potbelly stove solid fuel;
- Simple construction - if we look at the drawings, we will not find anything complicated in them;
- Possibility of cooking - for this, potbelly stoves are equipped with cooking holes with lids;
- Ease of use - subject to availability good chimney, the potbelly stove will work properly and not smoke on the entire room.
Unfortunately, heating with a potbelly stove has its drawbacks:
- Low efficiency of the stove - without proper modernization, most of the heat will fly into the pipe;
- Not the most solid appearance - although some craftsmen make real works of art out of bourgeois women;
- High body temperature - fraught with burns;
- High fuel consumption - in order for the stove to retain heat for a long time, without requiring the burning of tons of firewood, you will have to use tricks.
Despite some shortcomings, simple wood-burning stoves are still in demand among those who need warmth in the absence of a gas main.
How to make a potbelly stove with your own hands
Do-it-yourself potbelly stove is made surprisingly quickly. First you need to decide what material it will be made of. Prepare the following tools:

A do-it-yourself potbelly stove can have the most intricate and artsy look. Show your imagination and you can get a unique thing, the second of which cannot be found in the world.
- Bulgarian (angle grinder);
- Welding machine;
- Sandpaper and a file for processing the edges of metal;
- Roulette for measuring sizes;
- A powerful drill and suitable drill bits.
Let's see how to cook a potbelly stove with good heat dissipation for a summer house or a garage from an iron barrel.
Do-it-yourself potbelly stove from a barrel
The easiest option is a potbelly stove from a large barrel (150-200 liters). It must be supplemented with grates, doors and a chimney. We begin the manufacture of the stove with the construction of a reliable non-combustible base. The best option is to lay out a small brickwork on which the barrel itself will stand. It will take several days to make it. After that, we proceed to further work.
In the front wall of our potbelly stove, a rectangular hole should be cut out for the loading door - use a metal jigsaw for this. The resulting piece of metal will act as our door - we attach a rotating lock, a handle and hinges to it. After that, we weld the second part of the loops to the barrel. On the opposite side, we weld a metal loop into which constipation will fit.
At the bottom, you need to make an ash pan with another door. We allocate 10-15% of the total volume for it. We make the door in the manner described above, but it should be narrower - ash is raked out through it, it also serves as a blower. Optimal Height- 40-50 mm. Next, we proceed to the manufacture of grate:
- Cut off the top lid of the barrel;
- We make a grate from segments of metal pipes (you should get a circle with long slots);
- We weld the grate with inside barrels, between the loading door and the ash pan door.

An old can or flask is also a great option. Using it, you free yourself from the need to weld the loading door.
We make a hole with a diameter of 100 mm in the lid, weld a small piece of pipe of the same diameter here - this will be a chimney hole. Next, weld the lid in place. Our potbelly stove is ready, it remains only to attach a chimney to it and you can start testing - we load firewood and try to kindle a flame.
We made with you a potbelly stove for long burning with our own hands - it is distinguished by an extremely large combustion chamber. Please note that you can make a cooking hole in the top cover - its diameter is 100-150 mm. Instead of a barrel, you can easily use a gas cylinder or a piece of pipe of a suitable diameter. Remember that a potbelly stove from a pipe and a cylinder should have enough large diameter(at least 350-400 mm).
If necessary, you can make a similar potbelly stove in a horizontal version - you just need to slightly change its design. The rest of the assembly principle does not change.
The most efficient stove is a pyrolysis potbelly stove, which burns out the remains of combustible gases and emits a large number of heat compared to other ovens. No need to think that it will be a complex unit. Making a potbelly stove of this type will take you 20 minutes longer than a conventional unit without pyrolysis. Let's see how it is produced.
Unit welded from sheet metal with a thickness of 3 to 5 mm. The use of thin iron does not make much sense - the stove will turn out to be too thin, the heat will bend it, and in the end corrosion will finish it. So find steel that is thick enough so that you don't have to make a new stove every heating season.
We need to carve out seven pieces of metal (the thickness of the iron we have is 3 mm):

The main advantage of using sheet metal is that you can make a potbelly stove of any size and volume.
- Two pieces measuring 450x450 mm are the side walls;
- Four pieces measuring 450x250 mm are the front, back, top and bottom walls;
- One piece measuring 440x240 mm - this will be the grate;
- Two pieces measuring 244x350 mm - these will be internal partitions.
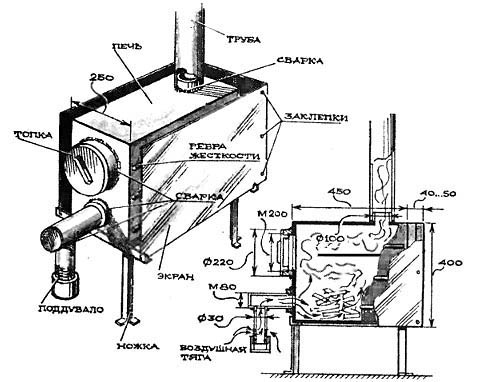
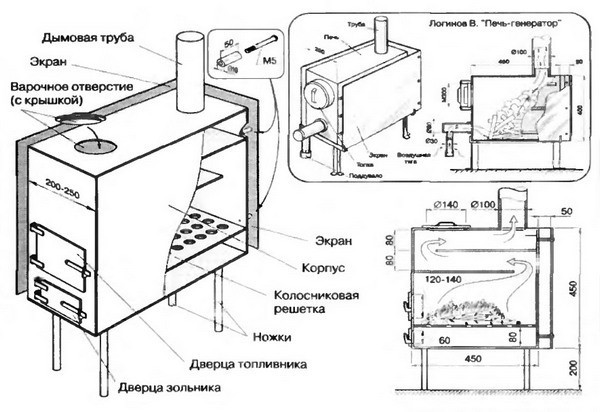
Thus, we will get a Loginov furnace, which has two internal partitions to increase efficiency. The same partitions will be responsible for pyrolysis.
In the front wall, we make two doors - in accordance with the instructions described above. Next, we weld a metal box without a top cover from all pieces. Next stage- production of a grate. To do this, we take a metal sheet and make many holes in it with a diameter of 10-15 mm. We fix the grate at a height of 80 mm from the bottom of the stove. Next, we weld the partitions, placing them at a height of 60 and 120 mm from the top cover.
On the back surface we make a couple small holes and weld thin metal tubes (diameter 10-15 mm) into them. They should be located above the lower partition, going to the front wall. Their length is about 150 mm - secondary air will be sucked through them. The tubes are welded in before the second partition is fixed.
We prepare the top cover - we cut a hole in it with a diameter of 100 mm for the chimney. If necessary, we supplement the wood-burning potbelly stove with a cooking hole. We weld the lid to our stove - everything is ready! Now we install the stove in a regular place and proceed to the tests. And yes, do not forget to attach legs to it or install it on a non-combustible base (for example, made of brick).
The height of the chimney for potbelly stoves is at least one meter. The optimal indicator is 1.5-2 meters from the horizontal outlet or top cover.
Modernization of stoves bourgeois
Now you know how to properly make a potbelly stove so that it can be used to heat a country house, garage or utility room. But we need the furnace to be efficient - to give maximum energy, burning a minimum of fuel. You will be surprised, but one possible variant we have already considered modernization - the pyrolysis unit presented above is an improved version. Pull out the partitions from there, and you will get the most banal potbelly stove.

The choice of pipes for the chimney should be approached with special attention- too thin or poorly welded pipes will quickly burn out, which will lead to smoke in the room.
Not only pyrolysis will help increase the efficiency of the stove. If you look at the drawing of the potbelly stove given above (from sheet metal), you will notice that the unit is closed on three sides with metal sheets. They are separated from the body by 50 mm and play a protective role. But that's not all - draft is formed in the internal space, a convection process occurs. Due to this, the efficiency of the potbelly stove increases.
The next stage of modernization is the creation of a chimney bend. The thing is that through it a huge amount of heat escapes into the atmosphere. By increasing the length of the chimney with a horizontal section, we can use it to heat the room. The disadvantage of this approach is the deposition of soot in a horizontal area.
This name of the stoves is familiar to everyone. She represents small size design for space heating. Of course, she will not be able to cope with large areas, but as for garages and workshops, she will be able to provide heat. Some models also have a stove on top, which allows you to make teas or even a small meal.
This modification of stoves is easy to do with your own hands, and most importantly, they are made. Why? The fact is that such a design has several advantages:
- the drawing is quite simple, so that there are no special problems with construction;
- there are no special requirements for installation, so installing a potbelly stove is quite simple;
- small dimensions allow you to freely place the stove in almost any room;
- there are no special requirements for fuel either, so not much money will be needed for refueling;
- the weight of the potbelly stove does not require any specific foundation;
- rapid heating and heating of the room;
- to create such a device, not so much material is required, which will save;
- if the device is equipped with a hob on top, then hot tea or even a minimal lunch will always be at hand;
- the chimney here has the most simple design, which allows you to place the stove even on the second floor or in the deepening of the floor.
Such undeniable merits make it possible to understand why the potbelly stove is so often installed in utility rooms. But to be truly objective, it is worth saying that this device also has its weaknesses. First, rapid cooling. The oven heats up quickly and cools down just as quickly. Therefore, to maintain a constant heat, you need a lot of fuel. Which is the second drawback. Although here you can use the material that tends to burn or smolder for a long time. Secondly, from the point of view of fire hazard, this option is not very safe. Therefore, it is important to take precautions here. But with a competent approach, the shortcomings of the potbelly stove are easy to fix in particular operation.

Despite the fact that many stoves of this design do not look very attractive in the photographs, they fully cope with their purpose - heating the room. The main thing is to properly assemble the structure and ensure safe operation.
Making a rectangular oven
From what only do not make bourgeois! The fantasy of folk craftsmen is not limited. But for those who have never taken on such a design, it is worth starting with a more simplified version - a rectangular potbelly stove. This is the most popular model, which, moreover, is quite easy to assemble.
In order to make a potbelly stove yourself, you will need to prepare the following material and tools:
- plan-drawing - it marks the dimensions of each element;
- metal sheets - their number depends on the desired size of the stove, the main thing is that the material is not thinner than 4 mm;
- steel corners;
- metal pipe(30 mm);
- pipe (180 mm);
- welding machine.

To create such an option, you will need to perform the following steps:
- Metal sheets must first be cleaned and degreased, otherwise the welding machine will not be able to connect them reliably. To do this, you can use an ordinary soap solution or special cleaning agents.
- On a sheet of metal that will serve as the front part, it is necessary to cut two holes - one will serve to collect the ash, and the other will be the door of the firebox. The size of the door should be 3-4 cm less than the width of the future potbelly stove. As for the height of the location, it is usually made 1/3 lower than the top edge. Do not forget that there will be another rectangular hole for the ash pan at the bottom. It is desirable to separate them.
- To make a door, you need a little metal bigger size than the resulting window. To connect two elements, you can use steel hinges. There must be a handle on the door that will allow you to open and close the potbelly stove.
- Now the metal sheets are welded together to make a rectangular box. You should start with the side walls, which are fixed to the bottom. To control the vertical and horizontal directions, it is worth using during such work building level. Next, weld the back wall. The interior space is divided into three parts - smoke, firebox and ash pan. A grate is installed between the last two parts. 10-15 cm are measured on the side walls and corners are welded to the entire valley. Pre-prepared strips of the same sheet steel with a width of 2.5-3 cm are fixed to them. As for the length, then you need to focus on the available sizes of the potbelly stove. Distance - 5 cm. all elements are welded to two rods. Here you need to do this work as efficiently as possible, since such strips additionally perform the function of stiffeners.

- The grate itself should not be welded to the walls, because when you need to clean or replace any element in the potbelly stove, you will have to disassemble the entire structure. And that's enough and just pull out the grate.
- Now you need to fix two metal rod. They will serve as a support for the reflector. It is positioned in such a way that there is a channel in front through which the smoke will leave the potbelly stove. The reflector has to withstand the highest temperatures. Therefore, for its manufacture, it is better to choose a metal with a thickness of 1.5 cm.
- Now you can proceed to the top cover. Here it is better to make a hole in advance for the future chimney. Next, cut and weld the jumper. You will need to make it even narrower, which is placed at the level of the grate. It is she who will separate the door of the grate and the ash pan.
- Now handles for the door, latches and curtains are welded. As for the last elements, for reliability it is worth using a thick rod and a steel pipe.

- Once the design is ready, it is installed on the legs. For such purposes, a metal pipe (diameter 8-10 cm) is perfect, which is cut into segments of 2-4 cm. A nut with a screwed bolt is welded to each end. This will provide reliable stability.
- The last step is the arrangement of the chimney. Here you need a pipe 15-18cm in diameter. If we talk about the length, then it should be enough to bring the chimney out. Therefore, in order to avoid overspending material, it is worth considering the location of the potbelly stove. Since the chimney implies bends, each such angle should be equal to 45 degrees. At the lower end, a rotating shutter is equipped. The chimney itself is placed on a sleeve 15-20 cm high. For this purpose, a product with a diameter smaller than the main pipe is used. For connection use cooking.
After the product is ready, it can be installed and started to operate.

Potbelly stove from a gas cylinder
If you don’t want to fiddle with the drawing for a long time, and then assemble the stove from separate pieces, then you can use an old gas cylinder. His geometric shapes perfect for this product. This stove can then be placed in a garage or even a summer cottage.

All work on the independent manufacture of a potbelly stove has several main stages:
- First, the upper part is removed, where there is a crane. In its place, a plug of the future chimney is welded. Such an element is used to block the chimney while the stove is cold.
- Visually dividing the balloon into three parts, cut a hole in the lowest section square shape. It will serve to load fuel. The rest of the metal can be adapted under the door. But for starters, it is scalded around the edges to make it required size. At the same stage, hinges and a handle can be welded to the door. Optionally, it is equipped with a lock.
- Several holes are cut into the bottom of the cylinder. They will serve as a grate. To make an ash pan, thinner metal is required. This element welded in a rectangular shape. Experts recommend equipping the ash pan with a door so that the function and blowing are simultaneously performed. Now the box can be welded under the "grate".
- In order for the cylinder to be in a vertical position, three supports are welded from the bottom. For such purposes, you can use a pipe or a metal corner.
- The last step is the creation of the chimney. There are the same requirements as for a rectangular potbelly stove. A thick pipe is welded into the hole and bent at an angle of 45 degrees. It is advisable to bring the end of the chimney outside or provide good ventilation to the room.
Optionally, a steel reinforcement frame can be welded to such a potbelly stove, and then it will become like a hob.

A potbelly stove from a gas cylinder can also be positioned horizontally. The sequence of work here is similar to that with vertical position, but only the door is made in the place where the valve was, and the chimney is attached from the end, where the bottom of the cylinder is located.
Potbelly stove made of bricks
Here, rather, it is not the creation of the stove itself, but the deliverance metal structure from its shortcomings, and in particular from rapid loss heat. To do this, it is worth simply overlaying it with a brick.

But in such a situation there is a drawback - a limited metal has the ability to quickly burn through. Therefore, you can really try to assemble a brick potbelly stove. Maybe it will seem to someone that this is a violation of the classic version, although this model will heat up. BUT! Such a stove is installed once and for all. But this option has a number of advantages:
- it has an order of magnitude lower risk of fire. than the metal model;
- the level of efficiency is higher than that of the classical variation;
- brick potbelly stove is safety;
- heat retention takes much longer than in metal stoves, so that the room will be warmer long time if the fire goes out.
If the room has a concrete floor, then you do not need to think about the foundation for the stove. Otherwise, a solid foundation will be required.
Before laying the stove, the floor is dismantled so that a depression of 40 cm is formed. A layer of sand and gravel is laid on the bottom, which are covered on top reinforcing mesh. Next, formwork is installed and concrete is poured. It is advisable to add crushed stone to the solution. The construction of the potbelly stove is started no earlier than 7 days after the foundation is poured. This time is enough for the base to harden.
As soon as the concrete hardens, it is covered with roofing material and sprinkled with sand. The first brick row does not require a bonding solution. When working, be sure to use the building level. A bonding solution will be required for the ends. On the second row, the blower door is fixed, and just above it, the grate is fixed.

On the fourth row, the combustion chamber is being created. The firebox door is also installed here. To keep this element, use a greasy clay solution and a wire that serves to additional fastening. There are special holes in the oven door for this.
If a brick potbelly stove is used for heating large room, then it is better to lay it out in 10 rows. For the base of the chimney, the brick is laid out in 2-3 rows, and then a pipe is docked to it.
In general, there is nothing complicated in such a product. But it can look much more aesthetic than a potbelly stove made of metal.
Potbelly stove from a barrel
This option is suitable for those who are not particularly concerned with aesthetics, but require only heat. This option is suitable not only for barrels, but also for pipes of very large diameter.
In order to get such a stove, you need to perform the following steps:
- With outer side cut out two rectangular holes - the entrance to the furnace compartment and the ash pan;
- The “extra” pieces of the barrel are framed with strips of metal and equipped with a handle with a latch - in the future these will be doors;

- 10 cm down from the furnace hole, corner brackets are welded on the inside of the barrel, on top of which a grate is laid (purchased separately or made independently);
- With outside legs are welded to the bottom - for this you can use pipes or metal corners;
- further, hinges are attached near the holes and on the doors and the elements are connected;
- it is recommended to clean all the seams at the end so that the stove looks neater and less traumatic;
- as soon as everything is ready, the device can be connected to the chimney, which is taken outside in advance.
This method of making a potbelly stove is also great for a pipe. Only after the grate is installed, do not forget to weld the bottom of the pipe and upper part. And so nothing complicated!
In fact, there are many options for how you can make a potbelly stove with your own hands. Sometimes folk craftsmen come up with such masterpieces that store design devices simply cannot even stand nearby. But you need to chase not for beauty and originality, but for safety. Indeed, during the operation of the potbelly stove, carbon monoxide gases will be released, which can even poison a person. Therefore, when working in a room heated by such a device, every 30-40 minutes you need to go to Fresh air and ventilate the space.

Making a potbelly stove is half the battle. You still have to enjoy using it. It would seem that there is no difficulty - threw firewood and warm yourself. But not everything is as simple as it might seem at first glance.
Why finished devices cost more? Because the assembly engineers have provided all the conveniences. To make a homemade stove also bring pleasure, you should think about the following points:
- protection - during the laying of fuel, old coals can fall out, which is quite traumatic, so you need to build a small grid in front of the combustion chamber;
- since the stove is hot, it should be slightly insulated from the outside, or at least insulated the approximate surfaces - this will reduce the risk of fire;

- it is advisable to cover the potbelly stove with heat-resistant paint or anti-corrosion coating- so the product will last much longer;
- handles should be attached to the body, since during the combustion of fuel, the walls of the device will become very hot;
- you definitely need a draft adjuster through the wheels - this makes the work of the potbelly stove more comfortable;
- if the potbelly stove is made from an old gas cylinder, then it is important to make sure that there is no dangerous substance left inside the container - otherwise there is a high risk of an explosion.
Safe operation
Homemade products are always dangerous because during their construction, a person may lose sight of any details that seem insignificant to him. But in fact, it is they who will be responsible for the injury risk of the final product. The same applies to do-it-yourself bourgeoisie.
In order for the home stove to bring only heat, you should pay attention to the following points:
- The stove must be placed on a refractory surface - tiles, brickwork, metal sheet of good thickness, etc.;

- if the stove is near the walls, then it is also recommended to secure them - for such purposes, you can use the same tile, refractory drywall or any other material that is not afraid of contact with high temperatures;
- there should not be any flammable materials or substances near the device - the maximum allowable distance is not closer than 1.5 meters (firefighters generally recommend not to keep such items indoors);
- since the potbelly stove was assembled independently, it is not safe from the production side harmful substances, so the room should be good ventilation(both artificial and natural);
- in the manufacture of the product it is better to choose only quality material- at a minimum, such a product will last longer, and as a maximum, it will not bring any harm to its owner.

The service life and quality of heat directly depends on how a person approached this issue. Therefore, it is better to spend a little, especially since a couple of sheets of metal will definitely come out cheaper than a full-fledged heater. But the room will be warm and cozy.
A potbelly stove is an ideal solution in conditions when it is necessary to provide heating for small-sized premises (garage, utility room, bath heating), spending a minimum amount of money. You can save money by using materials that almost everyone has, as well as by the ease of doing it yourself. Next, we will consider what a potbelly stove can be made of and give specific drawings.
What tool is needed?
Regardless of the selected drawing or design features potbelly stove, for work on its manufacture, in addition to materials, you need to prepare the following tools and equipment:
- A hammer.
- Bulgarian.
- Welding.
- Drill.
- Drill.
- Brush.
- Chisel.
- Pliers.
- Roulette.
It is understood that each of the listed tools is designed to work with metals.
Choose a view and get started
Potbelly stove can be made by hand from:
- Sheets of metal.
- Pipes.
- Can.
- Gas bottle.
The type is selected from the availability of materials, as well as the preferred complexity of the work performed.
Potbelly stove from sheets of metal
Here are the features of making a stove from metal sheets that use different raw materials for heating: mining and firewood.
Furnace in production
To start working with your own hands, a metal sheet of about 5 mm is prepared (it is this width that allows the stove to warm up quickly and effectively heat the garage) and pipes (needed for a chimney and some other elements). For a more accurate understanding of the manufacturing principle, see the drawing: 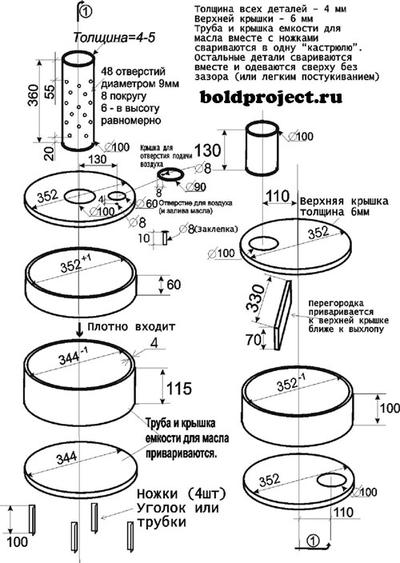
Let's get started:
- According to the given dimensions, it is necessary to cut out the elements from the sheet, from which the furnace will be made. Try to clean up the cut edges as much as possible.
- A part is being prepared for attaching the components of the potbelly stove - a pipe with holes.
- Parts of the upper tank are being prepared for the installation of a chimney pipe. To do this, according to the data given in the drawing, make a hole shifted to the left in relation to the center. Also, another hole is made at the bottom of the tank (shifted to the right) - it is intended for installing a connecting pipe.
- The constituent parts are welded together and a finished tank is obtained.
- The lower tank is welded in the same way. Only a hole is made to install the pipe in the center. You also need to make another hole with a slight offset - processing will be poured into it. A special sliding cover is made above the filling hole.
- The lower tank is attached to the upper one (they are welded to the connecting pipe). Structural strength should be given with brackets.
- Do not forget to weld the legs to the lower tank.
- To increase the service life, the furnace is cleaned and painted.
Attach the potbelly stove to the chimney and try to heat the garage. To do this, pour fuel into the lower tank and set it on fire. When it flared up, you need to close the processing hole with a sliding lid.
Important: To paint the structure, use special heat-resistant paints.
Rectangular wood stove
This option is suitable when you need to heat a garage or sauna rooms designed for relaxation.
The features of the model, the manufacture of which we will describe further with our own hands, lies in the high heat transfer and the ability to adjust the traction force.
Our oven will measure 45x45x80. Such dimensions are enough to heat the average room. It will fit long firewood and is easy to move.
In this case, we will not give a specific drawing, and will try to explain as much as possible in words. Before starting work, we buy:
- Steel 3-4 mm thick. A sheet and a half by two meters will be enough.
- Piece of pipe. Choose from diameters from 90 to 100 mm. Length: 0.4 m.
- Rebar 16 mm. You need exactly 6.2 m.
- Five kilograms of electrodes.
- Four door hinges.
- A steel rod, half a meter long and about 10 mm in diameter.
- Seven meters of a corner with a 40 mm shelf. The walls must be 5 mm thick.
When everything you need is prepared, we begin to work with our own hands in the following sequence:
- The future walls of the structure are cut out of the sheets.
- The corner is welded in such a way that a frame is obtained. When performing this and the first paragraph, you need to remember the above dimensions of the stove (45x45x80).
- The reinforcement is cut and welded to the frame with an interval of 2 cm.
- The finished frame is scalded with tin.
- According to the diameter of a smooth bar in the pipe section, which will be the chimney, 2 holes must be made. The pipe is welded to the frame (before that, you need to make a hole under it).
- A curved rod is inserted into the chimney openings. It must be in the form right angle. A piece of tin is welded to it round shape, slightly smaller than the inner diameter of the chimney - will be used for adjustment.
- The potbelly stove must have doors. They are cut straight out of the body. Loops are welded onto the removed piece of metal, with the help of which they are attached to the furnace.
- Bolts and handles are installed on the doors, which can be made of any convenient type. The main thing is that they guarantee the maximum fixation of the door (if you do not want to burn down the garage).
- When the work is finished, you can check the result of the work with your own hands and start heating the garage.
Important: To ensure traction, the doors are attached so that there are small gaps.
Potbelly stove from a pipe
This option implies the simplicity of doing the work with your own hands and an aesthetic appearance, which will allow you to heat not only the garage, but also small rooms in the country.
Work algorithm:
- The pipe is taken and cut to the desired length.
- 2 holes are cut in the side part: for the ash pan and the firebox. The distance between them is approximately 15 cm.
- The cut out parts of the metal will serve as doors. Their size increases with the help of welding on top of metal strips. You also need to immediately install the handles that secure the door.
- Corner brackets are welded inside the future stove (the grate, welded with your own hands from reinforcement or bought in a store, will be held on them).
- The grate is installed.
- In the circle of metal that will close the pipe opening (the upper part of the potbelly stove), you need to make a hole for attaching the pipe (chimney).
- The bottom and top of the stove are brewed.
- The pipe is welded.
- Hinges are welded and doors are installed.
- The furnace in the places of welding joints is cleaned and painted with special paint.
- The last stage is the connection to the chimney brought outside the premises.
If everything is done correctly, the potbelly stove will be able to completely heat a garage or other small room.
can stove
From any old can, a potbelly stove can be made with your own hands. For this you need:
- Can.
- Piece of pipe.
- Armature or wire.
Let's get started:
- On a can installed in a horizontal position, we mark the location of a rectangular blower. It must be placed under the cover.
- Cut out a hole for the chimney. It can be in the bottom or wall.
- We make a grate. It is easier to make it from steel wire, which, in a bent form, is brought into the middle of the future stove and straightened. It is necessary to arrange the zigzag in such a way that it is most convenient to fill the potbelly stove with firewood.
- We attach the legs.
- We weld the chimney.
The design implies a minimum of manufacturing costs and you do not need to have professional skills to perform the work. With its help, you can safely heat the garage and other utility rooms.
Gas cylinder stove
If you have a gas cylinder lying around on your site, use it to create a potbelly stove.
Work sequence:
- Cut off the faucet and make a hole plug.
- Cut a hole in the bottom for the door. From the resulting piece of the bottom, with the help of scalding it with a strip of metal, doors are made.
- A lock-handle is attached to the doors and they are mounted on the cylinder using hinges that are welded.
- In that part of the cylinder, which will be the bottom, you need to make a grate. To do this, it is enough to make holes.
- A tin box is welded under the holes in the bottom, into which soot and waste will fall. Doors also need to be made in front of the box - they will be used to adjust the thrust.
- The stove must be raised from the ground with the help of legs. For their manufacture, an ordinary pipe is suitable.
- A chimney is welded into the upper part of the cylinder.
- If necessary, a hob can be arranged on the surface of the structure.
Such a stove will heat a garage or small house in the country.
A potbelly stove is a fairly simple device for heating rooms. When doing work, remember that the oven must not only heat, but also meet the minimum requirements for fire safety.
Quite often there are situations when it is necessary for a short time it is good to heat a room, for example, a garage, a small warehouse or a repair shop, to perform certain work in comfortable conditions, while at the same time without significant cash costs. To solve a similar problem perfect option- a small potbelly stove. How to cook a potbelly stove yourself? It is not difficult, you just need to have metal, a set of tools at hand and be smart.
As consumable for the manufacture of an ordinary potbelly stove, you can use an old thick-walled barrel, concrete. But at the same time, the thickness of the metal wall of the product should not exceed eight millimeters, otherwise it will be quite difficult to heat it. As a result, low efficiency, loss of thermal energy, higher fuel consumption.
Most the best option counts metal container having a wall thickness of four millimeters. This design will have the highest heat transfer.
Potbelly stove is an oval, rectangular container, which has a firebox with a door, an ash pan, a chimney.
The most suitable material for a potbelly stove in a garage is cast iron, stainless steel. Any fuel can be used for a cast-iron potbelly stove, but it must be remembered that this is a rather fragile material that is afraid of sudden cooling.
Types of industrial bourgeois
- pyrolysis;
- oven with a hob;
- potbelly stove with a casing designed to increase heat transfer.
The main feature of a home-made potbelly stove is the use of any material at hand: metal boxes, barrels, cans, and other old metal containers.
Furnaces may differ from each other:
- consumables: brick, steel, cast iron;
- fuel: liquid, solid;
- functionality: gas generating, calorific, with the presence of a hob.
Work tool
To weld a potbelly stove at home, you must have a certain set of tools at hand:
- welding unit, electrode wire, protective suit and mask;
- grinder (grinder), special wheels for cutting and grinding metal surfaces;
- for the manufacture of some elements, you may need a gas cutter;
- drill with drills for metal;
- metal brush;
- skimmer;
- a hammer;
- pliers;
- chisel;
- measuring tape, meter, chalk.
Step-by-step instructions for making a potbelly stove
- All construction details are marked on a metal sheet - these are 6 rectangular walls of the furnace itself, one rectangle for a smoke reflector, grate plates, door locks.
- Next, the marked sheet must be cut. It is better to do this not by yourself, but at a metal base using a guillotine, then you will not have to additionally straighten the parts, as is the case with a grinder.
- The furnace body is rectangular in shape. All sides must be 90 degrees apart.
- In order to avoid mistakes when welding the box, do everything right, initially the sides are tacked together, then a control check is made for the horizontal, vertical arrangement of the parts. If everything is fine, the seams are completely welded.
Important! All seams must be sealed, so they need to be very well boiled. And to check the tightness of the connections, you can use kerosene, chalk.
- After graduation welding work seams are cleaned with a metal brush.
- Three sections are formed inside the stove: a firebox, an ash pan, a smoke chamber. The ash pan is separated from the firebox by a grate, to accommodate which 5x5 cm corners are welded to the side and back walls inside the potbelly stove at a distance of about 15 cm from the bottom.
- For the manufacture of the lattice, thick steel rods are taken, strips 3 cm wide. Steel rods with a diameter of 2 cm are used as stiffeners, to which steel strips (rods) are welded.
- Under the hot gas reflectors, two strong rods are welded to the inner walls of the stove from the top 15 cm down. Reflectors are made of a thick sheet of metal; they should not completely cover the furnace.
- When all internal elements the stoves are welded, you can weld the upper part of the box, after which you need to make a hole for the chimney.
- Lastly, the front part of the potbelly stove is welded.
- Doors are installed.
Important! The doors must be fitted as tightly as possible to the body of the furnace, for which they need to be perfectly aligned, if necessary, sanded with emery.
Such a do-it-yourself potbelly stove can be installed for heating both a workshop in a garage and a small country house.
Compact stove for heating small room, in the common people simply called a bourgeois, will soon celebrate its 100th anniversary. Having appeared in the 1920s, such metal stoves with a chimney became simply irreplaceable during the years of the Great Patriotic War. The potbelly stove does not give up its positions to this day, remaining a necessary attribute of a garage, greenhouse or country house. Such a stove is needed wherever people need to warm up and cook food, despite the lack of central heating.
The potbelly stove has its advantages and disadvantages. The undoubted advantages of such a heating device include:
- energy independence and autonomy;
- cheap fuel in the form of coal, firewood, sawdust, wood chips, peat, used technical oil, diesel fuel, paint and varnish waste, etc.;
- fast heating;
- small dimensions;
- installation without a foundation;
- capital is not needed;
- ease of operation;
- low financial costs in the case of making a stove with your own hands.
However, the stove-potbelly stove also has disadvantages:
- good ventilation is required in the room;
- high fuel consumption;
- the need for constant monitoring of the fuel level;
- quick cooling (however, we will fix this drawback - to increase the efficiency, the stove can be overlaid with bricks).
Note: If you feel the need for such a device, then you have two options - buy metal stove industrial production or do it yourself.
First, let's talk about purchased potbelly stoves, the cost of which starts at about 4,000 rubles (for example, the Ugolek stove) and rises to 40,000 rubles and more (this cost is typical for stoves with beautiful names"Bavaria", "Baron", etc.).
With heat exchanger 
In the middle of this price range, for example, stoves with a water heating circuit and a heat exchanger, an army cast iron stove, potbelly stove of long burning type "Klondike".

The material for stoves and fireplaces made in workshops is usually stainless steel and cast iron. The standard drawing assumes the presence of a bunker with a firebox door, an ash pan, a chimney pipe. However, it happens that a potbelly stove is equipped with a hob, burners and even an oven. The enterprises also make heater stoves, as well as potbelly stoves, in which, to increase the efficiency, a ceramic or steel casing is installed, which significantly increases heat transfer. If you wish, you can buy a stove-stove stove or just a stove with a gas generator for your home.
Potbelly stove-homemade
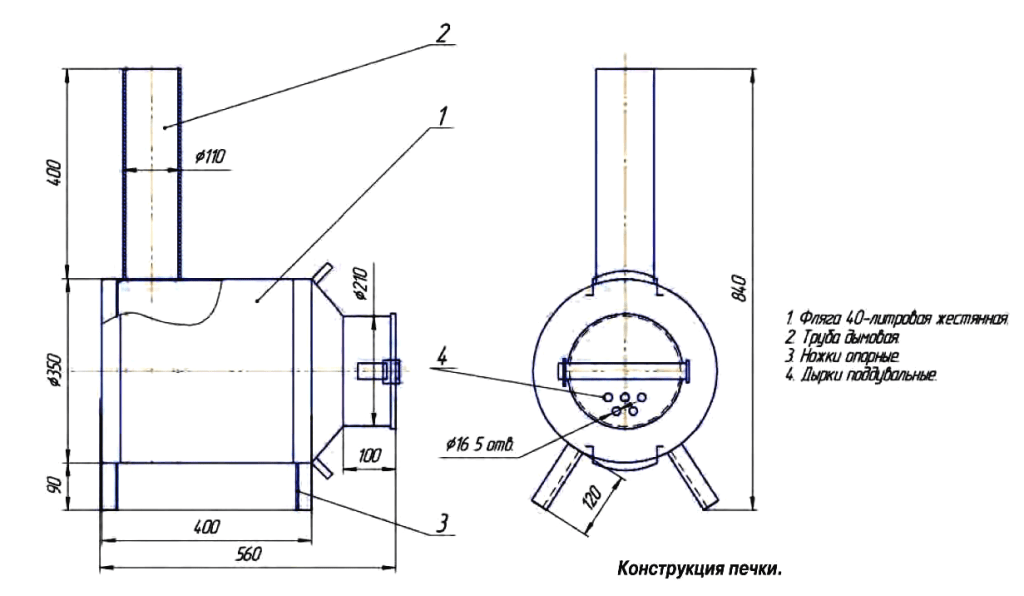
Making a potbelly stove with your own hands is easy even without a drawing. Improvised materials are suitable for work, whether it be a gas cylinder, a milk can, a barrel, a piece of pipe, or sheet iron lying around in the garage. Having decided what can be put into action, choose for a potbelly stove with your own hands a drawing of a rectangular or circular section of the combustion chamber.
For example, you need to do the heating yourself in country house and you have an unused milk can (for arranging the stove itself), a bent piece of pipe (for creating a chimney) and a piece of metal reinforcement with a diameter of at least 6 mm (for a grate). To make a stove out of all this, it is enough to be friends with the tools, as well as apply a little ingenuity.

The can is installed on its side - this is the basis of our do-it-yourself potbelly stove, its combustion chamber. A rectangular blower is sawn under the neck, the edges are processed with a file. The blower can be left in this form, or you can attach a damper to it, getting a stove with adjustable draft at the exit.
In the upper part of the bottom of the can, you yourself need to make markings for the chimney (it should be 2-3 mm smaller than the diameter of the pipe). We cut a hole and tightly drive a piece of pipe adapted for the chimney into it. Half of the work is done.
Next, we deal with the insides of the potbelly stove. With our own hands we make a grate in the form of a “snake” from a metal rod. We introduce the rod into the neck of the can and position it so that the grate stands horizontally in the future combustion chamber. That's all! If desired, you can put the resulting stove on an iron pallet and a rack of bricks. This will help to avoid heating the floor, as well as minimize the likelihood of a fire.
Note that a similar algorithm of actions can also be applied if you want to have a potbelly stove from a barrel. long burning such stoves cannot boast, but they cope well with the function of quickly heating the room.
The second life of a gas cylinder
It's a good idea for a small oven to reuse containers that can handle a lot of heat. We have already talked about barrels, but how do you like, for example, a potbelly stove from a gas cylinder or even two? These containers are good because they allow you to make a stove yourself for a country house or garage, as vertical arrangement, as well as horizontal.
To create such a potbelly stove, you will need the following tools:
- welding machine;
- grinding machine with circles;
- drill with drills;
- brush with metal bristles;
- tape measure and construction pencil for marking;
- hammer, chisel, pliers.
Materials for making a stove with your own hands need the following:
- 1 or 2 gas cylinders;
- Metal sheet for ash pan and hob(thickness must be at least 3 mm);
- cast iron doors (old ones are suitable, for example, from wood stove, or handmade from sheet metal);
- chimney pipe;
- thick metal fittings for the manufacture of legs and grate.
Before starting work in a gas cylinder, open the valve and leave it in this state for at least 12 hours so that the container is ventilated. Another way to clean the cylinder is to fill it to the top with water, and then empty it completely.
For a vertical potbelly stove, the gas cylinder is placed in a standard position for it, the neck is released and markings are made for the future firebox and blower. The marked pieces are cut out with a grinder. A grate is made separately - for this, reinforcement cut to the required dimensions is welded in the places marked from the bottom of the cylinder.
Hinges are welded to the cylinder, on which the doors are hung. Further, hecks are equipped, which are designed to secure and increase the efficiency of the potbelly stove. A smoke exhaust pipe is welded on top or side of the cylinder.
For a horizontal potbelly stove, the cylinder is installed on the "legs" sideways. A square hole is cut out in it for the door and a round one for the chimney pipe. Instead of a grate, a series of holes are drilled at the bottom, and a rectangular container is welded below the cylinder to collect the ash. The stove is almost ready, it remains to hang the door with your own hands and install a chimney.
If desired, the complete set of vertical and horizontal stoves from gas cylinders can be expanded by hob made from a sheet of metal attached to the top.
Free fuel
Note: If you want to minimize the cost of fuel for a potbelly stove, consider manufacturing homemade design for heating on automobile oil drained from the car.
A working potbelly stove is especially good for garage owners. The drawing of its design includes two tanks connected by a pipe, as well as a chimney.
To create a furnace for mining, you will need the following materials:
- Metal 4 mm thick for a potbelly stove.
- 6mm thick metal for top tank lid.
- Metal rods for the legs of the stove (3-4 pieces of suitable thickness).
- A pipe made of heat-resistant material for connecting tanks (diameter at least 100 mm, length approx. 400 mm).
- Chimney pipe (length not less than 4 m).
Work on the formation of a potbelly stove for working out is carried out in the following order:
- Legs are welded to the lower tank.
- A lid with holes made for oil and air is welded onto this tank from above.
- At least 50 holes with a diameter of 9 mm are made on the connecting tube.
- Weld the tube to the lid of the lower tank.
- A second tank with a filler neck and a chimney pipe is welded on top.
It is easy to use such a potbelly stove. Oil is poured into the cold machine through the filler neck almost to the top, not reaching the reservoir cap of just a few centimeters. Kindling material in the form of rags or newsprint is also laid there. It remains to set it on fire, and soon you will enjoy the warmth.

As a rule, such stoves "use" from 700 to 2000 ml of used oil per hour. Potbelly stoves at working out allow you to boil water and cook simple food. However, their operation requires the obligatory presence of good ventilation in the room to remove carbon monoxide, as well as compliance with fire safety rules (combustible materials must not be placed near the stove, use flammable materials such as gasoline, acetone, etc.). The waste tank must be protected from water ingress. Refueling with oil is carried out only after the stove has completely cooled down.
Sheet metal
How to make a potbelly stove out of metal? This project can be implemented by yourself if you have welding experience, as well as essential tool. From the materials you will need the following:
- sheet metal (its quantity determines the size of the stove);
- steel corners 5 mm thick;
- metal tube about 30 cm long;
- pipe with a diameter of 180 mm.
To get a potbelly stove, you need to weld a rectangle of metal sheets butted together (without a lid yet). On one side, place a blower and a furnace door. The internal space of the stove is divided into a smoke circulation, a firebox and an ash pan.

In the last two compartments, a grate is installed that will hold solid fuel. To do this, steel corners are welded inside the potbelly stove on the sides at a height of up to 15 cm. A grid welded in advance is laid on them (it can be made of steel strips welded to thick metal bars at a distance of about 5 cm). It is better to make the grate removable, so that later, when it burns out, it would be possible to replace it without any problems. In addition, the removable grate design makes it easy to clean the heater.
Let's return to the construction of the stove. In order to increase the efficiency of the potbelly stove, you can make fasteners for a removable reflector (a metal sheet with a thickness of at least 12 mm), which will separate the furnace and smoke. To do this, two metal rods are welded on top. After installing the reflector, you should get a channel for smoke.
Having equipped the inside of the potbelly stove, you can weld the top metal sheet, which will become the cover of the structure. A hole is made in advance in it for fixing the chimney pipe. Further, jumpers are equipped in the stove, delimiting the doors made for the ash pan, reflector and grate. As a rule, a small door is equipped under the ash pan, but two steel doors are made to the full width of the stove, so that it is convenient to get the reflector and grate.
The next step is to weld latches and legs to the structure (metal tubes with a diameter of up to 3 cm and a length of 10 cm are suitable for them), as well as chimney pipes from a curved pipe with a diameter of about 18 cm (note that the chimney is placed on a 20 cm sleeve ). The sheet metal potbelly stove is ready.
warm brick
A potbelly stove on wood, coal and other types of fuel can significantly increase its efficiency. To do this, it is enough to build a screen of baked clay bricks around it with your own hands. If you look closely at the drawings of such a mini-building, you can see that the bricks are laid at a short distance from the walls of the stove (about 10-15 cm), and if desired, around the chimney.

Bricks need a foundation. Do you want the masonry to last a long time? Then pour the base at a time to form a monolith. The material for the foundation is better to take concrete, which should be reinforced with steel reinforcement with your own hands. It is desirable to make a reinforcement layer at a distance of approximately 5 cm from the surface of the concrete pad.
Ventilation holes are made at the bottom and top of the brickwork, which will ensure the movement of air (heated masses will go up, cold air flows from below). Ventilation also prolongs the life of the metal walls of the potbelly stove, postponing the moment of their burnout due to cooling by circulating air.
Bricks laid around the stove accumulate heat, and then give it away for a long time, warming the air in the room even after the potbelly stove goes out. In addition, brickwork additionally protects objects surrounding the stove from fire.
If desired, the stove can be completely laid out of brick. Such a structure is beneficial in that it will serve long years without additional effort on the part of the owner. However, there are also certain disadvantages. The disadvantages of this option include the following:
- the process of laying out such a stove is quite laborious and is suitable only for those people who have experience in masonry with their own hands;
- a brick potbelly stove is quite expensive, as it requires the use refractory materials, including special clay for mortar.
In order to get a small potbelly stove on wood, it is enough to lay out a cone measuring 2 by 2.5 bricks, 9 bricks high. AT combustion chamber 2-4 rows are laid out from fireclay bricks. Ordinary clay baked brick is suitable for a chimney, into which you must remember to insert a stainless steel sleeve.
Whatever the method of making a miniature stove or a potbelly stove with your own hands, whether you make them according to a drawing or by eye, the main thing is that at the end you get an effective heater, and in an extended configuration also a hob for cooking. Look around for suitable materials(barrels, sheet metal etc.) and forward to your own homemade stove or even a fireplace stove!