How to make a two-level stretch ceiling. Do-it-yourself two-level stretch ceilings (photos and videos) Installation diagram of two-level stretch ceilings
Modern tension ceiling structures They are distinguished by excellent performance data, attractiveness and relative ease of installation. It should also be noted that they look especially good in large and high rooms. In order to make a two-level suspended ceiling with your own hands, first of all you will need to familiarize yourself with the techniques of working with the material used in its arrangement.
An example of such a material is a special vinyl film or similar elastic materials, from which combined curtain structures are most often constructed. When preparing them Special attention should be given to the quality of the surface being developed, taking into account the use of a wide variety of design solutions, characterized by the following characteristics:
- use of special built-in elements (combined design);
- variety of surface textures (matte, glossy or so-called satin);
- large selection of colors.
Stretch ceilings obtained on the basis of these solutions are distinguished by their practicality (electrical wiring and other household communications are easily hidden under them), beauty and ease of use. They can serve the potential user long years without diverting his attention to special service.
Features of tension type structures

Before making a two-level stretch ceiling, it would be useful to familiarize yourself in more detail with such wonderful properties as:
- the ability to create a perfectly flat surface;
- protecting the premises from flooding with water;
- attractive design.
Under the elements of tension structures, all the unevenness of the rough ceiling is very easily hidden, with a guarantee of obtaining a perfectly smooth outer covering.

If the suspended ceiling is installed correctly, there is no need to worry about the safety of the interior of the apartment (furniture in particular) in the event of flooding. The fact is that such a design does not allow liquid to pass through, but accumulates it in its volume. To eliminate the consequences of flooding, it will be enough to drain the accumulated water by temporarily dismantling the edge tension fabric.

Besides, wide choose colors and textures of the canvases used makes it easy to choose the material most suitable for your environment. However, like any ceiling coverings, such structures are not without a number of disadvantages, which include:
- lack of protection of coatings from accidental damage by sharp objects;
- poor tolerance to low temperatures;
- high cost of tension material and specificity of work on its installation.
Preparation for work

It is necessary to prepare the base of the ceiling by obligatory cleaning of it from the remnants of old, crumbling plaster, followed by the installation of electrical wiring in the locations of the pinpoints. lighting fixtures.
Before starting work on independent arrangement ceilings, special attention is always paid preparatory activities, produced in compliance with the following requirements:
- markup literacy ceiling surface, guaranteeing a perfectly smooth canopy covering;
- special care when cutting the canvas itself, eliminating the possibility of damage to the material;
- knowledge of safe working techniques (including using a gas heat gun used to stretch the fabric).
Regardless of the design of the suspended ceiling, the following tools and consumables may be required to prepare it:
- classic screwdriver;
- hammer drill, necessary for installing fastening profiles;
- level;
- special heat gun, equipped with a gas cylinder;
- frame profiles;
- ceiling stretch fabric;
- an ordinary stepladder, as well as special spatulas used for the convenience of stretching and securing the canvas in the profiles.
The base surface must be treated with a special antiseptic primer, eliminating the possibility of mold and mildew forming on it. With the order of assembling the frame two level ceiling You can watch the corresponding video on working with suspended structures.
Installation of two-level structures

Before purchasing a canvas, it is advisable to prepare a small sketch with the expected design of the future ceiling, including the smallest surface details. In addition, the sketch must necessarily indicate zones of inter-level transitions, as well as placement points spotlights. And only after that you can proceed to placing an order for the canvas from a company that manufactures suspended structures.
Self-assembly should begin with the arrangement of a frame made of profiles with a set of baguettes used to secure the tensioned fabric. In the case of manufacturing a combined structure, plasterboard inserts are installed in the required places of the frame, which are then puttied and painted in the required color, after which spotlights are mounted in them.
On next stage work, it will be possible to proceed to stretching the canvas itself, which must first be heated using a heat gun to a temperature of approximately 70°C. After heating, the straightened film is fixed in the previously installed profiles using special spatulas (its fixation on the lamp bodies is carried out using special latches).

If you are not completely confident in your abilities, trust the installation suspended ceilings professionals.
In conclusion, we note once again that due to the high cost of decorative canvases, you need to work with them very carefully so as not to damage them during installation.
Video
This video shows how to make a complex suspended ceiling with two levels and LED lighting yourself:
Photo


A two-level stretch ceiling with lighting is a decorative structure made of metal and plastic profiles, attached to the main ceiling to hide unevenness and laid communications. The whole thing is covered with an elastic fabric without forming a hard one. metal frame, as when installing suspended ceilings. This solution looks extremely attractive. Today we will find out how to make such a ceiling at home with our own hands.

Preparatory stage
Installation of a two-level stretch ceiling begins with preparing the rough level. Deleted old finish, the whitewash is completely washed off down to the concrete layer.
Already at this stage it is necessary to draw up a preliminary sketch of the future project. The main thing is to determine the location of future lighting devices. With this ceiling design, it is recommended to create two levels of lighting - main (chandelier, lamps) and local (hidden lighting based on LED strips, built-in spotlights).
Prices for suspended ceilings
suspended ceiling

The installation of the stretch ceiling and its frame begins only after the rough finish has dried. In the room where all this will happen, it is necessary to maintain low humidity (about 75%) and relatively high temperature air (approx. 24°C). This is necessary to properly straighten the stretched fabric and prevent it from sagging.
While the primer and plaster are drying, it is necessary to prepare a sketch of the two-level ceiling itself. Clearly determine what shape the contours of each level will outline, where the main lighting (chandelier) will be located. First, all this is done with a pencil on paper, then transferred to the ceiling.

It is most convenient to draw curved lines along a plastic profile applied to the ceiling. It bends easily, maintaining smooth transitions.
Having drawn up a drawing according to which the levels will be created, you need to set the height at which you plan to place the lower level of the stretch ceiling. Optimal size– from 15 centimeters or more. If the main ceiling has unevenness and slopes, then you can use laser level and make marks on each wall where in the future the profile will be fixed, onto which, in turn, an elastic base will be stretched.
Prices for ceiling profiles

Scheme 1. Design with hidden lighting: 1 - aluminum structure with hidden lighting; 2 - auxiliary beam; 3 — wall molding; 4, 5 — harpoon tension fabric; 6 — backlight; Dimensions are in millimeters.

Scheme 2. Sectional design of a multi-level stretch ceiling (harpoon-type fastening): 1 - upper level of the tension structure; 2 - separator; 3 — separator plugs; 4 — bump stop; 5 - base ceiling; 6 — internal frame; 7 - lower ceiling level; 8 - wall profile, as well as a plug for it; 9 - walls; 10 - decorative plinth.
In those places where the lamps and chandelier will be located, they are attached wooden blocks to adjust the level. After forming the tension level, you need to make holes here (soldering) and attach the lamp with brackets, covering the installation site with a decorative insert.

Installation of a plastic frame
Step 1. Installation of the plastic frame begins with attaching wooden retaining bars under the future profile. They are attached to the main ceiling using dowels. This is a simplified variation of the stiffening frame. You can replace it with metal U- and C-shaped profiles, but without experience it will not be possible to create such a structure. Therefore, it is better to use wooden blocks. They are attached with a space of 20-30 centimeters between each other.


Another option is to install a suspended ceiling frame
Step 2. Now the plastic profile itself is being installed along the previously drawn line. It is attached to the bars using ordinary wood screws. The ends of the plastic profiles are connected using an additional plastic insert. It should also be secured to the tree. The lower part of the plastic profile is covered with an angular flexible perforated insert - it is glued with polyurethane or glue with similar properties. This is done so that when the canvas is tensioned there is no sharp corners, on which the elastic material may tear.
Prices for spotlights
spotlight

Can also be used aluminum profile— you need to file it with a grinder, and you can’t rush here, the final cut is finished with a hacksaw
Step 3. During the installation of the plastic profile, it is important not to damage the communication cables (for example, fire alarm). They are either covered with a narrow plastic box or secured to the ceiling with staples. At the junction of the cable and the frame, a small incision is made in the latter.
Step 4. The plastic profile sets the height of the lower level of the future ceiling. Be sure to check the reliability of the fastening. The best option – point load at 15 kilograms. Such a safety margin will be sufficient even taking into account possible flooding from neighbors (if we're talking about specifically about the apartment).

Step 5. In places where the plastic comes into contact with the wall, the corners of the profile are cramped. It is more convenient to do this with a grinder with an emery sheet or a regular file. It is necessary to create a smooth bevel to the wall so that the point of contact is smooth, without a rough transition. At the point of contact it is attached metallic profile with a harpoon, since it will also be attached along this line tension material.
After attaching the plastic, you can begin installing the metal profiles. They are attached along the perimeter of the wall at a previously specified level (using a laser). In this case, a special profile is used specifically for a suspended ceiling. Its key difference is the presence of an elastic clamping insert inside (called a harpoon). It is this that will hold the ends of the fabric stretched over the frame. This profile is attached to the wall. Dowels are used as fasteners.

The same metal profile is attached to a plastic one (according to outside, where there are no bars). Self-tapping screws are used as fasteners. Next, you need to cover all noticeable caps of the fasteners with a light color. masking tape. Otherwise, they will be noticeable if you use a glossy light base - in bright light it will show through.
The most difficult thing in installing profiles is maintaining the specified level, so after each stage you need to check that straight lines are maintained. If an error is detected in a timely manner, it can be easily corrected. But when everything is already covered with canvas, even minor defects will be evident. To correct them in this case, you will need to dismantle the frame.
Materials for stretch ceilings
There are 2 main types of materials for suspended ceilings:
- PVC film (polyvinyl chloride);
- textile.
Which one is better? You can list the advantages of each of them.
Table. Comparison of the advantages of fabric and film ceilings.
But fabric material for suspended ceilings is much more expensive. It is allowed to use several materials at once. For example, the first level will be made of glossy PVC film to visually increase the space, the second level will be made of fabric with a satin-like texture. This is the optimal combination that designers often use.

Be that as it may, the final choice is up to the consumer. It is recommended to visit specialized stores and independently evaluate the attractiveness of each of the materials by studying their texture. You can even order photographic film for the ceiling according to your own design. Everything is limited only by flights of fancy and the size of your wallet, nothing more.
Is it possible to combine stretch fabric and hanging plasterboard? This option is possible, but it makes no sense. The exception is forced zoning of space. This is done when, for example, you need one large room divided into sleeping and guest areas. An aluminum frame made of C-shaped profiles must be mounted under a rigid base.
Fabric stretching
The selected fabric is stretched in the following order:
- first the lower level (the one closest to the floor);
- then the upper level (the one closer to the main ceiling).
Below is an algorithm of the required actions.
Step 1. When straightening the canvas, be sure to blow it with a gas heat gun (if PVC film is being installed). This is done to smooth out and eliminate wrinkles and prevent accidental tears.
Prices for fabric stretch ceiling
fabric stretch ceiling

Step 2. Next, the canvas is straightened out and hung at a height of at least 1.5-2 meters using special clothespins with rubber “sponges” - no trace remains after them. The canvas is re-blown from below gas gun to straighten out all the folds. As a result, the material looks as if it had been ironed. The room temperature will rise to 30°C, but windows cannot be opened.

Step 3. Next, you can start stretching the fabric. They start from the side of the plastic profile, from the corner (it is called the “base”). As practice shows, it is most convenient to use plastic spatulas. They simply “put” the edge of the canvas on them and push them into the harpoon. There, the canvas is securely fastened with an insert, and it will not be possible to pull it out without the same spatula. This is done in each corner, after which the material is re-treated with a heat gun. This time the canvas should be completely straightened and smooth.

Step 4. After the film has cooled, fasteners are installed around the entire perimeter of the level. There is no need to rush here. You definitely need to keep an eye on uniform distribution tension so that ties do not form. The place where the canvas is attached to the plastic profile is sealed with reinforced tape. A new profile for the upper level of the stretch ceiling will be attached there. It is mounted with the same self-tapping screws (you can use flea screws with recessed heads). Next, you can begin to straighten the second canvas.

The technique is similar and includes:
- straightening;
- hanging;
- heating with a heat gun;
- fastening at corners;
- reheating;
- final fastening on harpoons.
All that remains is to cover all the seams with decorative rubber inserts (bundle). It is manually pushed into the profile with the thin side without glue. If necessary, it can be quickly removed to pull off part of the canvas. This will be needed to access wiring and communications covered by a suspended ceiling.

Installation of lighting and fixtures
How to determine where to make a hole in a stretched fabric? It is easily pressed with your hands, thereby finding pre-attached bars or plastic rings. You cannot cut through the canvas - it must be burned. You can simply heat a piece of rounded reinforcement under a hot air gun and use the end to make a hole of the required diameter (but no more than 2-3 centimeters). The main thing is that the ends must be melted so that the fabric does not tear. Cutting is allowed only if a special thermal ring made of thin plastic is used, which is glued in the center of the future hole. Then the material is carefully cut along the inner contour of the ring.


Next, all the lamps are fixed (with suspension, if necessary), the fastening points are covered with decorative inserts (included with the lighting fixtures). If necessary, power supplies and automatic circuit breakers (for LED backlight or some energy-saving lamps). When performing this work, it is necessary to turn off the power to the room.
What other lighting options can be combined with stretch ceilings? Hidden LED strips look attractive - they are hidden behind the ceiling cornice. You can even use LED lighting with changeable lighting colors. If desired, you can also supply a remote control unit - manufacturers offer any variations. The choice depends only on the preferences of the owner of the house.
Prices for LED strips

If glossy PVC film was used as a stretch fabric, then lamps aimed at the ceiling can be attached to the wall along the perimeter of the room. The result will be a mirror effect, which will visually double the free space. Relevant for small cramped rooms.
After completing the installation of lighting fixtures, the installation of a two-level stretch ceiling can be considered complete. Control is carried out using a laser level. There are no rules for caring for the canvas. If necessary, wipe it with a damp sponge (applies to PVC film). The service life of such a ceiling reaches 20 years. Most manufacturers of tension materials provide a warranty of 5-12 years. Be that as it may, upon repeated cosmetic repairs It is not necessary to change the frame. It is enough to remove the old tension material and replace it with new one. Simplicity, attractiveness and low cost are the main advantages of such ceilings!

And at the end - a few more examples of two-tier stretch ceilings
Video - Installation of a two-level stretch ceiling with lighting
If you want to hide the defects of your main ceiling and at the same time add a “zest” to your interior, a two-level stretch ceiling is what you need.
This original and unique decorative design you can install it yourself. To begin with, you will need to develop a sketch that serves as a guide, which will serve as a guide during the work; fortunately, the plastic and flexible PVC film allows you to realize any design idea.

The sketch must be functional and practical. So, in a room whose interior is laconic, it will be completely unnecessary complex shape ceiling structure. The dimensions, boundaries and location of each ceiling level must be clearly defined. What level will be the main one? Which one will perform? And, of course, you cannot do without measuring the diagonal and perimeter of the room, determining its area, and, in addition, the location of lighting fixtures.
The next steps are the direct preparation of the ceiling surface for work: the previous finish and peeling areas of the previous plaster are removed from it. The floor slab is also cleaned of cement chips. If your ceiling has too serious defects, then read the article -.

Installation of supporting structure
It begins with defining the level interface. To apply it to the surface of the main ceiling, a thick marker is enough. Then the aluminum profile is attached along the marked line using a hammer drill and dowels.

Moreover, if the profile is fixed along a curve, it is cut with metal scissors at intervals of 3-4 cm. Covers the end surface between the top and lower level plastic strip. In this case, its thickness should be approximately 10 cm: a smaller thickness will deprive the entire structure of rigidity, and a larger thickness will deprive it of flexibility and elasticity, which will complicate the construction of curved sections of the frame. Its width will be affected by the planned height of the second level. In addition, such a strip, when attached to an aluminum profile, requires additional reinforcement.

To make a curved shape, the metal profile is cut with metal scissors or wire cutters
Otherwise, if the material is stretched, the loose section of the strip is screwed into the space of the second level.

This problem can be solved by installing wooden blocks along the strip, not exceeding the width of the strip in height. In this case, the number of bars is determined:
- Configuration - the more complex the shape of the outline of the protruding ceiling level, the more bars will be needed,
- The length of the dividing line - its size is directly proportional to the number of installed bars, optimal distance between them is 50 cm.
The strip is fastened to the bars using self-tapping screws. And so that the heads of the screws do not stand out under the ceiling, leaving dark spots, it is recommended to cover them with epoxy mastic and clean them. There is another option for simplifying assembly: using not a whole plastic strip, but pieces of it, with the obligatory fixation of them with wooden plates or self-tapping screws. In this case, the plate should not exceed the width of the strip, but the joints will have to be overlapped by about 5 cm in both directions.
In this article we will not dwell on the construction of a frame for a two-level ceiling, because we have already written everything about the construction of a frame and covering the ceiling with plasterboard - you can see this on our website, but below be sure to pay attention to what the frame is and how the frame is covered with plasterboard.


Installation of baguettes - brackets fixing the ceiling sheet

- At the main level, starting from the walls, in the lowest corner it is necessary to retreat approximately 4 cm from the ceiling and put a mark. Next, using a water level, this mark is transferred to other walls;
- If you need to install internal lighting under a stretched ceiling sheet, the ceiling drops even lower, because you need to take into account the height of the lighting fixtures used;
- With the second level, starting from the wall, marking the position of the baguette depends on the height of this level.
The material for the baguette is aluminum or plastic profile. At large area For stretch ceilings, it is better to use aluminum brackets: they are more rigid and reliable. The optimal interval between screws is approximately 10 cm, but in the corners it decreases to 5 cm.
Mounting brackets are installed along all sides of the room. Each level of the stretch ceiling needs its own row of baguettes, and the arrangement of the second level baguettes should be such that plastic construction completely covered with the material of the additional ceiling surface.

Installation of ceiling canvas

Here everything depends primarily on the material used:
- Polyvinyl chloride fabric is taken at 10% smaller size premises. However, taking into account the fact that this material it is necessary to heat it up to 70 0 C using a heat gun; installing it yourself is highly undesirable;
- When choosing a polyvinyl chloride fabric on a fabric basis, you need to take care of the allowances - 15 cm on each side. However, in this case, heating is not required, and the excess is cut off upon completion of the tension, which can be done with your own hands. It's easy to do. First, attention is paid to the first level.
When installing a two-level ceiling, work begins with the first level and is carried out from any corner. A construction spatula is taken, and with its help the ceiling sheet is tucked into the baguette. A similar action is performed in the opposite corner. After this, the material is attached to the center of each side of the wall. And in each case, between a pair of fixed places, the canvas is stretched in the center. Gradually, the tensioning process continues, and the interval between the points of fastening the canvas decreases. Finally, the canvas is fixed in a baguette using special plates, and the second level of the ceiling surface is stretched in a similar way.

Installation of lighting elements
There are two options here:
- The elements are removed inside, and then they will have to be installed before tension occurs;
- The elements are brought out, and then you have to carefully cut through the ceiling and glue plastic inserts in the places where the lamp is supposed to be attached.

When installing a two-level stretch ceiling yourself, you must take into account that in this case all responsibility is removed from the ceiling fabric manufacturers. The installation itself will have to be carried out very carefully, taking into account the smallest details, otherwise it may be necessary to completely remove the structure and carry out the work again.
Video - installation of a two-level ceiling
An original way to decorate the interior of an apartment would be a two-level ceiling with a suspended or tension structure. This option is perfect for the living room and bedroom. Decorative design can be supplemented with a unique lighting system, thanks to which appearance the premises will become refined.
Design features and advantages
When choosing a two-level design for arranging the ceiling in your room, be prepared to incur additional financial costs.

Therefore, decide in advance which installation method and ceiling design will be preferable for you:

The upper level can serve as a previously equipped ceiling plane. Drywall will be attached only in separate areas, which allows you to visually zone the room. You can attach the boxes around the perimeter, but the main condition will be a flat and smooth surface of the upper level.

Drywall is placed on one tier, and on the second - tension system. This can be implemented if surface finishing is prohibitively expensive.

The choice of installation option remains with the apartment owner. It is necessary to take into account the state of repairs, the layout of the premises, and your own financial capabilities.


Among the advantages of two-level technologies are:
- hiding rough finishing defects;
- the ability to cover communications;
- zoning of the premises;
- visual management of space in the room;
- Creation original design using in various ways backlight.

Construction of a ceiling with a plasterboard box
A fairly common way to decorate the interior of rooms is to install a plasterboard ceiling.

You can solve this problem yourself, although you will have to work hard by following our instructions.


Surface preparation and marking
At the very beginning, you need to clear the room of furniture and other things. The floor should be covered with film. The surface to be treated is cleaned of old coating.

If necessary, cracks and cracks should be sealed, primed and plastered. Finishing will be unnecessary if you plan to cover the entire ceiling with plasterboard.

After this you can start marking. Pre-measure the height of the corners and identify the lowest one. To ensure a horizontally level structure, you should focus on this angle.

As a marking, you can draw a straight line on the wall, used for installing profiles. Marking with dots will help you navigate the direct suspension.

If the lengths of the opposite sides differ, then it is necessary to align horizontally and then make the necessary markings. It is determined by the project you have chosen.


Installation of the first tier frame
The UD guide profiles are fastened at intervals of 600 mm around the perimeter. For the ceiling, a step of 400 mm is required.

If rounded solutions are assumed, then in such areas on the surface of the profile it is necessary to make notches at intervals of 25 mm, successively making bends taking into account the required radius.

Direct type suspensions are attached to pre-designated points on the ceiling. A pitch of 600 mm must be observed. After this, the ends should be folded and carefully trimmed.


Ceiling-type CD profiles are mounted on these suspensions. Where the second level of the structure is planned, it is advisable to install “crabs” in advance.

At this stage, you can take care of heat and sound insulation. To do this, insulation is placed in the interprofile recesses and fixed with the “tails” of the suspensions.

Then the frame of the first level is covered with plasterboard. In places where the modules are cut, it is advisable to remove part of the material with a knife, forming a chamfer. This is necessary for greater strength of the seams.

Installation of the second tier
In the process of arranging ceilings with your own hands, you need to carefully consider installing profiles for the second level. A contour for the UD profile is drawn on the wall.

A drawing according to the project must be applied to the surface. The presence of such markings makes it possible to visually evaluate future design. The profile frame is attached according to the markings. If necessary, the necessary places are rounded off.


To lower the frame under the tier, you must:
- cut the CD profile to the length required to lower the frame;
- cut the tabs (side parts) on one side of the cuts, which makes installation easier;
- insert the cuts with the flat side into the UD profile fixed to the ceiling;
- using the “flea” design, fix the cuts in increments of 500-600 mm;
- if it is necessary to fix curved pieces of a CD profile, then the step should be reduced to 200-300 mm;
- Place the UD profile on the installed sections, followed by strong fastening.

After the sidewall is ready, you need to cut off part of the CD profile. The length should be taken equal to the gap between the sidewall and the profile on the wall. Then they are firmly fixed on both sides. The frame will be completely ready.

Fastening drywall
To secure plasterboard sheets on the constructed frame, it is necessary to use a running start. The first row begins with a full-size sheet, which is mounted on profiles.

The second row also begins as a single piece, but from the opposite edge. The fastening technology can be seen in the photo of two-level ceilings.

To make shaped parts, you must first construct a template from cardboard. And then cut out the blanks using it. If the sidewalls are bent vertically, then molding must be done by rolling with a needle roller.


Then the surface is sprayed with water, and when the gypsum craton is saturated (after about an hour), an incision is made on the convex plane of the bend. The workpiece is placed on its edge, the desired bend is formed, fixed with a load and left to dry.

If you are creating illuminated ceilings, then you need to check all wiring and communications.

Drywall is fastened with self-tapping screws in increments of 150-200 mm. To improve the quality of future finishing, the screw heads must be deepened.

If at the same time the canvas is pressed through, then the fastening is redone, moving away from the previous place by 40-50 mm. Another sheet is attached from the opposite edge.


Remember, first you need to attach the top level, then move on to the side parts, and at the end - the decor of the bottom part.

After this, you can begin finishing. First the surface needs to be primed. After drying, serpyanka tape should be applied to the joints, the seams and the deepening places of the screws should be puttied.

It is advisable to secure the outer corners with corners. It is advisable to use a metal corner for smooth contours, but curved surfaces need to be secured with plastic ones. The corners can also be secured by pressing them into a layer of pre-applied plaster.

Sheets of fiberglass are attached to PVA glue, and placed on top finishing putty layer 15 mm. Then the surface is polished and primed. Finally, you should do finishing and secure lighting devices.

Features of arranging a tension structure
Two-level stretch ceilings also look great in the living room or bedroom. In this case, the perimeter of the room will be sheathed with gypsum craton, and in its center there will be a tension fabric.

The installation process is as follows:
- Marking and installation of plasterboard boxes around the perimeter.
- At a given height, a profile is attached, which will be the basis for fixing the canvas.
- Heating the room and heating the canvas using a heat gun.
- Fabric tension between profiles. First, diagonally opposite corners are attached. Then take turns with the other two.
- Along the perimeter, the canvas is stretched in turn along opposite edges - first one side, and then the second, lying opposite. Then the third and fourth.
- Installation of lighting points and decorative elements.

Two-level ceiling structures are a fairly popular way to give the interior of rooms an original and attractive look.

However, the installation process is quite labor-intensive. First you need to carefully work out the project, prepare the base, secure the frame, and only then proceed with the installation of the main canvas or sheets of drywall.

Photos of two-level ceilings


Stretch ceilings of several tiers have not surprised anyone for a long time. This finish not only looks impressive, but also allows you to hide structural elements or communications. Thanks to the appearance of special profiles for level transitions, it is not difficult to make a two-level stretch ceiling with your own hands. The manufacturer takes on most of the work. Based on the provided sketch, the material is calculated and cut, as well as the preparation of structural elements. All that remains is to assemble the frame and stretch the fabric. This will result in significant savings in installation costs. We have prepared step by step instructions, in which we will consider in detail which profile to choose to create two levels, how to properly prepare a drawing for the manufacturer and perform installation.
Types of two-level structures
According to the design, there are three main options for two-tier stretch ceilings. They vary in the materials used and complexity of manufacture.
Regular
The canvas is stretched in two levels; the design is a simple transition without a niche or hidden lighting. PVC film is mainly used. First, a frame of special profiles is installed, then the fabric is stretched over both levels. Often tiers are made from materials that differ in color and texture. Contrast emphasizes the difference.


Combined
In such a ceiling for tiers they use different materials. The second level (closest to the floor) is assembled from plasterboard. To do this, install the frame and sheathe the gypsum board. Then the structure is puttied or painted.
A film or fabric sheet is stretched as the upper level (located closer to the base ceiling). The baguette is attached to the vertical part plasterboard construction. To prevent it from coming off under tension, the joint is pre-strengthened. To do this, install an additional aluminum profile or wooden beam, since drywall does not have sufficient strength.


The main disadvantage of this option is that more long term installation For a stretch ceiling, it is enough to install a frame and stretch the film or fabric. And in the case of drywall, you have to additionally finish it and wait for the putty, paint, etc. to dry. This wastes time.
Backlit
The general principle is the same as for a conventional two-level ceiling. But additional lighting is installed. To do this, take a special frame into which the LED strip is then placed. Such baguettes are available for installation both near walls and between levels. The lighting can be located around the entire perimeter, only on one tier or in a niche between them.


Minimum room height for installation
During the installation of any tension structure, the ceiling is lowered. If the room ends up being too low, it will be awkward and uncomfortable to be in.
- For living rooms and kitchens in temperate climates - 2.5 m;
- in hot or cold areas - 2.7 m;
- for corridors and hallways - 2.1 m.

The shortest distance by which the ceiling will drop is determined by the width of the profile. For baguettes of the first level this is 3-4 cm, for the second - 8-10 cm. That is, the height will decrease by at least 11 cm. The calculations are valid for rooms with a small vertical difference in the ceiling.
It turns out that a height of 2.7-2.8 m is sufficient for a two-level stretch ceiling. Hallways and halls may be lower.
Material selection
The fabric used is thin polyvinyl chloride film(PVC) or synthetic polyester fabric impregnated with polyurethane.
From the point of view of two-level structures, the most important differences between the options are:
- The film is more elastic, so you can make any shape of levels with it.
- PVC canvas has more color options (about 200) and textures (glossy, matte, satin and various textures). Polyester comes only matte and has only 20 colors.
- For fabric and film, baguettes are made with different types fastenings. Special profiles for level transitions are produced only with harpoon fastening for PVC sheeting.


The film is cut out in production exactly to size. A harpoon (a strip of thicker polyvinyl chloride in the form of a hook) is welded to the edges. During installation, the canvas is simply tucked into the baguette using special spatulas. The harpoon is inserted into the groove of the profile, snaps into place and securely fixes the material. Installation is quick and easy, since the blade dimensions and tension are calculated at the factory.


For these reasons, fabric is rarely used in such designs. It is stretched only with combined ones (that is, in combination with drywall). The most common option for a two-level ceiling is a polyvinyl chloride sheet with a harpoon. This makes it easier to choose a baguette and create a complex design.
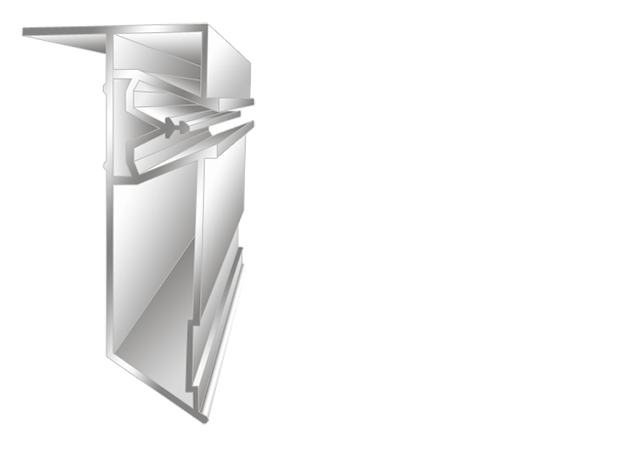
Selecting a profile for a two-level ceiling
There are several options here too. You can take a separating baguette, which is used to connect the canvases at the same level (marked with the letter combination SP) and a bumper. This is a profile resembling the letter “Y” or “Z” in cross-section.


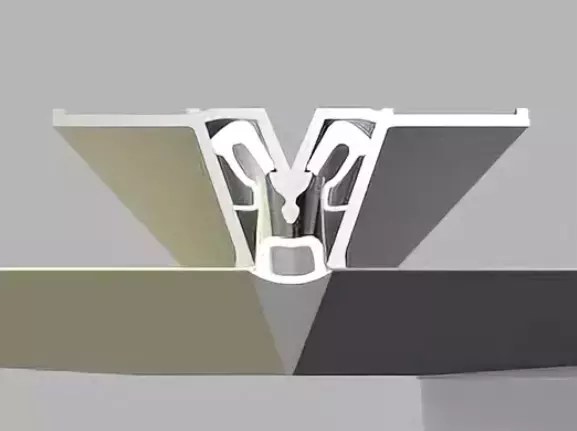

With this method of installing the second-level frame, the separating baguette is placed not horizontally, but vertically. It is secured to the top of a beam or strong plank. And the bumper is screwed to the bottom. One piece of film is inserted into top part separating profile and tension at the same level. And the other one is tucked into the lower slot and carried vertically to the bumper, where the film changes direction to horizontal.

But this method is relatively difficult to implement. More often they take baguettes specially created for two-tier ceilings. They are divided into several varieties, each with its own marking and purpose:
- PP- for easy transition between levels (tier height can be 5, 6.5 or 7.5 cm).
- NP- to create a niche with interlevel lighting (the transition height is 5 cm).
- KP- used together with the previous profile, performs a load-bearing function (height 9 cm);
- PL- to transition the level with backlight, the baguette has a niche for installing an LED strip, which is covered with a light-diffusing insert (height 7.5 cm).


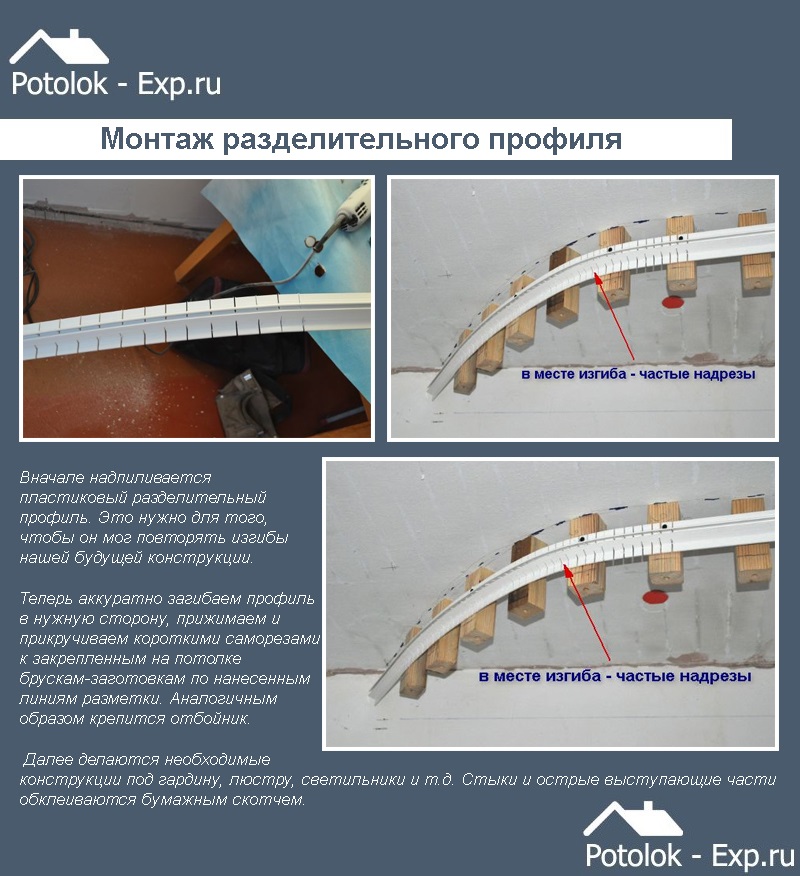
All types of profiles are used to create both straight and curved structures (circles, ovals, waves or spirals). To make the frame bend, the baguette is sawed every 15 mm. And then, for strength, they are fastened with aluminum tape and self-tapping screws (approximately one strip per three cuts or 2-4 cm).


Let us consider in detail the technology for installing a simple two-level stretch ceiling. The material of both tiers will be PVC film. As a frame we use a PP 75 ceiling profile for a stepped level transition. We will install spotlights in the lower tier. This is the most simple design two-level stretch ceiling for self-installation.

Required Tools
For installation you will need:
- stepladder (can be replaced with a stable table or stool);
- tape measure and pencil;
- laser level or hydraulic level;
- marking cord (chokline);
- hammer drill with a drill with a diameter of 6 mm;
- screwdriver or screwdriver;
- grinder or hacksaw and file;
- gas heat gun (can be rented);
- a set of spatulas for filling the film;
- sharp knife.


Preparatory work
Before you begin installing a two-level stretch ceiling, you need to take the dimensions of the room, draw a diagram and transfer it to production. Then the base floor is prepared for installation.
Measuring the room and creating a ceiling diagram
It is necessary to accurately determine the length of each wall and calculate the size of all angles. Even in a rectangular room, these dimensions may differ slightly. It is also important to determine where electrical wiring and other communications are located, if any.

Taking this data into account, you need to schematically draw the room and draw a sketch of the future ceiling. It notes:
- room dimensions;
- which of the tiers will be the top and which will be the bottom;
- distance from the border of level 2 to the walls.

The stretch ceiling diagram along with the dimensions is transferred to production. Specialists will create a frame and cut out the film (if the ceiling is wider than the roll, the sections are soldered on a HDTV machine).
Attention! It is better to order everything from one organization. This way the frame and the canvas will fit each other exactly.
Preparing the base base
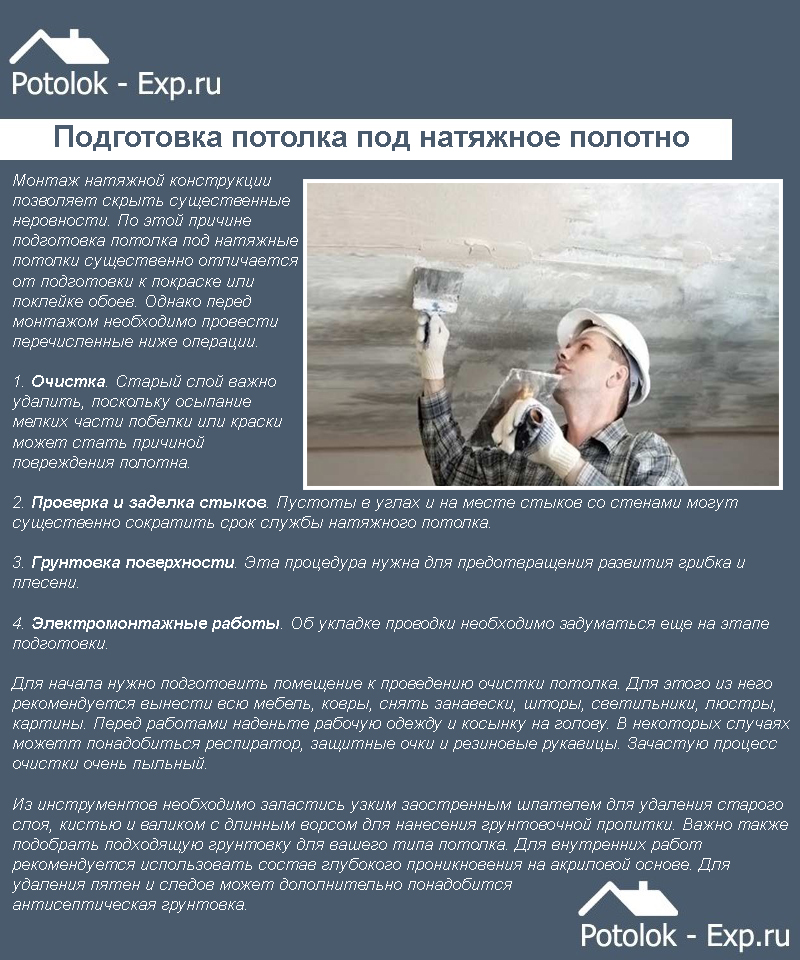
While waiting for materials, you can start working on the rough ceiling. The remains of the previous finish are removed from it: paint, plaster, wallpaper or tiles. To do this, use a spatula and water, sometimes with the addition of special products. If you do not remove the old coating, it may fall onto the film after installation. Then the ceiling will sag unsightly under the weight, and if the corners are sharp, it will tear. It is easier to prevent such problems than to repair or completely change the canvas later.

The surface is carefully inspected looking for cracks and joints. concrete slabs. They need to be sealed, otherwise in the future the ceiling may inflate or stick to the base when a window or door is opened. Used to seal cracks polyurethane foam, sealant or plaster, which is sometimes placed in several layers. Before applying the next one, wait until the previous one has dried.
Careful leveling of the base is not required, as it will be hidden. But you need to prime the ceiling with an antiseptic. This treatment serves two purposes: it strengthens the surface and prevents mold from developing. This is important, since a humid microclimate is created under the film, favorable for fungus.


Ceiling markings
The drawing must be transferred to the ceiling and walls. First, measure the height in the corners and places of level transition. From the lowest point, set aside the required distance (by which the ceiling will drop). Then the beating cord is pulled between the marks, pulled back a little and released. Thus, using a chokeline, horizontal lines are drawn on all walls.


The second level is marked similarly. The boundary between the tiers is marked on the ceiling. For straight lines, use a marking cord. Curved ones are marked with various devices: templates in the form geometric shapes, thread fixed at one point with a pencil at the other end, etc. In the case of ready-made structures, simply apply the workpiece to the ceiling.

The locations of the lamps are also noted. Check that the required distances (between them, to the walls or to the level transition) are the same.
Advice! It is better to mark the location of the light bulbs on the floor. Then they will be easier to find after installation.
Frame installation
If the dimensions of the 2-level ceiling structure are too large, it is delivered in separate parts. Then you will have to assemble it on site.


Then the profiles are attached to the walls and ceilings. If you screw a PP 75 baguette directly to the slab, the height will decrease by 9.5 cm. Sometimes more is required, then the frame for a two-level stretch ceiling is installed on metal corners or wooden beam. To maintain a horizontal plane, use a level or a thread stretched between points on the walls.

Then the wall molding is installed. The fastening pitch is 10-15 cm. On loose and fragile partitions, as well as closer to the joints, it is better to reduce it to 5, and sometimes even to 2-3 cm, or strengthen it with spacers.


The fitting of the baguettes is done closely without gaps or level differences. To avoid damaging the blade at the junction during installation, the edges of the profile are processed with a file, and the junction is sealed with aluminum tape.
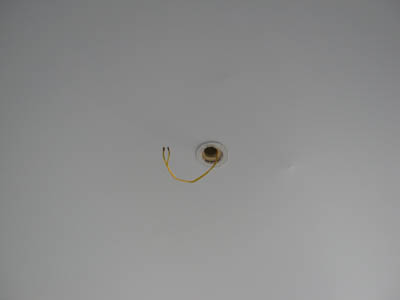
Installation of embedded lamps and electrical wiring
You will need platforms, flexible steel hangers for fastening and self-tapping screws “bugs” 3.5x9.5 mm. For spotlights they produce (fixed different diameters and universal).

Taking into account the distance from the base ceiling to the film, the height of the suspension is determined. The excess is cut off, the plate is bent like an accordion and attached to the platform. This way it will be possible to further adjust the height of the structure, and the strength will not suffer. Holes are drilled in the floor slab, then the mortgages are fixed into them with self-tapping screws.


After this, they begin laying the electrical cable. The lamps are connected to the network in parallel. If one of them burns out, the rest will work.
The wire is pulled to the first platform, a loop is made about 10 cm long, and then to the next, etc. To prevent the cable from touching the suspended ceiling in the future, it is fixed to the hangers. To do this, it is convenient to use small pieces of punched paper tape or plastic clamps.

Important! The wire should not be pulled, there should be a slight sag.
The ends of the loops are cut, stripped and inserted into the terminal blocks. This connection of lamps is safer and more convenient than twisting. To prevent the wires from interfering with installation, they are bent upward and tucked behind the inserts.
To make the film stretch and become more elastic, it is heated with a heat gun. Before starting this stage, close the doors and windows to prevent drafts.

The canvas is carefully unrolled on the floor and then hung to the corners using crocodile clips. The film is heated and gradually tucked into the baguette with a spatula. The sequence is:
- first one of the corners;
- then the opposite and the rest;
- the middle of the walls;
- between these points;
- and further along the entire perimeter.

This way you get a smooth canvas without wrinkles or folds.
Note! First the lower tier is pulled, and then the upper one.


Installation of spotlights
The marks on the floor determine where the mortgages are located. Thermal rings are glued to the ceiling, which are needed to protect the PVC film from overheating. During operation, the material will not melt when the light is on and will not separate from the cut.
The protector is coated assembly adhesive(preferably Cosmofen CA-12) over the entire surface so that no voids form. Then the ring is applied to the ceiling and pressed for 2-3 seconds, without moving or smoothing.


When the protection is stuck, the film inside is cut out with a construction knife. Trim the mortgage so that it is level with the ceiling. They pull out the wire, connect the lamp and put it in place. Built-in models have retaining springs on the body that need to be pressed and inserted into the hole in the ceiling.

Masking joints
Due to the design features of the baguette, after installing the tension fabric, gaps remain: between the ceiling and the wall, as well as the upper and lower tiers. To close the gap, use decorative plug. This is a PVC insert, which is chosen to match the color and texture of the film.
Masking tapes are available in several varieties. Along the perimeter of the room with a harpoon mount, insert:
- T-shaped plug - for smooth walls;
- SL - wide insert, allows you to hide gaps in curved areas;
- L-shaped (corner) - more elastic, suitable for hard to reach places or curved baguettes.


To mask the level transition, other models are used, since the size and shape of the gap in the separating profile is different:
- oval (looks most aesthetically pleasing);
- "fungus";
- tube (round section).