How to properly cover a roof with metal tiles. How to properly cover a roof with metal tiles
Metal tiles are one of the modern materials for roofing, combining an impressive appearance and affordable cost with a number of important technological advantages. The process of installing it is not too complicated: after familiarizing yourself with how to install a roof deck made of metal tiles, you can do such work with your own hands.
Of course, another option is always possible: save yourself the hassle by entrusting all the work to professionals. However, such a choice will cost much more, as a result of which not everyone will like this alternative.
So, if, after weighing all the pros and cons, we decided that we would cover the roof with metal tiles ourselves, then first of all we should familiarize ourselves with the technology and features of this process.
Characteristics of metal tiles
Metal tile material is a type of metal profile product that has a wavy surface characteristic of tiles. Its sheets are made from galvanized steel, and then a coating of polymer compounds is applied to them, giving the products an impressive appearance and resistance to adverse external factors.

Metal tile roofing has a number of important advantages, including the following:
- High strength, resistance to mechanical and wind loads.
- Light weight products and ease of installation. Covering a roof with metal tiles is not difficult; it does not require too much physical effort or the development of too complex skills.
- Aesthetic appearance.
- High resistance to corrosion processes.
- Long service life of several decades.
- Affordable price.
Having carefully studied the technology and procedure for covering a roof with metal tiles, you can carry out this work yourself, saving noticeably. It would be worth noting that the cost of installation work accounts for more than a third of the total costs of roofing.
Composition and design of metal tile roofing
Laying metal tiles on the roof is the process of installing a multi-layer structure consisting of the following parts:
- A vapor barrier layer, represented by a film that allows steam to pass through, but blocks condensation and water to prevent the insulation from getting wet. The vapor barrier film is laid on the lower surface of the rafters, after which it is secured using a construction stapler.
- Rafters, the quantity and strength of which largely determine reliability roofing covering generally. You should accurately calculate the attachment points of the rafters and the distance between them, and then carefully install them.
- A layer of insulating material that is attached between the rafter legs of the structure. For this reason, the width of the insulation should be taken into account when arranging rafter frame.
- A waterproofing layer, the material of which is laid over the rafters and protects the wooden frame structures from exposure to moisture or condensation.
- Lathing used for subsequent laying of metal tiles. Its function is uniform distribution roofing weight.
- Metal tiles laid on top of the sheathing structure, followed by fixation using self-tapping screws.

It should be noted that metal tile roofing can be of two types: cold and warm. The cold roof does not contain vapor barrier and thermal insulation layers. Naturally, such a roof will cost much less, but with this option, heating the attic and upper floor will present significant difficulties. Therefore, if the question is how to cover an attic roof with metal tiles, it is better to use warm option roofing covering.
Stages and procedure for installing a metal tile roof with your own hands
To ensure the reliability and long service life of a metal tile roof, you must first study in detail the features and rules of installation work, and then adhere to them during the installation process.

If we examine in detail the question of how to properly cover a roof with metal tiles - step-by-step instruction for this work is as follows:
- Arrangement of rafter structures. The rafter frame can be metal, but is more often made of wood coniferous trees, which is impregnated with an antiseptic and fire retardant. First, the support beam of the Mauerlat is installed, which is fixed using anchor bolts or metal studs embedded in concrete. Next, the timber ties that secure the Mauerlat are installed at a distance of 1-1.2 meters from each other. After this they are mounted vertical racks in the middle of each of the puffs, at intervals of 1-1.2 meters, using temporary supports for them. Then a ridge beam is laid on top of the racks, onto which the rafter legs are then attached. The distance between the rafters can vary, usually from 60 to 120 centimeters, and depends on the weight of the roof, the thickness of the rafters themselves and the width of the insulation.
- Covering the rafters with a layer of waterproofing material, which is laid horizontally, with some sagging and without tension, in order to avoid breakthrough under the weight of water. The waterproofing material is attached directly to the rafters using staples or stainless steel nails with a wide head.
- Installation of sheathing, for the construction of which wooden slats approximately 3 centimeters thick or sheets of moisture-resistant plywood are used. The spacing between the sheathing elements can also vary depending on the weight and steepness of the roof - for flatter roofs this distance should be smaller, and the sheathing itself should be stronger.
- Installation of an eaves strip, to secure which a front board is mounted in the area of the roof eaves to the ends of the rafters. The cornice strip is laid on top of the front board and fixed with galvanized nails.
- Installation of a vapor barrier layer, which is then covered with a layer of thermal insulation. Vapor barrier material laid on the lower surface of the rafter legs, and the subsequent installation of insulation is carried out between the rafter elements. Mineral wool, glass wool, polyurethane foam, polystyrene foam, etc. can be used as thermal insulation material.
- Installation of additional valley elements, which are fastened to the sheathing structure.
- The flooring of the metal roofing itself. This process also includes several stages. First, if necessary, metal tile sheets are cut to fit the surface to be covered. Then the bottom row of sheets is laid out, with an overlap of 10-20 centimeters. Next, the subsequent rows are laid. It is advisable to treat the joint areas between the sheets with sealant to prevent water leakage. All sheets of metal tiles are secured using galvanized self-tapping screws with a press washer.
- After completion of the laying of the main part of the roof structure, ridge, end and other additional elements are installed, as well as installation drainage system roofs.
How to roof different types of roof
Although in general the installation of metal tile coverings has much in common, regardless of the roof structure, nevertheless, for certain types of roofs this process may have certain differences and nuances. For example, for someone who is going to cover a hipped roof with metal tiles, or is thinking about how to cover a sloping roof with metal tiles, it is important to study some additional features in this matter before getting down to work. Otherwise, during installation and further operation you may encounter quite significant problems and unforeseen situations.

Classic and most simple options roof devices are pitched and gable structures. When looking for a solution on how to cover a gable roof with metal tiles with your own hands, you just need to follow the general work plan outlined above. The answer to the question of how to cover a pitched roof with metal tiles is even simpler. In this case, there is no need to equip the ridge and valleys, and all that is required is the direct installation of the roof itself. You just need to remember that pitched roofs can be with or without an attic, and like other roofs, they can be equipped with either an insulated or a cold version.
It is somewhat more difficult to install multi-pitched roofs, as well as roofs with complex structures. This may include, for example, covering the roof of a sloping roof with metal tiles. Broken roofs can have different numbers of slopes that continue each other, increasing inner space and the comfort of the living space as a whole. The process of arranging a sloping roof made of metal tiles with your own hands is generally the same as for conventional roofs, however, it is additionally required to close the joint areas that can allow water to pass through during precipitation. In this case, the waterproofing is laid along the slopes, and insulating material and sheathing can be installed in the same way.

In case of arrangement complex roofs with four or more slopes, it is recommended to use special steel elements that support the rafters and keep their location unchanged. The use of strong steel supports is also desirable for the most loaded ridge beams. It should be noted that hipped roofs differ from gable roofs in the absence of gables, instead of which additional triangular slopes are installed at the end sections. This type of structure is more difficult to install, but is characterized by greater reliability and durability.
Finally, it should be taken into account that building a roof with your own hands may require builders to use non-standard solutions and ideas, the practical choice of which always depends on a particular situation.
How to cover a roof with metal tiles: we cover a gable roof and hipped roof with your own hands, how to cover correctly, step-by-step instructions
How to cover a roof with metal tiles: we lay a gable and hipped roof with our own hands, how to cover it correctly, step-by-step instructions
Step-by-step instructions for installing metal tiles using special technology from A to Z
 Metal tiles are roofing materials in the form of profiled steel sheets coated with a polymer coating. Used to cover roofs with angles greater than 14 degrees.
Outwardly, it is similar to classic ceramic tiles, but surpasses it in reliability and ease of installation. In this article we looked at what is better, soft roofing or metal tiles?
Material stable to temperature changes and other negative climatic influences. Its main disadvantage is low sound insulation characteristics, but it can be eliminated if the work is carried out correctly.
In this article you will learn how to make a roof from metal tiles with your own hands, step by step from A to Z. If you do not know how to choose metal tiles, then read this article.
Installation of sheathing
This stage of work should be given Special attention, since it is on the sheathing that the tiles will be attached. This design also provides natural ventilation of the internal roof space.
- Metal tile sheathing is made from wooden beam. The relative arrangement of the boards can be continuous or thinned out.
- Most often used sparse designs, while the distance between the boards (sheathing pitch) is strictly tied to the distance between the lower depressions of the tile waves, since in these places the material has the greatest strength.
- Distance between the first two beams on the slope side there should be approximately 70 centimeters less than the established pitch.
- The minimum thickness and width of the board for sheathing is 25 and 100 mm respectively.
- The width of the board for the counter-lattice can be half as large. The first board from the edge of the roof should be 15-20 mm thicker than all the others.

Installation of the structure is carried out after completion of installation of the waterproofing layer. The main lathing is attached to the counter lath, which is connected to the rafter frame with self-tapping screws. At the ridge of the roof, additional support boards are laid under the metal tiles.
Calculation of metal tiles
Count the required amount of material for roof construction is done as follows (or use an online calculator):

When counting the number of sheets in a row, you need to keep in mind the value overlap, which can reach 15-20 centimeters.
To ensure that there is no shortage of material, it is better to round all values up.

Metal roofing: waterproofing and vapor barrier
Before you begin installing metal tiles with your own hands, you should take care isolation roofing pie. Protection internal spaces from liquid provided with layers of vapor barrier and waterproofing.
The waterproofing is located between the rafters and the counter-lattice and prevents moisture from the environment from entering the interior of the roofing pie. The most common waterproof materials– these are polyethylene and reinforced films. They are stretched over the entire area of the slope with slight sagging. It is important to ensure that the waterproofing does not overlap with the thermal insulation.

Vapor barrier is a protective layer does not allow moisture to penetrate into the interior of the roof, formed in the premises. This is the lowest layer of the roofing pie; it is located under the rafters (to which it is attached) and thermal insulation, thereby ensuring its protection from condensation.
An attic roof made of metal tiles must have a high-quality vapor barrier; in cold roofs without insulation, installing a vapor barrier is not necessary.
Required tools and equipment
Covering a roof with metal tiles begins with preparing the necessary tools. To install a metal tile roof you will need:
- Screwdriver.
- Rail.
- Tin snips or other metal cutting devices such as nibblers, circular saw, etc.
- Construction stapler.
- Tape measure and marker.
- Components of the roof and roofing pie: tile sheets, self-tapping screws, hydro-, steam- and heat-insulating materials, timber for sheathing and rafters.
Fastening and laying metal tiles - step by step
 How to cover a roof with metal tiles with your own hands? The metal tiles are attached to the sheathing using self-tapping screws with an ethylene-propylene rubber gasket, which provides waterproofing of the fastening areas.
If tiles with hidden fastening are installed, galvanized self-tapping screws with a press washer are used.
Self-tapping screws must be tightened with optimal force.
If the fastening force is insufficient, then moisture will get under the cap and cause it to corrode. If you tighten the screws too tightly, the gasket will be deformed, which will break its tightness.
- Before covering the roof with metal tiles, you should make sure that the sheathing is symmetrical and reliable.
- Self-tapping screws screwed into the lower deflection of the tiles, they must enter strictly perpendicular to the plane of the sheathing boards.
- When connecting two overlaps fastening is carried out in wave rises using shortened screws.
- Installation of tiles begins from the lower left corner of the slope, subsequent sheets are laid on top previous ones.
- Self-tapping screws screwed into each wave of tiles along the perimeter of the slope and in a checkerboard pattern in the interior areas. If a screwdriver is used for this, then its rotational effect on the material must be minimized.

Metal tiles - DIY installation + instructions
Now you know how to lay metal tiles correctly and we invite you to familiarize yourself with the most important thing - instructions for installation of metal tiles.
Installation of metal tiles - step-by-step instructions
How to properly cover a roof with metal tiles with your own hands? The first step is to arrange the rafter system.
It is on it that all other roofing elements will be fixed.  The system is constructed from wooden beams, wherein their size exceeds the dimensions of the sheathing bars.
The most important elements of the rafters are:
- Mauerlat. This is the fulcrum of the structure.
- Rafter legs. They hold the sheathing on themselves and rest on the mauerlat.
- Racks. Strengthen the support of the rafter legs.
The rafters are fastened to the wall using so-called tavern. These are strips of metal that connect two structures with nails or screws.
Next are installed main insulating layers: insulation, vapor and waterproofing. A waterproofing film or membrane is applied to the rafter system and fastened to it with a stapler. Thermal insulation is placed in cells, formed by intersections rafter beams, and is fixed using cords drawn crosswise in the lower plane of the rafters.

After completing the installation of protective structures, you can begin installing the sheathing, on which we will subsequently lay the roofing. She applied over rafters and waterproofing layer and is attached with self-tapping screws to these structures.
Installing metal tiles with your own hands:
- A cornice strip is attached to the frontal board, providing roof protection from exposure to wind.
- When performing work, the need to ensure good natural ventilation of the space is always taken into account. To do this you need to leave gaps between all layers of the roofing cake. The basis of natural ventilation is the possibility of free air circulation under the roof ridge.
- The last step is installation of metal tiles. It must be taken into account that the sheets must protrude beyond the edges of the sheathing by 5 centimeters and aligned horizontally along the eaves line.
- Ridge strip attached to additional two boards, which are installed at the joints of two slopes when installing the sheathing. Such measures are necessary to ensure additional sustainability of important structural element to negative impacts.

metal tile laying diagram
Laying metal tiles around a chimney requires extra care. Firstly, it must first be plaster. Secondly, you need to install boards around it that are attached to the sheathing. Third, tiles are cut 15 centimeters on all sides facing the chimney.

Additional elements
In addition to the above eaves and ridge strips, when installing a metal roof you may need such products(full list here):
- Snow guards. They loosen the snow masses falling from the roof, making their fall relatively safe for building structures and for humans.
- Junction strips. These products frame the joints of the tiles with all important structures, such as chimneys and ventilation pipes.
- Corners and valleys. They protect all corner roof structures.
- Low tides. Used to redirect the flow of rain and melt water.
- Horse.

- Distance between rafter frame beams should be no more 60-90 centimeters, otherwise the roof structure may sag.
- When performing work, you must wear shoes soft sole and move along the tiles, stepping into its lower deflections. This will prevent the material from being pressed through.
- The absence of contact between protective layers is important not only to ensure ventilation, but to prevent them mechanical damage during friction.
- To provide additional ventilation, you can arrange dormer windows in the attic.
- For level installation of all elongated additional elements need to pull the thread and secure it between two already installed structures.
This is what the technology for laying metal tiles on a roof looks like. This material has an approximate service life about 50 years, but without the need to carry out repair work operation will only take place when correct execution installation
It is important to correctly calculate the material consumption; for this you need to know the dimensions of the coating, as well as all dimensions and proportions. Even minor deviations from the required indicators can lead to a reduction in operational life by an order of magnitude.
Metal roofing - installation and step-by-step instructions for laying the roofing yourself
Installation of metal tiles: step-by-step instructions for installing a metal tile roof with your own hands. In this article we will talk about correct installation roof coverings, how to correctly calculate and lay the roofing covering on the sheathing, we will tell you about proven technology for installing rafters and additional elements.
How to cover a roof with metal tiles with your own hands and avoid mistakes
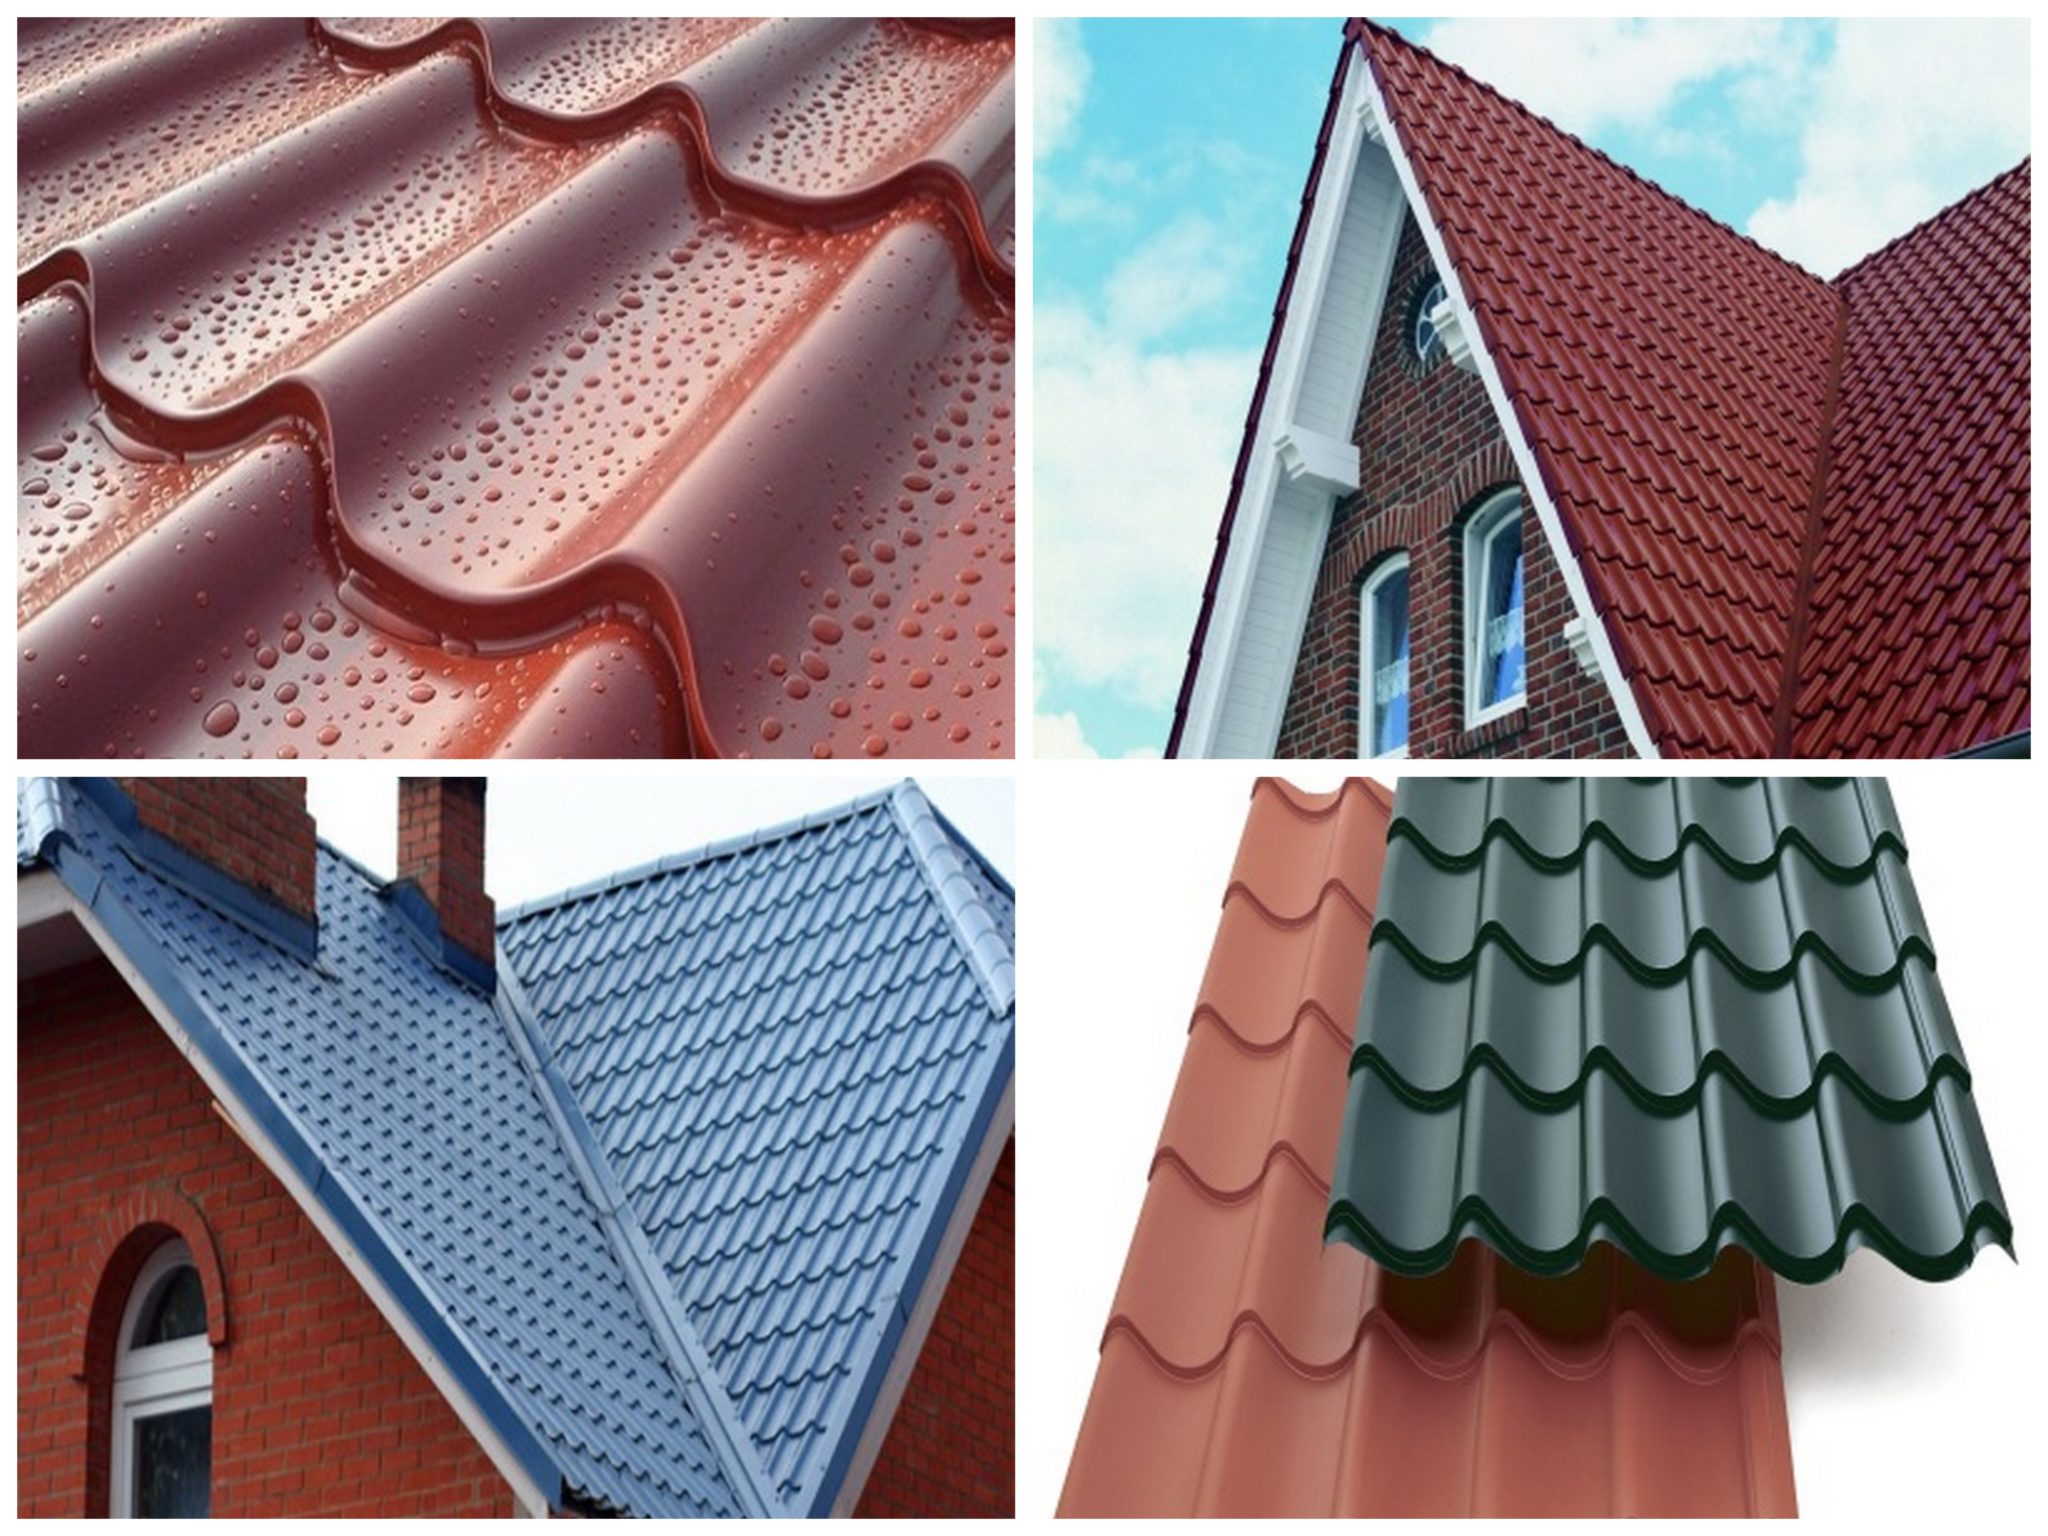
Metal tiles appeared on the building materials market relatively recently. However, it immediately gained enormous popularity among private developers. And no wonder. In addition to simply excellent performance characteristics, this material is also easy to install. We’ll talk about how to cover a roof with metal tiles with your own hands in this article. But first, let’s see what advantages and disadvantages this material has.
What is metal tile
Metal tiles are steel sheets, galvanized and coated with a polymer protective composition. This material is called so because of its characteristic shape. The sheets are stamped at the factory in such a way that from a distance they look like the well-known expensive and prestigious roofing material - clay tiles. Therefore, the roof looks very presentable. The standard sheet measures 110 x 118 cm.

A brief overview of the advantages and disadvantages of metal tiles
How to properly cover a roof with metal tiles will be discussed in detail below. Now let’s see what advantages and disadvantages this material has. Its advantages include:
- Aesthetic appeal. Sheets of metal tiles are usually painted in rich, bright colors. Therefore, a roof covered with them looks beautiful and modern.
- Durability. Since the sheets are protected from corrosion by two protective layers - zinc and polymer, such a roof can last for decades.
- Easy to install. The question of how to cover a roof with metal tiles is completely simple. Any home craftsman can install the sheets. Installation can be done in a short time.
- Low cost. Compared to other roofing materials, with the possible exception of corrugated sheets, metal tiles are very cheap.
This material has practically no disadvantages. Some disadvantages include the fact that if scratches occur, rust may appear on the surface of the sheets. In addition, metal tiles are a rather noisy material. When it rains, the sound of drops on the roof (in the absence of insulation) can be clearly heard in the rooms of the house.

How to choose metal tiles
Let's look at how to cover the roof of a house with metal tiles so that it lasts as long as possible. When choosing, first of all, you should pay attention to the type of polymer coating, as well as its thickness. Metal tiles can be covered with polyester, matte or glossy, with a thickness of 25 to 35 microns. The main advantages of this type of coating are low price and resistance to adverse environmental factors. Matte metal tiles look somewhat more aesthetically pleasing than glossy ones, imitating more realistically natural material. The disadvantage of polyester coating is considered to be not very good resistance to mechanical stress.
Sheets coated with plastisol are also produced. This material is made on the basis of polyvinyl chloride, well known to everyone. This is the thickest coating of all (100-200 microns). Mainly it hallmark is an embossed surface. The advantages of this coating include a high degree of wear resistance. It is extremely difficult to scratch a sheet protected by this type of polymer. Its disadvantage is its low resistance to elevated temperatures. Therefore, for example, if you are wondering how to cover a roof with metal tiles in a house built in an area with a hot climate, you should not purchase material with this type of coating.

Another type of polymer protection for metal tiles is pural (a film made on the basis of polyurethane). The layer thickness is usually 5 microns. This material scratches less than polyester, and at the same time, unlike plastisol, it tolerates elevated temperatures well. In addition, it does not fade in the sun at all. Its disadvantage is considered to be not very good resistance to plastic deformation. That is, during installation, such sheets must be bent as carefully as possible.
The last type of coating - PVDF - is a mixture of polyvinyl fluoride and acrylic. The thickness of this protective layer is usually 27 microns. Sheets coated with it have a glossy metallic color. This coating is the most durable of all. Its advantages also include maximum resistance to ultraviolet radiation and scratches. A very interesting feature of PVDF coating is its ability to self-clean during rain. Experts recommend using such sheets in aggressive environment. For example, to cover the roofs of houses located on the sea coast.
Features of the rafter system for metal tiles
Before you start figuring out how to cover a roof with metal tiles yourself, you should understand what the design of the rafter system should be. The bases for standard sheets are installed in increments of 60 cm. The lathing can be used solid or the elements can be arranged so that they coincide with the wave spacing of the sheets. All elements of the rafter system should be coated antiseptic composition. In addition, they are treated with a product that increases the fire resistance of wood.

How to cover a gable roof
First, let's look at how to cover gable roof metal tiles. This type of roof is one of the simplest structurally. Such a roof consists of two slopes located at a certain angle to the horizon. For metal tiles it should be at least 11 degrees.
When installing a roof of any structure, a waterproofing layer must be installed under the roofing material in question. The film is attached to the rafters with some sagging. The membrane strips are placed horizontally, with an overlap of 10 cm. Next, the sheathing is placed on top of the film on the rafter bases. Narrow boards (100 x 30 mm) are used under metal tiles.
So how to cover a roof with metal tiles with your own hands if it consists of two slopes? The sheets are attached to the sheathing with special roofing screws (4.8 x 28 mm). Every fastener must have an EPDM rubber gasket. It is necessary to purchase self-tapping screws whose cap color matches the color of the sheets. They should be screwed in with a screwdriver so that they press the material tightly against the sheathing, but do not put too much pressure on the gasket and do not deform the metal.
Installation on a gable roof begins from the end and from the eaves board. You can install elements from right to left or vice versa. Alignment is carried out along the cornice, and not along the end.
Fastening is carried out along a longitudinal wave through one transverse wave at the locations of the sheathing. Each sheet has a capillary groove on the left. During installation, it is covered with the next sheet. Fastening at the overlap is done with self-tapping screws in two places - under the wave and on it. The bottom edge of the sheet should protrude down beyond the cornice board by 40 cm.

The order of installation of sheets
How to properly cover a roof with metal tiles, or rather, what is the procedure for covering it? Installation is carried out in several steps.

Features of installing metal tiles on a sloping roof
A broken gable roof is another popular type of roof. Usually it is arranged if they want to equip a residential attic underneath it. Next, let's look at how to cover a sloping roof with metal tiles.
In this case, the installation of sheets is carried out in the same order. A special outer corner is installed at the break point in the roof. Its installation is carried out in the same way as installation ridge strip, through one vertical wave. The corner element is attached under the top sheet and above the bottom. A seal is placed between the top sheet and the corner.
Dormer windows
Now you know how to cover a roof with metal tiles with your own hands. As you can see, it is not difficult to place the sheets on the sheathing. It is somewhat more difficult to connect them with various types of roofing structural elements. For example, with an apron skylights. In this case, the sheet can approach the opening either with a successful wave phase or with an unsuccessful one. However, the window can usually be moved up or down. Therefore, just experiment to ensure the tightest connection between the lower apron of the window and the sheets of roofing material.
How to handle metal tile sheets
Thus, we found out how to cover an attic roof with metal tiles and how to sheathe a gable roof. Now let's look at how to handle sheets of this roofing material itself. The brought metal tiles should be laid out in piles so that the sheets will be arranged in rows. During installation, you should walk on the roof in soft slippers so as not to damage polymer coating.

How to cut metal tiles
The question of how to cover a roof with metal tiles with your own hands comes down not only to the rules for installing sheets, but also to how to cut them. When cutting, you cannot use a grinder, as this can lead to damage to the polymer coating. You can cut sheets either with electric scissors or metal scissors. Cutting should only be done with gloves and safety glasses.
Installation of metal tile sheets must be carried out quite carefully. This rule applies both when attaching them to the roof and when cutting them. Try not to damage the polymer and zinc coating of the material - and your roof will serve you for a long time.
How to cover a roof with metal tiles with your own hands and avoid mistakes
How to cover a roof with metal tiles with your own hands correctly? This is not difficult to do. One of the main advantages of this roofing material is its ease of installation. The most important thing in the cladding process is compliance the required technology and careful handling of sheets coated with a thin polymer layer.
How to cover a roof with metal tiles: installation technology

Metal tiles are a beautiful and durable roofing material, correct installation will provide it with durability and immunity to weather conditions.
Calculation of the amount of required materials
 The start of work is preceded by the calculation of the metal roof tiles. Each element has a full and usable area. Full - the size taking into account the overlap, useful - the one that actually covers the roof.
Each manufacturer produces roofing material with a different overlap size from others:
- 10 cm, 12 cm, etc. vertically
- 6 cm, 8 cm, 9 cm - horizontally
During calculations, only the useful area of the sheet is taken into account. Its length is determined by the wavelength of 35 cm, the number of waves may vary. Useful leaf length different manufacturers ranges from 35 cm to 3.5 m. In accordance with this indicator, horizontal rows are calculated.
The useful width of the sheets also varies: from 1 m 5 cm; 1 m 10 cm and beyond. The width of the sheets is the basis for determining the number of vertical rows.
If the roof slope has a regular rectangular shape, horizontal rows are calculated by simply dividing the width of the slope by the useful width of one sheet. The resulting number is rounded up.
Vertical rows are calculated by dividing the height of the slope by 35 cm and also rounding up. At a minimum angle of inclination (less than 14 degrees), two waves are required for overlap.

Calculation of metal roof tiles using the program
Other roofing elements, the quantity of which must be calculated:
- Elements covering the ridge and ribs; their total length is measured, another 10% is added to it for overlaps
- Elements forming the internal angle at the junction of the slopes - valleys, external and internal
- The eaves strip is a desirable, but not mandatory, element covering the ends of the rafters; its length is equal to the perimeter of the cornices
- End strip - covering the ends of the sheathing, protects the tile sheets from being torn off by the wind; its length is equal to the total length of the ends
- Film for waterproofing - the amount of material is equal to the roof area plus 15 cm for the overlap of each row
- Porous strip for sealing in the gaps between the ridge and valley
- Bars equal in length to the rafters, boards for sheathing; each slope is covered with them in increments of 35 cm
Tasks and roofing pie for metal tiles
Materials that have different purposes are installed layer by layer during the installation of the roof:


Installation of a roofing pie for metal tiles
Tools
- Screwdriver and hex socket for it
- Electric nibbler or nibbler
- Manual roofing shears
- Mallets
- Jigsaw, hammer, hacksaw (for installing rafters and sheathing)
- Level, plumb line, level

Tools for installing metal tiles
The eaves strip for metal tiles is also adjusted using electric scissors and secured with a screwdriver. The installation process of this element is described in more detail here.
Technology of covering a roof with metal tiles
Rafters for sheathing 5x15 cm are placed in increments of 60-90 cm.
 The first board is laid from below, it is 1-2 cm thicker than the others. It is nailed to the rafters with vertically directed nails of 7-8 cm.
The next boards are nailed in increments of 35 cm (equal to the wavelength on the sheet), ensuring a gable overhang.

Sheathing pitch for metal tiles
Internal valleys and cornice strip
 The internal valleys are secured first, starting from the bottom.
A porous sealing strip is fixed along the entire lower edge.
Before laying the tiles, the eaves strip is also secured. It is aligned along the bottom edge of the slope and fixed to the sheathing with self-drilling screws. The cornices are joined with an overlap of 5-10 cm.
Laying metal tiles on the roof
 Covering the roof with metal tiles is as follows: the first sheet is fixed at the bottom right.
A perfectly smooth edge of the first row is achieved thanks to a board nailed with a protrusion of 4-5 cm to the ends of the rafters. It is later dismantled.
The sheet is aligned along the overhang of the pediment and cornice, fixed with a self-tapping screw in the first upper wave on the right using a screwdriver.
The best screws for fastening are 35 mm roofing screws equipped with a rubber washer.
A second sheet is placed on top of the first sheet and secured at the overlap with a self-tapping screw. Next, the third sheet is laid in the bottom row or the first in the second, to ensure correct geometric shape roof panels.

Installation of metal tile profile
Installation of metal tile ridge
 When the installation of metal tile sheets is completed, a sealing strip is glued along the ridge, and the ridge itself is fixed on top of it.
The ridge elements are also attached along the ribs using special ridge screws.
Installation of the end strip for metal tiles
 The end strips are fixed to a pre-nailed end block and fixed at the top and sides. From above, the self-tapping screw enters the crest of the metal tile wave.
To increase the wind strip, make an overlap of 10 cm.
Installation of valley metal tiles
The lower valley is fixed to the sheathing using clamps.
The upper one - with roofing screws in increments of 20-30 cm along the top of the wave, without violating the integrity of the lower valley.

Installation diagram of the lower valley of metal tiles
Snow guards
 If the length of the slope is large, snow guards are installed in two rows. During the installation of the sheathing, they install additional beam at a distance of 12 cm from the main board. The snow retainer is attached to the beam with an anchor through a sheet of metal tile and a sealing rubber gasket.
Design of dormer windows
Speaker dormer window It is carried out similarly to the joints of slopes: the lower valleys are laid, tiles are laid on top of them, then the upper valleys are laid. The assembly is sealed with self-expanding tape.

Design scheme for dormer windows
Thermal insulation
 A heat-insulating layer is installed under the rafters, under which a vapor barrier film is placed along the entire length of the room.
The film sheets begin to be stretched from below, an overlap of 10-15 cm is made between the rows, which is glued with tape. Fix the film with a construction stapler to the rafters.
Metal tiles are a lightweight, non-flammable roofing material, its rigidity allows installation on the sheathing with a fairly large pitch. Taking into account the load, the difference in metal thickness and price, you can choose the best option. The key to the longevity of the roof is compliance with all rules and installation sequence.
Metal tiles are extremely popular because they have significant advantages over other roofing materials. Using metal tiles when covering the roof, you will provide your home with reliable protection from aggressive environmental influences. Let's look at how to cover a roof with metal tiles and what is required for this.
Advantages of metal tiles
The advantages of this material include:
- low cost;
- pleasant appearance;
- reliability;
- light weight;
- long service life.
Metal tile color chart
What will be required at work
Before starting work, you need not only to carefully study the instructions, but also take care of all the necessary materials and tools. First of all this:
- metal scissors;
- roulette;
- hammer;
- hacksaw;
- marker;
- stapler with galvanized staples;
- wooden slats of suitable length;
- screwdriver;
- drill.
Note! It will be quite difficult to cut complex profile metal tiles with hand scissors, so it is better to use a power tool for this (if possible).
It is also worth noting that the material is coated with a special polymer coating, which must not be damaged under any circumstances - it performs an anti-corrosion function. For this reason, you should exclude all cutting options that involve heating the area being cut. The optimal tool for cutting may be a grinder, but only with an abrasive wheel.
Regarding necessary materials, then for work you will need:
- metal tiles;
- board for constructing sheathing, 2.5x10cm;
- wooden beam, 2.5x5 cm;
- mineral wool for insulation;
- waterproofing (any except bitumen).
What kind of roof can be covered with metal tiles?
What type of roof can be covered with metal tiles?
Let us immediately make a reservation that this material is not suitable for all types of roofing. The fact is that the roof must meet certain requirements, namely:
- to be pitched;
- have a slope of more than 14°;
- have simple geometry.
If the roof has complex design, even if it is straightforward, then during installation it will be necessary to make more than a dozen trimmings, which will increase the consumption of material (after all, most of it will simply go to waste). Consequently, this will greatly increase the cost of building materials and installation itself.
Preliminary roof measurement
You need to start work with a competent measurement of the roof, its length and width - this will allow you to calculate the required amount of materials. If the width of the slope is no more than six meters, the length of one sheet should be equal to this width (with a small margin for the cornice). But if the width of the building exceeds six meters, then the sheet is divided into two parts, which are installed with an overlap of approximately 10 cm.
The sheet of tile itself must be at least 4 cm longer than the slope. The fact is that the sheet is attached to the slope, slightly overlapping the cornice. This allows us to ensure good ventilation under the roof ridge.
After this, the roof needs to be measured diagonally. It is also worth making sure that the roof has the correct geometric shape. Moreover, at this stage all defects and distortions will be revealed that need to be corrected immediately.
Thermal and waterproofing
Before you begin installing the sheathing and laying the tiles, you need to ensure that the roof has good waterproofing. This will prevent condensation on the inside of the roof, and even after leakage, moisture will be retained by a special substance - an absorber.
The most accessible and therefore popular insulating material considered a vapor barrier film. Treated with a special absorbent substance, it is installed directly above the room.
Thermal and waterproofing
The insulation must be laid on the rafter system so that the initial overhang layer does not exceed 2 cm. The following layers are overlapped by approximately 15 cm. A small sag can be left between the rafters, but not more than 2 cm. To fix the film, galvanized nails or a mounting stapler are used.
In parallel with waterproofing, the roof should also be insulated. Insulation boards are placed between the rafters. If the material is made in the form of mats, then it must be secured with the same mounting stapler (in this case, everything depends on the selected material; this issue has already been discussed in one of the previous articles).
Assembling the sheathing
Lathing for metal tiles
To assemble the sheathing, it is necessary to attach it to a layer of waterproofing along the slope wooden beams. Then boards 2.5 cm thick and 10 cm wide are attached to the beams.
Note! Installation of boards must begin from the bottom! The first board should be approximately 1–2 cm thicker than the others, because it is on it that the edges of the metal tile sheets will be installed.
The pitch between the boards can be different, from 30 to 45 cm, depending on the transverse profile of the roofing material. It is typical that the step between the first and second boards should be approximately 4 cm smaller than between other battens. Before starting work, all wooden elements should be treated with an antiseptic and (if possible) a fire retardant.
Sheathing step diagram for metal tiles
When installing the sheathing, special attention should be paid to the auxiliary elements.
- On both sides of the roof you need to install additional bars on the rafters - this will increase the reliability of fixing the ridge.
- When installing waterproofing, you need to extend it a couple of centimeters onto the chimney pipe and seal it with reinforced tape - this will help hide the gaps that have formed. On the chimney itself, it is necessary to make grooves (small grooves) 2 cm deep. Upon completion of the installation work, adjacent strips must be installed in these grooves and the joints must be insulated with silicone sealant.
- Valleys should be installed in the gaps formed between the slopes. To do this, a continuous sheathing with an additional layer of waterproofing is mounted from boards. Each of the valleys should be installed above the cornice strip and secured with self-tapping screws every 25 cm.
- You need to install a cornice strip on the frontal board with self-tapping screws and secure it every 25 cm. Such a strip must withstand strong wind, so it is installed with an overlap of 12 cm.
Additional roofing elements
Do-it-yourself roof covering with metal tiles
Work on laying tiles is carried out in the following order.
Do-it-yourself roof covering with metal tiles
First stage. Actually, we have already discussed it above - it consists of installing a cornice strip to the frontal board of the sheathing. We remind you once again about the mandatory 12-centimeter overlap.
- In the case of a gable roof, you need to start work from the end of the slope. If it was decided to cover from the right slope, then each subsequent sheet is installed on the extreme wave of the previous one. But if the material lies on the left end, then the new sheet is installed under the extreme wave of the one in front of it.
- The hipped roof needs to be covered from the highest point, gradually lowering (it all comes down to the peculiarities of the geometric shape of the hipped roof).
All sheets must be laid parallel to the cornice, with a mandatory 4-centimeter plumb line.
Third stage. If the sheets are installed in one row, then the first of them must be aligned with the cornice and temporarily fixed with a self-tapping screw in the ridge area. The second sheet needs to be aligned with the first and temporarily connected. So it is necessary to install two more sheets, then align the formed block along the cornice and secure it to the sheathing with self-tapping screws.
In the case of multi-row laying of metal tiles, the first sheet must be installed at the bottom, secured with a self-tapping screw and aligned along the end and cornice. A second sheet of tile is installed on top, and a third one on the side. All of them are temporarily attached with self-tapping screws. Then you need to level the formed block and finally fix it on the sheathing.
Finally, if the slope has a triangular shape, then first you need to determine and mark the center line on it. The same line should be drawn on a sheet of tiles. Then both lines are combined, the sheet is fixed with self-tapping screws. Subsequent installation is carried out on both sides of the first sheet.
Fourth stage. Self-tapping screws should be screwed into the recesses of the sheets through one wave. Each new row of screws should be staggered relative to the previous one. There should be 7-8 screws for each square meter of material.
The overlaps need to be strengthened in each wave.
When covering a roof with metal tiles, special attention should be paid to the reliability of fastening the sheets and the accuracy of their joining.
How to cover a roof with metal tiles
As a conclusion
All work must be carried out in accordance with the instructions given, ensuring that the wooden elements are thoroughly dried and there are no signs of rotting on them. This is the only way to achieve durability and reliability of the structure, as well as an attractive appearance of the roof.
Difficulties in the process of building a roof lie not only in creating a strong rafter system, but also in choosing the right roofing material. Each type of finishing offered on the modern market has its own characteristics and advantages.
One of the most popular is metal tiles. High aesthetics, convenient installation and affordable cost determine success of this material from buyers. In this article we will look at basic information about metal tiles, which will be useful both to those who have not yet made their choice in favor of a particular material, and to those who are planning to cover the roof with metal tiles with their own hands and are considering the possible difficulties that arise in the process of working with the described material.
For those who have decided on the type of roofing to choose, we recommend metal tiles from the S-Roofing company.
Like any other material, metal tiles have both advantages and disadvantages.
Talking about positive features coverings made of metal sheets, it is worth mentioning:
- Good anti-corrosion properties;
- Light weight providing maximum convenience installation;
- Various coating colors;
- Stability in any temperature conditions.
In addition, this is a fairly budget material. The cost of a metal roof, especially in comparison with its service life, is not that high. In addition, repairing a metal roof is not particularly difficult.
Disadvantages include insufficient sound insulation. If the roof under metal tiles is intended for an ordinary cold attic without special insulation that provides good sound insulation, the noise in the room during rain can be quite noticeable. However, some people find the sound of raindrops atmospheric, so this is not always a drawback.

So, we can say that metal tiles are really a good choice for a private builder. This is a beautiful, durable and practical material for pitched structures.
Metal roof installation.
To begin work with confidence in your actions, you should first understand what exactly metal tiles are.
The base of the plate is a steel sheet less than one millimeter thick, coated with a special protective layer of aluminum and primer. As a rule, a layer of polymers is applied to the primer, which determines the ability of the metal tile to withstand temperature changes and exposure to precipitation, as well as its color.

Typically, the polymer layer is made of plastisol or polyester. At the moment, manufacturers of metal tiles offer a wide range of colors, which is an additional advantage of the material - it can be matched to any design decision at home.
Sometimes, additional protection is provided by applying a special varnish. Regardless of the number of layers of various coatings applied, the metal tile sheet retains a small weight, which facilitates the installation process. On average, one square meter of tile covering weighs no more than five kilograms.
Calculation of metal roof tiles is made using specialized calculators that calculate the required volume of material based on the size of the slopes and the parameters of one covering element. You can find such calculators on our website in the top menu.
Metal tiles are steel sheets with several layers of protective and coloring coatings, which can significantly extend the life of the material.
Installation of a metal roof.
First of all, it is worth considering that metal tiles are suitable as a roofing material only for roofs with a sufficient angle of inclination. For a flat roof, such a solution will not be suitable or will require additional efforts to ensure waterproofing, which, taking into account wide range materials suitable for flat roofs, somewhat unjustified. The angle of inclination of a metal tile roof should be from fourteen degrees.
Before covering the roof with metal tiles, it is worth considering in detail all the stages of the upcoming work. The video at the end of the article perfectly illustrates how to cover a roof with metal tiles. After everything becomes completely clear, you can start working on the roof.
Waterproofing.
Covering the roof with metal tiles requires the presence of a reliable waterproofing layer that will protect truss structure from the slightest leak. The waterproofing film should be placed directly on the rafters. Make sure that the layers of material are correctly positioned - the absorbent surface should be directed inward, and the moisture-proof surface should be directed outward. Insulation of a metal roof requires the inclusion of a combination of hydro- and vapor barrier in the roofing pie.

Please note that the waterproofing film is fixed using a construction stapler and galvanized staples. The fastening is carried out directly to the rafters and begins at the edge of the roof, moving towards the ridge. The film must be overlapped - many types of film even have a special black stripe applied to them, which indicates where the edge of the next layer will be located.

The sagging of the material should not be more than two centimeters. After installing the waterproofing, work on the sheathing should begin.
How to properly make sheathing for metal tiles.
The roof sheathing for metal tiles is made from bars measuring 50x50 mm, boards 25x100 mm or from perforated metal profiles. It is placed on top of insulating materials on special counter-battens 5 centimeters thick. With the help of counter slats, additional ventilation of the metal roof is achieved; in addition, they protect the layer of waterproofing film from mechanical damage.

Installation of metal tiles.
After the installation of the roof under the metal tiles is completed, you can proceed to the direct installation of metal sheets. You should start from the end, laying from the very high point stingray - at the skate. You can start work as with right side roof, and from the left. All sheets are arranged with an overlap and fixed with self-tapping screws to the sheathing. It is best to use self-tapping screws with a sealing washer and a protective coating.
The fastening should be located perpendicularly, from the bend of the sheet directly into the sheathing. For every square meter of roofing you need to use 7-10 self-tapping screws. To prevent the sheets from being damaged during fixation, you need to pre-drill holes for the screws.

Please note that at the ends there should be an end strip on top of the profile wave, set as evenly as possible. It should also be fixed to the sheathing with self-tapping screws.
For roofs with complex architectural shapes, cutting sheets of metal tiles should be done in advance. In this case, you only need to use a circular saw or jigsaw. Other tools can damage the sheet's protective coating layers, which will accelerate the corrosion process.
The final stage in the installation of metal tiles is the installation of the ridge. Experts advise placing a seal under the ridge, attached to the sheathing with nails or self-tapping screws. The ridge itself must be strengthened with self-tapping screws in increments through the wave.

Junction protection.
The joints of the roof and vertical surfaces - pipes, walls, antennas - deserve special attention. At the joints it is necessary to place special strips, under which additional wooden blocks are sometimes fixed for reliability.

The process of installing metal tiles, as a rule, does not cause difficulties even for a private builder. First of all, it is worth taking care of the insulation and sheathing, after which work is carried out from the top of the roof edge.
Like other metal coating options, metal tiles require the home to be equipped with special protective system. Without preventing a lightning strike, living in a house with metal roof it could be downright dangerous.
To ensure that the roof structure made of metal tiles does not cause danger during a thunderstorm, you need to insure it against lightning strikes. Otherwise, wiring in the house may be damaged, electrical appliances may be damaged, or a fire may occur.
Reliable grounding will help to avoid all this. The lightning rod can be a special rod located above the highest point of the roof, most often the ridge, or a mesh that covers the entire surface of the roof. The rod type of grounding is more common.

The rod, located on the roof or on a nearby tree, must be connected to the ground located in the ground. A well-designed lightning rod will allow you not to be afraid of even the most severe thunderstorms.
The process of how to properly cover a roof with metal tiles must necessarily include the creation of grounding. Since metal tiles will certainly accumulate static electricity and pose a danger to the lives of home owners during a thunderstorm.
Let's summarize the material.
Metal sheet tiles are a reliable, attractive and practical material. Therefore, the question of how to cover a roof with metal tiles does not lose its relevance, despite the emergence of new materials on the construction market.
This article describes in detail the process of creating a roof from metal tiles - photos and videos illustrating the material make it as convenient and visual as possible.
The roof pie for metal tiles must include reliable waterproofing and sheathing. This way the coating will be more durable and will not require frequent repairs and replacement of roof elements.
By doing the work correctly and carefully, you will get a dense coating that can withstand both precipitation and sudden temperature changes. If the shade of the roofing tiles was chosen correctly, this finishing method will make the house not only practical, but also beautiful.
Installation of metal tiles with your own hands. Video lesson.
Each of us has seen metal tiles more than once. Every year, more than one hundred square meters of this roofing material is installed on various roofs. In view of the widespread use of metal tiles, I would like to say a few words about the correct choice of material, its proper storage, as well as how to cover the roof with metal tiles and install everything additional elements that come with it.
Advantages of metal tiles
This roofing material first appeared on sale in Finland in the second half of the last century and since then has been successfully leading among all coatings of this kind. Today, metal tiles are made from aluminum-zinc steel, which has a protective polymer coating that protects the metal from corrosion and is painted in different colors.
In the manufacture of this material, several coatings are used, which differ in their properties, cost and thickness. Galvanized profiled sheets have a more complex internal structure than it initially seems: usually a cold-rolled hot-dip galvanized sheet is used for the base, which has a thickness of 0.4-0.5 millimeters.
Metal tiles have a list of key qualities that determine their popularity: light weight, ease of installation, long useful life, increased wear resistance and reasonable price. The material does not burn, does not deform or melt. Sometimes consumers suffer from increased noise during strong winds or rain, but this occurs when the roofing, sound insulation and drainage are not installed correctly.

This roofing material has a stylish appearance, often imitating traditional ceramic tiles, but is far superior to its clay counterpart in ergonomic qualities. Metal tiles are used for reconstruction of buildings or new construction. In any case, it can last 50 years, or even more, without losing its original appearance throughout the entire period of operation.
The process of laying metal tile sheets is one of those jobs that requires strict adherence to the requirements specified by the manufacturer in the instructions. Deviation from these recommendations can lead to a significant reduction in the service life of the material, and manufacturers in such cases decline responsibility due to breach of warranty.
Calculation of metal tile sheets
To buy the required number of sheets of metal tiles, first pay attention to any residential building that has a similar roof. “Waves” are placed across the roof slope, and “rows” are located along the roof slope. The pitch of metal tiles is the distance between the rows. A sheet that consists of 6 “waves” and has a pitch of 350 millimeters is called a “module”. One-, three-, six- and ten-module warehouse sheets are available for sale.
But you can also order sheets according to your own measured sizes. Of course, prices for special orders will be higher. However, when covering a complex roof with sheets of standard sizes, a lot of waste is generated, which also affects the price of covering the roof with metal tiles. But the possibility of individual cutting of roofing material for each customer allows us to reduce this waste significantly. Therefore, you need to choose warehouse sheets or their cutting based on a specific option.
The metal tile sheet has 2 widths: general and useful. As for the length of the sheets produced, the minimum length is 450 millimeters, and the maximum reaches 7 meters. The lower 50 millimeters of the sheet from the cut line to the wave crest is called the “bottom cut,” the size of which is the same for cut and stock sheets. The “top cut” from the wave crest to the edge at the top is 50 millimeters for standard sheets metal tiles and up to 300 millimeters for sheets on special order.

To calculate the number of rows of sheets horizontally, you need to divide the maximum length of the slope along the ridge or cornice by the usable width of the sheet. Round the resulting number up. You can calculate the length of sheets in a stacked row by summing up several values.
The first of them is the length of the slope, measured from the eaves to the ridge, that is, from the bottom to the top point of the slope. The second is the length of the eaves overhang of 0.05 meters, which is calculated to prevent moisture from getting under roofing sheets. The third is the length of the vertical overlap of the sheets of 0.15 meters. If there are two or more sheets in a row, then each subsequent sheet will overlap the bottom one, interlocking with each other at the “lock” and forming a strong, tight and even connection.
When choosing sheets of metal tiles, remember that it is not recommended to take sheets that are longer than 4-4.5 meters, because this is expensive and quite labor-intensive; inconveniences arise when loading, unloading and lifting the material onto the roof, because a long sheet can be scratched and bent and become deformed. When using very long sheets of metal tiles, it is better to cut them into pieces, which must be laid with an overlap of 150 millimeters.
Metal tiles, according to building regulations, must be stored in unheated room, where protection from weather factors is maintained - rain and direct sunlight. Profiles that are factory-packed must be laid on a flat surface using beams 20 centimeters thick as a support, in increments of 50 centimeters. If you plan to store the material for longer than 1 month, unpack the metal tiles and stack them in stacks up to 70 centimeters high.
Construction of the rafter system
Calculation of the elements of the rafter system must be done at the roof design stage. It is necessary to take into account the features of the roof shape, wind and snow loads for the region. If there are errors in the calculation of the pitch and cross-section of the rafters, the roof may sag over time, and cracks may also appear. The pitch of the rafters for metal tiles should be 600-900 millimeters. If this indicator is increased, it is recommended to use cross boards large section (sheathing). As a rule, it is customary to use rafters with a section of 100 or 150 by 50 millimeters.
If you plan to insulate the roof, it is advisable to install additional horizontal ventilation between the rafters. Namely, in the side of the rafters, drill holes near the top of the roof that have a diameter of 2-2.5 centimeters, in increments of 30 centimeters. After this you need to process wood materials fireproof and antiseptic impregnations.
Before covering the roof with metal tiles with your own hands, it is recommended to check the diagonal length of all slopes, since the roof must have the correct rectangular shape. Then check the cornice, ridge, plane and slope fractures for horizontalness. If there are errors, the surface must be leveled.

When choosing metal tiles as a roofing covering minimum angle The roof slope should reach 14 degrees, which ensures acceptable water flow; the roof itself will not accumulate moisture and leak in the future. Be sure to install the cornice board in the cut-out rafters grooves to add more rigidity to the structure for mounting gutter hooks.
Many instructions for installing metal tile sheets recommend installing a fascia strip as well. The front board is attached to the end of the rafters for additional protection. Binder eaves overhangs carried out using corrugated sheets, siding or soffits, having previously made a special sheathing. If soffits without perforation are used as lining, it is necessary to leave ventilation gaps to ensure free flow of air into the space under the roof.
Hooks for gutters are installed immediately before fastening the metal tiles. It is best to use long hooks, which provide greater structural strength. Install the gutter holders on the cornice strip, cutting out grooves for the “leg” of the hook. Secure the hooks with self-tapping screws. The installation pitch of the gutter holders usually coincides with the pitch of the rafters. For installed metal roofing, it is customary to use short hooks.
Arrangement of waterproofing and ventilation
Moisture and its minimal penetration into the under-roof space are contraindicated for any roofing pie, as it leads to rotting and cracking of the rafter system and corrosion of metal tile sheets. Avoid similar negative factors It will work out if you choose insulation of sufficient thickness for the roof, protect it from condensation with a waterproofing film and from moisture with a vapor barrier, and also arrange natural ventilation of the space.
To organize proper ventilation of a metal roof, you need to calculate the area of ventilation gaps, according to the ratio of the total space of ventilation gaps to total area roofing 1 to 100. Remember that ventilation gaps must be placed between the waterproofing and the roof, thermal and waterproofing for through air flow, at the ridge and in the eaves hem for air flow.

For waterproofing metal roofing, it is customary to use waterproofing and anti-condensation films, as well as superdiffusion membranes. You should absolutely not install bitumen waterproofing under a metal tile roof! The waterproofing material is laid in such a way that air flows pass from the eaves without obstacles under the ridge of the roof and exit through the ventilation holes that are installed in the highest place.
Lay the waterproofing layer horizontally between the ridge and the eaves with an overlap of 15 centimeters, on top of the rafter system. You should start from the cornices. Lay the material with a slight sag between the rafter legs of 20-25 millimeters to avoid tearing the film in cold weather. Fastening of this material can be done using wooden slats installed along the trusses. Lay the vapor barrier film overlapping under the insulation, connecting its pieces with adhesive tape.
Construction of sheathing for metal tiles
Metal tiles require the creation of sheathing. For this, bars are used that have a cross-section of 5 by 5 centimeters, and boards measuring 3.2 by 10 centimeters. First of all, nail from the ridge to the eaves to the rafters along waterproofing film falling bars. Sheathing boards are attached to them horizontally. The first of them from the cornice should be 1-1.5 centimeters thicker than the others - 5 by 10 centimeters.
The boards must be fastened with the following distances: from the beginning of the first board to the middle of the next one there should be 28 centimeters, between the middles of the remaining boards - 35 centimeters. It is recommended to check the sheathing pitch every 5 rows from the first board. Self-installation metal tiles are not an easy task. And if you make a mistake with the horizontality of the cornice board, you will have to re-cut the entire sheathing again.

Near the attic windows, chimney ducts and in the valleys, you need to make a continuous sheathing, nailing two additional abutment strips measuring 150 by 25 millimeters over a distance of 300 millimeters to the sides of the ridge strip. If the valley angle is almost flat, it is worth laying an additional layer of waterproofing material. The endow is attached using self-tapping screws to the sheathing in increments of 300 millimeters. The lower edge of the valley should be laid on top of the cornice strip. The overlap should be at least 100 millimeters at the horizontal junction of the valleys.
It is necessary to make a groove in the chimney pipe (it is strictly forbidden to cut into the masonry seams) with a depth of at least 15 millimeters and waterproof the pipe by 50 millimeters, securing the cut with adhesive tape. The external junction strips will be placed on the pipe, top part leading into the groove. This area must be sealed with a high-quality heat-resistant sealant. Also at this stage it is necessary to provide space for the arrangement of passage elements of the roof - ventilation and antenna exits.
Fastening sheets of metal tiles
So we come to the main question of how to properly cover a roof with metal tiles. Regardless of the fact that metal tiles are a durable material, you should follow some rules when working with them. The process of laying metal tiles begins on the ground; you need to unpack and arrange the sheets in piles intended for each slope. You can't take sheets with bare hands, wear protective gloves.
The technology for arranging a roof made of metal tiles allows for cutting sheets for complex areas on site. However, you cannot cut sheets with a grinder, as the protective polymer layer may be damaged. Use electric nibblers or tin snips for cutting. Before you start cutting, practice on a separate piece, since cutting metal tiles is more difficult than ordinary steel sheet.
When lifting metal tiles onto the roof, it is important not to scratch them. Take the sheet of material as you move it beyond the edge of the stamping line and lift it onto the roof using the guides from the boards. It is not recommended to lift long sheets by the edges, because the sheet may bend. Also, do not load multiple sheets at the same time. Remember that when moving through the sheets, you need to choose shoes with soft soles. Do not step on the crest of the wave, but only on your toes. Place your foot parallel to the slope.

The direction of laying sheets is not tied to anything, so it can be done from left to right or from right to left. When choosing to install metal tiles from left to right, you will have to lift the edge of the sheet, and place the edge of the next one under it. As a result, the outermost sheet will rest on the previous one, or rather, on its transverse wave, which prevents the sheets from sliding. On gable roofs, the installation of sheets begins from the end, and on hip roofs - they are laid from the hip. Align the sheets relative to the cornices. If you start laying the covering with long sheets, it will be much easier to level them.
When laying the material in one row, the first sheet is placed on the sheathing, temporarily attached with one self-tapping screw. Then lay the next sheet, aligned with the first, and fasten the sheets together. Make sure that all sheets fit together tightly and correctly from a geometric position. Install the metal tiles, moving from the eaves to the ridge. After this, attach all the sheets to the sheathing, and the last sheet in the row is attached to the sheathing only after leveling the next block.
When laying sheets of metal tiles from right to left in several rows, lay the first sheet, aligning it along the end and the cornice, then place a second sheet on top of the first, temporarily secure it with one screw in the center of the sheet at the ridge, align the sheets and fasten them together with screws. Then you need to lay the third sheet on the left side of the first, fasten the sheets together and lay the fourth sheet over the third. Align the entire block along the end and cornice, and then finally attach the metal tile sheets to the sheathing.

When laying material on a triangular slope, before starting installation, it is necessary to mark the center of the slope and draw an axis through this center. Then the same axis needs to be marked on the sheet and the features of the axes drawn on the sheet and the slope should be combined. Secure the sheet to the ridge with one self-tapping screw. On both sides of it, continue installation according to the principles that were described in the previous versions.
Sheets of metal tiles are attached to each other, to the eaves, to the ends and to the sheathing. First, three or four sheets are fastened together at the joints, then they are secured in place with one screw, aligned strictly along the eaves, and only then the sheets are finally attached to the sheathing. Sheets of roofing material are attached to the sheathing with two self-tapping screws - near the ridge and at the eaves. Continue installing the coating according to the same scheme. Brush away any drilling shavings with a soft brush after finishing installing the metal tiles and touch up the surface if necessary.
End and ridge strip
To protect the metal tile from the lifting force of the wind and the process of loosening its fastening, an end strip is required. It also acts as a protective element for the structure from moisture. The end strip is installed towards the ridge from the cornice, without cutting off the excess at the ridge. Attach this strip to the end board with self-tapping screws every 500-600 millimeters
Due to the difference in heights, the end strip is pressed tightly against the sheets of metal tiles, this eliminates rattling and noise during gusts of wind. The overlap of the end strips should be up to 100 millimeters. The waterproofing layer must be laid on top of the end strip, which will cover the edge of the waterproofing material. Also, such a strip should cover the upper crest of the wave to protect the metal tiles from water ingress.

To ensure proper ventilation of the space under the roof, air must freely pass to the ridge from the eaves and exit through the holes in the ridge seal to the outside. Lay waterproofing on the continuous sheathing so that it overlaps the bottom layer of waterproofing material along the edges by at least 150 millimeters.
The ridge is attached to the sheathing using ridge screws into the upper crest of the metal tile wave on both sides. The seal is attached to the ridge before the latter is installed on the roof, having first removed the protective film from it.
Upper valley and abutment strips
The upper valley strip is needed to remove moisture from the inner corner of the roof, located at the junction of two slopes. The valley is secured with self-tapping screws so that they do not go through and damage the waterproofing. Remember that a self-expanding sealant must be laid between the sheets of tiles and the upper valley.
It is also necessary to leave ventilation gaps of about 20 millimeters between the valley planks, and make an overlap of 200 millimeters at the joints when laying the planks. The corner sheet of the valley should overlap the roofing sheet by at least 250 millimeters.
Special strips must be installed on breaks in the roof and when the roofing is adjacent to the wall. Roof fractures can be reverse or straight. In areas of fractures, it is recommended to maintain continuous waterproofing. In case of a direct break in the slope, the sheathing boards should be as close to each other as possible. The sheet of metal tile covering the breaks in the slopes should protrude slightly above the break in the roof and thereby cover it.
In the case of a reverse fracture of the roof slope, you can use the junction with the wall as a mating element, placing it on the lower slope with the rolled side. The connection of the roof to the wall is arranged according to a similar principle as the procedure for connecting to a pipe. The waterproofing is removed and raised onto the wall, at least 50 millimeters before the groove. Depending on the connection - to the end or side of the wall, use a universal or profile seal.
Fastening gutters and snow guards
Long hooks are installed on the eaves board or rafters before covering old roof metal tiles. For better water drainage, the gutter angle should be at least 5 millimeters per linear meter. It is customary to install hooks with a vertical offset. To insert the gutter into the hook, you need to insert its spout into the gutter in such a way that the spout is inside the curl.
Then you should fix the other edge of the gutter using a snap-on plate clamp. The outer edge of the gutter should be 6 millimeters lower than the inner edge in order to prevent water from entering the façade during heavy rainfall. The continuation of the edge of the metal tile should hang 50 millimeters above the gutter. The gutter is connected to the corner of another gutter or to the next gutter end-to-end using a special connector.

The gutter connector is equipped with a special rubber gasket, providing a tight connection between two gutters, as well as compensating for thermal expansion. Drainpipe should have such a length that the drain elbow is located at a distance of about 200 millimeters from the ground or moisture-resistant base, since if it is too higher altitude water splashes. To organize the removal of water, it is necessary to equip a storm drain.
It is imperative to install snow holders on a metal tile roof, because thanks to these products the snow will not fall on your head and will not scratch the roofing material as it falls off. Snow holders are attached under the second transverse step of the metal tile parallel to the cornice. They are installed under the crest of the wave in bars that were previously attached. The lower edge of the snow guard is attached from above on every second wave. For long slopes, it is recommended to install snow guards in several rows.
Lightning rod and roof grounding
To install the lightning rod and weather vane, prepare a metal bracket, a compass, metal screws, and a wrench. Weather vanes can be mounted on a ridge, roof end or spire. For safety reasons, metal roofing must be grounded. This is done in order to protect the roofing material from damage when lightning strikes the roof and protect the residents of the house. Such a system consists of a down conductor, a grounding conductor and an lightning rod.
The lightning rod is installed at the highest point of the roof using wooden supports. The down conductor is attached to the lightning rod and lowered along the sheathing under the sheets of tiles. It is welded to the lightning rod, and where it comes into contact with the sheets of metal tiles, the protective coating or layer of varnish is removed. For greater contact of points, it is worth branching such a wire into several sheets so that lightning quickly finds the path of minimal resistance.

Then they run the down conductor along the wall of the residential building and connect it to the ground electrode. It is recommended to install the down conductor along the wall opposite the entrance. To equip the grounding of the roof, you need to dig a hole 1.5 meters deep, fill it with a 10-centimeter layer of sand, fill it with water, lower the ground electrode there, fill the hole with soil and water it.
Now you have learned how much it costs to cover a roof with metal tiles, and how to do it correctly. But that is not all! Additional elements are included with each ventilation or antenna output. First, you should place a template of a passage element or ventilation outlet on the metal roof and trace it along the contour. Then you need to cut a hole along the resulting line. Outlets and passage elements are fixed to the metal profile with special self-tapping screws.
Metal tiles are extremely popular because they have significant advantages over other roofing materials. By using metal tiles to cover your roof, you will provide your home with reliable protection from aggressive environmental influences. Let's considerhow to cover a roof with metal tilesand what is required for this.
The advantages of this material include:
- low cost;
- pleasant appearance;
- reliability;
- light weight;
- long service life.


What will be required at work
Before starting work, you need not only to carefully study the instructions, but also take care of all the necessary materials and tools. First of all this:
- metal scissors;
- roulette;
- hammer;
- hacksaw;
- marker;
- stapler with galvanized staples;
- wooden slats of suitable length;
- screwdriver;
- drill.
Note! It will be quite difficult to cut complex profile metal tiles with hand scissors, so it is better to use a power tool for this (if possible).
It is also worth noting that the material is coated with a special polymer coating, which must not be damaged under any circumstances - it performs an anti-corrosion function. For this reason, you should exclude all cutting options that involve heating the area being cut. The optimal tool for cutting may be a grinder, but onlywith abrasive wheel.
Regarding the necessary materials, for work you will need:
- metal tiles;
- board for constructing sheathing, 2.5x10cm;
- wooden beam, 2.5x5 cm;
- mineral wool for insulation;
- waterproofing (any except bitumen).

Let us immediately make a reservation that this material is not suitable for all types of roofing. The fact is that the roof must meet certain requirements, namely:
- to be pitched;
- have a slope of more than 14°;
- have simple geometry.
If the roof has a complex structure, even if it is linear, then during installation it will be necessary to make dozens of trimmings, which will increase material consumption(after all, most of it will simply go to waste). Consequently, this will greatly increase the cost of building materials and installation itself.
Preliminary roof measurement

You need to start work with a competent measurement of the roof, its length and width - this will allow you to calculate the required amount of materials. If the width of the slope is no more than six meters, the length of one sheet should be equal to this width (with a small margin for the cornice). But if the width of the building exceeds six meters, then the sheet is divided into two parts, which are installed with an overlap of approximately 10 cm.
The sheet of tile itself must be at least 4 cm longer than the slope. The fact is that the sheet is attached to the slope, slightly overlapping the cornice. This allows for good ventilation under the roof ridge.
After this, the roof needs to be measured diagonally. It is also worth making sure that the roof has the correct geometric shape. Moreover, at this stage all defects and distortions will be revealed that need to be corrected immediately.

Before you begin installing the sheathing and laying the tiles, you need to ensure that the roof has good waterproofing. This will prevent condensation on the inside of the roof, and even after leakage, moisture will be retained by a special substance - absorber
Vapor barrier film is considered the most affordable and therefore popular insulating material. Treated with a special absorbent substance, it is installed directly above the room.

The insulation must be laid on the rafter system so that the initial overhang layer does not exceed 2 cm. The following layers are overlapped by approximately 15 cm. A small sag can be left between the rafters, but not more than 2 cm. To fix the film, galvanized nails or a mounting stapler are used.
In parallel with waterproofing, the roof should also be insulated. Insulation boards are placed between the rafters. If the material is made in the form of mats, then it must be secured with the same mounting stapler (in this case, everything depends on the selected material; this issue has already been discussed in one of the previous articles).
Assembling the sheathing

To assemble the sheathing, it is necessary to secure wooden beams along the slope to the waterproofing layer. Then boards 2.5 cm thick and 10 cm wide are attached to the beams.
Note! Installation of boards must begin from the bottom! The first board should be approximately 1–2 cm thicker than the others, because it is on it that the edges of the metal tile sheets will be installed.
The pitch between the boards can be different, from 30 to 45 cm, depending on the transverse profile of the roofing material. It is typical that the step between the first and second boards should be approximately 4 cm smaller than between other battens. Before starting work, all wooden elements should be treated with an antiseptic and (if possible) a fire retardant.

When installing the sheathing, special attention should be paid to the auxiliary elements.
- On both sides of the roof you need to install additional bars on the rafters - this will increase the reliability of fixing the ridge.
- When installing waterproofing, you need to extend it a couple of centimeters onto the chimney pipe and seal it with reinforced tape - this will help hide the gaps that have formed. On the chimney itself, it is necessary to make grooves (small grooves) 2 cm deep. Upon completion of the installation work, adjacent strips must be installed in these grooves and the joints must be insulated with silicone sealant.
- Valleys should be installed in the gaps formed between the slopes. To do this, a continuous sheathing with an additional layer of waterproofing is mounted from boards. Each of the valleys should be installed above the cornice strip and secured with self-tapping screws every 25 cm.
- You need to install a cornice strip on the front board with self-tapping screws and secure it every 25 cm. Such a strip must withstand strong winds, so it is installed with an overlap of 12 cm.

Work on laying tiles is carried out in the following order.

First stage. Actually, we have already discussed it above - it consists of installing a cornice strip to the frontal board of the sheathing. We remind you once again about the mandatory 12-centimeter overlap.
- When gable roofyou need to start work from the end of the ramp. If it was decided to cover from the right slope, then each subsequent sheet is installed on the extreme wave of the previous one. But if the material lies on the left end, then the new sheet is installed under the extreme wave of the one in front of it.
- Hip roof you need to cover from the highest point, gradually lowering (here it’s all about the peculiarities of the geometric shape of the hipped roof).
All sheets must be laid parallel to the cornice, with a mandatory 4-centimeter plumb line.
Third stage . If the sheets are installed in one row
When , then the first of them needs to be aligned with the cornice and temporarily fixed with a self-tapping screw in the area of the ridge. The second sheet needs to be aligned with the first and temporarily connected. So it is necessary to install two more sheets, then align the formed block along the cornice and secure it to the sheathing with self-tapping screws.multi-row laying
metal tiles, the first sheet must be installed at the bottom, secured with a self-tapping screw and aligned with the end and cornice. A second sheet of tile is installed on top, and a third one on the side. All of them are temporarily attached with self-tapping screws. Then you need to level the formed block and finally fix it on the sheathing.Finally, if the slope hastriangular shape
, then first you need to determine and mark the center line on it. The same line should be drawn on a sheet of tiles. Then both lines are combined, the sheet is fixed with self-tapping screws. Subsequent installation is carried out on both sides of the first sheet. Fourth stage.Self-tapping screws should be screwed into the recesses of the sheets
in one wave.
. Each new row of screws should be staggered relative to the previous one. There should be 7-8 screws for each square meter of material.

As a conclusion
Overlaps need to be strengthened in each wave

When covering a roof with metal tiles, special attention should be paid to the reliability of fastening the sheets and the accuracy of their joining.
All work must be carried out in accordance with the instructions given, ensuring that the wooden elements are thoroughly dried and there are no signs of rotting on them. This is the only way to achieve durability and reliability of the structure, as well as an attractive appearance of the roof. Video - Installation instructions for metal tiles Among
roofing materials
In the construction market, buyers most often give their preference to metal tiles - a beautiful, practical and affordable material. Metal tiles are made from sheets of copper, aluminum or steel, which are shaped using cold pressure. This way the material takes a shape similar to that of ceramic tiles without losing its quality.
Installing such a roof does not require special knowledge, however, it is still worth familiarizing yourself with the technology of the process, so in this article we will tell you how to properly cover a roof with metal tiles with your own hands.
- Wave height and steel thickness. The higher these parameters, the stronger the metal tile will be, however, the price will increase;
- The type of profile is a matter of taste. There are 3 types of them: symmetrical, asymmetrical and trapezoidal;
- Protective covering. Any metal tile is coated with a special anti-corrosion layer of zinc with impurities, for example, aluminum. The presence of this layer is extremely important, because the metal of the roof is constantly in an unfavorable environment.

It is worth talking separately about decorative layer metal tiles. This layer is optional, but is applied quite often. Its main task is to give a spectacular appearance, but it also serves as excellent protection against the harmful effects of the environment.
The decorative layer can be made of the following polymer materials:
- Polyester- an inexpensive and reliable coating that is suitable for regions with any climate, but you must work with it extremely carefully, because it does not tolerate mechanical stress;
- Plastisol– more durable polyvinyl chloride coating. It is immune to corrosion, as well as mechanical damage, but is completely unsuitable for hot regions due to intolerance to high temperatures;
- Pural– provides resistance to corrosion and various weather conditions, however, when installing it you also need to be extremely careful due to the possibility of plastic deformation;
- PVDF– one of the most optimal options. It can withstand all kinds of weather conditions, is resistant to damage and fading, and has a long service life.
What you should know about working with metal tiles
Speaking about how to cover a roof with metal tiles, first of all it’s worth talking about the necessary tool. You will need:
- Hammer;
- Screwdriver;
- Marker;
- Roulette;
- Rake-rule;
- Metal scissors.

When planning roof construction, do not forget:
- The roof slope angle must be at least 14 degrees;
- You should not cut metal tiles with a grinder, because... high temperatures contribute to the destruction of the protective layer. It is also necessary to know correctly so as not to damage it;
- If you are planning to roof complex shape, purchase material with a large supply, because when cutting, there will be a lot of unnecessary trimmings;
- Purchase reliable paint, which must be used to carefully paint the cut areas of the metal tiles in order to protect them from corrosion;
- A roof with metal tiles needs additional sound insulation;
- When laying metal tiles, walk on them in soft shoes, trying to step on the concave part of the wave.
Insulation and waterproofing
Finishing the roof of a house with metal tiles always begins with providing waterproofing, which will protect the roofing sheets from condensation and also eliminate possible leaks.
First of all, you need to take care of the vapor barrier. It is laid out as follows:
- A piece of the required length is cut, taking into account overhangs of 20 mm towards the cornice;
- Also maintain a slight sag of 1.5-2 cm between the rafters;
- Join the rows with an overlap of 15 cm and securely glue them with tape;
- A staple gun is best for attaching vapor barriers, but you can also use small nails.

If you decide to insulate the roof, lay sheets mineral wool between the rafters.
Next you need to put waterproofing material. It will protect the insulation, as well as the wooden roof vault, from moisture. Attach waterproofing to outside rafters, like a vapor barrier. Also remember to leave a gap between the shingles, waterproofing, insulation and vapor barrier for better ventilation.
Installation of sheathing
If we cover the roof with metal tiles with our own hands, then we should also tinker with the sheathing ourselves. This stage is very complex and requires extreme concentration, but with proper calculations there should be no problems.
First, you need to decide on the material from which the sheathing will be assembled. Most often, a 50 by 50 mm beam or a 100 by 25 mm board made of softwood is used to assemble it. Before use, it is necessary to thoroughly dry the timber and also treat it with moisture-proof impregnation.

Assembling the sheathing:
- Choose a board that is 15 mm thicker than the others;
- Secure the selected board to the eaves;
- The second board should be of standard sizes, but it must be fastened 50 mm closer than all subsequent ones;
- The remaining boards are fastened at a distance equal to the transverse profile of the tile;
- It is recommended to make a continuous sheathing at the ridge and in the valleys to create additional strength;
- The end strip should be attached to the height of the tile wave above the general level of the sheathing.

Now you can cover the roof with metal tiles, however, in order to identify errors in a timely manner, we recommend checking the geometry of the slope and also comparing the size of the diagonals.
Installation of metal tiles - how to cover a roof with your own hands
The start of assembly depends on the type of roof:
- If you are covering a gable roof, start laying sheets from either end;
- With a hip roof type, installation begins from the highest point and proceeds in two directions.

When laying the sheet, leave a 40 mm extension along the cornice, temporarily secure it with one screw with a rubber insert at the top.
If you lay sheets from right to left, then attach the next sheet overlapping the previous one, however, if the sheets are laid from left to right, then the next sheet must be placed under the wave of the previous one. Fasten the laid sheets together, but do not screw them to the sheathing, so that later you will have the opportunity to trim them.

The organization of valleys requires special attention:
- As mentioned above, continuous sheathing is required under the valleys, so think about this in advance;
- Attach a steel sheet to the continuous sheathing;
- Cut the metal tiles so that two adjacent sheets form an even angle;
- Close the resulting corner with a decorative element, securing it with self-tapping screws into the upper part of the tile wave.

If you have laid the tiles correctly, then at the junction of the top sheets there will be a gap in which you need to lay the sealant and secure the roof ridge to the edges.
As you can see, covering a roof with metal tiles with your own hands is quite simple; it is only important to understand the technology and approach the matter with maximum concentration.