How to build a real house from improvised materials. Houses from unusual materials (20 photos) Do-it-yourself house from improvised
Someone will certainly take a look at this collection of ideas and say what is easier to buy new furniture or decor. But this article is not for them, but only for true connoisseurs of the unique style and products. self made. Here you will find the 10 most beautiful interior items that you can do for your home without spending extra money.
The best crafts for the home with your own hands from improvised materials for 2018!
1. Decoupage and other do-it-yourself furniture repair ideas
Restoration of old chests of drawers and sideboards is perhaps one of the main trends of our time. Many pieces of furniture fail over time: tables and chairs become loose, cushioned furniture is pressed through and requires a new "stuffing". But chests of drawers and sideboards can stand for themselves long years and bother you with their outdated appearance.
Home needleworkers and decoupage masters have not only found a way to update the design old furniture, but also raised the fashion for the use of vintage "grandmother's" chests of drawers in the interior. Detailed instructions on painting and decoupage you will find in our article .
Below are some photos of amazing home projects to inspire you.

Restoration of an old chest of drawers with replacement handles and hand painting: 
 Painting and finishing old pedestal with metal buttons:
  As a result, the furniture acquired the original decor effect in Moroccan style. Simple, like all ingenious:
By the way, in this way you can create more sophisticated things for the home:

Decoupage and painting amazingly transform old furniture facades, but not every person has enough time and patience for this painstaking task. Therefore, the best DIY home ideas also include refurbishing furniture with duct tape in marble, gold, and other unusual finishes. A minimum of effort - and the most ordinary piece of furniture will turn into the main decoration of your interior.


2. Beautiful things for the home with your own hands: carpets
Perhaps the most pleasant thing about creating things for the home with your own hands is when one of the guests asks: where did you get such beauty? A stylish rug with a zebra print (or other motif of your choice) will certainly deserve such a compliment. And not once.

The fabric can be any. The main thing is that it should not be too demanding in care: it is not afraid of moisture and is easy to clean. In this case, the master chose the vinyl fabric. It is heavy and strong enough to look like a true carpet. What's more, the quality of vinyl these days is very impressive and it's available in wide choice colors and interesting textures.
All necessary materials and tools:
- Thick paper;
- Vinyl upholstery;
- Scissors;
- 2 Krylon pens or regular fabric paint.
Procedure:
- Create a paper stencil. Draw and cut out the outline of the zebra skin, then the drawing itself on it. Do not worry about your artistic talent - the skin of a zebra and should not look uniform or symmetrical. In extreme cases, the pattern can be copied from a picture on the Internet or even printed out to cut out.
- Attach the stencil to the vinyl fabric and outline the stripes with Krylon pens (spray or brush). After that, the stencil can be removed and continue to paint the areas inside the contours.
- Let the paint dry and you're done! To be sure the pattern will hold, you can "seal" the carpet by spraying a clear coat of acrylic spray paint over it.

Krylon handles create a stunning gold leaf effect on the surface of the fabric. In addition, the paint in them dries quickly and is very securely held. If you can’t buy them in your city, then use regular fabric or wall paint. As the next hero of our article.

He took a cheap white rug as a basis and decided to give it interesting view with your own hands using a chevron pattern. All he needed was thin duct tape, scissors, a thick brush, and two different shades of latex paint.

Finally, another inspiring example where a makeshift stamp is used instead of a stencil. The craftsman had a rubber bath mat, leftover wall paint (thinned a bit with water for a vintage effect), a roller, and an old IKEA wool rug. We look at the photo that he managed to cook from these ingredients.


3. Unusual "marble" DIY crafts (photo)

7. Turn photos into wall decor
This is much cooler than just hanging photos in frames! Your personal photos or any images you like from the internet can turn into beautiful wall art for any room. To make such a decor with your own hands, you can use any of the following methods.
- Find or buy a substrate. A thick sheet of polystyrene foam or polystyrene foam (as in this case), a board and other improvised materials can act as it.
- Print a photo, after editing its dimensions so that they are about 5 cm more sizes substrates. These "extra" centimeters will go to the folds.
- Cut the photo and backing into pieces if you want a modular set rather than the whole picture. Otherwise, skip this item.
- Overlay the photo on the substrate and wrap the ends. The author of this product used a double-sided adhesive tape to pin photos. You can mount on ordinary glue or others available funds. The very surface of the photographs can also be treated with glue or gloss paste.

- Print the image and prepare the canvas to which it will be transferred.
- Pull the canvas over the frame and apply a thick layer of medium gel on it. These gels are widely available and today you can buy them in any store of finishing materials.
- Place the photo on the oiled canvas and press down. Leave it like this for several hours, but periodically sprinkle with water from a spray bottle.
- Carefully, use your fingertips to start erasing the back of the image from the canvas. Remove all paper in this way.

As a result, you will get a beautiful one with scuffs that will only give it a touch of vintage style. It remains only to apply the last layer of medium gel on it as a protective coating.

For inspiration, here are a couple more ways to decorate your interior with a photo.
 We apply the old window frame as a photo frame. How do you like the idea?
8. Creative homemade lampshades for lamps
Homemade lampshades made of fabric, paper, thread and other improvised means will not only decorate your home, but also bring an unusual atmosphere into it every dark time of the day.

Look for the best ideas for your taste in our article . On next photo- popular creative lampshade from threads.

9. Succulents - do-it-yourself living home decor
A succulent living wall is perhaps the most amazing DIY craft you can make for your home. Agree: if you saw it in someone's design of a living room or another room, you would not be able to remain indifferent!

Dekorin will tell you how to get such an impressive and sustainable decor:
- You will need a shallow wooden container for planting and a metal mesh.
- To fix the mesh on the container, use an impromptu wooden frame, which can be made from small boards or chips. Attach to staples or nails.
- Prepare any for composition. They easily take root in the most difficult conditions and look best when you combine different shades and shapes of leaves. Common examples of succulents: aloe, various cacti, young or stone rose (Sempervivum), stonecrop (Sedum), mountain grate (Orostachys), etc.
- Fill the container with soil and plant your chosen plants in it. Use any cactus mix for drainage.

Here are examples of crafts for the home that you can do with your own hands using the above method.


10. Crafts for the house with your own hands from glass containers
Glass bottles and jars often accumulate on balconies and in pantries. What they are not turned into today: lamps, candlesticks, vases, table decor ... It's amazing how easily they become part of stylish interior, one has only to apply a little ingenuity, as well as paints, fabrics, threads, paper and other improvised means. Last batch of photos for today. Also read:
10 best ideas what you can do at home with your own hands updated: March 21, 2018 by: Margarita Glushko
How to build not big house ik from improvised materials
Many summer residents along with the purchase land plot acquire the ability to build a small cozy house, which will contain everything you need to create comfortable conditions for living and recreation. The building does not have to be large. With your own hands, you can make the house the way you dreamed of without significant financial costs.
Small project wooden house from boards
For this, all improvised materials that are at the disposal of the owner of the land will be useful. The main thing is that the most unusual fantasies are realized here. Decor for every taste gives the building individuality.
Handy materials used in construction
To start building a house, you need to decide what exactly you are going to build from. There is always an unnecessary container, wooden boxes or pallets. Old window or door frames, slats or brick.
In addition, inexpensive building materials can be made by hand. The cost of homemade clay bricks is small, and the products themselves are quite warm.
Improvised material is cheaper than straw not to be found. The original decor makes the building attractive in appearance. Using only straw in construction will not work.

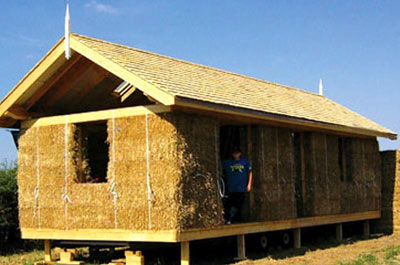
The original design of a small straw house
To build a house, you need to build a solid frame. To make the structure stable, a bar or beams is used.
You can also make a straw house with your own hands frameless technology. A one-story structure with a light roof is created from tightly pressed straw blocks.
Let's take a closer look at the current options
The owners of summer cottages choose construction projects that are less expensive in terms of building materials. Wherein great importance has the speed of building a dwelling. If the summer resident considers it suitable for himself frame structure, then it can be made to order in a construction company.
After manufacturing, the parts are delivered to the address you specified. Then for everything construction works it will take one week. This speed is typical for many cottages.
Features of thatched residential structures
Straw blocks are excellent energy-saving materials.

Building country house from straw on a pile foundation
The cost of straw is lower than wood. Blocks are molded from cereal straw, or they are made from hay.
In addition to the low price, a straw house has other undeniable advantages:
- Straw blocks are characterized by low thermal conductivity. Therefore, the energy consumption required to heat the home will be minimal.
- Do-it-yourself construction is carried out quickly: there is no need for mortar or special equipment. For the construction, a simple columnar foundation is considered suitable.
- The environmental friendliness of straw is due to the lack of chemical treatment.
- The novelty of the project and its original decor guarantee a spectacular result - a unique structure.
Among the disadvantages of a straw house, it should be noted that mice or insects can start in it.
When the materials at hand have moisture content above 20%, the straw can rot. Pressing allows avoiding both problems.

An example of a straw house
High-quality bale formation is carried out using a special baler.
However, the denser the blocks, the more difficult it will be to make the installation: their weight increases. It is recommended to add slaked lime to the composition of the plaster. A straw bale has practically no air inside, so the risk of fire is less than that of a log house made of wood.
Is it difficult to make a home out of a container
Using a container for a future home opens up great opportunities for creative design and quick arrangement of a residential building. Anyone who wants to build with their own hands beautiful dwelling V minimum term, you can not ignore this option.
In this case, everything depends only on your needs and fantasies. If you need a large house, then simply combine several containers together. All upcoming work is to finish the home inside and out.

An example of the interior and exterior of a country house from a container
Special holes are cut out for windows and doors.
The interior is insulated. It will also serve as a good sound insulator. For this purpose, from wooden beams the frame is assembled. It is easy to do it with your own hands. The space between the bars is filled with any of the available materials:
- foam;
- polyurethane foam;
- mineral wool;
- mineral plates.
There are no restrictions on choice.
Bright coloring and attractive decor can change appearance standard container. If you like graffiti, then create a unique masterpiece. This decor will be noted by everyone: both summer residents living in the village and just vacationers.

The process of installing and assembling a house from containers
Housing can turn into an outlandish castle or a watchtower, from which it is interesting to watch everything that happens. Can do blooming garden, which pleases with rich colors in winter and summer. If you decide to decorate with graffiti and want to draw a picture yourself, then start with a sketch. The contours of the image are first recommended to be applied with a neutral color, and then the filling is done with the desired color, and a gloss is applied.
To prevent the equipped container from being stolen, its lower part must be welded to the foundation supports.
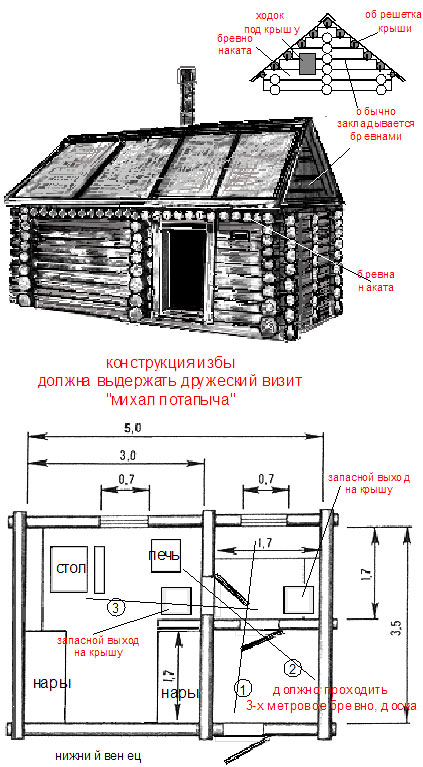
Construction of a small hunting lodge at an affordable price
If you are an avid hunter, then you definitely need a building where you can stay for the night. The building should be budget and comfortable. It is enough for a hunter to have minimal amenities. By using bayonet shovel and chainsaws, you can put a small hut with your own hands.
For materials used:
Phased construction of a hunting hut
- Construction starts with the foundation. For this purpose, roundwood, peeled from bark, is used. A shovel will help with this. The material dries for six months.
- The land where the construction work will be carried out must be leveled. The prepared material is laid around the perimeter.
- The walls of the hut are built from logs. The wood is fastened with staples.

The design and layout of the hunting hut

Device inner space and floors in a hunting hut
The resulting mixture is placed on logs and compacted.
The decor of the hunter's home is his trophies, guns and skis, which are required for hunting in winter. They are irreplaceable attributes. A fireplace in a hunting hut can be originally decorated with bricks. Antique crockery and pieces of furniture will help to create a retro atmosphere.
The main result is to achieve a combination traditional style with modern comfort. To provide optimal conditions recreation for the hunter, you can use autonomous systems life support.
Rustic style - important additions to the design
Country-style home decor suggests simplicity and a minimum of glamor. An excellent choice would be items of light and warm colors. In a rustic atmosphere looks great rough wooden furniture. Its surface looks authentic. Here, sculptures made of wood, carved with their own hands, will also be in their place.
The interior will be complemented by handmade embroidery and patchwork textiles. Do-it-yourself baskets and boxes woven from willow twigs can be filled with cones.
An important attribute is flower vases. They can be placed on knitted doilies. Fragrant field cornflowers or chamomile are placed in vases.
Today the construction of the hut is an exciting activity. Improvised materials allow you to build a house at the lowest cost.

Design and interior option small house rustic style
At the same time, the building, in terms of its external attractiveness, does not lose at all to residential buildings built with the help of new building materials. However, the cost is affordable for people with low income. Using everything that is at hand, you can build a solid home for yourself and your family members.
Every home owner wants to feel as comfortable as possible in it. This becomes the reason that there is a desire to decorate the interior not only beautifully, but also in an original way.
However, often the funds for this are not enough, because the services of professional designers, like beautiful things, are not cheap. Therefore, in Lately All large quantity homeowners prefer to decorate the interior of the house on their own with the help of crafts from improvised means, which are cheap.
It is worth noting that the main advantage of such crafts is not the cheapness of materials. The most attractive circumstance is that each thing created by you is unique. But it is the uniqueness of the design that attracts attention.

From products that were created with his own hands, a special energy emanates. And thanks to this, an atmosphere of comfort and warmth appears in the house.

An important circumstance is the fact that such designs can act not only as ordinary decorating elements. With their help, you can organize the space much more conveniently. After all, they can be used to store a variety of little things that are necessary for the economy.
Do you think that this is impossible, because you need to have some special skills? No, even a child can handle this work of creating crafts.

Pay attention to the photo of crafts from improvised means, which is presented below. It shows an example of creating a key holder, which is not only a beautiful addition to the interior, but also serves as a small key hanger.

And the process of its creation is not complicated. Let's consider it in more detail.
Key hanger
Surely, many are familiar with the situation when you have to raise the whole family to the ears to find the keys. Indeed, often people do not burden themselves with the purchase of special small shelves for storing keys and other small things.

And since the key is pretty small items, losing it among the larger things is easy. To get rid of the need to constantly look for the keys, many keep them in their purses.

However, we can offer you more interesting and original way storage. And for this we will build a housekeeper.

Its main feature is that outwardly it will resemble a product decorated with brickwork.

We will tell you step by step how to make crafts in the form of a housekeeper from improvised means. But first, let's consider what kind of tools and materials will be needed to create it: a thick sheet of cardboard or plywood, thick napkins, hooks, glue, varnish, paints.

Stages of the housekeeper
At the first stage, you need to cut out the back wall of the future key holder. As a material, you can use either thick cardboard or a piece of plywood that is not too thick.

In the second step, you should cut out small rectangles from cardboard that will imitate bricks. Please note that they must be the same size.

In the third step, you must glue the cut out "bricks" to the base with glue. Remember that there should be a small gap between them. And also do not glue them on the entire surface of the product. Indeed, in the central part there should be a small plate with an inscription, and in the upper part there should be a picture.

Note!

At the fourth stage, you should start lubricating the bricks with glue. Do not feel sorry for the glue at this stage, because it is necessary for you to put a crumpled napkin on top of it. From above it can also be covered with a small layer of glue for better impregnation.

Using a stick or the back of a brush, press the napkin into the gaps to form corners. Leave the product to dry.

Please note that any crafts from improvised means at home should be durable. Therefore, we strongly recommend not to save on binding materials.

At the fifth stage, the process of creating a visual resemblance to natural brickwork. Once the panel is dry, cover it with paint. Seams must be painted over with bronze paint.

At the sixth stage, paint the bricks a second time. However, this time you need to use a dry brush. To do this, dip it in bronze, wipe it on paper to make it dry, and then dip it again in the color you used to paint the bricks.

Note!

Remember that to achieve maximum similarity, you should move the brush in only one direction.

In the seventh stage, which is the final one, you should cover ready product transparent varnish and attach the hooks on which the keys will hang.

Crafts for the backyard
If you are the owner country house, then for you the process of decorating is not limited only to the area of \u200b\u200bthe dwelling. Therefore, to improve the area around the house, you should use garden crafts from improvised means that will decorate any garden or vegetable garden.

To make them, you can use plastic bottles, hemp, tires and old Stuffed Toys. In this case, it all depends on what set of tools and materials you have.

Crafts from tires are very popular, because it is quite simple to create them, but at the same time they look original and interesting.
Note!


For example, you can create a real cup out of tires, which will become a wonderful flower garden. To create it, you will need one tire, a round board (the diameter of the board should be larger than the tire), paint, a small piece of rubber.

The tire and board must be painted in the color that you like. If you have the skills of an artist, you can use them to decorate the product with beautiful images.
In the event that you do not have such drawing skills, you can paint the design in one color or with polka dots. The handle of the cup should be secured with a large stapler. And now your product is ready.

We draw your attention to the fact that even children's crafts from improvised means can become worthy decoration your garden. Use the kids crafts they made from plastic bottles and glasses. Despite their simplicity, they look quite original.

If they have small size, use them to decorate your porch or window sills. Thus, you can focus on them, and they will not be lost on large area garden (garden).

Photo crafts from improvised means


They acquire the opportunity to build a small cozy house, which will have everything necessary to create comfortable conditions for living and recreation. The building does not have to be large. With your own hands, you can make the house the way you dreamed of without significant financial costs.
The project of a small wooden house from the boards
For this, all improvised materials that are at the disposal of the owner of the land will be useful. The main thing is that the most unusual fantasies are realized here. Decor for every taste gives the building individuality.
To start building a house, you need to decide what exactly you are going to build from. There will always be unnecessary containers, wooden boxes or pallets. Old window or door frames, slats or bricks will come in handy.
In addition, inexpensive building materials can be made by hand. The cost of homemade clay bricks is small, and the products themselves are quite warm.
Improvised material is cheaper than straw not to be found. The original decor makes the building attractive in appearance. Using only straw in construction will not work.
 The original design of a small straw house
 To build a house, you need to build a solid frame. To make the structure stable, a bar or beams is used.
also possible using frameless technology. A one-story structure with a light roof is created from tightly pressed straw blocks.
Let's take a closer look at the current options
The owners of summer cottages choose construction projects that are less expensive in terms of building materials. In this case, the speed of construction of the dwelling is of great importance. If the summer resident considers the frame structure suitable for himself, then it can be made to order at a construction company.
After manufacturing, the parts are delivered to the address you specified. Then all the construction work will take one week. This speed is typical for many cottages.
Features of thatched residential structures
Straw blocks are excellent energy-saving materials.
 Construction of a country house from straw on a pile foundation
 The cost of straw is lower than wood. Blocks are molded from cereal straw, or they are made from hay.
In addition to the low price, a straw house has other undeniable advantages:
- Straw blocks are characterized by low thermal conductivity. Therefore, the energy consumption required to heat the home will be minimal.
- Do-it-yourself construction is carried out quickly: there is no need for mortar or special equipment. It is considered suitable for construction.
- The environmental friendliness of straw is due to the lack of chemical treatment.
- The novelty of the project and its original decor guarantee a spectacular result - a unique building.
Is it difficult to make a home out of a container
Using a container for a future home opens up great opportunities for creative design and quick arrangement of a residential building. Anyone who wants to build a beautiful home with their own hands in the shortest possible time should not ignore this option.
In this case, everything depends only on your needs and fantasies. If you need a large house, then simply combine several containers together. All upcoming work is to finish the home inside and out.
 An example of the interior and exterior of a country house from a container
 Special holes are cut out for windows and doors.
The interior is insulated. It will also serve as a good sound insulator. For this purpose, a frame is assembled from wooden beams. It is easy to do it with your own hands. The space between the bars is filled with any of the available materials:
- foam;
- polyurethane foam;
- mineral wool;
- mineral plates.
There are no restrictions on choice.
Bright colors and attractive decor can change the appearance of a standard container. If you like graffiti, then create a unique masterpiece. This decor will be noted by everyone: both summer residents living in the village and just vacationers.
 The process of installing and assembling a house from containers
 Housing can turn into an outlandish castle or a watchtower, from which it is interesting to watch everything that happens. You can make a blooming garden that pleases with rich colors in winter and summer. If you decide to decorate with graffiti and want to draw a picture yourself, then start with a sketch. The contours of the image are first recommended to be applied with a neutral color, and then the filling is done with the desired color, and a gloss is applied.
To prevent the equipped container from being stolen, its lower part must be welded to the foundation supports.
Construction of a small hunting lodge at an affordable price
If you are an avid hunter, then you definitely need a building where you can stay for the night. The building should be budget and comfortable. It is enough for a hunter to have minimal amenities. With the help of a bayonet shovel and a chainsaw, you can put up a small hut with your own hands.
For materials used:
- logs;
- glass;
- bars;
- roofing material;
- metal staples;
- brick.
Phased construction of a hunting hut
The decor of the hunter's home is his trophies, guns and skis, which are required for hunting in winter. They are irreplaceable attributes. A fireplace in a hunting hut can be originally decorated with bricks. Antique crockery and pieces of furniture will help to create a retro atmosphere.
The main result is to achieve a combination of traditional style with modern comfort. To ensure optimal rest conditions for the hunter, autonomous life support systems can be used.
Rustic style - important additions to the design
Country-style home decor suggests simplicity and a minimum of glamor. An excellent choice would be objects of light and warm shades. Rough wooden furniture looks great in a rustic atmosphere. Its surface looks authentic. Here, sculptures made of wood, carved with their own hands, will also be in their place.
The interior will be complemented by handmade embroidery and patchwork textiles. Do-it-yourself baskets and boxes woven from willow twigs can be filled with cones.
An important attribute are flower vases. They can be put on knitted napkins. Fragrant field cornflowers or chamomile are placed in vases.
Today, building a hut is a fascinating pastime. Improvised materials allow you to build a house at the lowest cost.
 Option for the design and interior of a small house in a rustic style
 At the same time, the building, in terms of its external attractiveness, does not lose at all to residential buildings built with the help of new building materials. However, the cost is affordable for people with low income. Using everything that is at hand, you can build a solid home for yourself and your family members.
60-year-old British farmer Michael Buck from Oxfordshire was able to build an amazing eco-house in his backyard using only natural and recycled materials. It's hard to believe, but the ingenious pensioner spent only 252 dollars (about 9 thousand Russian rubles) to make this dwelling!
In order to build this unusual house, reminiscent of a hobbit's dwelling, former teacher drawing took two whole years to collect all the necessary materials and 8 months for the construction of the dwelling itself.


In its manufacture, the farmer did not use power tools and even studied the ancient construction technique. In his building mix included sand, clay, straw, water and earth. The living area of the house is 300 sq.m.

He also made a simple wooden frame and a thatched roof, for which he collected straw from his own fields. The floor in the house is covered with planks left over from old boats, and the glass for the windows is made from a truck left in a landfill.


The lack of central heating may make it seem cold in this eco-house in winter, but Michael says that the mixture of which the walls and thatched roof won't let the cold get in. In addition, the jack of all trades built a wood-burning stove that will not let you freeze.


Also near the house there is a source of drinking water and a separate toilet.

Michael, who spent a lot of time building the house, said he was a bit disappointed because it was supposed to cost nothing to build.


The father of three lives next door with his wife, Sheila, and rents out the "hobbit house" to a woman who works on a nearby dairy farm. Because of his views on life, Michael does not take money from her. the woman pays him with milk and cream.

Michael said: "I wanted to show people that you can build a house that will cost next to nothing. We live in a society where we spend our whole lives paying off the mortgage. But with a little effort, you can get your own home for next to nothing."