How to paint a floor plinth. Features of painting polyurethane foam skirting boards How to paint a polyurethane floor skirting board
For more harmonious combination with the main finish, sometimes they still have to be painted. Of course, the paint for the skirting boards must be chosen correctly. There are certain staining technologies that must be followed.
We will talk about which dye is better to use, as well as how to properly decorate the baseboard, in this article.
What paint to choose
The original white color is usually changed for foam and. MDF plinth is also available for painting. Sometimes they are designed in a similar way and. Of course, the paint should be chosen depending on what material the baseboard is made of.
There are simply a huge number of dyes on the modern market. different types, quite suitable for decorating skirting boards
The choice of means for foam plinth
For foam and polystyrene ceiling moldings, you cannot use products based on acetone or white alcohol. These chemicals can dissolve the planks. So what is the best way to paint a foam baseboard? For this type of decor, you should choose a product for which ordinary water serves as a solvent. It can be water-based paint or water-based paint.

Pokaska ceiling plinth foam can be made with water-based or water-dispersion paint
Advice: In the event that you do not find in the store an option that is ideal for finishing the ceiling shade, you can paint the foam baguette with a white water-based emulsion to which color is added.Which tool is suitable for polyurethane and plastic skirting boards
Now let's see how to paint. For such a decor, almost any tool is suitable. Typically, for plastics and polyurethane (which is basically regular foamed plastic), an oil-based or permanent water-based paint is used. If you need a glossy surface, choose the first option. In order to get matte polyurethane or, you should use the second one.

Oil paint can be used to decorate polyurethane and plastic skirting boards
Paint for wooden skirting boards and MDF planks
What to paint? It is also suitable for almost any kind of tool. It can be varnish or alkyd enamel. They also use oil and acrylic paint for wooden skirting boards and MDF planks. water based without smell.

MDF floor plinth for painting
How to choose a shade
What color to decorate the planks? Usually the plinth, both and decorated to match the main coating. Can the ceiling molding be painted the same color as the walls? More often it is still made out to match the color of the ceiling, however, this option is quite acceptable. In any case, it is better to choose a slightly lighter option than the main coating.

Usually the skirting board is painted to match the color of the ceiling.
On a note: By choosing a means to change the color of the strips, repeating the shade of the walls, you can make the room visually higher. If the color is the same as flooring, the room will visually appear larger.Coloring technology
With what paint to paint the ceiling plinth or floor, we figured out. Next, consider the actual features of the technology for processing slats. First of all, you should decide when you will decorate the elements - before mounting them in place or after.

How to paint a ceiling plinth. Decoration can be carried out both before installing the slats in place, and after
In the first case, painting can be done without the risk of staining the wallpaper. Most often, it is advised to use this method. However, painted ceiling or floor decor in place may not look particularly neat. The fact is that in this case, the joints treated with putty will become noticeable. So, if you wish, you can decorate the slats after they are installed in place.
Important: If there are any defects on the floor or ceiling edging decor, they must be removed before registration. Putty all scratches, and wash off all dirty stains. Wooden and foam options should be pre-primed.
Before painting, the baseboard should at least be wiped
How to paint floor skirting
For finishing the floor, wooden or plastic decor is most often used. In the event that you decide to carry out the processing before installing the slats in place, you can use a sprayer. On the wall, the painted plinth is passed with a brush (the width of which should be less than the width of the planks). Move it along, carefully rubbing the product and preventing the appearance of streaks. Usually two coats of paint are applied.

When processing planks, the paint should be rubbed as thoroughly as possible.
Decorating the fillet on the ceiling
First, decide whether you need to paint the ceiling plinth. Most often, a white foam baguette is used for the ceiling. This color goes very well with most other shades. If you still decide to change the color of the foam baseboard, also use a brush. Pass the surface should be long smooth strokes. Don't use too much on the brush. Otherwise, there will definitely be leaks. This type of decor is also covered in two layers. It is better to use not too new brush. From just bought, hair may remain on the baguette.
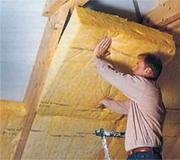
Whatever repair you start, you cannot do without a polyurethane baseboard. It is used for finishing the floor and ceiling. Without this element, any repair will seem incomplete. Due to its diversity, the polyurethane skirting board can emphasize the design of any room, as well as hide various cables and wires under it. But the color scheme of such products is not very diverse and often does not fit the general background of the room. Therefore, often those who make repairs are interested in the question of how to paint a polyurethane floor and ceiling plinth.
positive and negative sides polyurethane skirting boards
An important advantage of this skirting board is its flexibility, thanks to which it can be used in various configurations. This can be finishing along the edges of round and oval surfaces, processing niches and arches. It looks great on flat ground, along walls and ceilings.
The positive aspects of the ceiling polyurethane plinth
A variety of colors and textures, as well as wide and narrow sizes.
Does not require special care, just wash with warm soapy water and wipe with a cloth.
Does not highlight bad smell and can be used in residential premises for various purposes.
It practically does not deform and, unlike wood, does not deteriorate.
In addition to the mass of advantages, the polyurethane plinth has a drawback, it is relatively heavy compared to the foam product. Therefore, it should be fixed to the ceilings with high-quality glue.
Positive and negative sides of the floor polyurethane plinth
It is characterized in the same positive way as the ceiling plinth, but in addition, it is resistant to mechanical damage, as it often happens on the floor.
Flexibility allows you to hide all the irregularities of the walls.
Makes it possible to hide cables, wiring and various cords under you.
The negative point is the cost of the product, it is almost the same as the price of a wooden counterpart.
Installation of a floor polyurethane plinth
Before we consider how to paint a polyurethane floor plinth, let's figure out how it is attached. This is done with the help of special glue, and the work process is divided into several stages.
The walls are cleaned and, if necessary, degreased.
From the wrong side, glue is applied to the plinth, it lies in special grooves and ends.
After that, the plinth is brought to the wall, pressed and held in this position for 3-4 minutes. If possible, they can support the wall with something heavy to press down the baseboard.
The joints are treated with sealant.
If the wall is uneven, then in those places where the plinth did not stick to it, you can nail it, and after the glue has dried, pull them out and mask the holes with sealant. In the corners, it is also recommended to nail the plinth.
A wide polyurethane floor skirting looks pretty nice, but it's a little harder to install. Rather, it is mounted in the same way as its narrow counterpart, but when the plinth shrinks, this happens over time, the joints can disperse. When this happens, it is removed from the cracks old glue and a new one is injected with a syringe, which will hide all defects.
In addition to planting a polyurethane plinth on glue, its installation can also be done using self-tapping screws. It's not at all difficult to do this.
Painting polyurethane skirting board
In this section, we will learn how to paint a polyurethane baseboard to match the style of your room. Sometimes it happens that you have chosen a skirting board by design and shape, but there is no suitable color. In this case, you can purchase another product colors and repaint it to suit your style. Or it may be that you changed the wallpaper or painted the walls and now your skirting board color does not fit the main interior, it can also be painted. If the baseboard is supposed to be painted initially, then you can purchase a white color, which is basically created for this purpose.
The ceiling plinth is painted with water-dispersion paint, and for the floor product, an acrylic or latex coating is suitable. You can paint the skirting board before it is installed and directly on the wall, having previously sealed the floor and wall near the skirting board with adhesive tape.
If you want to install both ceiling and floor products from the same material, opt for polyurethane foam skirting boards. Advantages and disadvantages of polyurethane products, comparison with cornices made of other materials, about: how to fix, how to paint - the topics of the article.
Read about detailed technology installation of polyurethane ceiling plinth, choice of paint, cutting, joining in corners. The article will help put the final touch on the repair - hide the gap between the wall, ceiling / floor.
Polyurethane skirting board - advantages and disadvantages
- The strength of polyurethane foam products allows you not to be afraid of mechanical influences - shocks. Skirting boards made of polyurethane are not subject to cracks and chips.
- Ecological purity - safe use in any room, including the children's room.
- Big variety color solutions makes it easy to match the interior, but you can use pure white or with subsequent painting in the desired shade.
- Ease of installation - you can use the gluing method.
- Ease of processing - the ability to cut to the desired size.
- The flexibility of the polyurethane floor and ceiling plinth makes it possible to hide the joint even in rounded rooms.


The disadvantages of polyurethane products are their high weight - almost 2 times heavier than foam, plastic cornices - and a higher price.
Illuminated polyurethane ceiling skirting board
Flexible polyurethane products allow you to mask the unevenness of the wall, and when installing the cornice in the premises complex shape are simply irreplaceable. By evenly installing polyurethane LED or neon lighting on the plinth, you can emphasize the design of the stretch ceiling or layered design from drywall.

Polyurethane ceiling plinth photo - with backlight
Installation of polyurethane ceiling products
There are two types of installation.
First. Installation of a polyurethane ceiling plinth is carried out on glued wallpaper using Dragon glue, Moment Montazh or acrylic sealant white color.
Second. The polyurethane product is installed on plastered, primed walls/ceilings. Installation is carried out on putty or acrylic sealant. Then wallpaper is glued. This method has advantages over the first method - the cornice and ceiling look like a single whole.
Advice: If you have uneven walls and plan to change your wallpaper in the near future, use method number two. It allows you to qualitatively, without cracks, edging the ceiling with a polyurethane plinth, while you do not need to be afraid that the adhesive composition does not get on the wallpaper.Cutting polyurethane skirting
Before installation, the polyurethane product must be marked and cut at the corners.
First method. To do this work will help the miter box - a device for trimming at an angle. With it, you can get a smooth, precise cut.
Advice: If you do not have the skills to work with this tool, then practice. For this purpose, use skirting boards.Second method. If you can’t use a miter box or the angle is not straight, then use a stencil, which can be made from cardboard or thick paper.
What to cut? In both the first and second cases, the polyurethane skirting board is cut with a hacksaw with fine teeth or a construction knife with replaceable blades.

Plinth ceiling polyurethane photo - cutting using a miter box and a thin hacksaw with fine teeth
Installing a polyurethane skirting board
How to glue a polyurethane product to the ceiling? First, it is better to do the most difficult work - the design of the corners. Then add straight sections. It is easier to work in this sequence than to go around the entire perimeter of the room in order.
Consider an example of sticking a polyurethane skirting board to the ceiling using a finishing putty or acrylic sealant.
List of tools:
- mounting gun;
- construction knife with replaceable blades;
- hacksaw for metal;
- rubber spatula;
- construction mixer;
- container for diluting putty.
Installation technology of polyurethane cornices using putty:
Stage 1. Using a construction mixer, the putty poured into the water is brought - the amount of water and dry adhesive composition according to the instructions - to the desired consistency.
Stage 2. With a spatula, carefully apply the mixture to the wall and the back surface of the plinth.
Stage 3. Exactly applied to the installation site and pressed. With a spatula, then with a sponge or a wet rag, remove the excess, cover up the cracks, if any.
Stage 4. After the putty has dried, it is necessary to cover the cracks again.
Polyurethane ceiling plinth - installation video lesson:
Installation technology of polyurethane cornices using acrylic sealant:
- With a glue gun, sealant is applied to the baseboard, making sure that all irregularities are filled with sealant.
- Press to the surface at the installation site, withstand 30 seconds.
- Remove excess with a wet cloth.
- Carefully cover the cracks after the sealant seizes.
- Paint the ceiling and plinth with polyurethane.
- Paste wallpaper.
Installing a polyurethane skirting board to a stretch ceiling
The main nuance is that the polyurethane product is glued only to the wall and in no case is attached to the ceiling, so as not to damage the expensive canvas.
Advice: Before starting work, protect the canvas from accidental contact with the adhesive mass with a polyethylene film. After installation, it can be easily removed.Further steps for installing a polyurethane skirting board to stretch ceiling are exactly the same as above. It should be borne in mind that the large weight of the products does not allow the use of wide massive polyurethane skirting boards, because they can sag under their own weight. If you have a high ceiling and like stucco, use a wide decorative styrofoam cornice.
Installation of polyurethane floor plinth


Consider an example of fixing a polyurethane product to a wall/floor using a putty adhesive, produced like silicone in cartridges.
Installation is carried out on walls lined with putty and primed.

Plinth floor polyurethane wide
Polyurethane floor plinth installation technology:
Step 1. Cutting corners using a miter box. If the corners are not straight, then it is advisable to use a two-plane miter box.
Step 2. Open the putty cartridge, insert it into the mounting gun.
Step 3. Apply 2-3 longitudinal even strips of adhesive mass to the polyurethane product, so that the putty layer covers the gap between the polyurethane product and the wall as much as possible. To do this, apply a polyurethane baseboard for the floor without glue and inspect the gap.
Step 4. Press the polyurethane skirting board against the wall, let it grab.
Step 5. Remove excess putty with a wet sponge.
Step 6. View for cracks. Add glue to places where it was not enough. Remove excess.
A distinctive feature of this putty glue from acrylic glue for polyurethane baseboards is that it does not shrink.

Plinth floor polyurethane flexible
Advice: If the walls are very uneven, then in places of greatest curvature, you need to support the glued product with something heavy. For this purpose, you can use bags with building mix.How to paint a polyurethane baseboard
Painting is started no earlier than one day after installation.
Advice: To protect the walls, ceiling / floor, you need to paste over the places adjacent to the polyurethane plinth masking tape or a strip of wax paper. After work, it can be easily removed without damaging the surface under it.
White polyurethane skirting board in the interior
If your flooring has a texture and color, then the polyurethane flooring should be painted one or two shades lighter. For this purpose, a waterproof dispersion paint can be used. It is better to paint a polyurethane skirting board from a spray gun, but you can buy ready-made paint in an aerosol package.

Massive polyurethane ceiling plinth with stucco elements, painted white
Unpainted skirting boards are available for sale, both floor and ceiling, primed with white primer. By choosing oil paint for the product, you can arrange both a matte and glossy surface. Water based paint gives the polyurethane skirting board a matte finish. acrylic paint"will bring" gloss.
Advice: It doesn't matter what color you choose. It is necessary to create the unity of the polyurethane plinth with the interior of the room so that it does not look like an alien object in the renovated room.Stucco decoration made of polyurethane looks great when painted. This is successfully used by designers, decorating interiors in original color schemes. In addition, the coloring of polyurethane decorative elements has a number of practical implications:
Polyurethane attracts dust, and its porous surface makes it difficult to clean. Painted elements are easier to care for.
Paint attached polyurethane products kind of expensive plaster moldings.
The right shade of paint will allow the stucco decoration to harmoniously fit into the interior without standing out from it with a “false note”.
On unpainted skirting boards, moldings, joints are always noticeable, even with very careful installation. You can hide these shortcomings with putty and subsequent staining.
Paint selection
The main thing to consider when choosing a paint: no solvents - they literally melt the material. Paint for polyurethane should be water based. Suitable for the following colors:
acrylic- the most popular solution, thanks to affordable price, the absence of unpleasant odors. Acrylic paint gives the product a matte finish, typical for plaster moldings. The coating is well tolerated wet cleaning, durable, not afraid of changes in temperature and humidity;
silicone- in addition to all the advantages inherent in the acrylic analogue, it has excellent dirt-repellent properties and a long service life. An excellent choice for decorating hallways, bathrooms, kitchens;
latex— paint differs in the increased wear resistance, is not afraid of moisture. You can choose a paint for skirting boards or polyurethane moldings with a glossy effect.
Impressive results can be achieved with decorative coatings for antique styling, ivory, craquelure. Light and pliable polyurethane "turns" into a durable, heavy stone, antique metal - thanks to a thin layer of a special coloring composition.


Photos from official websites of manufacturers / brands: Orac Axxent, Orac Luxxus
Facade stucco made of polyurethane is recommended to be painted after installation. For this, special acrylic, latex compounds, alkyd and polyurethane paints marked "for outdoor use".
Absolutely not last step repair can be considered painting the ceiling plinth, as practice has shown, this stage of work is best done before wallpapering, so as not to stain them.
It is necessary to paint the ceiling baguette in order to hide the yellowed and darkened places of the plinth, as well as to give it any shade or color. To do this, we need to figure out how to paint and paint.
Why do we need to paint a baguette?
Foam or polyurethane baguettes available on store shelves building materials, mostly white. With a white ceiling, the question may arise: is there a need to paint the baseboard and how to paint the foam ceiling plinth?
And we have an answer to this question.
- Products made from such raw materials often have mechanical defects in the form of scratches and dents, which are especially visible in bright light.
- Also, this type of material is a little translucent due to its loose structure, and painting will give it solidity and strength.
- Unpainted skirting boards can darken and turn yellow over time and are difficult to clean compared to painted material, which can be easily wiped down with a damp cloth.
- An important point is that without joints, the plinth is almost impossible to glue, and the most visible ones will be in the corners. Therefore, before painting, all joints are smeared, and after painting they are completely invisible.
- And the last but not least fact in favor of painting is that we have the opportunity to give the skirting board the desired color.

Painted ceiling plinth
Preparatory work

Painting the ceiling molding
Before starting the painting process, you need to fix all defective places, such as corners, joints and other defects. It is better to do putty for finishing work or white silicone.
Preparatory work is carried out in several stages:
- To begin with, we will find a container with water and a sponge, and to putty the joints, a rubber spatula or a piece of plastic plate.
- Then apply putty to the joint with a rubber spatula - this is done along the seam. In this case, you need to firmly press the spatula to the baseboard, but not very hard.
- Remove excess putty with a cloth or sponge.
- Then cover the corners with your finger, if you do not want to injure your fingers, it is better to put on a glove.
- If gaps remain along the edges of the plinth, they can also be covered over.
- After the skirting board dries, all defects are removed with fine sandpaper.
When is the best time to paint?

Ceiling plinth
Some experts advise painting on the floor. This option has two pluses - you don’t need to climb on the stepladder and the glued wallpaper will remain clean.
- If we decided to act with this particular method, then first of all we cut the parts of the desired length, having previously adjusted the corners. We will seal and paint the joints after gluing the ceiling baguette, but this must be done very carefully, since there is still a chance of paint getting on the wallpaper;
- But still, most are painted after installation, and this method is much more complicated and naturally stronger. It is also necessary to take into account that the painting of the ceiling plinth with the ceiling will be monophonic and will cover all the flaws if they are painted together.
Choosing a paint

We paint the plinth with our own hands
An important point is the choice of good paint. For foam and polyurethane ceiling products, it is absolutely impossible to use solvent paints, therefore you need to take water-based paint.
- If you paint the ceiling baguette on the ground, then you can use spray paint, so the process will speed up and there will be no streaks;
- If you need to paint the ceiling plinth in other shades or colors and this was not found in ready-made, can buy white paint and add color to it;
- For more serious demands on the interior and the result of the final color of the skirting board, we recommend using glazes. What is a glaze - this is a kind of tinting, such as stain, applied by spraying from a spray gun and rubbed with a sponge. Using the Glaze you can get different kinds invoices.
Types of invoices

Painting the ceiling molding
For this type of painting, it is not necessary to have construction skills. The main thing before work is to thoroughly remove the dust from the baguette, and it is even better to treat it with a primer.
- To obtain a platinum effect of painting, experts advise using Tairé's glaze. The application is made equally, with the exception of the middle part, which remains unpainted. Then, with a sponge, the edges of the applied strips are gently smeared and the top layer of the coating is slightly removed.
Using this technique, we will achieve a lighter effect for convex surfaces and add saturation to the deep sections of the baguette, then with a dark Humbert Glazer we highlight the pattern of the ceiling plinth and the created effect; - To create a golden effect, you need to have a silver and gold glare. We dip the brush into the toner, and then wipe it almost dry, paint over the convex part of the baguette with gold paint. Thus, the effect of shabby gilding or silver will be obtained;
- Malachite effect - for this method we will use a green glaze and a leather swab. First of all, a green glaze is applied with a swab, a veining effect is obtained, then a slightly diluted glaze (for a lighter shade) is applied with a pen;
- Aged wood - To achieve this relief, a brown glazer and a brush with a hard bristle are used. So you can make a texture similar to wood, and with a thin brush you can add stripes in the form of fibers;
- Dirty Stone - To get this effect, glaze Taira and blend with a brush to get light streaks. Then we make the application of small strokes with a dark shade. After the first layer has dried, it is necessary to apply additional touches to the relief with a bronze-colored glaze.

Installation and painting of the ceiling plinth
There are several nuances in this case:
- If you paint a ceiling baguette that has not yet been installed, then for this you can use a brush or a can of paint.
- If you paint a ceiling molding already glued on the wall, and the wallpaper is already glued, then in order to protect them, you need to glue paper tape along the molding line.
- If we are worried that there is a possibility of damaging the wallpaper when peeling off the adhesive tape, then there is another way to paint. You can take a wide spatula or a sheet of paper and put it where we paint.
- Having painted the ceiling baguette once, it needs to be allowed to dry a little. After everything dries, we look at the result, we are satisfied and no defects are visible, then our work is finished.
And if the joints of the baguette are still translucent, then the procedure can be done again.
Outcome

Do-it-yourself ceiling plinth painting
After we learned how to paint the ceiling plinth, then this work can be done independently and save money without hiring people to do this work. For getting good result you must follow the advice given in this description.