How to roll back the system a couple of hours ago. How to restore the system to an earlier date
So, you bought a computer and decided to immediately try it out in action. But then suddenly some kind of malfunction occurs, and the system stops starting. This is where the question comes to mind: "How to do it on Windows 7?" The answer is pretty simple. But first, let's talk about when it is really necessary to perform and why it may be required.
Why does this happen?
In general, there are many reasons for all kinds of failures that may require a rollback of Windows 7. Let's look at the most common of them.
The first is the "curvature" of the user. Particularly curious people love to delve into the Windows folder, which stores data about the system. If you remove them or somehow fix them, then at the first reboot the computer will stop working.
The second is viruses. They are usually main reason the question arises: on "Windows 7"?" Various Trojans and worms penetrate your operating system and "clean up" Windows folder. Therefore, you need to be careful when using the Internet.
System tools
The first way to answer the question: "How to roll back the system to Windows 7?" - This is a system restore. Usually, this method it helps a lot in the case when viruses have not damaged important system files.
Before rolling back Windows 7, check your computer for viruses. If there are any, it is best to clean the system and only then get down to business. When the process is completed, you can carry out the restoration.

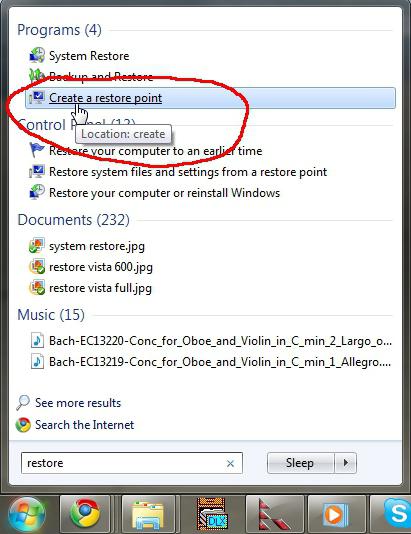
In order to answer the question of how to roll back the system in Windows 7, go to the Start menu. Find "Standard" there. Go to the "Utilities" tab. All you need to do next is select Windows 7. Now a window should pop up in which you will need to select the date to which the rollback is performed. Click "Next" and wait for the computer to restart.
So that you can do this process, you need to make sure that your system creates this feature by default. You can use special programs that allow you to make these points yourself.
Disks
In order to fully understand how to roll back the system to Windows 7, let's continue our study. Sometimes there are cases when system tools are useless. More precisely, the computer does not even log into the OS. Then special resuscitators come to the rescue.
If you cannot log in, then you will need any LIVE CD or so-called resuscitator. Turn on the computer and insert the media. In BIOS, set the boot of the first queue - "reading CD-Rom". Next, it will be easy for you to figure out how to roll back the system to Windows 7.
You will just need to follow the instructions that will appear after the launch. You will see a window in which you will be given a choice of the date to which the "OS" is rolled back. When the day is selected, just wait for the process to complete. You can use your computer again.
Installation
So, if you are still thinking about how to roll back the system to Windows 7, you can try another way. To do this, you will need an installation disk with the operating system.
Insert the disc and run the usual installation. As soon as you see the welcome window, pay attention to the inscriptions in the lower left corner. There is a small line that you will need. It's called System Restore.
Click on the inscription and a long menu will open in front of you. It will offer you different ways kickbacks. In order to successfully complete the case, you will need to "Restore using previous system states". Click on the "Next" button. A window will appear in which, as usual, you need to select the date on which the OS will roll back. The computer may restart several times. Eventually, you will be able to use your computer again.
Stalemate
But there is also an extreme method of dealing with computer failures. The fact is that all recovery tools work properly until something really serious happens to your system. In case of major damage or viruses, only extreme methods will help. This is a system reset.

In order to reinstall the OS, first of all, get the installation disk. You can download it or buy it from the store. After that, you need to set the BIOS to boot from the disk. Insert the media into the computer, then reboot.
Wait for the initial window to load. Here you can select "Restore" and "Reinstall". If the first option does not help, choose the second. Next, select the "build" method: clean installation and over the old system. It is best to choose a clean one. It will help save space and remove viruses. Next, select the disk where the OS will be "installed" and start the installation. Wait for completion. Attention, the computer will restart about 3 times in the process!
How to roll back the system, Windows 10 and work with restore points! We will tell you about the options to do rollback windows 10 to the desired restore point!
After all, even if there is a system backup on a non-system partition created using backup software, it will be of little use if there is no boot disk with the corresponding program. Recovery operating system by returning to the initial settings - with the preservation of user files, but with the loss installed programs and system settings - too radical a step, which should be taken only after attempts to roll back to a restore point have failed.
What is a Windows 10 restore point
A point is a saved copy of the system settings for a given date or event that allows you to roll back the Windows 10 system. The OS stores data about the settings of the main drivers and files. And restores them if necessary, regardless of their new location and state.
"Checkpoints" are created according to the following scenarios:
- Direct user request
- installing drivers that are not digitally signed by Hardware Quality Labs
- automatically every 24 hours
- OS update
How to do a system restore on Windows 10
- First of all, you need to open the "Control Panel". You can do this in several ways:
- After that, go to the view type - categories

- Click on "System and Security"
- Select "System"

- In the left column, click on the line "System Protection"

- Choose your system disk(with the Windows icon) and click on the configure button

- Check the "Enable system protection" box and indicate the amount that you are ready to allocate on your hard drive to create a copy of the OS (we recommend that you allocate at least 20GB if hardware allows). Confirm "OK"

- After that, click on the "Create" button. The settings will be saved and the process of creating a checkpoint will begin (usually takes no more than 5-10 minutes).

System rollback procedure
If it's loaded
Restoring a conditionally working OS is quite simple.

When the system does not boot
In a situation where the computer does not boot at all, you can try to get into the recovery environment by holding down the Shift + F8 keys while the OS is booting. But achieving the desired goal will not be easy. Few have time to press these keys at the right time due to the reduced boot time latest versions Windows. As soon as the computer starts to boot, you need to quickly press the Shift key, and then frantically fiddle with the F8 key. After training, perhaps the work of some will be rewarded.
It is much easier to enter this environment either through the installation disk or using a specially created disk.
Below we will consider both of these options and roll back the "dozens" to the restore point.
Using the Windows 10 installation disc
It doesn’t matter which installation DVD (or flash drive) is on hand - with the same edition of Windows 10 that is installed on the computer, or with another one, in any of these cases, the issue with access to the recovery environment has been resolved. Moreover, for these purposes, you can use the Windows 8.1 installation disc or even the Insider Preview test edition, which is available for free on the Microsoft website.

Insert the installation DVD of either Windows 8.1 or Windows 10 into your computer's drive, or connect a bootable USB flash drive if the distribution is written to it. from the respective medium. Click "Next" on the first window of the system installer.
Select "System Restore" at the bottom of the window.

We will see the same recovery environment, in the menu of which you need to select one or another action. We need a diagnostic section.
Create a Windows 10 recovery drive
If you don’t have an installation disk with system versions 8.1 or 10 at hand, you can’t do without involving a second computer device in solving the problem. And instead of waiting for the distribution image to be downloaded from the Internet, it’s easier to create a Windows 10 recovery disk using its regular tools. Naturally, for this it is necessary that the same Windows 10 be installed on the second computer device. In general, you need to take care of the presence of such a disk in advance. So the resuscitation disk, recorded on a USB flash drive, will always be with you in the wings if there are problems with loading the computer.
To create a disk, go to the control panel. The shortest way to it is to call the context menu on the Start button.

At the top of the control panel window (on the right) is a search field. Write in it a key query to search for the desired section and select this section.

We need the first function - "Create disk".


The program will warn that all existing data on the flash drive will be destroyed. Click "Create".


Now enable the BIOS to boot from the desired media - from a USB flash drive. After loading, you will see the same recovery environment designed to resuscitate the OS. Further steps will be exactly the same as in the previous case.
When can't you roll back Windows 10 to a restore point?
As already mentioned, the Windows rollback process may not always complete successfully, and this applies not only to a situation involving the recovery environment, but also when we are talking about the normal launch of this process in the system properties window. If viruses damage important files of the rollback points you created, most likely, the only way out of the situation may be, if not reinstalling the OS, then at least returning it with the loss of all settings and programs.
Sometimes it will not be possible to successfully roll back the operating system using the recovery environment due to the reduced functionality. And this, by the way, is one of the reasons why you should not use artisanal Windows builds. Often the latter are designed only for installing Windows from scratch, without the possibility of returning to the previous state of the OS. The bzhkap functionality of the system is cut by the assemblers, allegedly for the purpose of optimization. In this case, it will not always be possible to reanimate the operating room even with the help of third-party Live disks. But even in the case of a pirated assembly of Windows with reduced functionality, various kinds of problems can be foreseen by stocking up in advance with a backup copy of the system and bootable media using third party programs for backup.
Have a great day!
In case of failures and errors, to return the operating system to its previous state, Windows XP has a built-in system for archiving the registry and system data. And although it is imperfect in many ways, it often helps to solve problems. The name in English is System Restore Application, which means system recovery program. Often the process of restoring a system to a previous state is called " System rollback". The program can be accessed in different ways. The first thing to do is to check if you have system recovery system. To do this, right-click on the “My Computer” icon (see note at the end) and select “Properties” from the drop-down menu at the bottom. In the window that opens, titled

"Properties" select the tab "System Restore" at the top. The window contains a list of disks and if the recovery system is enabled, then next to each entry, there should be an inscription "Watching". At the bottom there is an inscription "Turn off system restore on all drives", when the system is on, there should not be a checkmark in front of the inscription. When you select a disk and click the "Options" button, a window of the same name will open in which you can turn off System Restore on this
disk. Here you can also use the slider to change the disk space allocated for archiving. The System Restore program creates so-called system restore points. By default, restore points are created periodically and when

important system events, for example: installation of programs, drivers, package updates. You can create your own restore points. It is especially useful to do this if it is supposed to perform dubious actions in the system, in the positive outcome of which you are not sure.
There are several ways to use the recovery system. The first way is through Windows Help and Support. To do this, click the start button and in the menu on the right, click "Help and Support" and on the right we find "Revert changes using System Restore" and click on this inscription. The System Restore window opens, where you can select

"Recovery
an earlier state of the computer" or "Create a restore point", select what you need and click "Next". If you selected "Restore over
the corresponding window with a calendar, where you can select a restore point by date or time, and click Next to continue restoring. When choosing

To create a restore point in the window that opens, you need to enter the name of your point and by clicking the "Next" button it will be created.
Sometimes there is no "Help and Support" in the "Start" menu, then you can try to call it with the F1 key. If this does not help, then you most likely have disabled the Help and Support service. How to deal with services, you can read
You can open the System Restore window by going to Start > All Programs > Accessories > System Tools > System Restore.
 Note: Sometimes users, not knowing how to display a full-fledged My Computer icon on the desktop, pull out a shortcut (this is the one with an arrow). Then when you select "Properties", the shortcut properties window opens, and this is not what we need. To solve this problem, you need to go to the "Start" menu and right-click "My Computer", and then as indicated above. Or display a full-fledged icon on the desktop. You can read about it
System Restore is one of the features of Windows that gives you the ability to roll your system back to a point where you're sure everything worked. properly. This will help save your computer from all sorts of problems. You can literally roll back the OS back to the last date, the time when the computer was working normally.
In general, the computer stops working normally in one of the following cases:
- changes you have made (installed software or changed critical settings)
- malware infection,
- some mechanical problem (your disk is full, you don't have enough random access memory, overheating, or failure).
System Restore is a great tool. It won't remove a virus or repair a broken fan. But in the event that the problem is in the latest changes made by you or software, which you have installed, it can save you. The utility will roll back your OS to a date before the problem occurred.
System rollback constantly generates "restore points" whenever the OS is updated or when new programs are installed. They capture the basic OS settings at a point in time when everything was working fine. If something goes wrong, you can return at any time.
Rolling back the system usually removes applications and drivers that were recently installed, but does not change your personal files. Rollback must be enabled on each disk, and you need about 300 MB for this.
How to rollback
This process usually takes a few minutes, but you will not be able to use your computer during this time. Hover over right upper corner display, move the mouse cursor down and click the Search button. Or just hold down the keys on the Windows keyboard, & Q. In the search field, type "Recovery", then open the corresponding item.

The most recent points will be displayed by default. To select the item you need, click the Next button, then Finish. The computer will now roll back. This takes a few minutes, and will include a reboot.
Alternatively, you can find another item. Usually, rollback points are created for all recent significant changes to your OS.
Settings
In the Recovery dialog box, open System Recovery Settings. To manually make a new Windows point, click the "Create" button.

To use your point in the future, you will be prompted to name it. Think of a suitable name and select "Create".
Please note that this tool only "restores" past settings in the registry and system Windows files. It will also uninstall any apps you may have installed since the rollback point was created. You can use a spyware removal tool, but if that doesn't solve your problem, you'll have to resort to a clean install of Windows.

Computer or laptop started to glitch badly? Or does it not turn on at all? First of all, try restoring the windows 7 system. The operation takes 10-15 minutes, but it can really help. Indeed, in this case, the windows 7 system is rolled back a couple of days ago, when the PC or laptop was still working fine.
Windows 7 system restore: what is it?
What is windows 7 rollback? This is an operation during which all settings and system files are restored from the created Windows backup. That is, if you accidentally deleted important files or changed settings (for example, installed a new driver), and after that the computer started to slow down (or does not turn on at all), then this can be fixed. At least it's worth trying.
Restoring the previous windows version is carried out from checkpoints that are created every week, as well as after making any changes (installing or uninstalling programs). Typically, this feature is enabled automatically. Plus you can create breakpoints manually.
How to check if this option is enabled on a computer / laptop, and how to create new points manually, you can read here - How to enable system restore?
There are at least 3 ways to start windows 7 recovery:
- Windows means;
- through safe mode;
- using a flash drive with Windows 7.
Let's consider each of them in more detail.
When you roll back windows 7, all your personal files will remain in place. So you don't have to worry about this.
But there is one nuance here. When restoring, files recorded between today and the day you decide to roll back to may disappear. Therefore, if you have recently (today, yesterday, the day before yesterday, etc.) uploaded important documents to your PC, it is better to save them to a USB flash drive. Just in case.
How to rollback the system back using windows 7?
The first way to roll back the windows 7 system back is by means of the OS itself. But it is only suitable if your PC or laptop turns on. It does not matter if it is buggy or freezes, the main thing is that you can load the desktop.
So, to start Windows 7 System Restore, do the following:
After that, the rollback of the Windows 7 system will begin. When the operation is completed, the computer or laptop will restart, and you will see a message that everything was successful.

Restart windows 7 through safe mode
If the PC or laptop does not turn on at all, then you can try restoring windows 7 startup in safe mode. To do this, when turning on (or rebooting) the PC, repeatedly press the F8 key until the menu appears. Next, select "Safe Mode" and press Enter.
However, there are some nuances associated with different versions Windows. Therefore, in order to avoid difficulties, I recommend that you read - How to enter Windows Safe Mode?
Wait until the computer or laptop turns on, and then follow all the same steps as in the previous version. That is, to roll back the windows 7 system, follow the steps 1 to 7 described above.
Restoring windows 7 from a flash drive
And the third way: restore windows 7 from a flash drive (or disk) with installation files. The downside of this option is that you need to write Windows to a USB flash drive that is on a computer or laptop. And the plus is that in this way you can try to restore the windows 7 system, even when the PC does not turn on and safe mode does not start. So this is your last chance.
In this case, you need to create a bootable USB flash drive with the installation of Windows (you can do this with friends or acquaintances), and then boot windows from it. Read more about this here:
How to make a bootable windows flash drive in UltraISO?
How to set boot from flash drive in BIOS?
If you did everything correctly, a window with the installation of windows 7 will start. To restore the Windows system, do the following:


Wait for the procedure to be completed and click on "Reboot". Then immediately pull out the flash drive from the connector (or the disk from the drive), after which the PC should turn on in the usual way.
By the way, restoring windows on a laptop and a computer is carried out in the same way. So you can try any way you like.
That's all. Now you know how to roll back the windows 7 system. I hope one of the 3 methods will work and you will be able to restore the PC or laptop to working order.
What to do if there are no restore points? You can try one option - windows 7 system restore without restore points.
(1 rating, average: 5.00 out of 5) Loading...
it-doc.info
How to restore windows 7 system without restore points
The computer system is a complete "organism", usually working without failures and problems. However, no device is immune from damage or malware attack when the integrity of the system is completely violated. In such cases, it is important to react in time and try to quickly restore the system. Most often, restore points are used for this purpose, but they must be created in advance. Unfortunately, it is not always possible to make sure, therefore given material I want to devote to the question of how to restore the windows 7 system if there are no restore points. Moreover, there are far more than one way, and it is better to be familiar with them, otherwise you don’t know when you have to resort to such methods.
Recovery using windows
The first option, which I want to talk about, is to restore the system through the operating system itself. I will not beat around the bush, I will immediately go directly to the actions:

Safe mode
The situation was described above when the computer OS is loaded and running. But it's not always so lucky, it happens that it simply does not load. How then to be? Very simple: use safe mode! Previously, I have already described how this procedure takes place, so I will repeat it literally in 2 words. At the moment when the computer has just started to turn on, you must press the F8 key. If everything goes well, a black window with options will appear in front of you, if not, you will see the windows logo, therefore, you need to turn off the computer again and start over.
Go to the "Safe Mode" item and do almost the same as described above.

That is, first go to "System Restore to an Earlier State", then click the "Start System Restore" button. Now select the checkpoint, confirm the recovery of disks and recovery points, after which the recovery procedure will start. After that, it will not be superfluous to try to improve system performance by getting rid of unnecessary garbage on PC.
I hope my tips helped you!
learnwindows.com
How to roll back windows 7 to a restore point?
 Hello dear readers of my blog. In the previous lesson, we learned how to create a restore point, because, as you know, it is recommended to do this every time before installing new programs or updating device drivers. Well, in today's lesson we will talk about rolling back the Windows 7 system to the previously created checkpoint. To begin with, I want to warn you that you do not have to worry about the safety of the files contained on the hard disk, because they will not be touched, however, the settings you made after last creation checkpoint will be reset. Now let's get started! To roll back Windows 7, open the start menu, type system restore in the search bar and select "restore system files". IN next window click the "next" button, then select the last checkpoint and click "next" again.
  Now confirm your intention to rollback windows system by pressing the "done" button.
  Next, the system will warn you that when the recovery process starts, it cannot be interrupted, to continue, click "yes".
 After that, the system rollback will begin, after which the computer will spontaneously turn off, and booting up again, it will display a notification on the desktop screen about successful recovery, after which it remains only to close it.
Now you know how to roll back the Windows 7 system to a checkpoint and in the event of a system failure, you will always know how to fix it. The main thing is not to forget that every time before updating device drivers or downloading some software that is not on the official website of its developer, it is recommended to create a restore point.
That's all for me, if you have any questions regarding today's topic, then contact me. Thank you all for your attention and see you soon.
www.yrokicompa.ru
How to restore windows if there are no restore points?
Computer or laptop failures happen unexpectedly. It seems like yesterday everything worked, but today it does not even turn on. In this case, the easiest way is to roll back the system to a working version.
And how to restore Windows if there are no restore points? There is almost nothing on the Internet about this subject. But still there is one possibility to restore the work of a PC or laptop. Consider this your last chance.
System restore without a restore point
How to roll back the system if there are no restore points? Actually, no way. After all, if there are no these very points, then there is nothing to restore from. Is it logical? Logically.
But it is still possible to restore a system without a restore point. But not by means of Windows, but with the help of a special program - LiveCD.
Create an emergency flash drive
There are many bootable LiveCD images, so any one can be used. For example, great option considered Active Boot.
When choosing a program, pay attention to its capabilities (what it can do). Do you need to reset your password? Restore randomly deleted files? Check your computer for viruses? Looking for a program that can do this.
To create an emergency flash drive, you need to write this LiveCD to it. For example, using UltraISO.
More about this here - Creating a bootable USB flash drive in UltraISO
Usually, to enter the BIOS, you need to press the F2 or Del button. Although there can be many options (especially on laptops).
 When you turn on windows on the first screen, you can see the button to enter the BIOS. IN this example is the Del button.
 Change download priority
 A flash drive (USB-HDD) was put in first place (First Boot Device). Now, when you turn on windows, it will boot first. The second is the CD-ROM (disk drive).
 If you don't know how to do this, you can read detailed instructions- BIOS setup for booting from a USB flash drive
Restoring windows without a restore point
If you did everything correctly, the laptop or PC will boot from the USB flash drive, after which the LiveCD program will start. And then do what it was all about.
That is why you need to choose the right program, as described above. If she knows how to reset the password or check the PC for viruses, then simply select the appropriate item in the menu and wait for the procedure to be completed.
But first of all, it is recommended to copy all important files, documents and photos to a USB flash drive. Almost all LiveCD programs have an explorer (like Total Commander) with which you can open the desired folders and copy them to your USB flash drive.
If the cause of the failure of the computer or laptop is unknown, then you can try to restore windows from an archived copy of the registry. LiveCD will also help you with this.
To do this, boot from a USB flash drive and open the RegBack folder. It is located along the path:
windows\System32\config\RegBack
In this case, the name of the local disks will most likely change. For example, the local drive C can be renamed to D or E. Be guided by the total size, as well as the folders and files that are on it. You can't look at the letters.
So, to perform a system restore without a restore point, you need to:

After that, restart the PC (or laptop) and boot from the HDD (for this you need to change the boot priority of devices in the BIOS back).
If the failure was related to the registry, this will help fix the problem. After that, windows will boot up and work as before.
This is how windows 7 restore is done without a restore point. There are no other ways (except with the help of special programs). Please try to avoid such situations in the future. To do this, set Windows to automatically create restore points.
Read more about it here – How to enable System Restore in windows 7?
(2 ratings, average: 2.50 out of 5) Loading...
it-doc.info
How to create a system restore point and how to roll back windows XP / Vista / 7 / 8
Sometimes a situation arises when it is necessary to quickly undo unwanted changes in the system: for example, after updating the software, installing drivers, or cleaning the registry, problems with the stability of windows began to appear. However, not all users know how to make a "rollback", how and when to make rollback points on their own, and in what cases the OS does them in auto mode - in general, I will try to answer all pressing questions on this important topic in this note.

Let's start by checking if the System Restore service (rstrui.exe process) is running. To do this, through the "Start" button, right-click on "Computer" → further, in the drop-down menu, select "Properties" → "System Protection". The "Protection Options" area will display the available local drives and their security level. By default, System Restore is enabled for the drive where Windows is installed (C:). However, it can be enabled for any other drive by marking the required one (for Vista, it's all manipulation!) and clicking on the "Configure" button (see the first screenshot in the Win7 design). In the window that opens, activate "Restore system settings and previous versions of files" and confirm the changes with the "OK" button. In addition, in windows 7 the ability to manage disk space for system recovery returned, as it was in XP, but for some reason it was "forgotten" in Vista (see screenshot below).

When does windows itself (automatically) create restore points?
It happens in the following cases:
- when installing programs and drivers;
- when installing OS updates via the Internet;
- according to the schedule (every 24 hours in windows Vista and every 7 days in the "seven");
- when you roll back the system to one of the earlier restore points.
Of course, the user can independently create a rollback point (see the first screenshot) before any potentially dangerous actions (such as changing system files) according to the principle "more is not less".
How to do a system rollback?
All windows restore points are located in the hidden system folder C:\System Volume Information. You can “roll back” to the desired point on your own in several ways, for example:
- through the "Start" button, click "Help and Support" → "Revert changes using System Restore" → "Restore an earlier computer state" and "Next" (for windows XP);
- through "Start", click "Control Panel" → "System Restore" (or "Recovery") → "Start System Restore" → in the final select desired point rollback (see screenshot);
- through the "hot" key combination "WinKey + R" → in the window, enter rstrui → "OK" (the most convenient option for windows 8).

Some important notes
- Quoting a help article from the Microsoft website: "System Restore does not protect FAT32 and other FAT file system drives because these drives do not support shadow copies." In XP, when creating a rollback point, only key files of the system and programs were tracked, unlike windows Vista / 7 / 8, where, thanks to the Volume Shadow Copy Service (VSS), changes are recorded throughout the partition. In any case, personal files are not included in OS restore points, i. all your documents and photos after the "rollback" will not disappear.
- At emergence to. - l. problems with the loading and stability of Windows, you should use the last restore point created shortly before the date and time when the problems started. If the situation, alas, has not changed, you can always choose another (earlier) rollback point.
- Beginners computer users I recommend reading my article Quick Creation system restore points: Single Click Restore Point (SCRP) utility". More experienced users who have the Wise Registry Cleaner on their PC are the luckiest, because everything you need to quickly create a rollback point and, in fact, "roll back" windows at their fingertips, see details here.
Dmitry dmitry_spb Evdokimov