How to cover a chair with a back with your own hands. Master class on chair upholstery
Almost every family has old furniture, which was inherited, but this furniture does not always have an acceptable appearance. The upholstery is quite easy to replace. Then grandma’s favorite chairs and armchairs will get a second life and sparkle with new colors.
Instead of buying new chairs, you can reupholster old ones: replace worn seats with new ones, saving money.
Covering a chair with a soft seat
For this you will need:
- thick tape;
- lining fabric;
- upholstery fabric;
- filler (batting, padding polyester, coconut fiber);
- furniture foam rubber;
- construction stapler;
- hammer and nails.
Upholstering chairs yourself is not so difficult if you follow the technology and know the assembly sequence. It happens when not only the casing, but also the internal contents require replacement. The first step is to remove the seat, remove the old nails using a nail puller, and remove the upholstery and filling. All you should have left is the wooden frame from the seat.

The main tool for upholstering a chair is furniture stapler.
Now you need to attach a thick tape along the bottom (in the form of a lattice), which is used for upholstering furniture. Nail one end of the tape with 3 nails, wrap the other end around wooden block and pull. On the opposite side, secure the tape with nails, then cut it off, bend the end and secure with a stapler. The distance between the strips should be about 5 cm. Usually 2-3 strips are nailed on each side on the chair seat, intertwining them together in the form of a lattice. Instead of nails, you can use a stapler - in this case, the staples are arranged in 2 rows, at a short distance from each other. For this purpose, it is better to take 8 mm staples.
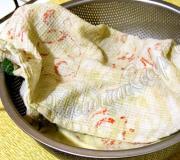
After this, take the lining fabric and secure it with a stapler around the entire perimeter wooden frame. Next, lay a layer of filler. It can be batting, coconut fiber or padding polyester. Then a piece of foam rubber is cut so that it is 2-3 cm larger than the seat. First, it is secured with staples in the center of each side, then the sides are shot. The corners are finished last, with the ends gathered into small pleats. During work, you need to make sure that the foam rubber does not warp, otherwise the upholstery will turn out uneven and take on an untidy appearance.

To reupholster a chair, you must first strengthen the frame and then remove the upholstery fabric.
All that remains is to cover the seat with fabric. Lay the material out on the table, place the seat on top (foam down), shoot 3 staples in the center of each side. Try to stretch the fabric evenly so that there are no distortions, otherwise it will affect the appearance of the product. Make beautiful folds at the corners, shoot them with a stapler, cut off all excess. Fold the ends under and secure them in the same way, and then place the seat on the chair.
Upholstering chair seats with your own hands is more difficult if the upholstery contains springs. Many furniture craftsmen do not recommend replacing them with less durable foam rubber. The first step is to carefully disassemble the contents. As a rule, the springs are already connected to each other. Then all you have to do is check the strength of the bundle. If some threads become frayed over time, they need to be replaced. After you have nailed the ribbons and lining, install a bunch of springs on it, sewing each one from the bottom (with a few stitches on all sides). Secure a thick lining fabric over the structure and sew the springs to it in the same way. This is followed by a layer of batting or padding polyester, after which the seat is upholstered with fabric and installed on the chair.
Covering a chair with a hard seat
For this you will need:
- thick furniture foam;
- thick fabric;
- construction stapler;
- braid;
- glue gun

Chair upholstery diagram.
Upholstering a chair with a hard seat is quite simple: even a person who has nothing to do with furniture can easily handle it. First you need to cut the foam rubber, it must completely match the dimensions of the seat. There is no need to cut the fabric, since it is much easier to work with a cut that is 15-20 cm larger than required.
Foam rubber is placed on the chair seat and covered with a cloth. First, shoot (along the side) each side in the center, then on the sides. After this, the corners are decorated: the fabric is gathered into small folds and secured with staples. It is important to ensure that the staples are positioned clearly along the line. Next, the material is cut off, departing from the fastening by about 5-7 mm.
All that remains is to glue the tape that will hide the staples. The easiest way to do this is with glue gun- although the work is easy, it requires maximum attention and accuracy. The upholstery of a stool is done in the same way, but in this case the upholstery fabric is not shot along the side, but from the back side of the seat. Therefore, there is no need to decorate the seam with braid.
How to replace the upholstery on a chair?
To replace the upholstery you will need:

The upholstery of the chair is done using a construction stapler, upholstery fabric and a hammer with nails.
- upholstery fabric;
- construction stapler;
- hammer and nails.
It is possible to update the upholstery on an old chair on your own. The first step is to carefully remove the old upholstery.
It is important to remember exactly where and how the fabric was attached, and even better, photograph it all.
Use the old upholstery as a pattern; when cutting, add a margin of 1-2 cm on each side.
First, the armrests are retightened. In order for the fabric to stretch easily, a rigid braid is sewn along its edge (on the reverse side). If you don’t have one on your farm, you can use a strip of thick cardboard (it’s shot with a stapler). The upholstery is repeated in exactly the same way as it was done earlier.
After this, they begin a rather important process, covering the back. There should be no distortions or folds. In order for the fabric to lie flat, you need to build the following device: take fiberboard, cut a long strip 2-3 cm wide, drive wallpaper nails into it (at a distance of 1-2 cm), and then pin the bottom of the upholstery fabric onto them. By doing this, you can easily stretch the fabric evenly and secure it along the bottom of the chair. For this purpose, use deep staples 0.8 or 10 mm.
After the back and armrests are tightened, we begin sewing the seat cover. An old case is used as a basis. If the zipper is well preserved, then there is no need to replace it with a new one. The bottom of the chair is covered in the same way as the back.
Using the tips outlined above, you can easily update not only a chair or stool, but also an old chair. Go for it, and you will succeed!
There can be a great many reasons to renew old chairs or decorate new ones with your own hands. This includes the need to adapt furniture to the interior, the desire to correct design flaws, to restore chairs inherited from a grandmother or found for next to nothing at a flea market. In this material we will talk about 4 ways to transform “four-legged friends” (including office and garden chairs) beyond recognition, and also present 70 cool photo ideas for alterations.
Method 1: Painting a chair
Even the most old-fashioned or simply ordinary chair, say, a “Viennese” wooden, plastic, folding or office chair, can be transformed by painting. The main thing here is to choose the right color. Here are some inspiring examples where color alone saved furniture from ending up in a landfill.


Old Viennese chair before and after renovation

A few more examples of remaking the most common Viennese chairs made of bent beech, which can be found in almost every home or cottage.

Here are some cool ideas for painting stools.

Inspired? Then let's get to practice!
To paint the chair you will need:
- Acrylic paint, or preferably chalk paint, in one or more colors;
- Synthetic flat brushes (separately for primer, paint and varnish);
- Protective gloves (better to buy at a pharmacy);
- Primer for wood/metal (depending on the frame material);
- Wax or matte varnish (polyurethane or acrylic);
- Medium to fine grit sandpaper.
How to paint a chair with your own hands:
- Prepare the chair for painting: wash it to remove rough dirt and dust, then sand it sandpaper medium grit to remove the top layer of old varnish or paint. The surface should be slightly rough.

- If you want to update metal chair, then it is not necessary to sand it (although it is safer to sand the top gloss), but before priming/painting the frame must be degreased with white spirit.
- Also, you can avoid the tedious sanding step if you use chalk paint, but you won’t be able to do without a primer.
- If your chair is varnished, it can be removed with a special varnish remover.
- If the chair has any damage, such as scratches, chips or cracks, fill them with furniture putty.

- Wipe the chair from dust, wait for it to dry and apply two layers of primer to the entire frame, allowing each layer to dry for about a day. Between layers, it is advisable to sand the primer with fine-grained sandpaper (no. 220 is suitable).
- Take a new brush and paint the chair in 2-3 layers, allowing each layer to dry completely. Make sure that the paint does not smudge.

- If you want to paint a chair with a distressed effect, then first apply a dark paint, say dark gray or dark blue, to some places (for example, the edges of the seat, back and armrests), and then cover them with wax. Next, you should paint the chair with the main paint in 2-3 layers. And finally, lightly work with fine-grained sandpaper to expose the dark “substrate”.

- Do you want to achieve the effect of a perfect factory paint job? Then be patient: every coat of primer and paint (except finishing layers) will have to be sanded with fine-grained sandpaper. This way the coating will be as smooth and reliable as possible.
- To paint only certain parts or parts of the chair, use masking tape.
- Treat the chair with wax or matte varnish. Voila, your “four-legged friend” has found a new life!
Helpful Tips:
- Don't know what color to paint your chair? You can't go wrong if you paint it white, because this color is the most versatile and goes well with any bright upholstery;
- Before painting, you can glue it to the back of the chair. stucco decor using wood glue;
- Achieve the effect of a very old and dirty chair in Provence style, you can use dark brown wax;
- Chalk paints are a relatively new type of paint that are not yet widely available. However, we recommend using it, because due to its thickness, increased adhesive properties and super-fast drying (in 30 minutes), it saves a lot of time and effort. In Russia, you can purchase chalk paints from designer Daria Geiler, and in Kazakhstan – from Vernenskaya Manufactory. You can also always order paints from foreign manufacturers - Annie Sloan and Rustoleum.
Better figure out how to paint old chair This video master class will help you with your own hands.
Method 2. Seat reupholstery
Most often, if a chair has a soft seat, then painting the frame is not enough to completely update it - you need to change the upholstery. Here are some photo examples of how reupholstering a seat can turn an old chair into a stylish piece of decor.


Office chair before and after painting, replacing the back and seat upholstery
By the way, if your chair or stool does not have a soft seat, then you can make it yourself: first cut the MDF base exactly to the shape of the seat, then follow our master class, upholster it and, finally, screw it to the chair frame with self-tapping screws.

To make a soft seat for a stool, just glue the foam rubber directly to the base, and then cover it with fabric, driving the stapler staples into inner side seats.

Stool with homemade upholstery

To work you will need:
- Anti-stapler (or its alternative);
- Furniture stapler and staples no higher than the thickness of the seat base;
- Textile;
- Foam rubber about 4 cm thick;
- Batting or padding polyester;
- Scissors;
- Serrated bread knife (with teeth);
- Screwdriver.
How to reupholster a chair with your own hands:
- First we need to remove the seat from the chair frame using a nail puller or a screwdriver.
- We remove the old upholstery using an anti-stapler and remove the filling if it is worn out (if it is in good condition, then it can be reused). Next, wipe the base of the seat from dust and dirt.
- If the wooden base of the seat seems too old and unreliable, use it as a template to cut out a new seat from plywood.
- We place the seat on the foam rubber, trace its outline and cut it out.

- We cut the fabric and batting in such a size that they can be wrapped around all sides of the seat (along with foam rubber), leaving 10-15 cm free. This excess is needed to make it more convenient to stretch the material.
- So, we have four blanks: base, foam rubber, batting/sintepon and fabric. Now we need to put it all into a sandwich. First of all, we spread the batting, put foam rubber on it, and on the foam rubber - the base of the seat, wrong side up. Next, we simply fold the edges of the batting onto the seat and, slightly stretching the material, fix it with a stapler. The corners of the batting can be cut off, or you can simply bend them and fasten them in the same way.

How to restore a chair seat
- Once all the batting is attached to the seat, trim off any excess batting.

- If desired, the foam rubber can be pre-glued to the base or stapled around the perimeter, retreating 5 mm from the edge of the seat.
- The most crucial moment– the stage of reupholstering the seat with fabric. Spread the fabric with the wrong side up and place the seat on it. Next, fold the edges of the fabric along one side and secure with a stapler. Now lightly stretch the fabric over the opposite side of the seat and secure it with a stapler.

Repeat the procedure on the remaining two sides and start decorating the corners - they need to be wrapped as shown in the photo below.

Chair after restoration
- We return the seat to its place and fix it with the “original” fasteners.

Helpful Tips:
- The soft seat of the chair can be additionally decorated with furniture nails around the perimeter.
- The upholstery fabric should be selected in accordance with the style of the chair. For example, traditional jacquard fabric is not suitable for a modern chair, and a classic chair with an elegant back is unlikely to “make friends” with fabric with a newfangled geometric print.
- The same fabric from which your curtains are made is ideal for upholstering a chair. In the interior, such a coincidence will look very harmonious.
- The print on the fabric can echo the carved crossbars as shown in the photo below.

For a more visual master class on upholstering the seat of an old chair, watch this video.
Method 3. Decoupage a chair with paper
Do you want to decorate a chair with a cool print or cover up minor defects like scratches and stains with patterns? This can be done using the decoupage technique.

Chair decoupage idea

Chair decoupage idea


Chair decoupage idea

Chair decoupage idea


You will need:
- Any paper with the desired print, for example, it can be multi-layer napkins, pages from magazines and books, geographic Maps, posters, wallpapers, etc.;
- PVA glue;
- Brushes 2 pcs (for applying glue and varnish);
- Scissors;
- Transparent matte acrylic or polyurethane varnish;
- Water (if necessary);
- Roller for working with large formats.
How to update chairs using decoupage technique:
Step 1. Clean the chair from dirt and stains, paint if necessary, following the first instructions in the article.
Step 2. Cut out the fragment that you need from the selected printing. The workpiece can be either large (for example, in the shape of the seat and back) or very small.
- If you use napkins, you first need to separate the top layer with the pattern and only then cut it out.
- If you want to cover the entire chair, including the legs, the paper needs to be chaotically torn into small pieces of approximately 10x10 cm, as shown in the following photo slider.
![]()
- To decoupage the back and seat, they need to be removed from the chair frame using a screwdriver, and then used as a template for cutting the workpiece (see photo below).

Step 3. Generously coat the area you want to decorate with PVA glue and place your design on it, then smooth with a brush with the remaining glue, releasing all air bubbles and smoothing out the folds.

- If the cut out print is small, then it is better to apply glue not to the chair, but to the back side of the workpiece itself.
- If the paper is very thick, then you need to moisten it a little in water - this will make it more flexible.

- A top layer of glue is not necessary, but is often desirable (it should be thin in any case).
Step 4. Repeat step 3 with the other parts of the chair and leave the glue to dry for about a day.
Step 5: Cover decorated areas or the entire chair with clear varnish in 4 layers, allowing each layer to dry completely. Ready!

Method 4. Decoupage a chair with fabric
It would seem that there is no other way to radically modify a chair with your own hands other than by painting. In fact, there is another cool way - decoupage with fabric.
- A chair updated in this way will last a surprisingly long time, even under heavy loads. And if individual threads come out of the fabric along the edges of the chair, you can simply cut them off and treat them with a layer of PVA glue.

Decoupage idea for an old chair
You will need:
- Textile;
- Wooden chair;
- PVA glue or special glue for decoupage;
- A sharp stationery or breadboard knife;
- Brush for applying glue.
How to update a chair using decoupage technique:
Step 1. Using a screwdriver, remove the back and seat from the chair. If you want to paint the chair, do it before taking it apart.
Step 2. Spread the fabric on a flat surface, place the seat on it and trace it along the contour, stepping back about 2.5 cm from the edge, then cut out the blank.

Step 3: Cover outside your seat with PVA glue, then place the fabric on it and smooth it out. Once the fabric is straight, coat it with PVA glue and leave to dry overnight.

Step 4: Once the fabric is dry, make sure it is completely stiff. Next, trim the excess fabric with a sharp knife exactly along the edges of the seat.

Step 5. Now coat the perimeter of the seat with PVA glue again to prevent wear around the edges.
Step 6: Repeat steps 2-5 with the chair back and other parts you want to decorate and finally put the chair back together. The main condition for successful restoration of a chair is that the pattern must accurately repeat the shape of the surface being decorated.

Here are some more photo ideas for decorating a chair with fabric.

Decoupage office chair fabric with additional protection with polyurethane varnish

Stool decoupage ideas


Beautiful covers of different shades are usually used to perfectly disguise the weathered upholstery of chairs. This option is really good. Should I spend money on purchasing covers if the chair doesn't look good enough?
If you decide DIY chair upholstery, be sure to find out for yourself which installation work will be needed. It is up to you to decide whether the upholstery needs to be replaced.
Restoring a chair is quite simple. But the work requires careful attention. The previous fabric is completely removed. After this, a thorough inspection of the entire surface will be required. If necessary, repairs are carried out. Then a new filler is prepared and the upholstery fabric is strengthened without fail.
Upholstery. Preparatory work
You want to do any job efficiently and quickly, chair upholstery is no exception. And when you do it yourself for the first time, there can be a lot of “delays.” For this you need to be prepared.
Any sufficiently thick fabric will do. If desired, leather (artificial or natural), wool or tapestry can be used.
Foam rubber of a certain thickness is suitable for padding. Batting, latex, and padding polyester are also often used.
Don't forget a furniture stapler, pliers and a screwdriver. You will need them during the restoration process.
Your chair may need some preliminary repairs. If it is “flimsy”, then it must be carefully glued, perhaps nailed somewhere. this must be done at the preliminary stage. In this case, you will not have to remove the updated upholstery later.
And also this advice: “If a chair is “flimsy”, its wooden part is “dead,” then throw away such a chair and buy a new one. Restoration is relevant when the repaired chair is no worse than a new one.”
Removing old upholstery

The chair is pre-disassembled. The first step is to carefully remove the seat. Then the chair must be turned over. Then unscrew the bolts and remove the brackets. All work must be performed with the utmost care. There is no need to rush in such a matter. As a result, you will be able to perform upholstery on high level. Use pliers to remove staples. The screws can be easily removed using a regular screwdriver.
Be sure to find out how stable the entire structure is. If the legs are loose, they must be strengthened. All loose connections are sealed. To seal cracks, a mixture of sawdust, PVA glue and dye is used.
If repairing the chair is not needed, then start by removing the old fabric. After this, you can proceed to creating a new upholstery. The staples are removed carefully.Often, old upholstery material can be used when creating a pattern. Now removed upholstery You can throw it away. The same manipulations are done with the back. The work is carried out in the same sequence as we described above.
Features of fabric and padding
 Prepare the foam and fabric of your choice. Make a pattern. A strong and tight fastening of the material is required. It is important to use a template. It is made from paper. I use wallpaper for this. The process itself is not difficult. After the chair is completely disassembled, the seat is placed on paper front side and carefully circle it. It is required to retreat at least 5 cm from the line. This margin is provided for hemming. The template is carefully cut out and everything marked is carefully transferred to the material.
Good for stylish upholstery:
- Furniture fabric of sufficient density. We recommend paying attention to high-quality wool, carpet fabric, velor with or without ornament.
- High-quality leather (artificial or natural).
The choice depends directly on the features of the interior and the textiles used in the interior. It is important that the chairs and cushioned furniture harmonized in style and color. We recommend choosing textiles that are ideally matched for bedspreads and at the same time closely follow the pattern of the curtains.
Foam rubber is traditionally used as padding. For optimal reliability, we recommend carefully placing it on the seat and gluing it. Do not use a thick piece. In this case, it will simply be uncomfortable to sit on the chair. It's best if you focus on old material. You need to purchase not only textiles and foam rubber, but also suitable threads. Use only those with optimal strength. At the same time, they must match the color of the fabric. If the edges of the fabric need to be hemmed, you simply cannot do without them. This will also be needed when the pattern is not so simple and is made not from one part, but from several.
Do-it-yourself furniture reupholstery
To change the upholstery of chairs correctly, you must follow a certain sequence:
 Initially, the foam rubber is glued to the base. At the same time, all excess is carefully trimmed. Don't forget to fold the edges before doing this. To strengthen the hems on the wrong side, staples are used.
Then they move on to cutting the fabric. Place the fabric on a perfectly flat surface (face down). A seat is placed on it (foam down). There is a margin left for the obligatory hem. The rest of the fabric is cut off.
A furniture stapler is used to fasten the upholstery. The fabric is stretched well. It is important that there are no folds and free places. Before this, the upholstery is folded and necessary points, in which the fixation will be made.
The upholstery depends entirely on the shape of the seat. It is much easier to do the job if the piece of furniture is rectangular. If it is round, you will have to try. The same can be said about the chairs.
Be sure to pay close attention to how the legs are secured. Often special cutouts are provided for them on the seat. In the process of attaching fabric and foam rubber, you will have to remember this. It is necessary to make cutouts so that this space is completely free.
Take into account the size and shape of the grooves for the legs. If you do not take this into account in time, you will not be able to produce high-quality upholstery. It will no longer be possible to carefully assemble the chair if you do not provide cuts in the fabric. There really is a way out of this situation. But it requires some patience. When you create a pattern, you need to select small wedges. They will very beautifully surround the cutouts designed for fastening.
In order to change the upholstery of your old, but beloved chairs, you will not need a significant time investment. Don’t forget about the neat design of the back. There is an option to replace the method of fastening the material from staples to nails (and sometimes vice versa).
Here's the video of the process of self-upholstery:
The fabric is carefully stretched over the foam. They attach it with staples. This will allow you to nail the nails correctly. In this case, folds are guaranteed not to appear. Then the fastener itself is performed. They always start from the top. The fastener pitch varies. It is not recommended to make it very large.
Restoration involves not only the obligatory polishing and subsequent painting of all its wooden parts.
I think you understand that upholstering chairs with your own hands is not particularly difficult. But for some reason, everyone can cope with such work.
Furniture workshop "Encore" is ready to reupholster your chairs, armchairs, sofas if you can't do it yourself!
Even with the most careful treatment, furniture sooner or later begins to wear out. What to do if the casing wooden chairs Has she completely lost her presentable appearance? Don’t rush to part with things that are familiar and dear to your heart! Thanks to such a simple measure as reupholstery, you can quickly and easily bring them into proper condition.
Before you start reupholstering a chair, you need to decide on the choice of new upholstery materials - internal filler seat and face fabric. Sheet polyurethane foam or foam rubber is traditionally used as filler. When purchasing material, keep in mind that the sheet thickness should be at least 40 mm, and the density should be about 30-50 kg/m3. Batting and padding polyester are used less frequently for padding - during use they quickly deform, lose their original shape and sag all the way to the plywood. appearance It is no less responsible to approach the choice of upholstery fabric - it directly determines restored furniture. Give preference to durable and– the fabric for upholstering the chair should hold its shape well. In addition, the textiles you like should be easy to wash and clean from dirt with a sponge or brush. The most popular materials for upholstering chairs are chenille, tapestry, flock and jacquard.


As you can see, self-upholstery chairs does not require any special skills or abilities. Rather, it is an interesting creative process that allows you to significantly save the family budget.
What good quality No matter the furniture, it will still fall into disrepair. But how sad it is to part with your favorite soft chairs! After all, they are comfortable and stable, but the upholstery lets them down. You shouldn’t throw your furniture in the trash; it’s better to give it a second life. Upholstering a chair is a very exciting and uncomplicated process. A little effort and patience - and your interior will be transformed, and your budget will not suffer from the purchase of new furniture. Show your imagination and design skills - and your family and friends will be surprised and kindly envy such chairs!
Out with the old!
Reupholstering a chair will go like clockwork if you prepare everything you need and have a good mood. First, carefully inspect the frame for damage and scratches. If there are any, they can be eliminated with the help of varnish. You can paint the frame to match the color of the upholstery, it will turn out original and stylish. Such bright colors can decorate both a children's room and a living room. Select the fabric and accessories, and you can safely get to work.
Dismantling
All old soft elements of the stool must be carefully removed. Arm yourself with a nail puller, scissors, a hammer, and a knife. All these tools will help you remove fabric and filling without any problems. First of all, remove the seat, being careful not to damage it. wooden structure. Pry the nails with a nail puller and pull up. Now separate the fabric from the padding to make a pattern. This way you definitely won’t make a mistake with the size, and the re-upholstery will go like clockwork.
Be sure to remove all springs by cutting the twine holding them, but only if they are severely worn or damaged. Typically springs last for several decades. If they are in satisfactory condition, simply cover the springs with a piece of burlap and secure with an industrial stapler.
If the springs still had to be removed, it was the turn of the old nails. All that remains of the chair should be the base and the plywood or lattice on the seat. Repairing and reupholstering chairs is done in order to save money, so ordinary foam rubber can serve as a sealant.
Do the same with the back of the chair. Extract everything soft materials without damaging the fabric.

Noble tree
If you care for it correctly wooden furniture, it will serve you faithfully for a long time. Tighten all bolts wooden frame, and you can start painting. The varnish is perfect for any type of wood. Cover all elements with two layers of varnish or acrylic paint. If desired, the legs can be decorated using the decoupage technique or applied with a design using a stencil. There are special waterproof stickers for furniture on sale. You can also decorate chairs with them, but then it is better to choose a plain fabric. It will turn out original and unusual.
Soft seat
Before going to the store to buy fabric, take measurements of the chair and calculate the number of meters of material. Padding kitchen chairs requires special attention. Their seats deteriorate faster, as they are used constantly and are subject to soot, grease, and dirt. Jacquard, tapestry, and chenille work well. Fabrics are not that cheap, so you shouldn’t buy too much.

To make the pattern, take a piece of construction paper and trace around the old fabric from the seat. Now transfer the pattern to new material and cut. We do the same with foam rubber. When all the blanks are ready, you can begin to assemble the structure. Chair reupholstery is in full swing! Using universal glue, we attach the foam rubber to the base (usually plywood). After the glue has dried, we apply the fabric and begin to fold the edges inward, sealing the seat.
We stretch the fabric tightly and fasten it to the plywood with a stapler. Now we screw our piece of furniture art to the frame and enjoy the work! The backs need to be covered with fabric at the back so that the chair looks neat. Fold the edges evenly, making sure there are no folds or bends.
Instead of fabric, you can use a leather substitute. The chairs will look presentable and strict. The edges can be trimmed with furniture nails with shiny heads. Create stylish things with your own hands!

Skillful fingers
Creating comfort and beauty in your home is a great pleasure. If you have patience and feel a creative impulse, your home will be transformed beyond recognition. Spare no effort, show your imagination, and everything will work out! Upholstering a chair can turn into exciting activity for the whole family. You will get great pleasure, and even save your family budget!