How to sheathe the inside of a house with plasterboard beautifully and for a long time. How to sheathe the inside of a log house with plasterboard Installation of a profile for plasterboard in a wooden house
September 28, 2016Specialization: facade finishing, interior finishing, construction of summer houses, garages. Experience of an amateur gardener and gardener. We also have experience in repairing cars and motorcycles. Hobbies: playing the guitar and many other things that I don’t have time for :)
Drywall is an environmentally friendly and practical building material, which is often used even for finishing wooden houses. The process of its installation in this case, although not much different from the installation of gypsum boards on ordinary walls, however, it still contains some nuances. Therefore, below I will tell you in detail how to cover walls with plasterboard in wooden house.
Drywall installation
IN Lately Drywall is often used for rough finishing of wooden houses, which is associated with the following advantages of the latter:
- the material is able to breathe, just like wood, due to the presence of microscopic pores. This contributes to the formation of a favorable indoor microclimate;
- does not contain harmful components, as a result it is an environmentally friendly material;
- with its help you can level the walls and prepare them for finishing with almost any finishing materials.
If you install plasterboard on a metal frame in a wooden house, then this procedure will not differ at all from covering brick or other walls with it. Therefore, further I will tell you how to cover wooden walls with gypsum boards on wooden frame. The latter compares favorably with metal in its thermal insulation qualities, environmental friendliness and some other advantages.
It must be said that often, in parallel with wall cladding, their insulation is also carried out. Therefore, we will also touch on this operation.
I’ll say right away that you can start this procedure only after the house shrinks. As a rule, this takes one and a half to two years from the date of construction of the housing.
So, the process of covering walls with plasterboard with your own hands includes several stages:

Below we will familiarize ourselves with all the nuances of this work at each of these stages.
Stage 1: preparation of materials and tools
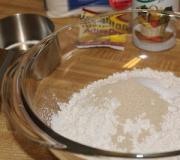
To perform the operation described above, we will need the following materials and tools:
- the drywall itself;
- dry planed beams or boards;
- metal corners or adjustable brackets;
- self-tapping screws;
- protective impregnation for wood;
- starting and finishing putty;
- mounting knife;
- wood hacksaw;
- building level;
- painting cord;
- construction stapler;
- grinding devices;
- primer;
- paint roller with tray.

If you plan to insulate the walls before covering with plasterboard, you should also prepare:
- wooden slats with a section of 2x2 cm;
- vapor barrier film;
- insulation - it is best to use mineral (basalt) mats for these purposes, as they are environmentally friendly and fireproof.
In addition, you may need other tools and accessories, which I will mention in the article.

Stage 2: preparing the walls
Before covering the walls with plasterboard in a wooden house, you need to carefully prepare them. This procedure is performed as follows:
- First of all, the walls must be treated with a protective impregnation, which will make the wood resistant to negative biological influences and moisture. Let me remind you that the impregnation is literally rubbed into the surface of the wood, and the procedure is performed in two stages;
- If there are gaps between the crowns, they must be filled with insulation. For these purposes, you can use polyurethane cords that are fixed with a stapler. Construction sealant is applied over the cords.
This completes the process of preparing the walls. The only thing before you start further work, you must wait until the impregnation is absorbed and the sealant hardens.

Stage 3: frame installation
If you plan not only to cover the walls with plasterboard, but also want to insulate them, then before constructing the frame, you need to create a gap that will ensure condensation drains from under the insulation.
It is performed as follows:
- first of all, 2x2 cm slats should be fixed to the walls. They should form horizontal belts on the walls, fixed in increments of about 50 cm. To fix the slats, you can use ordinary self-tapping screws;
- Now you need to secure the vapor barrier film on the resulting sheathing using a construction stapler. Keep in mind that the film must be stretched so that a ventilation space is formed between the wall and it.
- At the joints, the fabric should overlap, and the joints themselves can even be taped.
To make the ventilation gap work, you can drill several holes under the canopy and at the base of the walls. The latter must be filled with mineral wool and protected with mesh.
As a rule, when people ask how to cover walls with plasterboard in a wooden house, they are interested in the nuances of installing the frame, since this procedure is the most complex and at the same time responsible.

In fact, there is nothing overly complicated in installing a frame; the main thing is to understand the principle of its structure. These instructions will help you with this:
- First decide on the thickness of the frame. If, for example, the thickness of the insulation is 100 mm, the thickness of the frame should be 110 mm. If the walls are not insulated, then care must be taken to save space so that the gypsum board sheets are located as close to the wall as possible;
- then you need to retreat from the wall a distance equal to the thickness of the frame and mark a point on the adjacent walls;
- through the obtained points you need to draw vertical lines from floor to ceiling;
- then the resulting vertical lines need to be connected with horizontal lines on the floor and ceiling. To make straight lines, it is best to use a painter's cord;
- Next, you need to draw vertical lines on the wall, which will be covered with plasterboard, using a level or plumb lines. The step between the lines should be 50 cm. If the walls are insulated with mineral mats, the step should be taken a centimeter and a half less than the width of the mats, so that the latter fit tightly into the space of the frame;
- Now, focusing on the control lines on the floor and ceiling, you should secure the first rack from the corner. For these purposes, you can use the same brackets that are used to mount a metal frame. When attaching the rack, be sure to check its position with a level;
- then, according to the same scheme, a stand is installed near the opposite corner;
- To simplify the process of aligning the intermediate posts, threads should be stretched between the two outer posts, which will serve as beacons.

Using this principle, a frame is installed on all walls that you want to cover with plasterboard.
The wooden frame, as well as the ventilation gap slats, also need to be treated with protective impregnation.
It must be said that in some cases it is possible not to install a frame. If the inside of the house is sheathed, for example, with SIP panels, and the walls are even, the sheets can be glued to the panels with starting putty. The latter is applied to the back side of the sheet in lumps in increments of 15-20 cm.

Stage 4: framing the frame
The next step is covering the wooden walls with plasterboard. The only thing is, in the case of insulating walls, before starting this work, you need to perform the following steps:
- First of all, you need to lay mineral mats in the space of the frame. Wherein make sure that no gaps form at the joints of the mats, as well as between the mats and the floor or ceiling;
- in the process of laying mineral mats, you immediately need to lay the wiring;
- Now we need to attach the vapor barrier film to the frame. As in the previous case, it should be stretched and overlapped.

Now let's start covering the frame. On at this stage You will need to cut sheets of drywall. To do this, you need to measure the walls, and then apply markings to the drywall.
I must say that cutting sheets is very simple:
- first of all, you need to cut the cardboard along the intended line with a sharp knife;
- then the sheet must be broken along the cut;
- after this, the cardboard should be cut with a sharp knife from the back side of the sheet;
- It is advisable to treat the edges with a special plasterboard plane, which makes them even and immediately chamfers them. The average price of this device is 450 rubles.
If you need to cut a part from drywall complex shape, you can use a jigsaw.
As for the installation itself, this procedure contains practically no nuances. The sheets are fixed to the frame with self-tapping screws in increments of 25 cm. Each self-tapping screw must be recessed below the level of the drywall so that they do not interfere with further finishing.
Since the sheets are massive and quite heavy, it is more convenient to do the work together. If you don’t have an assistant, you can cut the panel sheets into smaller sizes.

Stage 5: finishing
The final stage is finishing the drywall. This work is carried out according to standard scheme, regardless of what type of walls are covered with plasterboard:
- Before you begin finishing, you need to prepare the surface of the drywall. To do this, you need to cut a 5 mm thick chamfer from the ends of the sheets at the joints;
- then a reinforcing self-adhesive tape made in the form of a mesh should be glued to the joints of the sheets;

- Now the surface of the walls must be primed. The primer is applied in two layers using paint roller. To make it convenient to dip the roller into the ground and squeeze it out, the liquid should be poured into a special tray;
- after priming the walls, you need to cover the joints of the sheets and the heads of the screws with starting putty, using a narrow spatula;

- Next, the starting putty must be applied to the entire surface of the walls, using a wide spatula or trowel. In addition, you will need a narrow spatula to apply the composition to the working tool.
In order for the putty to lay down in an even, even layer, the spatula must be placed against the wall under acute angle and make smooth movements.

While applying the first layer of putty, you should apply perforated corners to all outer corners to make the corners even and also protect them from chipping. For alignment internal corners, you can use an angle spatula;
- after the starting putty has hardened, the surface must be sanded using a mesh or coarse sandpaper to eliminate serious flaws on the putty surface;
- Now the walls need to be cleaned of dust - wipe them with a damp sponge or rag;
- then you need to apply two layers of primer again on the prepared surface;
- After hardening, the walls must be covered with finishing putty. It is applied in the same way as the starting one, but in a thinner layer. At the same time, you should work as carefully as possible in order to grind the surface less in the future;

- The final stage is finishing putty with fine sandpaper, during which all defects on the surface of the walls must be eliminated. To do the job efficiently, it is necessary to provide bright lighting.
During the grinding process of walls, a large number of dust. Therefore, before starting work, it is necessary to protect your respiratory organs with a respirator.
Here, perhaps, is all the information on how to properly sheathe walls with plasterboard in a wooden house. Now you can wallpaper them or, for example, paint them.
Conclusion
The process of covering wooden walls with plasterboard is not much different from installing plasterboard on other types of walls. The only thing that requires a special approach is the preparation of the foundation. In addition, the frame itself can be made of wood using the technology described above, which also contains many nuances.
You can get more information from the video in this article. If you have any questions regarding drywall installation, ask them in the comments and I will be happy to answer you.
September 28, 2016If you want to express gratitude, add a clarification or objection, or ask the author something - add a comment or say thank you!


The big advantage of wooden houses is that there is practically no need to carry out Finishing work. But “there is no accounting for taste,” and in some cases the owners of wooden cottages still prefer to see, for example, wallpaper on the walls, and for this it is necessary to carry out interior decoration. One of the popular options for creating a rough surface is covering walls with plasterboard - in a wooden house it is used almost most often.

It is easy to attach plasterboard sheathing to wooden walls
Drywall: pros and cons
Relative cheapness: it is cheaper than lining, for example;
Safety– when using special plasterboard impregnated with moisture or fire repellents, practical qualities wooden house will remain, and operational reliability will increase;
You can not only do wall decoration, but also do ceiling from plasterboard in a wooden house;
Easy and practical installation– a large area of sheets will allow you to cover impressive surfaces at once, in addition, drywall can bend and take on a variety of shapes. It is easy to make small elements for installation from it to cover hatches, boxes or pipes.
Combination of qualities: is a good covering material, and, in addition, is used for additional insulation of the house or its vapor barrier;
The disadvantages of using drywall are worth mentioning:
Fragility– both during transportation and in operation. Without special fasteners, attempts to hang something heavy on drywall are guaranteed to end in damage to the material;
Low temperature operating conditions– if it is colder than minus 10 °C, work with drywall is stopped;
Bulky– relative to other materials, drywall during installation can eat up a dozen or two centimeters of valuable space, so its use in small rooms is not recommended.

Drywall can “eat up” part of the room due to installation features
Features of finishing walls with plasterboard in a wooden house
Tree - natural material, with all the ensuing consequences during operation. Before covering walls with plasterboard in a wooden house, you must complete the following steps:
Also treat the walls fire-fighting (fire retardant) solution;
Must be installed under drywall vapor barrier film, regardless of whether you insulate the house or not;
Next problem wooden houses – shrinkage, so you should wait until the house goes through this stage (the exception is already dry profiled timber, but such houses are much more expensive), and only then start finishing;

Sliding fastener for drywall profile
When installing electrical wiring, it is worth, again, remember fire safety, so all wires should be put into a metal “corrugation” or installation open method– in cable channels.
For bathrooms and rooms with high humidity, it is worth choosing moisture-resistant plasterboard, and for chimneys and stoves when finishing them - fire-resistant.
On our website you can get acquainted with the most popular projects of wooden houses from construction companies, presented at the exhibition of houses “Low-Rise Country”.
How to install the frame
The frame in a wooden house under plasterboard can also be wooden or metal. The latter is considered more durable, in addition, a wooden frame can only be used in a house with complete shrinkage.
A floating frame for drywall in a wooden house is absolutely necessary, both in houses before the shrinkage stage and after, because vibrations linear dimensions rooms' ceiling and floor dimensions continue. There are two main types of frames, both are mounted according to a similar principle. If a wooden frame is used, like the walls, it must be treated with fireproofing agents.
The frame is installed after the wall processing stage, but before laying internal communications (which will be hidden under drywall).

One of the advantages of drywall is that electrical wiring and other communications will be hidden under it.
Metal carcass made from profiles (guides and ceiling), self-tapping screws. Also used in the work are a grinder, a cutter, a level and a screwdriver, a pencil, a stepladder, a tape measure and a cutter. If you plan to cut sheets, use a special knife for drywall.
Using the entire set, the work is performed in the following order:
Guides fastened to the floor, according to a level “knocked out” in advance;
Lines are marked For vertical racks, at a distance of about half a meter, so that one standard sheet there were at least two or three guides, and the joint of the sheets should fall on the guide;
The racks are cut according to the following formula - wall height minus approximately 10 cm (shrinkage);
On every profile cut grooves approximately 10 cm long and slightly wider than the screw on which it will be attached to the wall, each profile is usually numbered (since the wood is very different, and the grooves can fall on knots or cracks, which is unacceptable: in this case the groove is displaced);
Such attachment points on each - 3-4 pieces at least, small blocks are also screwed onto the wall under them so that the support area is larger;

On our website you can find contacts of construction companies that offer interior redevelopment services. You can communicate directly with representatives by visiting the “Low-Rise Country” exhibition of houses.
To installed profiles screwed using a cutter or self-tapping screws, other profiles (as if “topsy-turvy”) so that you can put drywall on top;
Install cross profiles to maintain rigidity (usually cut from a regular profile).
Wooden sheathing for drywall in a wooden house is assembled in the same way, but since wood is more soft material, in addition, on the surface of the bars you can provide a recess for the head of the screw to create a perfectly smooth surface. In addition, all bars also need to be treated with agents against moisture, fungus and fire.
The following bars are used for the frame:
Length from 2 to 4 m;
The timber is well dried, has no visible damage or bends;
Section 40 by 40 or 50 by 50, or 40 by 50 mm.
It is believed that a wooden frame will last less than a metal one, however, subject to the installation and processing technology, their service life is approximately the same (if, of course, the timber itself is of acceptable quality).

An example of finishing walls with plasterboard in a wooden house using a wooden frame with sliding fastening
We insulate the walls before installation
Before installing drywall, optional insulation is installed - mineral wool, polystyrene or other. To prevent the insulation from getting wet, a vapor barrier film. All materials are purchased with a 10% reserve.
To install, for example, polystyrene foam, the following stages of work are performed:
Additional wall alignment or the most protruding section along which installation will be carried out is determined;
Wall treated with primer;
Polystyrene foam is mounted in the reverse order of drywall - that is, first place the pieces on small surfaces and then use large sheets;
Window openings and other potential hazards of cracks are additionally puttied;
In a couple of days sheets are additionally attached disc-type nails, for which holes are drilled in the wall;
If at this stage there are gaps, they are covered with pieces of foam plastic or polyurethane foam(without toluene content!), the excess is cut off with a knife, the joints are once again covered with an adhesive solution.
A special stapler is used to attach the cotton wool. You should also avoid the appearance of cracks or clearings at this stage, since otherwise the meaning of thermal insulation will be lost.

Insulation of a wooden wall under plasterboard with cotton wool
The stage of treating walls against fungus and fire should be carried out before laying the insulation.
Video description
Several Yet useful tips For insulation, see the video:
Installation of drywall on walls
This step seems simpler than the previous one, but it still requires:
observe technological clearances– you can leave 1 cm at the bottom, then covering it with a plinth, you will need more at the top – about 5 cm;
Besides, between the sheets you need to leave 2 mm, then covering them with putty;
option allowed overlapping installation, when the edges of the sheets are manually processed, forming angles of 45 degrees, then placed “at the joint”; horizontal lines for laying drywall should not converge (sheets are laid in a “checkerboard” order);
seams It’s better to glue it on top with tape (“serpyanka”) and then putty.
Video description
In some cases, to save space, profiles are recessed into the walls. In this case, it is necessary to take into account the inevitable shrinkage of a wooden house. Clearly shown in the video:
The gaps between the ceiling and the sheets are closed decorative elements, but it is worth knowing that they also should not be attached to the walls. To maintain flexibility in the movement of structures, the screws are not tightened tightly; I leave a small gap in case the structure “walks.” But the head of the screw should be “recessed” so that later you can properly putty the surface or hang wallpaper.

In the bathroom and kitchen, plasterboard must be covered with waterproofing
The final finishing of a wooden house with plasterboard after installation also allows for laying tiles.
Conclusion
Drywall is easy to use, practical and good even for the conditions of a wooden house. The bulk of the work does not involve working with the drywall itself, but in preparation for its installation, processing the walls and laying the profile. The variety of material choices allows you to choose plasterboard for any room, including bathrooms, kitchens and areas with open fires.
Is it possible to cover a wooden house with plasterboard? There are different answers to this question: some believe that this material violates the environmental friendliness of the building, others, on the contrary, are its ardent supporters. Covering the walls with plasterboard in a wooden house allows you to level the surface, but such cladding will completely hide the natural beauty of the wood, so not everyone agrees to this finishing option.
Advantages and disadvantages of drywall

Gypsum plasterboard sheets (GKL) are thin cardboard plates, the space between which is filled with gypsum. It's light and quite practical material , which has gained wide popularity in construction: it is used in finishing walls and ceilings, it is used in finishing slopes, erecting partitions and other works. It is widespread due to its low cost and good operational characteristics
, and it is also quite suitable for a wooden house.
Covering a wooden house with plasterboard has several advantages: You can cover a wooden house with plasterboard yourself; it is not a very difficult job, and you can handle it even without experience. Working in a wooden house has several important features
, which must be taken into account during installation.
You can install gypsum boards without dirt and unnecessary noise, this is an additional plus for choosing this particular cladding option. It can be installed even in an unheated house during the cold season.
Technology of working with plasterboard sheets.
How to sheathe the inside of a wooden house with plasterboard? Work with gypsum plasterboard is carried out in several stages and begins with the preparation of the walls. The entire surface must be cleaned of the slightest traces of rot and mold, in addition, all cracks must be sealed as efficiently as possible. It is possible to sheathe the inside of a wooden house with plasterboard in most rooms, but such work will be quite expensive. The craftsman will need a screwdriver, a grinder, special knives
For gypsum boards, in addition, self-tapping screws are required as fastening elements.
- How to cover a wooden house with plasterboard? Main stages of installation: Installation of the frame. A vertical rack profile is attached to the floor and ceiling, which must be connected horizontal jumpers
- Plasterboard sheets are attached to the frame with self-tapping screws. The edge of each of them should be located in the middle of the profile, so two adjacent sheets are attached end-to-end to one rack. Self-tapping screws should be recessed into the material; if the caps are visible above the surface of the sheet, they will significantly complicate subsequent finishing.
- Serpyanka tape is used to seal drywall joints. Next, on top of the serpyanka, the joints between the gypsum boards are carefully sealed with putty, the surface should remain smooth, without cracks. After it has dried, you can immediately begin finishing: drywall can be covered with various finishing materials to give the interior the desired appearance.
If we are covering a wooden house with plasterboard, it is important to be as careful as possible. The racks must be positioned exactly vertically; their placement is checked with a plumb line.
A metal frame is more often chosen because it is not only stronger, but also more durable than a wooden one. If a wooden frame is still used for the walls, it must be pre-treated with an antiseptic to protect it from possible rotting.
Drywall is used in a variety of areas of construction; this material will allow you to create real interior masterpieces.
Subject to technological requirements when installed in a wooden house, it will be quite appropriate, as it will allow you to create an interesting and beautiful interior.
Covering walls with plasterboard in a wooden house is a great way to short time carry out interior finishing of residential and utility rooms at minimal cost. But, as with any use building material, repair and decoration in this way has positive and negative points, as well as its subtleties, without taking into account which the result may not be entirely expected.
 Drywall in a wooden house
 How is the cladding of wooden gypsum board walls done correctly and what do you need to know about such work?
Plasterboard sheets are a universal finishing material. It allows you to create perfectly smooth wall surfaces in almost any room, but there are some drawbacks to this finishing method.
| Positive aspects of finishing with plasterboard | Negative aspects of finishing with plasterboard |
| Versatility. The material is suitable for all types of premises (residential/non-residential). You can sheathe the walls in a wooden house or any other (brick, concrete). | Low moisture resistance. If flooded, the finish will quickly deteriorate. |
| Allows the alignment of almost any differences in walls and ceilings (even with a significant difference of 80-100 mm). | Relatively fragile material. |
| The ability to create walls from plasterboard of any shape; the material bends perfectly and takes the desired shape. | When creating structures, it reduces the volume of the room. |
| Plasterboard structures allow you to hide all engineering communications in them. | |
| Installing drywall can significantly reduce the cost of interior finishing. For minimal decoration you need a small amount of plaster. | |
| Safe for health, non-flammable.
| |
| Easily combined with other finishing materials. |

Despite the shortcomings, finishing with plasterboard in a wooden house is an excellent option to quickly interior renovation in a newly built house or to restore an old one. It is only important to take into account some specifics of the room and purchase necessary materials .
 Scheme for using gypsum boards in the house
 How to level walls with plasterboard in a wooden house and what will be needed for this?
Stages of covering a wooden house with plasterboard
Before purchasing the required amount of materials, you need to determine what type of frame the interior will have: wood or metal.
Metal or wood
The walls of a wooden house are quite suitable for finishing with gypsum plasterboard, made from the same material. But, there are some nuances that need to be taken into account before attaching sheets to such a frame:

It is desirable that the slats or timber for the frame be free of knots and other defects. Special attention You need to pay attention to choosing even planks, otherwise they will make it difficult to install the sheathing, and the walls themselves in the home will be crooked.
 Metal carcass
 However, if there are no problems with the wood, then this is suitable for assembling a frame for plasterboard finishing.
With metal profiles there is no such problem, you just need to stock up required quantity. You should definitely pay attention to the quality of the protective zinc coating and the wall thickness of the products (standard 0.6 mm).
What is needed for finishing
The basic list of materials and tools is the same as when working with drywall in conventional buildings. will be needed.
- Drill and screwdriver with a set of drills and bits.
- Grinder and metal scissors (for cutting profiles). If a wooden frame is being built, then a hacksaw is quite sufficient.
- A knife for drywall or a regular stationery knife, but with a supply of blades.
- Plastering accessories: spatulas (300 mm and 50 mm wide), nozzle, mixer;
 Kit necessary tools and materials
 Materials you will need:
- Putty - starting and finishing.
- Serpyanka for joints.
- Primer.
- Drywall.
An important condition for finishing wooden walls with plasterboard is their initial treatment with antiseptics against rot and fungus!
 Types of GK sheets
 Drywall is purchased taking into account the room in which it will be installed.
The use of moisture-resistant sheets is highly recommended in bathrooms, bathrooms and kitchens. Furnaces and ventilation pipes trim the material. In other rooms, as cladding, a standard wall sheet is quite suitable.
Preparatory stage
At the preparatory stage, before covering the walls, you need to carefully inspect them for changes, and if an old building is being restored, you need to carefully check the wood.
It is worth knowing that in a new house, after construction is completed, you cannot immediately begin installing drywall on wooden walls. It takes time for the wood to shrink and dry out.
If there are places with rot or fungus, they are thoroughly cleaned and treated with antiseptics. Severely damaged areas need to be restored.
In a new wooden house, before covering the premises with plasterboard, it is necessary to treat all surfaces with an antiseptic, as well as with a special impregnation that preserves the wood.
 Antiseptic treatment
 If the surfaces are perfectly flat (which is extremely rare), you can fasten the drywall to the wall. In other cases, determine the difference in height differences and select optimal distance, on which the frame will be mounted.
After this, you can begin assembling the base and finishing the walls with plasterboard in a wooden house.
Installation of metal and wooden frames As mentioned above, when smooth walls or with minor differences (a few millimeters) you can attach sheets without a profile directly to wooden walls. However, this happens extremely rarely, and before attaching drywall to wooden wall
, you need to build an appropriate frame. How this is done is shown in the video:
Wooden frame
The sheathing is assembled under from slats or timber of the appropriate section. Initially, elements are installed on the floor and ceiling that will act as guides. Fixation can be achieved with ordinary self-tapping screws.
 The same slats are mounted on the walls on the left and right. Then they begin to install the main racks from the same timber. If the distance from the walls of a wooden house is significant, direct hangers are attached to them, with which the sheathing is connected to the load-bearing surface.
 With guides, the slats are attached with mounting angles or straight hangers bent at right angles. Wood screws are used as fasteners. To make the structure rigid and reliable, you need to install transverse slats made of timber on the wooden frame, which are installed on the base using mounting angles. The frame on the ceiling is assembled in a similar way.
When ready, insulation is placed in it (if necessary) and wiring is laid.
Metal carcass
Using the frame, it is assembled according to the same principle as in conventional brick buildings, finishing them with gypsum plasterboard.
 Frame made of metal profiles
 Finishing stages:
- Initially, guides from the UD profile are installed according to the markings.
- Next, you need to install direct hangers to the walls.
- The frame posts are inserted into the guides and connected, to which the hangers are bent and secured with “bugs”. The number of profiles is calculated based on 3 pieces per sheet of drywall. Moreover, adjacent sheets of sheathing are joined to the outer slats.
- Also required crossbars, made from rack profile.
When the frame is ready, insulation is placed in it and the wiring is pulled through.
 Wiring in a profile frame
 On the ceiling, the structure for plasterboard is assembled using PNP and PP profiles.
Base sheathing
Sheets of material are secured using self-tapping screws with a length of at least 20 mm. Fastening drywall is done using a screwdriver or drill with variable speed control.
The sheet is installed on the frame and one edge is mounted, and then the opposite. When screwing in a self-tapping screw, you need to control the pressing force so that the head does not damage the top layer of the material, while it is slightly recessed into the surface (1–1.5 mm).
The use of gypsum boards in an old house in this video.
If you need to cut a sheet, first make markings on its surface on the front and back sides. Then they make an incision. By cutting through the cardboard, you can easily break off the desired piece. Irregularities in the cut can be easily smoothed out with the same knife or a regular plane.
Attach drywall to wooden blocks necessary, just like for metal slats, using self-tapping screws and a screwdriver.
 Attaching drywall to the profile
 Finishing walls are one of the final stages of construction. Ideally aligned walls provide an advantage for further improvement of the living space. Timber or log wooden buildings This is no exception. But when interior decoration a wooden house has its own rules, compliance with them facilitates the installation of gypsum boards.
One of the design options is partial finishing
Note! When finishing plasterboard sheets Many factors take into account the design of a wooden house. This is the deviation from the vertical of the wall during shrinkage of the log house, the gap during vertical alignment between the wall and the drywall, the degree of shrinkage of the house in different time years when installing it on swampy or mobile soils.
Houses made of timber are less energy-intensive in this regard, since the walls have a relatively flat surface due to the joining of the timber structure, and drywall is easily installed on them. Log houses, on the contrary, require more time to prepare the supporting frame. Conditionally according to complexity internal lining wooden houses are divided into three types:
- wooden houses made of timber;
- wooden houses made of rounded logs;
- houses made of skinned wood.
Aligning walls with wooden guides
Let's consider the most complex type finishing, this is a house made of hide wood. For other types, the technology does not change, but requires less labor in preparing the wall for installation and the frame structure for fastening gypsum boards.
When cutting down a house technologically correct location logs - by diameter. Thick logs are located at the bottom, and thin logs finish the frame. It is necessary to evaluate the protrusions of the logs into the room and draw a conclusion about the correct tactics for leveling the walls under the frame. This could be trimming or building up the wall of the house.
Combined leveling is also practiced, where the thickest logs are trimmed, and the thinnest ones are built up to form a vertical base for attaching the profile. How to make a frame correctly, they are guided on the spot.
Alignment various methods
You can make the sheathing from a wooden block or from a metal profile. The generally accepted pitch of vertical guides is no more than half the width of the plasterboard sheet. That is, when using the sheet standard width 1200 mm is 60 centimeters.
When installing vertical guides, thick logs are pressed together or a groove is selected in them to fit the profile. The sampling depth depends on whether insulation is used, if so, what type and thickness. And thin logs are built up with wooden spacers made from bars. When performing installation, it is convenient to adjust the thickness of the pads with a plane, removing a small layer and controlling the vertical deviation with a level.
Frame on timber wall
Types of fastening plasterboard sheets
The installation of drywall sheets in a home depends on many factors. First of all, this is the mobility of a wooden house and its shrinkage. Even completely dried log material absorbs moisture and increases in size; this is true for the entire territory of Russia.
If the gypsum board is rigidly attached to the sheathing, this is fraught with ruptures or breaks; a correctly installed frame allows you to avoid this. To avoid deformation of drywall, sliding installation is used. The essence of such fastening is that it has a degree of freedom and compensates for vertical displacements of the frame when the frame moves.
Free mount
The sheet of drywall itself is attached to the sheathing in the standard way using self-tapping screws. For attachment to metal profile use metal screws to wooden sheathing An acceptable solution is to use wood screws with a wider spiral pitch. The distance between the screws is 15-20 centimeters.
Finish (fine) finish
Marking and cutting is carried out in accordance with general technology and installation of drywall will not cause difficulties; a chamfer is selected from the ends of the drywall at an angle of 45 degrees for filling with a solution of plaster or putty.
After sealing the seams
The final finishing of the wall includes filling the joint between the plasterboard sheets with a plaster solution and applying sickle tape. For better fastening on the frame and to prevent cracking of the joints, it is recommended to slightly deepen the serpyanka into the seam. The recesses from the screws are filled with plaster. Smooth finishing plaster will not change the color of the walls if they are intended for painting.