How to fix drywall to wooden blocks. Wooden frame for drywall: pros and cons, installation Wooden guides for drywall
Fastening drywall to timber is one of two ways to finish a room on a frame, although less common. is associated with many nuances that are absent when using. Still, the use of wood is possible and does not even lose relevance, especially when. Is it possible to mount drywall sheets on wooden beam, and what should be known and taken into account when working with such material?
The process of attaching drywall to a wooden beam
It is possible to assemble a frame from a bar for drywall in any residential and non-residential premises.
- living rooms with wooden walls;
- utility rooms of a dwelling made of wood;
- at dachas;
- outbuildings (sheds, garages, etc.);
- V residential buildings and apartments;
- on balconies and apartment buildings.
 Ready-made wooden frame for the installation of drywall in the loggia
 However, when used in unheated utility rooms, good waterproofing, and the timber itself must be dried and treated with at least a paint and varnish coating.
It is best to use modern protective impregnations for wood, or drying oil, but the latter option is practically not produced today.
Why use a frame made of timber, if a metal profile can completely replace it, and is it possible to do this?
Advantages and disadvantages of wooden frames
What are the advantages of a wooden frame over the already classic metal profile counterparts:

But, the ideal material does not exist, the beam also has its drawbacks. This is a shorter service life in comparison with metal counterparts, flammability, the possibility of damage by insects and rodents.
 Mounted wooden frame for drywall sheets
However, the main disadvantages wooden crates can be called low resistance to moisture and the inability to assemble a non-standard curvilinear frame.
However, GKL can be mounted on a bar, but following the technology and carefully choosing the material.The choice of timber for the crate
If it is decided to collect, then the choice of material must be approached very carefully.
List following:
After purchasing the material, all rails must be inspected again and treated with protective impregnations or at least painted. This will protect the wood from moisture penetration.
It is important to remember that you need to store the timber and slats in a horizontal position, otherwise, after time has passed, vertical storage will result in curved racks.What do you need to work
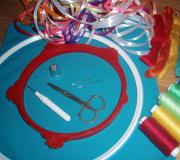
Scroll necessary tools for the assembly of a wooden frame is different from the equipment for working with metal profiles.
Required tools:
Need to buy and Additional materials: , .
Mounting angles are selected according to the size of the beam, if it has sides of 50 × 50, then the hardware is preferably the same. This will provide secure fastening. Various types of mounting brackets
How to assemble a frame and fix drywall
Assembly work begins with the marking and fastening of the timber, which will act as guide profiles. collected according to the following algorithm:
- If the room has a wooden floor, then on the ceiling you can simply assemble the crate by attaching the slats across bearing beams;

- Lines are drawn on the floor and ceiling where the guides will be laid, the distance from the wall is chosen to be optimal for leveling the surface and laying thermal insulation when (if it is planned);
- A guide beam is laid along the marks and holes for fasteners are drilled through it. At this stage, you will have to change the drills, having initially drilled holes in the wood, you will need to change them for concrete floors and floors;
 Laying rails on the floor
 - on the right and left along the walls they are installed on a rack with an emphasis on the guides, they are also attached to the walls with dowels-nails. Additionally strengthened with mounting corners at the top and bottom;

- At a considerable distance from bearing wall along the lines where the racks will be installed, direct suspensions are attached. Fittings are also fixed with dowels, nails, or fasteners suitable for the material of the walls;
 Scheme of fastening a wooden frame to a log house
 - Racks are mounted on the rails, they are connected to the corners of the bearing beams and connected to the suspensions. It is better to fasten fittings to wooden racks with press washers, their wide hats will securely fix all the elements. The number of racks is calculated by 3-4 pieces per 1 sheet of drywall;
 The scheme of fastening the racks to the timber
 - In a checkerboard pattern, crossbars must be installed in the frame between the uprights. Fastenings are provided with corners. The location is changed alternately at the top and bottom, alternating after 1-2 sheets;

- When laying the insulation in a wooden frame, it must be covered with a steam barrier. The wiring is enclosed in a corrugated plastic pipe and mounted with brackets on racks.
 Scheme for installing insulation inside a wooden frame

A similar technology is also used to assemble a frame from a beam to the ceiling. At the same time, a continuous crate is made without placing the crossbar in a checkerboard pattern. The video tells about the installation of a wooden frame under drywall.
- If the room has a wooden floor, then on the ceiling you can simply assemble the crate by attaching the slats across bearing beams;
Despite the fact that such construction material, like drywall, they began to be used everywhere quite recently, it was patented back in the 19th century in America. Its first sheets were most similar to the Napoleon cake - 10 sheets of paper glued with a thin layer of plaster. It was invented by the owner of a paper mill.
Such "paper" has gained wide popularity in the present day.
A little about drywall
Modern drywall is a complex composite material consisting of cardboard, gypsum and various additives that give it additional qualities, such as:
- Increased sound insulation.
- Fire safety.
Drywall was once called "dry plaster", but the name did not stick.
It is used for "dry" finishing of the room. That is, when using drywall, dirt is several times less than with traditional repair work Oh.
Drywall is available in 3 versions:
- Standard, made without additional additives.
Note!
Panels standard drywall, depending on the thickness, are divided into ceiling and wall.
- moisture resistant;
- Fire resistant.
IN last years Knauf, one of the main manufacturers of drywall, has released Superpol sheets, which are designed to level floor coverings. They have increased strength.
Important!
Drywall is ideal for finishing residential premises, as it is environmentally friendly and does not emit toxic substances when heated.
It has an acidity close to the acidity of human skin and naturally regulates the microclimate in the room.
Modern repair technology cannot do without it. It is thanks to drywall that it is possible to build multilevel structures, creating modern design premises.
How to install drywall
Drywall installation is carried out using frame and frameless methods.
- frameless- sheets of drywall using special glue are attached directly to the walls.

- frame- a frame for drywall is mounted from galvanized metal profiles certain form or wooden slats, and already sheets are fixed on it with screws.
Each method of fixing drywall has its own strengths and weaknesses.
- Frameless allows you to save room space, but its installation requires even wall coverings and installation work is delayed for a long time due to the fact that before further work you have to wait until the glue hardens.
- Frame fastening makes it easy to install thermal insulation and communications, but you have to install sound insulation, and the size of the room is concealed, albeit slightly.

Important!
At wireframe method installation of wall scraping for electrical wiring can be avoided. That is, there will be practically no dust during work.
Drywall not only level the walls. When redevelopment of the premises, partitions from GKL are the best option. They are lightweight, easy to use and can be lined with anything.

Related articles:
Wooden base of plasterboard partitions
Those who, after installing partitions, want to live in comfort, with good sound insulation, and those for whom one of the main parameters is environmental Safety premises - they decide to make a frame for drywall from wood.

In order to extend the life of the structure, the choice wooden parts the frame should be approached with all seriousness.
- The cross-sectional dimensions of the cut of the selected parts for vertical racks should not be less than 40x70 mm in cross section, and 30x50 mm for horizontal ones.
- All wooden slats are necessarily impregnated with an antiseptic - in order to protect against insects, and a mixture that gives the structure fire safety.
Important!
This procedure is a necessity that will help you save money on repairs in the future.
- The frame is made from trees. conifers. The moisture content of wooden parts should not exceed 15%.
For your information!
Design requirements - the first group of fire resistance.
Tools for the job
In order to carry out the work on the manufacture of the frame, you must have the following tools at hand:
- Drill.
- Saw or hacksaw.

- Screwdriver.
- Screwdriver.
- Level.
- Mounting dowels.
- Wood screws.
- Metal corners.
Making a partition in an apartment
To make a wooden frame for drywall, you must first prepare an accurate drawing, which will indicate the locations of all doorways.
- When calculating the rigidity of the structure, it is required to take into account the number of horizontal elements.
- Counted up required amount drywall sheets.
- The partition body is assembled. Installation begins with the strapping support bars. Fastening to the floor and ceiling is carried out with self-tapping screws and dowels.

- Vertical struts are installed.
- Between uprights horizontal support rails are fixed.
The cross section of the beam of these rails is allowed to be smaller in size than that of the racks, but, nevertheless, not less than 30x50 mm.
Important!
Sheets of drywall during sewing must be shifted relative to each other on its opposite walls.
- A heater is installed on the partition mounted on one side, and possibly insulated electrical wiring.
- Sheathing begins on the side from which the insulation is fixed.
Installation of insulation is necessary to reduce the sound permeability of the structure.
As a heater, mineral fiber mats, polystyrene foam of various densities or polystyrene foam are used. Each of them has its own advantages and disadvantages, and the decision which insulation to use depends on the purpose of the room.
Note!
Mineral wool insulation materials, such as basalt or dolomite fiber, provide additional moisture protection to the structure and reduce the fire hazard of the room.

The length of metal dowels for drywall, with which the insulation is fixed, should be at least 25-30 mm. Otherwise, the design will be unreliable and short-lived.
Wooden frame for wall cladding
It is advisable to install drywall on a wooden frame when cladding walls if their height is more than three meters or the walls have significant roughness and poor-quality plaster coating.
- The wall is marked under the frame.
- are revealed dangerous places with loose plaster and irregularities.
- The crate is installed in accordance with the measurements taken, starting with a horizontal beam, which is fixed to the floor.

- Vertical slats are mounted to the horizontal beam with an indent of 10 mm from the edge of the crate. The step between them is taken 600 mm.
- After the verticality of the structure is checked by a plumb line (level), a second horizontal beam is fixed to the ceiling, to which vertical slats are attached.
- Structural alignment on uneven floor under the horizontal beam is carried out by lining chipboard scraps or wood left over from the slats.
Adviсe:
- In order not to make cuts in drywall when making lathing near door or window openings vertical slats move.
- During subsequent sheeting of joints above window or doorways should not be.
Installing drywall on a wooden frame with your own hands is not at all difficult, even in the absence of a partner. Even easier, if the floors are even, the process of such installation is not difficult.

To date, drywall is rightfully recognized as one of the most popular and sought-after materials. This is due to its affordability and undeniable ease of use. He is often used to level the floors in the house. Today we will talk about how you can attach drywall to walls, and also get acquainted with all the pros and cons of this common finishing material.

What it is?
Before embarking on the study of such a finishing material as drywall, it is worth understanding what it is.

Drywall is a finishing material that consists of two layers of cardboard with hard gypsum and special fillers inside. It is used in the most different purposes. For various works Sheets are available in various thicknesses. Plasterboard panels can be laid not only on walls, but also on the floor or ceiling. The main thing is to choose materials of a suitable category.

Peculiarities
Today in the stores of building and finishing materials you can find absolutely any product for any repair work. To level the walls, customers are offered high-quality putties, plasters and other practical compounds. However, many people choose “dry” material for such work - drywall.

To date, the problem of uneven walls is familiar to many. It is faced by both owners of private houses and city apartments. However, it is quite possible to make the floors even on your own, without involving a team of finishers.

Uneven floors are bad not only because they look unpresentable, but also because many Decoration Materials. These can include tile, most types of paints and wallpapers. On a base with drops and potholes, such coatings do not hold securely, and they look very sloppy. Many of the finishing materials even emphasize the bumps on the walls.

In such cases, you can not do without a perfectly even and smooth drywall. After its installation, the walls acquire a more aesthetic and neat appearance. In addition, the sheets of this popular material are as simple as possible to process and can be covered with almost any canvas and paint.

Plasterboard sheets are attached to the wall using a special wooden or metal frame. There is also a frameless installation method, which experts consider more difficult.


When choosing one or another installation method, it is worth considering that you need to work with drywall carefully. This is due to its peculiarity, which consists in fragility and the possibility of crumbling. If you accidentally damage the drywall, then it is unlikely that it will be possible to restore its original appearance. That is why, for the manufacture, for example, arched structures ordinary drywall will not work, as it will simply break if slightly bent.

Another distinctive quality drywall is its multitasking. It is used not only for leveling different grounds, but also for the manufacture of interesting multi-level ceilings, shelving with shelves, niches and cabinets. This once again confirms the unpretentiousness this material and ease of working with it.


Advantages and disadvantages
Like any other finishing material, drywall has advantages and disadvantages that you should be aware of if you decide to install it on the walls in your home.
Let's start with the list positive qualities drywall sheets:
- They are distinguished by a flat and smooth surface, because of which they are chosen for leveling various bases.
- The advantage of drywall is its thermal conductivity. In a room where the walls are sheathed with this material, it will always be warm and cozy.
- Drywall is recognized as environmentally friendly pure material. It contains no hazardous harmful substances, so it can be safely used even in the decoration of children's rooms.
- GKL sheets are fireproof and do not support combustion.


- Another significant advantage of drywall is its vapor permeability. Due to this quality, such material is not susceptible to the formation of mold and fungus.
- Often, consumers buy drywall, as it has affordable price and is used for a variety of purposes.
- Plasterboard walls can be supplemented with various heaters (more often foam and mineral wool are preferred).
- Working with drywall is quite simple. You do not need to buy expensive tools for this.


- Using this finishing material, you can realize any bold design ideas. That is why drywall is used by many designers in their designs.
- Drywall does not require expensive and regular maintenance.
- GLA does not emit an unpleasant chemical odor.
- It is seamlessly processed. To do this, you can use almost any material, from conventional paper wallpaper to tiles.


- Plasterboard sheets can be installed in any room. It can be not only a dry living room or bedroom, but also a bathroom or kitchen. Of course, for the latter it is necessary to select moisture-resistant canvases.
- Thanks to gypsum sheets, you can hide unattractive communications and wires in the room.
- With the frame method of fixing drywall, draft walls do not need to be prepared for a long time and scrupulously with the help of special compounds. It is enough to treat them with antiseptic agents to avoid the reproduction of harmful microorganisms.
- Many consumers purchase drywall for repair because it can be used immediately after purchase, letting them lie down for 2-3 days without undergoing additional preparation.
- To date, the choice of drywall sheets allows you to choose the best option for any conditions.


As you can see, the list of positive qualities of drywall is quite impressive.
However, it also has its weaknesses:
- Ordinary drywall is not recommended for installation in rooms with high level humidity. For such conditions, it is worth choosing exclusively moisture-resistant types of material. However, according to experts, even such drywall in wet conditions begins to lose its properties and deteriorate.
- Drywall sheets may begin to crumble, especially under heavy loads. That is why on plaster walls it is not allowed to hang heavy objects such as large clocks, hanging sinks in the bathroom, lighting fixtures, large paintings and other objects with considerable weight. Otherwise, these things will not stay in place for long, and then just fall off and damage the drywall.


- Work with drywall must be very careful not to damage it. Do not bend this material unless it is arched.
- Drywall on the frame will "eat up" some space in the room, so this method of installing the material is not suitable for all areas.


How significant are the listed disadvantages - each consumer must decide for himself. But it is worth noting that many problems can be avoided if you choose the right material and strictly follow the instructions when attaching it to the walls.
Materials and tools
If you decide to independently install drywall on partitions in your home, then you should stock up on tools and materials.

From the toolkit you will need:
- special knife for cutting drywall sheets;
- special glue (for frameless mounting method);
- building level, plumb line, special marking cord, tape measure, long ruler (you can take a rule instead), pencil / marker - you will need these tools for marking walls and for competent control of the verticality of surfaces;
- regular and rubber hammers;

- spatula (you can take a trowel instead);
- a separate container for mixing the adhesive composition;
- screwdriver;
- perforator;

- self-tapping screws;
- dowel;
- screws;
- electric drill with mixer attachment;

- roller with a long handle;
- soft brush;
- planer (needed for chamfering);
- putty (for applying the finishing layer after all work has been completed).

From the materials you will need:
- GKL sheets (regular, moisture-resistant or fire-resistant - it all depends on the room in which the sheets are planned to be installed);
- galvanized profile or wooden beam (to form a frame with an appropriate installation method).

Application area
Drywall is a versatile material. It is used in the most different conditions and seamlessly fixed on various grounds.

It is simply impossible to do without this material if we are talking about a wooden house or a building from a log house. In such conditions, the walls are almost always uneven and require proper alignment. However, it should be borne in mind that wooden houses always shrink and gypsum boards can only be installed in them after completion. this process. Otherwise, the sheets may be damaged under such conditions or deformed.

For installing drywall on walls in wooden houses necessary:
- provide space for the installation of insulation (unless, of course, you plan to additionally insulate the room);
- have free place for laying communication systems.


Aligning the walls in wooden houses is not an easy task. In this case the best option will become frame mounting. However, some owners first attach sheets of plywood or chipboard to the boards and bars, and then drywall is glued to them.

Drywall can also be attached to walls with concrete base. For such surfaces, it is not at all necessary to make a complex frame. Drywall can be glued to such bases using special glue. Such adhesives are very common in stores today. For example, qualitative composition Perlfix offers well-known firm Knauf.

Drywall is often used to level brick walls. Here you can also refer to the usual gluing of the material without making the frame. In such cases, immediately before installation, it is necessary to find out with the help of a level how curved the floors are, after which any dirt, dust and grease stains are removed from the brick. Besides, Brick wall must be absolutely dry, otherwise it will not be possible to achieve sufficient adhesion with drywall even when using high-quality glue.

In case you want to level the walls of foam blocks, then you should contact wireframe method installation. This is due to the softness of such grounds. However, some users turn to frameless installation, but before that, the foam block must be prepared - finished with soil or plaster.

Aerated concrete walls also often require alignment. In such cases, both frame and frameless mounting methods can be used. In the second case, it is necessary to treat aerated concrete bases with a primer deep penetration. Glue in such cases must be selected especially carefully, as in cases with foam block ceilings. Experts recommend using compositions from Knauf and Volma Montazh.

Drywall can make the walls smooth even in adobe houses. Such buildings are full-fledged composites built from clay, earth, straw and sand. Of course, with such building materials, there is no need to talk about perfectly even partitions. For this reason, they simply need leveling sheets such as drywall.

Mounting methods
We have already mentioned above that drywall sheets are attached to the walls by making a frame or in a frameless way. The choice of one or another installation option largely depends on the structure and conditions of the room and, of course, the preferences of the owners.

Go to profile
This option for installing drywall is the most popular. It is quite possible to make it yourself. With this method, gypsum sheets are installed on a pre-prepared frame, consisting of metal profiles fixed along the wall.

It is worth considering some of the nuances of this common installation method:
- A heater can be placed between the wall and the profile, if necessary. Most often, consumers choose for this mineral wool, foam or polystyrene. However, we must not forget that the draft walls must be treated with an antiseptic composition before laying the insulating layer.
- In the cavity behind the frame, various engineering communications can be hidden. It can be water pipes, radiators or electrical wiring.
- Do not forget that in rooms with a high level of humidity it is permissible to use only moisture resistant drywall. Ordinary sheets in such conditions will not last long.


Mounting drywall sheets on the frame has several advantages:
- with such an installation in the room, additional noise and heat insulation is provided;
- frame installation allows you to align even ugly curved walls;
- before installing the frame and fixing the drywall, the draft partitions do not require preparation (it is enough to walk on them with antiseptics).


Let's take a closer look step by step instructions for the installation of drywall on the frame:
- First you need to measure the walls and make markings on them for the installation of metal profiles and suspensions.
- Marking for guides must begin with the top profile. At the same time, the necessary indent is made from the ceiling, then a line is drawn and transferred to the floor with the help of a plumb line.
- Vertical profiles must be placed at a distance of at least 60 cm from each other. In this case, it is necessary to ensure that each drywall sheet rests on three racks.
- As for the installation of suspensions, here it is also necessary to maintain a certain distance - 60-80 cm will be quite enough.

- After that, you can proceed directly to the installation of the frame. First, along the perimeter, you need to fix the guide profiles. To fasten them to the ceiling and floor, you must use a puncher, dowels and screws.
- At the points marked during the measurements, you need to attach the suspensions.
- Carriers should be inserted into the guide profiles and fixed with hangers.
- Fasten all the details as reliably and tightly as possible, since the durability and strength of the entire structure as a whole will depend on the quality of the frame.

- Before installing drywall sheets, it is necessary to strengthen the horizontal guides.
- When the frame is ready, you should proceed to install drywall sheets on it. They need to be attached to vertical position. To do this, you can use special self-tapping screws for metal 25 mm. But they need to be screwed in such a way that the caps are slightly "drowned" in the drywall.
- After installing all the sheets, the joints between them must be treated with putty using reinforcing tape.
- When the putty is completely dry, the drywall attached to the frame should be completely puttied. After that, the surface of the wall finish will be perfectly even and smooth (without any flaws).

According to experts, this installation technology is simpler. However, it should be borne in mind that such a design will take up part of the area in the room, so in a very small room it is better to use the frameless method, unless, of course, this is allowed to be done.
Profileless structures
The frameless fastening of drywall is also called adhesive, since with it the sheets are fixed on the ceilings with the help of a special adhesive.
When choosing this installation option, you must comply with the following conditions:
- on draft floors there should be no fungus or mold;
- crumbling areas should also not be;

- walls should not be subject to freezing;
- they must be protected from moisture and excessive moisture;
- from the surface of the walls it is necessary to remove old finishing materials, as well as dust, dirt and any other contaminants.

Frameless drywall fasteners can only be accessed if the curvature of the walls does not exceed 4 cm. Otherwise, it is better to build a profile frame.
Glue plasterboard on the base can be in different ways.
The best option must be selected based on the technical condition of the floors:
- The first mounting method is designed for more even surfaces. With it, the fixing of gypsum boards occurs directly on the wall using mounting gypsum glue. It is transferred to the base along the perimeter (longitudinal lines).
- If the floors have irregularities on their surface, then drywall is recommended to be glued to them using Perlfix glue. It must be applied in portions along the entire length of the back side of the gypsum sheet (keep a distance of 35 cm between the heaps of glue), as well as along its perimeter.


Now it is worth considering in more detail the instructions for the profileless installation of drywall sheets:
- First you need to measure the floors and plan the placement of drywall slabs.
- Then you need to correctly prepare the surface of the base. If the wall has a porous structure, then it should be covered with a primer mixture.
- Now you need to cut the GKL sheets, as you will need not only whole panels, but also pre-prepared inserts.
- To make a straight cut, it is better to use a sharp construction knife. If you are going to make curved cuts, then you should use an electric jigsaw.

- Prepare the glue. To do this, you can use modern gypsum mortars, which harden for a long time.
- If the glue dries too quickly and you want to extend its drying time, then it is worth adding wallpaper adhesive or good old PVA to the water for dilution.
- Now you can start gluing drywall to the walls. Pay attention to the thickness of the adhesive layer. It directly depends on the area of irregularities on the base. If the overlaps are sufficiently even, then the mixture can be applied to it immediately.
- To eliminate significant curvature, it is worth putting beacons. They can be built from plasterboard strips with a width of 10 cm. These elements must be glued around the entire perimeter in a vertical position, maintaining a step of 40-50 cm.

- The right and left beacons (extreme) should be mounted using a plumb line.
- After that, focusing on the mounting line (or thread) stretched between the extreme beacons, you need to install the remaining strips.
- Align the beacons with the rule.
- Gypsum boards must be pressed using the rule set in the various provisions. Tap the panels with a rubber mallet and correct their position.
- When the glue dries, the seams between the plasterboard panels must be finished with putty.

Drywall is a lifeline in matters of wall alignment. Installation of gypsum sheets cannot be called unbearably difficult and energy-intensive.
For a more aesthetic and robust design, Consider the following advice and recommendations from professionals:
- It is permissible to install gypsum boards in the room only after laying floor coverings. Also, by the time the floors are leveled in the room, all issues related to laying communications and heating systems should be resolved.
- When gluing drywall (with frameless way), try to avoid cruciform joints. It is better to lay out sheets with an offset.
- Pay attention to the width of the gaps between the gypsum sheets for profileless installation. This indicator should be from 5 to 7 mm, the gap from the floor - 7-10 mm, and from the ceiling - 3-5 mm.
- To keep the drywall securely on the floors, you need to pay attention to their technical condition. There should be no crumbling and falling apart sections in the walls.

- With the frame installation method, it is recommended to create a chamfer on the cut material (it is needed for better sealing of all finishing seams). For this, it is recommended to use a special edge planer.
- It is recommended to prepare all tools and materials before starting installation work. This will allow you to work without distractions and without wasting time on unnecessary activities.
- Adhesive compositions must be diluted, based on the instructions. It must be printed on the packaging.
- Do not over-tighten fasteners on drywall as this can warp the brittle material.
- To work with drywall you will need a level. Of course, you can choose the tool that is more convenient for you to work with, but experts advise turning to laser devices.

- Pay attention to the temperature regime during installation work. The recommended temperature is +10 degrees. If the room is noticeably cooler, then you should take care of additional heating systems in advance.
- Plasterboard sheets are recommended to be installed on the walls not immediately after purchase, but after they lie down in your house for 2-3 days in dry and warm conditions.
A properly made wooden frame for drywall is in no way inferior in its reliability load-bearing structure made of metal profiles.
Plasterboard sheets (GKL) are quite difficult material composite type. It is made from plaster, cardboard and various additives. The latter give drywall special qualities. Chief among them is the high Fire safety and excellent soundproofing. In addition, when using GKL, a minimum of dirt and waste is generated. This distinguishes it favorably from other construction activities.
Plasterboard sheets are made of three types:
- standard;
- fire resistant;
- moisture resistant.
Types of drywall sheets
GKL is used for the construction of partitions in residential and office space, wall and ceiling surfaces. Some modern manufacturers (for example, KNAUF) have launched in recent years the production of special drywall, ideal for flooring. Due to the fact that GKL does not emit harmful compounds during operation (the material is considered environmentally friendly) and is characterized by an acidity index approximately identical to the acidity of human skin, it is often used for repair work in residential buildings.
Among other things, drywall is able to create an optimal microclimate in living rooms. It can naturally regulate the humidity in them. Nowadays, drywall sheets are almost indispensable for performing various kinds repair work. They make and simple designs, and chic multi-level buildings. Due to this, you can create the most modern bright and original design in your home.
There are the following technologies for mounting drywall sheets: frameless and frame. In the first case, sheet products are attached to the wall with an adhesive. The second technology involves the preliminary arrangement of a special frame. Subsequently, drywall is attached to it.
The frameless method makes it possible to save room space. Its significant drawback is that the installation of GKL is allowed exclusively on flat wall. But with the help of a frame technique, drywall can be fixed on surfaces that have bulges and depressions. But at the same time, the total volume of the room becomes smaller.

Frameless installation method GKL
GKL frame mounting technology is a minimum building dust. You do not need to make grooves in the wall for wiring and other household communications, all systems are placed in the free space between the structure skeleton and the wall surface.
The frame for the subsequent installation of drywall sheets on the wall is easily built with your own hands. home craftsman with minimal experience in carrying out repair activities, in a matter of hours, he will erect a skeleton for gypsum boards. And then it will also quickly fasten drywall to a self-made structure.
In most cases, the frame is made of metal profile products. But there is also a simpler method. It makes it possible to build skeletons for gypsum boards from light and easy-to-install wooden products (battens, beams). We will talk about this method of creating a frame structure for drywall with our own hands.
It is recommended to build a frame for mounting the GKL on the wall from coniferous wood. In this case, the wood must have a moisture content in the range of 12-18%, and also undergo a special fire-retardant treatment at the manufacturer of the beams or laths. It is also recommended to additionally apply antiseptic agents to wooden products. This treatment will protect the frame from:
- rodents (the smell of an antiseptic well repels mice and other animals that can damage the structure);
- mold and fungal microorganisms that destroy wood;
- carpenter insects;
- biological natural decay.
It is allowed to do the antiseptic protection of wood with your own hands. For these purposes, you can use sodium fluoride. It is sold as a light gray fine powder. You will need to mix the purchased mixture in well-heated (but not boiling) water (35–40 g of the drug per 1 liter of liquid). Then process with the resulting composition all the elements of the future frame for drywall.

Sodium fluoride for antiseptic protection of wood
Fluorine antiseptic easily penetrates into wooden products and is practically not washed out of them. It is important that it is non-toxic to humans, has no odor, and does not decompose during operation. Working with such a composition is simple and safe. Almost complete analogue of fluoride is sodium silicofluoride. It is allowed to purchase such a drug. But before use, add a little soda (calcined) to it.
It is impossible to carry out antiseptic treatment of wood with compounds containing the following components:
- anthracene oils;
- coal;
- creosote;
- slate.
The effect of their use will be good. But they are harmful to human health, as they are recognized as toxic substances. Pro tip! Before arranging the frame for mounting drywall on the wall, be sure to give wooden products lie down in the room where you will build the structure. In 48–72 hours, the wood will fully adapt to the humidity and temperature conditions. This process in the language of specialists is called tree acclimatization.
The design we are interested in is made of wooden bars or slats. different section- from 3x5 cm to 5x6 cm. The specific dimensions of the lumber are selected taking into account the expected load on the frame. All work is carried out using the most common building tools- hacksaws or saws, electric drills, screwdrivers, screwdrivers, levels. Nails and mounting dowels are used as fasteners.
Important point! GKL is mounted on frame structure in cases where wall surfaces are characterized by low-quality coating (plaster or other) and significant roughness. It is also desirable to install such a structure when finishing walls in rooms with a height of 3 meters or more. The implementation of the adhesive technology for mounting GKL with their own hands in such high rooms is recognized by professionals as inappropriate.

Installation of plasterboard on a frame structure
A wooden frame on the wall is created according to the following scheme:
- Analyze the state of the wall surface. Found irregularities are sealed with putty (plaster), areas with a peeling old coating are cleaned.
- Mark up the wall. Perform this operation with strict observance of levels and angles (use measuring tools).
- The horizontal beam is mounted first. It should be attached to floor base anchors.
- Attach wooden slats vertically to the installed beam. They should be about 1 cm from the edge of the crate. The distance between the individual vertical elements is 60 cm.
- Check the correct position of the rails with a level.
- Install the second horizontal element on the ceiling.
Before proceeding with the installation of the gypsum board, you should align the frame made. If the floors in the room are uneven, the correct position of the horizontal beam can be set by lining pieces of wood or scraps of chipboard products under it. After leveling the skeleton, firmly fix all its parts. That's the whole technology of assembling a wooden frame on the wall. Feel free to proceed with the installation of the GKL on a skeleton made by yourself.
The installation of drywall sheets should begin from the window or doorway of the room or from its far corner. GCR is fixed with wood screws. The mounting step of the hardware is 25 cm. It is recommended to use self-tapping screws with a length of no more than 3.5 cm.

Installation of drywall sheets on a wooden frame
Important note: if you are installing moisture resistant sheets, it is best to fix them to the frame with jagged galvanized nails. Place the first self-tapping screw (nail) at a distance of 1.5 cm from the edge of the unlined edge of the GKL (1 cm from the lined one). Another subtlety of the work - when fixing drywall, it is necessary to move from one edge of the sheet to the other. In this case, the installation of products is carried out end-to-end. Special edges are provided on the end parts of the GKL. According to them, you can subsequently easily close the gaps between the products (first prime them, and then process them with putty).
Finally, we add that the fasteners must be installed as carefully as possible. Make sure that the heads of nails or self-tapping screws do not break through front side GKL. Such fasteners hold the sheets very poorly. Over time, drywall products will begin to walk and loosen up, which, quite possibly, will lead to the destruction of the entire structure.
A wooden ceiling can be perfectly sheathed with drywall. This finish is not only very beautiful. The technology by which drywall is fastened to a wooden ceiling or to a ceiling on metal profiles allows you to create multi-level ceilings, which will be decorated with various borders or other relief elements.
In addition, such a ceiling is easily putty, you can embed lighting in it, and glue stylish stucco molding on its surface. It is also important that such a ceiling will breathe perfectly, and the natural microclimate will not be disturbed. Drywall is a modern environmentally friendly material that allows you to create miracles with the interior of the house.
Methods for attaching drywall to a wooden ceiling
Installation of drywall is most relevant in the case when there is a need for facing very uneven ceiling, especially in those rooms in which the height is three or more meters.
To date, there are several ways to attach drywall to a wooden ceiling.
Namely:
- For adhesive materials special adhesives for drywall);
- On wooden slats-profiles;
- On metal.
Drywall in very rare cases is attached to the adhesive material, directly to the ceiling itself. This is only possible if the ceiling is perfectly flat. Besides this method is not practical, since it is likely that the GKL (gypsum boards) will sag or fall off altogether.
Therefore, we will not pay special attention to this method in this article.
Most often, options are used using a specially prepared frame. And then we will consider in detail how to hem drywall to the ceiling and the technology for manufacturing these frames.
Wooden slat frame

Such a frame allows you to hide all sorts of flaws in the ceiling, while not sacrificing much of the height of the room. Drywall on wood slats is preferable if you need to mount a simple single-level ceiling. This method is cheaper than using a metal frame.
However, only high-quality bars and slats, perfectly dried in the chamber, are suitable for the frame, which subsequently will not be deformed and will be able to withstand a decent load for many years.
- Before proceeding to installation work, you need to visually determine the lowest point of the ceiling. It is from her that we mark the design position of the frame: we retreat 5 cm, and with the help of a level we draw a flat horizontal line around the entire perimeter of the room. If you do this work correctly, then your end point will coincide with the start.
- Further along this horizontal along the entire perimeter, with the help of self-tapping screws, we fix the rail.
Please note: how correctly you calculate and design the frame will depend on the success of all subsequent work!
- Next, we fix the base bars to the ceiling surface with such a step that will ensure the reliability of fastening the hemmed system. The recommended distance between the base bars, located in parallel, should not be more than 0.8 m.
- In a perpendicular direction, we attach load-bearing strips to them, which will be the basis on which drywall can later be hemmed. In the event that you have a small area of \u200b\u200bthe ceiling, a single-base frame will suffice, in which the adjusted wooden bars to the ceiling will simultaneously serve as carriers for fixing the plasterboard. Of course, the step of fastening the bars in such a frame will decrease and will be about 0.5 m.
Installation of a wooden frame and drywall

- We fasten the bars to the ceiling with self-tapping screws on dowels with a fastening step of 0.8 m. In the case of a two-layer sheathing, the step is reduced, because double the weight of the binder. The attachment points of the bars located in the neighborhood should not be on the same straight line. They need to be alternated in a checkerboard pattern.
Drywall installation on wooden ceiling is made with a step of fastening the sheet to the frame of 0.15 m in the case of a single-layer filing. The fastening step for the first layer can be made 0.5 m when filing in two layers. When fixing the second hemmed layer, the pitch of the screws will be 0.15 m.
Note!
The length of the screws is 25 - 35 mm. This screw size is perfect for 12.5mm drywall thickness.
If the thickness of the sheets is different, it is necessary to select fasteners based on the depth of entry into the material.
Fastening beams to the ceiling

The base bars to the wooden ceiling can be carried out on straight metal hangers (brackets) or adjustable metal hangers with a wire hanger. Through the use of direct suspensions, it is possible to increase the distance between the plasterboard and the ceiling surface.
We fasten the brackets to the beam on both sides with self-tapping screws. We shoot the brackets themselves to the supporting ceiling and bend them along the width of the bar at a right angle. If you need to increase the distance between the ceiling and the plasterboard, there is a D111 system ( suspended ceiling on wooden frame).

Drywall on a wooden ceiling on a wooden frame allows the use of wire hangers. Frame elements on hangers are held by special clamps that allow quick installation And necessary adjustment height.
Metal carcass

How to fix drywall to using a metal frame (see also)? It's actually not that hard if you have detailed instructions. Metallic profile is a more reliable and durable material for creating a frame under the GKL than wood.
Before installing the frame, you need to decide to what height the plasterboard ceiling will be lowered. Between the plasterboard and the ceiling, you can install not only lamps, but also various communications (ventilation, water supply and electrical wiring).
You will need 2 people to install the frame and support the sheets. One sheet of drywall weighs about 15 kg.
What is the frame made of
The metal frame consists of guide profiles. They hold the main frame of the entire structure and rack profiles are fixed to them, on which drywall is mounted. The cross section of the profiles has a U-shape. And rack profiles are similar to the letter “C”.


The length of the profiles is always three meters. If it is necessary to increase the length of the profiles, use the butt joints, which are inserted inside and fastened with self-tapping screws. With the help of suspensions, it is possible to correct and level the plane of even the most crooked ceiling and give the frame structure relative rigidity.
In any hardware store you can find very convenient direct hangers, which you will use in your work. Other types of suspensions are quite difficult to adjust, and they are also quite unreliable due to the manufacturing defects.
Rack profiles can be perpendicularly fastened using cruciform joints, which are also called crabs. If you are going to install the ceiling in small room, then this will not take you much effort and time, but it is still better to find yourself an assistant.

Frame installation
To install the frame and GCR, you will need the following tools:
- gun for driving dowels;
- knife for cutting drywall sheets;
- felt-tip pen;
- level (2-3 meters);
- drill;
- hammer;
- screwdriver;
- self-tapping screws for drywall, metal and dowels;
- metal profiles;
- drywall panels.
First you need to determine where in your room is the lowest corner, and then measure the distance from it that you need to lower the frame. After that, draw a horizontal line around the entire perimeter with a level and a pencil and be guided clearly along it when fixing the guide profiles.
These profiles, depending on the type of surface, are fixed either with dowels or self-tapping screws in increments of 20-30 cm - the main thing is that it is firmly and securely attached to the wall.
After that, we proceed to the installation of rack profiles. In the event that the width of your room is approximately 2.5 meters, then a metal frame with sufficient rigidity will be quite enough. The assembly of such a frame is very simple.
You just need to attach the rack profiles to the wall and fasten them. It is necessary to fix them at a distance of 0.4 meters, using the drawn lines located on the side walls.
Next, cut the rack profiles along the length of the room with metal scissors and insert them into the guides, and then fasten the resulting structure with self-tapping screws. To give it rigidity, you need to use special suspensions.
They need to be fixed to the ceiling with dowels-nails in increments of 60-80 centimeters, and then further improve strength with self-tapping screws. If you do not use suspensions, then the frame will not be securely fixed in the end, and after puttying and painting all joints will crack.
In the event that you will install a chandelier or ceiling lamp, then it is necessary to install mortgages, since plasterboard sheets will not be able to support the weight of your lamp. Attach several rack profiles to the frame for the future location of the lighting fixture.
After you have mounted the frame, you can start installing the GKL. For this you will need: a clerical knife and a felt-tip pen. We make markings on a sheet of drywall according to the size of the room and cut it off.
Then we fasten the plasterboard to the ceiling using self-tapping screws with a pitch of 25 cm. It is easier to screw them in with a special screwdriver.

Slightly sink the heads of the fixing screws into the drywall panel. Next stage- gluing the sickle mesh to the joints (to avoid cracks), then primer and putty.