Change the appearance of icons on Android. How to replace icons on Android: necessary applications
Popularity of the operating room Android systems This is largely due to the fact that it gives the user ample opportunity to customize the device interface. However, standard set the functions were not enough to change the basic set of icons. This, of course, causes some inconvenience, especially if you want to customize your gadget taking into account your own preferences.
However, the question of how to change icons on Android is solved quite simply.
For these purposes, special programs have been developed - launchers. Launcher (from the English Launcher) is considered to be the shell responsible for graphic image. This includes applications that control the device, desktops and all kinds of widgets.
How to change icons using the launcher
Choose any launcher you like, since the range of this range of software is quite large. We would suggest one of the most popular -:

Changing icons in each launcher is slightly different, but the principle itself is the same everywhere. You can use the application icons that the launcher itself provides. For example, in the same " C Launcher“They are presented in sufficient quantities. Or you can download an icon pack (a set of icons) from a store (for example,).
Now you need to open " Settings", go to the section " Applications" (on different devices it can be “Icons” or “Personalization”), and select the desired package.
There is a second option. First open the installed package, then select “ Set icons", and then select the launcher to use.
Replacing icons using special software
It is quite possible that you are quite happy with the stock (pre-installed) launcher, but you are already tired of the application icons and just want to change them. In this case, you can use the Beautiful Icon Styler program, with which you can change application icons without installing a launcher.
After launch, the main menu of the program will open, where by clicking the “Start” button, select the launcher, then by swiping to the left we will see a tab with the icons that we will change. One more swipe, and we will see a set of paid and free icons for downloading:

Here it must be said that although the application itself is distributed free of charge, you can take advantage of the free offer only for three downloads, and then you will have to, as they say, “fork out.” True cost full version fits into one dollar ten cents, which is quite affordable for any wallet.
Replacing icons with “Superuser” rights
I don’t think that to change icons it makes sense to lose the right to warranty service and install Root rights. Therefore, we will not dwell on this method in detail, we will simply outline it briefly.
So, select and install it. Then we need a frame Xposed Framework and a module for it Unicon. Next, go to Xposed, open the “Modules” section, select “Unicon”, and use it to change the icons.
*Note: Don’t forget that when installing programs and applications not from the Google Play store, you will need to allow installation from unknown sources in your phone’s settings:

I hope that today’s topic “How to change icons on Android” is written in a simple and understandable way. Stay in touch and share your experience on the pages of our “Knowledge Base” section. Good luck!
Android in its standard form looks poor. Yes, all the necessary functions seem to be there, but you still can’t turn on displaying battery percentage. Eat beautiful animation download, but it's of no use. There was still no support for the topics. So what now - install another custom, the tomorrow night build of which will definitely fail? No, we will do everything with only root. Read on and learn how to change the Android interface.
PREPARATORY STEPS
To perform many of the tricks described in the article, you need root and a root that depends on it. IN standard version it will work 100% correctly only in AOSP firmware, but even in them there may be glitches. Problems with Xposed modules can often arise in stock firmware with modifications from the manufacturer, but there is a special version of Xposed for them: for TouchWiz, for MIUI, for firmware based on Android 5.0+. HTC owners can install the official build, but S-OFF is almost always required.
Got root, installed Xposed? Then let's go.
1. CHANGE THE LOADING ANIMATION
 The boot animation is stored in the /system/media/bootanimation.zip file. Inside there is a text document desc.txt, it indicates the frame rate, horizontal and vertical resolution, etc. There are also the images themselves (frames), which change with the frequency specified in desc.txt. The order and rules for playing animation from folders are also written in this file.
All you need to do is get the archive from the device using a file manager with root support, unpack and replace the images, not forgetting to first compress them to the desired resolution. Next, just pack the archive without compression and return it to its place. But, of course, it’s easier to take a ready-made archive. On the site hboot.co.uk there are plenty of them.
On the other hand, although the animation is interesting to look at, it makes no sense. But it can be useful to see which services are running. The easiest option is to install LiveBoot, which outputs logcat and dmesg, i.e. Android messages and Linux kernels.
2. ADD YOUR SOUNDS TO THE STANDARD SET
Sounds can be dropped into one of the folders in /system/media/audio. alarms - alarm ringtones;
notifications - sounds for notifications;
ringtones - ringtones;
ui - system sounds, such as low battery, camera focusing, selection of interface elements. Some applications may access them by default, so you can replace them with your own.
Why put ringtones in the system partition? Firstly, the files there are able to withstand a general reset to factory settings; secondly, sounds from special folders can be set to a signal (alarm sound, call, SMS receipt) in almost any application.
3. CHANGE FONTS
I very, very doubt the usefulness of these actions, because the standard Android font is almost perfect. But the taste and color...
You can use a special application to install fonts. For example, HiFont allows you to change fonts in Samsung firmware, HTC, Motorola, Lenovo, Huawei, Nokia X. And if there is root, then in all other devices. You can either use fonts already available in the application catalog or add your own.
But where to get them? There are three options:
- fonts taken from different firmware of Android devices can be found in the post on w3bsit3-dns.com;
- on w3bsit3-dns.com there is a good collection of user-created fonts in the next post;
- collection on XDA.
You can install fonts without using a special application. We take the .ttf files from the archive, replace them with them in /system/fonts/ (root is needed) and reboot the device.
4. CHANGE ICONS
 Icons can be changed using special applications̆, for example Unicon - Icon Themer. After installation, you need to activate the application in the Xposed settings (it will notify you). Next, restart your smartphone and open the application. All you have to do is click on Download themes from Google Play and select an icon pack, install it and restart your smartphone. But it is worth considering that the icons do not change in some launchers, for example Google Start.
5. ADDING THEMES SUPPORT
 Before installing the theme, HKThemeManager will show the entire list of applications to which the theme will be applied. Uncheck those that are not needed, click on “Apply theme” and reboot the device.
There is also an alternative option for installing themes - the Layers Manager application. It works in any firmware on Android 5.0+ thanks to the introduction of the RRO resource reassignment mechanism. The application's database of topics is huge and is located on Play Market. To see it, just type Layers Theme in the search.
Keep in mind that the application does not work on firmware based on CyanogenMod: the local engine and RRO conflict.
6. CONVERT ANDROID 5.X+ INTO ANDROID N
The Android N-ify module will help us with this. After installation, the following features from Android N will appear:
- The design of the notification panel will noticeably change. The quick settings panel will appear;
- Interesting inscriptions will appear in the settings under some items.
- For example, under Wi-Fi the name of the current access point will be written, under the “Battery” item - the remaining operating time and battery charge in percentage;
- the Easter egg will change in the “About phone” menu;
- there will be a quick switch between the last two running applications by double clicking on the "Recent" button.
Android N-ify also has useful settings, through which you can not only disable it, but also configure individual changes made.

7. IMPROVING THE STATUS BAR
For me, the status bar in stock Android is the most unfinished thing. Luckily, Xposed can be used to change a lot of things and make it more convenient.
8. Changing the battery indicator
Battery Home Icon installs a battery indicator instead of the Home button. Moreover, this indicator is highly customizable: you can change colors, enable/disable the display of percentages, charging animation, and so on.
XbatteryThemer - customize the battery icon. There are many different themes, both ordinary and very extraordinary.
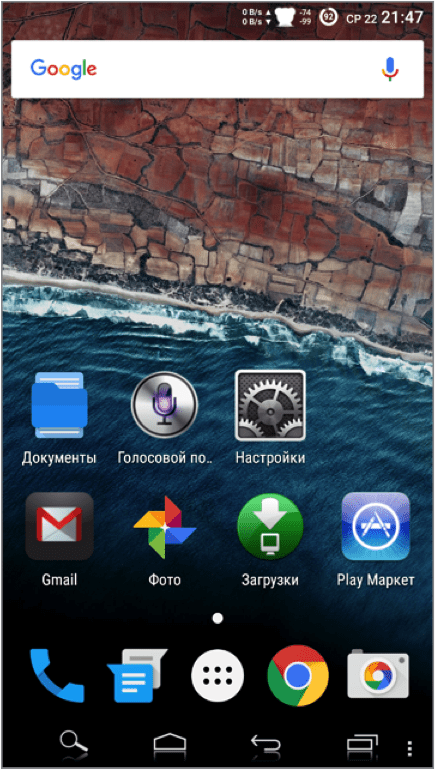
9. Display the speed of the Internet connection
Network Speed Indicator - network speed indicator. Can show the speed of mobile networks, Wi-Fi, Bluetooth, Ethernet. Everything is customizable - from units of measurement and speed threshold to color and font size. You can also add the amount of internet traffic used to the status bar using DataUsage. The data shown is the same as in the “Data transfer” settings section.
10. Display the actual signal level
Sometimes you need to know how good the Internet connection is in different parts rooms, how the position of the smartphone affects the signal reception level, or you just need to compare the signal reception level of your smartphone and other models. NetStrength will help with this. The module can display the cellular network signal level in decibels per milliwatt (dBm or dBm). This unit of measurement has negative meaning, and the closer it is to zero, the better the reception. You can also enable the display of ASU (Arbitrary Strength Unit - signal-to-noise ratio in the pilot channel). Calculated using the formula ASU = (dBm + 113)/2.
By the way, the module can show the Wi-Fi reception level in dBm, Mbps (Mbit/s - megabits per second) and percentage.
11. Monitor the download process
Statusbar Download Progress is one of the most useful Xposed modules. It displays the download process from the Play Market or a file from the Internet in the form of a thin white bar above the status bar. I immediately recommend activating “God Mode”, thanks to which progress will be displayed for any applications that have a progress bar. In the settings you can set the display above the status bar or below the line.