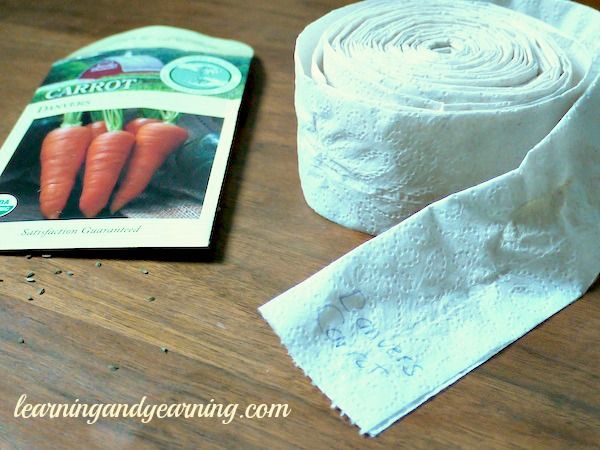
We prepare ribbons and plant carrots on toilet paper. Carrot seeds on toilet paper Glue carrots onto toilet paper with starch
This year, to make our work easier, we decided to sow carrots using a sowing tape. I love this idea because planting carrots on paper makes gardening so much easier! There is no need to thin out under the scorching sun, but in the summer this is very tiring and takes up a lot of time, which can be spent on relaxation...
Background
Last year I was so dissatisfied with the germination of carrots, I even told myself that I didn’t want to plant them at all this year, but spring came and I wanted to have my own young carrots in July - from my garden, after all, they sweeter times at 100.

And one more point in favor of the sowing tape - if after planting the carrots there is a good rainfall, then the carrots sown just like that may “leak” - most likely this is exactly what happened to me last year (after planting it rained for several days).
I think that many gardeners are now trying to sow carrots on tape, and I decided to deepen this issue not only for myself, but also for you, dear readers. So, how can you use seed tape correctly to get the most best result germination? And are there any alternative options to the tape? We'll figure out…
Preliminary soil preparation
Properly prepared soil is very important for carrot germination. And our beds will have to be prepared two weeks before planting, and not according to the principle of coming to the dacha, digging, loosening, planting, and all this in two weekends.
A week before planting, or better yet two weeks, you need to loosen the soil to a depth of 10 cm, after which you must immediately take a rake and level the bed. Of course, this means the earth dug up in the fall using a spade.
Laying a ribbon with seeds
Immediately before sowing, we loosen the bed again, make shallow furrows—about two centimeters—and place a seeding tape in the furrow. Then carefully pour in a small amount of water and cover with soil. We very easily level the ground and water it again - carefully so as not to wash the soil off the tape.
Gardener's secret: Using ripe compost, laid in a half-centimeter layer, you can significantly increase germination!
Glue the seeds onto paper yourself
Another great recipe is that you can make a sowing tape with carrot seeds yourself! To do this, take paper with a loose texture (toilet or newspaper works well), cut it lengthwise into strips 2 cm wide.

We make a seeding tape from each half as follows: make a paste of starch or flour, drop it onto paper and place carrot seeds in increments of 2.5 cm.
The paste is made like this: for 1 glass of water, 1 tsp. starch or flour.
Is there some more tricky way- take two-layer toilet paper, peel it a little from the edge and put seeds between the layers.
I also came across an interesting proposal from one summer resident on the forum - do not cut the toilet paper roll lengthwise, but simply fold the paper in half, gluing the seeds, gradually winding up the roll, see photo below... It saves a lot of time both in making the tape itself and in planting!
You can additionally fertilize our seeding belt by adding mineral fertilizers to the water for boiling the paste. The ratio is as follows: per 1 liter of water, one tablespoon of mineral fertilizer.
You can glue the seeds in winter, before the start of the summer season. Agree, in winter there is most often nothing special to do, so there is more than enough free time.
Planting carrots on napkins
Found another one interesting option planting carrots on napkins. The principle is similar to tapes, the only difference being that you immediately form a bed by gluing the seeds in the same way as your root crops will grow.

At home, prepare napkins by sticking carrot seeds in 5 cm increments in the row and between the rows.

Well, you already lay out your napkins on the garden bed and sprinkle it with a layer of soil. The result is an immediately formed bed that does not need to be thinned.
What seeds to take
For gluing, it is better to take high-quality, varietal seeds, their germination will be better, and the result in the fall will please you. And this method of gluing seeds onto paper will save them from disappearing.
There are also coated carrot seeds on sale; they are easier to stick, but they require more watering at first, since the seed is, as it were, inside a pea made of fertilizer and filler. They need some time to swell and give moisture to the seed inside. But the plus is that the sprout will immediately have nutrition and the growth of the seedling will be optimal.
conclusions
In the same way you can make a sowing tape with seeds of other vegetable crops and greens with small seeds, such as lettuce, dill, celery. Instead of doing thinning in the summer in a kneeling position, it is better to make a paper strip with seeds in advance and not know grief. The winter is long, what else to do but prepare for the sowing season.
These are the tricks I learned about planting carrots on paper. As you can see, there are options that are both more expensive and more economical, with more labor (which, of course, will pay off later) and with less! Let's approach the garden creatively, comrades! Let's enjoy the process, so to speak!
Finally, watch the video that shows how to plant carrot seeds on a tape in the ground
Proper sowing of carrots on tape and planting on toilet paper
And the carrots grow very large. In the fall, I dig it up, cut off the stems and tops, wash it, dry it, and put it in sugar bags that I keep in the cellar. Carrots remain as freshly dug until spring (pictured).
I also plant onions around the perimeter of the carrot bed. It grows very large, and it also repels carrot flies. After harvesting the vegetables, I immediately sow white mustard, so my soil is very soft and there are no weeds at all. I sow the carrots in the bed where the onions grew, and the onions after it.
Carrot seeds on tape - professional reviews
Sowing and caring for carrots is not an easy task for gardeners. But some tricks will make growing carrots easier. In particular, you can use the method of sowing seeds on a tape. This significantly reduces labor costs and increases productivity.
Why are seeds on a tape so good?
They are fully prepared for sowing. The seeds are located at a distance of 3-3.5 cm from each other. They do not need to be thinned out, so the roots of neighboring plants are not injured and the root crops grow beautiful and even. It will be convenient for young shoots to develop. They will not win space for themselves to live under the sun.
The crops are sparse and well ventilated. And the carrot fly doesn’t like this. It will not be attracted by the smell of tops, which is strongly manifested at the time of thinning.
Easy to use. Furrows are made in the ground, watered abundantly, a ribbon with seeds is laid and covered. It is only necessary to regularly moisten the crops, preventing the seeds in the tape from drying out before germination.
The seeds are evenly buried in the soil and are not washed away even during heavy rainfall, which means they germinate at the same time. The optimal embedment depth is from 1.5 to 2 cm. Further care sowing consists of careful weeding, timely watering and shallow loosening of the soil.
Currently on the market are seeds on tapes produced according to different technologies. The tapes are made mainly from toilet paper using adhesives or starch and have a huge disadvantage. This material– a breeding ground for pathogenic microorganisms that cause crop death.
The most advanced technology is 100% cellulose tape. The seeds are placed between two layers of material connected mechanically without the use of glue. The tape is non-toxic and decomposes well in a humid environment.
Damage for environment excluded.
Using seeds on a tape makes growing carrots a convenient and simple task.
Obviously, seeds on a tape are the smartest solution!
Carrot with ballpoint pen
After all, I have little gardening experience and experience, so it’s not always clear to me what is meant by “seeds” for the experienced. So you have to figure it all out through experience.
For example, how did I plant carrots, parsnips and dill before? I’ll mark rows in the garden bed and sow the seeds more densely - what if the germination rate is poor? And then I’ll rip out the excess (even though I felt sorry for these stretchers to the point of tears). But the harvest was still pitiful.
Then I read that you need to glue the seeds onto toilet paper. I was patient, the winter evenings were long, I did everything as it was written. Well, I think now everything will grow on its own. It's time to plant. I started burying these ribbons in the ground - no such luck! They get tangled in the wind, fray, tear, and there is no way to cope alone.
Somehow I buried them and suffered a lot. But it was even more painful to look at the sprouted carrots: the rows were crooked, the shoots were sparse. Well, I got what I wanted, it had nothing to do with the carrots. I took care of it as usual - weeding, loosening, watering. But when in the summer my grandchildren began to pull it out of the garden, my surprise knew no end: the root crops were even, long and thick. I've never had anything like this! “Yes, I think, after all good way, I just need to think a little about how to deal with the tapes.”
Now I do this. I make a paste from flour, cut the paper into strips, and lay it out on the table. I have a checkered oilcloth on my table and it serves as a stencil. I take a toothpick, dip it in the paste, pick up a seed with it and plant it on the tape. I fill them, wait for them to dry, and roll them up.
But not just like that, but into plastic tubes 3 cm long, which I saw in advance from the bodies of ballpoint pens.
This is how I store them until planting. And when I plant, I dig the end of the tape at the beginning of the row, insert a match into the tube, and press it with my thumb and forefinger right hand and then I simply unwind this “reel”, at the same time sprinkling the paper with seeds with my left hand. Here the wind is no longer scary, and the seeds fall smoothly.
Now I have beautiful, large and even carrots, and all my neighbors have enough parsnips.
It is also large and smooth, there is no shame in offering it. The hassle of thinning seedlings is also a thing of the past. And every time I dig up root vegetables, I say thank you to Dacha.
But my neighbor at the dacha taught me how to sow dill. He never worked out for me; he grew up frail. What was the matter? It turns out that you just need to scatter the seeds around the garden in the fall, and pull out the extra ones in the spring. I tried it and now this is the only way I sow it.
Enough for food from early spring, for canned food, and for freezing. That’s for sure, live forever and learn! And I also want to say: hard work in the garden will definitely give quality.
 6 in 1 Multifunctional vegetables, carrots, potatoes, salad Radish shredder…
286.5 rub.
Free shipping★★ ★★ ★★ ★★ ★★ (4.80) | Orders (132)
Almost everyone grows carrots in their garden or vegetable garden, but not all gardeners and gardeners know that it is possible to plant carrots on toilet paper. That is why this article will be of interest to all those who are interested in this method of planting carrot seeds. You will learn about the advantages and disadvantages of this method, get step by step instructions on planting carrots on toilet paper and tape.
This is very new interesting method sowing carrot seeds and it has its undeniable advantages:
- Since the seeds for planting are prepared indoors, you can lay out all the necessary things that you will need during work on the table next to you. That is, convenience and comfort are an advantage over carrying out work in field conditions, where it is very difficult to sit comfortably and prepare necessary tools and containers.
- On the paper strip, the carrot seeds will be applied evenly, so in the soil their location will be at the same distance from each other.
- The result will be clear. You will be convinced of the germination of carrot seeds and only then transfer the seedlings to open ground.
- The method is economical in that everything is done manually without extra costs.
- It's the same with depth. The paper tape will be evenly laid in the soil along its length, so the seeds will lie at the same depth.
- Moisture retention. You don't have to constantly monitor humidity.
- During normal planting, not all seeds germinate, so seed consumption increases almost 30 times; when planting seedlings on toilet paper, you will save seeds and get good harvest.
- Simultaneous germination of planted seeds.
- With this planting method, root crops will be protected from carrot flies. This pest feeds on the roots of sprouts and lays eggs in the beds. Using this method The bed is covered with covering material, so the root crops are protected and egg laying is impossible.
- Not afraid of weather and climatic conditions when sowing.
- At this method there is no need to water and weed the seedlings for some time. After the weeds spontaneously burn out from the sprouts, there is no competition between carrots and weeds for some time.
This method has no obvious disadvantages as such, only a huge number of advantages. We can name only a couple of small disadvantages, this is that when planting carrot seeds in open ground on toilet paper or tape seedlings will have to wait a little longer, about 2-3 weeks, than if you planted the seeds directly in open ground.
Also, planting seeds on toilet paper or tape will take much more time and effort, because you need to prepare the seedlings in advance for planting than if you planted carrot seedlings directly in open ground.
How to glue carrot seeds onto paper?

Germinating carrot seeds on toilet paper or tape is not very difficult.
For germination you will need:
- Three-ply toilet paper is best;
- small capacity;
- polyethylene must be dense;
- sprayer;
- special glue that you can buy or make yourself.
Let's pay attention to the most important point - glue, what kind of glue it should be.
Starch glue will be mixed from 1 teaspoon of potato starch and a glass of water. The dry mixture must be prepared in advance while the water is boiling, after the water begins to boil, we must tip the dry mixture into it.
You can also improve the prepared paste with some mineral fertilizer added to the glue composition. After the glue is ready, let it cool. After the glue has cooled it can be used.
Also, a flour paste is prepared, but instead of a teaspoon of potato starch, a teaspoon of flour and, possibly, mineral fertilizers are added to the composition.
Starch paste can be prepared in another way:
- Take 400 milliliters of water and bring it to a boil and turn it off.
- Then take 100 milliliters of plain water at room temperature, not cold, and mix 2 tablespoons of potato starch in it.
- Bring 400 milliliters of water to a boil again and slowly begin pouring in the prepared starch solution in a thin stream. As a result, the solution should not turn out thick.
Another cooking method flour paste is as follows:
- Take an enamel pan.
- Fill with water and bring to a boil.
- Pour flour into the water in a thin stream in small portions (1 tablespoon of flour per 100 milliliters of water).
- Stir the mixture regularly.
- At the moment when the mixture begins to acquire a consistency similar to batter, the pan with the mixture is removed from the heat.
- The solution is left to cool for a while.
To glue the seeds, tweezers can be used, as well as a cotton swab dipped in water in advance. After the glue has cooled, apply it to toilet paper and begin gluing carrot seeds at a distance of 4 to 5 centimeters from each other.
You can first dip a cotton swab into the cooled glue, then take a seed and stick it on toilet paper. Or, first take a drop of glue with a cotton swab, apply it to the paper, then take a seed and place it on top of the glue.
For gluing, you can use one of these methods. Then you should wait until the paste on the toilet paper dries and begin to roll the strips into one roll. As a rule, it takes a day for the paste to dry completely. If you don't wait for it to dry, the layers of toilet paper will simply stick together. AND last step, the wrapped roll must be placed in a separate bag and labeled with the selected carrot variety.
Don’t forget that not all seeds are suitable for sticking on toilet paper, so you need to calibrate the seeds before planting. Seeds are calibrated using saline solution
, which is diluted in a glass (salt by eye). Seeds that float are bad and need to be removed.
The seeds that have sunk to the bottom of the glass are good, so they are left for planting and washed in warm water at room temperature before planting.
Of course, store-bought ready-made tapes have a loose texture, so it is possible to use old newspapers for stickers, but we must not forget that waste newspaper paper contains a lot of printing ink, which is unlikely to be too useful for our future harvest. Thus, it is best to use multiple layers of toilet paper.
Preparing the soil for planting
 Before disembarking seed material the soil must be prepared. This will help the seeds germinate much faster.
It is best to dig up the ground where you plan to plant carrots in autumn period, a depth of up to 30-40 centimeters is desirable, then in winter the earth can rest.
Before starting seasonal work in spring period, just go over the beds that have been dug with a rake. This needs to be done a couple of weeks before the start. seasonal work. Loose soil without stones is suitable for carrots, because if the carrot encounters obstacles while growing, then you will get a crooked, forked harvest.
Don’t be late with sowing; carrots need to be sown several weeks earlier than usual so that they have time to ripen and produce a good harvest by the fall.
The fact is that when planting carrot seeds glued to toilet paper or tape, germination time increases.
Seeds that are planted directly in the ground germinate a couple of weeks earlier than those that are glued.
Under no circumstances should you fertilize the soil where carrot seeds grow with manure. If you previously fertilized any areas with manure, then carrots can be sown there only after two years.
It is necessary to be very careful about the depth of the grooves prepared for planting carrot seeds, because if the depth is too great, the seeds simply will not germinate, and if the seedlings are planted at a shallow depth, then most likely they will be scattered by the wind.
The depth of the grooves should be from 1.5 centimeters to 3 centimeters. The distance from one groove to another should be 20 centimeters.
Master class on planting in the video below.
Planting carrots on tape (step-by-step instructions)
This section of the article will describe planting carrots on tape step by step.
- This method is also not at all complicated:
- First of all, grooves must be made in the dug beds. Their depth should vary from 2 to 4 centimeters. Then we lay out the ribbons with seeds along the width of the beds. This can be done alone, but with windy weather
- It is advisable to lay the ribbons so that the carrot seeds remain at the bottom.
- Then, the laid out ribbons begin to be watered and sprinkled with earth.
- The next step is the next watering; it is necessary for the speedy germination of seeds on the tape.
- At the end of the bed, the beds should be covered with black polyethylene. The beds should remain covered for at least a couple of weeks.
In order for the seedlings to sprout faster, you can use the following secret: lay a small layer of compost at the bottom of the prepared furrows.
You can plant carrot seeds on tape without gluing, then do the following:
- Thin toilet paper is placed on the bottom of the prepared grooves.
- Carrot seeds are carefully placed on top of the toilet paper.
- Then another layer of thin toilet paper is placed on top.
- Sprinkle the planted seeds with soil.
- You should carefully moisten the soil and layers of toilet paper.
In dry weather, it is necessary to monitor soil moisture and water more often. Under no circumstances should the soil be allowed to dry out.
On long winter evenings, you can start preparing for spring sowing and glue the seeds onto paper. This will make it possible to use precious time more efficiently in the spring, when every minute counts and it is necessary to have time to plant all the crops in a timely manner. With tape, seeding takes just minutes, leaving time for more important matters.
You will need
Paste or office glue;
- toilet paper or paper towels;
- scissors;
- brushes for applying the adhesive base;
- toothpick or tweezers.
Instructions
You can stick it on toilet paper strips seeds of radishes, carrots, radishes, head lettuce, cabbage, dill, celery, nigella onions. The distance between the glued seeds should depend on the crop.
To carry out pre-plant gluing, cook a thick paste from wheat flour or starch and cool it. If you don’t want to cook the paste, you can glue the seeds onto office glue.
Cut toilet paper or paper towels into strips 2.5-3 centimeters wide. Make marks with a pencil or marker at the distance where the seeds will be glued. Apply a thick layer of paste or office glue to the resulting tape and begin gluing the seeds. To do this, pour the seeds from the bag into a flat saucer. Since almost all of them are very small, take them with a toothpick dipped in water or carefully with tweezers.
Glue carrots, radishes and parsley at a distance of 5-6 cm from each other. Make the distance between turnips and beets at least 10 cm. Between radishes for summer use - 6-7 cm. Glue winter radishes at a distance of 12-14 cm. Leave a distance between leaf celery - 5 cm, root vegetables - 20 cm. Leave between cabbage seeds 50 cm, between dill and parsley - 2 centimeters. For seed onions for greens - 5 cm, for turnips - 10 cm.
Also keep in mind that such a distance can only be done for full-weight, high-quality seeds. If you doubt their fullness, then reduce the distance between the seeds of all crops by two or three times. After planting and germination, simply thin out the plants.
Dry all ribbons with glued seeds thoroughly, twist them, tie them with an elastic band, sign them, put them in a canvas bag and store them in a dry, dark, cool place until sowing. In the spring you will make beds, furrows and simply spread ribbons with seeds, mulch and water. This will take several times less time than with conventional sowing. In addition, it will significantly reduce the number of seeds for sowing.
This option for planting carrots is much more convenient than sowing them by hand. A homemade seeding tape based on toilet paper, or a store-bought version of it, can significantly make further work on the beds easier. This planting option almost eliminates the boring procedure of thinning carrots, or, if the carrots still need to be thinned, it takes much less time, because they do not grow as often as when sowing them by hand.
Carrots on toilet paper. Basic landing rules
How else is such a simple method convenient? Quite often in the spring, when we plant carrots, there may be downpours. If you sowed in a simple way, then it is quite possible that the rain will simply wash them out of the bed and you will have to replant them again. If you plant carrot seeds on tape or on toilet paper, then they will most likely remain in the soil after a heavy rainfall and you will not have to sow them a second time. For any type of sowing of any vegetables, there is certain rules, compliance with which will help to achieve good seed germination. Such rules, of course, also apply when sowing carrots using tape or, alternatively, using toilet paper.
Setting the stage
The soil must always be prepared so that you do not plant. When sowing, such preparation is also certainly necessary. Usually they do this 2 weeks before planting. But the method - “I came to the dacha, took a shovel, dug up the area, leveled it with a rake, and planted it” - does not apply here. It’s better to do this in advance, that is, at least a week before planting, and even better, even 2 weeks before. You will need to loosen somewhere, about 10 centimeters deep. When you do this, immediately level the soil with a rake. Here we are talking about the soil that you already dug up in the fall to the extent of a bayonet. It doesn't have to be virgin soil.
Planting carrots on a tape
When you go out onto the plot with the intention of planting carrots, you will need to “refresh” the bed, that is, loosen it again. After this, we prepare the furrows for planting. They should not be deep, because carrots are very small. 2 centimeters deep is more than enough. It will be possible to lay a ribbon with seeds in these grooves, which after laying is watered and only then sprinkled with soil. From above this soil will need to be thoroughly leveled and then watered again, but here this must be done carefully so that the thin layer of soil from this seeding tape is not washed off.
You can increase germination in a simple way. To do this, take ready-made compost and lay it about half a centimeter thick.
How to glue seeds onto toilet paper yourself?
Store-bought tape with carrot seeds is, of course, a convenient thing, but it can be replaced with a homemade version of such tape. It is made quite simply from paper, which is quite loose in texture. Toilet paper is perfect for this. You can also take newsprint paper, but printing ink on it obviously won’t add any color to your carrots. beneficial properties. So let's still take toilet paper. Of course, its width is too large, so you will need to cut it carefully and make strips of it about 2 cm wide. You will need to cut it lengthwise, so the ribbon can be made very long.
Option #1
When you have prepared the strips, you can use them to make such a “carrot” sowing tape. In order for the seeds to stay on this tape and not fall off when planting, they will need to be glued there. To do this, you will need to prepare because super glue is clearly not suitable for this (just kidding!). This paste is usually made from ordinary starch or flour. When you prepare the paste, simply drop it onto the strip and rub it a little. There is no need to glue the seeds close. The step here is maintained at about 2.5 centimeters.
If you don’t know how to make paste, here is the simplest recipe. You will only need a tablespoon or the same amount of flour (there is not much difference), which will need to be dissolved in a glass of water.
Option No. 2
You can secure the seeds on toilet paper in a different way. To do this you will need two-layer paper. We simply carefully layer it and carefully place the seeds in the gap between the two layers.
Option #3
The third option with toilet paper is not to cut it at all, but simply fold the strip in half lengthwise. We also carefully glue the seeds there and slowly wind up this roll. So, you don’t have to cut the roll and you can prepare such a seed strip faster.
When you prepare the tape, you can immediately fertilize it. This is done at the stage of preparing the paste, when some kind of mineral fertilizer. Here the calculation is per liter of water. For this amount of water, you will need the same tablespoon.
You can make such seeding strips based on toilet paper in winter, when there is free time. So by spring, when you need to work closely on your plot, you will already have everything ready.
Carrot seeds on a napkin
A good alternative to toilet paper is ordinary napkins. Everything here is done in the same way as with toilet paper. But napkins are wider than paper, so you can make not just one strip with seeds on a napkin, but several at once. Here you simply stick it in the same way as you see the root crops in your garden. It is best to stick the seeds about 5 centimeters apart. You should have this distance between the rows. Next, you place such a napkin with seeds on the garden bed and sprinkle it with soil. This way you will have a fully formed bed, and you won’t have to thin it either. Here's how to plant carrots without thinning.
Which carrot seeds to choose?
It is best to stick high-quality seeds, good grade. The germination rate of such seeds is quite good. And if they sprout well, then most likely they will develop just as well. By securing them in such a simple way on toilet paper, or on other similar “carriers”, you will not allow them to disappear, for example, due to the same downpour.
Today you can buy replacements also coated. It will be easier to glue them, but you will have to water them more, because they resemble dragees, that is, peas. The carrots themselves are hidden, as it were, inside this very dragee of fertilizers and other useful filler. Here, increased watering is simply necessary, because a certain time is required for such seeds to swell and for moisture to penetrate directly to the seed inside this pill. But there is also a big plus for these carrot seeds - each of them already has its own supply for feeding the young sprout, which means its growth will be practically guaranteed.
conclusions
Not only carrot seeds can be sown on toilet paper or other similar media. All this is quite applicable to other vegetables, as well as herbs, whose seeds are quite small. It can be the same, for example, celery or different varieties. It is very convenient to sow seeds on the tape. This way, in the summer you won’t have to “crawl” through your beds and thin them out. So it’s best to do this in the winter, while free time allows you to make such seeding tapes, which, as you can see, can be done not only using toilet paper, but also in some other ways.
And here is a very good video on the same topic. Here you will be shown how to prepare a paste, how to apply it to toilet paper, and how to glue seeds to this paper. Let's see.