Drainage system around the house: drainage device for the foundation. Reliable protection against fatal destruction - drainage around the house Installation of a drainage system for a private house
Drainage around the house is necessary to protect the buried parts of the building - ground floor, foundation. Underground structures are dangerous from flooding from heavy rains and snowmelt, as well as from high groundwater, especially if groundwater is aggressive to concrete. Protecting a house with a drainage system is one of the first and foremost tasks in a new construction, and when working around an already built house, drainage becomes an extremely difficult and costly undertaking. Reworking unsuccessful drainage or installing it in a landscaped landscape is almost a disaster. Whereas timely, competent drainage around the house will remove excess moisture from the foundation, and thereby increase the service life of both structures and the building as a whole.
Drainage around the house with your own hands
On our own a drainage device of the wall and ring (trench) type is possible. The second type of drainage is successful on clay and loam, and of course, if the house does not have a basement, a technical underground, a warm basement, and so on. For example, a house on stilts, because it also needs to be protected from aggressive groundwater. Trench or ring drainage consists of drains directed into water-permeable layers. Crushed stone has good filtration, and the correct slopes of drains are formed by laying them on a stable (carefully compacted) base. All connections and turns of drainage pipes - on special connecting elements, Special attention give waterproofing of pipes and connections. A clay aquiclude is organized around the house for protection. At the same time, the trench ring is separated from the foundation structures by about 1.2 - 3.0 m. This type drainage - protection of the house from flooding and rapid discharge of flood water when its level decreases. In addition, when arranging a trench drainage ring, the groundwater level almost always decreases: the new GWL is much lower and passes under the foundation, which is the purpose of drainage. An important plus is that the ring drainage trench can be used for simultaneous laying storm sewer, subject to the design and calculation.

Approximate stages of the ring drainage device:
- Markup must be accurate, best to work laser level. The base is prepared after measuring the height difference and installing a control pole at each point in the scheme. Accuracy is needed maximum, up to a millimeter;
- According to the set marks, they are backed up with coarse sand, with layer-by-layer compaction. The slopes of the drains must be uniform, counter-slopes should not be allowed. Water drainage will be gravity flow to the drainage well (receiving ditch, collector, ravine, and so on), and it is best that the “water intake” be away from the house;
- Mandatory pipe protection and phase separation with geotextiles. The fabric needs to be thermally bonded (not needle-punched, which quickly silts up). Filtration clip - from clean, washed crushed stone or gravel. It is also necessary to observe the specified slopes of trenches and pipes. In the backfill filter, a notch is carefully made and a perforated drainage pipe is laid. Flat drainage pipes with additional geotextile protection can become especially effective and economical. A budget option for simple drainage (or an irresponsible structure) - a PVC sewer pipe familiar to everyone, and perforation is done with a drill or drill. It is important that the size and shape of the holes be such that gravel or gravel cannot clog them or make it difficult for water to drain from the pipe into the filter;
- Mount pipes with a reliable connection in sections, then once again control the slope. Minimum slope– 20 mm per 1 running meter trenches. The excess is checked with a level, the uniformity of the slope is also checked with a level at control points, it can also be checked by stretching the cord along the pipeline sections;
- All drainage turns are equipped with cleaning - vertical pipe sections built into the drain and protected from water and debris (tight cover). To remove blockages, cleaning is very effective. It is also important to protect the pipe and filter with a continuous geotextile cocoon without the slightest gap, and secure it firmly (with twine, tape, staples). Finished pipes with geofabric and coconut fiber casings are more expensive, but they last longer and have better filtration performance and do not silt much longer;
- The top of the drainage trenches is covered with an overpipe with washed filtering gravel or gravel to a height of 200 mm, then a clip is made, not sparing the overlap geotextile. To do this, along the edge of the trench (when laying under the pipe), a canvas is left with a known margin. The top of the drainage layer - coarse washed sand - one of best filters, and without the properties of heaving.

Completion of the system - drainage well, from concrete prepared at the site or purchased - corrugated plastic. The second option when calculating material, time and labor is often more economical. But they are used for the drainage well and reinforced concrete rings, and the walls are concreted along the reinforced mesh. The hatch is cast iron or modern high-strength plastic. All sewer outlets are necessarily insulated, usually expanded polystyrene or a foam clip is used, the thickness of the thermal insulation is from 250 mm.

wall drainage
Wall drainage is relevant in many cases:
- The sole of the foundation is laid below the groundwater level (level ground water subject to seasonal fluctuations);
- The basement floor is not high enough from the groundwater level (a distance of more than 0.5 m is considered safe);
- The base of the plot under the house is composed of clays or loams, strongly heaving soils, which, when saturated with water, are capable of winter time and thaw push the structure out of the ground. At the same time, the height of groundwater practically does not affect the operation of the foundation and the consequences of soil movements;
- Effective and constant capillary moistening of soils under the house;
- When deepening the basement floor by more than 1.25 m, when building on clay and loam.
Arrangement of wall drainage is rational before backfilling the pit, after building the house, this event will be difficult and expensive, and the landscaping will be disturbed - after all, you will have to dig the house along the contour in small sections, taking into account security measures.
Rectangular in plan, the buildings are drained along the perimeter of the base, and each corner drain must have access to a manhole. The lowest, deepest point of the drainage contour is led to a facility for pumping water or, if possible, for spontaneous flow into a ravine, quarry or storm sewer. An old and proven method to additionally protect the foundation is the installation of a clay castle along the contour of the foundation, with a distance of about 0.5-1.0 m from the wall. When saturated with water, many types of clays turn into an effective aquiclude.

Basic requirements for wall drainage:
- Accurate and uniform drain slope - not less than 20 mm / 1 r.m. pipeline;
- The upper point of water intake by the drainage pipe is at the highest in relation to the rest of the corner of the building, and the lower one is the drainage well;
- Each corner joint of the drainage conduit is supplied with a manhole, and straight linear sections must have a manhole for every forty meters of their length;
- Accounting for GPG (depth of soil freezing for a specific construction area - reference value);
- Drainage bottom - no higher than 0.3-0.5 m from the base of the foundation (cushion, backfill);
- Removal of the drainage circuit from the foundation of the floating slab type - from 300 cm;
- Inserting a drainage pipe into a drainage well only with check valve to prevent back flow. The height of the tie-in is 200 mm from the bottom of the well.

Drainage around the house and blind area
It is important to take into account the height of the contour drainage around the house relative to the blind area - they must match.
Any type of drainage is laid to a depth below the lowest foundation structure no less than half a meter. In addition, it is important to understand that the presence of drainage does not in any way cancel measures for waterproofing foundation structures - depending on the conditions, purpose and financial capabilities, this can be a budget bitumen coating and pasting waterproofing, rubber coatings, spray-on insulation and efficient expensive membranes. But in any case, the protection of the foundation from water should be comprehensive: waterproofing plus drainage and dewatering.

Owners of their own homes are well aware that the installation of drainage around the house is on the list of priority measures. It is very important to protect buildings from flooding, otherwise gradual wetting and destruction of the foundation, distortions are inevitable. window frames And doorways, the appearance of cracks on the walls and many other troubles. Despite the apparent complexity of the work, it is quite possible to install the drainage system yourself.
What is drainage and why is it needed?
Drainage is a system that removes excess moisture from buildings. Most often, it is a structure of pipes through which water leaves the site. Some believe that an effective catchment area will provide a solid blind area around the house and drainage will no longer be needed. However, experts strongly recommend equipping a drainage system that can much better protect the building from excess moisture.
There are three types of drainage:
- open. As drains, open ditches with a depth of about half a meter and the same width are used. The simplest option that is easy to do on your own. However, the trenches seriously spoil the view of the site, in addition, they quickly crumble and become unusable, so they are reinforced with various trays.
- Zasypnoe. The dug ditches are covered with large rubble, rubble or broken bricks. Top covered with turf. Undeniable dignity structures - durability, especially if geotextiles are used during the installation of the structure. The main disadvantages are the lack of the possibility Maintenance during operation and relatively low throughput.
Closed. Drainage is carried out using perforated pipes laid in the ground. The system is very effective, without the disadvantages of the two previous options, but it is rather complicated to arrange.
Open drainage trenches are reinforced with special trays and covered with gratings.
The main types of drainage structures
When thinking about how to make drainage around the house, you need to know that there are several types of such systems.
wall drainage
The structure is mounted around the foundation, it is considered mandatory if there are basements and basements. It is best to start installing the system during the construction of the foundation, at a time when the foundation pit has not yet been filled up. Otherwise, earthworks will have to be carried out again, which will lead to additional labor costs and financial investments. Drainage is laid along the base of the building, pipes from the corners are led to manholes. At the lowest point of the structure, an outflow well is equipped, from which water is pumped out or discharged outside the site. For additional protection of the foundation, a clay castle is set up at a distance of about a meter from the house.

The arrangement of wall drainage is best done during the construction of the foundation
Ring or trench system
This option is laid at some distance from the foundation with a deviation of about 1.5-3 m from it. It is advisable to use such a design if there are no technical undergrounds, plinths and basements in the building or if it is located on loamy and clay soils. A clay castle is also mounted between the foundation and the system. For effective protection buildings from excess moisture, drainage is laid 0.5 m deeper than the lowest point of the foundation. It is assumed that the drains will be laid on a layer that easily passes water, for example, on crushed stone.
Preparing for installation
Before you begin to equip the drainage, you need to prepare the foundation:
- we process the outer part of the base with a bitumen-kerosene primer;
- apply bituminous mastic on top;
- in wet bitumen we lay plaster and paint or reinforced mesh with cells 2x2 mm;
- To close the mesh after the mastic dries, after about a day, we apply another layer of coating.
System arrangement rules
The basis for the construction are special drainage pipes. Most often, these are plastic parts with a diameter of 75 to 100 mm with perforations applied to them. If it is not possible to purchase them, you can take the usual sewer pipes the desired diameter and drill holes in them. In this case, it is necessary to take into account the dimensions of the gravel in which the part will be laid, it must be larger diameter drilled holes.
Practice shows that it is quite possible to equip the drainage of the house with your own hands. In this case, the following requirements must be met:
- The perforated pipe is covered with gravel for about 0.3 m. To prevent clogging of the system, parts wrapped in filter material are used or geotextiles are laid.
- If the structure passes under the road along which the transport is moving, a metal pipes, connected by tightly fitted couplings with the rest of the system.
- For unhindered cleaning and maintenance of the structure at the main nodal points (at bends, at the intersections of parts) and every 10-12 m on straight sections, manholes.
Water from the system is discharged into a gutter or sump, the simplest version of which is a conventional welded box with a metal grate.

drainage system set up at a slope to the point of discharge of water
Instructions for laying drains
Experts advise starting the arrangement of the system by building a site plan. Even the simplest plan will help determine optimal location pipes and calculate the number necessary materials. Installation of the structure is carried out in stages:
- We mark the site in accordance with the completed plan.
- We dig trenches of the required depth. Their width should be sufficient to fit the pipe and crushed stone inside.
- We organize the slope of the drainage system. We measure the height differences and set them to right points milestones. Carefully pour sand to the bottom of the trenches until the desired bottom slope is formed.
- We line the bottom of the ditch with geotextile, on top of which a layer of gravel is laid. Be sure to follow the chosen slope. We are preparing a small recess necessary for laying pipes.
- We lay the perforated parts on the prepared place and connect them securely. Be sure to check the slope of the pipeline. This can be done with a cord or rope stretched along the trench.
- Installing manholes.
- The laid pipes, if the filter material is not attached to them, are wrapped with geotextile and fixed with polypropylene tape or twine.
- We fill the system with washed gravel with a layer about 20 cm wide.
- We wrap the filter layer with a geotextile sheet previously laid in the ditch, making a large overlap.
We finally fill the system with coarse river sand.
![]()
The drainage pipe, together with the filter layer, is wrapped in geotextile
Inspection and collection wells
As experience shows, the "correct" manhole guarantees effective drainage around the house. The device is designed for maintenance and periodic cleaning of the system, without which it quickly becomes clogged and becomes completely unusable. You can buy a ready-made element in a store or make it yourself from a piece of plastic pipe of a suitable diameter. The well should be large enough for a person to put their hand into it to clean the structure.
At the lowest point of the system, a well is installed to collect water. It can also be purchased at the store or made independently. Welded and reinforced concrete structures. The latter can be made from rings or cast with your own hands. In any case, the depth of the well should be sufficient so that sand and earth settling to the bottom do not interfere with the free flow of water. The sediment is periodically cleaned out.

Example self-manufacturing storage well
Properly executed drainage system around the building will protect it from excessive moisture, threatening many problems. Professionals can easily cope with this work, but if you wish, you can do it yourself. A pleasant result of the efforts spent will be cozy house, reliably protected from the harmful effects of groundwater.
17.07.2016 0 CommentsOwners of suburban areas are often faced with a situation where an excess of water in their territory after snow melts or heavy rains interferes with comfortable living. An equally significant problem is the high location of the groundwater level on the site. To a greater extent, this applies to those whose land ownership is located in the lowlands of the existing terrain and on the slopes of natural hills with a significant content of clay in the soil. Excess moisture in the ground not only has an adverse effect on root system garden plants, but also heats the basements of buildings, which negatively affects the durability of the foundation structure.
The device of the drainage system will help to solve this problem forever. The drainage system is a complex engineering structures, the functional purpose of which is to collect and divert water from the service area. Often the owners comfortable living it is enough to install the system not over the entire site, which is quite costly from a time and financial point of view, but only drainage around the house.
In contact with
Classmates
Depending on the method of implementation, drainage systems are divided into types:
- Surface, subdivided into:
- Linear (performed in the form of shallowly dug trenches located along the perimeter of the building). Such drains can be either open or closed. open system, which has the appearance of a tray uncovered from above along the perimeter of the protected area, in addition to the unsightly appearance in addition, it poses a risk of injury if you move carelessly around the territory and is not popular with landowners. Closed systems more attractive in terms of security and have a more presentable appearance;
- Spot, which are located directly in places where water accumulates (under drainpipes or in front of the entrance to the house) and are interconnected by pipes.
- Deep, which consist of a whole network of buried perforated pipes that collect and remove groundwater from the site.

Preliminary work
Before starting work, whether the installation of drainage around the house is done by hand or by a specialized organization, it is required:
- To study the site to determine the slope of the existing terrain;
- A detailed design of the future system is being developed, which takes into account the slope of pipes in the ground of the order of 5 mm. - 1 cm on running meter;
- Choose the type of future drainage system based on the prevailing on a particular land plot conditions;
- Choose the type of drainage pipes. Currently, both flexible and rigid pipes are on the market, the drainage effect of which is achieved by the presence of holes along the entire length. Flexible pipes are cheaper, rigid pipes are more durable, and it's worth putting some effort into prioritizing features for the homeowner.
Necessary tools for creating drainage
For the production of work, depending on the type of drainage around the house, you will need the following tools and consumables:
- Garden wheelbarrow;
- Shovels (shovel and bayonet).
- Hydraulic level (in the form of two flasks connected by a hose) for the implementation and control of the slope of the drainage system;
- Roulette;
- Pegs with rope;
- Bulgarian.
- Manual rammer.
- Drainage pipes, gutters, trays and their accessories.
- Coarse gravel or crushed stone (fractions 20-40 mm.);
- Concrete or components for its manufacture (cement);
- River coarse sand.
- Geotextile.
Surface drainage technology around a private house
 This system does not require complex installation, is not allocated on the territory of the site, but due to sand traps and garbage collectors does not cause difficulties in operation, while having a significant throughput.
When choosing the design of such a drainage system, it is necessary to take into account the likelihood of loads acting on it - in places of traffic, the use of models with increased strength is required.
Work sequence:
- In the selected installation sites of the devices, pits are dug, comparable in size to the design, adding a small margin. The depth of the pits should take into account the thickness of the concrete pad to be poured;
- Concrete pillows with a thickness of about 100-120 mm are poured in the pits;
- The pits are connected along the perimeter of the house with pipes laid in trenches. The depth of the pipes should correspond to the mark of the top of the concrete pads;
- Storm water inlets are installed in the pits, connecting them to the drainage pipes of the system. The slope of the pipe system must exceed 0.5% (5 mm per linear meter of pipe length).
- Before final pouring with concrete, it must be installed on storm water inlets. decorative grilles to make sure that they are level by 3 - 5 mm. below the ground for the most effective collection of atmospheric water. Lattices usually do not require fasteners, but simply fit on the device receiving water;
- The space between the storm water inlets and the walls of the pits is poured with concrete mortar.
- At a distance of 3-5 meters from the building, they dig a trench with a length of four meters and a depth of 0.5 - 0.7 m, the bottom of the trench is covered with coarse sand and carefully rammed. The longer the trench, the more efficient the drainage from the protected area will be. A layer of geotextile is laid on top, a layer of crushed stone (gravel) with a thickness of about 0.1-0.2 m is poured on it. Pipes from point rainwater inlets are led out to the trench and connected to each other. A drainage pipe is laid on the gravel with holes down, pipes leading from the storm water inlets are connected to it with adapters. Then a layer of crushed stone is poured on top with a layer of 0.1 m and covered with geotextile. In conclusion, the trench is backfilled with soil and the construction of the blind area is started.
 The linear drainage system around the house, unlike the point one, is made in the form of long open storm water inlets and is used for buildings without specifically allocated discharge zones atmospheric water. In this case, water is collected in receiving gutters along the entire length of the drainage line and then with the help of underground pipes outside the boundaries of the protected area.
The gutters of such a drainage system are cast from frost-resistant plastic or fiber-reinforced concrete. They have a long service life, are resistant to significant mechanical stress. Geometric dimensions gutters are selected based on the amount of water they receive, which directly depends on the area of \u200b\u200bthe roof of the building.
Work production technology:
- According to a previously developed scheme, the location of the storm water inlets is marked on the ground by means of pegs and a rope.
- According to the markup, trenches are dug under the water intake gutters. The depth of the bottom of the trench is determined based on the height of the storm water inlet profile + 100 mm. for pouring a supporting concrete pad, the width of the trench should be approximately 70-100 mm. exceed the width of the gutter. At the same time, one should not forget about ensuring the proper slope of the storm water inlets and the deepening of the gratings covering them by 3-5 mm. below the surface of the earth.
- The bottom of the trench is carefully leveled and rammed.
- A concrete cushion of a given thickness is poured.
- At the lower point of the drainage perimeter around the house, a sand trap is installed ( sand trap), controlling the correct installation of the building level. From the sand trap, water is discharged into the existing sewerage system or outside the site by pipes buried in the ground.
- Mount the gutters of the drainage system, connecting their grooves to each other. It will not be superfluous to seal the joints with sealant.
- Transition couplings connect gutters with sand trap, for this purpose, there are plugged holes in its body or places provided for their device.
- After controlling the slope and quality of laying, the gutters on the sides are poured with concrete mortar. Before pouring, decorative gratings should be put on the gutters to prevent deformations due to pressure on the walls of the concrete mixture.
- The sinuses of the trench are backfilled with soil.
Such drainage around the house during operation requires periodic cleaning of storm water inlets and gratings as they become clogged. Depending on the amount of precipitation, the cleaning procedure is recommended every two to three weeks.
Deep drainage technology
Such drainage around the house with your own hands can be done according to two schemes: wall or ring. In both cases, it is a perforated drainage pipe system that collects soil water at the depth of its occurrence, which is then discharged outside the site. The production of such works, compared with surface systems, is characterized large volume excavated soil.
Wall drainage scheme
 wall drainage around the house is usually arranged in parallel with the construction of the foundation and basement walls of the building under construction to avoid subsequently additional earthworks. However, if necessary, if a problem with groundwater was discovered later than the construction of the building, there will also be no difficulties with the installation of such a system.
Device technology:
- The walls of the basement of the building are coated with two layers of hot bituminous mastic with reinforcement of the first layer with paint mesh.
- Along the perimeter of the building along the foundation, a trench is dug 0.3-0.5 m below the depth of the base of the foundation, at the corners of the building and in the lowest place on the site, pits are provided for the construction of manholes.
- A leveling layer of sand 0.1-0.2 m thick is backfilled and carefully rammed in layers, observing the required slope of the trench bottom of the order of a centimeter per meter of length.
- A layer of geotextile is laid in the trench, trying to ensure that the edges of the fabric go 50-70 cm onto the walls of the basement and trench.
- A layer of rubble about 10 cm thick is covered.
- Drainage pipes are laid on crushed stone, orienting them with holes down.
- In the places intended for this purpose, manholes are installed and drainage pipes are attached to them. The top edge of the wells should be located above the surface of the earth. Drainage pipes in wells should have breaks, this will allow them to be cleaned in case of clogging.
- On top of the drainage pipes, a layer of crushed stone is backfilled into the trench so that it covers the pipes by 0.1-0.2 m.
- The edges of the geotextile from the walls of the trench cover the resulting drainage structure around the foundation of the house and fix them with synthetic twine.
- Fill the trench with soil.
Do-it-yourself ring drainage technology around the house
 The implementation of drainage according to this scheme is in many ways similar to the wall system and the technology of work is almost identical. Ring drainage is optimal when placing a site on clay and loamy soils in buildings where a basement or technical underground is not provided. In this case, a trench for drainage pipes is dug at a distance of 1.5 - 3.5 m from the house, while laying a layer of clay between the drains and the building (the so-called clay castle) to protect the base from groundwater infiltration. Otherwise, the technology for the production of works is no different from the wall-mounted scheme of execution. In addition, if the trenches are located at a distance of about 1.5 m from the house, they can be used to collect rainwater by arranging linear drainage in the same place. This will save time and effort on earthworks when laying linear storm water inlets.
As can be seen from the materials of this article, do-it-yourself drainage around the house is a fairly simple task and absolutely any owner of suburban buildings can do it if there is a desire and a certain amount of finance.
In contact with
Drainage around the house, waterproofing the foundation and blind area is a set of measures aimed at preventing the base of the building from getting wet and losing the bearing properties of the soil. And the device is chosen depending on the type of foundation, the type of soil, the nature of the top water and the level of groundwater.
Kinds
Drainage around the house is superficial, deep and reservoir. And to be precise, the drainage system is often a combination of these types. For example, a reservoir view will not be effective if it is not “closed” to a deep one.
Surface
This species is responsible for collecting precipitation and meltwater. It, in turn, can be of two types:
- Open. This is a system of ditches or trenches that are laid with a slope to a storm sewer or drain well. Fully open ditches are usually arranged only at the boundaries of the site. Around the house (along the perimeter of the blind area), near the platforms and paths, gutters are laid in trenches, which are covered with bars.
- Zasypnoy. This is also a system of trenches, but already covered with crushed stone (or gravel) of large and medium fractions, where a fine fraction, screenings or coarse sand are added for “splitting”.
The depth of the trenches lies in the range of 50-70 cm.
Deep
This is the system closed type, which is responsible for the removal of sedimentary and melt water, as well as seasonal perched water. In swampy areas and in close proximity to water bodies, deep drainage around the house reduces the load on the waterproofing of the foundation from the impact of high groundwater (above 2 meters from ground level).
Types of deep drainage:
- Wall mounted. The purpose is to reduce the pressure of water on the waterproofing of the walls of the underground part of the buried foundation of a house with a basement or underground floor. It consists of drainage pipes laid along the perimeter of the base of the foundation. Passes on the border of the retaining wall of waterproofing or clay castle (provided that they exist).
- Annular. Used around a house with a shallow foundation. Drainage pipes are laid below the base of the foundation along the perimeter of the house beyond the outer boundary of the blind area.
- Solid. This type is used to drain the entire area of \u200b\u200bthe house. The scheme consists of main and auxiliary channels, in which the auxiliary ones are laid in a "herringbone" direction towards the main ones, and they, in turn, converge to the catchment wells.

Plastovy
This type of drainage can be attributed to deep, but it does not pass around the house, but under it. More precisely - under the foundation slab or concrete floors on the ground.
As standard, the base of the slab itself, in the form of a pillow of sand and gravel, has good drainage properties of its own. And since the area of the bottom of the pit is larger than the area of the slab, then in order to organize the drainage of water from the foundation, it is enough to arrange annular drainage from the pipes around the perimeter.
More complex scheme when the bottom of the pit is made with a slope from the center to the edges or with a decrease in one direction (practiced for slopes). And the water from the drainage layer is diverted further through the pipe system to receivers or wells.
The most complicated scheme is when trenches are additionally dug along the bottom of the pit, into which crushed stone is poured. For floors on the ground, pipes are additionally laid, which are connected to wall drainage.

Device
Surface drainage differ in the way in which water channels are created.
A simpler device for filling surface drainage:
- according to the scheme, trenches are dug (at least 40 cm wide);
- tamp the bottom, forming a slope towards the water collector;
- cover the bottom with a layer of sand (up to 10 cm);
- crushed stone of medium and large fractions is poured to the surface level.
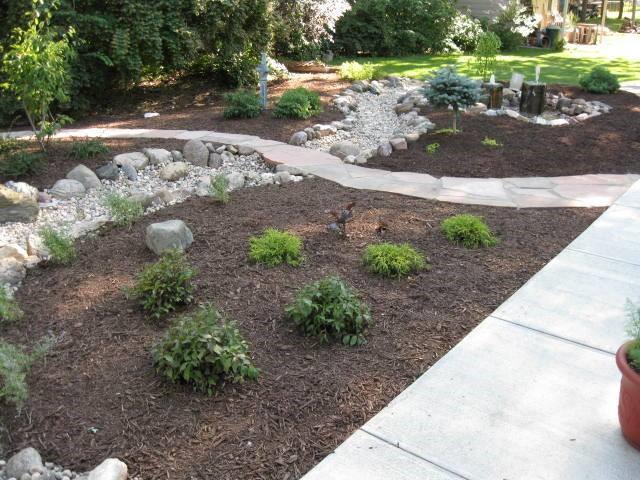
IN decorative purposes the upper visible layer can be made of pebbles and small boulders to create an imitation of a "dry stream".
The surface drainage device of the tray type (stormwater) is a little more complicated, but it is more common:
- according to the scheme, they dig trenches, taking into account the dimensions of the trays and the concrete base;
- a layer of a mixture of sand and gravel is poured onto the rammed bottom;
- a foundation is formed from lean concrete with the necessary slope;
- install gutters, fill the sinuses of the trench with concrete and ram it;
- mounted on top of the grid.
Scheme
The arrangement of deep types of drainage differs only in the level of pipe laying and layouts on the site, and the principle of construction is common for all:
- in the place allotted according to the scheme, a collector well is arranged;
- dig trenches for ring drainage, and for common system- main and auxiliary channels;
- wall drainage pipes are laid during the construction or reconstruction of the house, when the foundation is completely open to the very heel;
- in places where the trenches turn, revision wells are arranged (if the distance from the turn to the next well is more than 20 m), and with a long straight section, revisions are arranged after 25 m;
- the bottom of the trench should not have solid protruding inclusions, and the walls should be straight for dense soils or in the form of a trapezoid with reinforced slopes for the duration of work for loose soils;
- if necessary, the bottom of the trench is “reinforced” by backfilling with sand or laying an artificial base;
- if the drainage pipe has a filter shell, then a single-layer backfill of coarse-grained sand with a high filtration coefficient is made around it;
- if the pipe does not have a geotextile sheath, then first it is backfilled with crushed stone of a fine fraction around it, then a layer of sand follows.
When laying corrugated pipe without a shell, the grain size should be less than the depth of the corrugation, and the crushed stone should not contain chipped particles with sharp edges.
A pipe without a sheath can be laid according to a different scheme:
- geotextiles are laid on the bottom and walls of the trench;
- fall asleep rubble;
- lay and connect pipes;
- another layer of rubble is poured on top;
- wrap the geotextile cloth so that its edges overlap, and fasten them;
- fill the trench with sand to the level of the humus layer;
- pour fertile soil or lay a hard surface of the tracks.
Deep drainage without pipes
On soils with good water permeability and low GWL, it is not advisable to arrange an expensive deep drainage system of perforated pipes around the house. Especially if the area is small. But the surface open or filling system is also not suitable - it takes usable area. In these cases, deep drainage is arranged without pipes, or, as it is also called, soft drainage.
The simplest scheme in execution has almost the same device as deep drainage, but without pipes:
- dig a system of trenches;
- geotextiles are laid on the bottom and walls;
- fall asleep rubble;
- overlap the edges of the textile;
- sand is poured, and then soil.
Another advantage of this type is the simple nature of the work. The time for arranging the drainage is reduced, plus it is not necessary to monitor the constant and continuous slope of the pipe - it is enough if the general level of the trench goes down towards the drainage well or beyond the boundaries of the site (to the ditches or a reservoir).

There are generally “folk” methods for arranging soft drainage without pipes, when bundles connected from long brushwood are used as a conduit. And so that they do not silt, they are covered with rubble and sand.
How to make drainage around the house with your own hands. Step-by-step instruction
If the house has already been built, and it became obvious that the water permeability of the soil is low, and throughput wall or reservoir drainage is insufficient, then the easiest way to solve the problem of waterlogging of the soil is to do-it-yourself ring drainage around the house:
- Draw up a layout of trenches with a depth of occurrence and slopes to a collector or drainage well.
- They dig trenches with a bottom width of more than 40 cm. The depth at the very “upper point” should be below the base by the diameter of the drainage pipe plus the thickness of the crushed stone cushion.
- The bottom of the trenches is compacted, a layer of sand is poured, then crushed stone, and a slope angle is formed towards the receiver. The slope is calculated depending on the diameter of the pipe, based on a minimum water velocity of 1 m/s. But it should lie within 0.5-3%, be constant or increase to the lowest point.
- Pipes are laid according to one of the above schemes. The connection of drainage pipes is carried out with couplings, which, unlike socket joints, do not silt. The choice of a specific type of pipe (including material and ring stiffness) depends on the depth and design pressure from above (backfill, soil, and when laying under tracks or platforms, the weight of the coating and the load on it must be taken into account).
A novelty has appeared on the market - drainage pipes with an additional filter layer made of specially shaped expanded polystyrene granules. This layer is located between the pipe and the geotextile sheath. When laying this type of backfilling with crushed stone is not required.
- Perform backfilling. The nature and order of the layers is chosen according to the type of drainage pipes.
Below is a video on the ring drainage device. The owner of the house made sure and twice used geotextiles - as a pipe shell and around the drainage backfill. Such a system will not silt longer under conditions clay soils. It also shows well how important it is to choose clean gravel.
Drainage around the house is no more difficult (but no easier) than autonomous sewerage with septic tank and filter well. The amount of work on laying pipes is greater, but there are no strict requirements for the tightness of the system. And make the drainage quite within the power of yourself. The only difficult moment is if the drainage well is mounted from concrete rings, then you need to bring technology.