Wooden window frames carved templates pictures. How to make carved window frames? DIY templates
Reading time ≈ 4 minutes
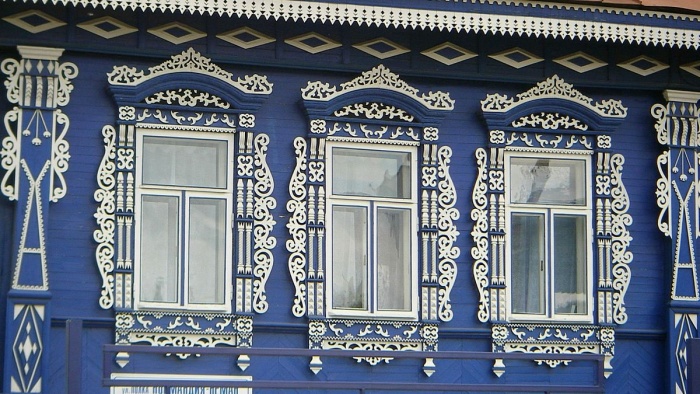
Decorating the facade of the house is an important step. Since ancient times, people have tried to make the face of their home unique by covering the space near the door and windows with intricate carvings. Our ancestors gave every turn they made sacred meaning and hoped that these golden laces would protect the home from the penetration of dark forces. The fashion for antiquity leads to the fact that today ancient traditions have become again in demand. In this article we will talk about how to make window frames with your own hands.
Project
Any business should start with a project. First, they draw the façade of the building, taking into account all the actual details. Then you need to make a drawing of carved window frames. You can also use the drawings and diagrams presented on the site.


Using a visualization program, if you have one, you can make a 3D project of the house. It will show everything in its entirety and will allow you to evaluate how appropriate the wooden trim you like on the windows is.

When project documentation ready, preparing a set of tools that will be useful for the upcoming work.
- screwdriver;
- feather drill for wood (12 mm);
- a jigsaw, preferably with a soft start, without it it will be difficult to cut out complex elements;
- Sander.
You should take care of the material for future platbands. Traditionally, pine boards are used High Quality, which have a minimum number of knots. If there are knots on the surface of the boards, then the cuts must be made in such a way as to prevent a knot from getting into place.
Sawing out platbands

The manufacture of window frames begins with cuts that need to be made from the inside. First, holes are drilled along the contour of the pattern, where it is planned to make openwork patterns in the future. The video shows that when working, the drill must be held perpendicular to the surface of the board.


When the end-to-end patterns are ready, cut out the outer contour.

The tool must be guided from one end to the other, the direction does not matter. Pre-cuts are made in the middle part.

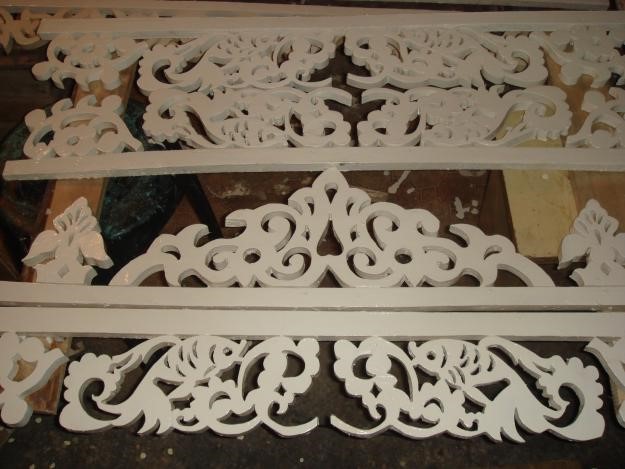
The result is a finished part for window decoration. Next, a similar one is made in mirror image to use it on the opposite side.
Surface grinding

To give the wood an optimal appearance, it is processed using a sanding machine, the sanding wheel of which should have a grit of 80. The result is a smooth surface, ready for painting.
Primer and painting

Before painting, the wood is treated with an antiseptic, which will protect it from rotting and bark beetles. This composition must be applied to the entire surface, without even missing hard to reach places. Scrupulousness in work will allow the platbands to last for many years.

When the composition is applied, you need to thoroughly dry the workpieces, and only then begin painting the parts. The best option- paint on water based, intended for woodworking. The window frames in a wooden house are painted in the color specified in the project. For this project we use paints of two colors: white and cherry.


The work is carried out using 2 brushes: wide (50 mm) and narrow (20 mm). The first is for painting external surfaces, the second is for internal ones.


It is necessary to carefully paint over the parts, leaving no uncovered areas. After the first layer has dried, apply the second.


One layer is enough. They are careful in their work. Smudges can completely ruin the overall picture. Products should dry in normal conditions- on open air.
Assembly
It is better to assemble blanks into a single composition using horizontal surface. This is much more convenient than directly on the window.


Old Russian architecture is invariably associated with carved window frames. This form of house design is distinguished by its diversity of species. Just a few decades ago, in each region there lived craftsmen with their own style of creation. decorative elements. Today's return to origins is accompanied by a revival of interest in window decoration using carved frames.
Purpose of framing
The word “platband” itself speaks of its location - “on the face”, that is, one of its functions is to decorate the facade of the building. Therefore, people tried to express their individuality through it and decorate their windows with carved frames. In addition to the decorative role, window frames, first of all, perform constructive function, closing the gap between the frame and the opening. This prevents dust from entering the house, protects against precipitation, drafts and extraneous sounds.
In the old days, carved platbands were also attributed magical properties. It was believed that the window frame a certain form The planks protect against the evil eye and serve as a kind of amulet. Therefore, in the bizarre patterns one could see various figures and plants carrying a specific meaning.
IN modern architecture functional purpose platbands for windows are as follows:
- Well-chosen carved decoration allows you to visually elongate a low building or expand a narrow wall.
- The opportunity to show individuality and decorate the building in accordance with the spirit of a certain era.
- Allows you to achieve a unified architectural ensemble between all buildings on the site.
- Protection of cracks from external penetration negative factors(precipitation, noise, dust).
- It is one of the elements of thermal protection of the house.
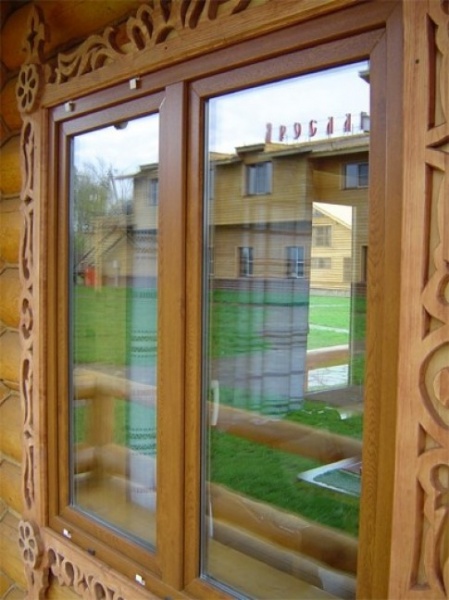
Note! Sometimes platbands are the only option for framing a window. This mainly concerns wooden log houses when the use of other materials is unacceptable due to loss of harmonious appearance.

Carved finishes, especially those made of wood, have a number of features that should be taken into account during operation:
- Dependence on the influence of atmospheric factors. Moisture and temperature changes invariably cause damage to decoration.
- When selecting a frame, you should take into account the properties of the rock from which the frames are made and take care of high-quality processing. Timely preventive measures extend the service life of window products.
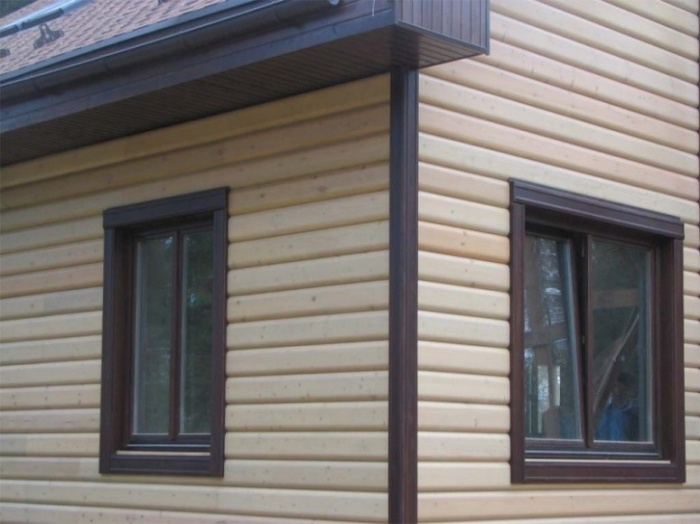
- Difficulties often arise when combining wooden carved elements with modern plastic frames. With this combination, it is preferable to install windows that imitate wood texture.
The meaning of carved elements
The desire to conform to ancient traditions requires knowledge of the meaning various elements carved platbands:
- The sun is usually placed on a kokoshnik. It symbolizes life and energy.
- The personification of wisdom and fertility is contained in the image of a snake.
- A symbol of harmony between spiritual and material aspirations is a cross in a carved frame.
- The feeling of unity with nature is emphasized through vegetation.
- The earrings testify to the hospitality of the owners of the house.
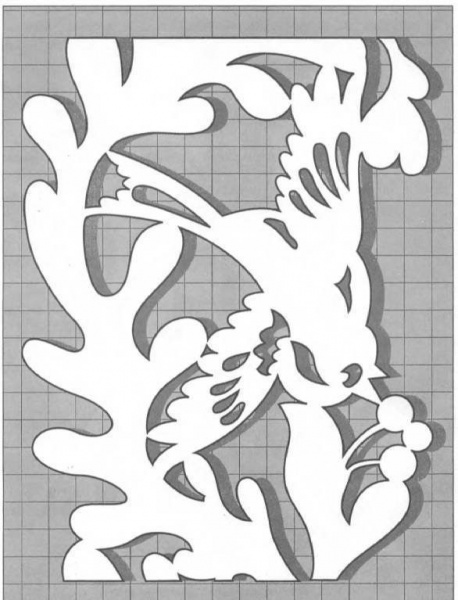
- The connecting element of all times is the silhouette of a bird on the window.


Characteristics of materials and forms
Natural and artificial materials are used to produce window frames. Traditionally, carved elements were made from weather-resistant wood. Characteristics of the properties of individual rocks will help determine the most suitable type:
- Larch is minimally susceptible to rotting processes, but is not suitable for the production of carved frames due to its fragility.
- Aspen, alder and linden are the most convenient species for creating openwork decor on windows. However, the pliable and soft wood of carved frames requires special treatment due to its ability to absorb moisture well.
- Window frames made of oak, ash or beech are characterized by resistance to negative atmospheric influences, but the processing of carved elements is burdened with difficulties, overcoming which you will get a durable decor.
- A good choice would be birch or pine wood, which allows you to create neat carved decor. At the same time, the platbands are strong enough for external use.
- Small carved window decorations that are fixed to the main elements can be made from cherry or apple trees.
Advice ! Regularly updating the coating of wooden frames with waterproof paint or varnish will ensure their long service life.
What other materials are used in the production of window trims and what their features are, we will consider below:
- Laminated MDF allows you to accurately imitate the color of any type of wood, but is intended exclusively for indoor use.
- Plastic windows are harmoniously combined with platbands made of a similar material (PVC), which is not subject to rotting and has a wide color palette, resistant to impact solar radiation. The color of the trim is selected taking into account the finishing of the house to match or contrast with the facade.
- For windows round shape Products made of polyurethane, characterized by ease and ease of care, are ideal.
- Metal strips are attached to protect the assembly seam, connecting them into a single unit with the profile box.
There are two main ways to install platbands:
- The invoice is the most common method when decorating windows. For fixation, special glue or nails are used.
- The telescopic method involves an L-shaped form of manufacturing the platband, which allows you to secure the product by entering into the grooves of the box. Most often used for finishing doorways. Its characteristic difference is the absence of traces of fasteners.

Patterns and types of threads
The carved shapes of the platbands give the window individuality, but to make them, you will definitely need templates. Having wood carving skills allows you to choose a complex ornament. If the ability to work with wood is not enough, it is better to find a light pattern for window trim. We suggest studying:
- variants of single element templates and their general appearance;
- top, bottom and side decoration details.
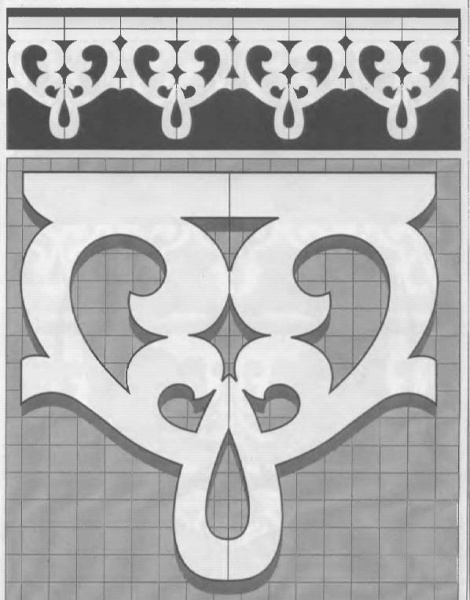


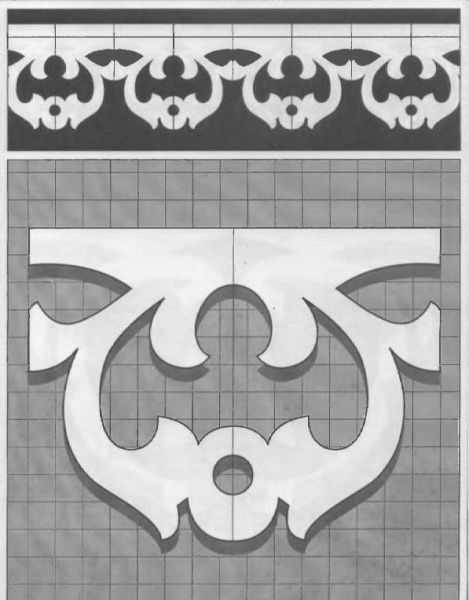


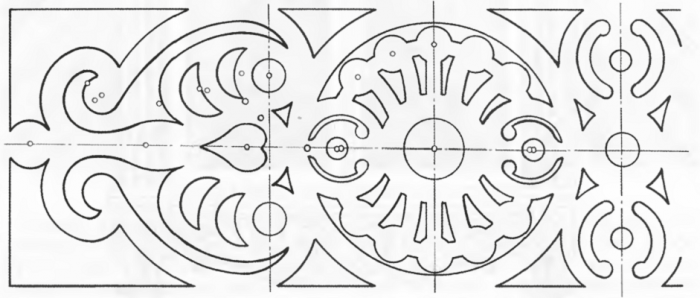
You can copy them completely or add your own details to the pattern. The carved frame design you like or a fragment of it needs to be enlarged to a scale taking into account the size of your window. To make carved templates, fiberboard, thick cardboard or paper are used. It is advisable to decorate windows with platbands with the same carvings. Please note that making small carved elements is much more difficult, and they deteriorate faster than others. In this case you will need partial replacement framing.
Warning ! Be sure to take into account the slope at the top of the carved platband. This will prevent snow accumulation and ensure timely drainage of water.
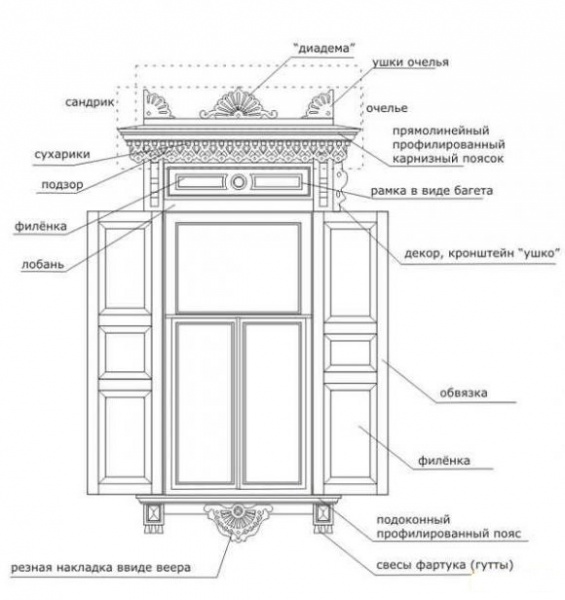
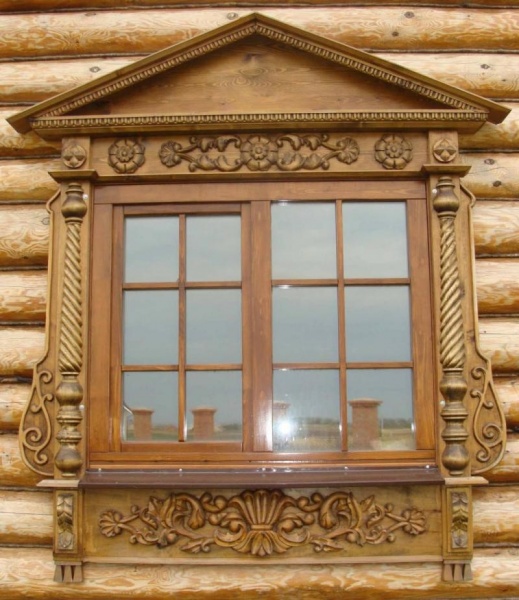
The upper part of the window casing is called a kokoshnik, the lower part is called a towel. The most widespread ornaments of carved frames are the contours of plants, images of animals and geometric shapes.
The key details of the drawing for any window casing are:
- bottom strip or window sill;
- vertical rail;
- top bar.
The pattern can also contain all kinds of hangers, flowerpots or a tiara. Detailed description The names of carved decorative elements are presented in the diagram below:
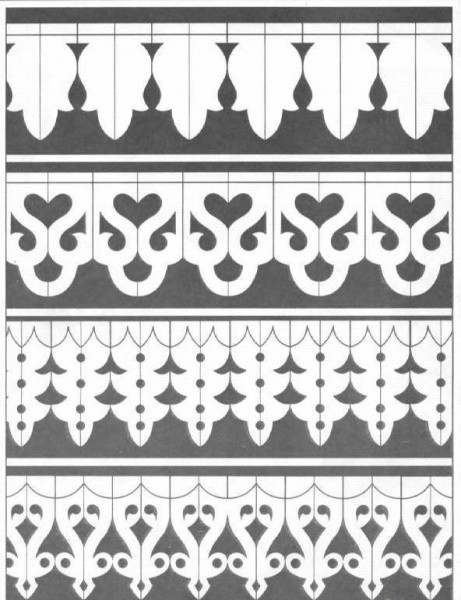
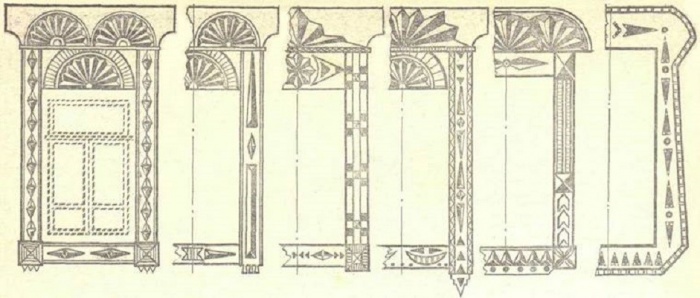
If your windows have different size, experts advise making a drawing with an intermediate repeat repeating required amount once. For rapport, you can choose one or two elements that are repeated alternately. An example of such a scheme is shown in the photo below:

There are several ways to make carved wooden frames for windows:
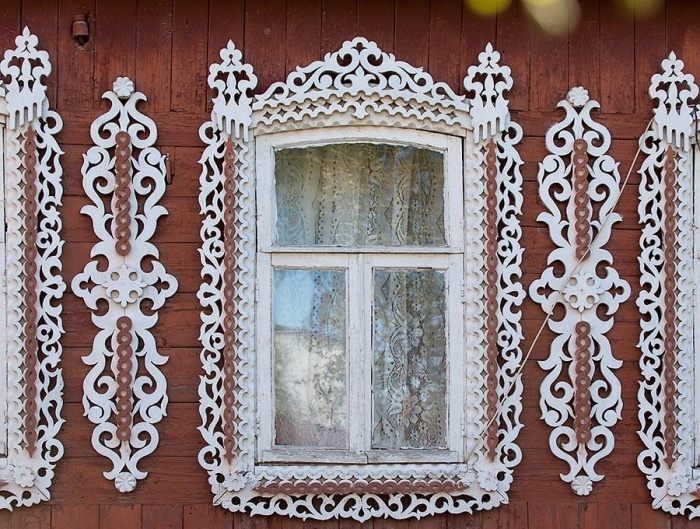
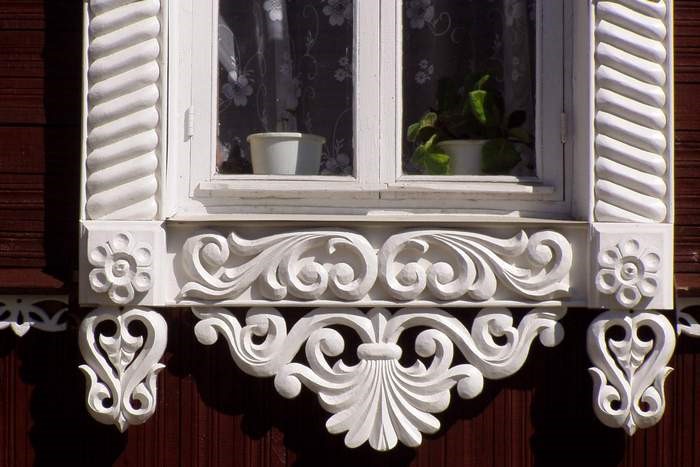
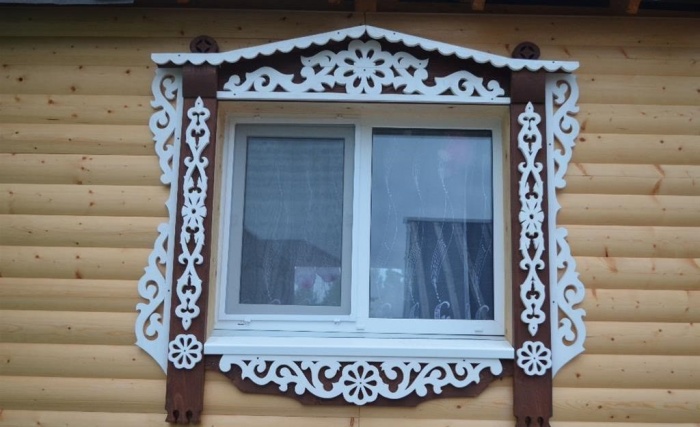
- The most decorative and delicacy are characterized by carved frames. The product is made of light-colored wood or is subsequently coated with white paint. This window design is more dark wall looks sophisticated and elegant, vaguely reminiscent of Vologda lace.
- With overlay carving, separately cut parts are fixed to a continuous board by gluing or nailing. This technique allows you to design a window with a simple platband. Protruding elements are often coated with contrasting paint.
Sometimes both types of carving are combined.

Manufacturing process
Having decided on the pattern, material, type of carving and method of fastening the trim, you can proceed directly to the manufacture of carved frames for the windows.
Important ! The design on the workpiece needs to be placed correctly. The placement of elements along the fibers of wooden blanks will prevent cracking of the thread.
It is better to mark the places in the pattern where slits need to be made with color. The work on making platbands consists of the following stages:
- Taking measurements from the window.
- For slotted thread boards are selected from minimum thickness 30 mm, the overhead method allows the use of wood with a thickness of 10 mm. All work is carried out with dry lumber.
- Blanks are cut out.
- To ensure a tight fit of the carved platband from the inside, the wood is selected to a shallow depth (1-2 mm).
- The pattern applied using the template is cut out. Drills are used to form holes various diameters, a jigsaw will be needed to make the cuts. To create a beautiful cut, the jigsaw insertion point is marked with a drilled hole.
- All carved elements of the window casing are cleaned with sanding paper. Wood dust is removed from non-through holes using a vacuum cleaner.

Overhead thread involves fastening finished elements to a wide casing using nails with their heads removed. The strength of the connection will be strengthened by applying glue to the underside of the casing. It is not recommended to use self-tapping screws due to the risk of damaging the carved section of the connection.
Carved platbands are installed on wooden windows using blind or through tenons. The first option is distinguished by a reliable connection and a complex installation process. The second method is simpler, but less reliable. Installation of carved elements on a plastic window is carried out using liquid nails.
Preliminary protective treatment of carved frames and regular preventive maintenance will ensure long-term preservation of the attractive appearance of the window.


The first platbands appeared back in the days wooden houses. Despite the simplicity of the design, to build such a house, you need to have experience and knowledge in the field of architecture. The casing is a painted fresco, which is located near window frame. The casing will not only original decoration, but will also perform a number of additional functions.
Due to their tight fit to the window frame, the platbands block access to drafts in the window slots, protect against dust and moisture getting into the gaps, and also have thermal insulation properties. After all, foam is used to install platbands, which is already an excellent thermal insulation material.

Heat from the house will not escape through the window openings in the frame, which means that cold will not enter the house. Also, the casing protects against damage plastic windows under the influence of moisture and temperature. The only drawback is that the platbands become unusable over time and will need to be restored. But this is much more economical than restoring windows.

The next important factor is design. Platbands are mortise figures made of wood or plastic, which are selected individually to match the image of your home, so that the harmony and aesthetics of both the window frames and the house as a whole are maintained.


Types of platbands
The designs of the platbands are similar to each other, so it is difficult to characterize them in any way. Therefore, the types of platbands are divided into the material from which they are made:
- Plastic
- Tree

Now, in order, about each type, its advantages and disadvantages.

Plastic trims
Plastic platbands are more resistant to moisture on the surface, do not deteriorate under the influence of temperatures and have the longest service life. Modern technologies allow us to produce plastic trims under the design of the tree.

Naturally, there will be noticeable differences in contrast between natural wood and artificial, but do not forget about the other positive characteristics of plastic.

MDF trim
MDF is a dense board made of sawdust and glue. To increase their service life, such boards are varnished, which significantly increases the time of operation and use of MDF.

Wooden platbands
The most common are wooden frames. Therefore, the types of wooden platbands are divided into the following types:
- Made from natural wood
- Environmentally friendly

Natural platbands are made from 100% wood. To extend their service life, such platbands are treated with special materials that protect the surface from environmental influences.


Environmentally friendly platbands are made from safe materials that, in the event of a fire, will not release harmful combustion products into the atmosphere.

Wood itself is a soft and plastic material, so it is possible to make a platband of any shape and any size, which is a huge plus and significantly distinguishes wood from the background of platbands and other materials.

Installation of platbands
Beautiful wooden trims are installed in three ways:
- Overhead
- Telescopic
- Finnish

Installation of overhead platbands is done on outside house and window frame. Telescopic installation has curved shape the letters “G” and are inserted into the grooves of the window.

The Finnish installation of platbands can be immediately noticed by the presence of a canopy over the window and the simplicity of the form. The choice of platbands depends on your taste preferences.

Material for the manufacture of wooden platbands
Many frames are created to match the old design of the 18th century from natural wood, but what kind of wood is best to use, read below. Perfect option- use the type of wood from which the house is made, so as not to disturb the structure and design of the house.

In other cases, it is best to make platbands from oak or beech. Due to the density of the material, it will be expensive to make yourself designer model or simply apply threads without special material.

If you are planning to start making wooden frames yourself, then it is best to use cherry or sour cherry. These varieties are more susceptible to carving and are used more often than others for self-creation platbands.

Regardless of the type of wood, you need to remember the main rule - any wood must be varnished to protect the wood from environmental influences.

To emphasize the uniqueness and good taste of the owner of the house, wooden door frames will be an excellent addition to window frames. Thus, we can conclude that the use of platbands gives solidity to the house, and due to the universal component - wood, the platband can be made to order, taking into account your preferences.

Photos of wooden platbands


The appearance of the house largely depends on how the windows are decorated. It is they who emphasize, and sometimes even shape, the style of the building. And the main way to give them character is window trim. That's about them we'll talk further.
Purpose and classification
Platbands are long narrow strips that frame windows or doors. Based on this principle, a distinction is made between windows and doors. They usually differ in width, but to maintain uniform style, must be made of the same material. In addition, they are made in a similar manner, using repeating elements and painting in the same color.
Door and window frames serve not only to give the building/room a finished look, although this is also important. They also close the technological gap that forms between the door or window frame and the wall. After installing windows and doors, this gap is filled with insulation, but this does not improve the view, and water, dust and sound continue to penetrate into the room, albeit in smaller quantities. So they once came up with the idea of closing that gap with slats, and even decorating them.

Depending on the installation site, the platbands can be external or internal. The protective role is played mainly by platbands for outdoor installation. That’s why they are made from materials resistant to climatic factors (or covered with protective compounds) and the thickness of this material is usually greater. Internal platbands mainly perform a decorative function. They are operated under gentle conditions, therefore the requirements for the properties of the material are different - decorativeness is important, not resistance to climatic influences.
Materials from which window casings are made
Window trims are selected depending on general style home decoration. Houses are built and decorated in different ways, and accordingly, the materials and style of additional decorative elements are chosen differently. TO brick houses, For example, would be better suited plastic or metal, but not wood (this is if there are any trims at all). Windows are also decorated with plastic or metal. For wooden ones, on the contrary, wood is more suitable. But this is not the rule either. The choice of platbands is a personal matter for the owner. He puts in whatever he wants. It is only important to understand all the pros and cons of each material.
Wood
Platbands for wooden house, most often made of wood. But any type of wood requires constant maintenance - painting and/or varnishing. Every two to three years you have to renew the coating. Only in this case, products made from it look normal for many years.

Plus wooden window casings is that they can be carved, with figured elements various forms. This gives an almost endless number of options. There are absolutely simple models– regular planks, perhaps with some additional elements. The choice depends on the style of the house.
Wooden frames are used both on the street side and indoors. Simply, during installation they will use different protective impregnations and coloring compounds.
Plastic
If PVC windows are installed in the house, then plastic trim is also installed. They are good because all maintenance requires periodic wiping to remove dust and dirt. No other operations are needed.
Plastic trims are made from climate-resistant plastics, adding a dye that is resistant to fading. Components are added to the mass that protect the material from high and low temperatures.

The advantage of plastic platbands is their low price. The downside is a limited selection of models and styles, not a very wide range of colors. There are usually white and a couple of shades of brown available. The rest can only be available upon order, and even then not always. And one more minus - it is still an artificial material. Not everyone wants to install plastic trim on a wooden house. Even though wooden ones are not cheap at all.
The area of use of plastic platbands is indoors or outdoors. If you need external plastic trim, pay attention to temperature regime operation. The plastic must withstand the harshest frosts in your region.
MDF
MDF trim is an option for indoor use. You can’t put it on the street - it will quickly become unusable. It is compressed crushed wood fibers from which products are formed. Their surface is laminated with a film, which can be smooth, colored, or imitate the surface of stone (marble, for example) or wood.

If you don't like plastic on the windows, the second option is a budget option– platbands made of MDF. In any case, most often it is them. There are even special models - telescopic. They are good because a special additional board is cut to the required size, due to which they can change the width and fit into any opening. With their help, the doorway is designed quickly and efficiently.
Care MDF platbands no more difficult than for plastic ones - wet wiping. For severe contamination, you can use non-abrasive (liquid) and non-aggressive (without choir, etc.) detergents.
Metal trims
This type of platbands is usually installed on the street with plastic or metal-plastic windows. This is a thin sheet of galvanized metal coated with paint that is resistant to climatic factors(usually powder coated).

Metal platbands for windows belong to the budget category. They don't cost very much. Suitable for private houses decorated in modern style. Metal trims go well with houses finished with metal and aluminum composite. The second area of application is for production and office premises. They are good because they combine practicality, durability, and low price.
Arrangement of platbands
Classic window trims consist of four elements: an upper and lower trim, two side strips. They can be connected using a single spike (as in the figure). They can also be connected end-to-end, as they do not carry any load. In this case, they simply fit the planks tightly one to another, securing each element separately.

If the window has a window sill, there is no need for a bottom trim. When installing, first fix the window sill, then the side strips and lastly the top trim.

The width of the platbands is selected individually each time, but is usually in the range of -100-250 mm. When choosing the width, we proceed from two technical parameters:
- the platband must extend onto the frame by at least 5-10 mm;
- in order not to interfere with opening the windows, they should retreat from the hinges by 10-20 mm (the further, the wider the shutters open).
The final width is selected based on the style of the house. In some places narrow planks are more suitable - 100-130 mm wide, in others wide ones - 200-250 mm are required. To avoid mistakes, you can “try on” the planks by pinning them on a couple of nails and see from afar which option you like best.

The thickness of the planks for the manufacture of platbands is 20-35 mm. In most cases, a board 20-25 mm thick is used, as this optimal size for independent execution - not too difficult to process, but quite voluminous to obtain a decorative pitchfork.
Platbands in a wooden house
The most questions arise when decorating windows in a wooden house. Most are inclined to believe that only wooden frames are suitable for a wooden house. There is a reason for this - wood with wood looks most organic. But choosing the material is not everything in this case. There are a few important points, which you need to pay attention to:

So the choice of the appearance of the platbands is far from the last of those that will have to be decided. You also need to choose the method of processing the wood, the installation method, and the type of casing too.
Types of wooden platbands
Wood is extremely ductile and very beautiful material, therefore the number of variations in the design of platbands tends to be infinite... All of them can be divided into several types: simple and carved. Simple ones look great on houses in a modern style, carvings are good for ethnic buildings.

Simple in shape from moldings
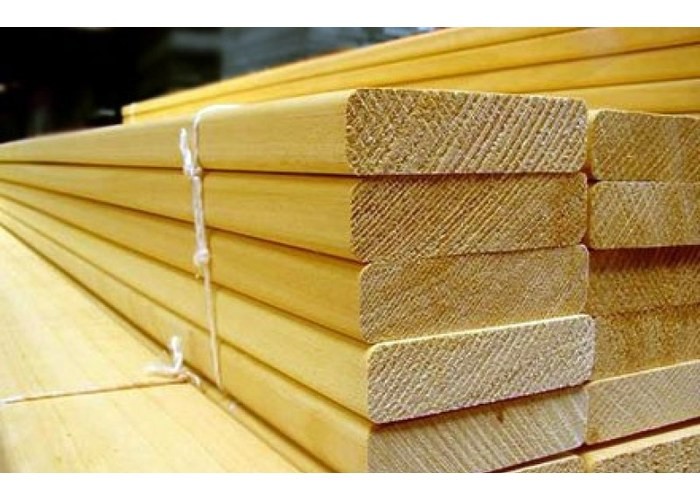
Industry and private traders sell planks of various sections:

From this molding you can make simple platbands with your own hands. To do this you need to calculate the amount required material(based on window measurements). It should be taken into account that the length of one plank is 220 cm. Do constituent elements You are unlikely to, so it’s worth considering that there will be a lot of scraps. The most successful case is when you can “cut out” two elements from one plank - usually a side panel and an upper/lower part.

The planks are joined in two ways - at 90° and at the floor 45°. The appearance of the platbands is different. When joined at 45°, a neat frame is obtained; when joined at 90°, a more expressive design is obtained. The protruding edges can be left straight, they can be cut at any angle, rounded, cut into shapes... It’s whatever you like best or whatever you have the skill, desire, or imagination to do.
The simplest homemade platbands
The option differs from the one described above in that we carry out the primary processing ourselves. Edged and unedged boards are suitable. The edged ones produce a modest finish for country house or for a house made of planed/laminated timber. First we sand the board coarsely. sandpaper, then more and more subtle. When the surface becomes smooth and even, you can begin cutting.

Nothing complicated at all - just well-processed boards
WITH unedged boards The bark is removed and the surface is also sanded. There are options here. You can achieve smoothness by removing imperfections. You can only remove the top rough layer, leaving all the imperfections of the wood and in the future, only emphasize it during processing.
Carved platbands
Openwork wooden frames for windows are a beautiful, but expensive option. Expensive - if you order their execution, and labor-intensive if you do it yourself. There are, however, simple but effective patterns that, if you have a jigsaw and the desire, you can make yourself.

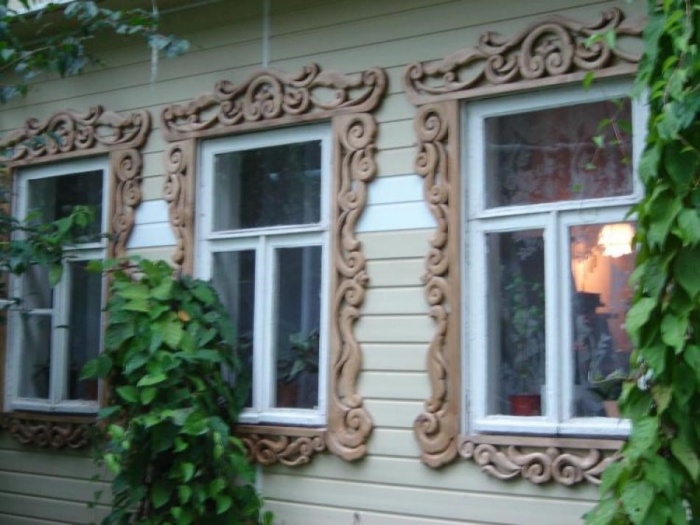
There are two types of openwork platbands - with slotted and applied elements. Slotted - this is when the holes in the platbands are made through and the wall is visible through them. Overlays are when the window is decorated with ordinary slats, and on top of them are elements of slotted carvings or decorative protruding elements (overlays in the form of rhombuses, rectangles, etc.).

In the case of overlays, contrasting colors are often used. For example, planks are painted in dark color, and the openwork is light. But this trick is easy only at the installation stage - you can paint both parts separately. Subsequently, you have to carefully apply different paints with a thin brush.
How and why to attach platbands in a wooden house
In lumber or log house windows and doors are placed on the casing - a special frame of the opening made of wood, which is not rigidly fixed to the walls, but is held in place by friction in a tongue/groove type lock. They make a casing from thick wooden beam. The window or door frame is attached to the casing. When installing platbands, they are also attached to the casing. Since there is no load on them, the planks are usually attached on both sides, retreating 10-15 cm from the edge.
Two types of fasteners can be used:

Fastening to dowels is more labor-intensive, but it is absolutely invisible. If this process is too difficult, use finishing nails.
How to attach platbands to a log wall
There are no problems when installing platbands on timber: the surface is flat and easy to attach to. If the log house is made of logs, everything is more complicated. There are two options:

Which method to choose is your decision. Both are viable and both are not ideal - it is difficult to ensure a tight seal.
How to prevent moisture from seeping under the trim
Ensuring tightness is the main concern when installing platbands on a wooden house. Most questions arise about how to prevent moisture from flowing under the top bar. Water flowing down the wall inevitably gets into the gap between the platband and the wall. There are several options for solving the problem, mostly traditional, but using new materials.

Platbands with wooden “visor”
Such platbands are also called “Finnish”, since almost all houses in Finland are framed in this way. In addition to the traditional four slats, they also have an additional inclined canopy, which is supported by consoles resting on the side slats. It is advisable to choose the angle of inclination of the plank the same as the angle of inclination of the roof or close to it. Although it is an insignificant detail, this finish looks more organic.

When installing, under the canopy in a log or beam, you can make a cut of a few millimeters, “recess” the edge of the canopy there, and seal the remaining gap at the bottom and top with sealant (silicone, frost-resistant, with adhesion to wood).
Finnish platbands are good for everyone, but they don’t go well with carvings. The style is not the same. They are great for a simpler, more concise design. Although, there are similar options in the Russian style, but making them is not at all easy.
Metal visor
Using the same principle - to drain water from the platbands - this method solves the problem. Only a metal strip in the shape of the letter Z is used - part of the standard flashing. The color is selected to match the walls or the color of the cash.

The installation method is the same: they make a cut in the wall, only its size is much smaller - the thickness of the plank is several millimeters. The installation is the same as described earlier: we insert one part into the groove, seal the cracks silicone sealant. The only difference is that the free edge can be secured to the top strip of the trim (using self-tapping screws).
Installing the bottom trim at an angle
The lower strip of the casing can simultaneously serve as protection from precipitation. To do this, it is installed at an angle. The choice of inclination angle is no different - close to the roof inclination angle.

The installation of this strip is simple. It is supported from below by triangles cut out of wood and fixed to the frame. The water will not flow down the wall, but at some distance from it. Here it is important to do it correctly - so that the water does not wash away the foundation.
Photos of platbands for windows of different types


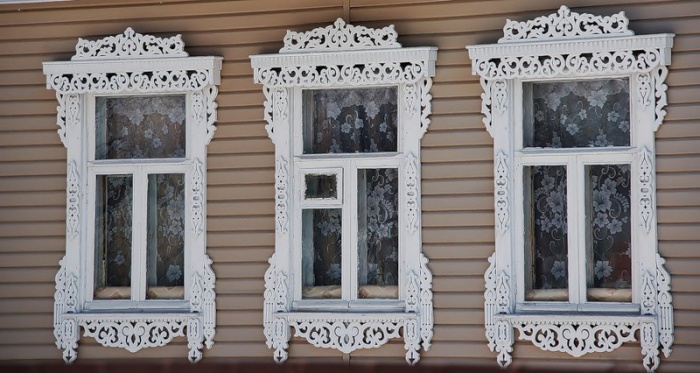
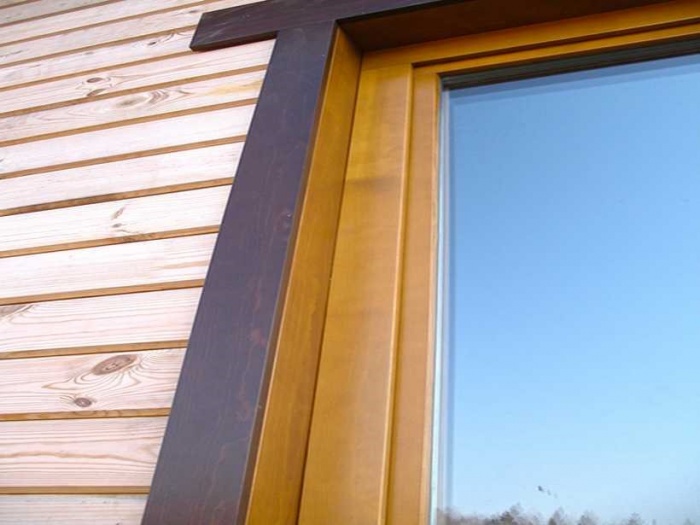
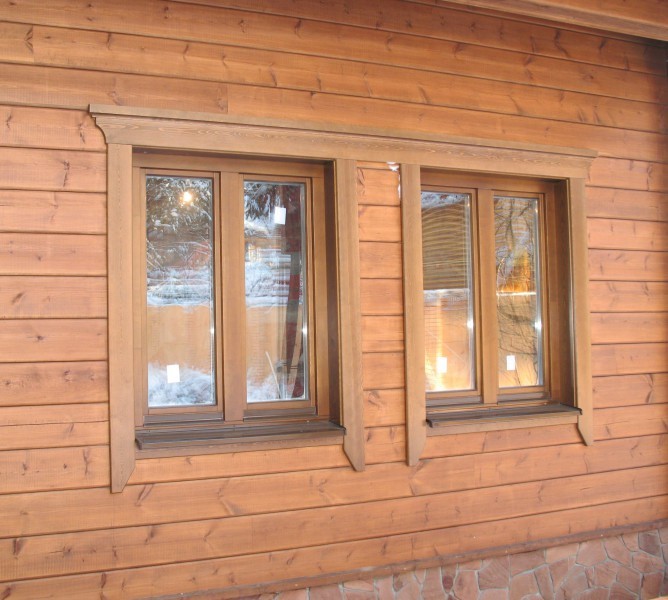
Simple platbands with only small carving elements - on a house in Scandinavian style you see people like this often

Carved overlay trims - delicate carvings on a dark background


Shutters and trim - this can often be found on old houses


Platbands are an important component for any window. They are often associated with beautiful carvings that serve purely decorative purposes. But they don’t always have a catchy look, and they have much more functions. This is a universal element that is necessary to protect windows and improve their insulating qualities. Therefore, their installation is recommended in almost any wooden house.
Why are platbands needed?
The platband decorates the window and makes it much more colorful. But initially its purpose was protective. Platbands are used as an external element of the window frame, which not only protects it from damage, but also closes the mounting gap between the frame and the wall of the house.
This approach provides:
- Reduced heat loss;
- Elimination of through holes;
- Protection from dust and noise;
- Protection from moisture.
Interesting ! Previously, platbands were also used as amulets. Because of this, they were given a colorful and unusual look.
Although these advantages are not so significant in concrete and brick structures, they are extremely important for wooden houses. Over time, wood can dry out and warp, causing gaps to form between the frame and the rest of the structure. Platbands allow you to slow down this process, as well as reduce damage from existing holes.
Types of platbands
There are many types of platbands used for houses. They often differ in the material used, since their design is similar. The main classification of platbands is based on the method of installation and marks two types of platbands:
- Invoices;
- Telescopic.
The invoice option is considered the most common, being the old type. It is installed simple method over the window frame, thereby blocking access to the sun and precipitation to the joint. Installation of this type is very simple and does not require much effort.
The telescopic casing is more modern. It does not require fastening additional elements like screws or nails, because it is placed in the gap between the wall and the frame. Thanks to this, it is securely fixed around the entire perimeter.
Priority use telescopic method installation It is more convenient, because it covers the gap more reliably and prevents its deformation. However, its installation is complicated by the fact that it requires completely removing the window, which is not always possible in wooden houses. In such cases, it is easier and more efficient to use an overhead platband.
Platband materials
Materials for platbands may be different. Often, wood is used for these tasks, which is what is recommended for wooden structures. But here several options are allowed, including:
- Wood;
- Plastic;
Wood - practical and natural option, which is suitable for any structure. Due to its versatility, it can be given any ornament and style, and the use of the same type of material will allow it to perfectly complement.
Advice ! For better alignment, it is recommended to make platbands from the same wood as the structure. But if the texture is the same, then the color can be changed using special compounds.
It is often chosen precisely because of the diversity in decoration, because other materials require special processing on machines and rarely have similar decorative elements.
Although wood is reliable and durable, it does have its drawbacks. Among them are vulnerability to moisture and high temperatures. In addition, frost also has a negative effect on it, destroying and deforming the structure.
Plastic is much more convenient in this regard. It is practical and reliable, and its wide production capabilities allow it to be given any texture, including wood. But at the same time, it does not deform from moisture and temperature changes, and its lifespan is much longer. Another advantage of plastic is that it has fastening elements in advance, which allows it not to spoil appearance platbands with nails or screws.

Perhaps the only drawback of plastic is its artificiality. Many owners don't want to add more to their home. artificial materials and reduce its environmental friendliness. This is where the third option can help.
MDF is boards made from wood waste. They are natural, but at the same time impregnated with special compounds, which significantly increases the life of the material and protects it from external factors. Often such platbands are laminated, which increases their lifespan and reliability. The only drawback of such elements is their relatively low strength compared to plastic and wood.
What material to use is a purely individual choice. Each of them has its own advantages, but there are also disadvantages.
Which wood is better
If the choice fell on wooden trims, then it is important to note the choice of wood species. In fact, almost all options are suitable for this task, because they do not need to carry any load. But there are some nuances here too.
The best option for platbands is oak or beech. This is a durable breed that can serve long term and not be deformed by moisture or heat. But the problem is that it is extremely difficult to work with. It is extremely difficult to cut patterns on such material on your own, and not every master will undertake it.
Advice ! The way out of this situation is special milling machines, the pattern on which is pre-loaded into the program.
If you need a softer and less expensive breed, then you can choose linden. It is easy to work with, but without careful processing it will quickly collapse. You need to use high-quality antiseptics and some kind of coating, which can worsen its appearance.
An intermediate option for this task is birch or pine. This is a fairly durable variety that requires only basic care. But at the same time it will be easy to work with.
Preparation for installation
You must first take all measurements from the window. It is important to choose the appropriate dimensions so that the outline of the frame does not peek out from behind the platband and is securely hidden. Next, preparatory stages are carried out with the material.
If wood is used in the work process, then you need to first cut out blanks for platbands, decorate them at your discretion and process them. Plastic and MDF do not require treatment, but wood requires impregnation with protective compounds against moisture, as well as to protect against insects.
Important ! All work is carried out with dry lumber. If it is poorly dried, then deformation is possible after installation, which will ruin the whole job.
After measurements and processing, it is important to mark in advance the places of joints and fasteners on the platbands. All holes are pre-drilled. The platbands are carefully polished.

It is also important to prepare the work site itself. Window joints are carefully isolated, because in the future access to them will be limited. If any insulation or repair work is planned, then it must be done before installation.
You must first select a fastening method. It is not required for telescopic trims, but there are several options for overhead trims. Among them the most popular are:
- Nails;
- Dull thorn;
- Through tenon.
The first option is the simplest, but it spoils the overall picture and creates extra load on the material during installation. Therefore, the spikes are more comfortable. A blind tenon involves installing small tenons on the window frame, and making small holes under them. A through tenon implies the same technology, but the hole in the platband is through.
If the house is built from a log house, then you need to make room for platbands. To do this, it is worth cutting off the protruding edges, which can be done at an angle.

Installation of platbands in a wooden house

After all preliminary procedures have been completed, the installation phase begins. To begin with, all the components of the platband are connected to each other. To do this, you can use the same tenon technology, nails or glue. But the latter is often used as an auxiliary component.
During the installation process when using spikes, you need to do the following:
- Mark the future location of the tenons on the frame and trim;
- Make or purchase spikes for this task;
- Drill appropriate holes in pre-marked locations;
- Place the trim onto the tenon and secure it.
The first stage includes preliminary marking of the perimeter where the fastening elements will be placed. It is important to evenly distribute the load, so they should be placed along the perimeter of the structure.
After purchasing or manufacturing the spikes, future holes are drilled for them. This is a simple step, after which the installation process itself begins. The casing is carefully positioned so that all the tenons fit into the holes.
The task is quite simple, it is only important to accurately mark the future location of the fasteners. It is recommended to use glue during work to securely fix the structure after installation. This will reduce the risk of it falling and improve the sealing of the holes.
You can simplify the process using ordinary self-tapping screws. Although they will detract from the appearance, their use greatly simplifies installation.
Upon completion of the work, it is worth treating the working holes with a compound so that they do not absorb moisture. Next, you just need to monitor the condition of the structure and care for it as necessary.
The whole process is quite simple, it is only important to combine all the elements qualitatively and not neglect preparatory stages installation Thanks to this, this design will last for a long time, decorating the house and protecting residents from drafts and moisture.