How to repair cracks on an apartment wall. Crack in the wall of a panel house: what to do for an effective solution
I saw several written requests in my mailbox, where people asked me to tell them why they were in the walls and how to seal them. It turned out that everything they knew and did before did not work. Not a single method saved them from new formations. So I decided to write this article.
I haven’t talked about this topic with anyone for a long time, and I came across similar work about a dozen years ago, so I decided to update my knowledge and see what great minds We managed to come up with something new in this regard. By the way, we always try to give you the latest information so that you keep up with the times. After all, something new is often invented, and applying it is often cheaper and more effective.
Let's get to the bottom of the problem
Well, let's start by defining the types of cracks. Yes, they are radically different from each other, divided into two types. The first is erosion cracks, caused by a process called erosion, although weathering may also be involved. So, erosion is a process of destruction that is associated with time, with the influence of mold, precipitation, wind or thermal expansion.

For example, we have a wall that was plastered with ordinary cheap cement, and even in a 1/3 ratio. Yes, the plaster holds up and looks beautiful. But it absorbs moisture and crumbles due to insufficient molecular bonds. But as a result, water penetrates into it, washing away all our connecting elements from the top layer.
When the time of autumn rains comes, they abundantly saturate and saturate everything around with moisture. The wall does not have time to dry thoroughly before winter, and the moisture freezes, and at the same time it greatly increases in volume. Try typing in glass bottle water and place in the freezer. You will see that once it freezes, it will easily crack the bottle. And if it happens metal container, then it will simply straighten out or inflate.
So, the same thing happens in the thickness of the plaster, water tears it apart from the inside. Do you see how much there is? So, all these factors, of course, destroy the surface layer more and more over time. And what is the result? That's right, microcracks appear. The length of each of them is approximately 1 cm.
If they are not sealed, more will fall into them. large quantity water, or some other factors will act doubly intensely and increase the cracked areas several times. If in this case you do not cover them up, then after some time such plaster will completely fall off.
In general, you understand, we have now described an example of an erosion crack on the surface of the plaster of a building. Exactly the same can be found indoors. For example, if the wrong composition of cement was selected, then it may not respond very quickly to thermal expansion and may also crack.
There is another type. For example, if we talk about a very old brick house, which was not finished with plaster, but simply a brick was laid under the jointing. Yes, here erosion, even over a long period of time, cannot do anything to brick, that is, to compressed and baked clay.
Most likely, erosion will begin to wash away the joint cement, and as a result, small cracks may appear in the brick wall. If the cement from the joints is washed enough so that the main load is removed from it, then where will it fall? Of course, it will either attack the remainder of the concrete in the seam, or it will move to a larger section downwards, and then overcome it too.
All this, it would seem, is nonsense. But tell me, what is the purpose of plaster? That's right - prevent harmful factors from reaching the main wall. And I’ll tell you that even plaster with minor defects can cope with this. The cracks that have appeared are the result of your savings, because the wrong type of cement was selected that was needed. Either you didn’t know about the existence of another, or you just saved money.
After all, there are any kind of cement mortars. For example, decorative, heat-resistant, structural, lightweight, dense, porous, astringent, tensile, protective-radiation, polymer, chemical, heavy and several dozen different ones!
Yes, you won’t find them in regular construction stores, because it is profitable for the buyer to purchase only one type, the cheapest, and sell it to you at the highest markup. But, as you can see, if you want, you can choose a special one for any type of work. Well, not about that now.
In general, the plaster described above copes with its task, that is, it protects the main walls from destruction. And if you saved on it on purpose or not on purpose, then be so kind as to patch it up a little, and everything will be fine. We will describe how to do this later.
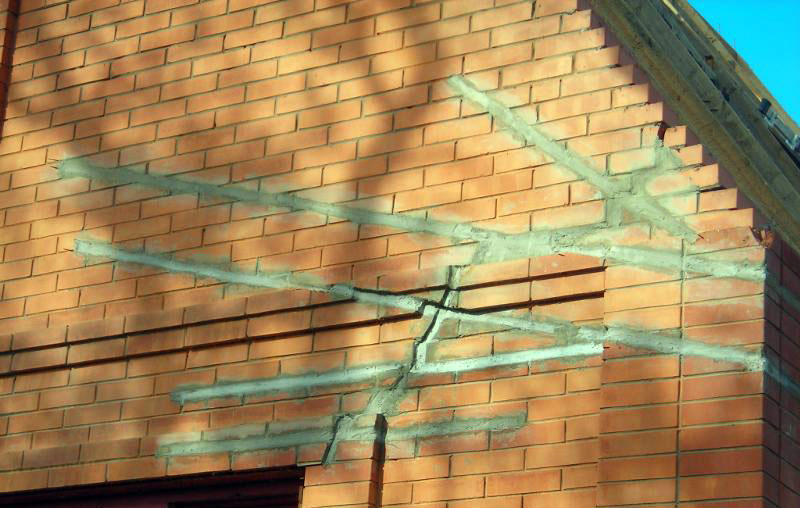
Now comes the fun part. I am almost 100% sure that you asked for advice not because you need to fix a dozen tiny cracks, but because you have a real problem with the formation of significant cracks. If you have not small cracks on the wall, but large ones, half a meter or a meter long, and they arose not just on the plaster, but in the body of the main, that is, load-bearing, wall, then you do not have an erosion crack, but a real one deformation
Remember for the rest of your life, a deformation crack never just appears, and you will never eliminate it with any coating. If you have one, then you need to fight not with it, but only with the cause of its occurrence.
So, let's figure out what are the causes of deformation cracks and list them.
Excessive one-sided shrinkage of the foundation
The most terrible type of deformation. In addition, this is the most common situation, it occurs everywhere. If the foundation was not poured according to technology, if dozens of conditions for its pouring were not met, then it may crack. As a result, the wall located on it will also crack. In this case, a shear will occur - not a shear, but a shear - of the static loads, and the entire structure will begin to move relative to the axis, which will yield to this movement.
Yes, it's a little difficult to understand. Let's diagram what we're talking about:

As you can see, part of wall "A" begins to move. This movement can be either vertical or horizontal. In any case, this is an extremely serious building defect. And if such a problem arises, we are faced with global work.
Many people advise foaming the crack, covering it up, and that’s it. But if you think rationally, you can realize that on average square meter the wall weighs about a ton. Of course, there are 500 kg, there are also 5 tons - it doesn’t matter. So, part of the wall weighing 20–30 tons goes down, while also pushing through the foundation. It is simply unrealistic to solve such a colossal problem with simple putty. Well, never mind, more on this later.
Damage to the foundation due to damage to the blind area
The blind area is connected to the base and is an element that protects the foundation from water. So, if the blind area is damaged, water begins to flow into the foundation space. It liquefies the soil and accelerates shrinkage.
If the thickness of the freezing layer reaches the level of water in the foundation, then when it freezes, it similarly begins its destructive effect. And when destroyed, we get, again, the consequence that was described above.
Thermal expansion
This can also be a problem, but quite rarely. The atmosphere inside the room does not change quickly. The house is like a thermos in which the temperature is constantly maintained. Inside, it is almost equal to the temperature of the room walls. If it is -10 outside and +25 indoors, then constant heat exchange occurs. From heating devices to walls, from walls to atmosphere and vice versa. So, the temperature inside, as we know, does not change, and thermal expansion is either completely absent or extremely insignificant.
Now let's imagine a house that has had no window for several years. For example, at your dacha it was broken, but you didn’t see it or decided not to put it back in. So what happens? The weather outside changes very quickly. IN autumn-winter period It often happens that during the day the temperature is +2, and at night it drops to -8. As you remember, our window is broken, and the temperature in the room is changing at exactly the same speed as outside.
The walls of the building, having heated up during the day, cool down very quickly at night, and vice versa. So they begin to play like an accordion: sometimes they expand, sometimes they narrow. Since the rate of temperature change is high, the speed of this “game” is also high. But concrete or brick walls are not an accordion, so they can’t stand it and burst.
In this case, only the walls burst, but the foundation remains intact. Although it is difficult to eliminate such a malfunction, it is possible. At the same time, it is possible to make it as if it did not exist.
Design changes
These also cause deformation cracks. To help you understand faster, let's give an example. Let’s say you bought a house, and in the middle of the hall there is a column, and it’s like an eyesore. If you don't like it, kill me. Without thinking for a long time, you tear it down, and six months later you begin, perplexed, to ask: why are the walls cracking?
Well, how can they not crack or burst if you demolished the support beam, which carried the lion's share of the load. The walls took on a load they were not designed to withstand and began to burst. Everything is simple and sad. If you have a similar situation, then now you have serious work ahead of you, which we will describe below.
Rotting, damage to stiffeners or support beams
Cracks can also occur for this reason. If, for example, you have a two-story building, and the span above the window was built using not a channel, but wooden beam, then when he can no longer bear the load, what will happen? That's right, at this point the wall will burst, or something even worse will happen.
The same applies to damage to stiffeners or concrete lintels. If, for example, you had a seismic beam in your apartment, but you didn’t like it and you demolished it without permission, get ready for serious problems and punishment, because cracks are now inevitable. And they will arise not only for you, but also for all your neighbors, who will definitely call the BTI.
Let's say you live in your private house, which you recently bought, you have one room upstairs that is empty, and you decide to put it there lathe. Yes, somehow you manage to get it in there, you are happy and everything is fine. And a month later you discovered that you had a finger-thick crack on your wall. Strange, yes, where did it come from?
Well, of course! You have placed a machine, the minimum weight of which is 3 tons, on an area of three squares. And the slab that took on the load began to put a huge mass of pressure on a section of the wall, which as a result could not stand it and burst.
We eliminate erosion cracks

Let's move on to the “sweetest” part of our story. I say this because everything is done extremely simply and does not require special effort. Understand that all your actions should be aimed only at preventing the damaging factor from entering the crack body, and nothing more.
If you pursue the goal of preventing their occurrence, then it is pointless; you will not be able to do this anyway. Perhaps you can treat the surface with a strengthening primer, but the effect of this is minimal. So, in order to eliminate erosion cracks, do the work in the following sequence.
- Since you still have to worsen the visual condition of the wall by applying some other solution to it, leaving stains, then treat the entire wall with a strengthening compound. It won't be redundant. And if you don’t want to do this manipulation with the entire wall, then apply it only to the crack and, preferably, into its cavity too. This can be done with a syringe or sprayer, which, for example, you have left over from a window cleaner.
- Dilute the solution, and it is better not to use gypsum-based putty or cement, but, for example, tile adhesive or a similar composition. Such products bond better with the surface, and in this case your putty will definitely not fall out of the wall.
- We collect glue or some other solution into a large syringe or similar device and press it into the crack. Sometimes I even took a thick bag, poured a little glue into it, cut off a corner (a very tiny piece), and worked with it like pastry bag. Just don’t press, otherwise the bag will split along the seam.
- We fill the crack until our solution begins to bulge out of it.
- We take spatulas and draw them from above, leveling our solution along the plane of the wall.

That's all. We carry out such manipulations with all our cracks. Upon completion of the work, it would be useful to prime everything again.
Elimination of deformation cracks
And this is the most serious, hard and thorough work. We have to spend a lot of money and work physically. So, information for general understanding. If there has been damage to the foundation, it is useless to build the wall; the foundation needs to be repaired. If there has been damage to the wall without damage to the foundation, then the wall must be sewn. If a seismic beam, stiffener or some other support was damaged, then it needs to be restored.
I won’t say much about the restoration of beams and other supporting elements. Remember the main thing: you don’t just have to restore this beam, weld it with reinforcement and concrete it. You will have to transfer the load that was there before to it, and this is done either molecularly or using jacks.
Now let's talk about the first two types of work.
Restoring the foundation
In order to do this, carry out the work in the following sequence.


That's it, the work is finished. Now, as soon as the old foundation moves even a millimeter, the new foundation will take its load; they are now tightly connected. All that remains for you is to plaster the crack. Only plastering should be done after at least two months. The entire structure must “play” and lie on a new foundation. If you plaster it the next day, you will see a tiny crack again in a month. This is exactly the distance that was needed for everything to rest on the new foundation. And if you did everything correctly, then you will never remember about it again.
This is how, friends, the cracks are eliminated once and for all, and not just covered over and forgotten. Understand that if you cover it up, it will do absolutely nothing. By the way, we once restored a building kindergarten, which burst during an earthquake. So, we measured the shrinkage by gluing a ruler to one side of the crack and measuring the discrepancy. It was a cosmic 2 mm per month, and this is critical.
We completely restored the damaged building in this way, and then the quality of our work was checked by gluing strips of glass to the control points of the cracks. None of them have burst to this day, since we always provided a guarantee, and every year we ask how our foundation stands there.
How walls are sewn
If there were cracks on the walls for some reason, you inspected everything and did not find damage to the base, then the foundation is intact and you will have to sew up the walls. So, necessary work depends on the type of damage, of which there are also two. The first is local damage, and the second is global.
In case of local damage, that is, in case of damage small area, small and simple work is required. And if the damage is global, for example, your entire building bursts, then you will have to do something more complicated.
So, local type of damage. These include small cracks one meter long, +/- 50 cm. These are sealed as follows.

Global damage. They are eliminated in exactly the same way as local ones. Only there, as you already understood, the crack is twice as large, and therefore we have to do something else.
You will have to throw several reinforcing belts over the entire building. It's done like this.
- We mark lines around the entire perimeter, at a distance of 50 cm from each other. We make as many of them as we can fit. If the damage to the walls is not so severe, then we do it at a distance of 1 meter from each other.
- Along the entire length of the marked lines we make grooves 20 mm deep.
- We lay the reinforcement along the entire length in one groove. And we grab it there with a few strokes of alabaster or putty - it doesn’t matter what exactly, the main thing is that it holds.
- And now the most difficult part, here you will have to work as a team. So, let's take the cutter. As you know, this is a cutting unit that runs on oxygen and propane. So, we take the cutter and warm up all our fittings. Let's do it as hard as possible. If its length does not exceed 6 meters, then great, you can use a cutter to heat it all up red-hot, this will be ideal.
- As soon as the reinforcement has turned red, and it must have a diameter of at least 16 mm, then we grab the other two segments close to the wall from both edges. And they didn’t just stick it with slag from the electrode, but made a high-quality, solid seam. Because we are making a tense tension coupling, and it will be constantly under load.
- We move on to heating the next one and repeat the same operations.
- Once all the belts are welded, we plaster them.
Well, in the end, as soon as the metal cools, the entire circuit pulls our house together with tremendous force. By heating the metal, the molecules expanded and the length of the reinforcement increased. Then she returned to her previous position, only there she already had points of support - other reinforcements, which were all pulled together, as if with a noose. And now your walls will never crack again; they will be constantly rigidly restrained by reinforcing belts. It's like a woman's corset tightening her waist.
Well, friends, as you can see, everything is not as simple as you expected. In another article we will tell you how such serious problems could have been avoided. Because prevention is always easier than correcting something that has already been damaged.
I hope you found our story useful. I want to tell you finally that our goal was to write an introductory article, not rigid technical literature, so it should not be relied upon as instructions for use. And as you understand, only you are responsible for all actions you take. Therefore, approach all work wisely and carefully, and you will never have any problems. Good luck!
Some time after the completion of the construction of the house, first small and then large cracks begin to appear on the internal and external walls. You will learn why this happens and how to repair a crack in a wall made from different building materials in our article.
- Causes of cracks
- General recommendations for repairing cracks
Causes of cracks
Without knowing the real reason for the occurrence of spoiling appearance building splits in the facing layer or even in the masonry of the wall, you will never be able to stop the process of destruction of the structure. If the fight is not started immediately, the house will eventually lose its strength, become cold and unusable.

The main reasons for the destruction of the structure:
- Incompetent soil examination at the construction site causes errors during the development of the type and depth of the foundation. Not enough solid foundation cannot withstand the shrinkage of the structure.
- In the first years there is a strong shrinkage of the house. If the owner of the building decided to make an extension to the main building already during operation and did not complete expansion joint, cracks are sure to appear between the existing and new buildings.
- A sharp increase in the load on the walls and foundation as a result of the construction of a previously unplanned additional floor.
- Using low-quality mortar for the construction of walls or violating the technology of constructing a brick building.
- Failure to comply with the installation technology of the facing facade.
As soon as you notice the appearance of the first crack, it is necessary to carefully examine the entire structure in order to detect and be sure to eliminate the cause of the violation of the integrity of the building’s structure.
Important! There is no point in repairing cracks if you don't know why they are spreading. It is necessary to begin repairing the cracks themselves only after the growth of the crack and the deformation of the walls have completely stopped.
Repairing cracks on interior walls
Whatever the size of the crack, repairing it begins with thoroughly cleaning the problem area from small debris and dust.

Small cracks in plaster
After cleaning the area, be sure to rinse it with water. Prepare a thin gypsum solution. Use a spatula to cover the crack. Do not forcefully squeeze in as much solution as possible - this will cause further destruction plaster. After drying, go over the seam with sandpaper.
Brick wall repair
Repairing cracks in brick walls is carried out in several stages.
- Stage No. 1. Expand and deepen the problem area using a spatula, hammer or knife. Use a brush to remove dust and small particles.
- Stage No. 2. Apply primer and seal the crack with a special joint sealant. Remove excess sealant with a spatula.
Important! Cannot be used to repair cracks silicone sealant, if subsequent treatment with plaster or paint is planned.
Repairing a plasterboard wall
Widen the crack and seal it with drywall putty.
You can repair the crack by gluing fiberglass.
Spider-web cracks
Owners of premises with plastered walls face this problem. The main reason for the appearance of cobwebs on the wall is improper preparation and application of the solution. For repairs, you will need fiberglass “gossamer” or fiberglass mesh.

The problematic area of the wall must be thoroughly cleaned and only then a special glue must be applied. Glue the fiberglass itself and leave until completely dry.
Putty the wall and continue finishing.
Fighting cracks on external walls
To repair load-bearing walls from the outside, you will need other solutions, and for large cracks, other methods of sealing.

Repair of small cracks
If the width of the masonry split is no more than 5 mm, repairs will not require much effort and time.

- Step #1. Gently widen the edges of the crack using a hammer. In this case, the adhesion of the mortar to the brickwork will be much better.
- Step #2. Use a wire brush to thoroughly clean the split area from debris and small pieces of plaster.
- Step #3. Prepare cement mortar for repair.
- Step #4. Using a spray bottle, wet the embroidered and cleaned crack.
- Step #5. Start repairing the wall.
Advice! You can add a few drops to the solution liquid soap and PVA glue, which will make the repair better and more durable.
Larger gaps up to 10 mm wide are prepared for repair in the same way as small ones. It is better to make the composition of the solution stronger. Add one part good cement to 2 parts sand.
Sometimes construction foam is used to repair deep but narrow cracks.
Fighting large cracks
A large crooked crack appeared in the wall on the façade brick house, and you immediately begin to fight it. Take your time, you need to observe the condition of the split in the wall a little. Having found out the cause of the destruction of the wall and eliminated it, start working on the crack itself. Remove the top layer of plaster around problem area before laying the wall. Install beacons throughout the crack. These can be small pieces of paper tape connecting opposite sides of the split.

If after a few days you find torn paper tapes, the cause of the masonry rupture has not been eliminated and you need to carefully examine everything again. When the installed beacons remain in place, all preliminary measures have been made correctly and the moment comes to repair the wall.

Instructions for repairing a large crack
- Step #1. If possible, it is best to dismantle the old brickwork and make a new one. To strengthen the structure, use metal strips or reinforcement. Lay the bricks in the form of a castle.
- Step #2. Start with standard cleaning and priming. Drive T-shaped anchors into the gap and secure them with dowels. To make the brick wall more rigid, install metal profiles across the crack.
- Step #3. Prepare a solution of one part cement and three parts sand. Fill the reinforced crack with mortar.
- Step #4. Install on the area cleared of the decorative layer. plaster mesh and apply plaster.
- Step #5. When the rough layer is dry, proceed to finishing.
Advice! Use steel staples to repair large cracks. The ends of the staples are driven in different sides cracks.

- Using a scraper and sandpaper level the problem area of the wall.
- After filling the cracks with mortar, be sure to cover the repair area with a primer.
- Wood glue mixed with tooth powder or ground chalk is great for repairing small cracks on any surface.
- Repairing cracks in walls can be done using regular pieces of cloth or bandage. Apply a layer of PVA glue to the wall, cleaned of dust and debris. Place a strip of plain fabric on top and apply glue again. When the surface is thoroughly dry, apply glue again.
- Make waterproof putty from leftover paint and cement. Make the mixture as thick as sour cream.
- To repair cracks at the junction of different building materials, use steel mesh and lime-cement mortar.
- To prevent new cracks from appearing on the walls of the house, strengthen the foundation.

Now you know how to cover up a crack in a wall, how to properly prepare the cracks for repairs, and what measures need to be taken to stop the destruction of the building. If you prefer to have the work done by professionals, then find the right master in Chelyabinsk you can.
Minor defects can be corrected yourself if they are related to the plaster. If the appearance is associated with deformation of the main structure, then you need to seek help from specialists.
Exterior materials for cracks
- Neomid Professional ─ universal putty. For deep cracks and potholes. Contains reinforcing fibers.
- SEMIN Fibrelastic ─ elastic putty for external and interior work. Especially for “breathing” cracks and joints.
- Profix ─ mounting and putty mixture. This is a flexible putty with easy application.
Crack mixtures for interior work
- SEMIN Rebouchage ─ filling putty for interior work.
- UNIS High-thickness ─ gypsum putty. Universal, easy to apply, crack-resistant. Warranty up to 15 years.
- TERRACO Handyflex ─ super elastic crack filler.
DIY repair
 Often during repair work you have to deal with unpleasant defects. They are discovered while re-sticking wallpaper or leveling a wall for painting. You can deal with minor flaws yourself. When there are more defects outside than inside the house, it makes the job more difficult. Of course, it is difficult to deal with the cause, but you can try to hide this defect.
Puttying cracks in a monolithic house
To “cure” defects in monolithic walls, you will need the appropriate tools and materials:
- sealing composition (sealant, foam) and concrete solution;
- putty knife;
- sanding mesh and holder for it;
- brush with stiff bristles;
- jointing tool.
First you need to widen the flaw by beating the edges with a hammer for better adhesion of the crack to the putty. Clean the defect from dust and pour sealant into it, then level the seam with concrete mortar. What to cover with? You can, of course, use only the solution, but the sealing compound will not allow it to appear anymore. After drying, you need to sand any unevenness well.
What is the best way to cover up cracks in a load-bearing block wall?
 Smooth cracks appear on the masonry when it is not reinforced. There are several putty options for wall repair. Let's look at some ways to eliminate the defect.
1 way:
- clean and, if necessary, expand the crack;
- clean from dust;
- using metal E-shaped anchors secured with dowels, strengthen the crack between the blocks;
- add pieces of broken cinder block to the solution (the smaller the better) and plaster the defect.
2 way
- widen the crack;
- prime;
- seal with mortar.
For small cracks, it is permissible to use tile adhesive, mounting foam or special foam for blocks.
If there is a straight crack in the corners, how to fix it correctly
 A straight corner crack must first be opened, primed with a tenacious “Soil-Contact” primer and the seam sealed. To do this, take the Isogypsum putty on a spatula and rub it well into the flaw. Place a mesh on top of the putty. After drying, smooth out all uneven surfaces.
Repairing cracks in brickwork: how to remove them
- Repairing cracks in brickwork begins with removing dirt, dust, chipped bricks, fallen mortar and other unnecessary elements.
- It is good to wet the crack, since the base of the brick tends to absorb water. By throwing the solution, it will penetrate deeper into the crack.
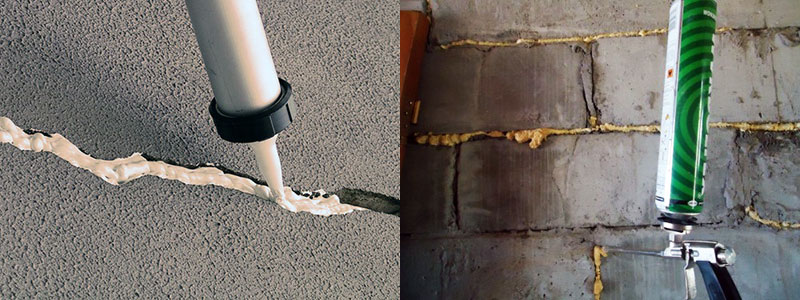
- Cover the wide part of the defect with mortar, and fill the narrow part with sealant from a “gun”.
- Since the sealant has White color, and the solution is gray, you need to give the crack an aesthetic appearance. To do this, apply glue with a spatula. tiles. It tolerates temperature changes well, is frost-resistant, and moisture-resistant.
- After drying building material, rub the seam, smooth out the unevenness.
Repairing cracks in a concrete wall of a panel house with cement mortar
- First, check the condition of the crack, widen it with a hammer and chisel.
- Use a compressor to blow off all the dirt.
- Depending on the brand of cement, prepare a solution. To do this, mix sand, cement, water, beat until mushy.
- Lubricate the defect with PVA glue for better adhesion of the crack to the solution.
- Fill the hole with mortar to the level of the wall.
- Smooth out the seam.
- After drying, clean up.
If there are cracks in a new house, how to repair them
- Use a special tool to widen the crack.
- Clean it from dust.
- to improve the adhesion of the putty.
- Seal the seam with putty using a putty knife.
- To prevent recurrence of formations, glue with sickle tape.
- Hold the top of the tape with one spatula, and smooth the tape with the second.
- Reapply putty and allow time to dry.
- After 24 hours, sand the surface of the seam.
Walls are vertical load-bearing and enclosing structures. They withstand force and non-force impacts. Therefore, they must be strong, durable, and withstand temperature and humidity conditions.
What to follow when repairing cracks: main rules
 So that the load-bearing capacities and enclosing properties of the walls are preserved long time, you need to be guided by " General recommendations on crack repair technology."
Repair of cracks is carried out after drawing up a map of defects and a defect list, which confirm the results of the examination and the reasons for their occurrence.
When choosing unpleasant formations, you need to consider:
- wall material;
- number of flaws;
- defect width;
- branching of flaws;
Only after this do renovation work:
- embroider;
- clean from dust;
- Rinse;
- fill with suitable plaster.
If you notice a crack in the house, you need to monitor its changes: whether it expands or remains the same. When design changes have occurred, you need to seek advice from specialists. Only they will be able to professionally assess the condition of the surface and recommend measures to prevent and eliminate them.
Useful video on the topic
All buildings collapse over time, and this process is irreversible. However, it is possible to extend the service life of a property; to do this, it is necessary to carry out timely repair work and seal the resulting cracks. When carrying out renovations in their homes, many are forced to face this problem. in the wall so that the further repair process turns out to be of high quality?
Gaps in the wall are a fairly common occurrence.Why are many structures susceptible to destructive processes?
In order to eliminate a crack in the wall, you need to find out the cause of its formation and determine the material from which it is made. To do this, an analysis is carried out to determine the size and location of the crack.
It should be noted that gaps arise in a variety of cases: errors or complete non-compliance technological process laying building materials, assembling drywall, laying concrete or incorrectly made proportions of the plaster mixture, incompatibility of wall building materials and plaster, sudden changes from heat to cold. There are a lot of factors influencing the appearance of cracks and cracks.

Getting rid of cracks on a plastered wall
For both external and internal walls of a structure, the destruction of plaster is one of the most common problems. They are very often formed on sand-cement plaster. Most often, they are quite thin, no thicker than a hair, and they are usually located all over the wall in the form of a web. They are especially noticeable after priming plastered walls. This happens when the proportions are violated when preparing the plaster mixture, as well as when it is applied incorrectly or when caring for the surface after. This also happens if the material is applied in a thick layer at a time (more than 2–3 cm), this is unacceptable, since the technology is violated.
Among other things, cracks can also appear when the work is done (painting or wallpapering). To avoid this, the wall must be reinforced before final puttying. Various building materials will help with this, for example, painting fiberglass, fiberglass mesh or. Considering that glass wallpaper is much more expensive, we will not focus on them, it is only worth noting that the method of applying them is no different from gluing fiberglass.
Video on how to glue fiberglass:
Fiberglass is considered the best option for eliminating cracks in walls. It is fixed to a special glue (for glass wallpaper) (primed) base, followed by putty or painting without applying it. Due to its structure, fiberglass is a reinforcing material.
When walls have deep damage, solutions
One of the main reasons why cracks appear in the walls is the uneven settlement of the constructed structure. First of all, this applies to new houses, which develop sediment during the first two to three years after construction. After this period, most often, the built house no longer sediments as much and rarely cracks. However, this is not insurance against further minor deformation and, therefore, cracks will appear anyway.
In addition, the cause of cracks and crevices on the walls may be non-compliance with the technological process during the construction of the building. This may include incorrectly made cement composition, and incorrect laying of stone blocks or, as well as violations during the construction of the foundation, etc.

Under various circumstances, cracks and cracks appear in the walls. If the cracks are deep, you must first set up beacons to determine whether they continue to expand. Beacons represent a control sealing of cracks in some places with cement mortar for research. If cracks have widened, first determine the cause of their creation and only seal them after the process is completed. If cracks increase every day, you need to contact professionals to prevent the destruction of the house and ensure the safety of your life.
If the gypsum boards are cracked
The plasterboard wall cracks mainly at the seam. A problem arises when the gypsum board sheets are not properly secured. For correct installation sheets, you need to study the rules for installing gypsum boards. Another common mistake is that the seams in the drywall are not sealed correctly. However, sometimes other cases occur, for example, a sharp temperature change in the room, severe dampness or a flood. When interacting with water, drywall is susceptible to deformation, and when it dries, it cannot be corrected. This makes it possible to completely replace it in case of flooding.

- container for preparing the plaster mixture;
- grater and grater;
- steel smoother;
- Master OK;
- brush and brush;
- small trowel for filling small depressions.
You can make the solution yourself or you can buy ready-made dry ones in stores. plaster mixtures, which are diluted with water.
According to the advice of experts, for better sealing of wall surface cracks, it is recommended to use reinforced tape, thanks to which the cracks do not spread further.
To summarize, it can be noted that, If cracks are identified, first you need to decide correct selection option for sealing cracks. And then the surface will be repaired quickly and efficiently, and you won’t have to resort to repairs for a long time.
Cracks in the walls of a house, both inside and outside, are a common occurrence, and they appear according to various reasons, which we will look at below. You will also learn how to repair a crack in a brick wall concrete surface, cracks in drywall, or in a wall plastered with cement. Self-sealing cracks in brick walls is within the power of every owner who is not afraid of work and has minimum set home tools.
Repairing cracks in brickwork
Destruction of brickwork can occur due to:
- Soil shrinkage under the base of the foundation;
- High groundwater level;
- Shallow foundation deepening;
- High load due to erroneous calculations;
- Incorrectly prepared mortar and violations of construction technologies.
The area where cracking has appeared indicates the cause of the destruction. So, the appearance of cracks in the wall below means that bearing loads from the ceiling pressure are calculated incorrectly. If cracks grow at the top of the wall, then most likely the foundation is shrinking.
Before covering up cracks in the brickwork, it is necessary to check their condition - whether the cracks are growing or not. This is done by placing plaster beacons, which are placed along the edges of the crack and hold the strip of paper. There are also special devices with measuring graduations. The crack is monitored for 7-10 days. 
Minor repairs cracks in brick walls up to 0.5 cm wide are done this way: cover the damage with liquid cement without adding sand. Process technology:
- The gap is freed from dirt and moistened with water;
- The edges of the crack are expanded to increase the area covered by the solution, the solution is tightly packed inside;
- The same solution, only with the addition of purified sand, can seal cracks 0.5-1 cm in size;

Large cracks (≥ 10 mm) must be repaired in several ways:
- The destroyed local section of the masonry is dismantled and the brick is laid over a new one:
- They remove the bricks, starting from the top rows, and put the bricks back “into the lock”;
- The area of the new masonry is reinforced with any metal scraps that are suitable in size;
- If it is impossible to disassemble the brick in the damaged area, cracks in this area can be repaired with a thick layer of cement-sand mortar, as described in point No. 2 above;
- The crack is also wedged with T-shaped steel spikes, the edges of which are attached to the wall with dowels. With this method of repair, the same crutches need to be driven in from the inside;
- You can repair cracks in brickwork using an installation tool. construction foam or sealant, after the substance has hardened, deepen the damage by 1-2 cm, repair the depression cement mortar. The sealant is squeezed into the gap with a special construction gun;
- An internal crack in the wall of a brick house is repaired as follows: first, the edges of the crack are tightened with a steel plate (plates), the edges of which are secured with anchors or dowels, then the area is covered with mortar;
- If during the inspection of the building it is discovered that the wall is cracked due to shrinkage of the foundation, the base must be strengthened with an external concrete grillage along the entire perimeter. The grillage is poured into a trench, which is dug along the entire base to the depth of its placement.
How to repair cracks in a plaster wall
It would seem that a crack in the plaster is not a dangerous and insignificant problem, but this is not only a visual drawback. Not only does it suffer decorative coating, but also brickwork. Most often, plaster cracks on external walls, since their surface is affected by both moisture and temperature changes. Through such small cracks, water enters the bricks, and in frosty weather it turns into ice and destroys the wall. 
From the inside, such cracks in the plaster are more like a spider's web - they are small and shallow, and appear due to incorrect proportions of the plaster solution or a thick layer of plaster applied at one time. That is, the technology here is clearly broken, and the problem can only be corrected radically - knocking off the old layer and applying a new one.
How to repair microcracks that may occur after wallpapering, plastering or painting walls? First you need to reinforce these damages with fiberglass mesh, glue a piece of glass wallpaper or fiberglass, and then plaster this place. Plaster mortar for these purposes can be external or internal, and the differences lie in the composition - external mixture is based on the use of cement, internal - using lime. 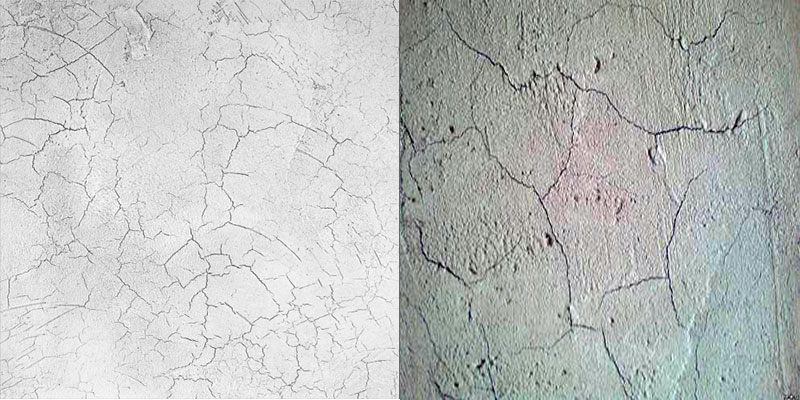
When damage occurs on the plaster, how to repair microcracks? The repair solution can be industrial or homemade, and the repair technology is as follows:
- Using a paint brush, the solution is applied to the area where there is a crack, and the surface is rubbed with a grater or spatula;
- If the old layer of plaster was applied by spray, then to obtain the same effect after the repair, the brush is wetted in water, and then the plastered wall is moistened with a clap of a wet brush;
- What to do if cracks appeared during the shrinkage of the foundation? Such damage is repaired deep impregnation cement mortar. The dried solution is coated with dispersion paint.
It is also recommended to plaster a crack in a brick wall with the addition of astringent plasticizers - gypsum, alabaster, slaked lime. 
The use of gypsum accelerates the hardening of the solution; in addition, the mixture with the addition of gypsum does not shrink during use. Adding lime is only necessary for repairing external walls, since lime mortar sets well only when free access air flows.
Repairing cracks in drywall sheets
Reasons for cracking of plasterboard walls:
- Improper installation of the frame and fastening of drywall sheets;
- Incorrectly formulated putty solution;
- High humidity in the room or temperature change.
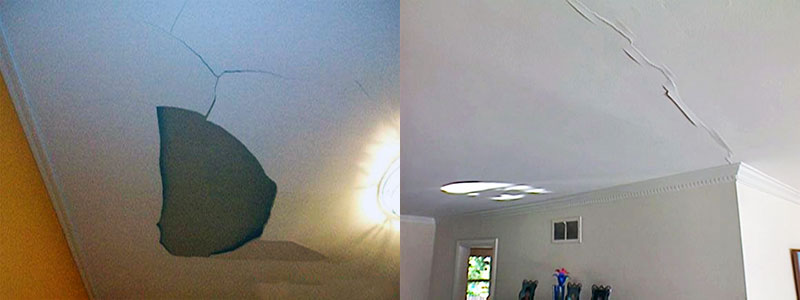
Drywall as a building material absorbs moisture well; moreover, a wet sheet can be deformed, and after drying, retain a curved shape. A severely curved sheet or section of a plasterboard wall can only be replaced with a new sheet. And horizontal, diagonal or vertical cracks in plasterboard wall houses can be renovated like this:
- Fill the crack with putty or fill it with acrylic;
- Plaster, and put a piece of fiberglass on top, put putty on top, cover the plastered area finishing layer construction mixture.

Before repairs, the wall surface is treated:
- Gets confused old plaster, the area is cleared;
- The putty is prepared from a ready-made dry construction mixture in the following proportions: two parts dry mortar to one part water;
- The putty layer should be no more than 2 mm; it is necessary to repair not only the cracked area, but also 5-10 cm of the adjacent surface;
- If reinforcing mesh is used, it is not stretched over the damaged area, but driven into the gap and then plastered;
- After the solution has dried (1.5-2 hours), the surface is sanded and cleaned of dust.

Repairing cracks in a concrete wall
Disproportional concrete solution in the manufacture of a concrete wall (slab) – main reason formation of cracks. When concrete is being placed into a form (formwork), it must be constantly compacted with a vibratory compactor, or, in extreme cases, bayoneted with a shovel or crowbar. The air remaining in the concrete not only weakens the structure of the material, but also promotes the movement of moisture into the pores, which in cold weather will lead to cracking of the concrete. But it’s not enough just to make the right solution and pour it - concrete must be constantly looked after, and especially at the beginning of the hardening process. Freshly poured concrete must be covered with a waterproofing agent so that moisture does not evaporate from the surface quickly and unevenly - if the moisture saturation of the concrete layers is not adequate, the upper, drier layer will crack, as the lower wet concrete will expand and put pressure on it. 
Cracks most often appear on walls that are exposed to contrasting temperatures, that is, on the street. Freezing in winter, moisture in the cracks expands and causes the crack in the weak point walls. If reinforcement is encountered along the path of such a gap, it begins to rust, which weakens the entire structure. Therefore, in order to avoid numerous repairs the building must be periodically inspected for new defects in the walls to prevent their further development.
If concrete wall cracks, it can be repaired by performing the following operations:
- Using a hammer drill or a hammer and chisel, the crack is deepened and widened, the area is cleaned of dust and moistened. If there is open reinforcement in the crack, it is painted;
- The proportions of the solution are 1:3, with the addition of Bustilat or PVA glue;
- If the crack is deep, lay a reinforcing mesh and apply a solution, which is smoothed with a spatula;
- After the solution has set, the irregularities are sanded with a grinder.
Cracks must be repaired in any case, even if they are small and short in length, since there is always a danger of their growth.


