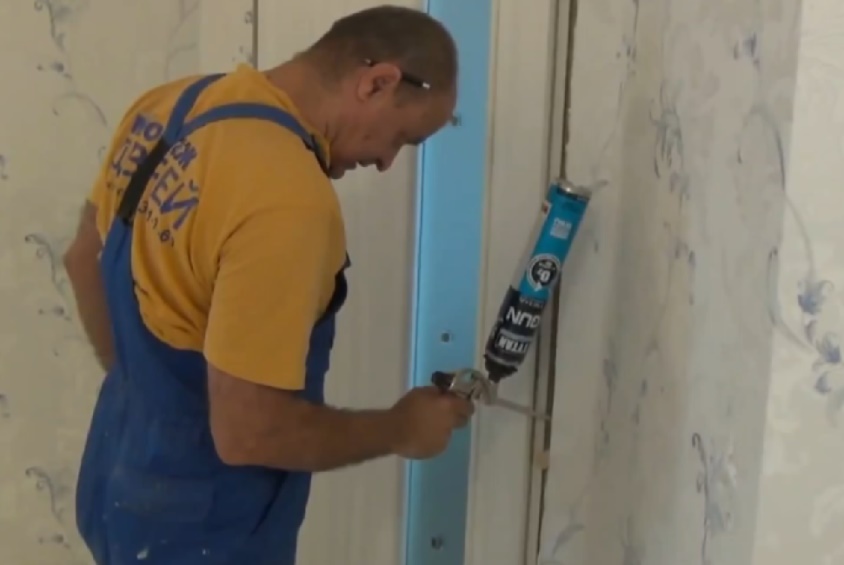
How to fasten the accessories. Installation of MDF trim and trim - my experience in carrying out the work
The ability to handle carpentry and measuring tools is already a reason to try to solve such a difficult task as installing interior doors with your own hands. The work is simple, but tricky in its own way. It will take scrupulousness and even tediousness in marking and adjusting, otherwise it will not be possible to install the interior door with the frame correctly.
Features of installing interior doors
At first glance, nothing complicated, but this is only a superficial impression. It's about about not just installing the frame and door leaf into the interior opening, but doing it beautifully, without distortions, scratches or sagging hinges. If this is your first experience, then it is best to make a detailed step by step instructions DIY installation of interior doors. This is not shameful for beginners. Even experienced craftsmen often make notes with their own hands - what not to forget and what to pay attention to when installing a door frame on a specific interior partition.
During the installation process, you will need to solve two of the most difficult problems yourself:
- Correctly assemble and install the frame of interior doors, align and secure it so that the frame does not sag under the weight of the door leaf;
- With your own hands, mark and cut out mounting grooves on the vertical post of the box and on the end of the canvas interior door.
U experienced craftsman It takes 2-3 hours to install an interior door; a beginner will need at least a day to completely install the frame and hang the door leaf.
Advice! It is not necessary to stupidly follow the instructions for installing interior doors, which recommend sequentially installing lock fittings, attaching hinges, and only at the very end solving problems with hanging interior doors. The main thing is to install the frame and door leaf with your own hands with a fresh mind, and you can put off the trim, locks and handles with trim for the next day.
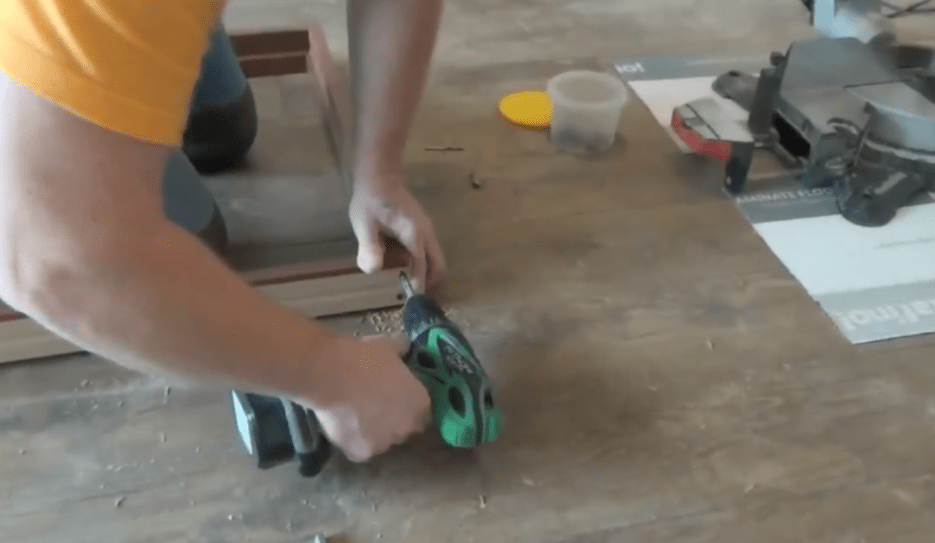
There will be a lot of measuring and sawing. All cuts are made by hand hand hacksaw, therefore, in addition to fresh forces, you will need to stock up on quality tools.

Tools for installing interior doors
A day or two before the start of work, you will need to assemble a working arsenal for working with lumber. You can collect it from friends or rent it. Why two days before installation? Because well before starting work, you will need to check with your own hands the serviceability and functionality of each tool:
- Construction levels - small, 70-100 cm, and large, 150 - 200 cm, with a working bubble indicator. Usually they don’t pay attention to the condition of the camera and beacon, considering them to be in good working order, but in rentals you can sometimes find bent and even broken copies; this is the most important tool in installing interior doors;
- Marking tool - carpentry corner with ruler, tape measure and meter metal ruler. We check for the presence of angle marks at 90° and 45°;
- A screwdriver or electric drill with a bit attachment for cross-head screws. We check with our own hands how the cartridge holds, and the serviceability of the wiring - batteries;
- Cutting tool, you can cut the timber of interior doors with a jigsaw, but it is best to stock up on a pair of hacksaws - carpentry and metal. The first is used for cutting box parts, the second is used for fine cutting of platbands.
In addition to the tool, you will need a hammer, a clamp, a carpenter's chisel, foam in a can, tape and gloves. There is little dust and waste generated when installing interior doors, but you will still have to periodically remove it with your own hands so as not to spread it throughout the apartment.
In addition, it would be correct to have a hammer drill with a bayonet blade in stock, because when installing an interior door frame, problems may occur with the doorway in the wall. Ideally, the gap between the frame posts and the ends of the opening should remain 10-20 mm, for normal alignment and foaming of the cracks. In reality, the opening may be uneven, and you will need to knock down part of the concrete or stone with your own hands, a hammer drill or a hammer and chisel.
How to assemble an interior door frame
The best option would be to purchase a ready-made door kit, which usually includes:

In this case, the entire process of installing the interior frame box comes down to transferring the second parts of the hinges onto the frame parts with your own hands, assembling the hinges with self-tapping screws and installing them in the opening.

The entire job will take less than two hours. One of the options for installing interior doors with your own hands in the video

The only drawback of the above scheme is that not all manufacturers modern models interior doors manufacture their products in kits designed for do-it-yourself installation. Most often, the customer buys a door leaf, and the trim and frame parts are purchased with the expectation of installing an interior door with a frame on their own.
How to install an interior door with your own hands
First of all, you need to lay out the door leaf on a flat area. Next, the selected pair of beams is laid to the left and right ends of the sash. Using a tape measure, we measure the width and expected height of the future supporting frame. Then, using a building level and a tape measure, check the dimensions of the interior passage.
Important! This is done in order to determine whether the platbands will cover the edges of the hole in the wall, and what thickness of additional elements should be used.

If you “miss” the height or width of the frame, you will have to redo the trim yourself or, even worse, you will need to raise the interior door in height.
Assembling a door frame frame of any size
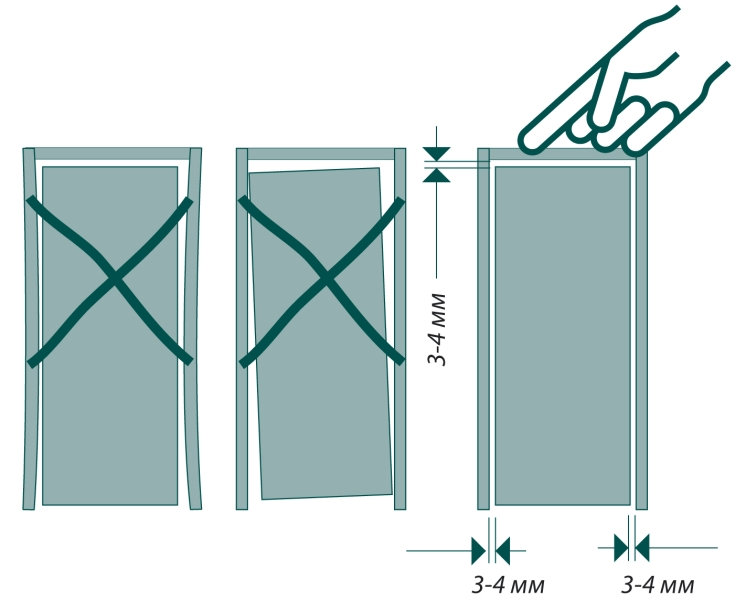
In order to install the interior door without distortions, it is important to choose the correct distance between the left and right posts so that the door leaf fits into the frame with a small gap, no more than 2 mm on each side. In this case, the door will open freely without jamming in the hatch.

The easiest way to assemble the frame with your own hands is using a clamp, a saw and two blanks. Vertical racks, as in the case of preparation, they are placed at the ends, leveled and fixed with clamps.
On the side of the upper and lower edges of the canvas, an allowance equal to the thickness of the timber is left on the workpieces. At the same time, on the left allowance, a cut line is applied with your own hands at an angle of 45° for further joining with the horizontal crossbars of the frame. Without disassembling the structure, markings are applied to cut out the grooves for the canopies, lock and handle.

If the interior door is too wide or complex shape, then usually at this stage they check the conformity of the configuration of the frame with the door to the shape of the interior opening. To do this, a pair of nails are driven into a wooden plank at a distance from each other equal to the outer width of the frame. The plank must be secured above the opening, and a couple of plumb lines are hung on the nails. If the gap between the frame and the wall is 10-15 mm, then the calculation is correct.
Installing hinges on an interior door
After all checks have been completed, it is necessary to cut out mounting grooves for the awnings in the canvas using a chisel or carpenter's knife and hammer. The easiest way is to mill a niche using hand router, but, as practice shows, the work can be done with your own hands and without expensive power tools.

If this operation is difficult, then for interior doors you can use overhead hinges or models for drilling. For installation you only need to drill holes for screwing in the fasteners.
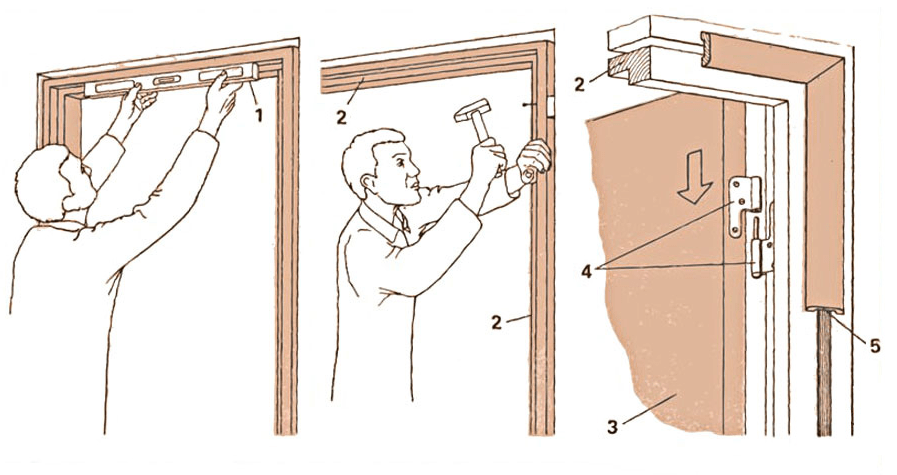
We fix the frame in the doorway
- Mark the level of the upper horizontal cross member of the frame with a marker on the steppe, this will help to complete correct installation horizontally and vertically;
- Using wedges and a building level, we level the frame vertically and horizontally with our own hands. We fix the position of the frame in the opening with wooden plugs and wedges.

Advice! If the frame and door leaf are light in weight, then the frame can be fixed with mounting perforated petals to the wall of the interior partition.

Next you need to blow out polyurethane foam The space between the frame and the wall, while installation is being carried out on the polyurethane foam, must be checked again and, if necessary, finally leveled vertically using a long building level. Apply a small amount to the top mark building level and, if necessary, we adjust the frame to the required height.

Installation of door leaf
After the loot is firmly fixed with hardened foam, it is necessary to install the mating parts of the canopies. To do this, initially the door leaf is raised with wedges so that there is a gap of 1-2 mm between the threshold and the lower edge.
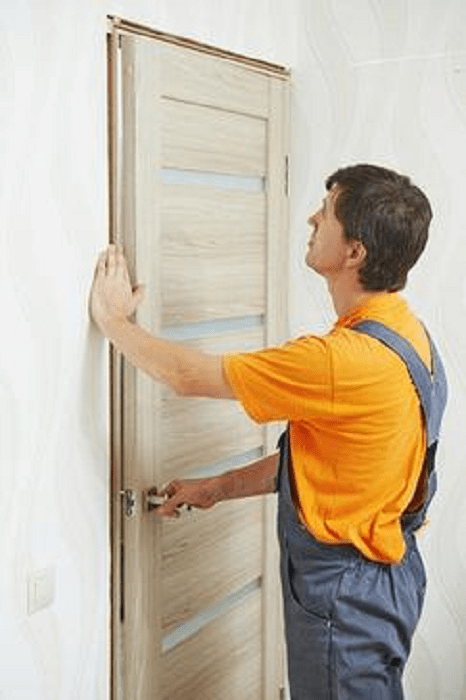
All that remains is to install the sash on the awnings, and you can move on to decorative finishing interior doors.
Installing trim on interior doors
Covering the frame with platbands is not particularly difficult. First of all, install the vertical trim strips. The height of the plank is measured according to the mark made earlier, after which the platband is applied to the frame and the cut line is marked at an angle of 45 degrees.
Advice! It is best to make an undercut with your own hands using a thin hacksaw blade on metal. First stick tape onto the cutting line. The plank is nailed with wallpaper nails or placed on glue.
The second vertical casing is installed in a similar way. After the installation of the vertical parts has been completed, you can mark the cut line on the horizontal strip and install it on the door frame in the same way.
What are the sizes of extensions for interior doors?
Additional strips are used as additional element to increase the width or thickness of the door frame. Most often, installing extensions on interior doors is required in a situation where the wall is much thicker than the canvas, and there is a gap between them that needs to be closed.
The width of additional slats ranges from 10 mm to 200 mm, for interior designs the most popular size is 10-20 mm, and often, due to the non-standard profile of the slot, the extensions have to be ordered or cut out with your own hands from the trim strips.

How to install extensions on an interior door
If, after installing the box, the unpleasant fact is discovered that the vertical plane of the frame is recessed into the space of the interior opening relative to the wall surface, then the only way The situation can be corrected by using additional strips.

You must first determine the size of the extension; to do this, place a building level on the wall and use a ruler to measure the distance to the front edge of the box. Thin strips are nailed with wallpaper nails, wide extensions are glued to the frame.
Professional advice on how to install interior doors
Among the features of installing home doors, the following problem areas can be noted.
Before installing the trim, you need to make sure that the frame or additional strip is located in the same plane with the surface interior wall. Otherwise, even if you do it perfectly with your own hands, a gap will definitely appear between the platbands.
The second problem we have to face is sagging doors if installed incorrectly. To correct the position, you need to remove the door leaf, place washers, or trim the edge and install the door in place.
Conclusion
Installing interior doors with your own hands will require a little practice in installing awnings and extensions, but in general the work is not difficult, and with the right skill you can hang the door in a few hours. The craftsmen claim that with each installation, the quality of their DIY work doubles.
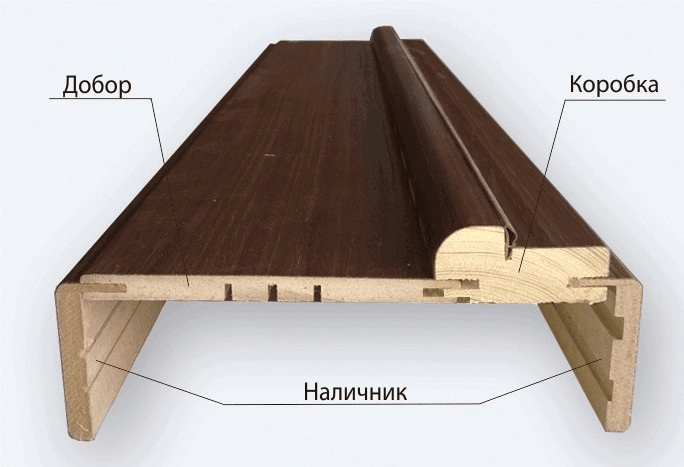
When installing door frames, it often becomes necessary to cover the remaining part of the slope with something. Most often, “extras” are used for these purposes, which can be purchased along with door leaves and trim. However, in most cases, such additional elements require adjustment, since the additional elements should be attached to the box as tightly as possible, and always strictly according to the size of the visible part of the slope.
Door frames
There are two options for door frames to which extensions are usually attached:
- with a groove for it,
- without groove.
In the first case additional element is inserted into the groove of the box with one (long) side, while its other side is unattached.
With the second option, the extension will need to be attached to the slope, without fixing it to the door frame.
Choice of extras

Extensions are strips made of laminated MDF. The color of these elements usually matches the color of the door frame and trim. But if you wish, you can always purchase additional colors of other colors, if this option is more suitable for the design of your room.
Do not forget that the extensions cover the slopes on three sides - on top and on two sides. In this case, it is desirable that the top extension be longer than the width of the door, and the vertical extensions rest against it at a right angle.
The varied width of the extensions allows you to choose them for slopes of almost any width. The main thing is that the additional element does not turn out to be narrower than necessary. If you cannot choose the exact size of the extension, you can trim it. To do this, it is recommended to contact furniture workshops, since you should additionally order there an edging tape sticker on one or two ends of the trim.
Installation of extensions with a groove

First, let's look at how to attach the extensions to the door if the door frame has a special groove:
- Install and secure the door frame in the opening. You can even hang the door - this will not affect the installation of the extensions.
- Trim the extensions to the required length.
- Measure the distance from the outer edge of the wall (slope side) to the door frame in at least three places. If these distances do not coincide, then the extension will have to be cut in a furniture workshop. On the end of the extension to which the casing will be attached, it is also necessary to glue the edge tape there.
- Insert the extensions into the grooves of the door frame: first the top horizontal, then the side vertical ones. The extensions must be located strictly at an angle of 90 degrees to the plane of the door frame.
- Check that they are horizontal and vertical.
- Paste masking tape in 4-5 places along the length of the extension in such a way as to use it to fix it in the desired position.
- Fill the space between the wall and the extension with polyurethane foam.
- Wait until the foam hardens, cut off any excess.
- Attach the trim.
Installation of extensions without a groove

After installing the door in the doorway, it is necessary to measure the remaining uncovered part of the wall (slopes). If the extensions have to be cut along the long side, then it is better to do this also in a furniture workshop. There you can also order the edging tape sticker on the two ends of the extensions (both on the side adjacent to the door frame and on the side of the platbands).
If the slopes are not plastered, then the extension should be secured as follows: take a wooden plank or a small beam and attach it to the slopes so that the extension can be secured on top of this plank, while maintaining its verticality (horizontal for the top extension) and right angle between it and door frame.
With smooth plastered slopes, you can do without an additional wooden plank, provided that there is no need to leave any space between the extension and the wall.

- Attach the extension to the bar.
- Fill the remaining space between the wall and the extension with polyurethane foam. To make the foam harden faster, spray it with water.
- Trim off any excess hardened foam.
- Secure the trim.
Benefits of using add-ons

As you can see, the technology of fixing the extensions allows you to avoid such a tedious procedure as plastering the slopes. A correctly selected additional element makes the slope smooth and beautiful, no matter how bad the slope looked before. However, if the space between the extension and the wall exceeds 3-4 centimeters, it is better to additionally secure the extension using small wooden blocks screwed to the wall.
In cases where you do not have the opportunity to use factory-made additions, you can make their man-made “analog” from laminate or MDF panels. This solution will make it possible to create “diverging” slopes (not located at an angle of 90 degrees relative to the door frame).
Video
Useful instructions for installing extensions:
Below you can see how the extensions are installed:
During repairs, you may be faced with the need to install extensions, but you can do it yourself, since installing strips for interior doors is easy to master.
These strips are installed to maximize the perimeter of the doorway. They consist of two vertical supports with one horizontal bar. This modification is needed in two cases: if the width of the door frame less wall or just to frame the opening and. Often they come complete with a door block and have no complex design, which means you can try to make them yourself. Moreover, this skill will come in handy on the farm more than once. They are made from different materials, such as MDF, fiberboard, metal, wood, which allows them to fit any furniture, wallpaper, interior.
Material for door trims
Additions are a good alternative to other ways to modify an opening. Their installation takes place as quickly as possible short time, and for installation there is no need to use substances with water, which will reduce the likelihood of significant shrinkage of the wood around the door. In addition, these elements do not require frequent repairs. You can purchase designs in a store or make them yourself. Especially if you plan to use wood for cladding. To make them, you first need to decide on the product components and dimensions. The width of the plank is calculated very simply: take the thickness of the wall, subtract the width of the box and add the dimensions of the fastenings.
The simplest extensions are made from straight boards. You just need to buy the material, cut off the excess from it, and adjust the connections for the fasteners. A groove mount would be best. On the front side of the board, mark the contours for cutting. Using a router, chisel and drill, cut down unnecessary material. Then clean the surface sandpaper. We make a tenon on the wrong side; to do this, you need to remove the wood from the marked mark. Now about aesthetics. To obtain the required shade, you will need a stain, which will also protect the material from aging. Then you should varnish them several times or paint them in the desired color. If the structure needs to be installed in a bathroom, then the coating must protect against high levels of humidity.
The extension is assembled from three parts, it looks like the letter “P” and is attached to the door frame, the wall in the area of the opening and to the mounting beam. Liquid nails or galvanized self-tapping screws are used to secure the planks. When fixing with outside To mask the caps, plugs are installed or covered with special mastic.

Doors after installation of accessories
When installing additional trim strips on a door opening is only at the planning stage, it is important to pay attention to the initial conditions. There are two cases: when the box has grooved quarters on the front side for connection with extensions, and when this does not exist. For the first case you need wooden planks, the width of which is approximately a centimeter larger than the width of the opening to be covered. As a rule, this is 1 cm, but there may be exceptions. Therefore, all measurements should be carried out at least at four points, because there may be a difference in the indicators. If a discrepancy is detected, the maximum is taken as the base size, then it will be possible to remove the excess.
Also, additional strips can come complete with the door, and special grooves will be placed on them, which will allow you to quickly install the entire structure yourself without any unnecessary manipulations and measurements.
In another case, when there are no grooves either on the box or on the extension, the connection point can be improved. Sometimes in a set of expensive doors you can find a gasket for the junction of the frame and the extension. There is nothing stopping you from using the technique for an option that you made yourself. It is enough to take transparent silicone rubber bands and lay them around the perimeter. Naturally, you don’t have to call a specialist; this is also easy to do with your own hands.
It is quite difficult to talk about the assortment of accessories because of their specificity. There are only 2 designs - conventional (laminated slats, sometimes covered with veneer) and telescopic (stacked). Extensions of the first type can differ in cladding materials and width (100, 120, 150, 200 millimeters). The second can be used to finish the opening in the wall, whatever its thickness. They have a groove on one side and a ridge on the other, this allows you to assemble shields of different sizes. They also differ in design and width. Dimensions for interior doors – 100, 120, 150 millimeters.
Another variety is combined extensions that combine several functions - door strip and platband. They are considered decorative corner and are used with a special box of a specific design, in the sides of which there are deep grooves. A special platband is made in them. It is unrealistic to install them on too thick walls, but they can slightly increase the width of the doorway (up to 50 mm).
Installation without assistance – quickly and cleanly
In order to correctly install the extensions, you need to follow the instructions.
Installation of heating cable
Step 1: Cable Installation
First we need to dig a hole around the well, the depth of which should slightly exceed the freezing level of the soil. Following around casing pipe and cutting the pipeline that is connected to the well, we wrap the heating cable. The number of turns of the product is usually indicated on the cable packaging.
Step 2: Additional insulation
A layer of thermal insulation material must be laid on top of the pipes that are wrapped with cable. When choosing a material, you should pay attention to the maximum temperature at which the insulation will not lose its properties. If you do not take this point into account, then when the cable gets too hot, the insulation may simply melt. We close the structure from above waterproofing layer, which will protect the insulation and heating cable from exposure to groundwater.
Step 3: Completion of work
We check the structure to make sure it is stable and does not allow water to pass through, and fill the foundation pit.
Using this algorithm, you can install interior and exterior fittings with your own hands. entrance doors. Only the width of the planks will be different. Making the box wider is allowed in different directions. And if there are no limiters, and the door can open in both directions, the frame is mounted flush with the outer plane of the opening. The extensions are placed on the side opposite to the closure. They will not interfere with the operation of the door.
As a rule, additional strips are installed on the opposite side door hinges sides. But it happens that you have to put it differently. In this case, it is better to make sure that they do not interfere with opening and closing. If, in a fully open state, there remains a gap between the edges of the frame and the door equal to the thickness of the product being installed with a margin of at least 2 mm, then there will be no problems. And when they are adjacent to the frame, you need to install backing strips, having first removed the plaster on the slopes.

Interior doors
If you neglect this, the additional strip will soon deteriorate, and the opening angle will be several times smaller. Depending on the humidity level, cover the extensions with special varnishes to protect the wood or metal from corrosion. If the door opens towards the strip, during installation you need to provide a gap so as not to damage it.
Modern methods of interior decoration are aimed at simplicity and manufacturability, increasing the speed of work and creating an attractive appearance all elements of the room. Almost no room is complete without doors that perform two main functions: dividing the various areas of the apartment among themselves according to their functional purpose and participating in the creation of the individual interior of each room. But when buying a new beautiful interior door that ideally matches your plans for decorating the apartment, a problem often arises - a discrepancy between the thickness of the door frame and the thickness of the opening in the wall.

Most walls are much thicker than the door frame (usually 80mm). Previously, such problems were solved by plastering the remaining (not covered with frame) part of the wall, followed by puttying, painting or wallpapering. This method took a lot of effort, time and money. Using extras is a more rational way to solve the problem. Before we figure out how to attach the extension to the box, let's look at the advantages of this method.
Benefits of use

- Refusal of “wet” finishing processes that adversely affect the wood of doors.
- Simplicity and high speed of installation door block together with extras.
- Long service life without the need for intermediate repairs.
- Creating Integrity door design and giving it a presentable appearance.

It is advisable to choose additions at the same time as purchasing doors. This will give you the opportunity to verify the accuracy of the match color range and surface textures of the door frame and extensions. Only in this case will you get a harmoniously designed doorway with a finished look.
To simplify the installation of the extension to the door frame, it is desirable that the manufacturer provide a special groove of the required width. This will allow you to get a tight connection between the frame and the extension without the use of additional fasteners, wedges and supports.
To calculate the width of the extension, you need to measure the width of the wall and subtract the width of the door frame from it, then add the depth of the groove to the result. The thickness of the wall is not always the same along the entire perimeter, so measurements must be taken at least at 4 points and the thickness of the extension must be selected according to the maximum measurement.
Let's take a closer look at how to attach the extensions to the door to create a holistic, aesthetic design.
Installation procedure

You can fasten the extensions before installing the door frame or, if it is more convenient for you, then after its installation. Most often, extensions are attached on the side opposite to the side of the hinge installation. This allows door leaf calmly open to the maximum angle without resting on the extension. If you do not need to fully open the door, you can deviate from this rule.
Installation "in the groove"
The first step is to measure in several places the distance from the installed door frame to the plane of the wall along the perimeter of fastening the extensions and add the depth of the groove to it. Next, you should mark the required width and saw off the extension. If the width of the wall has differences, then the gaps between the wall and the platbands can be reduced by using materials with a special telescopic fastening system.

Installation should begin with the vertical parts, on which the horizontal upper part fits tightly.
If there are large gaps between the walls and the finishing (more than 3 cm), it is necessary to perform step-by-step foaming. This will avoid deformation of the frame.
Using temporary fixing bars or wooden slats is guaranteed to prevent deformation of the extensions during the foaming process. After the foam has hardened (after 24 hours), it is necessary to cut off the protruding parts, putty the ends together with the wall and cover it with wallpaper. Installation of the platband is carried out after finishing the walls.
Quarter installation
When a “quarter is selected” in the door frame, you can use several methods of attaching the extensions:
First way. To eliminate gaps with front side
, the accessory to the box is wedged from the reverse side.

Second way.
It comes down to forming a kind of groove using one solid strip or several small strips on each post of the box by screwing them.
Video
If the door frame does not have grooves or quarters, then it is necessary to cut the groove with an electric router, and this can be done directly at the installation site.
If you manage to choose accessories that are ideally suited to your door and carefully install them, then as a result you will quickly and easily get a perfectly assembled door that harmoniously fits into the overall interior of the room. This video shows the installation process of the extensions. Many people, when renovating their homes, install new door(entrance or interior) or improve the old structure. When purchasing a door, do not forget about the nuances
decorative design
 Extensions and platbands give a finished look to the doorway
 Let's consider several options correct installation doborov. We will give recommendations to those who want to install them themselves.
An extension is a decorative element that allows you to close the wall of the opening that is not affected by the frame. Not all openings are the same. Their thickness depends on the material used. If the wall is made of brick, then its thickness can be one or more bricks.
 The width of the opening varies; installation of extensions is often required to create unity of space
 And creating unity of space is required in any case to complete the interior. Extensions do an excellent job of this function.
- Additional elements are represented by a board or panel of certain sizes from various materials. The range includes a range from 80 mm to 500 mm. The thickness of each panel is 10–15 mm.
- Door panels can be installed in the groove of the frame or flush against it.
When choosing a door, take care of purchasing the accessories at the same time, so that you don’t have to try to find a suitable shade in the future. The elements will come into contact with each other and the slightest difference in color will be noticeable to anyone. Therefore, when measuring an interior opening, check the dimensions of the horizontal and vertical surfaces.
 Extensions, trim, box, canvas must be the same shade
 The extension is not always sold in the right size. Buy the option that is closest to what you need. Big things can always be reduced. A missing size will create installation difficulties.
Various options for installing door panels
Openings can differ not only in the thickness of the wall, but also in the proportions of the space itself. Slopes are not always perfectly smooth and have a strictly vertical or horizontal direction.
There are oblique slopes (with an extension to the outer part of the wall), with an uneven surface when the walls are poorly plastered. It is necessary to take into account all the nuances so that the installation of decorative elements is correct.
Standard installation of door panels
It is assumed that there is a special groove in the door frame into which the extension is inserted.
 Often the extension is installed in the factory groove of the box
 Installation is carried out together with the box at the stage of fixing it in the opening. We will need the following elements:
- vertical extension - 2 pcs.;
- horizontal extension - 1 pc.;
- construction corner or tape measure;
- rule;
- hammer;
- hacksaw or circular saw;
- drill;
- mounting gun;
- foam;
- nails without heads or “liquid nails” glue;
- self-tapping screws;
- furniture plugs;
- masking tape;
- wedges, bars.
This standard set for any method of installing decorative additions. Let's move on to a description of the standard method.
Sequencing:
At this point all stages are completed. Using this guide, installing door panels with your own hands will become accessible to anyone home handyman at no extra cost.
Non-standard method of installing extensions
The frame of an entrance or interior door does not always have a special groove for a decorative slope tenon.
 If there is no groove, the extension is installed close to the box different options
 It refers to metal structures or the option of using a frame not included in the door kit. Then the groove may not be provided. But extras need to be installed. There is another method for installing panels:
- end connection finishing board to the frame, if the door was installed before the decorative strips were purchased;
- if the door is not installed, then the panels are fixed directly to the frame at the assembly stage.
Let's consider both options.
If the door is not yet installed
- Having assembled the vertical and horizontal parts of the box, we attach the extensions to the ends of the racks, having previously taken measurements and filed them to the required size.
- Using a thin drill, we drill holes for small nails at a distance of 200-300 mm from each other.
- Carefully nail the panel to the frame slats.
- We install the structure in the doorway, performing all the steps sequentially.
If the door is installed
In this situation, you can install the extensions with your own hands using two methods:
- securing with long self-tapping screws to the uprights of the box;
- fixing to the wall.
In the first case, it is necessary to select thin self-tapping screws of such length as to completely stitch through the width of the trim and timber. This method is possible if the thickness of the unfinished wall is no more than 200 mm. At larger size the strength of the structure may be in doubt.
- We screw the screws into the pre-prepared holes, driving them inside the panel. We carry out actions around the perimeter of the doorway.
- In the second case decorative board is fixed to the wall that needs to be covered. If the wall is flat and there is no large gap between the wall and the door frame, you can fasten the extension directly to the wall using self-tapping screws or liquid nails.
- When using self-tapping screws, drill small holes with a recess for the cap.
- We tighten the screws around the perimeter and close them with furniture plugs using silicone glue.
- When choosing the option with glue, apply liquid nails to inner surface additional Place it on the wall and press it tightly. For good adhesion of surfaces, you can secure the panels to the wall and box with masking tape.
- If the walls are uneven or the gap is very large, you can use backing bars to secure the extensions to the wall.
- Cutting the bars required thickness on parts of the required size.
- We fix them to the wall, controlling the process with a level. We form a frame for decorative panels.
- We install the extensions onto the resulting frame using self-tapping screws or liquid nails.
- Let's take mounting gun and blow out the space between the wall and decorative element without fanaticism, so as not to upset the proportions.
- After the foam has dried, remove the excess with a knife and proceed to installing the trim.
The unity of space has been created. Any type of DIY door installation is accessible to those who know how to hold tools and solve simple problems.
Doorway with deviations
The interior opening does not always have straight vertical or horizontal lines.
Basically, door panels are installed with inside where there are no loops. Situations arise that require decorative covering from the hinge side. Clearances must be maintained to allow the door to open smoothly. If you do not take into account the opening angle of the fittings, friction will arise between the surfaces, which will lead to rapid abrasion of the decor.
You can cover the wall with others finishing materials: wallpaper, painting, Wall panels, decorative plaster. The world of construction stores will offer you a variety of products. Door access reduces the time it takes to decorate a room, reduces the cost of purchasing additional products, and prevents difficulties with choosing a shade.
 The door is a single composition of the interior. Everything must be perfect.
 The price of accessories and their installation depends on several parameters.