B-B-Q. Types and device
Although a barbecue oven looks like a complex device, in reality it is not. It is very easy to make it yourself.
Fire-resistant solid bricks are used to build a barbecue.
To make a barbecue you will need:
- first grade red brick;
- fireclay brick;
- the required amount of furnace casting;
- clay;
- for preparing the solution - unwashed river sand;
- for the foundation - cement, gravel and reinforcement;
- mechanical sheet;
- boards for constructing formwork;
- roofing felt as waterproofing;
- trowel for applying the solution;
- medium sized hammer;
construction level; - plumb line;
- hacksaw for wet cutting of bricks;
- Bulgarian.
The difference between a barbecue and simple ovens, grills and fireplaces
Barbecue has a number of features that fundamentally distinguish it from a fireplace, grill and simple ovens:
- A fireplace is used exclusively for heating, a grill is used for preparing a variety of dishes, while barbecues and stoves are used for both.
- Once the coals have burned out, the oven remains warm for another couple of hours. Grills, barbecues and fireplaces can only provide warmth when burning.
- A grill does not have a chimney, but barbecues, stoves and fireplaces do.
- Fireplaces, barbecues and ovens have a back wall behind the brazier, but grills do not.

Cooking a variety of dishes on a barbecue is a real pleasure
Construction of a barbecue
Preparatory work
Initially, you need to make drawings to understand how much material will be needed and to determine the external and internal parameters of the structure. They are compiled on an individual basis.
Expert advice:
- the grill should be located at least 70 centimeters from the ground;
- it is necessary to provide niches for coal and storage of other utensils;
- the oven is made 15 centimeters lower than the grill;
- back and side wall structures must be designed higher than the grill itself.
It is also necessary to figure out exactly what place on summer cottage There will be a barbecue oven.
Based on the rules against fire safety, the structure cannot be placed next to wooden buildings.
Construction of the foundation
After everything has been prepared, you can begin building the foundation.
It is done this way:
- Along the perimeter future design dig a trench up to 40 centimeters deep.
- Gravel and crushed stone are poured into the bottom of the trench. The bottom must be thoroughly filled and compacted.
- The reinforcement bars are laid on top of crushed stone and gravel. They should end up looking like a folded grid.
- Formwork is made, after which the trench is filled with concrete. Experts recommend using grade 300 cement.

Laying the foundation for the barbecue
Laying bricks
The brick must be fireclay, that is, fireproof. To hold it together, you need to make a solution from red clay:
- Water is poured into the clay and mixed thoroughly. You should get a homogeneous mixture similar to sour cream.
- After this, 0.1 kg of cement and 0.5 kg of sand are added to the mixture. This solution is perfect for laying the base of the stove.
Then they make a pedestal for the barbecue. You should start with the niche where the fuel is stored. Its width is chosen at your discretion, but the height should be about 70 centimeters.
It is necessary to make a chimney and a firebox. This is done using clay mortar in two rows.
The brick itself is placed exclusively along the stove. The edges of the brick must protrude by one third. The average size barbecue: depth - 3 bricks, width - 7 bricks.
To increase the strength of the structure itself, floors are created using reinforcement.
One of last stages construction of a barbecue is the construction chimney. It is made from refractory bricks. A tooth is made behind the structure, which will help improve traction. A valve must be installed inside the pipe.
BBQ finishing
The final stage in making your own barbecue will be its finishing, of which there are many ways.
The finishing of the barbecue is made from both facing and fireclay bricks. In this case, you can fit into a budget accessible to everyone. The seams between the bricks should be small to enhance the aesthetic appearance of the product. You can make a lining at the bottom of the barbecue. The material in this case will be natural stone.
Read about how to make an enclosure for a dog inThe debate about who is the founder of barbecue continues to this day. In fact, almost every nation has a culture of cooking open fire or coals. Although the word barbecue itself is of English origin and means an open fire, the stoves on which food is cooked have a lot of varieties and design solutions.
Design selection
On constructive solution The oven is influenced by several factors. You can set up a barbecue area in your dacha yourself, but you need a suitable place for this. If the area is limited and you plan to fry meat on major holidays, then it is enough to buy or make a metal one. This is the simplest and most affordable solution.
It is much more difficult to build a barbecue in a brick country house with your own hands, plus the cost of construction will be higher than in a portable version. But this design is more functional and durable. Also, do not forget about the aesthetic side of the issue; brick or stone stoves, with the right approach, can become a pearl in the design of your site.
As for stoves that are exotic for our country, such as the eastern tandoor, it is better to entrust the installation of such structures to professionals. The same can be said about the stove complex, when in addition to the barbecue with grill, it is planned to build a smoking compartment, wood stove with oven, washing department, table and firewood storage.

The video in this article shows how to make a simple barbecue.
Choosing a site for construction
Theoretically for the most simple barbecue or a grill, 1.5 m² is enough, but cooking over a fire is a special ritual and the surroundings accompanying this action must also be appropriate.
As a rule, a barbecue area in a dacha is set up with your own hands in places inaccessible to prying eyes. This can be a free-standing gazebo or a canopy, partially bordering the country houses.
Planning such a complex in the far corner of the garden will not be entirely the right decision. Of course, from a fire safety point of view this will be perfect option, but think about how many times you will have to cross the site while you prepare the feast, and then all this will still need to be cleaned up.

To ensure fire safety, a distance of about 5 m from the fire is sufficient. Most often, this place to relax is located under a canopy near the kitchen. With this approach, it is much easier to supply water from the house and discharge it into a drainage pit.
Important: the entire furnace complex is being built separately; it should not border on any outbuildings or residential buildings, as this is fraught with a fire.
When starting to build a brick barbecue at your dacha with your own hands, pay attention to studying the wind rose on your site. The stove is installed on the leeward side, because neither you nor your guests or neighbors will like breathing smoke from the fryer.

Undoubtedly, the central place in such a complex. But for convenience, it would be useful to equip a small storage for firewood, some compartments for dishes, a place to store skewers or grill grates. It would also be nice to supply water and equip a cutting table.
Let's talk about construction
When choosing a complex design, it is better to give preference to more open options. There are enough closed spaces in the city, and when you go to the country, you want volume and closeness to nature. It should be noted right away that, without having construction experience, building a good indoor pavilion with your own hands is quite problematic. But the brick barbecue itself is quite within your power.

Unlike the classic barbecue, the barbecue is a multifunctional structure. The hearth itself is practically no different from a barbecue; it also has a rectangular shape and guides for skewers.
But above them, supports for grilling are mounted, sometimes with a spit; a smoking cabinet can be located above them; in addition, a stove and a number of accompanying compartments can be attached, starting with shelves for dishes and ending with a mini-bar. Of course, the number of compartments is selected individually. Such a structure cannot be called light, and for its installation you need to lay a foundation.

Laying the foundation
After a worthy place has been chosen and a general sketch of the structure has already been sketched, you can begin laying the foundation. The length and width of the barbecue is calculated individually depending on the size of the firebox and the presence of accompanying structures.
Important: the foundation slab or block must exceed the dimensions brickwork, half a brick around the perimeter.

Pawn load-bearing structure possible in 3 different ways.
Choose suitable way should be based on data on the composition of the soil, the presence of quicksand and the climate in the region.
- Most quick option this is the use of ready-made iron concrete slab. For this, soil is selected, the depth is determined depending on the thickness of the slab. A 50 mm sand and gravel cushion is made at the bottom and after compaction a slab is laid. Although the option is quick, you will need a crane to lay the slab, plus there is a possibility of uneven shrinkage.

- The next option is also a variation slab foundation, but is considered more reliable. The point is that reinforced concrete slab is being established on site. To do this, a pit is made about 350 mm deep and a dense sand and gravel cushion is laid.
After which the formwork is mounted, installed reinforcement cage and concrete is poured. The solution is made with the proportions of concrete grades M200 - M300. - But the most common and reliable is considered to be the usual one. strip foundation. Unlike the construction of houses, here it is done not along a closed contour, but according to the U-shaped principle. The laying is carried out to a depth of up to 50 cm. Next comes the standard instructions, 150 - 200 mm of sand and gravel filling, onto which a reinforced concrete base is poured.

Important: traditionally concrete gains design strength within 28 days.
But according to technology, in the first 10 days it needs to be moistened regularly, otherwise the monolith may crack.
Experts advise covering the foundation with plastic film until it gains strength.
Wall masonry
To build a barbecue at the dacha with your own hands, 2 types of bricks are used. The firebox and that part of the cladding that is in direct contact with high temperatures, is laid out from refractory bricks. This can be fireclay brick or solid, pre-burnt red brick.
The rest of the structure is made from facing bricks or any block material, even natural stone. We will consider brickwork, since its installation, in this case, requires less professional skills.
All bricks are soaked in water immediately before laying.
- When the foundation has settled and gained strength, it should be checked for horizontalness, according to the level. Deviations are eliminated due to the thickness of the mortar when laying the first 2 rows of the base. Before laying begins, the foundation is covered with waterproofing, this can be roofing felt or other rolled material.

Advice: after laying the first 2 rows and clear horizontal alignment, it is better to let the solution set for 3 to 4 days.
This is not necessary, but this will reduce the likelihood of the masonry becoming distorted in the future.

- Traditionally, the height of the firebox is 0.7 - 1 m from the ground. After laying 2 rows of the base, another 5 rows of ordinary brick are laid on them. Next comes the firebox, so the brick must be fireproof. From this point on, it is recommended to lay reinforcing wire every 2 rows, preferably copper, but ordinary wire rod with a cross-section of 0.6 mm can also be used.
- The next, butted row is laid out with refractory bricks across, so as to form an inner side. The bottom of the firebox will be based on it; it can be made of the same refractory brick, but it is faster and easier to use cast iron grates.
- Next, the firebox itself is laid out of 2 rows of refractory bricks and the bonded row of masonry is repeated again. Skewers with meat will be placed on it. If it is difficult for you to lay the bonded rows, then for the guides under the skewers a wide metal strip 5–7 mm thick is suitable, which is laid between the rows, but in this case another row of ordinary masonry is added.
- When the support for the skewers is ready, another row of bricks is laid, after which the stud level of the masonry is repeated again. It is designed to support the grid under the grill.
- It was experimentally proven that for comfortable cooking, the firebox window should have dimensions of about 1 m in width and 70 cm in height. Another 2-3 levels are made above the opening and the pipe can be laid out.

Chimney and auxiliary structures
- The dimensions of the smoke intake are calculated according to GOST standards, which state that per 1 m³ of the firebox there should be 960 cm² of pipe area, plus the height of the chimney, with such data it should be about 12 m. Do not be alarmed, the average volume of the firebox ranges from 0.125 - 0.14 m³, cross-section the pipe for it will be 120 cm², which is 110x120 mm with a pipe height of one and a half meters.
- The chimney cone can be purchased or welded from metal. But if you decide to lay it out of brick, then this should be done with a gradual narrowing. For the front and back walls, take a quarter of the width of the brick. For the side walls, take half the length of the block. This is how they are gradually brought to the desired section.
- Among the people, the masonry of this kind of structures is done on the basis of clay-sand mortar. But we advise you to use a special fireclay composition for laying stoves. It is sold dry finished form and there are instructions on each package. The cladding is traditionally laid on a cement-sand mortar; the best option is sand concrete grade M300.

- Once the firebox is ready, you can begin installing auxiliary structures and making it beautiful. As mentioned earlier, the top of the oven is lined with facing bricks, and at the same time the base for the sink and cutting table is erected. The masonry must be tied into a single structure.
- The easiest way to make stops for installing a washing bath is from a corner measuring 45 - 50 mm, placing it directly into the structure. Table or others horizontal surfaces can be mounted from facing bricks, laying it on metal corner. Or use an asbestos-cement slab, which is tiled for beauty.

The video in this article shows some of the subtleties in building a barbecue.
Conclusion

When you set up a barbecue area at your dacha with your own hands, the warmth of your hands remains in it, and for the rest of their lives your children and grandchildren will remember that it was you who did it. At every feast or simply watching the firewood burn, they will remember you with gratitude.


Do you like to cook kebabs and other food outdoors, but still don’t have your own barbecue? We invite you to correct the current situation right now! Having studied the following instructions, you will learn in what sequence a full-fledged garden stove is laid out, and the presented diagrams will help you thoroughly understand all the nuances of the technology.
Materials for building an outdoor stove
Start by preparing your materials. You will need:
- . You don’t need much of it, so you can prepare it yourself;
- boards for constructing formwork. An unedged board is perfect;
- fittings Needed to strengthen the foundation. You can use unnecessary metal products - cuttings of channels, thick wire, strips of steel, etc.;
- edged boards. From these boards you will build formwork for a concrete screed under the tabletop;
- bricks. You will need simple ceramic and refractory products;
- iron pipe with a diameter of about 150 mm;
- foundation waterproofing material. Roofing felt is usually used;
- mixer;
- sink. For garden stove A metal sink is best;
- rubber hose.
Select the required amount of starting materials in accordance with the selected dimensions of the future furnace.

Prepare a stove design. This guide walks you through the process of building a complete food preparation unit complete with a cutting countertop and sink. If you don't need a sink and table, simply omit the steps associated with arranging them from the instructions.
Choose a suitable location for. First of all, you should be comfortable using the oven.

Important! If near the selected site they grow tall trees, make sure that their branches will not be in close proximity to the future chimney. Otherwise, prune the branches or they will burn.
The stove should not be adjacent to any buildings with its back wall. During operation of the barbecue, the brick will become very hot, which will not have the best effect on the condition of the adjacent buildings - they may simply burn out.


Arrangement of the foundation for a barbecue oven

The oven will have a relatively small mass. It will be perfectly supported by a reinforced foundation with a thickness of about 20 cm. M100 concrete is optimal for pouring.
First step. Mark the area for the foundation. Do this using pegs (metal rods, pipe scraps) and twine (cord, rope, etc.).
Second step.
Dig a pit around the perimeter of the base. The recommended depth is about 30-35 cm. Be sure to leave a 5-centimeter margin for the width of the hole.
Third step.
Fill the bottom of the recess and compact it thoroughly.
Fourth step.
Make formwork. To make it more convenient, first assemble boards 30-35 cm wide from boards. Select the length according to the size of the sides of the base. Install the formwork elements around the perimeter of the pit. Fifth step. Place the reinforcement in the formwork. It is best to use steel rods with a diameter of 1 cm.
Sixth step. Pour the concrete. Proceed to


further work


possible 3-4 days after pouring the foundation.

Lay a double layer of roofing felt on the foundation. It will take over the functions of waterproofing and provide
reliable protection
If you decide to make a rectangular opening, place a metal corner on the last row of masonry in accordance with the diagram, and then lay out the walls of the stove around the perimeter. If you want to arrange an arched opening, first install a template for laying the vault.

If a sink will be installed, at the same stage lay a pipe in the wall of the stove. You will run the water supply hoses through it.
Lay out the walls to the desired height. In the example under consideration, the height of the walls is 0.9 m. Make the top row of masonry with a slight protrusion outward. Thanks to this, a step is formed inside, allowing the installation of formwork for pouring the screed.
For the laying to be successful, carry out it in compliance with the following rules:
- the seams must be of equal width;
- the height of the openings must be such that at least 2 rows of masonry fit between their upper edges and the table;
- The arched opening must be designed with one central brick.
Having completed the arrangement of the lower tier, start preparing the base for the firebox and table. Make a screed. Place the concrete formwork on the previously installed step inside the oven. Cut the boards according to the dimensions of the span. If a sink is to be installed, leave space in the concrete screed to accommodate it. This is done very simply. You just need to avoid blocking the area for installing the sink. Cover it with another kind of formwork, fixed with spacers.
Fill the screed and leave it for three days. After the specified time, dismantle the formwork of the sink opening.
Cover the countertop with a material of your choice. For example, solid slabs of marble are perfect - they are both beautiful and convenient.


The second tier of the barbecue oven consists of a combustion chamber and walls that cover the area from prying eyes from the street. With partitions, everything is extremely simple - these are ordinary solid walls, laid out in half brick. If you want, you can completely refuse to arrange them. The procedure for constructing the firebox deserves special attention.


Prices for refractory bricks
Fire brick
Furnace arrangement
The furnace firebox has a two-row design: the outer row is laid out from the usual ceramic bricks, internal – made of fire-resistant material.

Lay the firebox in the standard way. The recommended parameters are as follows:
the height of the firebox opening is 7 rows plus an arch, or 9 rows in the case of a rectangular opening;
- firebox depth – about 600 mm;
- width – about 700 mm.
Having laid out the opening combustion chamber, add a couple of additional rows of masonry on top and move on to arrangement.
To achieve the required chimney width, successively reduce the length of the combustion chamber walls. The back and front edges need to be shortened by half a brick in each next row. The side walls should be reduced by 25% of the width of the brick. According to this pattern, you need to lay out about 7 rows. Then you can begin to arrange the chimney pipe. It should have a rectangular shape. The recommended height of the structure is 12-14 rows.


At this point the fireplace is ready. To avoid any problems during this step, follow these recommendations:
- do not make the firebox opening too high. 7-9 rows are enough. Otherwise, the draft in the chimney will become too weak, as a result of which all the smoke will go into the area and not into the sky;
- The inside of the firebox must be lined with fire-resistant bricks. Otherwise, the masonry will simply crack under the influence of temperature changes;
- The chimney should also not be too high, because because of this, cravings will worsen;
- Make sure that the bottom of the combustion chamber is as flat as possible - this will make it much easier for you to clean out ash in the future.
Finishing touches
The barbecue is almost ready. Finally, do the following:
- install the faucet and sink;
- connect the water supply and intake hoses;
- cover the table top finishing material(optional). The best option finishing – natural;
- Lay out the area in front of the stove with paving slabs.
If you want, set up a table and a couple of benches next to the barbecue. Additionally, in such a situation, it is recommended to think about arranging a canopy.

Now you know how to build a barbecue oven. The presented unit will allow you not only to cook delicious dishes, but also burn leaves and other small debris - the barbecue copes with all tasks perfectly.
The countertop and sink will make the stove as convenient to use as possible. You don't have to run into the house to prepare groceries - everything can be done in one place.
The free space under the table is suitable for storing firewood. Here they will always remain dry and well ventilated, which will prevent the wood from becoming damp and rotting.


Happy work!
BBQ prices
Video - Do-it-yourself barbecue oven
Nature, Fresh air, the smell and taste of barbecue grilled on coals are indispensable attributes of a holiday or weekend for many people. Usually, to prepare barbecue at the dacha, improvised barbecues are set up from improvised means - old bricks, stones and grates. There is an alternative - buy an electric barbecue or a ready-made metal grill with legs. But if you compare how much such a barbecue stove costs with the effect of its use, then for these funds it is better to build a garden barbecue stove with your own hands. Our article will tell you how to do this correctly.
Outdoor stove projects
Any construction, including an outdoor brick barbecue, must begin with the selection of a suitable project. You need to understand how much space you can allocate for its construction and what dishes you plan to cook while relaxing at the dacha. If your menu is limited to kebabs, and the budget for setting up a garden fireplace tends to zero, then with some skill you can make these simple kebabs with your own hands:

As you can see, the solution is not needed here at all, and we build the barbecue on a flat area from any suitable brick. You will only have to spend money on purchasing gratings and a thick sheet of fireproof material (pictured on the right), preferably mineralite. At the same time, the barbecue can have any size, as long as it is comfortable to cook and the required number of skewers can be placed above the coals.
Note. Unlike heating stoves made of bricks, garden fireplaces and barbecues do not have any canonical design and dimensions; even the masonry drawings given in the literature can be easily changed to suit your needs. At the same time, it is important not to violate the concept of smoke circulation and removal of combustion products.
If you want to do the best and thoroughly build a more aesthetic barbecue, then you can take the diagram and order shown below as a basis. To build it, you will have to cast a small concrete slab yourself, which will serve as a connecting link between the brick supports and at the same time the surface for installing the metal brazier.

To prevent the smoke from the barbecue from being blown away by the wind in all directions, a smoke collector made with your own hands from sheet metal is installed on top of the supports.

The mortar for laying this simple barbecue is a regular cement-sand mortar with the addition of clay for elasticity. The brick is ceramic of any brand, and the lower part up to the slab can be made of white silicate. The height and dimensions of the barbecue can vary depending on your needs, and to protect it from precipitation, it is recommended to install a canopy made from available materials.

Those owners of land and summer cottages who have enough space and opportunities should consider options for creating an entire barbecue area with a stove complex and a gazebo. In addition to the kebab bar, the complex may include the following elements:
- hob;
- grill;
- smokehouse;
- oven;
- fireplace with a cauldron for cooking Asian dishes.
What from this list should go into the barbecue area is up to you, after which you will have to find a suitable project. Fortunately, it is not difficult to find masonry drawings of garden complexes with different sets, including corner ones, on the Internet. Next, we will present a couple of barbecue oven designs as examples and tell you how to build them correctly. The same applies to gazebo projects for placing an outdoor stove, and we propose to take the following drawing with a barbecue in the form of a fireplace as a basis:

Scheme and order of the street complex
This barbecue oven is combined with hob, a grill can be fitted here if desired. There is also a firewood shed for storing logs for pre-drying. The arched vault over the firebox and the design of the chimney make this stove much like a fireplace, only for an outdoor one. So, for construction you will need:
- red stove brick (solid) – 450 pcs.;
- fireclay stone for laying the firebox – 200 pcs.;
- ceramic general building bricks – 180 pcs.;
- fireproof clay – 40 kg;
- river sand – 0.1 m3;
- cement M400 – 8 bags of 25 kg;
- combustion door 41 x 41 cm, cleaning door 14 x 14 cm;
- view – 1 pc.;
- stove 71 x 41 cm made of cast iron;
- equal-flange steel corner 40 x 4 mm – 4 m.
Below are the masonry drawings and ordering of the multifunctional barbecue stove:


Outdoor stove project with smokehouse
Those who love a wide variety of smoked meats will be interested in this design a garden stove, where a small smokehouse is located above the hob in the smoke box. To build it, you need simpler materials, so in general, such a barbecue will cost less than the previous stove. Here is the list of materials:
- general construction ceramic brick – 430 pcs.;
- cast iron stove with 2 burners 71 x 41 cm;
- combustion door 28 x 28 cm, cleaning door 14 x 14 cm (2 pcs.); smokehouse 49 x 25 cm;
- valve 12 x 21 cm;
- steel corner for framing the slab;
- metal rods for hanging smoked meats.
The advantage of this structure is the absence of fire-resistant masonry, which greatly simplifies and reduces the cost of its implementation. The order and drawings of an outdoor barbecue with a smokehouse for DIY construction are shown in the figure:


As can be seen from the diagram, the grate and ash pan are also absent here, and in place of the ash chamber, a void is provided, filled with river pebbles. This allows you to accumulate and retain heat longer.
Metal barbecue
For a homeowner with welding skills, it is easier to make a portable barbecue out of metal yourself than to build one out of brick. Therefore, we could not ignore this very popular type of barbecue. But metal in good hands can take any form, which is where they appear different designs homemade barbecue. There is no point in presenting a traditional roasting pan with legs, but photos of more original products definitely deserve attention:

A metal barbecue made from a gas cylinder can hardly be called portable due to its considerable weight. But it has a firebox lid, which allows you to save smoldering coals for some time before frying the next portion of kebabs. Also interesting is the design of a barbecue with a lid, made with your own hands from an ordinary iron barrel:

The openwork design of a kebab bar with a polycarbonate canopy near the house looks very aesthetically pleasing, the drawing of which is shown below:

The first step in a barbecue area is to lay a foundation, since the weight of a brick oven is quite significant. There are 2 ways to construct a foundation: rubble and in the form of a “floating” concrete slab. For the first one, you will have to remove the top layer of subsidence soil in order to rest on a layer of clay. The dimensions of the pit should be 50 mm larger than the dimensions of the furnace in each direction.
A rubble foundation is laid by filling a dug pit with stone and pouring all the cavities with a liquid solution of 6 parts sand, 1 part M400 cement and 1 part lime. The upper platform of the foundation is also leveled with this solution, and after it hardens, waterproofing is laid from 2 layers of roofing felt. To install a “floating” slab for building a barbecue, the following step-by-step plan is followed:
- dig a 200 mm pit on the site more oven in each direction, pit depth – 300 mm;
- compact the bottom and pour 150 mm of coarse crushed stone, which also needs to be compacted;
- place wooden formwork protruding 100 mm above ground level;
- tie a reinforcement cage of 10-12 mm rods with a 100 mm cell and lower it into the pit, resting it on the sides of the formwork;
- make concrete from cement, sand and crushed stone in the following proportions: 1: 3: 7, respectively, and pour the foundation;
- after a week, remove the formwork, and after 3 weeks, lay 2 layers of roofing felt and begin construction of the barbecue.

For laying a barbecue, it is best to use a 1:1 clay-sand solution with the addition of a special oven plasticizer and a small amount of cement (about 20%). Fireclay stones should be laid on fireclay mortar, avoiding bandaging from the front ceramic masonry. The thickness of the seam should be maintained within 5 mm, the remaining mortar is removed with a trowel.
Each row of bricks should first be laid dry and, if necessary, chiselled or split. After that, each brick is soaked in a bucket of water, and then placed in the place where the mortar has already been applied. Light tapping is perfectly acceptable. At the end of each row, the horizontal is checked with a level and the vertical is checked with a plumb line. The smoke ducts of the barbecue are wiped from the inside damp cloth so that no solution remains on the walls.

Openings for stove fittings are made with a reserve for metal expansion of up to 5 mm, and for laying arched vaults of an outdoor fireplace, templates of the required shape - circles - are prepared in advance. They are usually made from wood or plywood, sometimes from plasterboard. When the barbecue is completely laid out, you should let the solution harden for about 2 days (depending on the weather), after which you carefully do the first heating. More details about the construction of the barbecue are described in the video:
Conclusion
In reality, there are countless options for country barbecues and it is impossible to list even a small part of them here. Therefore, we have presented several examples to help the average person understand the essence and complexity of the task. Only the first option without a solution can be called simple in execution; the rest will require time, patience and scrupulousness in your work, otherwise the stove will not last long.
The concepts of barbecue and barbecue are often confused, since they are built for cooking with smoke and coals. But a barbecue is needed to prepare barbecue, and a barbecue grill is a method of cooking food over an open fire using a grate.
Ordinary grill can be turned into a barbecue by attaching a grill to it.
BBQ oven There are mobile and stationary, the sizes depend on the functions performed. The simplest furnace is built in dimensions 0.18*0.07*0.9 m, resembles a regular grill with a grate.
A slightly improved barbecue is built with space for a hob, its dimensions are 1.7*0.4*1.9 m. simplest furnace complex has dimensions 1.2*2.2*1.9 m.
Stoves are offered for construction with a cauldron, barbecue, stove, and other accessories for cooking on coals. All you have to do is choose the project that suits your needs. We will tell you in detail in this article about how to build a brick barbecue with your own hands. Drawings and photos of some projects are attached. Well, the dimensions of a brick barbecue, drawings and photographs of other stove models can be found on the adjacent pages of our website.
Why build an outdoor brick barbecue with your own hands?
Modern diversity street slabs does not allow you to choose a single model - you want to take an element from each project. Building a barbecue oven in the garden out of brick with your own hands allows you to combine them into one ideal oven on your site.

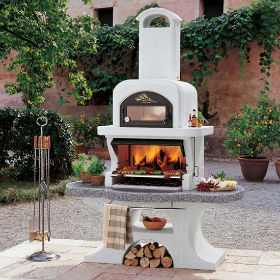
Photo 1. A small, highly aesthetic garden barbecue oven made of brick with a barbecue and a work table. Building such a simple barbecue oven with your own hands from brick and stone is easy and quick, especially if you have special instructions for laying a barbecue with a grill.
TO advantages of a brick kiln of own construction include the following advantages:
- possibility of creating own project;
- a stove built in this way will be stationary— it will not be stolen, even if the owners of the site are absent for a long time;
- Confidence in materials and durability assembled oven;
- laying a barbecue is so simple that a person without stove maker experience can master it;
- giving the site classic style or country style;
- creating a reason to be proud of your friends.
What are the designs of a brick barbecue and kebab oven?

The main projects for building a barbecue for a brick cottage are divided into 3 types:
- without pipe- a simple oven, reminiscent of a barbecue, requiring minimal construction costs;
- with pipe- an improved oven, when cooking in which the smoke will not be blown away by the wind different sides;
- with pipe and hob- for the possibility of preparing first courses, for example, soups, borscht, fish soup.
The best option is to create stoves with pipe without stove, because most often the company gathers to eat hot kebabs with equally hot drinks.
The pipe in the stove design will protect vacationers from the random dispersion of smoke and flying ash particles.
Building a brick barbecue: cost estimate
One of the first stages of the project implementation is the calculation of the material that will be needed to build the stove. Garden barbecues for the dacha have many diagrams showing how to make this or that structure, and some of them also have instructions. Here it is especially convenient to determine in advance the volume of required building materials.
Calculation of the amount of ordinary bricks for a building stoves with pipe(by rows): 38+10.5+10.5+10.5+10.5+33+33.5+13+13+13+13+35+35+9+9+9+9+9 +9+9+9+18+26+22+20+12+10+9+7+5+5 = 474.5 pcs.
- ordinary Red brick 1st grade - 474.5 pcs.;
Calculation of the amount of refractory bricks for laying firebox(starting from row 14): 7+7+7.5+7.5+7+7.5+7+3 = 53.5 pcs.

- fire brick to create a firebox - 53.5 pcs.;
- concrete mortar for pouring the foundation or its mixture of water, sand, crushed stone, cement in a ratio of 4:4:4:1;
- metal pipe 15-20 cm in diameter - 1 pc.;
- board for formwork formation - 1 pc.;
- coarse sand— 17 kg;
- reinforcement mesh — 2 m;
- sheet metal- 1 PC.;
- table top- 1 PC.;
- oven grate for collecting coals - 1 pc.;
- silicone and heat resistant sealant for sealing masonry cracks - 1 tube;
- facing material.
Before proceeding to the construction phase, check availability tools:
- shovel;
- building level;
- rope;
- roulette;
- hammer.
Such tools are so simple that it is difficult to find an alternative to use them.
Attention! When building a stove, you will need halves of bricks - these can be made using a grinding machine.
You might also be interested in:
We select and prepare a site for construction
The place where you can build a barbecue oven with your own hands is selected based on comfort and fire safety. On at a distance of 3-4 meters from the stove Trees, bushes and grass should not grow. If extensions, a bathhouse, or other buildings are built on the site, the stove must be built at a distance. The predominant direction of the wind should not be towards one’s own or neighbors’ buildings.

Photo 2. An impromptu place to relax with a barbecue in the garden thickets. Surely you have a corner on your property where a brick barbecue would fit perfectly. The photo does not allow us to estimate the size of the site, but even a small oven will look better than such a scorched piece of land.
If we discuss the comfort of using future cooking in an outdoor oven, it is most convenient to place the structure next to relaxation area- patio, gazebo, terrace. If there are no such places on the site, you can choose any place for the barbecue, and place a table with chairs nearby. Keep in mind that you will need a lot of water and firewood for cooking and maintaining the stove. The size of the furnace working area is selected depending on financial capabilities and the size of the area.
- located on the leeward side of a residential building. Otherwise, smoke will enter the house, penetrating inside and leaving traces of soot outside;
- It is undesirable to have plants next to a brick barbecue - their vital functions will be disrupted due to high temperatures.
Once a location has been chosen, you should prepare platform for the furnace area. The soil is cleared of the fertile layer: grass, bushes, trees. It is allowed to remove trees from your site without the consent of local authorities, provided that there are no environmental restrictions.
Attention! Remember that roots left in the ground can sprout and damage flooring furnace zone.
Usually, during planning and clearing an area for future construction, conifers and fruit trees. After this you can go to the stage of pouring the foundation according to the shape and size suggested by your chosen barbecue drawing diagram.
Construction of a brick barbecue
A stove on a personal plot, no matter what type it is, is a rather intricate structure and requires a certain amount of knowledge. Therefore, for everyone who decided to build a barbecue for their dacha with their own hands, step-by-step instruction , which is given on this page of the site, is simply necessary. If laying barbecue stoves by hand is a process unfamiliar to you, you are unlikely to be able to lay even the first row of brickwork without such instructions.

Before starting construction, it is advisable to carry out an approximate drawing for calculation required quantity materials and proper construction of the structure.
Stove makers with extensive experience do not use a drawing for masonry (they already know by heart how to lay a brick barbecue with their own hands).
If you are not a specialist, in addition to the usual drawing, you will also need order brick barbecue, masonry drawings or detailed barbecue masonry diagram.
Any barbecue oven is built from brick in layers - one row of bricks after another. The number of bricks in each row is not the same and they can be folded differently. To know exactly how to build a brick barbecue with your own hands and not confuse anything, you need drawings with order. Even a novice stove maker, having such drawings in hand, is sure that designs for arranging barbecue stoves will help avoid gross mistakes during construction.
How to make barbecue stoves for a brick cottage: foundation (step by step)
The heavy weight of a brick kiln requires a solid foundation. Equally suitable tape And monolithic foundation. We will use the recommendations of furnace specialists and give preference to the monolithic option.
Attention! It's best to pave work area around the stove.
So, let's start building a barbecue with our own hands - step-by-step instructions for pouring the foundation:

- digs a pit the size of 1.5*2 m with a depth of up to 0.4 m.
- the bottom is leveled using a shovel;
- a layer of sand is poured 10 cm thick, filled with a small volume of water, compacted;
- installed fastened with self-tapping screws wooden formwork;
- reinforcement mesh is laid;
- the foundation is poured with concrete mortar;
- leave for a week until hardened.
Attention! When stirred, air accumulates in the solution, which reduces the strength of the structure. To eliminate air, you need to make holes in the uncured concrete.
Brick barbecue laying: base
The base on which the entire structure of the stove will be installed is the first stage from which the laying of a brick barbecue begins. The step-by-step instructions that we provide here should help avoid mistakes due to which the entire structure may ultimately be unsuitable for use.
Attention! At the stage of laying out a barbecue with your own hands, grade 1 red burnt bricks and cement mortar are used step by step.

After the foundation has hardened, it is carefully studied for presence of cracks. They need to be sealed and wait until they harden.
Next, it is marked furnace circuit. Experts recommend stretching the cord between pieces of reinforcement inserted into the corners. Bricks are laid along the cord, greased with cement mortar and layer 2 is laid, starting with half a brick.
You should check the evenness of the masonry using a level.
Attention! Tap the top and side of each brick with a hammer - this strengthens the adhesion of the building materials.
The charcoal grate is placed on the second row. Apply the mortar to the end of the brick to increase the reliability of the masonry.
Subsequent rows will begin with half brick. Next, 5 rows of bricks are laid according to the presented scheme. Starting from the 6th, it will be located oven tray- a small protrusion is made here. 3 rows are laid according to the pattern, and a new ledge for kiln table basics.
Advice! Select the height of the oven and table based on ease of use. You can be free with the number of initial rows - they do not in any way affect the strength and reliability of the structure.
You might also be interested in:
Laying a barbecue stove: firebox
Attention! At this stage, you will need 2 types of bricks - regular red and fireproof, a solution of clay and sand. The bricks will be laid out in 2 rows - the outer one made of red brick, the inner one made of fireclay. The bottom of the firebox should also be lined with refractory bricks.
Reason for firebox And table tops done in the form of a screed. The boards are laid out one brick thick, cut to the size of the span. The top is filled with concrete mortar and left for 5 days.
The height of this part of the stove depends on its shape: 9 bricks for a rectangular one, 7 for an arched one. Depth - up to 70 cm. The pipe is removed after several rows.

Photo 3. The process of building a brick barbecue is underway. The photo was taken at the stage when the laying of the barbecue stove was almost ready and the construction of the woodshed was completed. Another module is at the stage of laying the first row of bricks.
Attention! To remove the chimney, the area of the masonry is gradually reduced, each row is reduced by half a brick in length and ¼ in width. From the 7th row, pipe laying with a height of up to 13 rows will begin.
Chimney laying
Attention! Red brick and cement mortar are used at this stage.
The chimney in a brick barbecue located in a gazebo is bought at a hardware store or welded from sheet material . To seal the free space between the pipe and the furnace, use heat resistant sealant. The gazebo must have a fireproof opening for the chimney outlet.
Important! A cap is placed on the upper end of the pipe to create proper draft and protect the furnace from precipitation that could impair its functionality.
It’s easier to buy a tabletop in a store, attaching it to a created ledge silicone sealant . To do it yourself, you need to plaster with cement and trim the surface with tiles or stone after installing the slab.
Decorating a stove with a pipe
After removing the chimney, you can take care of appearance B-B-Q. To do this, decorate the kebab and barbecue ovens with your own hands: lay out the floor covering with non-slip material, for example, porcelain stoneware. In this case, special glue is used. Along the façade they pass grinder and clean with a brush to remove any remaining solution. You can use tiles or wild stone to improve the aesthetic appearance of the structure.
Additional attributes
To increase the comfort of relaxation next to outdoor oven, it is advisable to take care of additional attributes.
To decorate the site and make it possible to have a cozy time in the evening, you should supply electricity and perform table lighting, hearth, space under the roof, boundaries of a recreation area or site.

Photo 4. Detailed diagram of a brick barbecue made by English-speaking specialists. In addition to the stove itself, the figure also contains a description of the work table with required sizes. If you are going to build a brick barbecue with your own hands, drawings of this kind will be necessary.
Work table to prepare food for cooking, rack to place spices, utensils and accessories are located next to the work area.
You can completely place the stove with a chimney in a glass gazebo and cook delicious kebabs all year round or install a canopy for basic protection from precipitation.
A table, benches or chairs are purchased or created as furniture for relaxation. Designers do not recommend buying cheap plastic furniture - it will spoil the atmosphere of outdoor cooking and may cause a fire. It is better to give preference to forged, wooden, wicker furniture in natural colors.
Fire safety
Remember to follow fire safety regulations. Nobody wants to interrupt their vacation to call the fire department and eliminate the consequences of a fire in nearby objects.
Rules for installing a stove to prevent fire:
- need for construction on solid foundation ;
- finishing metal sheets or other non-flammable floor material in front of the stove;
- placement at a decent distance from flammable substances, trees, bushes, buildings.

Photo 5. Set of imported fire extinguishers various sizes. For fire safety purposes, any brick barbecue oven must be equipped with one of these items: the photo demonstrates how rich a choice a dacha owner has.
Operating rules:
- when the oven is idle, it is covered cover so that precipitation does not disrupt functionality;
- protect children from being close to the stove;
- do not leave the stove lit, especially with food, unattended.
Various brick barbecue ovens: projects, photos, drawings
When you can’t settle on just one brick barbecue project, photos, diagrams, drawings of barbecue masonry can help you decide on your choice. Study the selection of illustrations we have prepared to understand which of the projects you like best. Please contact Special attention on the complexity of the proposed design: will you be able to implement this or that project with your own hands?

Photo 6. A fragment of instructions showing how to build a barbecue oven out of brick. A barbecue laying procedure like this makes the work much easier, especially for those who have never built a brick barbecue with their own hands. Drawings, so try to choose in order.

Photo 7. Graphic diagram brick barbecue. It will be quite easy to build a brick barbecue for your dacha with your own hands using this project.

Photo 8. Computer model of a brick barbecue: order and construction diagram. It will be easier to fold the barbecue with more detailed diagram, but even such a drawing speeds up the construction of the structure.

Photo 9. Computer-generated approximate diagram of a brick barbecue. Masonry drawings attached to such a plan will give accurate information about the size of the structure and the procedure for its construction.

Photo 10. Schematic sketch of a pedestal for a barbecue project. Drawings with dimensions are necessary, no matter what type of stove you choose - stone or brick, small or large, complex in design or not.

Photo 11. Computer-generated brick barbecue project. Downloading a project like this for free is very useful when you want to build a garden barbecue out of brick with your own hands.

Photo 12. A novice stove maker lays barbecue bricks in rows with his own hands. The photo was taken at the stage when the foundation is already ready and several rows of bricks have already been laid.

Photo 13. Small outdoor barbecue made of brick. The drawings of such a structure are extremely simple, however, if you decide to build a brick barbecue with your own hands, an order that describes in detail the laying of bricks is also desirable in this case.
h 
Photo 14. Brick stove with two pipes. On our website you can see the most unusual barbecue projects. A photo of this model, for example, shows that a stove for barbecue and shish kebab, built with your own hands, can resemble the outline of a stove from a Russian hut.

Photo 15. There are a wide variety of types of barbecues for a brick cottage. The photo shows an elongated model folded at a corner. It is noticeable from the side wall that the original brick barbecue laying scheme was used.

Photo 16. Near the plank fence there is a cottage barbecue made of bricks, built by the owner of the site with his own hands. This structure consists of three simple sections. It is clear that a rather unusual layout of the brick barbecue was used.

Photo 17. Brick structure for preparing various dishes on outdoors. To build even such a relatively simple barbecue oven with your own hands, ordering the brickwork may be necessary.

Photo 18. Backyard country house with barbecue area and oven with large chimney. To build such a rather complex brick barbecue with your own hands, diagrams with detailed dimensions and the order of actions are simply necessary.
Useful video
Watch the video posted here in which you can see how to lay a brick barbecue with your own hands. All other stages of construction are also shown.
Average rating: 5 out of 5.
Rated by: 1 reader.